Philco PHEM 1000 User manual

PHEM 1000
PHEM 1001
Instruction manual
Návod k obsluze
Návod na obsluhu
Instrukcja obsługi
Használati útmutató

Dear customer,
thank you for buying a PHILCO brand product. So that your appliance serves you well, please read all the
instructions in this user's manual.

1Revision 06/2014Copyright © 2014, Fast ČR, a. s.
EN
CONTENTS
PART 1: INTRODUCTION.............................................................................................................................................................3
• Important safety instructions ..............................................................................................................................................3
• Important safety instructions for using electrical equipment......................................................................................4
• Use in accordance with intended purpose......................................................................................................................4
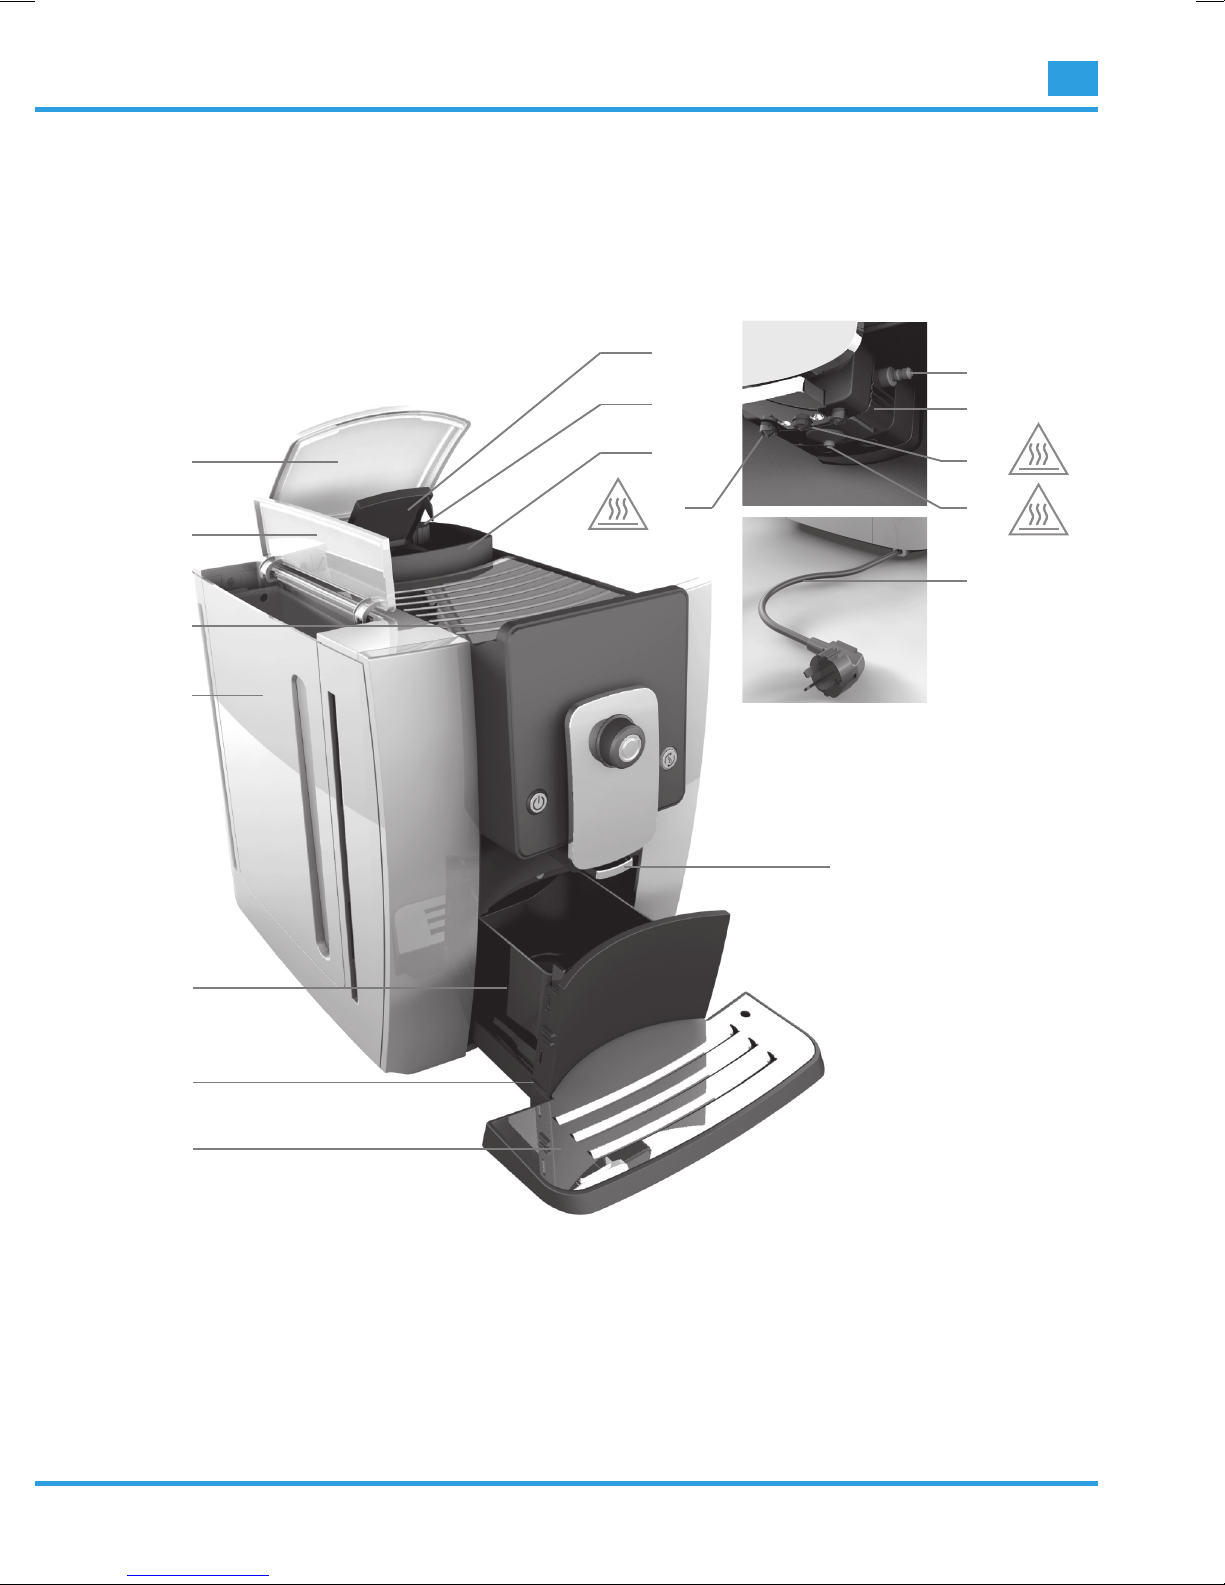
PART 2: DESCRIPTION OF THE APPLIANCE ......................................................................................................................5
• Description of the espresso machine................................................................................................................................5
• Description of espresso machine operation................................................................................................................... 6
PART 3: USING FOR THE FIRST TIME..................................................................................................................................7
• Testing and setting water hardness ..................................................................................................................................7
• Filling the coffee bean hopper............................................................................................................................................7
• Filling the water tank............................................................................................................................................................7
• Inserting the water filter.......................................................................................................................................................8
• Controlling the fineness of ground coffee........................................................................................................................8
• Using for the first time......................................................................................................................................................... 9
• Turning on the appliance.................................................................................................................................................... 9
• Turning off the appliance...................................................................................................................................................10
PART 4: CONTROLS ................................................................................................................................................................... 11
• Presetting the appliance..................................................................................................................................................... 11
• Brewing coffee by pressing a touch icon ....................................................................................................................... 11
• Quick parameter settings for brewing beverages........................................................................................................ 12
• Setting default parameters for the brewed beverages...............................................................................................13
• Available coffees and warm beverages.......................................................................................................................... 14
• Brewing beverages..............................................................................................................................................................15
PART 5: APPLIANCE SETTINGS............................................................................................................................................ 21
• Beverage settings ................................................................................................................................................................ 21
• Water filter............................................................................................................................................................................25
• Adjusting the water hardness setting ............................................................................................................................26
• Setting the economical ECO mode ...............................................................................................................................26
• Automatic shut-off.............................................................................................................................................................. 27
• Information ...........................................................................................................................................................................28
• Language ..............................................................................................................................................................................29
• Reset - Factory settings....................................................................................................................................................29
• Exiting the program settings menu................................................................................................................................29

2Revision 06/2014Copyright © 2014, Fast ČR, a. s.
EN
PART 6: CLEANING AND MAINTAINING THE APPLIANCE ..........................................................................................30
• Cleaning the espresso machine before use.................................................................................................................30
• Cleaning the brewing unit ................................................................................................................................................30
• Descaling the espresso machine..................................................................................................................................... 31
• Cleaning the spent coffee grounds container and the drip tray .............................................................................33
• Cleaning the water tank.................................................................................................................................................... 34
• Cleaning the coffee bean hopper ................................................................................................................................... 34
• Unpacking and cleaning the milk frother.....................................................................................................................35
• Cleaning the espresso machine......................................................................................................................................35
PART 7: WARNING MESSAGES AND TROUBLESHOOTING .......................................................................................36
• Warning messages.............................................................................................................................................................36
• Troubleshooting ................................................................................................................................................................... 37
• Transporting the appliance...............................................................................................................................................38
PART 8: TECHNICAL INFORMATION...................................................................................................................................39

3Revision 06/2014Copyright © 2014, Fast ČR, a. s.
EN
PART 1: INTRODUCTION
Important safety instructions
• This appliance may not be used by any persons (including children) with mental disabilities, weak strength
or by inexperienced persons, unless they have been properly trained or schooled in the safe use of the
appliance, or unless they are properly supervised by a qualified person who is responsible for their safety.
• Children must be supervised to ensure that they do not play with the appliance.
• Read all instructions before putting the espresso machine into operation and store them for future use.
• Before first use, remove all advertising labels and stickers from the espresso machine.
• During operation, set the espresso machine on the edge of the kitchen bench or table. Always use the
espresso machine on a dry even surface.
• Do not place the appliance on a hot gas or electric stove or near it or in a location, where it would be in
contact with a hot oven.
• Do not use the espresso machine on a metal underlay such as for example a kitchen sink.
• Before connecting the espresso machine to an electric power socket and turning it on, check that it is
completely and correctly assembled.
• ATTENTION: Do not use this appliance with a programmable switch, timer switch or any other component
that automatically switches on the appliance.
• Do not use accessories that are not designed for use with this appliance.
• Only add clean cold water to the water tank. Do not use any other liquids.
• Do not turn on the espresso machine if there is no water in the water tank.
• If the espresso machine is running, do not leave it unattended.
• Before you start cleaning the espresso machine or before moving it, turn it off and allow it to cool down.
• Do not place any items on the top surface of the espresso machine.
• This appliance generates hot water and can produce water steam during operation. Be careful not to splash
yourself with hot water or scald yourself with hot steam.
• Always turn off the espresso machine and disconnect the power plug from the power socket whenever it is
left without supervision, after finishing using it, before you start cleaning it or before you take it elsewhere,
disassemble it, assemble it or before storing it.
• Keep the appliance and its accessories in clean condition. Follow the cleaning instructions provided in this
manual.
• Do not start the coffee grinder if the lid is not correctly secured. Be very careful during the grinding process,
keeping your fingers, hands, hair, clothing and other items at a sufficient distance from the grinder.

4Revision 06/2014Copyright © 2014, Fast ČR, a. s.
EN
Important safety instructions for using electrical equipment
• Unwind the power cord before using it.
• To prevent injury by electrical shock, do not submerge the power cord, the power plug or the actual
appliance in water or any other liquid. Do not bend the power cord over the sharp edge of the working area
and do not allow it to touch hot items or allow knots to form.
• Do not use this appliance for a purpose other than that for which it was designed. Do not use it in a moving
vehicle or on a boat. Do not use it outdoors.
• We recommend that you regularly inspect the appliance. Do not use the appliance if the power cord,
power plug or the actual appliance is damaged in any way whatsoever. If damage has occurred, to avoid a
dangerous situation from arising, immediately stop using the appliance and take it to the nearest authorised
service centre for inspection, repair or replacement of damaged parts.
• Any maintenance other than cleaning may only be carried out by an authorised service centre.
• In the interest of increased safety, we recommend the installation of a residual current device (protective
shut-off switch) when the appliance is used.
• It is appropriate to install the residual current device with a capacity not exceeding 30 mA of residual
current into the circuit to which the appliance is connected. Contact a professional electrician.
Use in accordance with intended purpose
Carefully read this user's manual before first using this appliance.
- Not respecting these instructions may result in injury or damage to the appliance. The manufacturer takes
no responsibility for damages resulting from not following these instructions.
This appliance is designed for brewing coffee and other hot beverages.
This appliance is designed exclusively for household use only. It is not designed for use in:
• a location used as a staff kitchen in stores, in government offices and other workplaces
• agro-tourism
• in hotels, motels and other accommodation facilities.
• rented rooms
Any other use is considered to be inappropriate and dangerous. The manufacturer takes no responsibility for any
damages caused by inappropriate use of the appliance.
NOTE:
Store this user's manual. In the event that you hand this appliance over to somebody, also give them this
user's manual to use.
WARNING: HOT SURFACE!

5Revision 06/2014Copyright © 2014, Fast ČR, a. s.
EN
PART 2: DESCRIPTION OF THE APPLIANCE
Description of the espresso machine
1.
2.
3.
4.
5.
6.
7.
8.
9.
10.
12.
13.
14.
11.
15.
16.
17.
1. Cover of the coffee bean hopper
2. Lid of the water tank
3. Area for placing empty cups
4. Water tank
5. Coffee grounds container
6. Drip tray
7. Drip tray grill
8. Cover of the ground coffee container
9. Controlling the fineness of ground coffee
10. Coffee bean hopper
11. Coffee spout
12. Handle
13. Milk hose
14. Milk frother
15. Hot water spout
16. Milk and foamed milk spout
17. Power cord

6Revision 06/2014Copyright © 2014, Fast ČR, a. s.
EN
Description espresso machine operation
1.
2.
3.
4.
5.
6.
7.
8.
9.
10.
1. Espresso icon
2. Long coffee icon (lungo, long coffee)
3. Hot water icon (hot water)
4. Main power switch
5. Display
6. Cappuccino icon
7. Coffee latte icon (caffè latte)
8. Hot milk/cream icon (hot milk/foamed milk)
9. Clean button
10. Dial button

7Revision 06/2014Copyright © 2014, Fast ČR, a. s.
EN
PART 3: USING FOR THE FIRST TIME
Water hardness test
The harder the water is, the more frequently you will need to descale the espresso machine.
Hard water also fundamentally affects the final flavour of the brewed coffee.
Test the water hardness before the first use of the espresso machine to ensure maximum protection for your
new appliance and to extend its lifetime.
You can normally purchase this test at the chemist's or at other specialised stores.
As soon as you change your water source, it is necessary to perform another water hardness test.
Further instructions regarding water hardness settings based on the water hardness test results are provided
in chapter Adjusting the water hardness setting on pg. 26.
Filling the coffee bean hopper
• Never add coffee beans into the coffee bean hopper that have been specially
modified (e.g. with sugar, cocoa).
• Only add roasted coffee beans into the coffee bean hopper, never add other
foodstuffs such as rice, soya beans, cocoa beans, nuts, sugar and spices.
• Never put hard items into the coffee bean hopper which can irreparably
damage the grinder.
• The cover of the coffee bean hopper also functions as a seal and preserves the
aroma of the coffee beans. Therefore, always keep the lid firmly closed.
• The maximum capacity of the coffee bean hopper is 250 g.
1) Remove the cover of the coffee bean hopper.
2) Pour coffee beans into the hopper.
3) Return the cover of the coffee bean hopper.
Filling the water tank
• Pour only room temperature drinking water into the water tank. Never fill the water tank with another liquid
(e.g. warm water, hot water, milk). In this way you will prevent possible damage to the espresso machine.
To ensure proper coffee flavour, we recommend using water at a temperature of around 25 °C. Low water
temperature will negatively affect the final taste of the brewed coffee.
• To ensure that the coffee is both healthy and tasty, it is necessary to replace the water in the water tank
every day.
• Never fill the water tank past the MAX level mark.

8Revision 06/2014Copyright © 2014, Fast ČR, a. s.
EN
1) Open the lid of the water tank.
2) Take out the water tank.
3) Fill the water tank with room temperature drinking water, put the water tank back into the espresso machine.
4) Close the lid of the water tank.
Inserting the water filter
If you live in an area with hard water exceeding 10°dH, it is recommended to use a water filter.
You can purchase these filter in specialised electrical appliance stores or contact their manufacturer directly.
Detailed information about the installation, cleaning and replacement of a water filter is provided in the chapter
Water filter on pg. 25.
Controlling the fineness of ground coffee
• Set the grinding fineness for the coffee beans according to the type of coffee
bean coffee.
• Only adjust the fineness of the grind while the grinder is running as this will
avoid damaging it.
• We recommend a coarse grind setting for dark-coloured coffee beans.
• We recommend a fine grind setting for light-coloured coffee beans.
• If your coffee is flowing out slowly during the brewing process (or is not flowing
at all), set a coarser grind setting.
• If your coffee is flowing out too quickly and the colour is too light, set a finer
grind setting.
NOTE:
Setting the fineness of the grid will show itself only after brewing 2 cups of coffee.
FINE
MEDIUM
COARSE

9Revision 06/2014Copyright © 2014, Fast ČR, a. s.
EN
Using for the first time
• As the espresso machine was tested at the factory, a small amount of ground
coffee may still be inside. The actual appliance, however, is brand new.
• When it is first turned on, the automatic cleaning test will be initiated, which will
help to achieve optimal operating conditions. It is not possible to skip this step.
• Hot water may drip out of the coffee spout during the cleaning process. Avoid
coming into contact with hot water – risk of scalding.
Make sure that the espresso machine is connected to an el. power socket, then press
the main power switch.
1) Welcome.
2.) Automatic espresso machine test.
3) The espresso machine is starting to heat up. The heating system will automatically
stop when the correct coffee brewing and steam temperature is reached.
4) After heating up, the espresso machine will automatically clean out the brewing
unit and both the coffee and hot water spouts (the automatic cleaning system
ensures the best possible freshness of the brewed coffee).
5) After the cleaning process is finished, the espresso machine is ready for operation.
Turning on the device
• Whenever the espresso machine is turned on, the automatic heating and cleaning
process will be performed. It is not possible to stop this process. The espresso
machine can only be used after this process has completely finished.
• Hot water may drip out of the coffee spout during the cleaning process. Avoid
coming into contact with hot water – risk of scalding.
Make sure that the espresso machine is connected to an el. power socket, then press
the main power switch.
1) Welcome.
2) The espresso machine is starting to heat up. The heating system will automatically
stop when the correct coffee brewing and steam temperature is reached.
3) After heating up, the espresso machine will automatically clean out the brewing
unit and drain the coffee and hot water (the automatic cleaning system ensures the
best possible freshness of the brewed coffee).
4) The espresso machine is now ready for use. You can start brewing coffee.
1
2
3
4
5
1
2
3
4

10 Revision 06/2014Copyright © 2014, Fast ČR, a. s.
EN
Turning off the device
• Whenever the espresso machine is turned off, the automatic cleaning process will
be performed. It is not possible to stop this process. This process serves to clean
out the internal lines of the espresso machine and to remove the remains of ground
coffee.
• Hot water may drip out of the coffee spout during the cleaning process. Avoid
coming into contact with hot water – risk of scalding.
Press the main power switch.
1) Cleaning the espresso machine.
2) When the message «GOODBYE» appears on the display it means that the cleaning process was successfully
completed and the espresso machine will shut down automatically.
2
1

11 Revision 06/2014Copyright © 2014, Fast ČR, a. s.
EN
PART 4: OPERATION
Presetting the appliance
Using this espresso machine you will brew a delicious cup of coffee by simply pressing one button. Furthermore,
you can select your preferred coffee strength, its volume, the amount of milk and foamed milk or the temperature
and volume of the hot water.
• Brewing coffee by pressing a touch icon.
• Quick parameter settings for brewing beverages.
• Setting default parameters for the brewed beverages.
NOTE:
Press the dial button to stop the beverage brewing process.
Brewing coffee by pressing a touch icon
If the message «READY» is lit on the display, you can press one touch icon to
brew your desired type of coffee.
In the following example, we will show you how to prepare an espresso coffee
using the touch icons.
1) Press the espresso icon.
2) As soon as the icon shown in the picture appears on the display, press
the dial button. Without further user interaction, an espresso coffee will
be prepared with the default parameters.
3) If there is no further user interaction within 10 seconds of pressing the
beverage icon, the display will show the message «READY» and the
espresso machine will switch back to the main menu.
3
1
2

12 Revision 06/2014Copyright © 2014, Fast ČR, a. s.
EN
Quick parameter settings for brewing beverages
When brewing coffee, it is possible to quickly set the 8 parameters listed below.
• Amount of ground coffee for brewing a beverage.
• Volume of the brewed coffee.
• Milk frothing time when brewing a cappuccino.
• Milk heating time when brewing a latte.
• Temperature of the prepared hot water.
• Volume of the prepared hot water.
• Milk heating time when making hot milk.
• Milk heating time when making foamed milk.
The strength or volume of the brewed coffee can be temporarily set before or during the brewing process.
This setting will not be stored.
Information about changes to the default parameters can be found in chapter Beverage settings.
1) While the coffee is being ground, you can use the dial button to select
the amount of ground coffee that will be used for the beverage currently
being brewed – adjusting its strength. Turning to the left you will lower
the coffee strength to MILD , turning to the right you will increase the
coffee strength to STRONG . The default coffee strength is set to the
medium value of NORMAL .
2) While making an espresso, cappuccino, long coffee (lungo) and caffè latte
you can set the volume of the brewed coffee using the dial button. If for
example the default volume is set to 40 ml, then by turning two steps to
the left you will reduce the volume to 35 ml, while turning it by two steps
to the right you will increase it to 45 ml.
3) While making a cappuccino it is possible during the milk frothing process
to set the time of this frothing using the dial button. If for example the
default time is set to 20 seconds, then turning it 2 steps to the left you will
shorten the milk frothing time to 19 seconds, while turning it by 2 steps to
the right you will extend it to 21 seconds.
4) While making a caffè latte it is possible during the milk heating process to
set the heating time using the dial button. If for example the default time
is set to 20 seconds, then turning it 2 steps to the left you will shorten the
milk heating time to 19 seconds, while turning it by 2 steps to the right
you will extend it to 21 seconds.
5) Before heating hot water, its temperature can be adjusted using the dial
button. Turn to the left to reduce the temperature to LOW, turn to the right
to increase the temperature to HIGH. The default temperature is set to the
medium value of NORMAL.
6) While heating hot water, its volume can be adjusted using the dial button.
If for example the default volume is set to 150 ml, then by turning two
steps to the left you will reduce the volume to 145 ml, while turning it by
two steps to the right you will increase it to 155 ml.
3
4
5
6
1
2

13 Revision 06/2014Copyright © 2014, Fast ČR, a. s.
EN
7) While making hot milk, its heating time can be adjusted using the dial
button. If for example the default time is set to 20 seconds, then turning it
2 steps to the left you will shorten the hot milk heating time to 19 seconds,
while turning it by 2 steps to the right you will extend it to 21 seconds.
8) While making foamed milk, its heating time can be adjusted using the dial
button. If for example the default time is set to 20 seconds, then turning
it 2 steps to the left you will shorten the milk frothing time to 19 seconds,
while turning it by 2 steps to the right you will extend it to 21 seconds.
Setting default parameters for the brewed beverages
While heating hot water, its volume can be adjusted using the dial button. If for example the default volume is
set to 150 ml, then by turning two steps to the left you will reduce the volume to 145 ml, while turning it by two
steps to the right you will increase it to 155 ml. In a similar way it is also possible to change:
• Strength and volume of an espresso.
• Strength and volume of a long coffee.
• Strength and volume of an espresso for brewing a cappuccino and the foamed milk preparation time.
• Strength and volume of an espresso for brewing a caffè latte and the milk and foamed milk preparation
time.
• Hot water temperature and volume setting.
• Hot milk preparation time setting.
• Foamed milk preparation time setting.
The following table presents the range of parameters that can be changed for individual types of beverages:
Beverages Temperature Strength Volume
Espresso Machine Approx. 80 °C Weak:
Medium:
Strong:
Volume: 25-120 ml
Long coffee /Large coffee
Cappuccino Approx. 70 °C Weak:
Medium:
Strong:
Volume: 25-240 ml
Milk preparation time: 3-120 seconds
Foamed milk preparation time:
3-120 seconds
Coffee latte icon /Caffè latte
Hot water /Hot water Low: approx. 60 °C
Medium: approx.
70 °C
High: approx. 80 °C
Volume: 25-450 ml
Hot milk /Hot milk Approx. 40 °C Milk preparation time: 3-120 seconds
Hot cream /Foamed milk Approx. 50 °C Foamed milk preparation time of
3-120 seconds
Information about changes to the default parameters can be found in chapter Beverage settings.
7
8

14 Revision 06/2014Copyright © 2014, Fast ČR, a. s.
EN
Available coffees and warm beverages
Espresso
Coffee beans: Medium roasted
Cup temperature: 55 °C
Coffee strength: Strong
Extraction temperature: 93 °C
Coffee volume: 50 ml
Long coffee (Large coffee, Lungo)
Coffee beans: Medium roasted
Cup temperature: 55 °C
Coffee strength: Medium
Extraction temperature: 93 °C
Coffee volume: 100 ml
Hot water (Hot water)
High temperature: For brewing black / green tea
Normal temperature: For direct consumption
Low temperature: For making instant beverages or dried milk.
Cappuccino
Coffee beans: Medium roasted
Cup temperature: 55 °C
Coffee strength: Weak
Milk temperature: 10°C
Milk preparation time: 15 seconds
Coffee volume: 100 ml
Coffee Latté (Caffè latte)
Coffee beans: Medium roasted
Cup temperature: 55 °C
Coffee strength: Weak
Milk temperature: 10°C
Milk preparation time: 15 seconds
Foamed milk preparation time: 15 seconds
Coffee volume: 100 ml
Hot milk (Hot milk)
Milk can be heated to the optimal drinking temperature without the loss of nutritional values.

15 Revision 06/2014Copyright © 2014, Fast ČR, a. s.
EN
Brewing beverages
In this chapter you will learn how to use this espresso machine to make various types
of coffees, hot water, hot milk and foamed milk. Please read the following instructions
that will help you brew the most delicious hot beverages.
The espresso machine uses hot water when brewing beverages. Avoid coming into
any kind of contact with hot water – risk of scalding.
Before brewing any type of beverage, check that the message «READY» is shown
on the display.
• Never use heavily roasted coffee beans.
• Store coffee beans in a dry and dark place.
• Only use room temperature drinking water. When brewing coffee, you will
achieve optimal flavour using water at a temperature of 25 °C.
• To ensure that the coffee is both healthy and full of flavour, it is necessary to replace the water in the water
tank every day.
• Brew coffee into preheated cups.
• Using the handle, set the height of the coffee spout according to the cup height which will prevent coffee
from splashing out.
• The adjustable height of the coffee spout is: 80 - 140 mm.
ESPRESSO
The recommended volume for espresso coffee is between 30 and 50 ml.
Due to the small volume of the espresso it is appropriate to preheat the cups
before brewing.
1) Press the espresso icon.
2) Pressing the dial button you will start the grinder. At this moment, you
can turn the same button to adjust the amount of ground coffee.
The default amount of ground coffee for an espresso coffee:
3) While the coffee is brewing, you can use the dial button to adjust the
volume of the brewed beverage.
The default volume of an espresso coffee: 50 ml
4) As soon as the here shown picture appears on the display, the espresso
coffee is ready.
1
2
3
4

16 Revision 06/2014Copyright © 2014, Fast ČR, a. s.
EN
LONG COFFEE (LUNGO, LARGE COFFEE)
The flavour of lungo coffee is much finer than the strong flavour of espresso
coffee.
1) Press the long coffee icon (large coffee).
2) Pressing the dial button you will start the grinder. At this moment, you can
turn the same button to adjust the amount of ground coffee.
The default amount of ground coffee for a long coffee:
3) While the coffee is brewing, you can use the dial button to adjust the
volume of the brewed beverage.
Default volume of a long coffee: 150 ml
4) As soon as the here shown picture appears on the display, the long coffee
is ready.
HOT WATER (HOT WATER)
You can adjust the temperature of the hot water to three levels: high, medium
and low.
1) Press the hot water icon (hot water).
The default temperature level for hot water: medium.
2) If the temperature of the water is set to the medium level, its temperature
can be increased by turning the dial button to the right.
3) If the temperature of the water is set to the medium level, its temperature
can be decreased by turning the dial button to the left.
4) While heating hot water, its volume can be adjusted using the dial button.
Default volume of hot water: 200 ml
CAPPUCCINO
• While brewing cappuccino coffee, steam will be released from the spout.
Avoid coming into any kind of contact with steam – risk of scalding.
• Before brewing cappuccino or latte coffee, hot milk and foamed milk,
check that milk is being supplied to the frother via a hose.
• To achieve the optimal quality of foamed milk, use milk with a temperature
below 10 °C.
• If the espresso machine is set to the energy saving mode, it is necessary
to activate the independent heater to create steam. It is not possible to skip
this process.
1
2
LONG COFFEE
3
4
1
2
3
4
1
2
3

17 Revision 06/2014Copyright © 2014, Fast ČR, a. s.
EN
1) Press the cappuccino icon.
2) If the temperature is not high enough for steam generation, the independent
heater will be activated.
3) As soon as the here shown picture appears on the display, the heating
process is complete.
4) Pressing the dial button you will start the grinder. At this moment, you can
turn the same button to adjust the amount of ground coffee.
The default amount of ground coffee for a cappuccino:
5) As soon as the here shown picture appears on the display, the milk
frothing process will be started.
6) While foamed milk is pouring out, its preparation time can be adjusted
using the dial button.
The default preparation time for foamed milk: 20 s.
7) As soon as the here shown picture appears on the display, the coffee
brewing process will be started.
8) While the coffee is brewing, you can use the dial button to adjust its
volume.
Default volume of a coffee: 100 ml
9) As soon as the here shown picture appears on the display, the cappuccino
coffee is ready.
CAFFÈ LATTE (CAFFÈ LATTE)
• Use a larger cup when brewing a caffè latte.
• While brewing caffè latte, steam will be released from the spout. Avoid
coming into any kind of contact with steam – risk of scalding.
• Before brewing cappuccino or latte coffee, hot milk and foamed milk,
check that milk is being supplied to the frother via a hose.
1) Press the coffee latte icon.
2) If the temperature is not high enough for steam generation, the independent
heater will be activated.
3) As soon as the here shown picture appears on the display, the heating
process is complete.
4) Pressing the dial button you will start the grinder. At this moment, you can
turn the same button to adjust the amount of ground coffee.
The default amount of ground coffee for a caffè latte:
5) As soon as the here shown picture appears on the display, the hot milk
heating process will be started.
5
4
7
8
9
6
1
2
3
4
5

18 Revision 06/2014Copyright © 2014, Fast ČR, a. s.
EN
6) While hot milk is pouring out, its preparation time can be adjusted using
the dial button.
The default preparation time for hot milk: 15 s
7) As soon as the here shown picture appears on the display, the milk
frothing process will be started.
8) While foamed milk is pouring out, its preparation time can be adjusted
using the dial button.
The default preparation time for foamed milk: 15 s
9) As soon as the here shown picture appears on the display, the coffee
brewing process will be started.
10) While the coffee is brewing, you can use the dial button to adjust its
volume.
Default volume of a coffee: 100 ml
11) As soon as the here shown picture appears on the display, the caffè latte
is ready.
HOT MILK (HOT MILK)
• While making hot milk, steam will be released from the spout. Avoid
coming into any kind of contact with steam – risk of scalding.
• Before brewing cappuccino or latte coffee, hot milk and foamed milk,
check that milk is being supplied to the frother via a hose.
1) Press the milk/cream icon and using the dial button select the HOT MILK
(hot milk) function.
2) Confirm the selection by pressing the dial button. If the temperature is
not high enough for steam generation, the independent heater will be
activated.
3) As soon as the here shown picture appears on the display, the hot milk
heating process is complete.
4) While hot milk is pouring out, its preparation time can be adjusted using
the dial button.
The default preparation time for hot milk: 20 s
5) As soon as the here shown picture appears on the display, the hot milk
is ready.
6
7
8
9
10
11
2
3
4
5
1
Other manuals for PHEM 1000
1
This manual suits for next models
1
Table of contents
Languages:
Other Philco Coffee Maker manuals
Popular Coffee Maker manuals by other brands

Classic Coffee Concepts
Classic Coffee Concepts RC130 Instructions for installation, operation, maintenance

Tower Hobbies
Tower Hobbies T13001 Safety and instruction manual

Clatronic
Clatronic KA 2689 Instruction manual & guarantee

Bosch
Bosch TAS6515UC8 Quick start instructions

Stirling
Stirling STR-E15BDG instruction manual

ECM
ECM laura Specifications