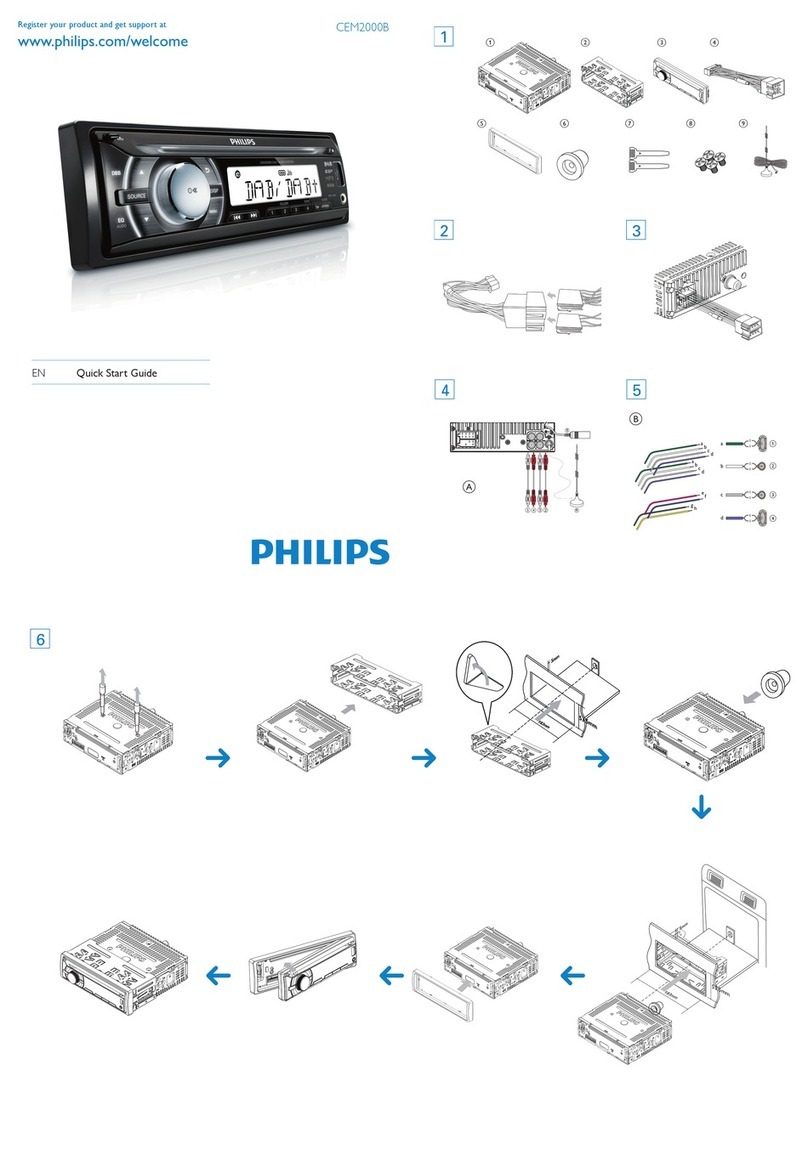
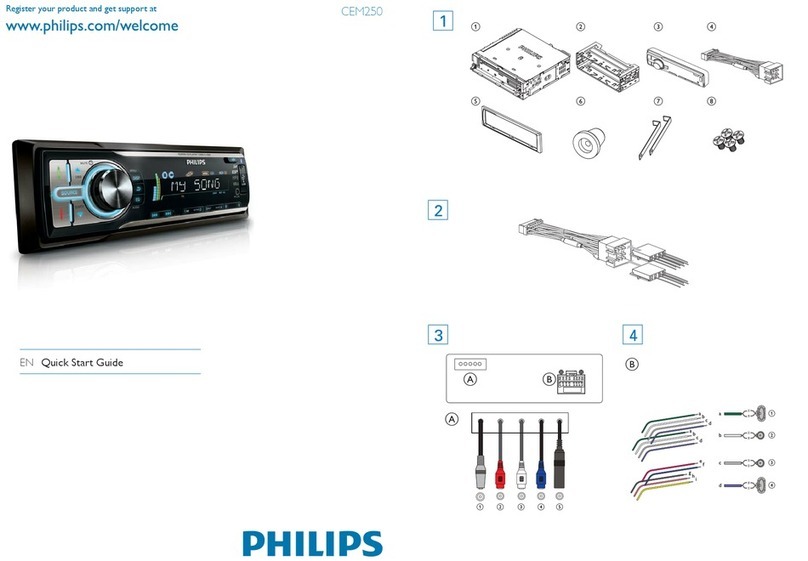
What's in the box
a Main unit and front panel (with a sleeve) b Tri m p l ate
c ISO standard connector d Rubber cushion
e 1 x Screw f 2 x Disassembly tools
g User manual h Quick start guide
Connect wires
1 Check the car’s wiring carefully, and then connect them to the supplied ISO wires.
Connector Connect to
1 Yellow wire The +12V car battery which is live at all times
2 Blue/White wire The electric antenna control lead or power supply lead of the antenna
booster. If there is no electric antenna or antenna booster, or it is
manually operated telescopic antenna, it is unnecessary to connect this
lead.
3 Black wire A metal surface of the car. Connect the black ground (earth) lead
before connecting the yellow and red power supply leads.
4 Red wire The +12V power terminal which is live in the accessory (ACC) position
of the ignition switch. If there is no accessory position, connect to the
+12V car battery terminal that is always live. Make sure that the black
5 Green and green/black wires Left speaker (rear)
6 White and white/black wires Left speaker (front)
7 Gray and gray/black wires Right speaker (front)
8 Purple and purple/black wires Right speaker (rear)
2 Connect the other end of the supplied standard connector to the car audio system.
Connector Connect to
1ANTENNA Antenna for radio
2External Mic An external microphone for phone call
3SUBWOOFER (Socket) Subwoofer
4REAR LINE OUT L (Socket) Rear left speaker
5REAR LINE OUT R (Socket) Rear right speaker
6OE REMOTE (Brown) OE remote
7FRONT LINE OUT L Front left speaker
8FRONT LINE OUT R Front right speaker
Mount into the dashboard
If the car does not have an on-board drive or navigation computer, disconnect the negative terminal of the car
battery.
If you disconnect the car battery in a car that has an on-board drive or navigation computer, the
computer may lose its memory.
If the car battery is not disconnected, to avoid short-circuit, make sure that the bare wires do not
touch each other.
1 Make sure that car dashboard opening is within these measurements:
2
Note
!
3 Place the supplied rubber cushion over the end of the mounting bolt.
4 Slide the system into the dashboard until you hear a “click ”.
5 Attach the tr im plate.
6 Reconnect the negative terminal of the car battery.
Turn on
Press .
» [WELCOME] scrolls.
To turn off the system, press and hold until [GOODBYE] is displayed.
Set the clock
1 Press and hold to access the system menu.
2 Press repeatedly until [CLOCK] and the current time is displayed.
» If the clock is not set before, [00:00] is displayed.
3 Rotate to set the hour.
4 Press
5 Rotate to set the minute.
6 Press
Select a source
Note
When all other sources are unavailable, the sys tem switches the source to [RADIO] automatically.
ÁQuick start guide Press repeatedly to select a source.
[RADIO]: FM/AM radio
[MP3-LINK]: the audio input through the MP3-LINK socket
[BT AUDIO]: the audio transferred from a Bluetooth device
[USB]: When a USB storage device is connected and recognized, you can select this source to play
[iPHONE]: When an iPhone or iPod touch is connected and recognized, you can select this source to
play the playlist of iPhone or iPod touch.
Tune to a radio station
1 Press repeatedly to switch the source to [RADIO].
2 Press repeatedly to select a band: [FM1], [FM2], [FM3], [AM1], or [AM2].
3 Press and hold or until the frequency digits blink.
4 Press or repeatedly to tune to a radio station manually.
» The radio station is broadcast.
To search for a radio station automatically, press or .
Select a tuner region
You can select a suitable country/region of the radio.
1 Press and hold to access the system menu.
2 Press repeatedly until [AREA] is displayed.
3 Rotate to select:
[USA] (United States) [EUR] (Western Europe)
[RUS] (Russia) [AUS] (Australia)
[EAS] (Middle East) [ASI]"#
[JAP] (Japan) [JAP] (Japan)
Store stations automatically
1 Press and hold to access the system menu.
2 Press repeatedly until [STORE >] is displayed.
3 Press
» The strongest stations of the selected band are saved in preset channel automatically.
Play from a USB storage device
1 Connect the USB storage device to the socket.
2 Press repeatedly until [USB] is displayed.
» Play starts automatically.
If play does not start automatically,
1 Press / to select a folder.
2 Press /
3 Press to start play.
Listen to an external device
1 Press repeatedly to switch the source to [MP3-LINK].
2 Connect the MP3 link cable to
the MP3-LINK socket on the system, and
the audio output socket (usually the headphone socket) on the external device.
3 Play the external device.
Use the dock
An application CarStudio is available in the iTunes App Store for this car audio system. To enjoy full features,
download the application to your iPhone or iPod touch.
Compatible iPod/iPhone models
iPhone 4S
iPhone 4
iPhone 3GS
iPhone 3G
iPod touch (3rd and 4th generations)
Prepare for docking
1 Press to eject the dock bracket.
2 Pull out the dock bracket until you hear a “click”.
3 Flip the dock bracket upwards.
4 Press and hold RELEASE to loosen the hooks.
5 Connect your iPhone or iPod touch to the dock with its screen facing you.
» The system switches the source to [iPHONE] automatically. If not, press repeatedly to switch the
source.
6 Pinch the hooks to secure your iPhone or iPod touch.
7 Adjust the dock bracket.
Reset the system
You can reset the system to factor y default settings.
1 Open the cover for the USB socket, MP3-LINK socket, and RESET button.
2 Press the RESET button with the tip of a ball-point pen or toothpick.
» The system is turned off, and all settings are reset to factory default.
Á
Contenido de la caja
a Unidad principal y panel frontal (con funda) b Embellecedor
c d Tope de go m a
e 1 tornillo f 2 herramientas de desmontaje
g Manual de usuario h
Asegúrese de proteger todos los cables sueltos con cinta aislante.
1 Compruebe cuidadosamente el cableado del vehículo y conecte los cables a los cables ISO
suministrados.
Conector Conectar a
1 Cable amarillo La batería de +12 V del vehículo, que proporciona alimentación continua
2 Cable azul/blanco El cable de control de la antena motorizada o el cable de alimentación del
$%
de antena, o se trata de una antena telescópica manual, no es necesario
conectar este cable.
3 Cable negro &'*9
antes de conectar los cables de alimentación amarillo y rojo.
4 Cable rojo El terminal de alimentación de +12 V que proporciona alimentación en
la posición de accesorios ACC de la llave de contacto. Si el vehículo no
dispone de posición ACC, realice la conexión al terminal de la batería de
+12 V del vehículo, que proporciona alimentación continua. Asegúrese de
;' '
vehículo en primer lugar.
5 Cables verde y verde/negro Altavoz izquierdo (posterior)
6 Cables blanco y blanco/
negro
Altavoz izquierdo (delantero)
7 Cables gris y gris/negro Altavoz derecho (delantero)
8 Cables morado y morado/
negro
Altavoz derecho (posterior)
2 9'*
Conector Conectar a
1ANTENNA Antena de radio
2External Mic Un micrófono externo para llamadas telefónicas
3SUBWOOFER (toma) Subwoofer
4REAR LINE OUT L (toma) Altavoz posterior izquierdo
5REAR LINE OUT R (toma) Altavoz posterior derecho
6OE REMOTE (marrón) Mando a distancia OE
7FRONT LINE OUT L Altavoz izquierdo delantero
8FRONT LINE OUT R Altavoz derecho delantero
Montaje en el salpicadero
Si el vehículo no dispone de una unidad de a bordo o de un equipo de navegación, desconecte el terminal
negativo de la batería.
Si desconecta la batería en un vehículo que dispone de una unidad de a bordo o un equipo de
navegación, se puede borrar la memoria del equipo.
$**'<;;
entre sí para evitar que se produzca un cortocircuito.
1 Asegúrese de que la abertura del salpicadero tiene las siguientes medidas:
2 =>
Nota
?'>@
3 Coloque el tope de goma incluido sobre el extremo del perno de montaje.
4 Deslice el sistema en el salpicadero hasta que oiga un “clic”.
5 Coloque el embellecedor.
6 Vuelva a conectar el terminal negativo de la batería del vehículo.
Encendido
Pulse .
» [WELCOME] se desplaza por la pantalla.
Para apagar el sistema, mantenga pulsado hasta que se muestre [GOODBYE].
Ajuste del reloj
1 Mantenga pulsado para acceder el menú del sistema.
2 Pulse varias veces hasta que se muestren [CLOCK] y la hora actual.
» Si no ha ajustado el reloj antes, se muestra [00:00].
3 Gire para ajustar la hora.
4 Pulse
5 Gire para ajustar los minutos.
6 Pulse
Nota
9'[RADIO]'
Pulse varias veces para seleccionar una fuente.
[RADIO]: la radio FM/AM
[MP3-LINK]H@MP3-LINK
[BT AUDIO]: el audio transferido desde un dispositivo Bluetooth
[USB]H&$K'
seleccionar esta fuente para reproducir archivos de audio almacenados en el mismo.
[iPHONE]H##'
fuente para reproducir la lista de reproducción del iPhone o iPod touch.
1 Pulse varias veces para cambiar la fuente a [RADIO].
2 Pulse varias veces para seleccionar una banda: [FM1], [FM2], [FM3], [AM1] o [AM2].
3 Mantenga pulsado o hasta que los números de frecuencia parpadeen.
4 Pulse o varias veces para sintonizar una emisora de radio manualmente.
» La emisora de radio comienza a emitir.
#' o .
!
1 Mantenga pulsado para acceder el menú del sistema.
2 Pulse varias veces hasta que se muestre [STORE >].
3 Pulse
» X'
'
"#$%
1 Conecte el dispositivo de almacenamiento USB a la toma .
2 Pulse varias veces hasta que aparezca [USB].
» XZ'
&
1 Pulse / para seleccionar una carpeta.
2 Pulse / para seleccionar un archivo.
3 Pulse para iniciar la reproducción.
*#
1 Pulse varias veces para cambiar la fuente a [MP3-LINK].
2 Conecte el cable de conexión MP3 a
la toma MP3-LINK del sistema y
la toma de salida de audio (normalmente la toma de auriculares) del dispositivo externo.
3 Inicie la reproducción en el dispositivo externo.
Uso de la base
[\"$'ZCarStudio para este sistema de audio para el coche. Para
disfrutar de todas las funciones, descargue la aplicación en su iPhone o iPod touch.
Modelos de iPod/iPhone compatibles
iPhone 4S
iPhone 4
iPhone 3GS
iPhone 3G
iPod touch (3ª y 4ª generación)
1 Pulse para expulsar el soporte de la base.
2 Tire del sopor te de la base hasta que oiga un “clic”.
3 ]@
4 Mantenga pulsado RELEASE^>
5 Conecte el iPhone o iPod touch en la base con la pantalla orientada hacia usted.
» El sistema cambia la fuente a [iPHONE]'$* varias veces para
cambiar la fuente.
6 #%;>##
7 Ajuste del soporte de la base
Restablecimiento del sistema
#Z'
1 Abra la cubier ta de la toma USB, la toma MP3-LINK y el botón RESET.
2 Pulse el botón RESET con la punta de un bolígrafo o un palillo de dientes.
» [>Z'
