Turn on
To turn on the unit,
Press .
To turn off the unit,
press and hold until the unit is turned off.
Select country/region
1Press to turn on the unit.
»[SELECT OPERATING REGION] is displayed.
2Rotate to select an option:
[USA] (United States)
[LATIN] (Latin America)
[EUROPE] (Western Europe)
[RUS] (Russia)
[M-EAST] (Middle East)
[ASIA]
[JAP] (Japan)
[AUST] (Australia)
3Press
Set clock
1Press MENU
2Rotate to set hour.
3Press
4Rotate to set minute.
5Press
Tune to a radio station
1Press SOURCE repeatedly to select radio mode.
2Press BAND or / repeatedly to select band: [FM1], [FM2], [FM3], [AM1], or [AM2] .
3Press and hold or
4Press or to tune to a radio station manually.
»The radio station is broadcast.
To search for a radio station automatically, press or .
Store stations automatically
1In Radio mode, press and hold DBB until [STORE - - -] is displayed.
2Press
»The six strongest stations of the selected band are saved in preset channel automatically.
Store stations manually
1Tune to a station that you want to store.
2Press a numeric button for 3 seconds.
»The station is saved in the selected channel.
Play from USB
1Slide the USB socket cover marked to the left.
2Insert the USB device into the USB socket.
»The unit starts playing from the USB
device automatically.
Connect iPod/iPhone
1Slide the USB socket cover marked to the left.
2Insert USB adaptor on one end of iPod/iPhone cable
to the USB socket on the main unit.
3Insert the other end of the iPod/iPhone cable to the
iPod/iPhone socket.
»The unit starts playing from the USB device automatically.
Reset
You can reset the unit to its default setting.
1Detach the front panel.
2Press the reset button by using a ball-point pen
or a similar tool.
»Preset adjustments such as preset channels and
sound adjustments are erased.
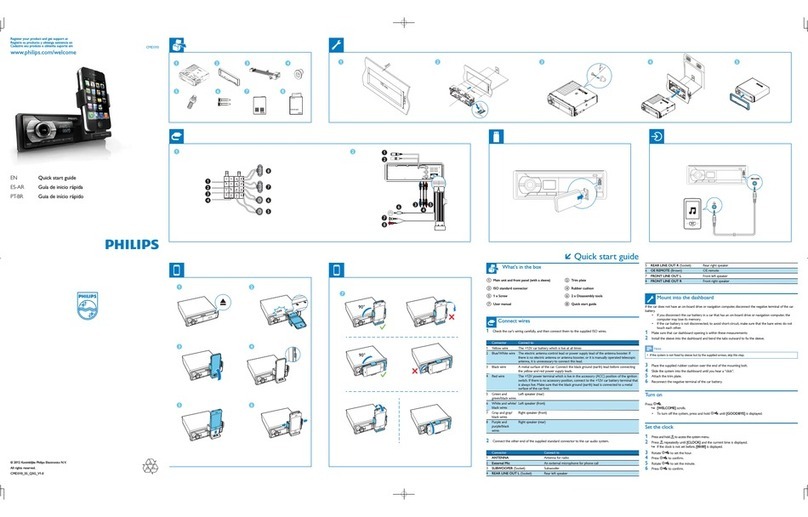
What’s in the box
Main unit
(with a sleeve)
Remote
control
Front panel Trim plate Carrying case for
front panel
ISO male connector Screw
x 1 pc
Rubber cushion Disassembly tools
x 2 pcs
User manual Quick start guide
fg
h
i
REAR FRONT
R
L
REAR AUX LR
j
1Connect the supplied male connector to the unit.
2Check the car’s wiring carefully and connect them
to the the supplied male connector.
1 Green/black strip Left speaker (Rear)
2 White/black strip Left speaker (Front)
3 Gray/black strip Right speaker (Front)
4 Purple/black strip Right speaker (Rear)
e Red Ignition key +12V DC when
ON/ACC
f Blue Motor/electric antenna relay
control lead
g Blue/white
hBlack Ground
i Yellow To the +12V car battery which
is energized at all times
3
applicable.
Connector Connect to
1 ANTENNA Antenna
2 FRONT LINE OUT R
(Socket)
Front right speaker
3 FRONT LINE OUT L
(Socket)
Front left speaker
4 REAR LINE OUT R
(Socket)
Rear right speaker
5 REAR LINE OUT L
(Socket)
Rear left speaker
6 OE REMOTE (Purple) OE Remote
7TELMUTING(Blue) To cellular phone
system
8 SUBWOOFER (Blue) Subwoofer
9 REAR AUX LINE OUT R Rear Aux right
10 REAR AUX LINE OUT L Rear Aux left
Connection: for cars with ISO connectors
ÁQuick start guide
CEM3100_05_QSG_V1.0.indd 2 2012-3-9 16:39:21
