manuals.online logo
Brands
  1. Home
  2. •
  3. Brands
  4. •
  5. Philips
  6. •
  7. Home Theater System
  8. •
  9. Philips HTS6515 User manual

Philips HTS6515 User manual

3Enjoy
DVD HomeTheatre unit Remote Control
and 2 batteries
Table stand
Micro bre
cleaning cloth
Subwoofer
User
Manual
Register your product and get support at
www.philips.com/welcome
Quick Start Guide
HTS6515
What’s in the box?
Connect
Set up
Enjoy
1
2
3
EasyLink control
This feature is only applicable if this DVD Home Theatre
unit is connected to HDMI CEC compliant TV/device
using HDMI cable. It enables all the linked devices
response or react to certain commands simultaneously
with one touch control.
HDMI
HDMI
HDMI CEC
TV
AUDIO
AUDIO
ATurn on the HDMI CEC operations on your TV and
other connected devices. See TVs/devices manual for
details.
BYou can now enjoy the EasyLink controls.
One touch play [ Auto Wake-up TV ]
APress PLAY.
It turns on this unit and start disc play (if a video disc
is detected), and your TV automatically turns on and
switches to the correct viewing channel.
Note This is only possible if this unit is in standby
mode. If this unit is in active mode, you have to press
DISC followed by PLAY to start disc play.
One touch power off [ System Standby ]
APress and hold 2.
It turns off all linked devices.
Note This unit responses to standby command from
other HDMI CEC compliant TV/devices.
One touch audio input switching
This unit is able to render the audio signals from the
active source and switch automatically to the
corresponding audio input.
Before you can enjoy this feature, connect audio cables
from this unit to your TV/devices and follow the
instructions below to map the audio inputs to the
connected devices.
APress DISC.
BPress OPTIONS.
CPress B.
DSelect
[ EasyLink ], then press B.
Screen Saver
DivX(R) VOD Code
Sleep Timer
Display Dim
Disc Lock
OSD Language
EasyLink
Standby Mode
General Setup
Auto Wake-up TV
System Standby
System Audio Control
Audio Input Mapping
ESelect [ System Audio Control ] > [ On ], then
press OK.
FSelect [ Audio Input Mapping ], then press OK.
GSelect [ OK ] in the menu, then press OK to start
scanning of devices.
HWhen scanning complete, select the audio input of
this unit that is used to connect to your TV/device
(e.g. AUX1 Input), then press B.
ISelect the TV/device (appeared in its brand name)
in the right panel, then press OK.
JRepeat steps 8~9 to map other connected devices.
KTo exit the menu, press OPTIONS.
Note Philips does not guarantee 100%
interoperability with all HDMI CEC compliant devices.
Speakers
Component
video cables
Big bracket
2 Small brackets
Mounting knob
Need help?
User Manual
See the user manual that came with your Philips DVD Home Theatre System.
2008 CKoninklijke Philips N.V.
All rights reserved.
sgpjp_816/12-eng1
Scart cable
Power cable
Audio cables
subwoofer
Satellite Receiver /
Cable Box
HDD / DVD Recorder
1Connect 2Set up
A
Find the viewing channel
APress 2to turn on this DVD Home Theatre unit.
BTurn on the TV. Use the TVs remote control to
select the correct viewing channel.
Note To search for the correct viewing channel,
press the Channel Down button on the TVs remote
control repeatedly (or AV, SELECT, °button) until
you see the Video In channel.
B
Start Ambisound setup
When you turn on this DVD Home Theatre unit for the
rst time, change the Ambisound setup according to
your room environment and setup.
AIn disc mode, press OPTIONS.
BPress Vto select [ Audio Setup ] in the menu,
then press B.
CSelect [ Ambisound Setup ] in the menu, then press
B.
DSelect a setup you want to change, then press B.
[ Room Acoustics ]
Select the type of walls that surround your room.
The default setting is [ Hard (concrete, wood) ].
[ Room Placement ]
Select the speakers placement position in your room.
The default setting is [ Middle of room ].
[ Speaker Distance ]
Select the distance between two speakers. The
default setting is between 2~3 meters.
[ Listening Position ]
Select the distance between the listening position and
the speakers. The default setting is between 2~3
metres.
EPress vV to select a setting, then press OK.
FTo exit the menu, press OPTIONS.
Note Refer to the accompanying user manual
for other setup options.
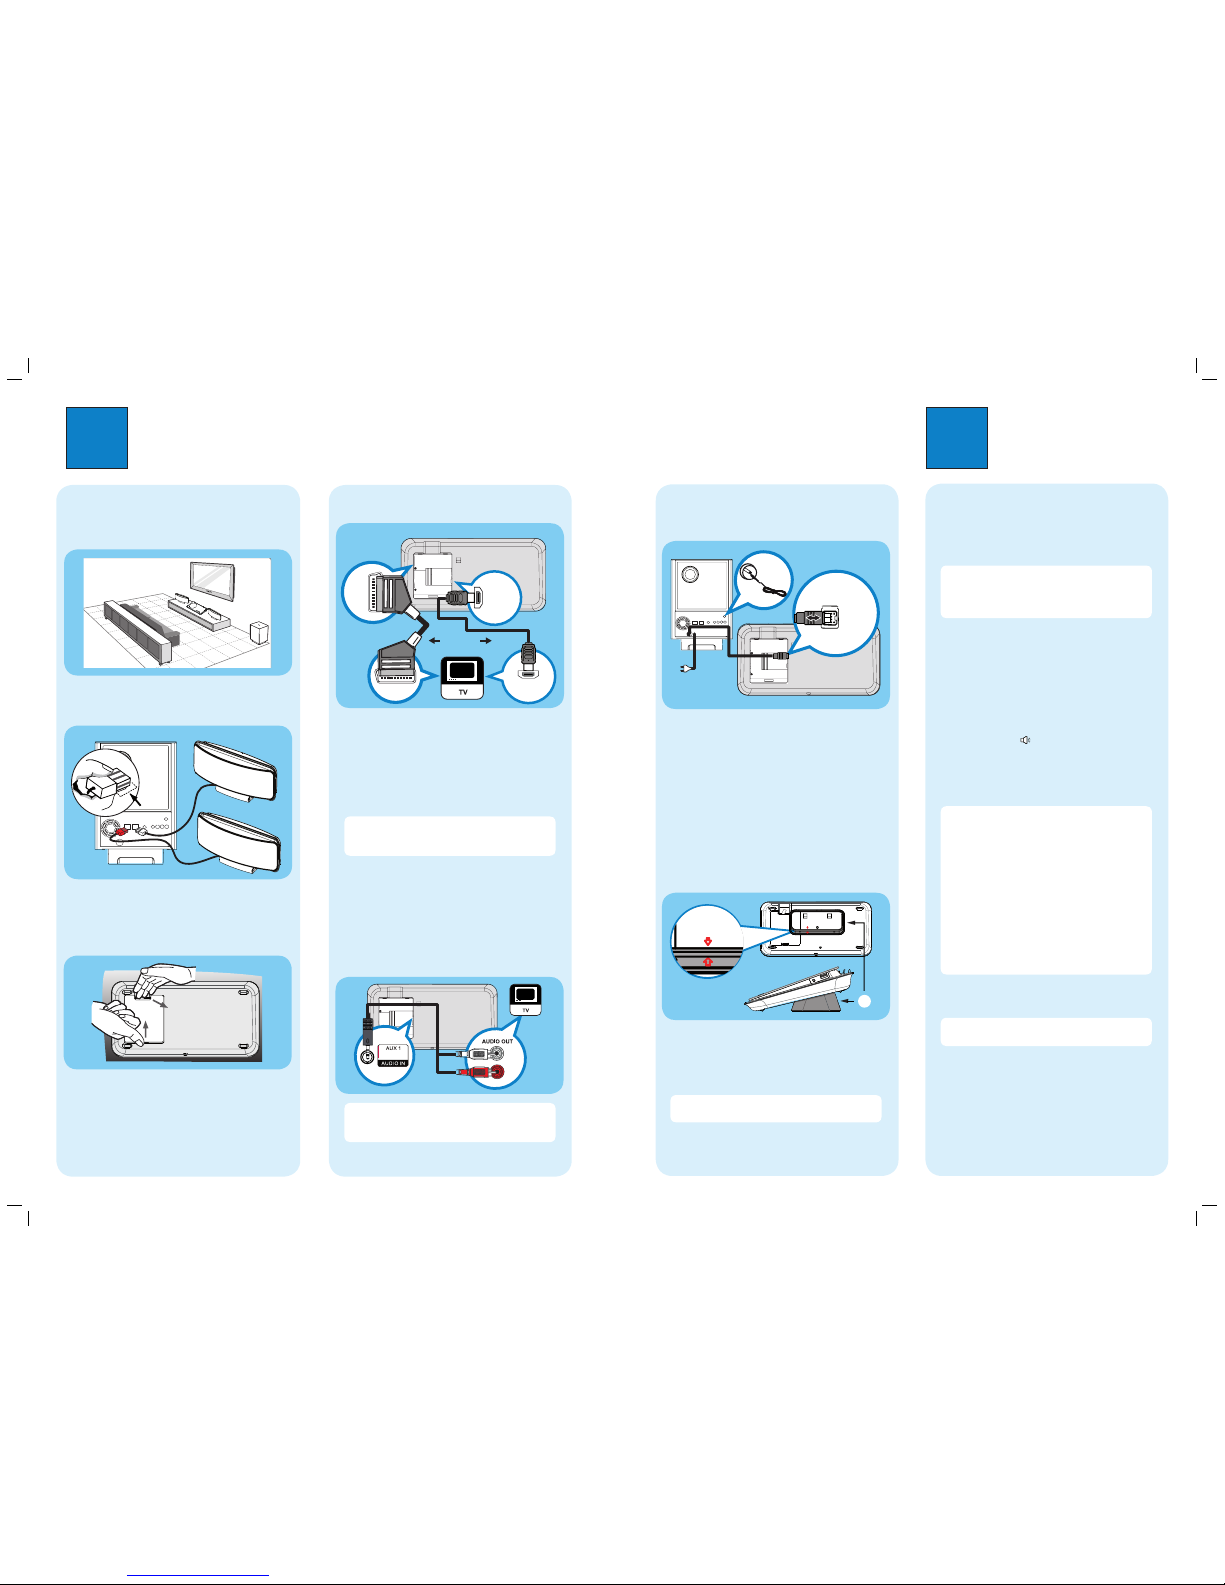
A
Placement
Proper speakers system placement is important to
ensure optimum sound performance.
RIGHT
LEFT
B
Connect speakers
RIGHT
LEFT
AConnect the left and right Ambisound speakers to
the matching sockets on the subwoofer.
C
Prepare for rear connections
APush up the catch and remove the rear cover.
BConnect the required cables (see the following
sections for details) and direct all the cables to the
open hole on top.
D
Connect to TV
HDMI IN
HDMI OUT
SCART
SCART
zConnect a scart cable from the SCART socket to
the SCART IN socket on your TV (or connect the
component video cables to the corresponding
COMPONENT VIDEO sockets).
zIf your TV supports HDMI, connect the HDMI cable
(not supplied) from the HDMI OUT socket to the
HDMI IN socket on your TV.
Note HDMI connection does not support audio
output from your TV to this unit, a separate audio
connection is required.
E
Connect audio output from TV (for
EasyLink control)
To hear the TV audio through this DVD Home Theatre
unit, connect the audio cables (supplied) from the
AUDIO IN-AUX1 sockets to the AUDIO OUT sockets
on your TV.
Note To listen to the audio output from this
connection, press AUX/DI /MP3 LINK repeatedly
until ‘AUX1 INPUT’ is displayed on the display panel.
Subwoofer (rear)
F
Connect subwoofer and power
cable
TO SUBWOOFER
C
A
B
AUnwind the cables from TO MAIN UNIT on the
subwoofer and connect it to TO SUBWOOFER
socket on this DVD Home Theatre unit.
BConnect the FM antenna to the inner pin of the FM
75 socket (for some models, it has been
connected in the factory). Extend the wire for
optimum reception.
CConnect the power cable from subwoofer to the AC
power outlet.
G
Attach table stand to DVD Home
Theatre unit
Align Arrow
With Table Stand

A
AlignArrow
WithtableStand
A table stand bracket
AClose the rear cover.
BPlace the table stand bracket with the arrow
indicators aligned. Then use the protrude panels to
hold the table stand bracket.
Note All the cables must be placed properly inside
the rear panel in order for the rear cover to close.
Subwoofer (rear) FM antenna
DVD Home Theatre unit (rear)
Or

Other manuals for HTS6515

3

This manual suits for next models

1

Other Philips Home Theater System manuals

Philips HTS5533/98 User manual

Philips

Philips HTS5533/98 User manual

Philips MCD300/93 User manual

Philips

Philips MCD300/93 User manual

Philips HTS3220 User manual

Philips

Philips HTS3220 User manual

Philips HTS3560 Instruction manual

Philips

Philips HTS3560 Instruction manual

Philips HTS3571 User manual

Philips

Philips HTS3571 User manual

Philips HTS6600/98 User manual

Philips

Philips HTS6600/98 User manual

Philips HTS6600/55 User manual

Philips

Philips HTS6600/55 User manual

Philips HTS3541/05 User manual

Philips

Philips HTS3541/05 User manual

Philips HTS3357/51 User manual

Philips

Philips HTS3357/51 User manual

Philips HTD5580 User manual

Philips

Philips HTD5580 User manual

Philips HTS3565D User manual

Philips

Philips HTS3565D User manual

Philips HTB9150/12 User manual

Philips

Philips HTB9150/12 User manual

Philips HES2800/12 User manual

Philips

Philips HES2800/12 User manual

Philips HTS3375/55 User manual

Philips

Philips HTS3375/55 User manual

Philips MCD735 series User manual

Philips

Philips MCD735 series User manual

Philips HTB3540/51 User manual

Philips

Philips HTB3540/51 User manual

Philips HTS3548W User manual

Philips

Philips HTS3548W User manual

Philips MX3550D User manual

Philips

Philips MX3550D User manual

Philips HTS3564 User manual

Philips

Philips HTS3564 User manual

Philips HTS5550/98 User manual

Philips

Philips HTS5550/98 User manual

Philips HTS5800H User manual

Philips

Philips HTS5800H User manual

Philips MCD906/73 User manual

Philips

Philips MCD906/73 User manual

Philips HTS335W/12 User manual

Philips

Philips HTS335W/12 User manual

Philips HTS7500 User manual

Philips

Philips HTS7500 User manual

Popular Home Theater System manuals by other brands

Samsung HT-XQ100 instruction manual

Samsung

Samsung HT-XQ100 instruction manual

Sharp HT-DP4000 Service manual

Sharp

Sharp HT-DP4000 Service manual

GDC SX-2001 Upgrade manual

GDC

GDC SX-2001 Upgrade manual

Onkyo HT-S3100 Quick setup

Onkyo

Onkyo HT-S3100 Quick setup

JVC TH-A25 instructions

JVC

JVC TH-A25 instructions

Platin W-30D owner's manual

Platin

Platin W-30D owner's manual

Sony HT-DDWG700 operating instructions

Sony

Sony HT-DDWG700 operating instructions

JVC RX-E111RSL instructions

JVC

JVC RX-E111RSL instructions

Sony DAV-DZ120K operating instructions

Sony

Sony DAV-DZ120K operating instructions

Samsung CHT-420 instruction manual

Samsung

Samsung CHT-420 instruction manual

Insignia NS-H2002-U user guide

Insignia

Insignia NS-H2002-U user guide

Pure Acoustics PU-55 user manual

Pure Acoustics

Pure Acoustics PU-55 user manual

Durabrand HT-395 manual

Durabrand

Durabrand HT-395 manual

Furrion DV3100 instruction manual

Furrion

Furrion DV3100 instruction manual

Sony DAV-EA20 operating instructions

Sony

Sony DAV-EA20 operating instructions

Sony DAV-X1V - 5 Disc 2.1 Channel Platinum Dvd Dream... operating instructions

Sony

Sony DAV-X1V - 5 Disc 2.1 Channel Platinum Dvd Dream... operating instructions

Samsung RTS-HE10 user manual

Samsung

Samsung RTS-HE10 user manual

Samsung E10T user manual

Samsung

Samsung E10T user manual

manuals.online logo
manuals.online logoBrands
  • About & Mission
  • Contact us
  • Privacy Policy
  • Terms and Conditions

Copyright 2025 Manuals.Online. All Rights Reserved.