1Connect
A
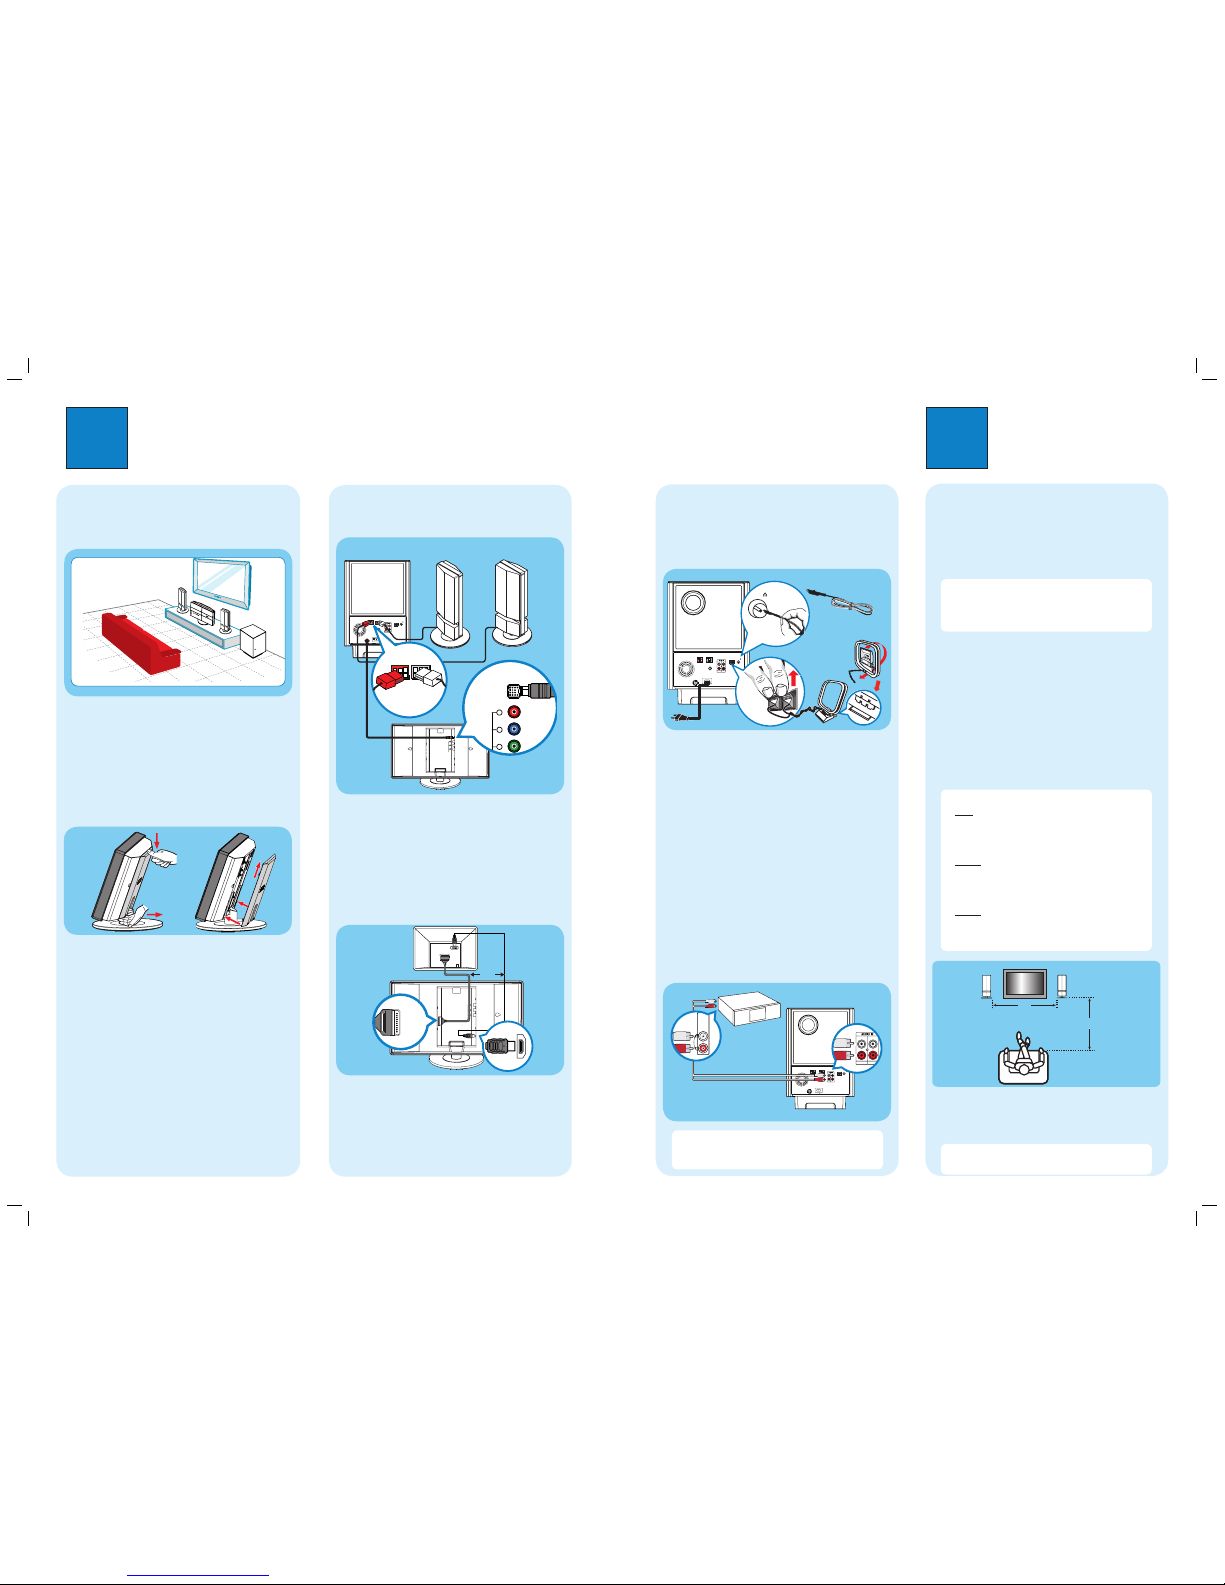
Placement
Proper speakers system placement is important to
ensure optimum sound performance.
APlace the speakers at the normal listening ear level,
equal distance from the TV and face it straight ahead
towards the listening area.
BPlace the subwoofer on the floor, at least one metre
away from the TV.
B
Remove rear cover from main unit
ACarefully push down the rear cover from the top
and detach it from the main unit.
BAfter all the connections have been made (see the
following sections for details), close the rear cover
by fitting the catches into the holes and pushing
upwards.
2Set up
C
Connect the speakers and main unit
to subwoofer
TODVD SYSTEM
AM/MW
FM/MWANTENNA
SPEAKERS
COAXIAL
DIGITALIN
AUX1 AUX2
RIGHT LEFT
FM75
R
L
MAINS
SCARTOUT
(TV1)
HDMIOUT
COMPONENT
VIDEOOUT
TOSUBWOOFER
TVAUDIOIN
(TV2)
AConnect the left speaker to the SPEAKER LEFT
socket and the right speaker to the SPEAKER
RIGHT socket at the rear of the subwoofer.
BConnect the TO MAIN UNIT cable from the
subwoofer to the TO SUBWOOFER socket at the
rear of the main unit.
D
Connect the main unit to TV
SCARTOUT
(TV1)
HDMIOUT
COMPONENT
VIDEOOUT
TOSUBWOOFER
TVAUDIO IN
(TV2)
SCARTIN
zConnect a scart cable (supplied) from the
SCART OUT (TV1) socket on the main unit to the
SCART IN socket on your TV.
zIf your TV supports HDMI, connect the HDMI cable
(not supplied) from the HDMI OUT to the HDMI IN
socket on your TV.
A
Finding the viewing channel
APress 2(STANDBY ON) on the main unit to turn
it on.
BTurn on the TV. Use the TVs remote control to
select the correct viewing channel.
Note To search for the correct viewing channel,
press the Channel Down button on the TVs remote
control repeatedly (or AV, SELECT, °button) until
you see the Video In channel.
B
Setting up the speakers
When you turn on this unit for the rst time, the
speaker setup message appears on the TV.
APress SETUP on the remote control to enter
‘General Setup Page’.
BPress cursor down to highlight { Ambisound
Setup } followed by pressing cursor right key.
CSelect one of the options below and press cursor
right key.
{ Room Acoustics }
{ Hard } - for concrete or wooden walls.
{ Soft } - for curtains or an open space.
{ Speakers Distance }
{ Near } - ‘X’ is less than 1.2 metres (3.9 ft).
{ Default } - ‘X’ is between 1.2~2 metres (3.9~6.5 ft).
{ Far } - ‘X’ is more than 2 metres (6.5 ft).
{ Listening Position }
{ Near } - ‘Z’ is less than 2 metres (6.5 ft).
{ Default } - ‘Z’ is between 2~3 metres (6.5~9.8 ft).
{ Far } - ‘Z’ is more than 3 metres (9.8 ft).
Note The underlined options are the default setting.
DSelect a most suitable predefined setting and press
OK to confirm.
EOnce complete, press SETUP to exit the menu.
Note Refer to the accompanying user manual
for other setup options.
E
Connect the radio antennas and
power cable
Keep the antennas away from the electronic devices to
prevent unwanted interference.
TOMAIN UNIT
AM/MW
FM/MWANTENNA
SPEAKERS
COAXIAL
DIGITALIN
AUX1 AUX 2
RIGHT LEFT
FM75
R
L
MAINS
A
B
FM 75
C
AConnect the FM antenna to the inner pin of the
FM 75 socket. Extend the antenna for optimum
reception.
BUnfold the AM/MW loop antenna and fix the claw
into the slot. Push the tabs and insert the wires into
the AM/MW sockets
CConnect the power cable from subwoofer to the AC
power outlet.
F
Connect audio output from other
device (optional)
Use a red and white audio cables (not supplied) to
connect the AUDIO IN-AUX1 or AUX2 sockets on the
subwoofer to the AUDIO OUT sockets on the
connected device (for example, DVD recorder, VCR,
Cable/Satellite Box).
MW
FM/MWANTENNA
TOMAIN UNIT
SPEAKERS
COAXIAL
DIGITALIN
AUX1 AUX 2
RIGHT LEFT
FM75
R
L
MAINS
Note Press AUX/DI on the remote control to
select ‘AUX1’ or ‘AUX2’ as the source you want to
listen to.
Main Unit
(rear)
Television
(rear)
Subwoofer (rear)
DVD recorder/
VCR/ Cable/
Satellite Box
Subwoofer (rear)
Listening
Position
Speakers Distance
FM antenna
AM/MW
antenna
Main unit (rear)
RIGHT
SPEAKER
LEFT
SPEAKER
Subwoofer (rear)
or


