manuals.online logo
Brands
  1. Home
  2. •
  3. Brands
  4. •
  5. Philips
  6. •
  7. Kettle
  8. •
  9. Philips HD3004/00 User manual

Philips HD3004/00 User manual

www.philips.com
by
Water Kettle HD3004
u
2 3
4222 001 95921
1
IntroductionIIIIIIIIIIIIIIIIIIIIIIIIIIIIIIIIIIIIIIIIIIIIIIIIIIIIIIIIIIIIIIIIIIIIIIIIIIIIIIIIIIIIIIIIIIIIIIIIIIIIIIIIIIIIIIIIIIIIIIIIIIIIIIIIIIIIIIIIIIIIIIIIIIIIIIIIIIIIIIIIIIIIIIIIIIIIIIIIIIIIIIIIIIIIIIIIIIIIIII
Dear Customer, congratulations on acquiring this new Glass by Philips Kettle.
The entire body of your new Glass by Philips kettle is made of glass.This gives your
kettle a beautiful transparent look and makes boiling water a fascinating event.This
kettle is also very energy-efficient and keeps your drinks free of scale.
ImportantIIIIIIIIIIIIIIIIIIIIIIIIIIIIIIIIIIIIIIIIIIIIIIIIIIIIIIIIIIIIIIIIIIIIIIIIIIIIIIIIIIIIIIIIIIIIIIIIIIIIIIIIIIIIIIIIIIIIIIIIIIIIIIIIIIIIIIIIIIIIIIIIIIIIIIIIIIIIIIIIIIIIIIIIIIIIIIIIIIIIIIIIIIIIIIIIIIIIIIIIIIIIIIII
Please read these instructions for use carefully before using the kettle and save them
for future reference.
◗This kettle is only intended for boiling water. Do not put any other ingredients in
the appliance, as this may lead to a hazardous situation.
◗Check if the voltage indicated on the kettle corresponds to the mains voltage in
your home before you connect the appliance.
◗Never fill the kettle beyond the maximum level indication. If the kettle has been
overfilled, there is a risk that boiling water will be ejected from the spout.
◗Never fill the kettle below the minimum level to prevent the kettle from boiling dry.
◗Some condensation may appear on the base of the kettle.This is perfectly
normal and does not mean that the kettle has any defects.
◗Depending on the hardness of the water in your area, small spots may appear
on the heating element of your kettle when you use it.This phenomenon is the
result of scale build-up on the heating element and on the inside of the kettle
over time.The harder the water, the faster scale will build up. Scale can occur in
different colours. Although scale is harmless to your health, too much scale can
affect the performance of your kettle. Please follow the instructions for descaling
the kettle given in this leaflet.
◗Keep the kettle and its cord well out of the reach of children and do not let
them play with the appliance. Prevent children from pulling at the mains cord.
Do not let the mains cord hang over the edge of the worktop.
Excess cord can be stored around the base of the kettle.
◗Boiling water can cause serious burns. Please take care when the kettle contains
hot water.
◗Be careful when you remove the lid immediately after the water has boiled, as
hot steam will come out of the kettle.
◗Only use the kettle in combination with its original base.
◗Do not place the kettle on a hot surface.
◗Do not immerse the kettle or its base in water or any other liquid.
◗Never use the kettle if the mains plug, the mains cord or the appliance itself is
damaged. If the kettle is damaged in any way, it must always be repaired by
Philips or a service centre authorised by Philips, as special tools and/or parts are
required.
◗Avoid touching the glass, as the kettle gets hot when it is boiling water. Only
touch the on/off switch and lift the kettle by its handle.
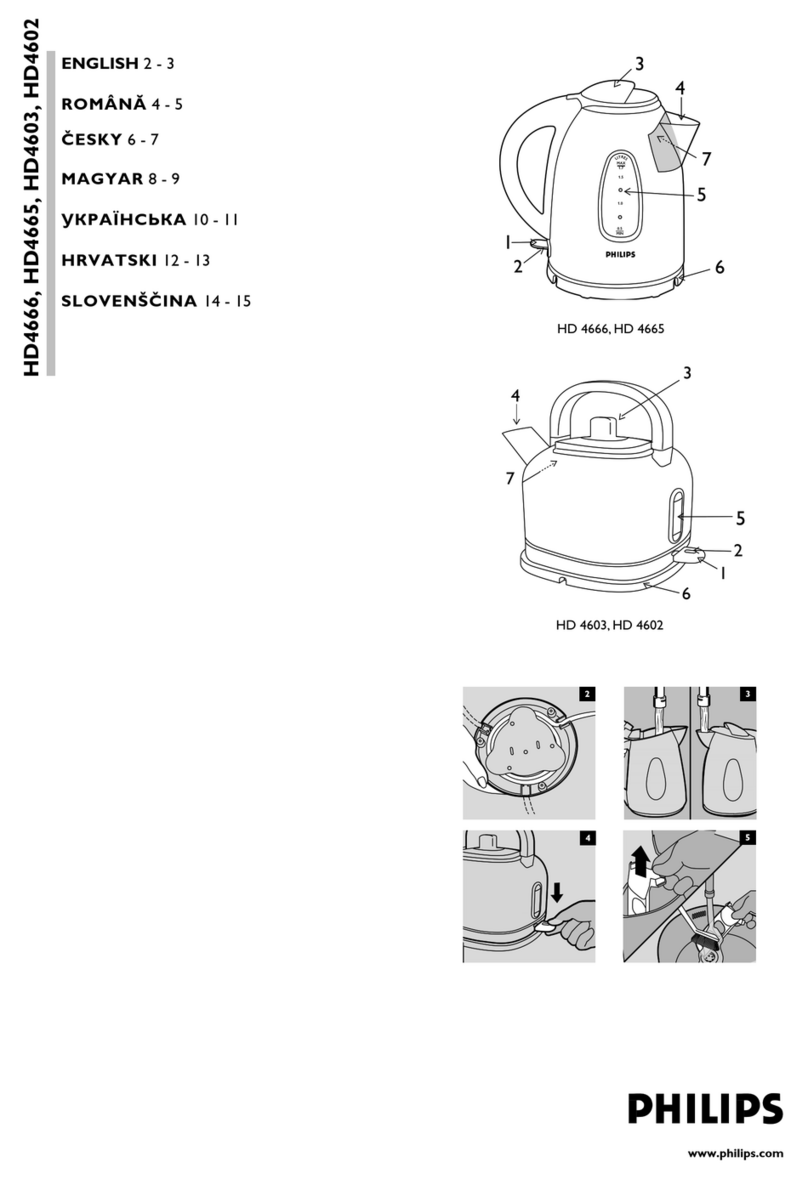
General description (fig. 1)IIIIIIIIIIIIIIIIIIIIIIIIIIIIIIIIIIIIIIIIIIIIIIIIIIIIIIIIIIIIIIIIIIIIIIIIIIIIIIIIIIIIIIIIIIIIIIIIIIIIIIIIIIIIIIIIIIIIIIIIIIIIIIIIIIIIIIII
AOn/off switch I
BPilot light
CSafety lid
DSpout
EWater-level indicator
FBase
GScale filter
Boil-dry protectionIIIIIIIIIIIIIIIIIIIIIIIIIIIIIIIIIIIIIIIIIIIIIIIIIIIIIIIIIIIIIIIIIIIIIIIIIIIIIIIIIIIIIIIIIIIIIIIIIIIIIIIIIIIIIIIIIIIIIIIIIIIIIIIIIIIIIIIIIIIIIIIIIIIIIIIIIIIIIIIIIIIIIIIIII
The heating element of your kettle is protected by a safety cut-out device.This
device will automatically switch the kettle off if it is accidentally switched on when
there is no water or not enough water in it. In this case the pilot light will blink and
the kettle will be switched off automatically after approximately 5 minutes. If this has
happened, lift the kettle from its base to reset the boil-dry protection. Then the
kettle is ready for use again.
Using the kettleIIIIIIIIIIIIIIIIIIIIIIIIIIIIIIIIIIIIIIIIIIIIIIIIIIIIIIIIIIIIIIIIIIIIIIIIIIIIIIIIIIIIIIIIIIIIIIIIIIIIIIIIIIIIIIIIIIIIIIIIIIIIIIIIIIIIIIIIIIIIIIIIIIIIIIIIIIIIIIIIIIIIIIIIIIIIIIIIIIIIIII
1Place the base of the kettle on a flat surface and put the plug in the wall socket.
2You can fill the kettle through the spout or by removing the lid.
If you choose to remove the lid, press the two release keys on the lid simultaneously
and pull the lid upwards.
3Put the kettle on the base.
If you have removed the lid, place it in the opening and press it shut.
You will hear a click.
4Press the on/off switch.
- The kettle starts heating up.
- The pilot light goes on (fig 2).
- The kettle switches off automatically when the water has reached boiling point.
5You can interrupt the boiling process by pressing the on/off switch.
Be careful, the body of the glass kettle becomes hot!
CleaningIIIIIIIIIIIIIIIIIIIIIIIIIIIIIIIIIIIIIIIIIIIIIIIIIIIIIIIIIIIIIIIIIIIIIIIIIIIIIIIIIIIIIIIIIIIIIIIIIIIIIIIIIIIIIIIIIIIIIIIIIIIIIIIIIIIIIIIIIIIIIIIIIIIIIIIIIIIIIIIIIIIIIIIIIIIIIIIIIIIIIIIIIIIIIIIIIIIIIIIIIIIIIIIIIIIIIIII
1Remove the plug from the wall socket.
2Clean the outside of the appliance with a moist cloth.
3Clean the lid and the scale filter in warm water with some washing-up liquid
or in the dishwasher.
4To clean the inside of the kettle, follow the instructions in the 'Descaling'
chapter.
Do not use any abrasive cleaning agents, scourers, etc. to clean the kettle.
Do not immerse the kettle or its base in water or any other liquid.
DescalingIIIIIIIIIIIIIIIIIIIIIIIIIIIIIIIIIIIIIIIIIIIIIIIIIIIIIIIIIIIIIIIIIIIIIIIIIIIIIIIIIIIIIIIIIIIIIIIIIIIIIIIIIIIIIIIIIIIIIIIIIIIIIIIIIIIIIIIIIIIIIIIIIIIIIIIIIIIIIIIIIIIIIIIIIIIIIIIIIIIIIIIIIIIIIIIIIIIIIIIIIIIIIIIIIIII
Regular descaling will prolong the life of your kettle.
In case of normal use (up to 5 times a day):
- Once every month if you are using hard water (i.e. with a hardness over
18º DH);
- Once every 3 months if you are using soft water (i.e. with a hardness up to
18º DH).
Turn to your local water board for information about the water hardness in your area.
You may wish to descale your kettle more often to keep it looking its very best.
1Fill the kettle with water up to three-quarters of the maximum level
indication and press the on/off switch.
2After the kettle has switched itself off, add white vinegar (8% acetic acid) or
an appropriate descaler up to the maximum level indication.
3Leave the solution in the kettle overnight.
4Empty the kettle and rinse the inside thoroughly.
5Repeat this procedure if there is still some scale left in the kettle.
Cleaning the filterIIIIIIIIIIIIIIIIIIIIIIIIIIIIIIIIIIIIIIIIIIIIIIIIIIIIIIIIIIIIIIIIIIIIIIIIIIIIIIIIIIIIIIIIIIIIIIIIIIIIIIIIIIIIIIIIIIIIIIIIIIIIIIIIIIIIIIIIIIIIIIIIIIIIIIIIIIIIIIIIIIIIIIIIIIIIII
Scale is not harmful to your health and it can occur in different colours, but it may
give your drink a powdery taste.The scale filter prevents scale particles from ending
up in your drink. Clean the filter regularly.
1Remove the lid.
You can remove the lid by pressing the two release keys on the lid simultaneously
and pulling the lid upwards.
2Remove the filter.
You can remove the filter by gently pulling it out of its holder (figure 3).
3Clean the filter by rinsing it under a running tap. If necessary, you can use a
soft nylon brush.
The scale filter can also be cleaned in the dishwasher.
You can also clean the filter by descaling it in the same way as the kettle.
4Let the filter soak in a cup of warm water with some white vinegar or an
appropriate descaler.
5Take the filter out of the cup and rinse it thoroughly.
ReplacementIIIIIIIIIIIIIIIIIIIIIIIIIIIIIIIIIIIIIIIIIIIIIIIIIIIIIIIIIIIIIIIIIIIIIIIIIIIIIIIIIIIIIIIIIIIIIIIIIIIIIIIIIIIIIIIIIIIIIIIIIIIIIIIIIIIIIIIIIIIIIIIIIIIIIIIIIIIIIIIIIIIIIIIIIIIIIIIIIIIIIIIIIIIIIIIIIIII
Cord
If the mains cord of this kettle is damaged, it must always be replaced by a service
centre authorised by Philips.
Scale filter
Replacement filters for your Glass by Philips kettle can be purchased from your local
Philips service centre under type number HD4979.
Information & serviceIIIIIIIIIIIIIIIIIIIIIIIIIIIIIIIIIIIIIIIIIIIIIIIIIIIIIIIIIIIIIIIIIIIIIIIIIIIIIIIIIIIIIIIIIIIIIIIIIIIIIIIIIIIIIIIIIIIIIIIIIIIIIIIIIIIIIIIIIIIIIIIIIIIIIIIIIIIII
If you need information or if you have a problem, please visit the Philips Web site at
www.philips.com or contact the Philips Customer Care Centre in your country
(you will find its phone number in the worldwide guarantee leaflet). If there is no
Customer Care Centre in your country, turn to your local Philips dealer or contact
the Service Department of Philips Domestic Appliances and Personal Care BV.
ENGLISH
EinführungIIIIIIIIIIIIIIIIIIIIIIIIIIIIIIIIIIIIIIIIIIIIIIIIIIIIIIIIIIIIIIIIIIIIIIIIIIIIIIIIIIIIIIIIIIIIIIIIIIIIIIIIIIIIIIIIIIIIIIIIIIIIIIIIIIIIIIIIIIIIIIIIIIIIIIIIIIIIIIIIIIIIIIIIIIIIIIIIIIIIIIIIIIIIIIIIIIIIIIIIIIIIII
Sehr geehrter Kunde, wir beglückwünschen Sie zu Ihrem neuen Wasserkocher aus
der Serie Glass by Philips.
Die gesamte Kanne dieses Wasserkochers der Serie Glass by Philips besteht aus
Glas. Der Wasserkocher ist also transparent und macht das Kochen von Wasser zu
einem faszinierenden Erlebnis. Gleichzeitig arbeitet er sehr energiesparend und hält
Ihre Getränke frei von Kalk.
WichtigIIIIIIIIIIIIIIIIIIIIIIIIIIIIIIIIIIIIIIIIIIIIIIIIIIIIIIIIIIIIIIIIIIIIIIIIIIIIIIIIIIIIIIIIIIIIIIIIIIIIIIIIIIIIIIIIIIIIIIIIIIIIIIIIIIIIIIIIIIIIIIIIIIIIIIIIIIIIIIIIIIIIIIIIIIIIIIIIIIIIIIIIIIIIIIIIIIIIIIIIIIIIIIIIIIIIIIIIIIII
Lesen Sie diese Bedienungsanleitung sorgfältig, bevor Sie den Wasserkocher
benutzen. Bewahren Sie die Bedienungsanleitung auf, um später nachschlagen zu
können.
◗Der Kessel dient ausschließlich dem Kochen von Wasser. Füllen Sie keine
anderen Substanzen in das Gerät, um Gefahren zu vermeiden.
◗Prüfen Sie vor dem Anschließen des Geräts, ob die auf dem Wasserkocher
angegebene Spannung der Netzspannung in Ihrem Haus entspricht.
◗Füllen Sie den Wasserkocher höchstens bis zur Maximalmarkierung. Wird mehr
Wasser eingefüllt, besteht die Gefahr, dass kochendes Wasser aus dem Ausgießer
läuft.
◗Achten Sie beim Befüllen darauf, dass der Mindeststand erreicht wird, damit der
Wasserkocher nicht "trocken" arbeitet.
◗Hinweis: Am Boden des Geräts kann sich etwas Kondenswasser niederschlagen.
Das ist völlig normal und kein Zeichen für einen Defekt.
◗In Abhängigkeit von der Wasserhärte in Ihrer Region können sich bei der
Benutzung des Wasserkochers kleine Ablagerungen auf dem Heizelement bilden.
Diese Ablagerungen bestehen aus Kalk, der sich im Lauf der Zeit auf dem
Heizelement und im Inneren des Wasserkochers absetzt. Je härter das
verwendete Wasser, desto scheller bilden sich diese Ablagerungen. Die
DEUTSCH
Ablagerungen können unterschiedliche Farben aufweisen. Der Kalk ist nicht
gesundheitsschädlich, kann aber die Leistung des Wasserkochers beeinträchtigen.
Beachten Sie die Anweisungen in dieser Broschüre zum Entkalken des Geräts.
◗Achten Sie darauf, dass sich Wasserkocher und Netzkabel außerhalb der
Reichweite von Kindern befinden, damit diese nicht mit dem Gerät spielen
können. Lassen Sie Kinder nicht am Netzkabel ziehen. Das Netzkabel darf nicht
über die Kante der Arbeitsplatte hängen.
Überschüssiges Kabel kann um die Basis des Wasserkochers gewickelt werden.
◗Mit kochendem Wasser können Sie sich verbrühen. Seien Sie besonders
vorsichtig, wenn der Wasserkocher heißes Wasser enthält.
◗Seien Sie vorsichtig, wenn Sie den Deckel unmittelbar nach dem Kochen
abnehmen. Heißer Dampf kann austreten.
◗Benutzen Sie den Wasserkocher nur mit dem dazu gehörigen Basisgerät.
◗Stellen Sie den Wasserkocher nicht auf heiße Flächen.
◗Tauchen Sie den Kessel und die Basis nicht in Wasser oder andere Flüssigkeiten.
◗Benutzen Sie den Wasserkocher nicht, wenn der Netzstecker, das Netzkabel
oder das Gerät selbst beschädigt ist. Schäden dürfen ausschließlich von Philips
oder einem von Philips autorisierten Service-Center vorgenommen werden, da
spezielle Werkzeuge und Ersatzteile benötigt werden.
◗Berühren Sie das Glas nicht. Der Kessel wird beim Kochen heiß. Berühren Sie
ausschließlich den Ein/Aus-Schalter und heben Sie den Kessel am Handgriff an.
Komponenten (Abbildung 1)IIIIIIIIIIIIIIIIIIIIIIIIIIIIIIIIIIIIIIIIIIIIIIIIIIIIIIIIIIIIIIIIIIIIIIIIIIIIIIIIIIIIIIIIIIIIIIIIIIIIIIIIIIIIIIIIIIIIIIIIIIIIIIII
AEin/Aus-Schalter I
BKontrolllampe
CSicherheitsdeckel
DAusgießer
EWasserstandsanzeige
FBasis
GKalkfilter
TrockengehschutzIIIIIIIIIIIIIIIIIIIIIIIIIIIIIIIIIIIIIIIIIIIIIIIIIIIIIIIIIIIIIIIIIIIIIIIIIIIIIIIIIIIIIIIIIIIIIIIIIIIIIIIIIIIIIIIIIIIIIIIIIIIIIIIIIIIIIIIIIIIIIIIIIIIIIIIIIIIIIIIIIIIIIIIIIIIIII
Das Heizelement des Wasserkochers wird durch eine automatische Abschaltung
geschützt. Diese wird aktiviert, wenn Sie das Gerät ohne Wasser bzw. mit zu
geringem Wasserstand einschalten. In diesem Fall blinkt die Kontrolllampe und der
Wasserkocher schaltet sich nach ca. 5 Minuten ab. Heben Sie den Kessel ab, um die
automatische Abschaltung zu deaktivieren.Anschließend kann der Wasserkocher
wieder wie gewohnt benutzt werden.
Der Gebrauch des GerätsIIIIIIIIIIIIIIIIIIIIIIIIIIIIIIIIIIIIIIIIIIIIIIIIIIIIIIIIIIIIIIIIIIIIIIIIIIIIIIIIIIIIIIIIIIIIIIIIIIIIIIIIIIIIIIIIIIIIIIIIIIIIIIIIIIIIIIIIIIII
1Stellen Sie die Basis des Wasserkochers auf eine ebene Fläche und stecken Sie
den Netzstecker in die Steckdose.
2Sie können den Kessel durch den Ausgießer befüllen oder den Deckel abnehmen.
Drücken Sie zum Abnehmen des Deckels gleichzeitig auf die beiden Griffmulden und
heben Sie ihn nach oben ab.
3Stellen Sie den Kessel auf die Basis.
Haben Sie den Deckel abgenommen, setzen Sie ihn jetzt wieder auf und drücken
Sie, bis er einrastet.
Sie hören ein Klicken.
4Drücken Sie den Ein/Aus-Schalter.
- Das Wasser im Kessel wird erhitzt.
- Die Kontrolllampe leuchtet auf (Abbildung 2).
- Der Wasserkocher schaltet sich automatisch aus, wenn das Wasser kocht.
5Sie können das Kochen jederzeit abbrechen, indem Sie den Ein/Aus-Schalter
drücken.
Vorsicht: Die Glaskanne wird heiß!
ReinigungIIIIIIIIIIIIIIIIIIIIIIIIIIIIIIIIIIIIIIIIIIIIIIIIIIIIIIIIIIIIIIIIIIIIIIIIIIIIIIIIIIIIIIIIIIIIIIIIIIIIIIIIIIIIIIIIIIIIIIIIIIIIIIIIIIIIIIIIIIIIIIIIIIIIIIIIIIIIIIIIIIIIIIIIIIIIIIIIIIIIIIIIIIIIIIIIIIIIIIIIIIIIIIIIIII
1Ziehen Sie den Netzstecker aus der Steckdose.
2Reinigen Sie die Außenwände des Geräts mit einem feuchten Tuch.
3Reinigen Sie den Deckel und den Kalkfilter in warmem Wasser mit etwas
Spülmittel oder im Geschirrspüler.
4Beachten Sie zum Reinigen des Kesselinneren die Anweisungen im Abschnitt
"Entkalken".
Verwenden Sie zum Reinigen des Geräts keine Scheuermittel, Scheuerschwämme o.ä.
Tauchen Sie den Kessel und die Basis nicht in Wasser oder andere Flüssigkeiten.
EntkalkenIIIIIIIIIIIIIIIIIIIIIIIIIIIIIIIIIIIIIIIIIIIIIIIIIIIIIIIIIIIIIIIIIIIIIIIIIIIIIIIIIIIIIIIIIIIIIIIIIIIIIIIIIIIIIIIIIIIIIIIIIIIIIIIIIIIIIIIIIIIIIIIIIIIIIIIIIIIIIIIIIIIIIIIIIIIIIIIIIIIIIIIIIIIIIIIIIIIIIIIIIIIIIIIIIII
Die Lebensdauer des Wasserkochers erhöht sich durch regelmäßiges Entkalken.
Bei normalem Gebrauch (bis zu fünfmal pro Tag):
- Einmal pro Monat, wenn Sie hartes Wasser (Härtegrad über 18° DH) verwenden.
- Alle 3 Monate, wenn Sie weiches Wasser (Härtegrad bis 18° DH) verwenden.
Das für Sie zuständige Wasserwerk gibt Ihnen Auskunft über den Härtegrad des
Wassers in Ihrer Region.
Sie können den Wasserkocher häufiger entkalken, damit er jederzeit "glänzt".
1Befüllen Sie den Kessel auf drei Viertel des Höchststands und drücken Sie den
Ein/Aus-Schalter.
2Wenn sich der Wasserkocher ausgeschaltet hat, geben Sie weißen Essig (8 %
Säuregehalt) oder einen geeigneten Entkalker bis zum Höchststand in den
Kessel.
3Lassen Sie diese Entkalkungsflüssigkeit über Nacht im Gerät stehen.
4Leeren Sie den Wasserkocher und spülen Sie ihn gründlich aus.
5Wiederholen Sie die Schritte, wenn sich noch Kalkrückstände im Kessel befinden.
Den Kalkfilter reinigenIIIIIIIIIIIIIIIIIIIIIIIIIIIIIIIIIIIIIIIIIIIIIIIIIIIIIIIIIIIIIIIIIIIIIIIIIIIIIIIIIIIIIIIIIIIIIIIIIIIIIIIIIIIIIIIIIIIIIIIIIIIIIIIIIIIIIIIIIIIIIIIIIIIIIIIIII
Kalk ist nicht gesundheitsschädlich und kann in unterschiedlichen Farben auftreten.
Getränke können aber leicht pulvrig schmecken. Der Kalkfilter verhindert, dass
Kalkpartikel in Ihre Getränke gelangen. Reinigen Sie den Filter regelmäßig.
1Nehmen Sie den Deckel ab.
Sie können den Deckel abnehmen, indem Sie gleichzeitig auf beide Griffmulden
drücken und den Deckel nach oben abheben.
2Nehmen Sie den Kalkfilter aus dem Gerät.
Ziehen Sie den Filter vorsichtig aus der Halterung (Abbildung 3).
3Reinigen Sie den Filter unter fließendem Wasser.Verwenden Sie gegebenenfalls
eine weiche Bürste.
Der Kalkfilter kann alternativ im Geschirrspüler gereinigt werden.
Sie können den Filter auch reinigen, indem Sie ihn wie den Wasserkocher entkalken.
4Legen Sie den Filter in eine Schale mit warmem Wasser und etwas weißem
Essig oder einem geeigneten Entkalker.
5Nehmen Sie den Filter aus der Schale und spülen Sie ihn sorgfältig ab.
ReparaturenIIIIIIIIIIIIIIIIIIIIIIIIIIIIIIIIIIIIIIIIIIIIIIIIIIIIIIIIIIIIIIIIIIIIIIIIIIIIIIIIIIIIIIIIIIIIIIIIIIIIIIIIIIIIIIIIIIIIIIIIIIIIIIIIIIIIIIIIIIIIIIIIIIIIIIIIIIIIIIIIIIIIIIIIIIIIIIIIIIIIIIIIIIIIIIIIIIIIIII
Netzkabel
Ist das Netzkabel des Wasserkochers beschädigt, muss es von einem von Philips
autorisierten Service-Center ausgetauscht werden.
Kalkfilter
Ersatzfilter für diesen Wasserkocher der Serie Glass by Philips können in Ihrem
Philips Service-Center erworben werden (Typennummer HD4979).
Informationen und KundendienstIIIIIIIIIIIIIIIIIIIIIIIIIIIIIIIIIIIIIIIIIIIIIIIIIIIIIIIIIIIIIIIIIIIIIIIIIIIIIIIIIIIIIIIIIIIIIIIIIIIIIIIIIIII
Benötigen Sie weitere Informationen oder treten Probleme auf, besuchen Sie die
Philips Website www.philips.com oder setzen Sie sich mit einem Philips Service-
Center in Ihrem Land in Verbindung (dieTelefonnummer finden Sie im beiliegenden
Merkblatt zur weltweiten Garantie). Gibt es in Ihrem Land kein Philips Service-
Center, wenden Sie sich an Ihren Philips-Händler oder an die Kundendienstabteilung
(Service Department) von Philips Domestic Appliances and Personal Care BV.
FRANCAIS
IntroductionIIIIIIIIIIIIIIIIIIIIIIIIIIIIIIIIIIIIIIIIIIIIIIIIIIIIIIIIIIIIIIIIIIIIIIIIIIIIIIIIIIIIIIIIIIIIIIIIIIIIIIIIIIIIIIIIIIIIIIIIIIIIIIIIIIIIIIIIIIIIIIIIIIIIIIIIIIIIIIIIIIIIIIIIIIIIIIIIIIIIIIIIIIIIIIIIIIIIIII
Cher consommateur, félicitations pour l'achat de cette toute nouvelle bouilloire Glass
de Philips.
Le corps entier de votre bouilloire Glass de Philips est en verre. Cela lui confère un
aspect superbe et transparent. Cette bouilloire est également très économe et vous
garantit que l'eau de votre boisson ne contiendra pas de particules de calcaire.
ImportantIIIIIIIIIIIIIIIIIIIIIIIIIIIIIIIIIIIIIIIIIIIIIIIIIIIIIIIIIIIIIIIIIIIIIIIIIIIIIIIIIIIIIIIIIIIIIIIIIIIIIIIIIIIIIIIIIIIIIIIIIIIIIIIIIIIIIIIIIIIIIIIIIIIIIIIIIIIIIIIIIIIIIIIIIIIIIIIIIIIIIIIIIIIIIIIIIIIIIIIIIIIIIIII
Lisez soigneusement ce mode d'emploi avant d'utiliser la bouilloire et conservez-le
pour une consultation ultérieure.
◗Cette bouilloire est destinée à faire bouillir de l'eau uniquement. Ne faites pas
bouillir d'autres ingrédients liquides pour éviter tout accident.
◗Avant de brancher votre appareil, vérifiez que la tension indiquée sur la
bouilloire correspond bien à la tension de votre secteur.
◗Remplissez la bouilloire jusqu'à l'indication maximale. Si vous mettez trop d'eau
dans la bouilloire, l'eau bouillante peut jaillir par le bec verseur.
◗Ne remplissez jamais la bouilloire au-dessous du niveau minimum pour éviter
une trop forte évaporation de l'eau.
◗De la condensation peut se produire sur le support de la bouilloire. Ceci est
tout à fait normal et non un défaut de fabrication.
◗Selon la dureté de l'eau de votre région, de petites taches peuvent apparaître
sur l'élément chauffant de votre bouilloire. Ce phénomène est le résultat de
l'accumulation du calcaire sur l'élément chauffant et à l'intérieur de la bouilloire.
Plus l'eau est dure, plus le dépôt de calcaire est important. Le calcaire peut avoir
des couleurs différentes. Bien que le calcaire ne soit pas nocif pour votre santé, il
peut affecter la performance de votre bouilloire lorsque l'accumulation est trop
importante.Veuillez suivre les instructions de détartrage de la bouilloire qui se
trouvent dans ce mode d'emploi.
◗Tenez la bouilloire et le cordon hors de portée des enfants et ne les laissez pas
jouer avec l'appareil. Faites attention qu'ils ne tirent pas sur le cordon. Ne laissez
pas le cordon d'alimentation pendre du plan de travail.
Enroulez le cordon autour du support pour en ajuster la longeur.
◗L'eau bouillante peut causer des brûlures graves. Faites donc très attention
quand la bouilloire contient de l'eau bouillante.
◗Faites attention lorsque vous ouvrez le couvercle immédiatement après
l'ébullition de l'eau, car de la vapeur très chaude peut s'echapper de la bouilloire.
◗N'utilisez la bouilloire qu'avec le support d'origine.
◗Ne placez pas la bouilloire sur une surface chaude.
◗Ne plongez pas la bouilloire ou son support dans l'eau ou dans tout autre liquide.
◗N'utilisez pas la bouilloire si la fiche, le cordon ou l'appareil lui-même sont
endommagés. Pour toute réparation, veuillez contacter un Centre Service Agréé
Philips car des outils et/ou composants spéciaux sont nécessaires.
◗Evitez de toucher le corps en verre de la bouilloire car il devient très chaud.
Touchez uniquement le bouton marche/arrêt et tenez la bouilloire par la poignée.
Description générale (fig. 1)IIIIIIIIIIIIIIIIIIIIIIIIIIIIIIIIIIIIIIIIIIIIIIIIIIIIIIIIIIIIIIIIIIIIIIIIIIIIIIIIIIIIIIIIIIIIIIIIIIIIIIIIIIIIIIIIIIIIIIIIIIIIIIIIIII
ABouton marche/arrêt I
BTémoin lumineux
CCouvecle de sûreté
DBec verseur
EIndicateur niveau d'eau
FSupport
GFiltre anti-particules de calcaire
Protection en cas d'évaporation de l'eauIIIIIIIIIIIIIIIIIIIIIIIIIIIIIIIIIIIIIIIIIIIIIIIIIIIIIIIIIIIIIIIIIIIIIIIIIIII
L'élément chauffant de votre bouilloire est protégé par un dispositif de sécurité. Ce
dispositif arrête automatiquement votre bouilloire si elle est mise en marche
accidentellement lorsqu'elle n'a pas assez d'eau ou pas du tout. Le témoin lumineux
dans ce cas clignote arrête automatiquement l'appareil après 5 minutes environ.
Dans ce cas, enlevez la bouilloire du support pour remettre à zéro le dispositif de
sécurité. La bouilloire est de nouveau prête à être utilisée.
Utilisation de la bouilloireIIIIIIIIIIIIIIIIIIIIIIIIIIIIIIIIIIIIIIIIIIIIIIIIIIIIIIIIIIIIIIIIIIIIIIIIIIIIIIIIIIIIIIIIIIIIIIIIIIIIIIIIIIIIIIIIIIIIIIIIIIIIIIIIIIIIIIIIIII
1Placez le support de la bouilloire sur une surface stable, puis branchez-le.
2Remplissez la bouilloire avec de l'eau à travers le bec verseur ou ouvrez le
couvercle pour la remplir.
Si vous voulez retirer le couvercle, appuyez simultanément sur les deux touches de
libération et retirez le couvercle.
3Placez la bouilloire sur son support.
Si vous avez retiré le couvercle, remettez-le et pressez-le pour le fermer.
Vous entendrez un clic.
4Appuyez sur le bouton marche/arrêt.
- La bouilloire commence à chauffer.
- Le témoin lumineux s'allume (fig. 2).
- La bouilloire s'arrête automatiquement quand l'eau est à l'ébullition.
5Vous pouvez à tout moment arrêter manuellement l'appareil à l'aide du
bouton marche/arrêt.
Faites attention: le corps de la bouilloire en verre devient très chaud!
NettoyageIIIIIIIIIIIIIIIIIIIIIIIIIIIIIIIIIIIIIIIIIIIIIIIIIIIIIIIIIIIIIIIIIIIIIIIIIIIIIIIIIIIIIIIIIIIIIIIIIIIIIIIIIIIIIIIIIIIIIIIIIIIIIIIIIIIIIIIIIIIIIIIIIIIIIIIIIIIIIIIIIIIIIIIIIIIIIIIIIIIIIIIIIIIIIIIIIIIIIIIIIIIIIIII
1Débranchez l'appareil.
2Nettoyez l'extérieur de la bouilloire à l'aide d'un chiffon humide.
3Nettoyez le couvercle et le filtre anticalcaire à l'eau chaude savonneuse ou au
lave-vaisselle.
4Pour nettoyer l'intérieur de la bouilloire, reportez-vous au chapitre
'Détartrage'.
N'utilisez pas des produits abrasifs, tampons à récurer etc. pour nettoyer l'appareil.
Ne plongez jamais la bouilloire ou le support dans l'eau ou dans tout autre liquide.
DétartrageIIIIIIIIIIIIIIIIIIIIIIIIIIIIIIIIIIIIIIIIIIIIIIIIIIIIIIIIIIIIIIIIIIIIIIIIIIIIIIIIIIIIIIIIIIIIIIIIIIIIIIIIIIIIIIIIIIIIIIIIIIIIIIIIIIIIIIIIIIIIIIIIIIIIIIIIIIIIIIIIIIIIIIIIIIIIIIIIIIIIIIIIIIIIIIIIIIIIIIIIIIIII
Un détartrage régulier prolongera la durée de vie de votre bouilloire.
Pour une utilisation normale (jusqu'à 5 fois par jour):
- Chaque mois si votre eau est calcaire (supérieure à 18° TH)
- Tous les 3 mois si votre eau n'est pas trop calcaire (inférieure à 18°TH)
Renseignez-vous auprès de votre distributeur local.
Vous pouvez détartrer la bouilloire plus souvent si vous le voulez.
1Remplissez la bouilloire aux trois quarts de la capacité maximale et appuyez
sur le bouton marche/arrêt.
2Quand l'appareil s'est arrêté, ajoutez du vinaigre blanc (8% acide acétique) ou
un détartrant de type alimentaire jusqu'à l'indication maximum.
3Laissez la solution agir dans la bouilloire jusqu'au lendemain.
4Videz la bouilloire et rincez l'intérieur à fond.
5Répétez cette opération s'il y a encore des particules de calcaire dans la
bouilloire.
Nettoyage du filtreIIIIIIIIIIIIIIIIIIIIIIIIIIIIIIIIIIIIIIIIIIIIIIIIIIIIIIIIIIIIIIIIIIIIIIIIIIIIIIIIIIIIIIIIIIIIIIIIIIIIIIIIIIIIIIIIIIIIIIIIIIIIIIIIIIIIIIIIIIIIIIIIIIIIIIIIIIIIIIIIIIIIIIIIII
Le calcaire n'est pas nocif à votre santé et peut avoir des couleurs différentes, mais
votre boisson peut acquérir un goût poudreux. Le filtre anticalcaire évite aux
particules de calcaire d'arriver dans votre boisson. Nettoyez le filtre régulièrement.
1Retirez le couvercle.
Vous pouvez retirer le couvercle en appuyant simultanément sur les deux touches
de libération et en tirant sur le couvercle.
2Otez le filtre.
Vous pouvez enlever le filtre en le retirant doucement de son support (fig. 3).
3Rincez le filtre sous l'eau du robinet pour le nettoyer. Si nécessaire, utilisez
une brosse à poils doux.
Le filtre anticalcaire peut être nettoyé au lave-vaisselle.
Vous pouvez le nettoyer selon la procédure de détartrage de la bouilloire.
4Faites tremper le filtre dans une tasse d'eau chaude avec un peu de vinaigre
ou un produit détartrant approprié.
5Otez le filtre et rincez-le bien.
RemplacementIIIIIIIIIIIIIIIIIIIIIIIIIIIIIIIIIIIIIIIIIIIIIIIIIIIIIIIIIIIIIIIIIIIIIIIIIIIIIIIIIIIIIIIIIIIIIIIIIIIIIIIIIIIIIIIIIIIIIIIIIIIIIIIIIIIIIIIIIIIIIIIIIIIIIIIIIIIIIIIIIIIIIIIIIIIIIIIIIIIIIIIIIII
Cordon d'alimentation
Pour plus de sécurité: Si le cordon d'alimentation de cette bouilloire est
endommagé, il doit être remplacé par un Centre Service Agréé Philips.
Filtre anticalcaire
Des filtres de rechange pour votre bouilloire Glass de Philips sont disponibles chez
votre revendeur Philips.Type HD4979.
Informations et serviceIIIIIIIIIIIIIIIIIIIIIIIIIIIIIIIIIIIIIIIIIIIIIIIIIIIIIIIIIIIIIIIIIIIIIIIIIIIIIIIIIIIIIIIIIIIIIIIIIIIIIIIIIIIIIIIIIIIIIIIIIIIIIIIIIIIIIIIIIIIIIIIIIIIIIII
Pour plus d'informations, visitez notre Philips Web site : www.philips.com ou
veuillez contacter le Service Consommateurs Philips de votre pays (vous trouverez
le numéro de téléphone dans le dépliant sur la garantie internationale). S'il n'y a
aucun Service Consommateurs Philips dans votre pays, contactez votre distributeur
ou le Service Department of Philips Domestic Appliances and Personal Care BV.
NEDERLANDS
IntroductieIIIIIIIIIIIIIIIIIIIIIIIIIIIIIIIIIIIIIIIIIIIIIIIIIIIIIIIIIIIIIIIIIIIIIIIIIIIIIIIIIIIIIIIIIIIIIIIIIIIIIIIIIIIIIIIIIIIIIIIIIIIIIIIIIIIIIIIIIIIIIIIIIIIIIIIIIIIIIIIIIIIIIIIIIIIIIIIIIIIIIIIIIIIIIIIIIIIIIIIIIIIII
Beste klant, gefeliciteerd met de aanschaf van deze nieuwe Glass by Philips waterkoker.
De gehele behuizing van uw Glass by Philips waterkoker is gemaakt van glas. Dit
geeft uw waterkoker een mooi transparant uiterlijk en maakt het koken van water
een fascinerende gebeurtenis. De waterkoker is bovendien energiezuinig en houdt
uw drankjes vrij van kalk.
BelangrijkIIIIIIIIIIIIIIIIIIIIIIIIIIIIIIIIIIIIIIIIIIIIIIIIIIIIIIIIIIIIIIIIIIIIIIIIIIIIIIIIIIIIIIIIIIIIIIIIIIIIIIIIIIIIIIIIIIIIIIIIIIIIIIIIIIIIIIIIIIIIIIIIIIIIIIIIIIIIIIIIIIIIIIIIIIIIIIIIIIIIIIIIIIIIIIIIIIIIIIIIIIIIIIIIII
Lees deze gebruiksaanwijzing zorgvuldig door voordat u het apparaat voor de eerste
keer gebruikt en bewaar deze om hem in te toekomst te kunnen raadplegen.
◗Dit apparaat is alleen bedoeld voor het koken van water. Doe geen andere
ingrediënten in het apparaat, aangezien dit tot een gevaarlijke situatie kan leiden.
◗Controleer of het voltage aangegeven op de waterkoker overeenkomt met de
plaatselijke netspanning voordat u het apparaat aansluit.
◗Vul de waterkoker nooit verder dan het aangegeven maximumniveau. Als er te
veel water in de waterkoker zit, bestaat het risico dat er kokend water uit de
schenktuit naar buiten spat.
◗Vul de waterkoker nooit beneden het minimumniveau om te voorkomen dat
het apparaat droogkookt.
◗Het is mogelijk dat er enige condens ontstaat op de voet van de waterkoker. Dit
is heel normaal en betekent niet dat het apparaat een defect vertoont.
◗Afhankelijk van de hardheid van het water in uw woongebied, kunnen er na
gebruik kleine vlekjes ontstaan op het verwarmingselement van de waterkoker.
Dit verschijnsel is het gevolg van kalkvorming die zich in de loop van de tijd
voordoet op het verwarmingselement en aan de binnenzijde van de waterkoker.
Hoe harder het water, hoe sneller er kalkaanslag zal ontstaan. Kalkaanslag kan
verschillende kleuren hebben. Alhoewel kalk onschadelijk is, kan het een
negatieve invloed hebben op het functioneren van uw waterkoker.Volg daarom
de instructies voor het ontkalken van de waterkoker in deze gebruiksaanwijzing.
◗Houd de waterkoker en het snoer uit de buurt van kinderen en laat kinderen niet
met het apparaat spelen.Voorkom dat kinderen aan het snoer trekken. Laat het
snoer niet over de rand hangen van het oppervlak waar de waterkoker op staat.
Wind overtollig snoer om de voet van het apparaat.
◗Kokend water kan ernstige brandwonden veroorzaken.Wees voorzichtig met de
waterkoker wanneer deze heet water bevat.
◗Wees voorzichtig als u het deksel wilt verwijderen vlak nadat het water gekookt
heeft, omdat er hete stoom uit het apparaat zal komen.
◗Gebruik de waterkoker alleen met de bijbehorende voet.
◗Plaats de waterkoker niet op een hete ondergrond.
◗Dompel de waterkoker niet in water of een andere vloeistof.
◗Gebruik de waterkoker niet indien de stekker, het snoer of het apparaat zelf
beschadigd is. Als de waterkoker beschadigd of defect is, dient deze gerepareerd
te worden door een door Philips geautoriseerd servicecentrum, omdat hiervoor
speciale onderdelen en/of gereedschappen vereist zijn.
◗Raak het glas niet aan wanneer de waterkoker ingeschakeld is, aangezien het glas
heet wordt. Raak alleen de aan/uitknop aan en til het apparaat op aan het handvat.
Algemene beschrijvingIIIIIIIIIIIIIIIIIIIIIIIIIIIIIIIIIIIIIIIIIIIIIIIIIIIIIIIIIIIIIIIIIIIIIIIIIIIIIIIIIIIIIIIIIIIIIIIIIIIIIIIIIIIIIIIIIIIIIIIIIIIIIIIIIIIIIIIIIIIIIIIIIIIIIIIIII
AAan/uitknop I
BIndicatielampje
CVeiligheidsdeksel
DSchenktuit
EWaterniveau-indicator
FVoet
GKalkfilter
DroogkookbeveiligingIIIIIIIIIIIIIIIIIIIIIIIIIIIIIIIIIIIIIIIIIIIIIIIIIIIIIIIIIIIIIIIIIIIIIIIIIIIIIIIIIIIIIIIIIIIIIIIIIIIIIIIIIIIIIIIIIIIIIIIIIIIIIIIIIIIIIIIIIIIIIIIIIIIIIIIIIIIIIII
Het verwarmingselement van deze waterkoker is beveiligd met een droogkookbeveiliging.
Deze beveiliging zal de waterkoker automatisch uitschakelen als hij per omgeluk
wordt ingeschakeld zonder dat er water in zit of als er onvoldoende water in zit. In
dat geval gaat het indicatielampje knipperen en wordt de waterkoker na 5 minuten
automatisch uitgeschakeld. Als dit gebeurd is, til de waterkoker dan van zijn voet om
de droogkookbeveiliging te resetten. Hierna kunt u de waterkoker weer gebruiken.
GebruikIIIIIIIIIIIIIIIIIIIIIIIIIIIIIIIIIIIIIIIIIIIIIIIIIIIIIIIIIIIIIIIIIIIIIIIIIIIIIIIIIIIIIIIIIIIIIIIIIIIIIIIIIIIIIIIIIIIIIIIIIIIIIIIIIIIIIIIIIIIIIIIIIIIIIIIIIIIIIIIIIIIIIIIIIIIIIIIIIIIIIIIIIIIIIIIIIIIIIIIIIIIIIIIIIIIIIIIIII
1Plaats de voet van de waterkoker op een vlakke ondergrond en steek de
stekker in het stopcontact.
2Vul de waterkoker via de schenktuit met water of verwijder het deksel om
hem te vullen.
Het deksel kunt u verwijderen door de twee knoppen op het deksel tegelijkertijd in
te drukken en het deksel dan omhoog te trekken.
3Plaats de waterkoker op de voet.
Als u het deksel verwijderd heeft, plaats het dan terug op de waterkoker en druk
het vast.
U hoort een klik.
4Druk op de aan/uitknop.
- De waterkoker begint op te warmen.
- Het indicatielampje gaat aan (fig. 2).
- De waterkoker schakelt automatisch uit zodra het water het kookpunt heeft bereikt.
5U kunt het kookproces onderbreken door op de aan/uitknop te drukken.
Pas op: de glazen behuizing van de waterkoker wordt heet!
SchoonmakenIIIIIIIIIIIIIIIIIIIIIIIIIIIIIIIIIIIIIIIIIIIIIIIIIIIIIIIIIIIIIIIIIIIIIIIIIIIIIIIIIIIIIIIIIIIIIIIIIIIIIIIIIIIIIIIIIIIIIIIIIIIIIIIIIIIIIIIIIIIIIIIIIIIIIIIIIIIIIIIIIIIIIIIIIIIIIIIIIIIIIIIIIIIIIIII
1Haal de stekker uit het stopcontact.
2Maak de buitenkant van het apparaat schoon met een vochtige doek.
3Reinig het deksel en het kalkfilter in warm water met een beetje afwasmiddel
of in de afwasmachine.
4Volg de instructies in het hoofdstukje 'Ontkalken' om de binnenkant van de
waterkoker te reinigen.
Gebruik geen schuurmiddelen, schuursponzen en dergelijke om het
apparaat schoon te maken.
Dompel de waterkoker en de voet niet in water of een andere vloeistof.
OntkalkenIIIIIIIIIIIIIIIIIIIIIIIIIIIIIIIIIIIIIIIIIIIIIIIIIIIIIIIIIIIIIIIIIIIIIIIIIIIIIIIIIIIIIIIIIIIIIIIIIIIIIIIIIIIIIIIIIIIIIIIIIIIIIIIIIIIIIIIIIIIIIIIIIIIIIIIIIIIIIIIIIIIIIIIIIIIIIIIIIIIIIIIIIIIIIIIIIIIIIIIIIIIIIIII
Regelmatig ontkalken verlengt de levensduur van het apparaat.
Bij normaal gebruik (tot 5 keer per dag), wordt u aangeraden de volgende
ontkalkingsfrequentie aan te houden:
- Eén keer per maand als u hard water gebruikt (meer dan 18° DH);
- Eén keer per 3 maanden als u zacht water gebruikt (tot 18° DH).
Vraag uw waterleidingbedrijf naar informatie over de waterhardheid in uw woongebied.
U kunt de waterkoker ook vaker schoonmaken om deze er op zijn best uit te laten zien.
1Vul de waterkoker tot driekwart van het aangegeven maximumniveau met
water en breng het water aan de kook.
2Voeg, nadat de waterkoker is afgeslagen, schoonmaakazijn (8% azijnzuur) of
een geschikte ontkalker toe tot het aangegeven maximumniveau.
3Laat het water met de azijn een nacht in de waterkoker staan.
4Schenk het apparaat leeg en spoel de binnenzijde goed uit.
5Herhaal deze procedure als er nog steeds kalk in de waterkoker zit.
Het kalkfilter schoonmakenIIIIIIIIIIIIIIIIIIIIIIIIIIIIIIIIIIIIIIIIIIIIIIIIIIIIIIIIIIIIIIIIIIIIIIIIIIIIIIIIIIIIIIIIIIIIIIIIIIIIIIIIIIIIIIIIIIIIIIIIIIIIIIIIIII
Kalk kan verschillende kleuren hebben. Dit is niet schadelijk voor uw gezondheid
maar uw drank kan er een poederig smaakje door krijgen. Het kalkfilter voorkomt
dat er kalkdeeltjes in uw drank terecht komen. Maak het filter regelmatig schoon.
1Verwijder het deksel.
Het deksel kunt u verwijderen door de twee knoppen op het deksel tegelijkertijd in
te drukken en het deksel dan omhoog te trekken.
2Verwijder het filter.
U kunt het filter verwijderen door het uit de houder te trekken (fig. 3).
3Reinig het filter door het onder de kraan af te spoelen. Indien nodig kunt u
een zacht nylon borsteltje gebruiken.
Het kalkfilter mag ook in de afwasmachine gereinigd worden.
U kunt het kalkfilter ook op dezelfde manier als de waterkoker schoonmaken.
4Laat het filter weken in een kopje warm water met een beetje
schoonmaakazijn of een geschikte ontkalker.
5Neem het filter uit het kopje en spoel het grondig af.
VervangingIIIIIIIIIIIIIIIIIIIIIIIIIIIIIIIIIIIIIIIIIIIIIIIIIIIIIIIIIIIIIIIIIIIIIIIIIIIIIIIIIIIIIIIIIIIIIIIIIIIIIIIIIIIIIIIIIIIIIIIIIIIIIIIIIIIIIIIIIIIIIIIIIIIIIIIIIIIIIIIIIIIIIIIIIIIIIIIIIIIIIIIIIIIIIIIIIIIIIIIIIIIII
Snoer
Als het snoer van dit apparaat beschadigd is, mag het uitsluitend worden vervangen
door een door Philips geautoriseerd servicecentrum.
Kalkfilter
Nieuwe filters voor uw Glass by Philips waterkoker zijn verkrijgbaar bij het
dichtstbijzijnde Philips servicecentrum onder typenummer HD4979.
Informatie & serviceIIIIIIIIIIIIIIIIIIIIIIIIIIIIIIIIIIIIIIIIIIIIIIIIIIIIIIIIIIIIIIIIIIIIIIIIIIIIIIIIIIIIIIIIIIIIIIIIIIIIIIIIIIIIIIIIIIIIIIIIIIIIIIIIIIIIIIIIIIIIIIIIIIIIIIIIIIIIIIIIIII
Als u informatie nodig heeft of als u een probleem heeft, bezoek dan de Philips
Website www.philips.com, of neem contact op met het Philips Customer Care
Centre in uw land (u vindt het telefoonnummer in het 'worldwide guarantee'
vouwblad).Als er geen Customer Care Centre in uw land is, ga dan naar uw Philips
dealer of neem contact op met de afdeling Service van Philips Domestic Appliances
and Personal Care BV.
ESPAÑOL
IntroducciónIIIIIIIIIIIIIIIIIIIIIIIIIIIIIIIIIIIIIIIIIIIIIIIIIIIIIIIIIIIIIIIIIIIIIIIIIIIIIIIIIIIIIIIIIIIIIIIIIIIIIIIIIIIIIIIIIIIIIIIIIIIIIIIIIIIIIIIIIIIIIIIIIIIIIIIIIIIIIIIIIIIIIIIIIIIIIIIIIIIIIIIIIIIIIIIIIIIIII
Estimado cliente: Felicidades por adquirir la nueva hervidora Glass de Philips.
El cuerpo de la nueva hervidora Glass de Philips está hecho de cristal. Esto da a su
hervidora un atractivo aspecto transparente y hace que hervir agua se convierta en
una experiencia fascinante. Esta hervidora es además de bajo consumo y mantiene
las bebidas libres de cal.
ImportanteIIIIIIIIIIIIIIIIIIIIIIIIIIIIIIIIIIIIIIIIIIIIIIIIIIIIIIIIIIIIIIIIIIIIIIIIIIIIIIIIIIIIIIIIIIIIIIIIIIIIIIIIIIIIIIIIIIIIIIIIIIIIIIIIIIIIIIIIIIIIIIIIIIIIIIIIIIIIIIIIIIIIIIIIIIIIIIIIIIIIIIIIIIIIIIIIIIIIIIIIIII
Antes de utilizar la hervidora, lea detenidamente estas instrucciones y consérvelas
por si necesitara consultarlas en el futuro.
◗Esta hervidora está diseñada únicamente para hervir agua. No eche ningún otro
ingrediente en el aparato ya que podría provocar situaciones peligrosas.
◗Antes de conectar el aparato, compruebe si el voltaje indicado en la hervidora
se corresponde con el de su hogar.
◗Nunca llene la hervidora por encima de la indicación de nivel máximo. Si la
hervidora de agua se llena en exceso, existe el riesgo de que el agua hirviendo
salga despedida por la boquilla.
◗Nunca llene la hervidora por debajo de la indicación de nivel mínimo para
evitar que hierva en seco.
◗Puede aparecer alguna condensación sobre la base de la hervidora de agua.
Esto es perfectamente normal y no significa que el aparato esté defectuoso.
◗Dependiendo de la dureza del agua de su zona, pueden aparecer pequeñas
manchas en el elemento calefactor de la hervidora cuando la utilice. Esto se
debe a la cal que se forma en el elemento calefactor y en el interior de la
hervidora con el paso del tiempo. Cuanto más dura sea el agua, más rápido se
formará la cal. Puede aparecer cal de diferentes colores. Aunque la cal no es
dañina para la salud, la acumulación excesiva de cal puede afectar al
funcionamiento de la hervidora. Por favor, siga las instrucciones que se adjuntan
en este folleto para descalcificar la hervidora.
◗Mantenga la hervidora y el cable lejos del alcance de los niños y no les deje
jugar con el aparato. Evite que los niños tiren del cable. No deje el cable
colgando de la encimera.
El cable que sobre puede enrollarlo en la base de la hervidora.
◗El agua hirviendo puede causar quemaduras graves.Tenga cuidado cuando haya
agua caliente en la hervidora.
◗Tenga cuidado al quitar la tapadera justo después de que el agua haya hervido,
ya que saldrá vapor caliente de la hervidora.
◗Utilice la hervidora sólo con su base original.
◗No coloque la hervidora sobre una superficie caliente.
◗No sumerja la hervidora o su base en agua u otro líquido.
◗No utilice nunca la hervidora si la clavija, el cable o el aparato están dañados. Si
la hervidora está deteriorada, sólo la podrán reparar Philips o un centro de
servicio técnico de Philips, ya que se necesitan herramientas y/o piezas
especiales.
◗Evite tocar el cristal, ya que la hervidora se calienta cuando está en
funcionamiento.Toque únicamente el interruptor de Marcha/Parada y sujete la
hervidora por el asa.
Descripción general (fig. 1)IIIIIIIIIIIIIIIIIIIIIIIIIIIIIIIIIIIIIIIIIIIIIIIIIIIIIIIIIIIIIIIIIIIIIIIIIIIIIIIIIIIIIIIIIIIIIIIIIIIIIIIIIIIIIIIIIIIIIIIIIIIIIIIIIIIIIIII
AInterruptor de Marcha/Parada (On/Off) I
BLámpara piloto
CTapa de seguridad
DBoquilla de salida
EIndicador del nivel de agua
FBase
GFiltro antical
Protección contra el calentamiento en secoIIIIIIIIIIIIIIIIIIIIIIIIIIIIIIIIIIIIIIIIIIIIIIIIIIIIIIIIIIII
El elemento calefactor de la hervidora está protegido por un dispositivo de
desconexión de seguridad. El dispositivo desconecta automáticamente la hervidora si
se conecta accidentalmente cuando no tiene agua o agua suficiente. En este caso, la
lámpara piloto parpadeará y la hervidora se apagará automáticamente al cabo de
unos 5 minutos. Si esto ocurriera, retire la hervidora de la base para volver a activar
la protección contra el calentamiento en seco. Después, podrá volver a utilizar la
hervidora de nuevo.
Cómo usar la hervidora de aguaIIIIIIIIIIIIIIIIIIIIIIIIIIIIIIIIIIIIIIIIIIIIIIIIIIIIIIIIIIIIIIIIIIIIIIIIIIIIIIIIIIIIIIIIIIIIIIIIIIIIIIIIIIIIIII
1Coloque la base de la hervidora sobre una superficie plana y enchufe el
aparato a la red.
2Puede llenar la hervidora por la boquilla o quitando la tapadera.
Si decide quitar la tapadera, presione a la vez los dos botones de liberación de la
tapadera y levántela.
3Coloque la hervidora sobre la base.
Si quita la tapadera, colóquela en la apertura y encájela.
Oirá un clic.
4Presione el interruptor de Marcha/Parada.
- La hervidora empieza a calentarse.
- Se enciende la lámpara piloto (fig 2).
- La hervidora se apaga automáticamente cuando el agua ha alcanzado su punto
de ebullición.
5Si presiona el interruptor de Marcha/Parada (On/Off), puede parar el proceso
de ebullición.
Cuidado: el cristal de la hervidora se calienta
LimpiezaIIIIIIIIIIIIIIIIIIIIIIIIIIIIIIIIIIIIIIIIIIIIIIIIIIIIIIIIIIIIIIIIIIIIIIIIIIIIIIIIIIIIIIIIIIIIIIIIIIIIIIIIIIIIIIIIIIIIIIIIIIIIIIIIIIIIIIIIIIIIIIIIIIIIIIIIIIIIIIIIIIIIIIIIIIIIIIIIIIIIIIIIIIIIIIIIIIIIIIIIIIIIIIIIIIIIII
1Desenchufe el aparato de la red
2Limpie el aparato por fuera con un paño húmedo.
3Limpie la tapadera y el filtro antical con agua tibia y un poco de detergente o
en el lavavajillas.
4Para limpiar el interior de la hervidora, siga las instrucciones del capítulo
"Cómo descalcificar".
No utilice ningún agente limpiador abrasivo, desengrasantes, etc. para
limpiar la hervidora.
No sumerja la hervidora o su base en agua u otro líquido.
Cómo descalcificarIIIIIIIIIIIIIIIIIIIIIIIIIIIIIIIIIIIIIIIIIIIIIIIIIIIIIIIIIIIIIIIIIIIIIIIIIIIIIIIIIIIIIIIIIIIIIIIIIIIIIIIIIIIIIIIIIIIIIIIIIIIIIIIIIIIIIIIIIIIIIIIIIIIIIIIIIIIIIIIIIIIIIIIIII
Si elimina la cal de forma regular, alargará la vida útil de la hervidora.
En caso de uso normal (hasta 5 veces al día):
- Una vez al mes si utiliza agua dura (es decir, con una dureza superior a
18° DH);
- Una vez cada tres meses si utiliza agua blanda (es decir, con una dureza de hasta
18° DH).
Consulte a la compañía suministradora de agua para obtener información sobre la
dureza del agua en su región.
Puede que desee descalcificar la hervidora más a menudo para que siempre esté
perfecta.
1Llene la hervidora con agua hasta tres cuartas partes de la indicación de nivel
máximo y presione el interruptor de Marcha/Parada.
2Cuando la hervidora se haya apagado automáticamente, añada vinagre blanco
(8% ácido acético) o un descalcificador adecuado hasta la indicación de nivel
máximo.
3Deje la solución en la hervidora durante toda la noche.
4Vacíe la hervidora y enjuague bien el interior.
5Repita este proceso si aún queda cal en la hervidora.
Cómo limpiar el filtroIIIIIIIIIIIIIIIIIIIIIIIIIIIIIIIIIIIIIIIIIIIIIIIIIIIIIIIIIIIIIIIIIIIIIIIIIIIIIIIIIIIIIIIIIIIIIIIIIIIIIIIIIIIIIIIIIIIIIIIIIIIIIIIIIIIIIIIIIIIIIIIIIIIIIIIIIIIII
La cal no es perjudicial para la salud y puede presentarse en diferentes colores, pero
puede proporcionar a las bebidas cierto sabor a polvo. El filtro antical evita que las
partículas de cal lleguen a la bebida. Limpie con regularidad el filtro.
1Quite la tapadera.
Puede quitar la tapadera presionando simultáneamente los dos botones de
liberación y levantando la tapadera.
2Saque el filtro.
Puede quitar el filtro tirando con suavidad del soporte (figura 3).
3Limpie el filtro enjuagándolo debajo del grifo. Si fuera necesario, puede utilizar
un cepillo de nylon suave.
El filtro antical puede lavarse también en el lavavajillas.
También puede limpiar el filtro descalcificándolo de la misma forma que la hervidora.
4Deje en remojo el filtro en una taza con agua tibia y vinagre o con un
descalcificador adecuado.
5Saque el filtro de la taza y escúrralo.
SustituciónIIIIIIIIIIIIIIIIIIIIIIIIIIIIIIIIIIIIIIIIIIIIIIIIIIIIIIIIIIIIIIIIIIIIIIIIIIIIIIIIIIIIIIIIIIIIIIIIIIIIIIIIIIIIIIIIIIIIIIIIIIIIIIIIIIIIIIIIIIIIIIIIIIIIIIIIIIIIIIIIIIIIIIIIIIIIIIIIIIIIIIIIIIIIIIIIIIIIIIIIIIIII
Cable
Si el cable de la hervidora está dañado, debe ser sustituido siempre por un centro
de servicio autorizado de Philips.
Filtro antical
Los filtros de repuesto para la hervidora Glass de Philips están disponibles en su
centro de servicio de Philips con el modelo HD4979.
Información y servicioIIIIIIIIIIIIIIIIIIIIIIIIIIIIIIIIIIIIIIIIIIIIIIIIIIIIIIIIIIIIIIIIIIIIIIIIIIIIIIIIIIIIIIIIIIIIIIIIIIIIIIIIIIIIIIIIIIIIIIIIIIIIIIIIIIIIIIIIIIIIIIIIIIIIIIIIIIII
Si necesita información o si tiene algún problema, visite la página Web de Philips en
www.philips.com o póngase en contacto con el Servicio Philips de Atención al
Cliente de su país (encontrará el número de teléfono en el folleto de la Garantía
Mundial). Si en su país no hay Servicio Philips de Atención al Cliente, diríjase a su
distribuidor local Philips o póngase en contacto con el Service Department of Philips
Domestic Appliances and Personal Care BV.
ITALIANO
IntroduzioneIIIIIIIIIIIIIIIIIIIIIIIIIIIIIIIIIIIIIIIIIIIIIIIIIIIIIIIIIIIIIIIIIIIIIIIIIIIIIIIIIIIIIIIIIIIIIIIIIIIIIIIIIIIIIIIIIIIIIIIIIIIIIIIIIIIIIIIIIIIIIIIIIIIIIIIIIIIIIIIIIIIIIIIIIIIIIIIIIIIIIIIIIIIIIIIIIIIII
Caro Cliente, ci congratuliamo con lei per aver acquistato il nuovo Bollitore Glass di
Philips.
L'intero corpo del vostro nuovo Bollitore Glass di Philips è realizzato in vetro, per
conferire all'apparecchio uno splendido look trasparente e per trasformare
l'ebollizione dell'acqua in un evento affascinante. Questo bollitore permette anche di
risparmiare energia e vi impedirà di bere bevande con il sapore del calcare.
ImportanteIIIIIIIIIIIIIIIIIIIIIIIIIIIIIIIIIIIIIIIIIIIIIIIIIIIIIIIIIIIIIIIIIIIIIIIIIIIIIIIIIIIIIIIIIIIIIIIIIIIIIIIIIIIIIIIIIIIIIIIIIIIIIIIIIIIIIIIIIIIIIIIIIIIIIIIIIIIIIIIIIIIIIIIIIIIIIIIIIIIIIIIIIIIIIIIIIIIIIIIIIII
Prima di usare l'apparecchio, vi preghiamo di leggere con attenzione le istruzioni e di
conservarle per eventuali riferimenti futuri.
◗Il bollitore è stato realizzato unicamente per far bollire l'acqua. Non mettete altri
ingredienti nell'apparecchio, per evitare di ritrovarvi in situazioni pericolose.
◗Prima di collegare l'apparecchio, controllate che la tensione indicata sul bollitore
corrisponda a quella della rete locale.
◗Non riempite mai il bollitore oltre il livello massimo indicato. Riempiendo troppo
il bollitore, l'acqua bollente potrebbe fuoriuscire dal beccuccio.
◗Non riempite mai il bollitore al di sotto del livello minimo per evitare che
l'apparecchio funzioni a vuoto.
◗Alla base del bollitore potrebbe formarsi un po' di condensa. Si tratta di un
fenomeno del tutto normale e non significa che il bollitore sia difettoso.
◗In base alla durezza dell'acqua nella vostra zona, potrebbero formarsi piccoli
puntini sulla serpentina del bollitore, durante l'uso. Questo fenomeno è il
risultato dell'accumulo di calcare sulla serpentina e, con il passare del tempo,
anche all'interno del bollitore. Più dura è l'acqua, e più rapidamente il calcare
tenderà ad accumularsi. Il calcare può presentarsi in colori diversi e pur essendo
del tutto innocuo, potrebbe danneggiare a lungo andare il vostro bollitore. Vi
preghiamo pertanto di attenervi alle istruzioni per la disincrostazione fornite nel
presente opuscolo.
◗Tenete l'apparecchio e il cavo fuori dalla portata dei bambini e fate in modo che
non ci possano giocare né possano tirare il cavo. Controllate che il cavo di
alimentazione non penzoli dal piano di lavoro.
Il cavo in eccesso può essere avvolto attorno alla base del bollitore.
◗L'acqua bollente può causare gravi ustioni. Prestate quindi la massima attenzione
quando maneggiate il bollitore!
◗Prestate la massima attenzione quando togliete il coperchio subito aver fatto
bollire l'acqua, in quanto potrebbe fuoriuscire del vapore bollente.
◗Usate sempre il bollitore solo con la base originale.
◗Non appoggiate il bollitore su superfici calde.
◗Non immergete mai l'apparecchio o la base nell'acqua o in un altro liquido.
◗Non usate il bollitore nel caso in cui la spina, il cavo o l'apparecchio siano
danneggiati. Nel caso l'apparecchio risultasse danneggiato, dovrà essere riparato
esclusivamente presso un centro autorizzato Philips in quanto potrebbero
necessari utensili e/o pezzi speciali.
◗Evitate di toccare il vetro in quando il bollitore diventa rovente quando l'acqua
bolle.Toccate solo l'interruttore on/off e sollevate il bollitore utilizzando il
manico.
Descrizione generale (fig. 1)IIIIIIIIIIIIIIIIIIIIIIIIIIIIIIIIIIIIIIIIIIIIIIIIIIIIIIIIIIIIIIIIIIIIIIIIIIIIIIIIIIIIIIIIIIIIIIIIIIIIIIIIIIIIIIIIIIIIIIIIIIIIIIIIIII
AInterruttore on/off I
BSpia
CCoperchio di sicurezza
DBeccuccio
EIndicatore livello dell'acqua
FBase
GFiltro anticalcare
Protezione per il funzionamento senz'acquaIIIIIIIIIIIIIIIIIIIIIIIIIIIIIIIIIIIIIIIIIIIIIIIIIIIIIIIIIII
La serpentina del vostro bollitore è protetta da uno speciale dispositivo di sicurezza
che provvede a spegnere automaticamente l'apparecchio nel caso venga accesso
accidentalmente o nel caso manchi l'acqua o sia in quantità insufficiente. In questo
caso la spia inizia a lampeggiare e il bollitore viene spento automaticamente dopo 5
minuti. Se questo accade, sollevate il bollitore dalla bsae per resettare la protezione
anti-funzionamento a secco. A questo punto il bollitore è nuovamente pronto per
l'uso.
Come usare il bollitoreIIIIIIIIIIIIIIIIIIIIIIIIIIIIIIIIIIIIIIIIIIIIIIIIIIIIIIIIIIIIIIIIIIIIIIIIIIIIIIIIIIIIIIIIIIIIIIIIIIIIIIIIIIIIIIIIIIIIIIIIIIIIIIIIIIIIIIIIIIIIIIIIIIIIIIII
1Appoggiate la base del bollitore su una superficie piatta e inserite la spina
nella presa di corrente.
2Potete riempire il bollitore attraverso il beccuccio o togliendo il coperchio.
Se scegliete di togliere il coperchio, premete contemporaneamente i due pulsanti di
sgancio posti sul coperchio e sollevate il coperchio verso l'alto.
3Mettete il bollitore sulla base.
Se avete tolto il coperchio, rimettetelo a posto, premendolo per chiuderlo.
Sentirete un "click".
4Premete il pulsante on/off.
- Il bollitore inizia a riscaldarsi.
- La spia si accende (fig. 2).
- L'apparecchio si spegnerà automaticamente non appena l'acqua inizierà a bollire.
5Per interrompere il processo di ebollizione, basterà premere l'interruttore
on/off.
Fate attenzione: il corpo del bollitore in vetro diventa bollente!
PuliziaIIIIIIIIIIIIIIIIIIIIIIIIIIIIIIIIIIIIIIIIIIIIIIIIIIIIIIIIIIIIIIIIIIIIIIIIIIIIIIIIIIIIIIIIIIIIIIIIIIIIIIIIIIIIIIIIIIIIIIIIIIIIIIIIIIIIIIIIIIIIIIIIIIIIIIIIIIIIIIIIIIIIIIIIIIIIIIIIIIIIIIIIIIIIIIIIIIIIIIIIIIIIIIIIIIIIIIIIIIIIIIIII
1Togliete la spina dalla presa.
2Pulite l'esterno dell'apparecchio con un panno umido.
3Lavate il coperchio e il filtro anticalcare in acqua tiepida saponata o in
lavastoviglie.
4Per pulire la parte interna del bollitore, seguite le istruzioni riportate in
"Disincrostazione del calcare".
Non usate prodotti abrasivi, spugnette ecc. per pulire il bollitore.
Non immergete il bollitore o la sua base nell'acqua o in altro liquido.
Disincrostazione del calcareIIIIIIIIIIIIIIIIIIIIIIIIIIIIIIIIIIIIIIIIIIIIIIIIIIIIIIIIIIIIIIIIIIIIIIIIIIIIIIIIIIIIIIIIIIIIIIIIIIIIIIIIIIIIIIIIIIIIIIIIIIIIIIIIII
Con una regolare disincrostazione, il vostro bollitore avrà una durata maggiore.
In caso di uso normale (fino a 5 volte al giorno):
- una volta al mese in caso di acqua dura (oltre 18° dH).
- una volta ogni 3 mesi in caso di acqua dolce (fino a 18° dH)
Rivolgetevi al vostro acquedotto comunale per informazioni sul contenuto di calcio
nella vostra zona.
Potreste decidere di disincrostare più spesso il vostro apparecchio per ottenere
sempre risultati ottimali.
1Riempite il bollitore fino a tre quarti dell'indicazione del livello massimo, poi
premete il pulsante on/off.
2Dopo aver spento il bollitore, aggiungete aceto bianco (acido acetico all'8%) o
un apposito prodotto disincrostante fino a raggiungere l'indicazione di livello
massimo.
3Lasciate agire la soluzione per tutta la notte.
4Svuotate il bollitore e risciacquatelo accuratamente.
5Ripetete questa procedura fino a quando non rimangono più tracce di calcare
nell'apparecchio.
Come pulire il filtroIIIIIIIIIIIIIIIIIIIIIIIIIIIIIIIIIIIIIIIIIIIIIIIIIIIIIIIIIIIIIIIIIIIIIIIIIIIIIIIIIIIIIIIIIIIIIIIIIIIIIIIIIIIIIIIIIIIIIIIIIIIIIIIIIIIIIIIIIIIIIIIIIIIIIIIIIIIIIIIIIIIIII
Il calcare non è nocivo alla salute e può presentarsi in colori diversi, ma conferisce
un sapore cattivo alle vostre bevande. Il filtro anticalcare evita alle particelle di
calcare di finire nelle vostre bevande. Ricordate di pulirlo regolarmente.
1Togliete il coperchio.
Per togliere il coperchio, premete contemporaneamente i due pulsanti di sblocco sul
coperchio e sollevatelo verso l'alto.
2Togliete il filtro.
Per togliere il filtro, sollevatelo delicatamente dal porta filtro (fig. 3).
3Sciacquate il filtro sotto l'acqua del rubinetto. Se necessario, utilizzate uno
spazzolino morbido in nylon.
Il filtro anticalcare può essere lavato anche in lavastoviglie.
Potete anche procedere alla disincrostazione del filtro, come avete fatto con il
bollitore.
4Immergete il filtro in una tazza piena di acqua tiepida e aceto (o prodotto
disincrostante specifico).
5Togliete il filtro dall'acqua e risciacquatelo con abbondante acqua.
RicambiIIIIIIIIIIIIIIIIIIIIIIIIIIIIIIIIIIIIIIIIIIIIIIIIIIIIIIIIIIIIIIIIIIIIIIIIIIIIIIIIIIIIIIIIIIIIIIIIIIIIIIIIIIIIIIIIIIIIIIIIIIIIIIIIIIIIIIIIIIIIIIIIIIIIIIIIIIIIIIIIIIIIIIIIIIIIIIIIIIIIIIIIIIIIIIIIIIIIIIIIIIIIIIIIIIIIIIIIIII
Cavo
Nel caso il cavo del bollitore fosse danneggiato, dovrà essere sostituito presso un
centro autorizzato Philips.
Filtro anticalcare
I filtri di ricambio per il vostro bollitore Glass di Philips possono essere acquistati
presso un centro assistenza Philips utilizzando il codice HD4979.
Garanzia e AssistenzaIIIIIIIIIIIIIIIIIIIIIIIIIIIIIIIIIIIIIIIIIIIIIIIIIIIIIIIIIIIIIIIIIIIIIIIIIIIIIIIIIIIIIIIIIIIIIIIIIIIIIIIIIIIIIIIIIIIIIIIIIIIIIIIIIIIIIIIIIIIIIIIIIIIIIIIIIIIIII
Se avete bisogno di assistenza o di ulteriori informazioni, vi preghiamo di visitare il
nostro sito web www.philips.com oppure di contattare il Centro Assistenza
Clienti Philips del vostro paese (per conoscere il numero di telefono, vedere
l'opuscolo della garanzia). Qualora nel vostro paese non ci fosse un Centro
Assistenza Clienti, rivolgetevi al rivenditore autorizzato Philips oppure contattate il
Reparto Servizio di Philips Domestic Appliances and Personal Care BV.
TÜRKÇE
GirişIIIIIIIIIIIIIIIIIIIIIIIIIIIIIIIIIIIIIIIIIIIIIIIIIIIIIIIIIIIIIIIIIIIIIIIIIIIIIIIIIIIIIIIIIIIIIIIIIIIIIIIIIIIIIIIIIIIIIIIIIIIIIIIIIIIIIIIIIIIIIIIIIIIIIIIIIIIIIIIIIIIIIIIIIIIIIIIIIIIIIIIIIIIIIIIIIIIIIIIIIIIIIIIIIIIIIIIIIIIIIIIIIIIIIIIII
Sayın müşterimiz, yeni Glass by Philips Su Isıtıcısını tercih ettiğiniz için tebrikler.
Glass by Philips su ısıtıcınızın tüm gö desi camdan yapılmıştır. Bu, cihazınıza güzel
saydam bir görünüm kazandırır e su ısıtmayı büyüleyici bir şölene çe irir. Bu su ısıtıcı,
enerji tasarrufludur e içeceklerinizi kireçten uzak tutar.
ÖnemliIIIIIIIIIIIIIIIIIIIIIIIIIIIIIIIIIIIIIIIIIIIIIIIIIIIIIIIIIIIIIIIIIIIIIIIIIIIIIIIIIIIIIIIIIIIIIIIIIIIIIIIIIIIIIIIIIIIIIIIIIIIIIIIIIIIIIIIIIIIIIIIIIIIIIIIIIIIIIIIIIIIIIIIIIIIIIIIIIIIIIIIIIIIIIIIIIIIIIIIIIIIIIIIIIIIIIIIIIIIII
Su ısıtıcısını kullanmadan önce, lütfen erilen talimatları dikkatlice okuyun e ileride
baş urmak için saklayın.
◗Bu su ısıtıcısı sadece su kaynatmak için üretilmiştir.Tehlikeli durumlar
oluşturabileceğinden, cihazın içine başka malzemeler koymayın.
◗Cihazı prize takmadan önce, cihazın üzerinde belirtilen oltajın e inizdeki şebeke
oltajıyla uygunluğunu kontrol edin.
◗Su ısıtıcısını Mak.göstergesinin se iyesinden daha fazla su ile doldurmayın. Eğer su
ısıtıcı fazla miktarda su ile doldurulursa kaynayan suyun ağız kısmından taşma
ihtimali olabilir.
◗Su ısıtıcısının susuz halde kaynamasını önlemek için, cihazı asla minimum se iyenin
altında doldurmayın.
◗Su ısıtıcının taban kısmında buğulaşma meydana gelebilir. Bu durum normaldir.
◗Bölgenizdeki suyun ser tliğine bağlı olarak, cihazı kullandığınızda, su ısıtıcınızın ısıtıcı
birimleri üzerinde küçük lekeler görünebilir. Bu belirti, ısıtıcı birimler üzerinde e
ısıtıcının içinde zamanla oluşan kirecin sonucudur. Suyun sertliği arttıkça, kireç
oluşumu hızlanacaktır. Kireç farklı renklerde oluşabilir. Kireç sağlığınıza zararlı
olmadığı halde, aşırı kireç su ısıtıcınızın performansını etkileyebilir. Cihaz kirecinin
temizlenmesi için, lütfen bu kitapçıkta erilen talimatları takip edin.
◗Su ısıtıcısını e kordonunu çocukların ulaşamayacakları yerlerde saklayın e cihazla
oynamalarına izin ermeyin. Çocukların cihazın elektrik kordonunu çekmelerine
engel olun.
Kordonun kullanılmayan kısmı, cihazın altında saklanabilir.
◗Su ısıtıcının içinde sıcak su bulunduğunda yanma tehlikesi olabileceğinden lütfen
dikkatli olun.
◗Cihazdan sıcak buhar çıkacağından, su kaynadıktan hemen sonra kapağı
kaldırırken dikkatli olun.
◗Su ısıtma cihazını yalnızca kendine ait orijinal tabanı ile kullanın.
◗Su ısıtıcısını sıcak bir yüzey üzerine koymayın.
◗Cihazı eya cihazın tabanını asla suya eya başka sı ılara batırmayın.
◗Elektrik fişi, elektrik kordonu eya cihazın hasarlı olması durumunda cihazı
kullanmayın. Eğer su ısıtıcı bir şekilde hasar görürse, özel alet e/ eya parçalar
gerektireceğinden, cihaz her zaman Philips eya Philips tarafından yetki erilmiş
bir ser is merkezi tarafından tamir edilmelidir.
◗Cihaz, su kaynatırken ısınacağı için, cam yüzeyine dokunmaktan kaçının. Sadece
açık/kapalı düğmesine dokunun e ısıtıcıyı kolundan tutarak kaldırın.
Genel tanım (şek. 1)IIIIIIIIIIIIIIIIIIIIIIIIIIIIIIIIIIIIIIIIIIIIIIIIIIIIIIIIIIIIIIIIIIIIIIIIIIIIIIIIIIIIIIIIIIIIIIIIIIIIIIIIIIIIIIIIIIIIIIIIIIIIIIIIIIIIIIIIIIIIIIIIIIIIIIIIIIIIIIIIIIIII
AAçma/kapama düğmesi I
BPliot ışık
CGü enlik kapağı
DAğızlık
ESu-se iyesi göstergesi
FTaban
GKireç süzme filtresi
Susuz-kaynama k rumasıIIIIIIIIIIIIIIIIIIIIIIIIIIIIIIIIIIIIIIIIIIIIIIIIIIIIIIIIIIIIIIIIIIIIIIIIIIIIIIIIIIIIIIIIIIIIIIIIIIIIIIIIIIIIIIIIIIIIIIIIIIIIIIIIIIIIIIIIIIIIII
Su ısıtıcınızın ısıtıcı birimleri gü enli cut-out cihazıyla korunmaktadır. Bu cihaz,
içerisinde hiç su yokken eya yeterli su bulunmadığı durumlarda, otomatik olarak
kapanacaktır. Bu durumda, pilot ışık yanacak e su ısıtıcı yaklaşık 5 dakika sonra
otomatik olarak kapanacaktır. Eğer bu durum oluşursa, susuz-kaynama korumasını
sıfırlamak için, cihazı tabanından kaldırın. Cihaz daha sonra tekrar kullanıma hazır
olacaktır.
Su Isıtma cihazının kullanılmasıIIIIIIIIIIIIIIIIIIIIIIIIIIIIIIIIIIIIIIIIIIIIIIIIIIIIIIIIIIIIIIIIIIIIIIIIIIIIIIIIIIIIIIIIIIIIIIIIIIIIIIIIIIIIIIIIIII
1Su ısıtıcısının tabanını düz bir yüzeye yerleştirin ve fişi duvar prizine takın.
2Su ısıtıcısını ağızlıktan veya kapağını kaldırarak doldurabilirsiniz.
Eğer kapağı kaldırmayı tercih ederseniz, kapak üzerindeki iki açma düğmesine aynı
anda basın e kapağı yukarı itin.
3Cihazı tabanına yerleştirin.
Eğer kapağı kaldırdıysanız, girişe yerleştirin e kapanması için bastırın.
Bir klik sesi duyacaksınız.
Açma/kapama düğmesine basın.
- Su ısıtıcı ısınmaya başlayacaktır.
- Pilot ışık yanacaktır (şek. 2).
- Su kaynama noktasına geldiğinde, cihaz otomatik olarak kapanacaktır.
5Kaynamayı açma/kapama düğmesine basarak istediğiniz zaman
durdurabilirsiniz.
Cam su ısıtıcısının gö desi ısınacaktır, dikkatli olun!
TemizlemeIIIIIIIIIIIIIIIIIIIIIIIIIIIIIIIIIIIIIIIIIIIIIIIIIIIIIIIIIIIIIIIIIIIIIIIIIIIIIIIIIIIIIIIIIIIIIIIIIIIIIIIIIIIIIIIIIIIIIIIIIIIIIIIIIIIIIIIIIIIIIIIIIIIIIIIIIIIIIIIIIIIIIIIIIIIIIIIIIIIIIIIIIIIIIIIIIIIIIIIIIIIII
1Fişi duvar prizinden çekin.
2Cihazın dış tarafını hafif ıslak bezle temizleyin.
3Kapağı ve kireç süzme filtresini, ılık suda biraz bulaşık deterjanıyla temizleyin
veya bulaşık makinesinde yıkayın.
Cihazın içini temizlemeyin, 'Kireç temizleme' bölümündeki talimatları takip
edin.
Su ısıtıcısını temizlemek için aşındırıcı temizlik maddeleri, o alayıcılar
b. kullanmayın.
Cihazı eya cihazı tabanını suya eya başka sı ılara batırmayın.
Kirecin temizlenmesiIIIIIIIIIIIIIIIIIIIIIIIIIIIIIIIIIIIIIIIIIIIIIIIIIIIIIIIIIIIIIIIIIIIIIIIIIIIIIIIIIIIIIIIIIIIIIIIIIIIIIIIIIIIIIIIIIIIIIIIIIIIIIIIIIIIIIIIIIIIIIIIIIIIIIIIIIIIIIIII
Düzenli olarak yapılan kireç temizlenmesi, cihazınızın ömrünü ar tıracaktır.
Normal kullanımda (günde 5 kullanıma kadar):
- Eğer sert su kullanıyorsanız, her ay bir kez (örn. 18° DH yukarısında olan ser tlik);
- Eğer yumuşak su kullanıyorsanız, her 3 ayda bir kez (örn. 18° DH yukarısında
olan sertlik).
Bölgenizdeki su ser tliği konusunda bilgi edinmek üzere yerel sular idaresine baş urun.
Su ısıtıcınızın en iyi görünüme sahip olması için, cihazınızın kirecini daha sık
temizleyebilirsiniz.
1Cihazı maksimum seviye göstergesinin üçüncü-çeyreğine kadar su ile doldurun
ve açma/kapama düğmesine basın.
2Cihaz kendiliğinden kapandıktan sonra, maksimum seviye göstergesine kadar
beyaz sirke (%8 asetik asit) veya uygun bir kireç çözücü ekleyin.
3Cihazı bir gece içinde sirkeli su ile bırakın.
Su ısıtıcısını boşaltıp içini durulayın.
5Eğer cihaz içinde hala biraz kireç kaldıysa, bu işlemi tekrarlayın.
Filtrenin temizlenmesiIIIIIIIIIIIIIIIIIIIIIIIIIIIIIIIIIIIIIIIIIIIIIIIIIIIIIIIIIIIIIIIIIIIIIIIIIIIIIIIIIIIIIIIIIIIIIIIIIIIIIIIIIIIIIIIIIIIIIIIIIIIIIIIIIIIIIIIIIIIIIIIIIIIIIIIIII
Kireç sağlığınıza zararlı değildir e değişik renklerde oluşabilir, ancak içeceğinize tozlu
bir tat erebilir. Kireç süzme filtresi, kireç parçacıklarının içeceklerinize karışmasına
engel olur. Filtreyi düzenli olarak temizleyin.
1Kapağı kaldırın.
Kapağı, kapak üzerinde bulunan iki açma düğmesine aynı anda basarak e kapağı
yukarı doğru çekerek kaldırabilirsiniz.
2Filtreyi ısıtıcıdan çıkartın.
Filtreyi yu asından hafifçe çekerek çıkarabilirsiniz (şekil 3).
3Filtreyi akan musluk suyunun altında durulayarak temizleyebilirsiniz. Eğer
gerekliyse, yumuşak bir naylon fırça kullanabilirsiniz.
Kireç süzme filtresi bulaşık makinesinde de temizlenebilir.
Filtreyi, aynen su ısıtıcısında olduğu gibi, kirecini temizleyerek de temizleyebilirsiniz.
Filtreyi, beyaz sirke veya uygun bir kireç çözücüsü katılmış ılık su dolu bir kap
içinde bırakarak ıslatın.
5Filtreyi kaptan alın ve iyice durulayın.
DeğiştirmeIIIIIIIIIIIIIIIIIIIIIIIIIIIIIIIIIIIIIIIIIIIIIIIIIIIIIIIIIIIIIIIIIIIIIIIIIIIIIIIIIIIIIIIIIIIIIIIIIIIIIIIIIIIIIIIIIIIIIIIIIIIIIIIIIIIIIIIIIIIIIIIIIIIIIIIIIIIIIIIIIIIIIIIIIIIIIIIIIIIIIIIIIIIIIIIIIIIIIIIIIIIII
Kordon
Eğer bu cihazın kordonu hasar görürse, kordon sadece Philips tarafından yetki erilmiş
bir ser is merkezi tarafından değiştirilmelidir.
Kireç süzme filtresi
Glass by Philips su ısıtıcısı filtrelerini, HD4979 model numarası altında yerel Philips
ser is merkezinizden temin edebilirsiniz.
Bilgi ve ServisIIIIIIIIIIIIIIIIIIIIIIIIIIIIIIIIIIIIIIIIIIIIIIIIIIIIIIIIIIIIIIIIIIIIIIIIIIIIIIIIIIIIIIIIIIIIIIIIIIIIIIIIIIIIIIIIIIIIIIIIIIIIIIIIIIIIIIIIIIIIIIIIIIIIIIIIIIIIIIIIIIIIIIIIIIIIIIIIIIIIIIIIIIIIIIII
Bir bilgiye ihtiyacnız olursa eya bir probleminiz arsa, lütfen www.philips.c m
adresinden Philips web sitesini ziyaret edin eya ülkenizdeki Philips Tüketici Danışma
Merkezini arayın (telefon numarasını uluslararası garanti kitapçığında bulabilirsiniz).
Eğer ülkenizde Tüketici Danışma Merkezi yoksa, yerel Philips satıcınıza baş urun eya
Philips E Aletleri e Kişisel Bakım Ser is Depar tmanı BV ile iletişim kurun.
PORTUGUÊS
IntroduçãoIIIIIIIIIIIIIIIIIIIIIIIIIIIIIIIIIIIIIIIIIIIIIIIIIIIIIIIIIIIIIIIIIIIIIIIIIIIIIIIIIIIIIIIIIIIIIIIIIIIIIIIIIIIIIIIIIIIIIIIIIIIIIIIIIIIIIIIIIIIIIIIIIIIIIIIIIIIIIIIIIIIIIIIIIIIIIIIIIIIIIIIIIIIIIIIIIIIIIIIIIIIIII
Caro Cliente, parabéns pela aquisição desta nova Chaleira Glass da Philips.
Todo o corpo da sua nova Chaleira Glass da Philips é feito de vidro. Este facto
confere à sua chaleira um bonito aspecto transparente e torna o aquecimento da
água num processo fascinante de se ver. Esta chaleira também economiza muita
energia e impede que o calcário passe para as suas bebidas.
ImportanteIIIIIIIIIIIIIIIIIIIIIIIIIIIIIIIIIIIIIIIIIIIIIIIIIIIIIIIIIIIIIIIIIIIIIIIIIIIIIIIIIIIIIIIIIIIIIIIIIIIIIIIIIIIIIIIIIIIIIIIIIIIIIIIIIIIIIIIIIIIIIIIIIIIIIIIIIIIIIIIIIIIIIIIIIIIIIIIIIIIIIIIIIIIIIIIIIIIIIIIIIII
Por favor, leia estas instruções com atenção antes de se servir da chaleira e guarde-
as para uma eventual consulta futura.
◗Esta chaleira destina-se unicamente a ferver água. Não coloque nenhum outro
ingrediente dentro da chaleira porque isso poderia provocar uma situação
perigosa.
◗Antes de ligar o aparelho, verifique se a voltagem indicada na chaleira
corresponde à corrente da sua casa.
◗Nunca encha a chaleira acima da indicação de nível máximo. Se a chaleira
estiver muito cheia, corre-se o risco de sair água a ferver pelo bico.
◗Nunca encha a chaleira abaixo do nível mínimo para evitar que funcione a seco.
◗Pode formar-se alguma condensação na base da chaleira. É perfeitamente
normal e não significa que a chaleira tenha algum defeito.
◗Dependendo do grau de dureza da água da sua zona de residência, poderão
aparecer pequenas manchas na resistência da chaleira. Este fenómeno resulta do
calcário que se forma na resistência e no interior da chaleira com o passar do
tempo. Quanto mais dura fora água, mais rapidamente se forma o calcário. O
calcário pode apresentar diferentes cores. Embora o calcário seja inofensivo à
saúde, o calcário em excesso pode afectar o rendimento da chaleira. Por favor,
siga as instruções dadas neste modo de emprego sobre a descalcificação da
chaleira.
◗Mantenha a chaleira e o cabo de alimentação fora do alcance das crianças e não
as deixe brincar com ela. Evite que as crianças puxem pelo cabo. Não deixe o
cabo suspenso para fora da bancada da cozinha.
O fio em excesso pode ser arrumado na base da chaleira.
◗A água a ferver pode provocar queimaduras graves. Quando a chaleira contiver
água quente, tenha muito cuidado ao manuseá-la.
◗Tenha cuidado quando retirar a tampa imediatamente após a fervura da água,
porque o vapor quente pode sair para fora da chaleira.
◗A chaleira só deve ser utilizada com a sua base original.
◗Não coloque a chaleira sobre uma superfície quente.
◗Não mergulhe a chaleira ou a base dentro de água nem de qualquer outro
líquido.
◗Nunca use a chaleira se a ficha, o cabo de alimentação ou a própria chaleira
estiverem danificados. Se a chaleira estiver estragada, só deverá ser reparada
pela Philips ou por um concessionário autorizado pela Philips, porque é
necessário utilizar ferramentas e/ou peças especiais.
◗Evite tocar no vidro porque a chaleira aquece quando a água está a ferver.
Toque somente no interruptor de ligar/desligar e levante a chaleira pela pega.
Descrição geral (fig. 1)IIIIIIIIIIIIIIIIIIIIIIIIIIIIIIIIIIIIIIIIIIIIIIIIIIIIIIIIIIIIIIIIIIIIIIIIIIIIIIIIIIIIIIIIIIIIIIIIIIIIIIIIIIIIIIIIIIIIIIIIIIIIIIIIIIIIIIIIIIIIIIIIIIIIIIIIIII
AInterruptor 'on/off' (ligar/desligar) I
BLâmpada piloto
CTampa de segurança
DBico
EIndicador do nível da água
FBase
GFiltro anti-calcário
Protecção contra funcionamento a secoIIIIIIIIIIIIIIIIIIIIIIIIIIIIIIIIIIIIIIIIIIIIIIIIIIIIIIIIIIIIIIIIIIIIIIIIIIIII
A resistência da sua chaleira está protegida por um dispositivo térmico. Este
dispositivo desliga a chaleira automaticamente se for ligada por acidente sem ter
água ou sem que a água seja suficiente. Neste caso, a lâmpada piloto ficará a piscar e
a chaleira desligar-se-á automaticamente passados cerca de 5 minutos. Se isso
acontecer, levante a chaleira da base para repor o dispositivo de protecção contra o
funcionamento a seco. A chaleira fica, então, novamente pronta a usar.
Utilização da chaleiraIIIIIIIIIIIIIIIIIIIIIIIIIIIIIIIIIIIIIIIIIIIIIIIIIIIIIIIIIIIIIIIIIIIIIIIIIIIIIIIIIIIIIIIIIIIIIIIIIIIIIIIIIIIIIIIIIIIIIIIIIIIIIIIIIIIIIIIIIIIIIIIIIIIIIIIIIIIIII
1Coloque a base da chaleira sobre uma superfície plana e ligue a ficha à
tomada eléctrica.
2Pode encher a chaleira através do bico ou retirando a tampa.
Se optar por retirar a tampa, pressione os dois botões da tampa em simultâneo e
puxe a tampa para cima.
3Coloque a chaleira sobre a base.
Se tiver retirado a tampa, volte a colocá-la na abertura e pressione para a fechar.
Ouvir-se-á um 'click'.
4Prima o interruptor.
- A chaleira começa a aquecer.
- A lâmpada piloto acende-se (fig. 2).
- A chaleira desliga-se automaticamente quando a água atinge o ponto de
ebulição.
5O processo de fervura pode ser interrompido premindo o interruptor.
Tenha cuidado, porque o corpo de vidro da chaleira fica quente!
LimpezaIIIIIIIIIIIIIIIIIIIIIIIIIIIIIIIIIIIIIIIIIIIIIIIIIIIIIIIIIIIIIIIIIIIIIIIIIIIIIIIIIIIIIIIIIIIIIIIIIIIIIIIIIIIIIIIIIIIIIIIIIIIIIIIIIIIIIIIIIIIIIIIIIIIIIIIIIIIIIIIIIIIIIIIIIIIIIIIIIIIIIIIIIIIIIIIIIIIIIIIIIIIIIIIIIIIIIIII
1Desligue a ficha da corrente.
2Limpe o exterior do aparelho com um pano húmido.
3Lave a tampa e o filtro anti-calcário com água quente e um pouco de
detergente líquido ou na máquina da loiça.
4Para limpar o interior da chaleira, siga as instruções do capítulo
'Descalcificação'.
Não use produtos de limpeza abrasivos, esfregões, etc. para limpar a
chaleira.
Não mergulhe a chaleira ou a sua base dentro de água ou de qualquer
outro líquido.
DescalcificaçãoIIIIIIIIIIIIIIIIIIIIIIIIIIIIIIIIIIIIIIIIIIIIIIIIIIIIIIIIIIIIIIIIIIIIIIIIIIIIIIIIIIIIIIIIIIIIIIIIIIIIIIIIIIIIIIIIIIIIIIIIIIIIIIIIIIIIIIIIIIIIIIIIIIIIIIIIIIIIIIIIIIIIIIIIIIIIIIIIIIIIIIIIIII
Uma descalcificação regular prolongará a vida da sua chaleira.
No caso de uma utilização normal (até 5 vezes por dia):
- Uma vez por mês se a água for dura (isto é, se tiver um grau de dureza
superior a 18° DH);
- Uma vez de 3 em 3 meses se a água for macia (isto é, se tiver um grau de
dureza até 18° DH).
Informe-se junto da Companhia das Águas sobre o grau de dureza da água da sua
zona de residência.
Se quiser, poderá proceder à descalcificação da chaleira com mais frequência para
que ela esteja sempre no seu melhor.
1Encha a chaleira com água até três quartos da indicação de nível máximo e
prima o interruptor de ligar/desligar.
2Depois de a chaleira se desligar automaticamente, junte vinagre branco (8%
de ácido acético) ou com um produto descalcificante adequado até à
indicação de nível máximo.
3Deixe esta solução a actuar durante a noite.
4Esvazie a chaleira e enxague muito bem.
5Repita este procedimento se ainda restar algum calcário na chaleira.
Limpeza do filtroIIIIIIIIIIIIIIIIIIIIIIIIIIIIIIIIIIIIIIIIIIIIIIIIIIIIIIIIIIIIIIIIIIIIIIIIIIIIIIIIIIIIIIIIIIIIIIIIIIIIIIIIIIIIIIIIIIIIIIIIIIIIIIIIIIIIIIIIIIIIIIIIIIIIIIIIIIIIIIIIIIIIIIIIIIIIIIIIII
O calcário não é prejudicial à saúde e pode apresentar-se com diferentes
colorações, mas pode conferir um gosto desagradável às bebidas. O filtro anti-
calcário impede que as partículas passem para o líquido. Limpe o filtro com
regularidade.
1Retire a tampa.
A tampa retira-se pressionando os dois botões da tampa em simultâneo e puxando
a tampa para cima.
2Retire o filtro.
O filtro pode ser retirado puxando-o com cuidado para fora do suporte (figura 3).
3Lave o filtro enxaguando-o à torneira com água corrente. Se for necessário,
limpe-o com uma escova de nylon macia.
O filtro anti-calcário também pode ser lavado na máquina da loiça.
O filtro também se pode lavar quando se procede à descalcificação da chaleira.
4Deixe o filtro de molho numa chávena com água quente e um pouco de
vinagre branco ou um descalcificante adequado.
5Retire o filtro para fora da chávena e enxague-o muito bem.
SubstituiçãoIIIIIIIIIIIIIIIIIIIIIIIIIIIIIIIIIIIIIIIIIIIIIIIIIIIIIIIIIIIIIIIIIIIIIIIIIIIIIIIIIIIIIIIIIIIIIIIIIIIIIIIIIIIIIIIIIIIIIIIIIIIIIIIIIIIIIIIIIIIIIIIIIIIIIIIIIIIIIIIIIIIIIIIIIIIIIIIIIIIIIIIIIIIIIIIIIIIIIIII
Cabo de alimentação
Se o cabo de alimentação da chaleira se estragar, só deverá ser substituído por um
concessionário autorizado pela Philips.
Filtro anti-calcário
Os filtros de substituição para a sua chaleira Glass da Philips podem ser adquiridos
no seu concessionário Philips local, com a refª HD4979.
Informações e assistênciaIIIIIIIIIIIIIIIIIIIIIIIIIIIIIIIIIIIIIIIIIIIIIIIIIIIIIIIIIIIIIIIIIIIIIIIIIIIIIIIIIIIIIIIIIIIIIIIIIIIIIIIIIIIIIIIIIIIIIIIIIIIIIIIIIIIIIIIIIIIIII
Se necessitar de informações ou se tiver algum problema, por favor visite a página da
Philips na Internet: www.philips.pt ou contacte o Centro de Informação ao
Consumidor Philips do seu país (o número de telefone está indicado no folheto da
garantia mundial). Se não existir um Centro de Informação ao Consumidor no seu
país, dirija-se a um agente Philips ou contacte o Departamento de Service da Philips
Domestic Appliances and Personal Care BV.

This manual suits for next models

1

Other Philips Kettle manuals

Philips HD7311 User manual

Philips

Philips HD7311 User manual

Philips HD9380/20 User manual

Philips

Philips HD9380/20 User manual

Philips HD4678 User manual

Philips

Philips HD4678 User manual

Philips HD4685/30/A User manual

Philips

Philips HD4685/30/A User manual

Philips HD4647/75 User manual

Philips

Philips HD4647/75 User manual

Philips HD4646 User manual

Philips

Philips HD4646 User manual

Philips HD4678 User manual

Philips

Philips HD4678 User manual

Philips HD4686 User manual

Philips

Philips HD4686 User manual

Philips HD9385 User manual

Philips

Philips HD9385 User manual

Philips HD4656 User manual

Philips

Philips HD4656 User manual

Philips HD4677/40 User manual

Philips

Philips HD4677/40 User manual

Philips HD4665 User manual

Philips

Philips HD4665 User manual

Philips HD9385 User manual

Philips

Philips HD9385 User manual

Philips HD 4603 User manual

Philips

Philips HD 4603 User manual

Philips HD9349 User manual

Philips

Philips HD9349 User manual

Philips Cucina HD4675 User manual

Philips

Philips Cucina HD4675 User manual

Philips Avance HD9450/81 User manual

Philips

Philips Avance HD9450/81 User manual

Philips HD4666 User manual

Philips

Philips HD4666 User manual

Philips HD7311 User manual

Philips

Philips HD7311 User manual

Philips SoundHub CSS9211 User manual

Philips

Philips SoundHub CSS9211 User manual

Philips HD4676 User manual

Philips

Philips HD4676 User manual

Philips essence HD4659 User manual

Philips

Philips essence HD4659 User manual

Philips HD4300/06 User manual

Philips

Philips HD4300/06 User manual

Philips HD4671 User manual

Philips

Philips HD4671 User manual

Popular Kettle manuals by other brands

Eldom Lux C520 instruction manual

Eldom

Eldom Lux C520 instruction manual

Gallet Amiens BOU 889WO instruction manual

Gallet

Gallet Amiens BOU 889WO instruction manual

Monzana 196493 instructions

Monzana

Monzana 196493 instructions

Bestron AWK1101Z instruction manual

Bestron

Bestron AWK1101Z instruction manual

Aurora AU 3508 manual

Aurora

Aurora AU 3508 manual

Krups FL701 user guide

Krups

Krups FL701 user guide

Cuisinart GK-1 Series INSTRUCTION AND RECIPE BOOKLET

Cuisinart

Cuisinart GK-1 Series INSTRUCTION AND RECIPE BOOKLET

Brentwood Appliances KT-1508BK Operating and safety instructions

Brentwood Appliances

Brentwood Appliances KT-1508BK Operating and safety instructions

GAS ONE BP-32 instruction manual

GAS ONE

GAS ONE BP-32 instruction manual

Oster BVSTKT35W instruction manual

Oster

Oster BVSTKT35W instruction manual

BOJ KT-1700X user manual

BOJ

BOJ KT-1700X user manual

Sunbeam KE9600 Instruction booklet

Sunbeam

Sunbeam KE9600 Instruction booklet

Scarlett SC-EK14E05 instruction manual

Scarlett

Scarlett SC-EK14E05 instruction manual

Petra 232500 Instructions for use

Petra

Petra 232500 Instructions for use

stelton Emma manual

stelton

stelton Emma manual

Russell Hobbs 23760 instructions

Russell Hobbs

Russell Hobbs 23760 instructions

ARESA AR-3437 instruction manual

ARESA

ARESA AR-3437 instruction manual

Groen DEE/4 Series Operator's manual

Groen

Groen DEE/4 Series Operator's manual

manuals.online logo
manuals.online logoBrands
  • About & Mission
  • Contact us
  • Privacy Policy
  • Terms and Conditions

Copyright 2025 Manuals.Online. All Rights Reserved.