manuals.online logo
Brands
  1. Home
  2. •
  3. Brands
  4. •
  5. Philips
  6. •
  7. Speakers
  8. •
  9. Philips MMS 223 User manual

Philips MMS 223 User manual

MARQUE : PHILIPS
REFERENCE : MMS 223/00S
CODIC : 1085875
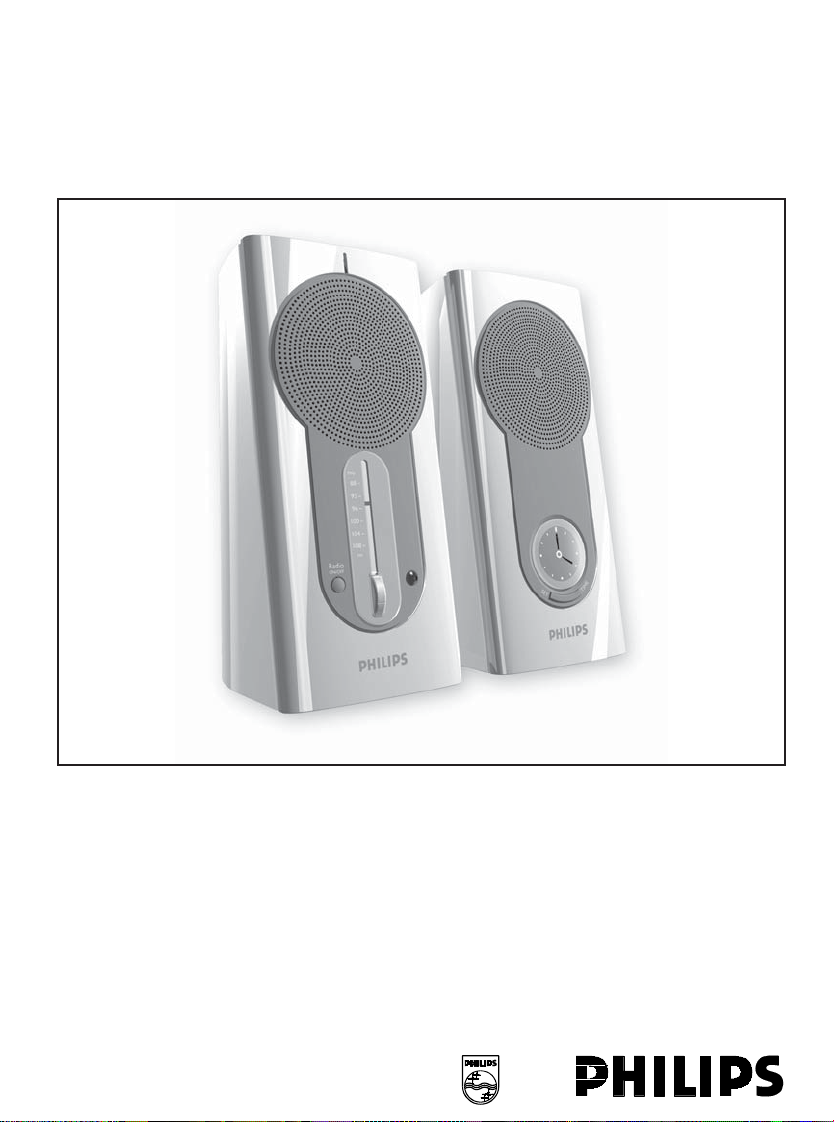
Multimedia Speaker System
This Quick Set-up Guide is applicable for :
ØMMS 223
For US/Canada only
MMS223
Convenient FM radio and multimedia speaker in one!
The MMS 223 is ideal for consumers who demand dependable PC audio
output for games, music CD’s, MP3 or other entertainment, and want the
convenience of an FM radio built in. Designed by Philips, the leader in
innovative and quality sound solutions, these speakers do not only reproduce
excellent sound, but also are fun to operate and great to look at.
MMS223
IMPORTANT SAFETY INSTRUCTIONS - Readbeforeoperating equipment
1. Read these instructions.
2. Keep these instructions.
3. Heedallwarnings.
4. Follow all instructions.
5. Do not use this apparatus near water.
6. Clean only with dry cloth.
7. Do not block any ventilation openings. Install in
accordance with the manufacturer’s instructions.
8. Donotinstallnearanyheatsources suchasradiators,heat
registers, stoves, or other apparatus (including amplifiers)
thatproduce heat.
9. Do not defeat the safety purpose of the
polarizedorgrounding-typeplug.Apolarizedplug
hastwobladeswithonewiderthantheother.A
groundingtype plughastwoblades andathird
groundingprong.Thewidebladeorthethirdprongareprovidedfor
yoursafety.Ifthepovidedplugdoesnotfitintoyouroutlet,consultan
electricianforreplacementoftheobsoleteoutlet.
10. Protect the power cord frombeing walked on orpinched,
particularlyatplugs,conveniencereceptacles,andthepoint
wheretheyexitfromtheapparatus.
11. Only use attachments/accessories specified by the
manufacturer.
12.Useonly with a cart, stand, tripod,bracket,ortable
specifiedbythemanufacturer,orsoldwiththeapparatus.
Whenacartisused,usecaution when moving the cart/
apparatuscombinationtoavoidinjury from tip-over.
13. Unplug this apparatus during lightning storms or when
unusedforlongperiodsoftime.
14. Refer all servicing to qualified service personnel. Servicing
isrequiredwhentheapparatus hasbeendamaged inanyway,
such as power-supply cord or plug is damaged, liquid has
been spilled or objects have fallen into the apparatus, the
apparatus has been exposed to rain or moisture, does not
operatenormally,orhas been dropped.
15. Battery usage CAUTION -To prevent battery leakage which
mayresultinbodilyinjury,propertydamage,ordamagetotheunit:
• Installall batteriescorrectly, +and -asmarkedontheunit.
• Donotmixbatteries(oldandneworcarbonandalkaline,etc.).
• Romovebatterieswhentheunitisnot used for a long time.
EL6475-E004: 02/8
AC
PolarizedPlug
Important notes for users in the U.K.
Mains plug
This apparatus is fitted with an approved 13 Amp plug.
To change a fuse in this type of plug proceed as follows:
1Remove fuse cover and fuse.
2Fix new fuse which should be a S1362 5 Amp, A.S.T.A. or SI
approved type.
3Refit the fuse cover.
If the fitted plug is not suitable for your socket outlets, it should be cut
off and an appropriate plug fitted in its place. If the mains plug contains
a fuse, this should have a value of 5 Amp. If a plug without a fuse is used,
the fuse at the distribution board should not be greater than 5 Amp.
Note: The severed plug must be disposed of to avoid a possible shock
hazard should it be inserted into a 13 Amp socket elsewhere.
How to connect a plug
The wires in the mains lead are coloured with the following code: blue
= neutral (N), brown = live (L). As these colours may not correspond
with the colour markings identifying the terminals in your plug, proceed
as follows:
Connect the blue wire to the terminal marked N or coloured black.
Connect the brown wire to the terminal marked L or coloured red.
Do not connect either wire to the earth terminal in the plug, marked
E (or ) or coloured green (or green and yellow).
efore replacing the plug cover, make certain that the cord grip is
clamped over the sheath of the lead - not simply over the two wires.
Copyright in the U.K.
Recording and playback of material may require consent. See Copyright
Act 1956 and The Performer's Protection Acts 1958 to 1972.
Typeskilt finnes på apparatens underside.
Obser er: Nettbryteren er sekundert innkoplet. Den innebygde netdelen
er derfor ikke frakoplet nettet så lenge apparatet er tilsluttet
nettkontakten.
For å redusere faren for brann eller elektrisk støt, skal apparatet ikke
utsettes for regn eller fuktighet.
Norge
Deutschland
Hiermit wird bescheinigt, daß dieses Gerät in Übereinstimmung mit
den estimmungen der Amtsblattverfügung 1046/1984 funkentstört ist.
Der Deutschen undespost wurde das Inverkehrbringen dieses
Gerätes angezeigt und die erechtigung zur Überprüfung der Serie auf
Einhaltung der estimmungen eingeräumt.
The socket-outlet shall be installed near the equipment and shall be
easily accessible.
4399 294 61151_Rev 1
NOTE: This equipment has been tested and found to comply with the limits for
a Class B digital device, persuant to part 5 of the FCC Rules. These limits are
designed to provide reasonable protection against harmful interference in a residential
installation. This equipment generates, uses and can radiate radio frequency energy
and, if not installed and used in accordance with the instructions, may cause
harmful interference to radio communications. However, there is no guarantee
that inteference will not occur in a particular installation. If this equipment does
cause harmful interference to radio or television reception, which can be determined
by turning the equipment off and on, the user is encouraged to try to correct the
interference by one or more of the following measures:
- Reorient or relocate the receiving antenna.
- Increase the separation between the equipment and receiver.
- Connect the equipment into an outlet on a circuit different from that to which
the receiver is connected.
- Consult the dealer or an experienced radio/ TV technician for help.
This symbol indicates that the unit has a
double insulation system.
Class II equipment symbol
Philips Consumer Electronics North America
One Philips Drive, P.O. ox 14810, Knoxville, TN 37914-1810
Phone: 1-800-531-0039
MMS 223 / 17
FORHOMEOR OFFICE USE
Tested To Comply
With FCC Standards
Installation
Swedish
ÀAnslut ljudkortet.
ÁAnslut strömförsörjningen.
ÂStäll in systemet med hjälp av
ljudkort/ljudkälla och
högtalarkontroller.
Obs: Anslut inte nätkontakten till
nätuttaget förrän alla
anslutningar har gjorts!
Danish
ÀTilslut lydkort.
ÁTilslut strømforsyning.
Ândstil systemet ved hjælp af
lydkort/lydkilde og
højttalerregüleringen.
Bemærk: Sæt ikke stikket i
kontakten til elnettet før alt er
tilsluttet!
English
ÀConnect soundcard.
ÁConnect the power supply.
ÂTune the system using sound
card/sound source and speaker
controls.
Note: Do not insert the power plug
into the AC outlet until all
connections are made!
Francais
ÀConnectez la carte sonore.
ÁBranchez l'alimentation.
ÂAccordez le système à l'aide de
la carte sonore/source sonore et
des commandes des enceintes.
Note: Nintroduisez pas la fiche
dalimentation dans la prise CA
tant que tous les branchements
ne sont pas effectués!
Portuguese
À
Ligue a placa de som.
Á
Ligue a alimentação eléctrica.
Â
Ajuste o sistema utilizando a
placa de som/fonte de som e
controlos das colunas.
Nota: Não introduza a ficha
eléctrica na tomada antes de
fazer todas as ligações!
Norwegian
ÀKople til lydkortet.
ÁKople til strømforsyningen.
ÂFinjuster systemet ved å regulere
innstillingene for lydkortet/
lydkilden og høyttalerne.
Merk: kke sett støpselet i en
stikkontakt før alle
tilkoplingene er gjort!
Polish
ÀPrzyùàczyã kartæ dêwiækowà
ÁWùàczyã do sieci
ÂDostroiã za pomocà karty
dêwiækowej, ukùadu doboru
êródùa sygnaùu oraz ustawiania
barwy i siùy dêwiæku
Uwaga:Nie wùàczaj wtyczki
zasilania do gniazda sieciowego
przed dokonaniem wszystkich
poùàczeñ!
Español
ÀConecte la tarjeta de sonido.
ÁConecte el suministro de
alimentación.
ÂAjuste el sistema con los
controles del altavoz y de la
tarjeta/fuente de sonido.
Observación:No inserte el
conector de alimentación en la
toma de corriente mientras no
haya completado todas las
conexiones.
Finnish
ÀYhdistä äänikortti.
ÁKytke virta.
ÂViritä järjestelmä äänikortin,
äänilähteen ja kaiuttimen
säätimillä.
Huom: Älä yhdistä pistotulppaa
pistorasiaan, ennen kuin kaikki
kytkennät ovat valmiit!
Russian
➀
Ïîäñîåäèíèòå çâóêîâóþ êàðòó.
Á
Ïîäñîåäèíèòå èñòî÷íèê ïèòàíèÿ.
➂
Íàñòðîéòå ñèñòåìó ïðè ïîìîùè
çâóêîâîé êàðòû/èñòî÷íèêà çâóêà è
îðãàíîâ óïðàâëåíèÿ àêóñòè÷åñêîé
ñèñòåìîé.
Ïðèìå÷àíèå:
Íå ïîäñîåäèíÿéòå
âèëêó ñåòåâîãî øíóðà ê ðîçåòêå ñåòè
ïåðåìåííîãî òîêà íå âûïîëíåíû âñå?
íåî õîäèìû? ñîåäèíåíèÿ!
Nederlands
ÀSluit de geluidskaart aan.
ÁSluit de voeding aan.
ÂStel het systeem in met de
regelaars voor de geluidskaart/
geluidsbron en de luidsprekers.
Opmerking: Steek de stekker
van het netsnoer pas in het
stopcontact als alle
aansluitingen gereed zijn!
Turkish
À
Ses kartini baðlayiniz.
Á
Güç kaynaðini takiníz.
Â
Ses karti/ses kaynagi ve
hoparlör kontrollerini kullanarak
sistemi ayarlayiniz.
Not: Bütün baðlantýlarý yapmadan
elektrik fiþini AC çýkýþýna
takmayýnýz!
Italiano
ÀCollegare la scheda audio.
ÁCollegare l'alimentazione.
ÂSintonizzare il sistema
utilizzando la scheda audio/
sorgente e i comandi delle
casse acustiche.
Nota: Non inserire il connettore di
alimentazione nella presa di rete
in c.a. prima di avere completato
tutti i collegamenti!
Deutsch
ÀSchließen Sie die Soundkarte an.
ÁSchließen Sie das Netzteil an.
ÂStellen Sie das System mit Hilfe
der Soundkarte oder einer
anderen Klangquelle und den
Bedienungselementen der
Lautsprecher ein.
Hinweis: Den Netzstecker nicht in
die Steckdose stecken, bis alle
Verbindungen hergestellt worden
sind!
~
EXPLANATION
~
1) Headphone
For private listening a headphone can be
connected
2) Power ON/OFF
To switch on or off power
3) Rotary Volume Control
To adjust the volume higher or lower
4) Line In
To connect the fixed Line In cable to the
soundcard/ sound source
5) Power
To connect to power supply
6) Radio Turner
Change the FM wavelength using the rotary
controller
7) Radio ON/OFF
To turn just the radio on or off
8) Set Time Button
To set the time on the clock (see below)
Diagram of the clock and the setting button French
Pour régler lhorloge
ÀAppuyez sur la touche set
time(réglage heure) pendant
moins d1 seconde pour régler les
minutes.
ÁAppuyez sur la touche set time
et maintenez-la enfoncée
pendant plus d1 seconde pour
régler les heures.
English
To set the clock:-
ÀPress set time button for less
than 1 second to advance the
minute hand.
ÁPress and hold set time button
for more than 1 second to advance
time setting.
Italiano
Per impostare lorologio
ÀPremere il pulsante set time
(imposta ora) per meno di 1
secondo per fare avanzare la
lancetta dei minuti
ÁTenere premuto il pulsante set
time per più di 1 secondo per fare
avanzare limpostazione
dellora.
German
Zum Einstellen der Uhr
ÀDie Taste set time (Uhrzeit
einstellen) weniger als 1 Sekunde
drücken, um die Minuten
einzustellen.
ÁDie Taste set time (Uhrzeit
einstellen) länger als 1 Sekunde
gedrückt halten, um die Stunden
einzustellen.
Esponal
Para poner en hora el reloj
ÀPulse el botón de puesta en hora
menos de 1 segundo para
avanzar minuto a minuto
ÁMantenga pulsado el botón de
puesta en hora durante más de 1
segundo para avanzar de forma
continua.
Nederlands
De klok instellen
ÀDruk kort op de knop set time
om de minuten gelijk te zetten.
ÁHoud de knop set time langer
dan 1 seconde ingedrukt om de
uren gelijk te zetten.

This manual suits for next models

1

Other Philips Speakers manuals

Philips HTS7111/12 User manual

Philips

Philips HTS7111/12 User manual

Philips BT6000 User manual

Philips

Philips BT6000 User manual

Philips SBT75/93 User manual

Philips

Philips SBT75/93 User manual

Philips MMS8085B/94 User manual

Philips

Philips MMS8085B/94 User manual

Philips SPA8210 User manual

Philips

Philips SPA8210 User manual

Philips SBCBC280/00 User manual

Philips

Philips SBCBC280/00 User manual

Philips STS9501/00 User manual

Philips

Philips STS9501/00 User manual

Philips SBCBC710/00 User manual

Philips

Philips SBCBC710/00 User manual

Philips CSS5235Y User manual

Philips

Philips CSS5235Y User manual

Philips SPA8210 User manual

Philips

Philips SPA8210 User manual

Philips AS 141 - User manual

Philips

Philips AS 141 - User manual

Philips PX840T User manual

Philips

Philips PX840T User manual

Philips SPA9350/10 User manual

Philips

Philips SPA9350/10 User manual

Philips CSS5235Y/93 User manual

Philips

Philips CSS5235Y/93 User manual

Philips HTB4150B User manual

Philips

Philips HTB4150B User manual

Philips 50 T Series User manual

Philips

Philips 50 T Series User manual

Philips SPA7355 User manual

Philips

Philips SPA7355 User manual

Philips TAW6205/37 User manual

Philips

Philips TAW6205/37 User manual

Philips SPA2210V Product information sheet

Philips

Philips SPA2210V Product information sheet

Philips HTL2100 User manual

Philips

Philips HTL2100 User manual

Philips SB5200 User manual

Philips

Philips SB5200 User manual

Philips S6305 User manual

Philips

Philips S6305 User manual

Philips HTL2151/F7 User manual

Philips

Philips HTL2151/F7 User manual

Philips HTL5120S/12 User manual

Philips

Philips HTL5120S/12 User manual

Popular Speakers manuals by other brands

iLive ISB223B user guide

iLive

iLive ISB223B user guide

Uniq UniqVoice user guide

Uniq

Uniq UniqVoice user guide

Vision SB-900P user manual

Vision

Vision SB-900P user manual

AudioSource ACLCR6C installation manual

AudioSource

AudioSource ACLCR6C installation manual

Tribit STORMBOX user manual

Tribit

Tribit STORMBOX user manual

Power Dynamics BD40V Series instruction manual

Power Dynamics

Power Dynamics BD40V Series instruction manual

Rockford Fosgate Punch PM2652W Installation & operation

Rockford Fosgate

Rockford Fosgate Punch PM2652W Installation & operation

Edenwood MEGASOUND Instructions for use

Edenwood

Edenwood MEGASOUND Instructions for use

AUDAC VIRO5 user manual

AUDAC

AUDAC VIRO5 user manual

JBL MS115 Technical manual

JBL

JBL MS115 Technical manual

Power Dynamics PDY2215A instruction manual

Power Dynamics

Power Dynamics PDY2215A instruction manual

August MS515 user manual

August

August MS515 user manual

MartinLogan ML-60 user manual

MartinLogan

MartinLogan ML-60 user manual

thomann PA302 A user manual

thomann

thomann PA302 A user manual

Bowers & Wilkins VM6 owner's manual

Bowers & Wilkins

Bowers & Wilkins VM6 owner's manual

DAPAudio RX-10A manual

DAPAudio

DAPAudio RX-10A manual

Axiom Audio QS4 Configuring

Axiom Audio

Axiom Audio QS4 Configuring

Power Dynamics CH300 instruction manual

Power Dynamics

Power Dynamics CH300 instruction manual

manuals.online logo
manuals.online logoBrands
  • About & Mission
  • Contact us
  • Privacy Policy
  • Terms and Conditions

Copyright 2025 Manuals.Online. All Rights Reserved.