Quick Use
Guide
Quick Use
Guide
AZ1836
38
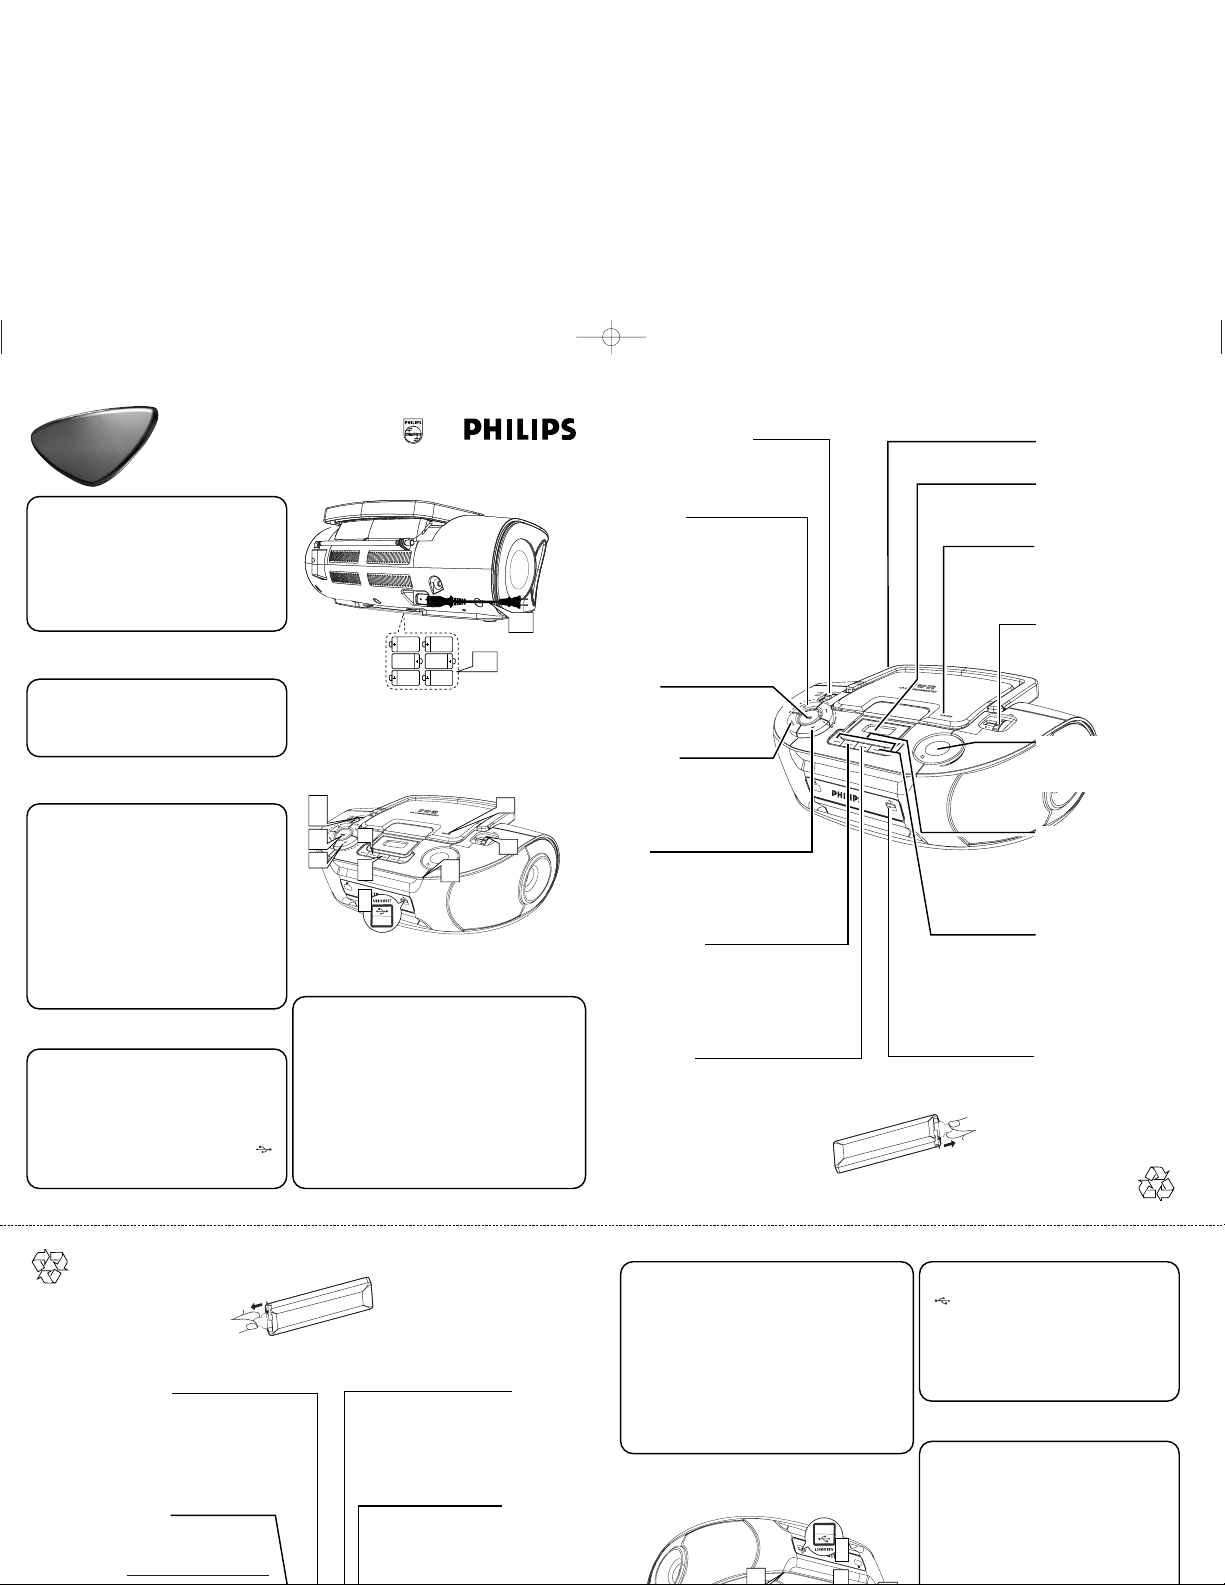
Press to start or pause
disc/USB playback
Source selector
Slide to select
function: CD/MP3
(or USB mode), FM or AM
VOLUME
Turn to adjust volume
level
6 x R14 • UM-2 • C-CELLS
1b
AC MAINS~
PHONES
1a
3c
2a
3a
4a
3e
4d
3f
2b
4d
3e
3b
4b
5c
4c
5b
TUNING
Turn to tune to a
station
OPEN•CLOSE
Push to open the disc
door
9
Press to stop disc/USB
playback, or erase a disc
program
ALBUM +/-
For MP3-CD/USB/WMA
play: Press to select
albums
R-14,UM-2 or C-cells
(not included)
CD/USB
Press to enter disc or
USB mode
∞,§
Briefly press to skip to
the beginning of the
current/previous/
later disc track;
During disc playback,
press and hold to find a
particular passage
backward/forward
MODE
Press to
select different
play modes, such as
REPEAT or SHUFFLE
(random order)
Telescopic antenna
Improves FM reception
PROG
Use to program disc
tracks and review a disc
program
Display
Shows disc/USB functions
USB REC
Copy one file or all files of a
disc to an external portable
USB storage device/MP3 player
2 Listening to the Radio
aPush the source selector to FM or
AM
.
bTurn TUNING to tune to a station.
3 Playing a disc
This player plays Audio Discs including
CD-R/CD-RW, MP3-CD. and WMA.
aAdjust the source selector to CD/USB.
bPress CD/USB to enter CD mode if
“USB” is displayed.
cOpen the disc door.
dInsert a disc with the printed side facing up
and close the door.
ePress 38 to start playback.
fTo stop disc playback, press 9.
4 Playing a USB device
aPush the source selector to CD/USB.
bPress CD/USB to enter USB mode if
“USB” is NOT displayed.
cPlug a compatible USB mass storage
device to AZ1836’s USB port marked .
dPress
2; on your AZ1836 to start play.
5 CD ripping
aFollow steps a-d from “3 Playing a disc”.
bPlug a USB mass storage device.
To r ecord one
c1 Select the track you want to record.
c2 Press once or repeatedly USB REC (or REC
on the remote) until ONE appears, flashing.
To r ecord all
c1 Press repeatedly USB REC (or REC on the
remote) until ALL appears, flashing.
dDisc playback will start automactically.
1 Choosing Power Supply
aConnect the AC power cord to the
AC~ Mains inlet and the wall socket.
-OR-
bOpen the battery door and insert 6 x C
batteries (not included).
USB Port
Connects an external
USB mass storage device
Removing the insulation plastic tab
Quick Use
Guide
Quick Use
Guide
AZ1836
38
Press to start or pause
disc/USB playback
Source selector
Slide to select
function: CD/MP3
(or USB mode), FM or AM
VOLUME
Turn to adjust volume
level
6 x R14 • UM-2 • C-CELLS
1b
AC MAINS~
PHONES
1a
3c
2a
3a
4a
3e
4d
3f
2b
4d
3e
3b
4b
5c
4c
5b
TUNING
Turn to tune to a
station
OPEN•CLOSE
Push to open the disc
door
9
Press to stop disc/USB
playback, or erase a disc
program
ALBUM +/-
For MP3-CD/USB/WMA
play: Press to select
albums
R-14,UM-2 or C-cells
(not included)
CD/USB
Press to enter disc or
USB mode
∞,§
Briefly press to skip to
the beginning of the
current/previous/
later disc track;
During disc playback,
press and hold to find a
particular passage
backward/forward
MODE
Press to
select different
play modes, such as
REPEAT or SHUFFLE
(random order)
Telescopic antenna
Improves FM reception
PROG
Use to program disc
tracks and review a disc
program
Display
Shows disc/USB functions
USB REC
Copy one file or all files of a
disc to an external portable
USB storage device/MP3 player
2 Listening to the Radio
aPush the source selector to FM or
AM
.
bTurn TUNING to tune to a station.
3 Playing a disc
This player plays Audio Discs including
CD-R/CD-RW, MP3-CD. and WMA.
aAdjust the source selector to CD/USB.
bPress CD/USB to enter CD mode if
“USB” is displayed.
cOpen the disc door.
dInsert a disc with the printed side facing up
and close the door.
ePress 38 to start playback.
fTo stop disc playback, press 9.
4 Playing a USB device
aPush the source selector to CD/USB.
bPress CD/USB to enter USB mode if
“USB” is NOT displayed.
cPlug a compatible USB mass storage
device to AZ1836’s USB port marked .
dPress
2; on your AZ1836 to start play.
5 CD ripping
aFollow steps a-d from “3 Playing a disc”.
bPlug a USB mass storage device.
To r ecord one
c1 Select the track you want to record.
c2 Press once or repeatedly USB REC (or REC
on the remote) until ONE appears, flashing.
To r ecord all
c1 Press repeatedly USB REC (or REC on the
remote) until ALL appears, flashing.
dDisc playback will start automactically.
1 Choosing Power Supply
aConnect the AC power cord to the
AC~ Mains inlet and the wall socket.
-OR-
bOpen the battery door and insert 6 x C
batteries (not included).
USB Port
Connects an external
USB mass storage device
Removing the insulation plastic tab
AZ1836_QSG_37. qxp 2006.2.21 4:42 PM Page 1


