6
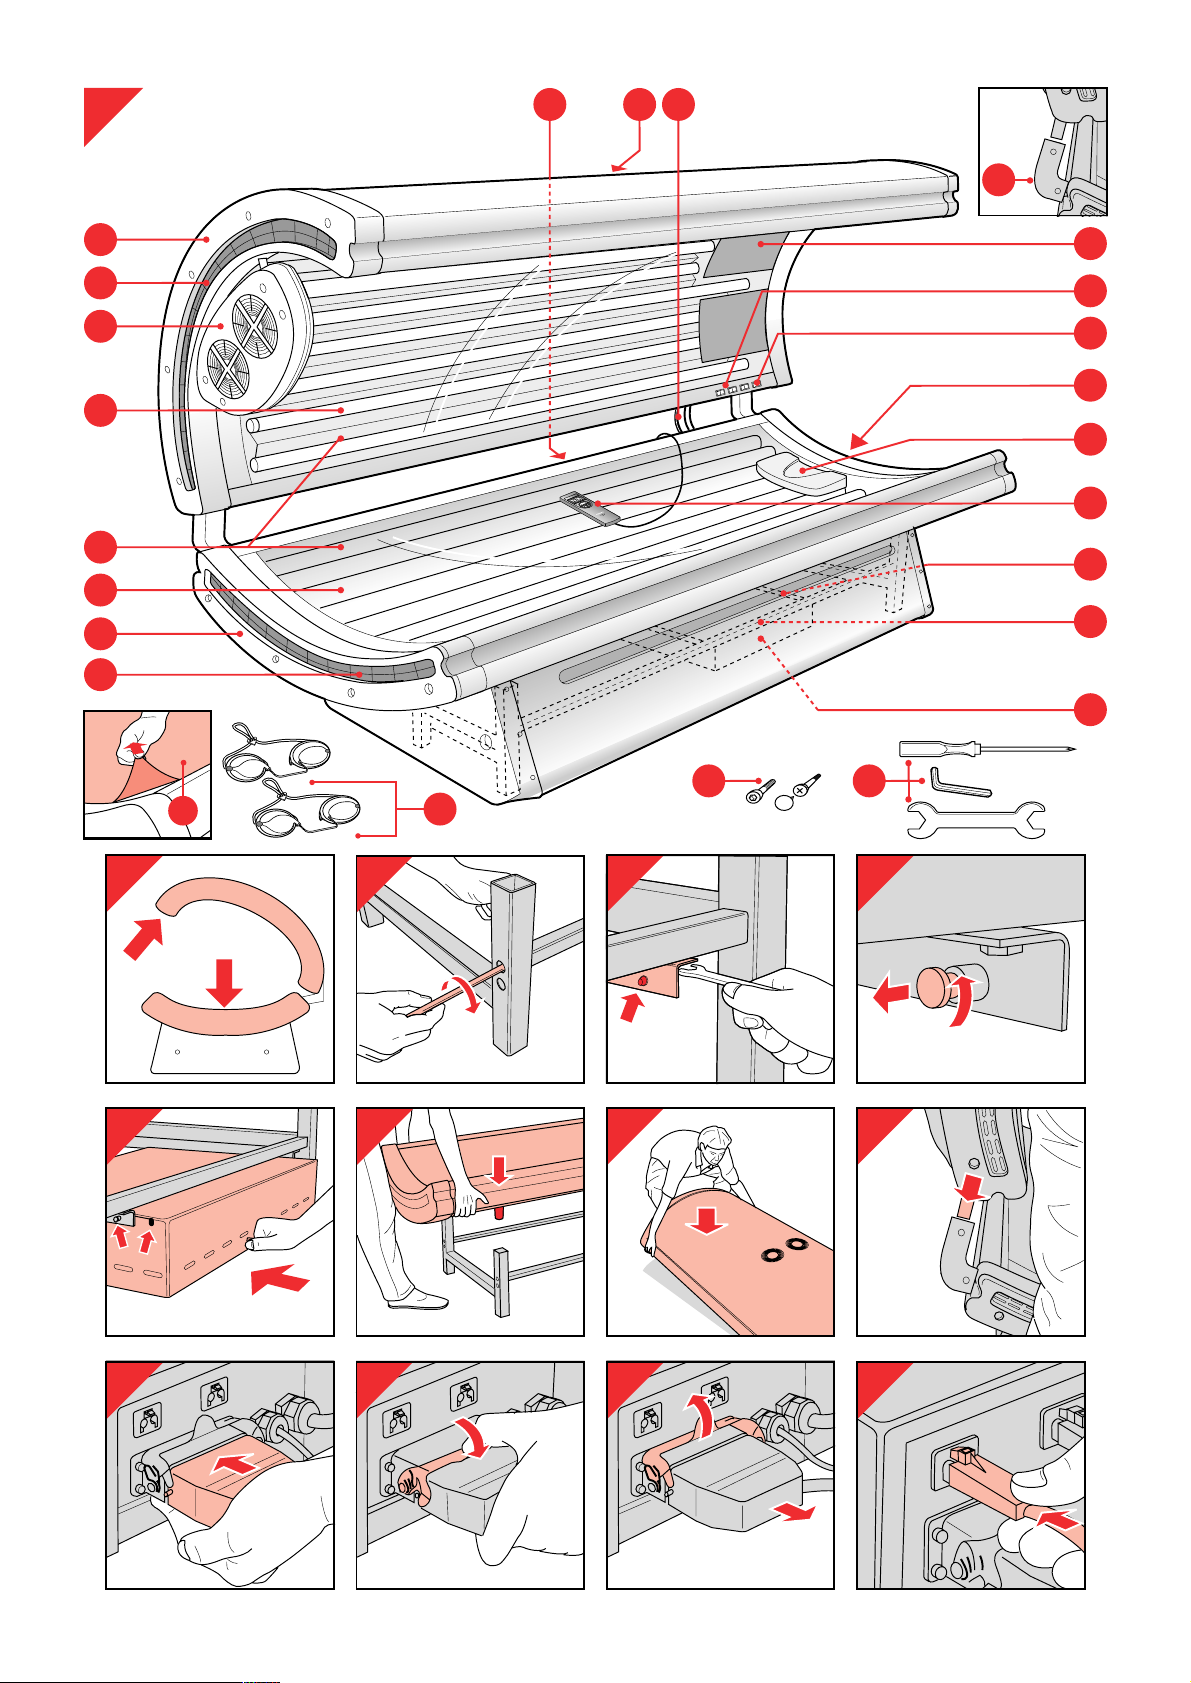
General description (fig. 1, page 3)
ATube lamps and starters of the couch
BTube lamps and starters of the canopy
CFacial tanner
DSwitch(es) for facial tanner
O= facial tanner off
Aand ,= facial tanner on at 75% of its full power
Aand »= facial tanner on at full power
EFan for body cooling
FSwitches for fan
O= fan off
Aand n= fan on at half power
Aand b= fan on at full power
GEnd covers
HMains cord
ILegs of the frame
JConnecting tubes with protective covers
KConnecting cords between power supply unit and couch and
canopy
LFans to cool the tube lamps
MVents
NAcrylic sheets
OProtective foil
PProtective goggles (2 pairs)
(type no. HB 072/service no. 4822 690 80147)
QScrews, socket-head screws and decorative caps
RSocket-head screw wrench, screwdriver and spanner
SPillow
TRemote control
UHour counter
VGuide rails
WPower supply unit
Making the solarium ready for use
• It requires two people to assemble and move the solarium (fig. 2).
• During assembly the solarium becomes heavier and more difficult
to move. We therefore advise you to assemble the solarium at the
place where it will be used. Make sure there is enough free space
beside (at least 50 cm) and behind (at least 30 cm) the solarium.
- Assemble the tubes of the frame by means of socket-head screws
(fig. 3).
• Make sure the larger assembly openings in the legs of the frame are
pointing outward.
- Fasten the guide rails for the power supply to the frame (fig. 4).
• Make sure the locking pins are at the front and pointing inward.
- Pull the locking pins outward, as indicated in fig. 5, and give them a
quarter turn.
- Push the power supply unit some 10 cm along the guide rails
(fig. 6) and give the locking pins a quarter turn back to their
original position. Push the power supply unit further along the
guide rails until you hear a click.
• NB: The plugs should be pointing backwards. Make sure the cords
do not get caught under the wheels of the unit.
- Put the couch on the legs carefully. Make sure the legs slide
steadily into the appropriate openings in the couch (fig. 7).
• NB: The connecting tubes of the couch should be pointing
backward.
- Put the canopy on the floor with the tube lamps pointing
downward (fig. 8).
- Lift the canopy together with another person and position its
connecting tubes over the connecting tubes of the couch (fig. 9).
- Slide the tubes steadily into the connecting tubes of the couch.
- Put the plugs of the power supply unit in the sockets of the couch
and the canopy.
Insert the large plug into the socket of the power supply unit. This
will take some effort. Lock the plug in position by operating the
metal handle (figs. 10 and 11). For undoing the plug, see fig. 12.
The small plugs are identical and interchangeable. Put them in the
appropriate sockets of the power supply unit (fig. 13). For undoing
the small plugs, see fig. 14.
- Pull the remote control forward between the couch and the
canopy.
- Fasten the side panels to the legs of the frame (fig. 15) with the
screws supplied (fig. 16). Slide the front panel behind the edges of
the side panels and fasten it with the screws supplied (fig.17).
Stick to the order indicated in fig. 14 to ensure that side panels (1)
and (2) enclose the edges of the front panel (3).
- Fasten the front panel to the couch and push the decorative caps
onto the screw heads.
• The only purpose of the panels is to enhance the appearance of the
appliance.
- NB: Only move the solarium by carefully sliding its legs across the
floor or by carefully lifting it slightly off the floor together with
another person.
• Never try to move the solarium as shown in fig. 18. This could
cause the frame to couch to become detached.
Making ready for use
- Push the canopy backward (fig. 19) and remove the protective foil
from the acrylic sheet (fig. 20).
- Insert the plug of the power supply unit into the wall socket.
Remote control (fig. 21)
aTime setting button 0-30 minutes
bStart button
cPause button
dBlinking signal
ePilot lamp
fBuzzer
gDisplay
• Note that in the following instructions, the buttons to be
used are shown in red.
• In the following cases the number 00 will appear on the
display:
- after you have put the plug in the wall socket;
- at the end of a tanning session;
- after a power failure.
In all these cases, the tanning lamps are out.
- When you put the plug in the wall socket, pilot light ewill go on
(fig. 22). This pilot light will stay on as long as the appliance is
connected to the mains. Fully unwind the mains cord.
- First set the time of the tanning session. Push the +button to put
the time forward; push the -button to put the time backward
(fig. 23). Keep the button pressed in to adjust the time more
quickly.
- Switch on the tanning lamps by pressing the start button I
(fig. 24).
• A blinking signal dwill appear; the set time is shown on display g
(25 minutes in this case) (fig. 25). The countdown of the set
tanning time will now start.
• You can interrupt the tanning session by pressing pause button fi
(fig. 26). The tanning lamps will be switched off. You can switch
them back on again by pressing start button I(fig. 27).
The remaining tanning time will appear on the display.