ADVANCED UV LIGHT ELIXIR User manual

ADVANCED UV LIGHT GMBH • RUHRTALSTRASSE 85-93 • D-45239 ESSEN
Phone: ++ 49 201 8 49 12 – 10
FAX: ++ 49 201 8 49 12 – 55
e-mail:[email protected]
www.auvl.de/ www.drmueller.de
FUTURE INDUSTRIES, ORIGINAL DR. MÜLLER • 626 SURF AVE • STRATFORD, CT 06615
Phone: (203) 381-0000
(800) 376-8537
Fax: (203) 380-6540
5880 BLACKWELDER ST • CULVER CITY, CA 90232
Phone: (310) 841-0500
Fax: (310 0 841-0509
e-mail: [email protected]
weww.futureindustires.com / www.auvl.com
OWNER‘S MANUAL
ORIGINAL DR. MÜLLER HIGH PERFORMANCE TANNING EQUIPMENT
(Version 2, 06/2004 Technical Changes Reserved)

Original Dr. Müller®
ORIGINAL DR. MÜLLER HIGH PERFORMANCE TANNING EQUIPMENT
2
Preface
This Owner‘s Manual will help you to operate and use the
high-performance sunbed ELIXIR, in this manual referred to
as “sunbed“ or “ELIXIR“ in a safe and appropriate way.
This Manual is addressed to:
• Service personnel
• Authorized and skilled electrical personnel
• Qualified tanning salon personnel and
• End-users
Every person who
• transports
• installs
• connects
• operates
• sets the controls
• maintains
• cleans
• disassembles
• stores or
• disposes of
Keep this manual in a place close to the sunbed for further
use.
Features
Diverse elements in this manual show a standardized format.
This way it is easier to distinguish between standard text
elements,
• listings or
steps of action
Description
The high-performance sunbed ELIXIR offers peak tanning
performance at a premium comfort level.
The ELIXIR is the perfect choice for professional tanning
salons as well as for fitness and beauty salons.
The compact design allows for installation in smaller rooms
with limited space.
The esthetic and functional design easily fits into any salon
decor.
The user friendly control panel with integrated display allows
simple and easy use of controls during a tanning session.
The body cooling is individually adjustable. As an option,
the sunbed can also be equipped with an A/C unit.
The SunFresh-System neutralizes the typical tanning odour.
An aroma-device, SunHaze which is also available as an
option, infuses the body cooling air with a finely vaporized
citrus aroma for a comfortable and refreshing tanning
experience.

Original Dr. Müller®
ORIGINAL DR. MÜLLER HIGH PERFORMANCE TANNING EQUIPMENT
3
Table of Contents .........................................3
Safety Instructions - further details ..................................5
Obligations of the Operator ..........................................5
Proper use of the Sunbed ..............................................6
Improper Use ...............................................................6
Hints at Residual Risks ...................................................6
Basic Safety Instructions ................................................7
Electrical Connection .............................................7
Safety Provisions ....................................................7
The right location ..................................................7
Operation .............................................................7
Transportation .......................................................7
Cleaning ..............................................................7
Maintenance .........................................................7
Safety Instructions for Users ...........................................8
Safety Devices ..............................................................8
Emergency Stop Button ..........................................8
Mains Disconnection Switch ...................................8
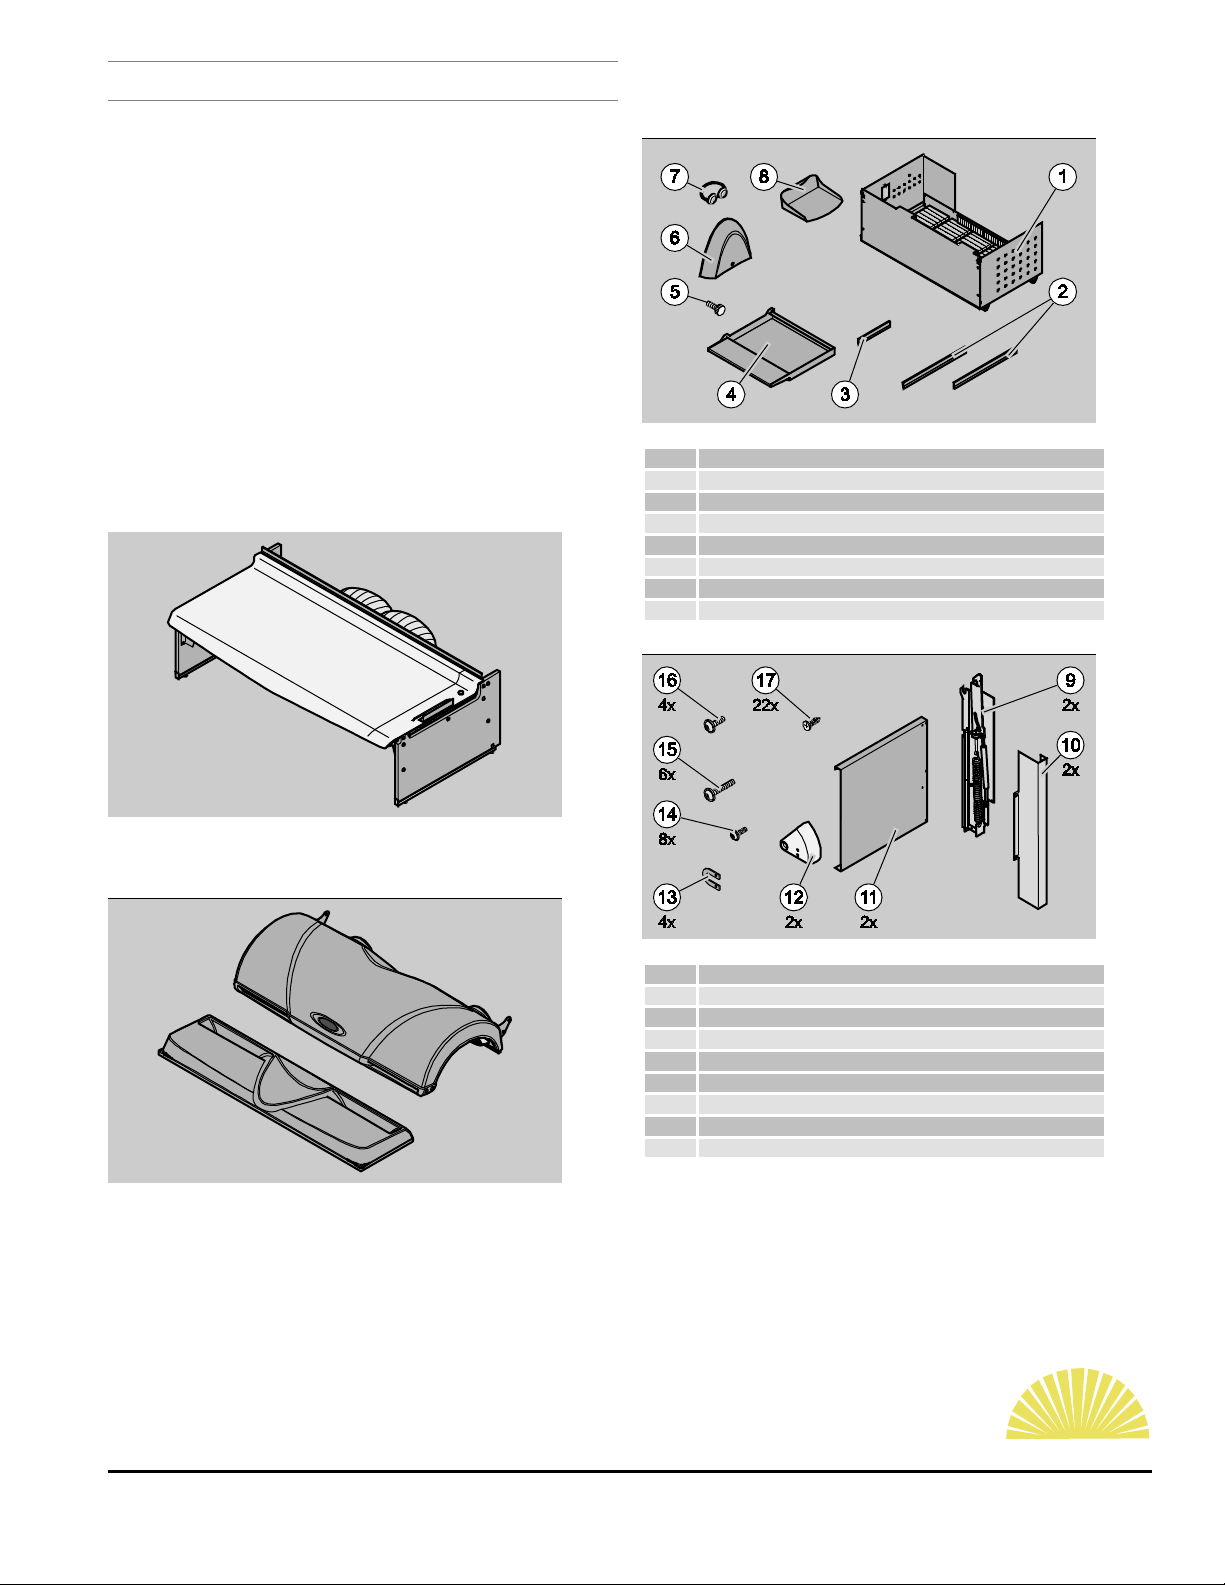
Delivery .......................................................9
Sunbed ........................................................................9
Top and Front Cover Plate .............................................9
Ballast Tray and additional components ..........................9
Technical Data ...........................................10
Room Requirements ....................................................10
General Lay-Out ........................................................11
Front View ...........................................................11
The Rear View .....................................................12
The Control Panel ................................................13
Transport ...................................................14
Transport with a fork-lift ........................................14
Transport with a rolling truck/trolley .......................14
Assembly and el. connection .....................14
Preparatory work at the site of installation .....................15
Assembly Steps at the Sunbed ......................................15
- rear side ..................................................................15
Pivot-Supports .....................................................15
Back plates .........................................................15
Top ....................................................................16
Spring Coverings .................................................16
Pivot-Support Coverings .......................................17
Exhaust Air Hoses ................................................17
Electrical Cable, Time-Control Device,
Coinbox Device ...................................................17
Ballast Tray .........................................................18
A/C trough .........................................................19
A/C unit (optional) ...............................................20
SunHaze Aroma Device (optional) .........................20
Front Cover Plate .................................................21
Removal of protective foils ....................................21
Body Cooling Fan ...............................................21
Control .......................................................22
Control with coinbox control device .............................22
Control without coinbox control device .........................22
The Emergency Stop Button .........................................22
Control Options .........................................................23
Facials ................................................................23
Body Cooling Fan ...............................................23
Ionizer ................................................................23
Air Conditioning Unit (optional) ............................23
SunHaze aroma device (optional) .........................23
Exposure Time .....................................................23
Sarting/Stopping a tanning session .......................23
Definition of Skin Type .................................................24
Recommended Exposure Time
for ELIXIR Version 36-03 .......................................24
Recommnded Exposure Times
for ELIXIR Version 40-00 .......................................25
Recommended Exposure Times
for ELIXIR Version 40-03 .......................................25
Maintenance ..............................................26
Maintenance Chart .....................................................26
Daily Maintenance Inspection prior to first Operation ...26
The daily maintenance inspection includes: ............26
Annual Inspection (or every 800 hours of
operation whatever occurs first) .............................26
Body Cooling Fan ......................................................27
Disassembly ........................................................27
Assembly ............................................................27
Sunbed Plexi ..............................................................28
Lifting the sunbed plexi .........................................28
Disassembly ........................................................28
Assembly ............................................................29
Closing the Sunbed Plexi ......................................29
Top Plexi ....................................................................30
Disassembly ........................................................30
Assembly ............................................................31
Front Cover Plate .................................................... 31
Disassembly ........................................................31
Assembly ............................................................31
Low-Pressure Lamps and Starters ..................................32
Disassembly ........................................................32
Assembly ............................................................32

Original Dr. Müller®
ORIGINAL DR. MÜLLER HIGH PERFORMANCE TANNING EQUIPMENT
4
Facial Filterglass Frames ..............................................33
Disassembly ........................................................33
Assembly ............................................................33
Facial Filters ...............................................................33
Disassembly ........................................................33
Assembly ............................................................33
High-Pressure Lamps ..................................................34
Disassembly ........................................................34
Assembly ............................................................34
Ignitor for high-pressure lamp .................35
Disassembly ........................................................35
Assembly ............................................................35
Show-Light .................................................................35
Disassembly ........................................................35
Assembly ............................................................35
Aroma Device ............................................................36
Disassembly ........................................................36
Assembly ............................................................36
Cleaning ....................................................36
Disassembly ..............................................37
Storage ......................................................38
Re-use .......................................................38
Troubleshooting ........................................38
Disposal .....................................................38
Contacts: ....................................................38
Declaration of Conformity .........................38
Standards ..................................................38
Warranty ...................................................38

Original Dr. Müller®
ORIGINAL DR. MÜLLER HIGH PERFORMANCE TANNING EQUIPMENT
5
Safety Instructions
In this chapter you will find information on the proper and
improper use of the sunbed, obligations of the operator,
residual risks and general and specific dangers.
Read this chapter carefully prior to first operating the sunbed.
Always follow these safety instructions.
The operator is obliged to make sure that all safety
instructions are known, understood, and strictly observed.
If you sell or in any other way dispose of this sunbed, include
this Owner‘s Manual with the shipment.
Please send the name, address, phone or fax-number
of the new owner immediately to Advanced UV Light
or its authorized local/national distributor in order
to provide up-dates about important or unexpected
safety actions to the new owner.
Safety Instructions – further details
In this manual you find the following categories of safety
instructions and notices:
DANGER!
Notices containing the word
DANGER refer to a dangerous
situation which can result in fatal
or serious injuries.
CAUTION!
Notices containing the word
CAUTION refer to a dangerous
situation which can result in light
injuries or damage to goods and
property.
ATTENTION!
Notices containing the word
ATTENTION refer to a situation
which can result in damage
to goods or in environmental
damages.
These notices contain information on the use of
the sunbed.
Obligations of the Operator
Advanced UV Light GmbH is not responsible for damages
caused by improper use of the sunbed or disregard of the
instructions provided in this manual.
The operator of this sunbed must ensure that only skilled and
authorized personnel assembles this sunbed ready for use
and operates, maintains, and cleans this sunbed.
• The operator must make this manual available to the
staff performing transport and assembly work, and/ or
performing operation, maintenance and cleaning jobs.
Operator must also provide information on all applicable
standards and regulations for the prevention of accidents
at the workplace and provisions for a safe working-
environment. Operator must ensure that all safety
instructions are strictly observed.
• Prior to any use of the sunbed the operator or a person
authorized by the operator must ensure that
- the proper use of the sunbed is guaranteed and
- all safety standards are observed.

Original Dr. Müller®
ORIGINAL DR. MÜLLER HIGH PERFORMANCE TANNING EQUIPMENT
6
Proper Use of the Sunbed
Only adult human beings whose skin is suitable for cosmetic
tanning are allowed to use this sunbed.
The following persons suffering from one or more of the
symptoms described below are not allowed to use a sunbed:
• increased sensitivity to UV-light,
• allergic reactions caused by UV-light exposure,
• skin diseases which would exclude cosmetic tanning
• coronary and circulatory diseases,
• symptoms of disease or
• other unidentified health problems or
• people with pace-makers or
• under medication or using medicaton which may have
adverse effects in combination with UV-light exposure.
The recommended exposure times must always be observed.
See recommended exposure schedules on page 24 or – for
export units - separate attachment.
Use sunbed only with protective eye-wear.
This sunbed is designed exclusively for use in commercial
tanning salons, fitness and beauty studios subject to the
supervision and control of specially trained operational staff.
The proper use of the sunbed includes to consider with due
diligence all the information provided in this manual and
- in particular - to observe all safety instructions.
Every other use of the sunbed is regarded as an improper
and unsuitable use of the sunbed and may result in damages
to goods or property or eventually to serious personal harm.
Advanced UV Light GmbH is not responsible for injuries due
to improper use.
Improper Use
The use of this sunbed
• by children
• by persons suffering from diseases,
• by people disregarding recommended exposure times
• by people not wearing protective eye-wear are improper
uses of this sunbed and may cause personal injuries.
Advanced UV Light GmbH is not responsible for injuries
caused by improper use.
Hints at Residual Risks
This sunbed is designed according to state-of-the-art
standards and acknowledged safety regulations as well as all
relevant technical standards.
The construction is designed to prevent potential dangers or
to make due provisions for eventual dangers.
Despite of these provisions there still remain residual risks
when using this sunbed.
Eventual dangers for persons as well as goods and property
can be caused by
• operation of the sunbed in an improper way,
• use of the sunbed in an improper way or
• transportation of the sunbed in an improper way, the
start-up/turn off of the sunbed in an improper way,
maintainenance or or cleaning in an improper way.

Original Dr. Müller®
ORIGINAL DR. MÜLLER HIGH PERFORMANCE TANNING EQUIPMENT
7
Basic Safety Instructions
• Observe all Safety Instructions attached to the sunbed
and provided in this manual.
• Only authorized and skilled personnel is allowed to
transport, assemble, start-up and disassemble the
sunbed.
• Service personnel of Advanced UV Light GmbH and
its authorized distributors' are considered as trained
staff with the necessary expertise. This also includes
skilled electrical personnel who due to their training and
practical expertise provide appropriate handling and
service and who are aware of all potential dangers.
• Avoid any use or handling that may incur certain risks.
• Transportation, disassembly, assembly, maintenance
and cleaning (i.e. of low-pressure lamps) must only be
performed after the unit has completely cooled down.
Electrical Connection
• Operation of the sunbed is only allowed if the unit is
connected and secured on the site in compliance with
the technical requirements stated on the type label and in
accordance with local electrical standards.
• Operation of the sunbed is only allowed, if a mains
disconnection switch.
• Ensure that liquids ( i.e. cleaning solutions) do not get
into the sunbed. Stop the mains supply immediately by
activating mains disconnection switch and secure it with
lock and key in case any liquids have entered into the
sunbed.
• Prior to performing any jobs on the sunbed, i. e.
transportation, assembly, disassembly, maintenance
and cleaning the mains supply must be switched off. In
addition, the mains disconnection switch must be secured
with lock and key against unauthorized or accidential turn
on.
Safety Provisions
• Use the sunbed only when in fault-free technical
condition. All protection and safety devices must be
assembled and in working condition.
• Use the sunbed only with installed front cover plate.
• All DANGER-labels and notices must be immediately
replaced when damaged.
• Do not use the sunbed with defective filters or timer.
Suitable Site of Installation
• Do not install the sunbed in damp rooms or in rooms
where there is a risk of explosions.
• Do not keep or store any containers with explosive
materials, i. e. spray cans, close to the sunbeds.
• Smoking and open flames are prohibited within proximity
of the sunbed.
• Do not expose materials that may suffer damage from
UV-light exposure to the UV-rays emitted from this
sunbed.
Operation
• Do not cover or block ventilation (i. e. air entry) or
cooling devices to avoid potential thermal damages.
• Before or after each use, check the sunbed for obvious
outer damages or defects and eliminate immediately.
• Defects which may affect the safe operation of the sunbed
must be communicated immediately to the responsible
person in charge on the owner/operator' s behalf.
Discontinue the use of the sunbed until all of these defects
have been removed.
Transportation
• All devices used for transportation must be adequate to
the weight of the sunbed.
• All applicable standards and regulations to prevent
accidents at the work-place must be observed.
• All paths of transportation must be blocked and clearly
marked to prevent injuries caused by transportation
vehicles or the load.
Cleaning
• Clean and disinfect the sunbed prior to each use. Remove
rests of sanitary foils or other substances.
• Never clean the sunbed with abrasive or corrosive
cleaning materials. Do not use any tools with sharp
edges.
Maintenance
• All maintenance instructions and intervals must be
observed.
• Use only original spare parts as provided by Advanced
UV Light GmbH or its authorized distributors. In any
other case you need authorized service personnel to
approve of these parts being in compliance with technical
specifications as required by manufacturer.

Original Dr. Müller®
ORIGINAL DR. MÜLLER HIGH PERFORMANCE TANNING EQUIPMENT
8
Safety Instructions for Users
UV-light can cause damage to your skin and your eyes.
• Persons with very light skin, many freckles, fair to reddish
hair and light eyes and nipples are not allowed to use a
sunbed.
• Always wear protective eye-wear during a tanning session
and close your eyes.
• Take out contact lenses prior to a tanning session.
• Remove make-up or any cosmetics several hours
before taking a tanning session. Cosmetics may have
unwelcome side-effects and can cause adverse skin
reactions.
• Take only 1 (one) tanning session a day.
• For the first two sessions observe an interval of 48 hours.
• For the following sessions observe an interval of minimum
24 hours between tanning sessions.
• After a tanning session, do not tan in the natural sun on
the same day.
• Stop exposure immediately when you notice physical
symptoms or adverse skin reactions.
If the symptoms do not disappear after a short time,
consult your physician.
• Do not use drugs which promise to tan the skin without
UV-light exposure in combination with a tanning session.
This combination may increase the risk of a sunburn.
• Do not use any self-tanning creams or lotions. These
products may contain ingredients which can increase
the effects of UV-light exposure in an unforeseen and
unwelcome way.
• Do not use any creams or lotions with a sunscreeen
designed for outdoor tanning. These products may
contain substances which can influence the effects of
artificial UV-light exposure in an unwelcome way. Use
only products designed specifically for indoor tanning.
• Immoderate tanning results in overexposure. If skin
shows signs of blisters or irritation, consult physician
immediately.
• Over-exposure to UV-radiation emitted either by the sun
or indoor tanning equipment can cause premature aging
of the skin and increase the risk of skin cancer.
• The unprotected eye can catch conjunctivitis and in some
cases overexposure can seriously damage the retina.
Repeated exposures the increase the risk of cataracts.
Safety Devices
Emergency Stop Button
In case of danger all low- and high-pressure (HID) facial
lamps of the sunbed can be switched off immediately by
pushing the Emergency Stop Button. The ventilation system
will switch off after a short delay time.
In case of danger push the Emergency Stop Button
Low-pressure lamps and HID facial lamps will switch off.
Mains Disconnection Switch
The mains disconnection switch must be installed at the site.
During breaks of operation and after hours the mains
supply must be disconnected with the mains disconnection
switch. The switch must be secured with lock and key against
unauthorized reconnection.
If you want to disconnect the mains supply, turn the mains
disconnection switch into position "0".
The mains supply is disconnected.
Put the lock into the opening of the switch..
Close the lock.
If you want to reconnect the mains supply, remove the
lock.
Turn the mains disconnection switch into position “I“.

Original Dr. Müller®
ORIGINAL DR. MÜLLER HIGH PERFORMANCE TANNING EQUIPMENT
9
Delivery
On delivery you will receive 3 or 4 boxes respectively.
Check boxes immediately for signs of any transport
damages.
Inform forwarder immediately if you notice any relevant
and obvious damages.
Check immediately if you have received a complete
shipment as shown below.
As an option delivery may include additional
boxes with A/C unit and SunHaze device.
Sunbed
Top and Front Cover Plate
Ballast Tray and additional
components
1Ballast Tray
2Long brush seal
3Short brush seal
4A/C trough
5Black thumb screw for body cooling fan
6Body cooling fan
7Protective eye-wear
8Head-rest
9Pivot support
10 Spring covering
11 Back-plate
12 Pivot-support covering
13 U-bracket
14 Threaded screw M5x10
15 Long socket head cap screw M10x40
16 Short socket head cap screw M10x20
17 Sheet metal screw

Original Dr. Müller®
ORIGINAL DR. MÜLLER HIGH PERFORMANCE TANNING EQUIPMENT
10
Technical Data
Please see also technical data on the type label. For Northamerican equipment see separate data sheets.
Dimensions Length 2250 mm
Depth 1200 mm
Height (top open) 1180 mm
Height (top closed) 1690 mm
Entry level 600 mm
Weight Unit, cpl. without A/C unit ca. 350 kg
Sunbed ca. 125 kg
Top ca. 100 kg
Ballast Tray ca. 125 kg
Configuration
(Standard Version)
36-03 36 x 180 cm Low-pressure lamps
Facials 3 x 300/500 W
40-00 40 x 200 cm Low -pressure lamps
no facials
40-03 40 x 180 cm Low-pressure lamps
Facials: Left & Right: 2 x 650 W
Center: 1 x 1000 W
Room Ventilation and
Exhaust Air
Required access to open air 200 mm x 200 mm
Exhaust air volume 2500 m3/h
Main exhaust air stack Diameter 300 mm, Length max. 4 m
Electrical Connection
(only for EU-Standard
Versions)
Operational voltage 400 V / 50 Hz / 3 ph NPE
Configuration (Standard versions) 36-03 40-00 40-03
Total wattage ( without A/C) ca. 7000 W ca. 8800 W ca. 9750 W
Fusage 3 x 25 A 3 x 32 A 3 x 32 A
Required wire gauge on the site
flexible Wire Europa HO5VV-F
5 x 4 mm25 x 6 mm25 x 6 mm2
FI-Switch on the site 3 x 25/32 A
Room Requirements
Required space for operation and maintenance min. 2,5 x 2,5 m
Floor, level, load capacity min. 1,8 kN/m2
Ambient temperature +10 °C bis +30 °C
Relative humidity max. 65%

Original Dr. Müller®
ORIGINAL DR. MÜLLER HIGH PERFORMANCE TANNING EQUIPMENT
11
General Lay-Out
Front View
1Top 5Body Cooling Fan
2Facials 6Front Cover Plate
3Control Panel 7Sunbed Plexi
4Emergency Stop Button 8Silver-coloured Top Profile

Original Dr. Müller®
ORIGINAL DR. MÜLLER HIGH PERFORMANCE TANNING EQUIPMENT
12
Rear View
1Top 7Screwed Gland for Electrical Connection
Coinbox-Control device
2Back Plate 8Screwed Gland for Electrical Connection
3Exhaust Air Hose – footend 9Exhaust Air Hose - headend
4Main Exhaust Air Hose 10 Sunbed – side plates
5Type Label 11 Fresh Air Entry – right & left
6Connection for Coinbox or Control-Device (Timer)
(I/O-Board)

Original Dr. Müller®
ORIGINAL DR. MÜLLER HIGH PERFORMANCE TANNING EQUIPMENT
13
The Control Panel
1Display
-displays tanning time
5Set Time
Sets exposure time
(only for units without external
control device
2Ionizer ON/OFF
- neutralizes tanning odour
6Body Cooling Fan
– High Intensity
– OFF
– Low Intensity
3Optional:
Aroma Device ON/OFF
- refreshing aroma on demand
7Facials
– High Intensity
– Low Intensity
4Optional:
A/C unit ON/OFF
8Tanning Session
Start/ Stop / Remote Start

Original Dr. Müller®
ORIGINAL DR. MÜLLER HIGH PERFORMANCE TANNING EQUIPMENT
14
Transport
DANGER
MOVING LOAD!
Risk of injuries by moving load
or transport vehicles. Block
all transport paths to prevent
personal injuries caused by
transport vehicles or the load.
DANGER
Risk of Falling or
Slipping!
Due to its great weight, the
components of the sunbed can
cause bruises when falling down
or slipping.
Wear safety shoes!
Transport with a fork-lift
If the sunbed is mounted to a pallet, drive the forks
carefully into the pallet openings.
If the sunbed is not mounted to a pallet, four (4) persons
carefully lift the individual boxes onto the forks.
DANGER
TOPPLING LOAD!
The heavy load can cause
personal injuries or material
damages when toppling
down. Tilt the lift forks slightly
backwards to prevent the load
from toppling down.
Lift the load only for a few centimeters.
Drive the load carefully to the place of installation.
Transport with a rolling truck/trolley
Four (4) persons lift a single box onto the trolley
Roll the box carefully to the place of installation.
Four (4) persons carefully lift the box from the trolley.
Repeat the same procedure for all 3 boxes.
Assembly and el. connection
DANGER
FAULTY ASSEMBLY!
Incorrectly performed assembly
and connection work can result
in serious damages and fatal
injuries.
Only service technicians and
skilled electrical personnel are
allowed to perform assembly
work and electrical connection.
Four (4) persons are needed to perform the assembly job.
For assembly of the sunbed, proceed in the following order:
• Preparations at the site of installation
• Assembly steps at the sunbed – rear side:
– Pivot support
– Back plates
– Top
– Spring coverings
– Coverings for pivot support
– Exhaust Air Hoses
– Electrical wires
– Connection wires of timer control device or coinbox.
– Assembly steps at the sunbed – front side:
– Ballast Tray
– A/C trough
– A/C unit (optional)
– Aroma device (optional)
– Front Cover Plate
– Removal of protective foils
– Body Cooling Fan
For assembly of the sunbed you need the following tools:
• Allan key (hexagon socket screw key) , 6 mm
• Philips-screwdriver (crosstip screwdriver)
• Slotted screwdriver

Original Dr. Müller®
ORIGINAL DR. MÜLLER HIGH PERFORMANCE TANNING EQUIPMENT
15
Preparatory work at the site of
installation
CAUTION
HEAVY LOAD!
Overstraining when carrying the
heavy sunbed components can
cause serious damages to your
health.
Always carry the heavy
components of the unit with four
(4) persons.
Bring the boxes to the site of installation. Observe
instructions provided in the previous chapter “Transport”
Four (4) persons lift the sunbed from the pallet and move
it to the place of installation.
ATTENTION
Some components may easily
get scratched. Do not knock at
components. Do not damage
or scratch surfaces, i. e. with
assembly tools.
Open the box and unpack the sunbed as much as
possible.
Initially, position the sunbed in such a way, that
there is enough space for necessary assembly
work at the rear .
Four (4) persons lift the sunbed out of the box.
Four (4) persons cary the box with the ballast tray to
the place of installation and set it down in front of the
sunbed.
Check if shipment is complete.
ATTENTION!
Do not move the ballast tray
sideways. The wheels can move
forwards and backwards but not
sideways. When pushing the
ballast tray sideways, the wheels
may break.
Four (4) persons take the ballast tray out of the box.
Store for further use.
Assembly Steps at the Sunbed
- rear side
Keep the following items ready for use at the rear side of
the sunbed:
– 2 pivot supports,
– 6 long (M10x40) and 4 short (M10x20) hexagon
socket screws
– 2 back plates
– 10 metal sheet screws
Unpack these items.
Pivot-Supports
Mount the first pivot support to the sunbed as shown
below.
Put the 5 five screws into the threaded holes, three long
ones at the sides, two short ones below the spring. Fasten
screws thumb-tight.
Tighten the five screws with screwdriver.
Mount the second pivot support following the same
procedure.
Back plates
Mount the back plates to the sunbed as shown below.
First, fasten the screws hand-tight.
Tighten the screws with screwdriver.

Original Dr. Müller®
ORIGINAL DR. MÜLLER HIGH PERFORMANCE TANNING EQUIPMENT
16
Top
Keep the following items ready for use at the rear side of
the sunbedt:
– 4 U-brackets
– 8 threaded bolts M5x10
Four (4) persons carry the box which contains the top and
the front cover plate to the place of installation and set it
down.
Open the box and remove loose packing and padding
material.
Four (4) persons lift the top out of the box and set it in
front of the sunbed.
Store the front cover plate for further use.
Four persons (4) lift the top in level position over the
sunbed. The exhaust air openings must show to the rear
side of the sunbed.
CAUTION
RISK OF BRUISES!
There is a risk of hand bruises
when letting the top into the pivot
supports. When lifting the top, do
not hold to the hinge bolts.
Let the hinge bolts (1) of the top slide into the fork of the
pivot support (4)
Carefully tilt the top backwards so that the hauling lugs
(2) of the pivot supports lock on both sides over the tie-
bolts (3) of the top.
Close the top carefully and let it go.
The hinge and tie bolts of the top are secured
with U-brackets.
This prevents the bolts of the top from sliding
out of the hauling lugs or pivot support forks
respectively.
Put one U-bracket each around the tie-bolts and fasten
with two screws to the hauling lug.
Put one U-bracket each around the hinge-bolts and
fasten with two screws to the pivot-support. .
Spring Coverings
Keep the following items ready for use at the rear side of
the sunbed:
– 2 Spring Coverings,
– 2 Pivot support coverings
– 12 Metal sheet screws
Unpack these items.
Mount the spring coverings to the pivot supports as
shown below.
At first, fasten 4 screws each hand-tight.
Tighten screws with screwdriver.

Original Dr. Müller®
ORIGINAL DR. MÜLLER HIGH PERFORMANCE TANNING EQUIPMENT
17
Pivot-Support Coverings
Mount the first pivot support covering as shown below to
the pivot support:
Fasten the two screws hand-tight.
For assembly of the second pivot support covering, follow
the same procedure.
Exhaust Air Hoses
Feed the wires of the head—end through the exhaust air
hose of the head-end.
Push the exhaust air hose of the head-end over the hose
collar of the exhaust air duct at the head-end.
Fix the exhaust air hose with the hose clip.
Push the exhaust air hose of the foot-end over the hose
collar of the exhaust air duct at the foot-end.
Fix the exhaust air hose with the hose-clip.
The main exhaust air hose leads the exhaust
air of the main exhaust air duct into the locally
provided exhaust air system.
As an option, Advanced Light UV offers a main
exhaust air hose and a hose clip for connection
to the on-site exhaust air system.
Squeeze the main exhaust air hose carefully into an oval
shape.
Push the egg-shaped main exhaust air hose over the main
exhaust air duct.
Fix the main exhaust air hose with a hose clip.
Connect the main exhaust air hose to the on-site central
exhaust air system.
Electrical Cable, Time-Control Device, Coinbox
Device
DANGER
RISK OF ELECTRIC SHOCK
Disconnect completely from
mains supply with the mains
disconnection switch prior to
performance of any maintenance
work. Secure the mains
disconnection switch with lock
and key against accidental and
unauthorized activation. Else
there is a risk of fatal electric
shock.
Feed the electrical cable through the screwed gland for
the electric cable at the main exhaust air duct.
Push approx. 1,5 m electrical cable through the lower
screwed gland in order to connect it to the ballast tray.
Turn the screwed gland clockwise until the electrical cable
fits tightly and is secured against slipping out.
If you want to connect a coinbox control device, push
approx. 1.5 m of the electrical connection cable through
the upper screwed gland.
Fasten the screwed gland for the electrical cable of the
coinbox control device.
If you want to connect a time control device (Timer) push
the terminal of the time control device into the terminal
strip for the I/O board at the main
exhaust air duct.

Original Dr. Müller®
ORIGINAL DR. MÜLLER HIGH PERFORMANCE TANNING EQUIPMENT
18
Four (4) persons carry the sunbed carefully to its final
position for installation.
Assembly at the sunbed front side
Pull all of the connection cables out of the main exhaust
air stack to the front.
Ballast Tray
Four (4) persons carry the ballast tray to its draw-pull
position in front of the sunbed.
For transport purposes the front sheet of the ballast tray
has been mounted upside- down by manufacturer.
In order to disassemble the front sheet of the ballast tray,
loosen the 4 screws which hold the sheet.
Lift the front sheet upward to remove it from the ballast tray.
Store the front sheet for further use.
Remove the 2 screws at the opening of the left side plate
of the ballast tray.
The connection cables of the sunbed are attached to
a cable-plate. The cable plate is mounted above the
opening on the left side of the ballast tray.
Pull the connection cables of the sunbed through the
opening of the left side plate of the ballast tray.
Mount the cable plate with two screws at the opening in
the left side panel of the ballast tray.
Each terminal plug is numbered and bears a
colored mark. Connect each terminal plug with the
corresponding number and colour on the terminal strip.
Connect terminal plug X1–X4 with corresponding X1–X4
on the terminal strip.
Pull the connection cables from the headend from the
rear into the ballast tray.
Connect terminal plugs X5–X11 with corresponding X5–
X11 on the terminal strip.
Pull the Display- cable, the I/O-Board-cable and the
electrical cable from the sunbed and eventually the
coinbox device cable from the rear into the ballast tray.
Connect the terminal plug marked “Display“ with the
terminal socket marked “Display“ .
Connect the terminal plug marked „I/O-Board“ with the
terminal socket marked “I/O-Board“.
If you want to connect a coinbox control device put the
plug of the electric cable into the socket marked " X13".
Put the electric cable from the sunbed from the back
through the cable holder.
Pull enough cable through to connect it to the terminals.
In order to hold the electric cables in place,
fasten the srews of the cable holder.

Original Dr. Müller®
ORIGINAL DR. MÜLLER HIGH PERFORMANCE TANNING EQUIPMENT
19
DANGER
RISK OF ELECTRIC SHOCK
The electrical connection must
be performed by a skilled
person, qualified according
to all applicable national/
local electrical standards and
regulations, i. e. EN 60201-
1/VDE 0113 or corresponding
standards.
Connect the phases of the electric cable to the terminals.
Mount the front sheet of the ballast tray with the handles
in front to the ballast tray.
Fasten the front sheet with four screws.
Push the brush seals onto the side plates and the back
plate of the ballast tray.
Unloosen the screw on the sunbed plexi.
Open the top.
Lift the sunbed plexi and hold tight.
Tilt the sunbed plexi support slightly to the left and tilt
upwards.
When the support is in vertical position, let it down until it
locks.
Let the plexi rest on the support to prevent the plexi from
falling down.
Two (2) persons lift the ballast tray by a few centimeters in
the front and then push it under the sunbed.
A/C trough
Unpack the A/C trough.
Push the A/C trough under the sunbed..

Original Dr. Müller®
ORIGINAL DR. MÜLLER HIGH PERFORMANCE TANNING EQUIPMENT
20
A/C unit (optional)
Unpack the A/C unit.
Pull out the A/C trough from under the sunbed.
Put the A/C unit onto the A/C trough.
Push the A/C trough with the A/C unit under the sunbed.
Connect the terminal plug with the terminal socket
marked “Klima“.
SunHaze Aroma Device (optional)
See also separate Manual provided with the
Aroma Device
Unpack the aroma device.
The aroma device is delivered with a full
container of aroma solution.
Unscrew the closing lid (4) from the container (5).
Unscrew the vaporizer-lid (2).
Connect one end of the hose (1) to the vaporizer lid as
shown above.
Put the aroma device on the A/C trough.
Connect the terminal plug with the terminal socket
marked „Aroma“.
Push the free end of the hose into the opening at the
body cooling fan stack.
Table of contents
Other ADVANCED UV LIGHT Tanning Bed manuals