Phonak TVLink S User manual

Basestation
User Guide

2
1. Welcome 5
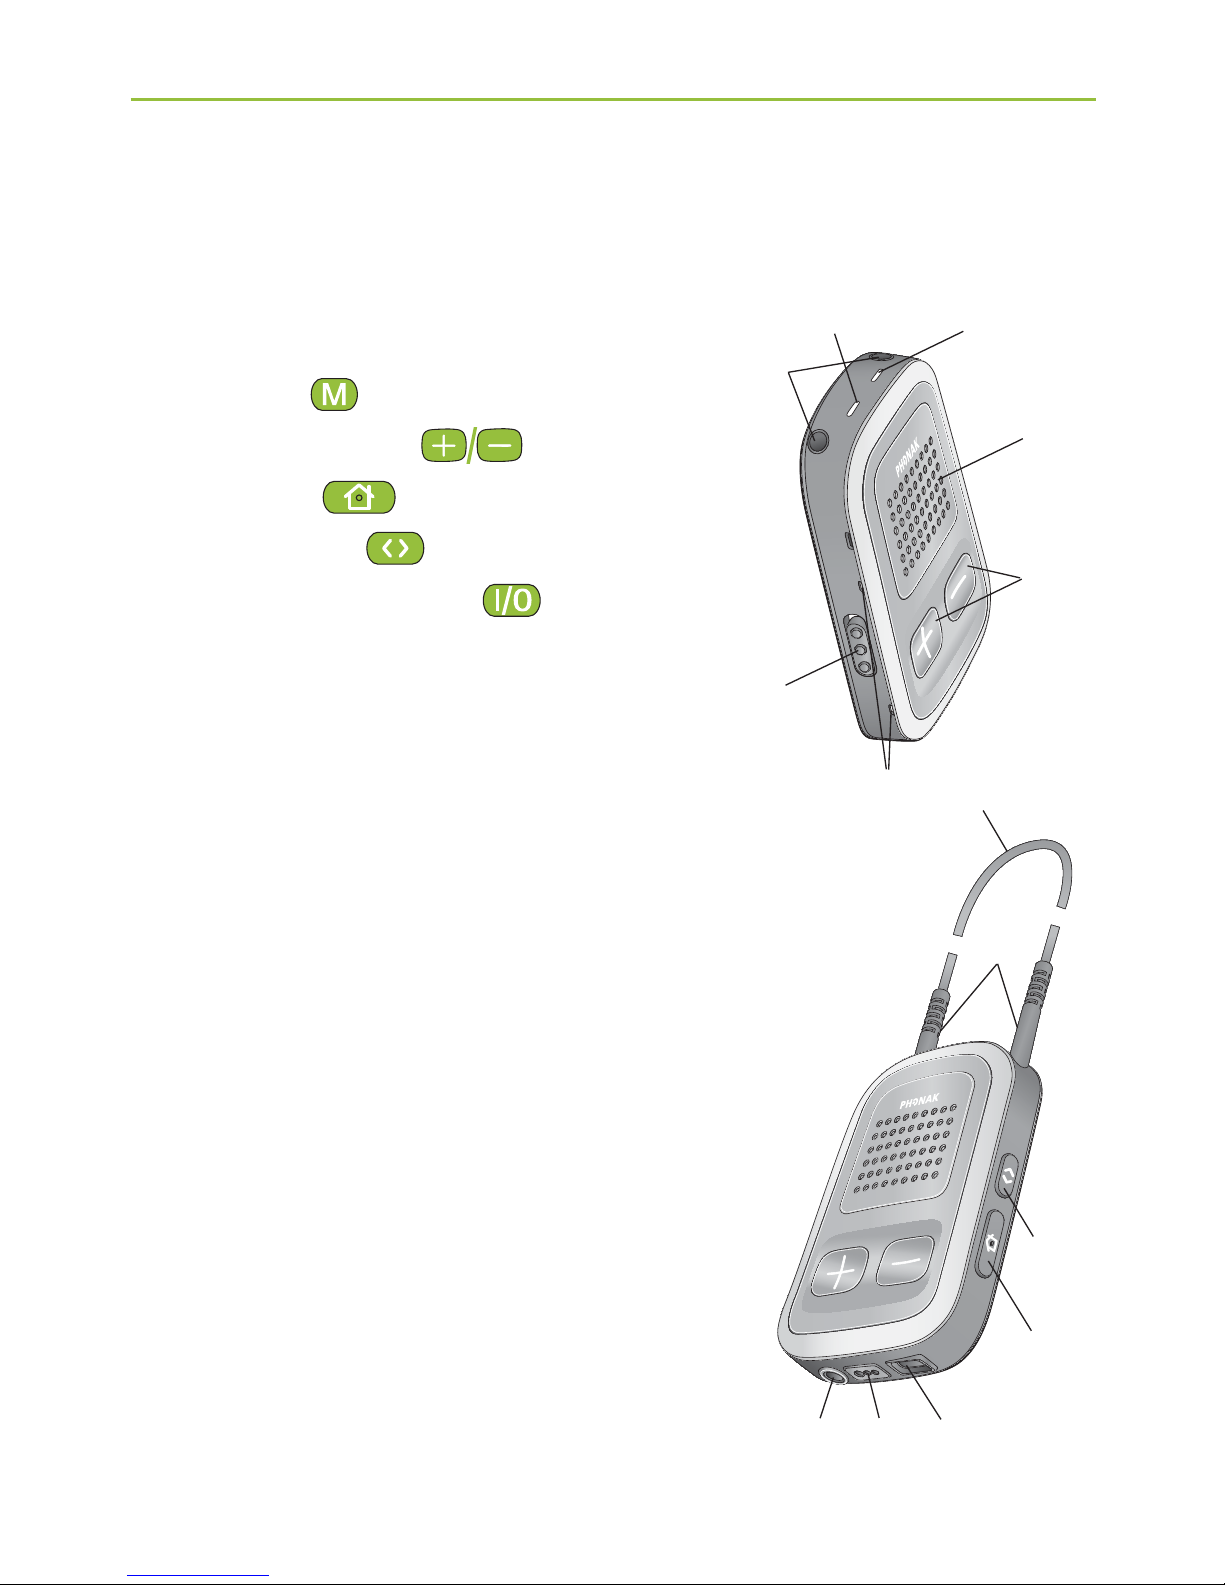
2. Getting to know your TVLink S 6
3. Getting started 11
Step 1. Setting up the power supply 11
Step 2. Connecting the TVLink S basestation 12
Step 3. Switching on all devices 17
Step 4. Pairing ComPilot and the TVLink S
basestation 19
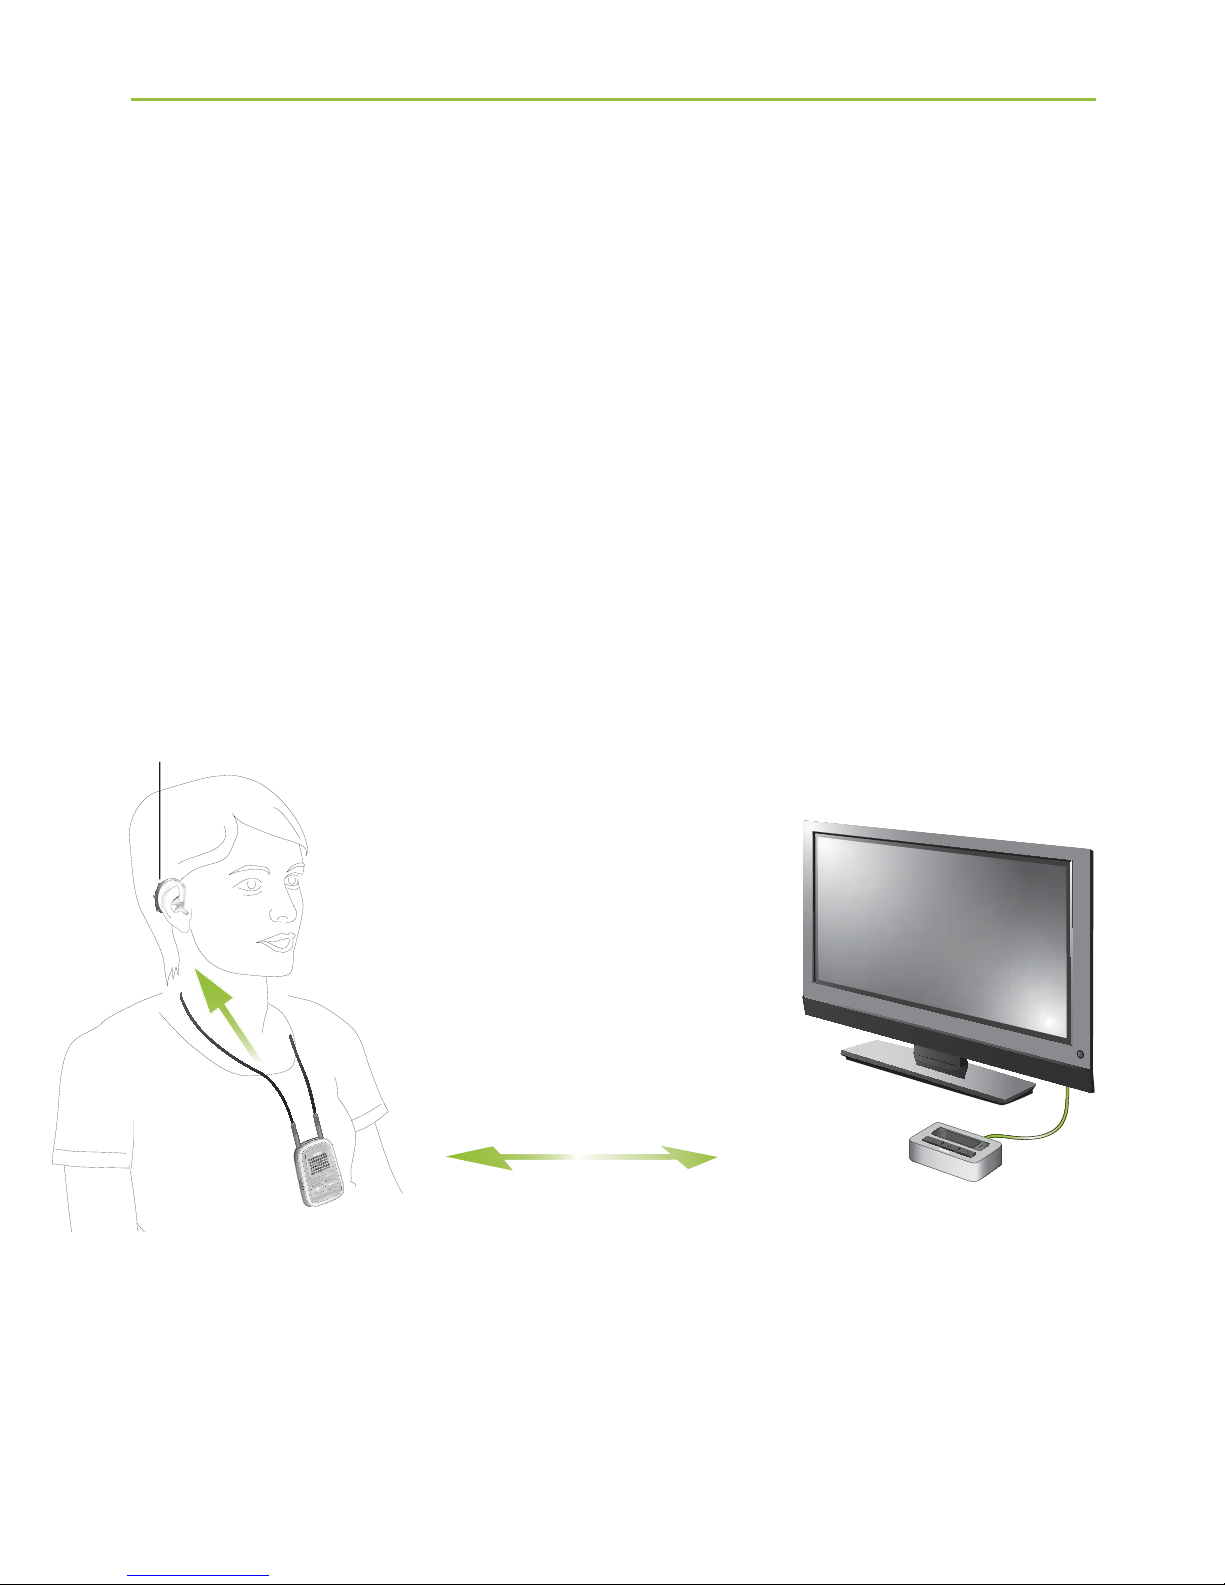
4. Daily usage of the Phonak TVLink S 22
Step 5. Wearing your ComPilot 22
Step 6. Listening to the TV 23
Step 7. Adjusting the volume of the TV signal 25
Step 8. Pause and phone calls during operation 27
Step 9. Switching off your TVLink S basestation
and ComPilot 29
Step 10. Charging ComPilot 31
Contents

3
5. Troubleshooting 34
5.1 Testing the audio transmission 34
5.2 Questions and answers 36
6. Important information: 39
6.1 Hazard warnings 39
6.2 Information on product safety 40
7. Service and warranty 43
8. Compliance information 44
9. Information and explanation of symbols 47


5
1. Welcome
Congratulations on choosing the Phonak TVLink S.
It expands the way you hear your world by wirelessly
connecting your hearing aids to your TV and other
entertainment or communication devices.
Please read this user guide carefully to discover how
to benefit from all the features of your TVLink S.
Please also carefully read the “Important information”
section in chapter 6.
Phonak – life is on www.phonak.com

6
The complete Phonak TVLink S system consists of the
following elements:
* The TVLink S extension package contains the stand-
alone TVLink S basestation with power supply and all
cables.
2. Getting to know your TVLink S
(h) Power supply with
mini-USB plug and
country adapter
(i) Audio cable for
RCA/Cinch sockets
(j) Audio cable for
3.5 mm jack sockets
(k) SCART/Peritel
adapter (optional)
ComPilot*
Phonak TVLink S
basestation

7
Device description
The Phonak TVLink S connects your hearing aids
wirelessly to your TV or other audio devices. The
system consists of three main elements:
Your hearing aids, the ComPilot and the Phonak
TVLink S basestation.
Up to 30 meters
(100 ft)
Cable
ComPilot TVLink S
basestation
hearing
aid

8
2. Getting to know your TVLink S
Phonak ComPilot streamer and remote control
Buttons
/Main ( )
0Volume +/- ( )
1Home ( )
2Connect ( )
3ON/OFF switch ( )
Inputs
4Microphone openings
5Audio input (3.5 mm jack)
6FM input (Europlug)
7Charging input (mini-USB)
Indicators
8Audio indicator
9Power indicator
Neckloop
:Neckloop sockets
;Neckloop (with antenna)
<Neckloop plugs
4
power
audio
/
0
3
89
:
1
<
2
;
567

9
The Bluetooth® word mark and logos are registered trademarks owned
by Bluetooth SIG, Inc. and any use of such marks by Phonak is under license.
Other trademarks and trade names are those of their respective owners.
For detailed information on the ComPilot such
as features, light indicator explanations, other
input sources, etc., please refer to the ComPilot
user guide which is delivered with each ComPilot.

10
Phonak TVLink S basestation
The TVLink S basestation is connected to your TV (or any
other audio source) and wirelessly sends audio signals
from your TV to ComPilot within a range of up to
30 meters (100 ft). The TVLink S basestation also serves
as a charging cradle for ComPilot when ComPilot is not
in use.
Buttons
(a) ON/OFF button
(b) TV signal volume (up)
(c) TV signal volume (down)
Inputs
(d) Power input (mini-USB)
(e) Audio input (3.5 mm jack)
(f) ComPilot charging slot
(g) Status light
(b)(c)
(f) (g)
(d) (e)
(a)
TVLink S basestation
2. Getting to know your TVLink S

11
Step 1. Setting up the power supply
1. Select the adapter that corresponds to your country.
US EU UK AUS
2. Insert the round corner of the
adapter to the round corner of
the universal power supply
until it is completely inserted.
3. Click the tail of the adapter in
to lock it into place. Make sure
the adapter is securely locked.
To remove the power adapter:
a. Pull back the tab on the universal
power supply and hold.
b. Gently pull the adapter upwards
to remove it from receptacle.
c. Then start over with step 1 (above).
2.
a. b.
3.
3. Getting started

12
TVLink S basestation
Step 2. Connecting the TVLink S basestation
To connect the power supply:
Place the TVLink S basestation next to your TV.
Connect the mini-USB plug (d) of the power supply
to the Power input (“Power”) of the TVLink S
basestation. Plug the power supply into the wall
socket (h).
(d)
(h)
3. Getting started

13
Use the RCA/Cinch cable (i) to connect the
TVLink S basestation to the TV:
Connect the stereo (e) plug to the audio input
(“Audio IN”) of the TVLink S basestation. Connect
the red and white plugs (i) to the matching
red and white output sockets on your TV.
(e)
(i)

14
You can also connect your TVLink S basestation to
the headset socket of your TV, using the audio cable:
Connect the stereo plug (e) to the audio input of
the TVLink S basestation (“Audio IN”).
Plug the other end into the headset output socket
of your TV.
(e)
(j)
3. Getting started

15
When connecting the TVLink S basestation to
the headset socket of your TV you are able to adjust
the volume via your TV remote control.
Some TVs will switch off their loudspeakers when
plugging the jack into the headset socket – the TV
will not be audible for other people. In such a case
use the Cinch/RCA or SCART output socket as
described above. For further information on volume
adjustment please refer to step 7 below. The Phonak
TVLink S basestation can also be connected to any
other audio source such as an MP3 player, PC or
home sound system using the stereo plug cable (j).

16
Optionally you may use a SCART adaptor:
Plug one end of the audio cable (j) into the TVLink S
basestation and the other end into the SCART
adaptor. Then plug the SCART adaptor (k) into a free
SCART output socket of your TV.
(e)
(j)
(k)
3. Getting started

17
Step 3: Switching on all devices
To use the TVLink S, all devices must to be switched on.
Switch on your TV or other audio source.
Make sure your hearing aids are switched on and
properly in place.
To turn ON your ComPilot, slide the power switch 3
to the ON position as shown in fig. 1.
ComPilot
ON
Fig. 1
powerio
po
po
po
po
po
o
o
o
po
po
po
w
we
we
we
we
we
we
we
we
we
we
r
r
o
o
w
w
w

18
Switch on the TVLink S basestation by a short press
of the ON/OFF button (a) as shown in fig. 2. The
status light (g) will illuminate green initially and
may switch to blue later.
TVLink S basestation
If the ComPilot Power indicator 9blinks red or
is not illuminated at all, the ComPilot battery level
may be low. In this case please first charge the
ComPilot as described in step 10 on page 32.
For a more detailed explanation of the ComPilot
indicator lights please refer to the ComPilot user
guide.
(a)
(g)
Fig. 2
3. Getting started

19
Step 4: Pairing ComPilot and the TVLink S basestation
If you received the ComPilot and the TVLink S
basestation together in the complete TVLink S
package, ComPilot is already paired with the TVLink
S basestation. You will see two solid blue light
indicators, (g) and 8, and may directly proceed to
step 5.
Before starting to use the TVLink S system, ComPilot
and the TVLink S basestation need to be paired. The
pairing procedure controls which Bluetooth devices are
permitted to communicate with each other.
Make sure both devices are switched on as described
in step 3 above.
You do not need to insert ComPilot into
the basestation charging slot (f) during pairing.
Pairing needs to be completed only once for each
device you wish to use with your ComPilot.

20
1. Press and hold the ComPilot and button
simultaneously for 2 seconds until the Audio indicator
8starts to rapidly blink blue (fig. 3). Your ComPilot
will remain in the pairing mode for two minutes or
until the pairing is completed.
Press /2 sec
Fig. 3
poweraudio
au
au
au
au
au
au
au
au
u
u
au
au
di
di
di
di
di
i
di
di
di
di
di
i
di
o
o
o
o
o
o
o
o
o
o
o
o
u
di
i
di
di
i
i
di
i
i
di
di
d
di
d
d
d
3. Getting started
Other manuals for TVLink S
2
Table of contents
Other Phonak Docking Station manuals