Phonic Ear EasyListener2 230R User manual

user guide
230R receiver
4500 230R Multi-Freq User Guide 9/21/04 12:44 PM Page 2

contents
caring for your system . . . . . . . . . . . . . . .42
transmitters that are compatible
with the 230R receiver . . . . . . . . . . . . . . .43
EasyListener2 channel numbers
and corresponding frequencies . . . . . .44-45
product specifications . . . . . . . . . . . . . . . .46
warranty . . . . . . . . . . . . . . . . . . . . . . .47-49
regulatory compliance . . . . . . . . . . . . . . .50
introduction . . . . . . . . . . . . . . . . . . . . . . . .1
understanding sound field and its benefits .2
installation tips . . . . . . . . . . . . . . . . . . . . .3
system guidelines . . . . . . . . . . . . . . . . . . .4
system components . . . . . . . . . . . . . . .5-6
230R receiver features . . . . . . . . . . . . .7-8
setup and operation . . . . . . . . . . . . .9-13
auxiliary input (aux in) . . . . . . . . .14-20
auxiliary output (aux out) . . . . . . .21-23
speaker setup . . . . . . . . . . . . . . . . .24-30
advanced system setup . . . . . . . . .31-35
optional accessories . . . . . . . . . . . . . . . .36-37
230R part number
cross-reference list . . . . . . . . . . . . . . . .38-39
troubleshooting . . . . . . . . . . . . . . . . . .40-41
4500 230R Multi-Freq User Guide 9/21/04 12:44 PM Page 6

introduction
Congratulations on the purchase of your new 230R sound field receiver! With proper care and
use it will become one of your most valuable classroom tools for many years. Students will
be able to consistently and easily understand what the teacher is saying, regardless of
his/her location in the classroom. Teachers can now speak all day in their normal voice
without having to raise their voice to get their students’ attention.
Numerous studies show that classrooms using sound field enjoy better student comprehen-
sion, increased student participation, better grades and fewer behavioral referrals.
Read this manual carefully to become familiar with your receiver and to get the most out of
its many features and options.
1
4500 230R Multi-Freq User Guide 9/21/04 12:44 PM Page 7

understanding sound field and its benefits
?
• distance
• noise
• echo
cough!
• distance
• noise
• echo
?
without sound field
with sound field
2
4500 230R Multi-Freq User Guide 9/21/04 12:44 PM Page 8

Before you set up your system, take a good look around your room. Where are the outlets
located? Where are the computers and other electronic equipment? Where can you put your
receiver so it's easy for you to reach, but out of the way of students and main traffic areas?
Though each classroom is different, there are some general guidelines for both receiver and
speaker placement:
The receiver — should be in the front of the classroom at teacher's eye level when standing,
close to a wall outlet.
Compact wall speakers — should be mounted as high as possible and angled down
toward the listeners' ears. Place them around the room so there is even coverage in the listening
area (where the students are seated). Use as many as needed — four is recommended.*
Distributed ceiling speakers — space them evenly above the students’ seating area.
A minimum ceiling height of 10 feet is necessary, and 12 feet is even better. Use as many
as needed — a minimum of four is recommended.*
Cluster ceiling speaker — should be centered directly over the students’ seating area.
A minimum ceiling height of 12 feet is recommended, and 14 feet is even better.
* For optimal speaker placement, download Sound field Wizard software from our website at www.phonicear.com.
installation tips
3
4500 230R Multi-Freq User Guide 9/21/04 12:44 PM Page 9

system guidelines
To help ensure that you get the most out of your new sound field system, we have put
together the following list of suggested guidelines:
Speak at a normal level — the system is projecting your voice for you.
Periodically check the volume and OptiVoice settings – these are often set and
then forgotten, but if accidentally changed, will affect how your system sounds.
Minimize the effects of feedback – avoid walking too closely to the speakers while
using the transmitter and microphone.
Place receiver in an open location – do not place the receiver in, or close to a metal
cabinet or enclosure. FM signals are effected by metallic objects and the receiver requires
proper cooling and ventilation.
Attach antenna – the receiver will not operate without the FM antenna.
Turn unit off while not in use – turning the unit off when not in use saves energy and
still allows the receiver to recharge the 330T transmitter batteries when connected to the
rear of the receiver.
4
4500 230R Multi-Freq User Guide 9/21/04 12:44 PM Page 10

5
system components
8
910
57
11 12
4
6
12 3
4500 230R Multi-Freq User Guide 9/21/04 12:44 PM Page 11

6
8 aux out cable/(RCA 3.5mm)
(AT0805)
9 aux-in adaptor plug /(1
/4in– Dual RCA)
(310-2544-1342)
10 aux-out adaptor plug/(3.5mm – 2.5mm)
(310-2544-1341)
5 power supply
(040-7402-105)
7 antenna
(AT0831)
11 330T transmitter charging cord
(1.3mm – Dual 1.3mm)
(300-6497-105)
4 microphone/(AT0655 boom
microphone shown here)
12 speaker wire
(AT0581)
(Plenum rated, 24ft/7.3m, 48ft/14.6m,
60ft/18.3m lenths)
6 power cord
(AT0787 for USA/Canada)
(AT0787-EN for England)
(AT0787-EU for Europe)
(AT0787-AU for Australia)
2 body-worn transmitter
(330T shown here)
1 230R base station receiver
3 speakers (470-2856-119)
(compact wall speaker shown here)
*speakers packaged separately
NOTE: Refer to part number cross-reference list
4500 230R Multi-Freq User Guide 9/21/04 12:44 PM Page 12

7
230R receiver features
front
back
7
2 3
4
56
8
911 12 13 14 16
17
10 15
18
1
4500 230R Multi-Freq User Guide 9/21/04 12:44 PM Page 13

8
3 channel adjustment button
4 FM receiver signal light
1 channel display
6 FM Volume control
5 OptiVoice™control
7 aux Volume control
8 power button
9 power cord jack
10 transmitter charge jack (1.3mm)
11 3-band equalizer adjustment
12 aux in jack (1
/4in)
13 speaker wire terminals
14 number of speakers switch
15 aux out port (RCA)
16 aux out level control
17 squelch adjustment
18 antenna
2 sleep/standby power indicator light
4500 230R Multi-Freq User Guide 9/21/04 12:44 PM Page 14

9
connecting power to 230R receiver
1
230R back
Plug power supply (040-7402-
105) into power port on back of
230R receiver
Plug power cord (AT0787) into
power supply unit (040-7402-105)
1
2
040-7402-105
1
3
2
AT0787
Plug power cord (AT0787) into
wall socket
3
4Check to see that green light is on,
indicating that unit has power
4
setup and operation
5
Attach antenna to antenna port on
back of 230R receiver
5
4500 230R Multi-Freq User Guide 9/21/04 12:44 PM Page 15

10
Push power button
Confirm that LED channel
display lights
turning on 230R receiver
2
1
2
1
2
4500 230R Multi-Freq User Guide 9/21/04 12:44 PM Page 16

11
Push up or down channel adjust-
ment buttons to set channel on
receiver to match transmitter
channel
Make sure that receiver channel
matches transmitter channel
adjusting channel setting
3
1
2
1
2
330T
NOTE: See “EasyListener2 channel
numbers and corresponding frequencies”
section for a complete list of Phonic Ear
channel numbers and corresponding
frequencies.
4500 230R Multi-Freq User Guide 9/21/04 12:44 PM Page 17
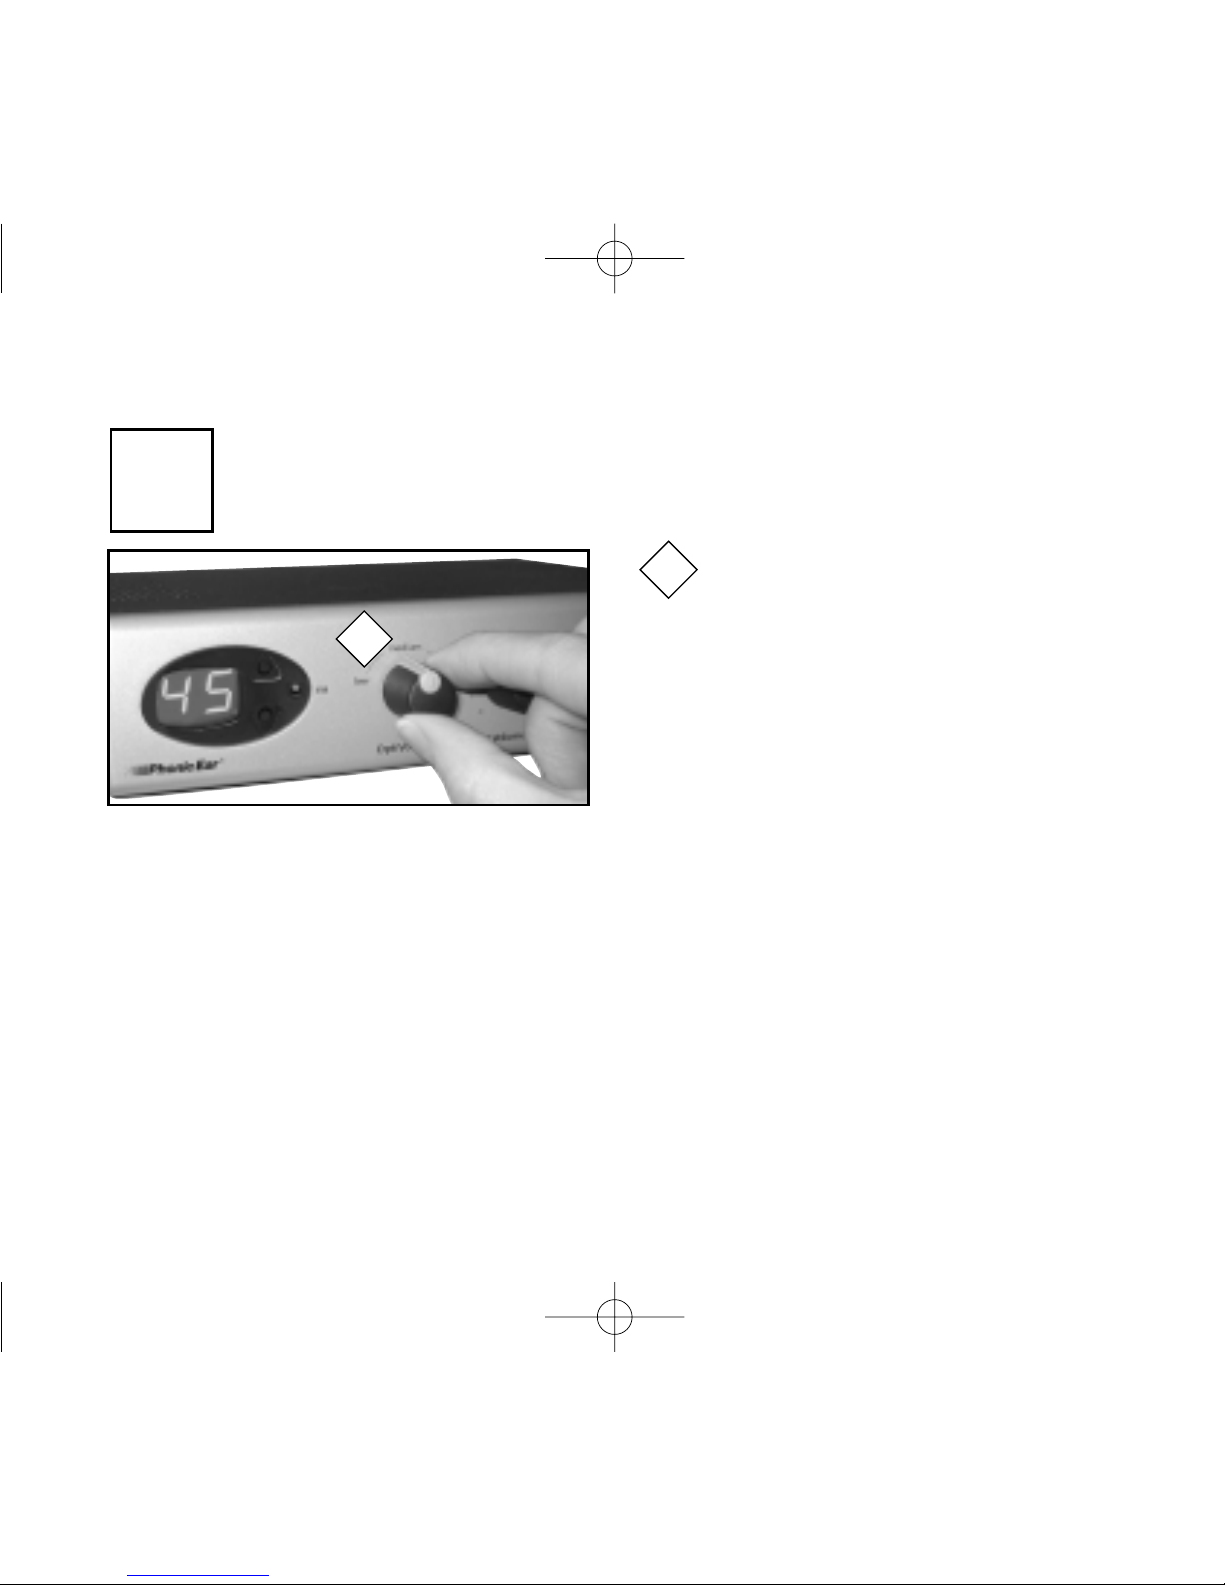
12
adjusting OptiVoice™ setting
1Set OptiVoice switch to medium
1
4
low: Recommended for use in low-noise situations and for most natural voice quality.
medium: Recommended for everyday use. Best setting for average classrooms where low-
medium noise levels are present.
high: Recommended for use in high noise levels. Helps to ensure top comprehension
during critical tasks such as test-taking or hearing impaired instruction.
NOTE: With each increase in level, there is an increase of approximately 3dB in gain
(volume). This may require you to decrease your volume setting to avoid potential micro-
phone/speaker feedback.
OptiVoice is a 3-position switch that automati-
cally adjusts the sound quality of the primary
speaker’s voice. It allows teachers to shape the
sound of their voice and helps to ensure maxi-
um speech clarity in low, medium and high
noise levels.
4500 230R Multi-Freq User Guide 9/21/04 12:44 PM Page 18

13
Follow steps or below to adjust FM
volume setting to proper level. Two people are
needed to set the volume level. It is difficult to
hear your own voice and make adjustments to it.
setting FM volume
5
1
1
With a sound level meter - Take a level reading in the “A” setting in the center of the
room during normal classroom activity, and another reading of the teacher's amplified voice
(without the class activity). The level of the teacher's voice should be set between 10-15
decibels above room noise level.
Without a sound level meter - First, ask someone other than yourself (if you are the
teacher) to listen to the amplified voice and make volume adjustments. An ideal volume level
is achieved when the listener can hear the amplified voice at a comfortable level and the vol-
ume level from the speaker and teacher’s mouth is comparable. If you can hear yourself
through the loudspeakers, the volume setting is too high and should be decreased
NOTE: The average volume setting is
between 4–5, but may change depending
on room acoustics and noise level.
2
12
4500 230R Multi-Freq User Guide 9/21/04 12:44 PM Page 19

14
e
connecting CD, TV and other audio sources (optional)
For most connnections from CD
player, TV, stereo or other audio
sources, insert aux-in adaptor plug
(310-2544-1342) into aux in port
1
1
6auxiliary input (aux-in)
310-2544-1342
AT0702-25
or
300-6332-107
Connect audio source to adaptor
plug using AT0702-25 or 300-
6332-107 (optional accessories –
not included with system. See
“Optional accessories” list)
2
2
4500 230R Multi-Freq User Guide 9/21/04 12:44 PM Page 20

15
team-teaching with 211 receiver and handheld
microphone system
211R (back)
230R (back)
Connect one end of the AT0573-1
cable to Output jack on back of
211R unit
1
2
2
1
Connect the other end to the
aux in jack on back of the 230R
receiver
3
3Extend 211R receiver antenna
7
4500 230R Multi-Freq User Guide 9/21/04 12:44 PM Page 21

16
211R (back)
second teacher,
or student
230R (front)
No channel change is necessary on
the 211R and handheld mic – they
are factory set to match
Make sure that channel numbers
indicated on front of 230R receiv-
er matches channel number on the
330T unit
4
5
first teacher
330T
5Adjust the Aux Volume control
on front of 230R to proper level
7
7
AT0573-1
Set Volume control on back of
211R to approximately 1/3of the
way to it’s highest level setting
6
6
4
8team-teaching with 211 receiver and handheld
microphone system (cont’d)
4500 230R Multi-Freq User Guide 9/21/04 12:44 PM Page 22

17
team-teaching with body-worn personal receiver &
transmitter units
Insert aux-in adaptor plug (310-
2544-1342) into aux in port on
back of 230R
1
Connect aux-in adaptor cord (300-
6332-107) to adaptor plug. (Match
red to red and white to white.)
2
300-6332-107
1
3
receiver
NOTE: Second teacher should be wearing a
transmitter on same channel as receiver (see
diagram on next page)
*
*If a different receiver is used, a different
adaptor cord may be required.
310-2544-1342
2
Plug other end of aux-in adaptor
plug into aux jack on body-worn
receiver
3
9a
4500 230R Multi-Freq User Guide 9/21/04 12:44 PM Page 23

18
team-teaching with body-worn personal receiver &
transmitter units (cont’d)
First Teacher
Make sure that channel number
setting on the front of 230R receiver
matches the channel number of
your 330T (or other transmitter)
3
Second Teacher*
Make sure that channel number
indicated on receiver matches
channel number on the transmitter
4
second teacher
4
230R (front)
first teacher
3
41
receiver
32
transmitter
330T
32
9b
Set volume level on team-teaching
receiver to 2/3max (6-7 out of 10).
5
Set aux volume on 230R to
comfortable level (usually 4 -5).
6
6
5
* Refer to the following page for channel pair combinations
not recommended with a 72MHz system.
4500 230R Multi-Freq User Guide 9/21/04 12:44 PM Page 24
Table of contents
Other Phonic Ear Receiver manuals


