Phonic 16x16 Universal Expansion Card User manual

16x16 Universal
Expansion Card
English Deutsch Español Français Português 日本語 简体中文
User's Manual
Benutzerhandbuch
Manual del Usuario
Mode d'emploi
Manual do Usuário
取扱説明書
使用手册

16x16 Universal
Expansion Card
16 channel USB 2.0/Firewire 96 kHz audio interface
for the Phonic Digital Mixer
Interfase de audio USB 2.0/Firewire de 16 canales
para Digital Mixer
用于Digital Mixer的16声道USB2.0/IEEE 1394
96KHz音频接口扩展卡
V1.3 11/07/2011
English Deutsch Español Français Português 日本語 简体中文
ENGLISH.........................................I
ESPAÑOL.......................................II
简体中文........................................III

3
16x16 Universal Expansion Card
English Deutsch Español Français Português 日本語 简体中文
FEATURES 1
INSTALLATION INSTRUCTIONS 2
SYSTEM REQUIREMENTS 3
DRIVER INSTALLATION 4
CONTROL PANEL 10
CONTENTS
Phonic preserves the right to improve or alter any information within
this document without prior notice.
USER'S MANUAL

416x16 Universal Expansion Card
English Deutsch Español Français Português 日本語 简体中文
1. Read these instructions before operating this
apparatus.
2. Keep these instructions for future reference.
3. Heed all warnings to ensure safe operation.
4. Follow all instructions provided in this document.
5. Do not use this apparatus near water or in locations
where condensation may occur.
6. Clean only with dry cloth. Do not use aerosol or liquid
cleaners. Unplug this apparatus before cleaning.
7. Do not block any of the ventilation openings. Install
in accordance with the manufacturer
’
s instructions.
8. Do not install near any heat sources such as radiators,
heat registers, stoves, or other apparatus (including
.
9. Do not defeat the safety purpose of the polarized or
grounding-type plug. A polarized plug has two blades
with one wider than the other. A grounding type plug
has two blades and a third grounding prong. The wide
blade or the third prong is provided for your safety. If
the provided plug does not into your outlet, consult
an electrician for replacement of the obsolete outlet.
10. Protect the power cord from being walked on or
pinched particularly at plug, convenience receptacles,
and the point where they exit from the apparatus.
11. Only use attachments/accessories by the
manufacturer.
12. Use only with a cart, stand, tripod, bracket, or
table by the manufacturer, or sold with
the apparatus. When a cart is used, use caution
when moving the cart/apparatus
combination to avoid injury from tip-
over.
13. Unplug this apparatus during lighting
storms or when unused for long
periods of time.
14. Refer all servicing to service personnel.
Servicing is required when the apparatus has been
damaged in any way, such as power-supply cord or
plug is damaged, liquid has been spilled or objects
have fallen into the apparatus, the apparatus has
been exposed to rain or moisture, does not operate
normally, or has been dropped.
IMPORTANT SAFETY INSTRUCTIONS
CAUTION: TO REDUCE THE RISK OF ELECTRIC SHOCK,
DO NOT REMOVE COVER (OR BACK)
NO USER SERVICEABLE PARTS INSIDE
REFER SERVICING TO QUALIFIED PERSONNEL
The lightning flash with arrowhead symbol, within an
equilateral triangle, is intended to alert the user to the
presence of uninsulated
“
dangerous voltage
”
within the
product
’
magnitude to constitute a risk of electric shock to persons.
The exclamation point within an equilateral triangle is in-
tended to alert the user to the presence of important operat-
ing and maintenance (servicing) instructions in the literature
accompanying the appliance.
WARNING: To reduce the risk of or electric shock, do
not expose this apparatus to rain or moisture.
CAUTION: Use of controls or adjustments or performance
of procedures other than those may result in
hazardous radiation exposure.
The apparatus shall not be exposed to dripping or splashing and that no objects with liquids, such as vases,
shall be placed on the apparatus. The MAINS plug is used as the disconnect device, the disconnect device shall
remain readily operable.
Warning: the user shall not place this apparatus in the area during the operation so that the mains switch
can be easily accessible.
CAUTION
RISK OF ELECTRIC SHOCK
DO NOT OPEN

1
16x16 Universal Expansion Card
English Deutsch Español Français Português 日本語 简体中文
FEATURES
• User-installable 24-bit/96kHz USB 2.0/FireWire I/O Card for digital mixers
• Allows streaming of 16 independent channels to, and directly from DAW
(Mac OS X or Windows)
• Allows daisy chaining two mixers together through FireWire, providing
additional channels of audio to computer
SIGNAL ROUTING
The sixteen input channels (sent from the DAW software) are fed directly from
the digital mixer’s analogue input channels. By pressing the “DAW” button on
the corresponding input channel, the corresponding return signal is then sent
back to digital mixer from the host computer’s DAW.
1. Read these instructions before operating this
apparatus.
2. Keep these instructions for future reference.
3. Heed all warnings to ensure safe operation.
4. Follow all instructions provided in this document.
5. Do not use this apparatus near water or in locations
where condensation may occur.
6. Clean only with dry cloth. Do not use aerosol or liquid
cleaners. Unplug this apparatus before cleaning.
7. Do not block any of the ventilation openings. Install
in accordance with the manufacturer
’
s instructions.
8. Do not install near any heat sources such as radiators,
heat registers, stoves, or other apparatus (including
.
9. Do not defeat the safety purpose of the polarized or
grounding-type plug. A polarized plug has two blades
with one wider than the other. A grounding type plug
has two blades and a third grounding prong. The wide
blade or the third prong is provided for your safety. If
the provided plug does not into your outlet, consult
an electrician for replacement of the obsolete outlet.
10. Protect the power cord from being walked on or
pinched particularly at plug, convenience receptacles,
and the point where they exit from the apparatus.
11. Only use attachments/accessories by the
manufacturer.
12. Use only with a cart, stand, tripod, bracket, or
table by the manufacturer, or sold with
the apparatus. When a cart is used, use caution
when moving the cart/apparatus
combination to avoid injury from tip-
over.
13. Unplug this apparatus during lighting
storms or when unused for long
periods of time.
14. Refer all servicing to service personnel.
Servicing is required when the apparatus has been
damaged in any way, such as power-supply cord or
plug is damaged, liquid has been spilled or objects
have fallen into the apparatus, the apparatus has
been exposed to rain or moisture, does not operate
normally, or has been dropped.
IMPORTANT SAFETY INSTRUCTIONS
CAUTION: TO REDUCE THE RISK OF ELECTRIC SHOCK,
DO NOT REMOVE COVER (OR BACK)
NO USER SERVICEABLE PARTS INSIDE
REFER SERVICING TO QUALIFIED PERSONNEL
The lightning flash with arrowhead symbol, within an
equilateral triangle, is intended to alert the user to the
presence of uninsulated
“
dangerous voltage
”
within the
product
’
magnitude to constitute a risk of electric shock to persons.
The exclamation point within an equilateral triangle is in-
tended to alert the user to the presence of important operat-
ing and maintenance (servicing) instructions in the literature
accompanying the appliance.
WARNING: To reduce the risk of or electric shock, do
not expose this apparatus to rain or moisture.
CAUTION: Use of controls or adjustments or performance
of procedures other than those may result in
hazardous radiation exposure.
The apparatus shall not be exposed to dripping or splashing and that no objects with liquids, such as vases,
shall be placed on the apparatus. The MAINS plug is used as the disconnect device, the disconnect device shall
remain readily operable.
Warning: the user shall not place this apparatus in the area during the operation so that the mains switch
can be easily accessible.
CAUTION
RISK OF ELECTRIC SHOCK
DO NOT OPEN

216x16 Universal Expansion Card
English Deutsch Español Français Português 日本語 简体中文
INSTALLATION INSTRUCTIONS
1. First ensure all power is off on your Digital Mixer and the power cable is
disconnected.
2. Remove the back protective cover on the Digital Mixer by unscrewing the
two support screws.
3. Remove the free end of the ribbon cable located within the expansion card
slot.
4. Connect the ribbon cable to the appropriate connection on the expansion
card.
5. Insert the expansion card into the expansion card slow and screw into
place.

3
16x16 Universal Expansion Card
English Deutsch Español Français Português 日本語 简体中文
SYSTEM REQUIREMENTS
The following are the minimum required specications for use with the Digital
Mixer. If your computer does not meet these requirements, you will experience
lagging of audio and possible freezing of your computer when attempting to
operate the mixer. In the event that these things occur even though your system
meets the below requirements, it may be necessary to adjust the Streaming
Buffer Length in the Phonic Control Panel software.
Windows
● Microsoft® Windows® XP SP2 or SP3 / Vista / 7 (32- and 64-bit)
● Available FireWire port (suggested FireWire Interface: ADS Pyro 64
FireWire card with TI chip) or USB 2.0
● Intel Pentium® 4 processor or equivalent AMD Athlon processor
● Motherboard with Intel or VIA chipset
● 5400 RPM or faster hard disk drive (7200 RPM or faster with 8 MB cache
recommended)
● 256 MB or more of RAM (512 MB or more recommended)
Macintosh
● OSX 10.6.2 or later with native FireWire or USB support
● G4 or newer processor
● 256 MB or more of RAM
416x16 Universal Expansion Card
English Deutsch Español Français Português 日本語 简体中文
DRIVER INSTALLATION
To use the Digital Mixer efciently (or at all) on a PC, it is important to install
all the necessary drivers from the included CD (ASIO and WDM drivers). It is
important that users read all instructions carefully before continuing on to the
each step of installation, as users will be required to unplug and plug in their
device. Driver installation is not necessary for Mac users.
Windows XP / Vista / 7
1. It is recommended that you quit all applications before starting the installation
process.
2. Ensure the Digital Mixer is not yet connected to your Computer’s FireWire
input.
3. Insert the installation DVD included with your Digital Mixer into the DVD-
ROM drive of your computer. If the CD does not automatically start the
installation process within a few moments, then navigate to “My Computer”
> your DVD drive > “1394a_x_x_x_Phonic_Summit” (for FireWire) or
“USB_x_x_x_Phonic_Summit” (for USB) > double-click “setup.exe” to begin
the installation manually. The Phonic Control Panel software also will be
installed at this time.
4. Follow the installation instructions. The following instructions are specic to
the USB installation, although the FireWire installation is comparable.

5
16x16 Universal Expansion Card
English Deutsch Español Français Português 日本語 简体中文
5. Make sure no other programs are running on your PC and that the Digital
Mixer is not connected to your PC, then click “Next”.
6. Read and accept the terms of the License Agreement and click “Next”
to continue.
616x16 Universal Expansion Card
English Deutsch Español Français Português 日本語 简体中文
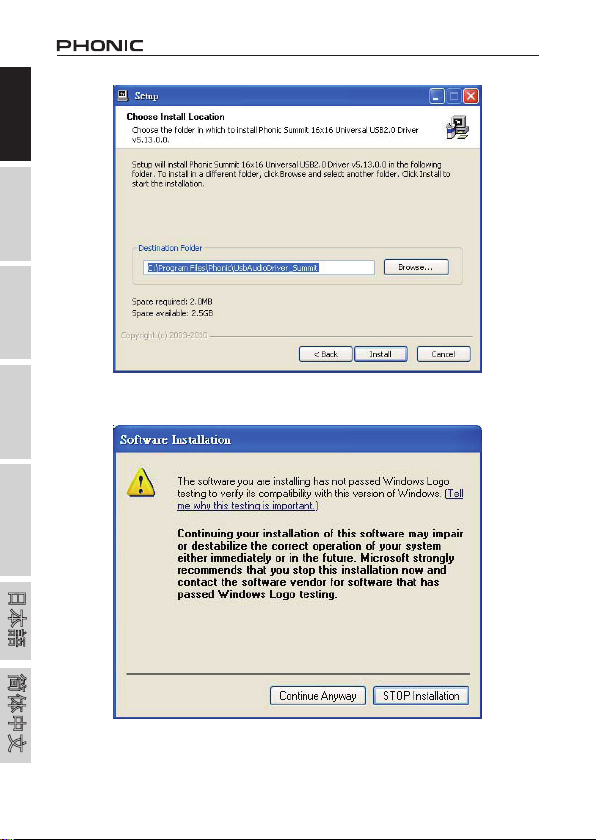
7. Select a new destination for the installation, or else click “Install” to
accept the default directory.
8. If you get a message telling you that the software has not passed
Windows logo testing, please click Continue Anyway.
7
16x16 Universal Expansion Card
English Deutsch Español Français Português 日本語 简体中文
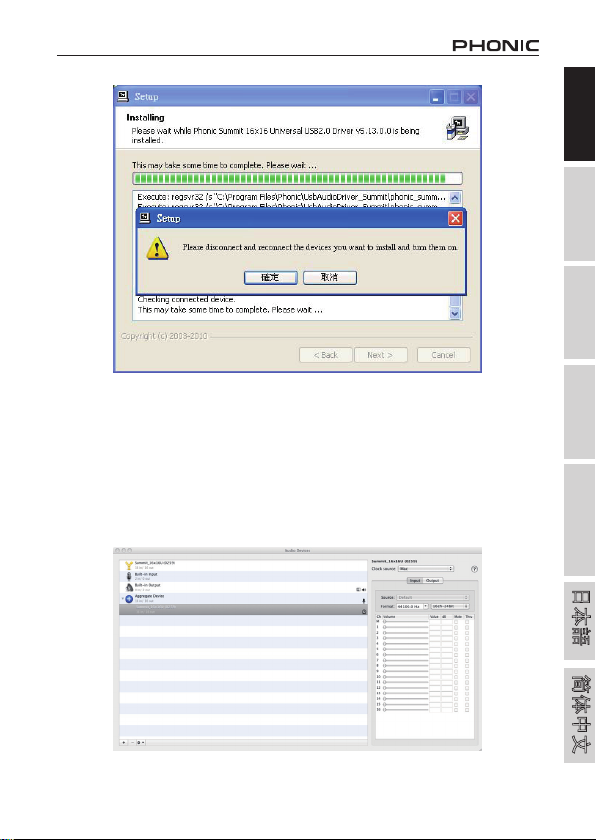
9. Connect the Digital Mixer to the Computer and turn the power on.
Mac OSX 10.6.2 or later
1. Make sure you have installed all updates available from Apple. This is
particularly important on 10.6.2 and later.
2. Connect the Digital Mixer to the computer via FireWire and USB.
3. Enter the AUDIO MIDI SETUP menu. The Digital Mixer should be available
as an input and output device.

816x16 Universal Expansion Card
English Deutsch Español Français Português 日本語 简体中文
WDM
INPUTS CHANNEL
NAME
MIXER
CHANNEL
Summit Line Ch 1/2 Channel 1/2
Summit Line Ch 3/4 Channel 3/4
Summit Line Ch 5/6 Channel 5/6
Summit Line Ch 7/8 Channel 7/8
Summit Line Ch 9/10 Channel 9/10
Summit Line Ch 11/12 Channel 11/12
Summit Line Ch 13/14 Channel 13/14
Summit Line Ch 15/16 Channel 15/16
OUTPUTS CHANNEL
NAME: (Computer
Returns)
MIXER
CHANNEL
Summit DAW Ch 1/2 Channel 1/2
Summit DAW Ch 3/4 Channel 3/4
Summit DAW Ch 5/6 Channel 5/6
Summit DAW Ch 7/8 Channel 7/8
Summit DAW Ch 9/10 Channel 9/10
Summit DAW Ch 11/12 Channel 11/12
Summit DAW Ch 13/14 Channel 13/14
Summit DAW Ch 15/16 Channel 15/16
ASIO
INPUTS CHANNEL
NAME
MIXER
CHANNEL
Summit Line Ch 1 Channel 1
Summit Line Ch 2 Channel 2
Summit Line Ch 3 Channel 3
Summit Line Ch 4 Channel 4
Summit Line Ch 5 Channel 5
Summit Line Ch 6 Channel 6
Summit Line Ch 7 Channel 7
Summit Line Ch 8 Channel 8
Summit Line Ch 9 Channel 9
Summit Line Ch 10 Channel 10
Summit Line Ch 11 Channel 11
Summit Line Ch 12 Channel 12
Summit Line Ch 13 Channel 13
Summit Line Ch 14 Channel 14
Summit Line Ch 15 Channel 15
Summit Line Ch 16 Channel 16
CHANNEL ASSIGNMENT
When using a Digital Audio Workstation on a PC, and within the included Phonic
Control Panel software, the following names have been attributed to the input
channels of the FireWire mixer. They can be altered through the control panel
software included with the mixer.

9
16x16 Universal Expansion Card
English Deutsch Español Français Português 日本語 简体中文
OUTPUTS CHANNEL
NAME: (Computer
Returns)
MIXER
CHANNEL
Summit DAW Ch 1 Channel 1
Summit DAW Ch 2 Channel 2
Summit DAW Ch 3 Channel 3
Summit DAW Ch 4 Channel 4
Summit DAW Ch 5 Channel 5
Summit DAW Ch 6 Channel 6
Summit DAW Ch 7 Channel 7
Summit DAW Ch 8 Channel 8
OUTPUTS CHANNEL
NAME: (Computer
Returns)
MIXER
CHANNEL
Summit DAW Ch 9 Channel 9
Summit DAW Ch 10 Channel 10
Summit DAW Ch 11 Channel 11
Summit DAW Ch 12 Channel 12
Summit DAW Ch 13 Channel 13
Summit DAW Ch 14 Channel 14
Summit DAW Ch 15 Channel 15
Summit DAW Ch 16 Channel 16
To alter an input channel’s name on your computer, open the Phonic Control
Panel software. On the left hand side of the control panel, users will nd the
settings categories. By clicking “Input Channels”, the main window will display
the titles input channels. You can then highlight the channel names and press
the “Edit Channel Name” button on the bottom of the control window. A new
window will appear that will allow users to adjust the channel name.
If you would like to use two of the Digital Mixer’s channels as your default audio
output device on you PC, simply go into the Windows control panel, and select
“Sound and Audio Devices”. Select the Audio tab and use the pull-down menu
to select the appropriate channels from the list of available devices. The Digital
Mixer can also be selected as the default output device for individual programs
by editing said programs’ settings / options.

10 16x16 Universal Expansion Card
English Deutsch Español Français Português 日本語 简体中文
CONTROL PANEL
The Phonic Control Panel can be accessed at any time by entering choosing
the shortcut from your Programs menu. This program will not only allow users
to alter their device and channel names and properties, but will also let them
correct for latency issues, change sampling rates, and so forth. When opening
the software, a number of options will be available for users to select from,
allowing them to adjust the available properties.
Devices
In the Devices section, users are able to view and edit the name of the Phonic
Device connected to their computer.
11
16x16 Universal Expansion Card
English Deutsch Español Français Português 日本語 简体中文
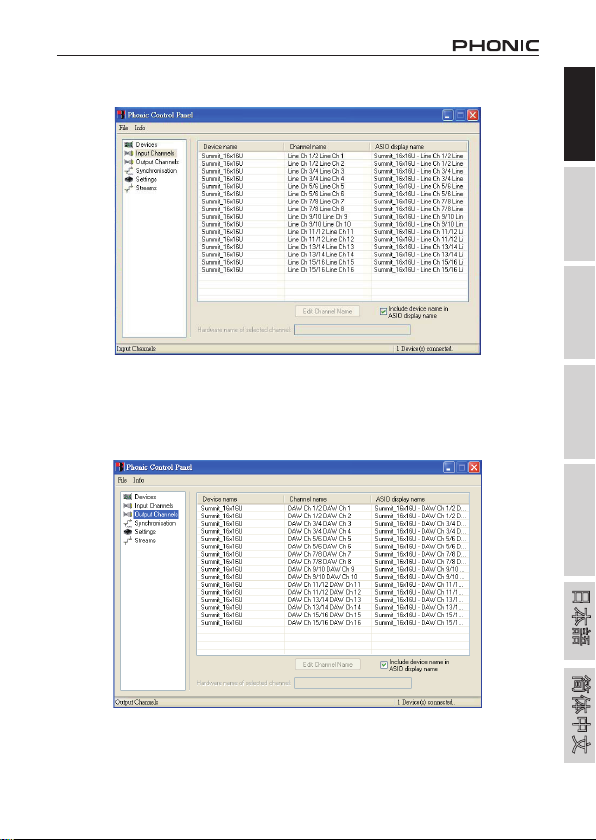
Input Channels
The Input Channels section allows users to view and edit the name of the various
input channels received from the USB/FireWire input. For a list of default channel
names, please consult the table on page 11 and page 12.
Output Channels
By entering the Output Channels section, users can view and edit the names of
the sixteen output channels from the computer to the Digital Mixer.

12 16x16 Universal Expansion Card
English Deutsch Español Français Português 日本語 简体中文
Synchronization
In the Synchronization section, users can adjust the sampling rate and other
synchronization properties. Many of these adjustable properties, as they are,
are set for optimum performance and, unless you are sure of what you need to
change, are probably best left alone.
First off, the synch mode can be altered, though making this alteration is not
recommended for novice users. The synch mode is basically the way the
computer determines what the ‘clock source’ (ie. device that your computer will
use to determine the timing of all digital signals received) will be. The default
setting for this feature is “CSP”, meaning the Digital Mixer is the “master” clock
source of the device. The other options allow users to make the Digital Mixer
follow the “timing” of whichever device is the clock source. Having two clock
sources has the potential to cause undesirable results to your audio, so it is best
avoided. If the Digital Mixer is the only piece of digital audio equipment attached
to the computer, there is no reason this option should be changed.
Users are also able to change between automatic and manual sampling rate
settings. When the sampling rate is manually set, users can select between
sampling rates of 44.1, 48.0, 88.2 and 96.0 kHz per second. Many devices have
sampling rates that do not surpass 44.1 kHz, therefore, when using multiple
digital devices, users are advised not to exceed this level unless they are sure
the secondary device’s sampling rate can match the selected sampling rate.

13
16x16 Universal Expansion Card
English Deutsch Español Français Português 日本語 简体中文
Settings
Users are able to adjust various buffer times in the Settings section.
The Stream Buffer Depth is adjustable between 0.5 and 20 milliseconds. It
adjusts the buffer used when streaming a signal from the Digital Mixer. If the
depth is set too high, an obvious latency will become evident. If the depth is too
low, various clicks and pops may become obvious. It is best to set the Stream
Buffer Depth to a level that allows users to get the lowest latency, while still
maintaining an optimal performance.
The default settings are ideal for most computers.
The ASIO Buffer Depth is adjustable between 4 and 40 milliseconds. This allows
users to adjust the latency of the stream received by ASIO driver-based software
(including Steinberg Cubase LE 5). The WDM (Windows Driver Model) Sound
Buffer Depth is adjustable between 4 and 40 milliseconds. This allows users to
adjust the latency of the stream received by WDM based programs.
Also in this section, users are able to view their “drop out statistics”, where the
number of times either the USB or FireWire connections have been interrupted
can be viewed.
14 16x16 Universal Expansion Card
English Deutsch Español Français Português 日本語 简体中文
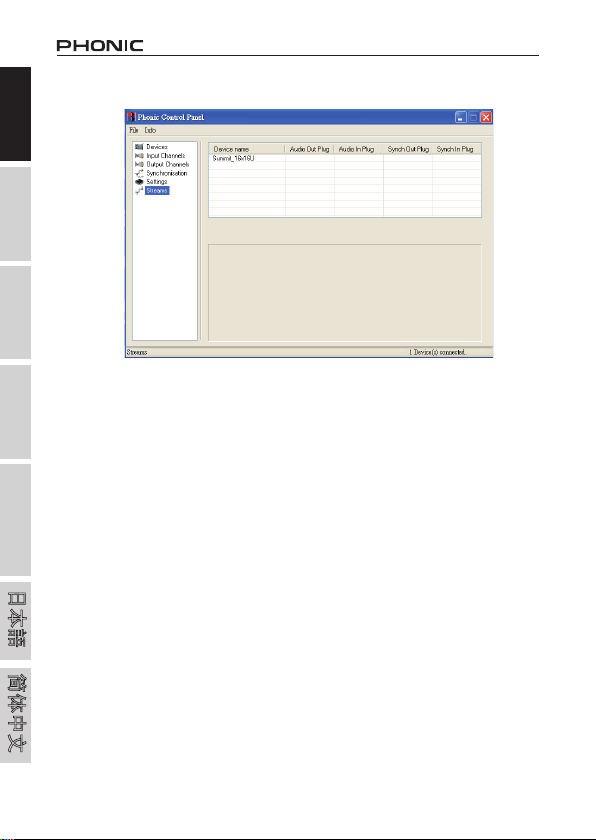
Streams
In the Streams section, the Digital Mixer device properties can be viewed. Each
input and output stream can be scrutinized, and the isochronous stream number
and its supported sampling rates can be viewed.
DAISY-CHAINING
FireWire is a ‘real’ bus, connecting all daisy-chained devices into one big
network. The devices are distinguished by their GUID. Devices with only 1
FireWire port can only be so-called ‘leafs’ on the bus (the far end of the chain;
the bus ends there).
For the Mac's FireWire port, there is no restriction as far as daisy-chaining of
FireWire devices is concerned. For example, when connection 2 Digital Mixer
mixers to a Mac, these can be controlled by means of an aggregated driver.
How to aggregate two or more devices:
1. Open “Audio MIDI Setup”
2. Select in menu bar “Audio” “Open Aggregate Device Editor”
3. Add a new aggregate device with the “+” button and name it
4. Select the device(s)
5. Select “done”
6. You can then select the aggregate device in the Audio MIDI Setup

15
16x16 Universal Expansion Card
English Deutsch Español Français Português 日本語 简体中文
Please nd a detailed description on the Apple website: http://www.apple.
com/ca/pro/techniques/aggregateaudio/
For Windows, simply ensure that you’ve installed the device driver once for
each instance of the Digital Mixer that will be used on the computer. After doing
so, you should be able to connect both units in a daisy-chain and have them
recognized by the Phonic Control Panel.
After connecting multiple units to your computer, you need to create proper
synchronization setup. One unit has to be a master device, and everything else
must be a slave to this.
Set the "Clock Source" to e.g. Digital Mixer (make sure it is not the PC or
Mac)
Setup the other Digital Mixer to sync to "SYT"
Please note that daisy-chaining is not possible through USB, as it is not a real
bus, rather a point-to-point connection.

16 16x16 Universal Expansion Card
English Deutsch Español Français Português 日本語 简体中文
SERVICE AND REPAIR
For replacement parts, service and repairs please contact the Phonic distributor in your
country. Phonic does not release service manuals to consumers, and advice users to not
attempt any self repairs, as doing so voids all warranties. You can locate a dealer near you at
http://www.phonic.com/where/.
WARRANTY INFORMATION
Phonic stands behind every product we make with a no-hassles warranty. Warranty coverage
may be extended, depending on your region. Phonic Corporation warrants this product for a
minimum of one year from the original date of purchase against defects in material and
workmanship under use as instructed by the user’s manual. Phonic, at its option, shall repair
or replace the defective unit covered by this warranty. Please retain the dated sales receipt as
evidence of the date of purchase. You will need it for any warranty service. No returns or repairs
will be accepted without a proper RMA number (return merchandise authorization). In order to
keep this warranty in effect, the product must have been handled and used as prescribed in the
instructions accompanying this warranty. Any tampering of the product or attempts of self repair
voids all warranty. This warranty does not cover any damage due to accident, misuse, abuse,
or negligence. This warranty is valid only if the product was purchased new from an authorized
Phonic dealer/distributor. For complete warranty policy information, please visit
http://www.phonic.com/warranty/.
CUSTOMER SERVICE AND TECHNICAL SUPPORT
We encourage you to visit our online help at http://www.phonic.com/support/. There you can find
answers to frequently asked questions, tech tips, driver downloads, returns instruction and other
helpful information. We make every effort to answer your questions within one business day.
http://www.phonic.com
Table of contents
Other Phonic Computer Hardware manuals

Popular Computer Hardware manuals by other brands


SeaLevel
SeaLevel ACB-MP.LPCI user manual

Danfoss
Danfoss Modbus RTU manual

Extron electronics
Extron electronics PIP 422 Specification sheet

ekwb
ekwb EK-FC460 GS/SONIC INSTALLATION AND MOUNTING MANUAL

3Com
3Com OfficeConnect 3CRWE154A72 Installation Steps

Cypress Semiconductor
Cypress Semiconductor CY8C22x13 supplementary guide