Phonocar PH501 Simple manual

5.1 AMPLIFIER
Istruzioni di Montaggio
Manual Instructions
Instructions de montage
Montageanleitung
Instrucciones para el montaje
PH501
S.pA. - Via F.lli Cervi, 167/C - 42100 Reggio Emilia (Italy) - Tel. ++39 0522 941621 - Fax ++39 0522 942452
www.phonocar.com - e-mail:info@phonocar.it
FRANCE
Vente et Assistance assurées par le Fabricant italien Tél/Fax N° Vert 0800.90.43.99
www.phonocar.fr • e-mail:info@phonocar.it
DEUTSCHLAND
71711 - MURR - Rudolf Diesel Strasse, 13 - Tel. 07144 82302-0 / Fax 07144 282114
www.phonocar.de - e-mail:info@phonocar.de
ESPAÑA
Delegado Comercial Sr. VERDERESE DOMENICO
Tel. 958 302295 - Fax 958 302470 - Movil 607592406
e-mail: info@phonocar.es

CONSIGLI
IMPORTANTI IMPORTANT
HINTS INDICATIONS
IMPORTANTES WICHTIGE
HINWEISE CONSEJOS
IMPORTANTES
I-Per una maggiore sicurezza nella guida, mantenere il
volume dell’autoradio non troppo elevato.
Un’improvvisa interruzione del suono può essere provocata
dall’intervento della protezione elettronica sui corto circuiti
o da un eccessivo surriscaldamento.
Consultare un rivenditore autorizzato.
Se l’amplificatore viene installato in luoghi chiusi è indi-
spensabile che il volume d’aria disponibile non sia inferiore
ad almeno 10 volte il volume dell’amplificatore.
Installare l’amplificatore in una posizione al riparo dall’ac-
qua. Per un corretto funzionamento dell’amplificatore non
apporre oggetti sul dissipatore e asssicurarsi che sia instal-
lato in luogo protetto e ventilato. Non installare l’amplifica-
tore capovolto.
Disturbi di schermatura . Per evitare fastidiosi disturbi
elettrici di schermatura posizionare i cavi di alimentazione
e i cavi segnale distanti tra loro. Evitare inoltre di avvicinarli
a centraline elettroniche, cavo antenna o cavi del sistema
elettrico dell’auto.
GB - To ensure a high security level while driving your car,
do not exceed with the radio volume.
A sudden sound interruption can occur when the electronic
short-circuit protection gets into action or in case of over-
heating. In such case, please turn to the nearest special-
ized PHONOCAR Sales-Point.
If the amplifier is supposed to be installed in a closed
space, make absolutely sure that the air volume is at least
10 times as much as the amplifier volume.
The amplifier installation position must be free from water
infiltration risks.
To have your amplifier work correctly, it is important that
it is installed in a secure and ventilated position, with the
cooling flaps completely free from any object.
Never install the amplifier up-side down.
Interference screening - To avoid annoying electric inter-
ference the feed and the signal cables must be at a certain
distance from one another and, at the same time, far from
the aerial cable, electronic control boxes, or any cables
regarding the car’s electric wiring system.
F-Afin de réduire les risques d’accidents en voiture, ne
pas exagérer avec le volume de votre radio.
Une soudaine interruption du son peut se vérifier quand
la protection électronique sur les courts-circuits entre en
action ou en cas de surchauffage. Dans ce cas, il est néces-
saire de contacter le spécialiste.
Quand la position d’installation est dans un milieu fermé,
s’assurer que le volume d’air disponible soit au moins 10
fois le volume de l’amplificateur.
Installer l’amplificateur dans une position absolument sans
risques d’infiltrations d’eau.
Pour un correct fonctionnement de l’amplificateur, il est
important qu’ il soit installé dans une position protégée et
ventilée, sans jamais poser des objets sur le couvercle de
refroidissement.
Jamais installer l’amplificateur renversé.
Parasites - Afin d’éviter de bruits fastidieux de parasites
électriques, le câble d’alimentation et celui du signal sont à
poser loins d’entre eux et loins du câble antenne, de centra-
les électroniques de commande, de la battérie et de câbles
du système électrique de la voiture.
D-Um die Sicherheit am Steuer nicht zu beeinträchtigen ist
es ratsam, die Autoradio-Lautstärke während des Fahrens
nicht zu hoch einzustellen.
Ein plötzlicher Tonausfall kann bei Auslösung der Kurz-
schluß-Elektronikschutzschaltung oder bei Überhitzung
auftreten. In diesem Fall bitte Ihren Händler zu Rate ziehen.
Bei Installierung in geschlossenem Raum darauf achten,
daß das zur Verfügung stehende Luftvolumen mindestens
10 mal das Volumen des Verstärkers ausmacht.
Die gewählte Einbaustelle muß frei von Wasser-Eindrin-
gungsgefahren sein.
Der Verstärker kann nur dann korrekt funtionieren wenner in
einem sicheren und gut belüfteten Platz montiert ist und die
Belüftungsflügel völlig frei sind.
Den Verstärker niemals auf den Kopf gestellt einbauen.
Störungs-Abschirmung - Um störende Geräusche zu
vermeiden, Stromzufuhr- und Signalkabel gut voneinander
entfernt halten und nicht in der Nähe des Antennen- oder
Batteriekabels, oder elektronischer Steuerkästen, verlegen.
E-Para conducir con seguridad, el volumen de la radio no
debe ser demasiado alto.
El sonido puede interrumpirse por intervención de la pro-
tección electrónica contra cortocircuitos. Consultar a un
revendedor especializado.
Al instalar del amplificador en lugares cerrados el volumen
del aire disponible no debe ser inferior a 10 veces el volu-
men del amplificador.
El amplificador debe instalarse en lugares en los que no ha-
ya infiltraciones de agua.
Para el buen funcionamiento del amplificador, hay que ase-
gurarse de que esté instalado en un lugar protegido y venti-
lado, y no apoyar ningún objeto en el disipador.
El amplificador no debe instalarse al revés.
Interferencias - para evitarlas, los cables de la señal y los
de alimentación deben instalarse distantes entre sÌ. Ade-
más, es aconsejable no colocarlos cerca del cable de la an-
tena, centralitas electrónicas, o cables del sistema eléctrico
del vehÌculo.
TIPOLOGIE
IMPIANTI TYPES OF
SYSTEMS TYPOLOGIE DES
EQUIPEMENTS VERBINDUNGS
VORSCHLÄGE TIPOLOGIA DE
LOS EQUIPOS
Monitor 3 Monitor 2 Monitor 1
DVD Player
Subwoofer Amplifier MP3 Player Car Radio

VERIFICHE
IMPIANTO INSTALLATION
CHECKING CONTROLE DE
L’INSTALLATION ÜBERPRÜFUNG
DER ANLAGE
VERIFICACI
Ó
N
DE LA INSTALACI
Ó
N
Abbassamento graduale del volume al cambio sorgente
Per evitare danneggiamenti agli altoparlanti il sistema riduce il volume ad ogni cambio della sorgente.
Verifica Ingresso Digitale
Quando si seleziona uno dei due ingressi digitali dal telecomando il sistema verifica la presenza del segnale.
Se il display inizia a lampeggiare significa che non è stato rilevato alcun segnale digitale.
Verificare le connessioni tra la sorgente e l’amplificatore.
Test Altoparlanti
Il sistema permette di verificare il corretto collegamento degli altoparlanti. Premendo il tasto «TEST» sul telecomando, un
segnale di 2 secondi passerà in tutti i canali. Per interrompere premere nuovamente il tasto TEST.
Spegnimento Amplificatore
Il dispositivo offre un completo sistema di protezione. La protezione si attiva nei seguenti casi:
1. Corto circuito
2. Sovracorrente
3. Temperatura dell’amplificatore troppo elevata
4. Tensione di alimentazione inferiore a 10 Volt
Ad esclusione del punto 4 quando interviene la protezione appare sullo schermo la scritta AMP PROTECTION e si disattiva
l’audio per 2 minuti. Se si risolve il problema, passato questo tempo, l’amplificatore riprende normalmente il proprio funzio-
namento ripartendo con un volume di 2 livelli inferiore (più basso).
Gradual decrease of the Volume, when source changes.
To avoid possible damage to the speakers, the systems automatically reduces the Volume every time the source changes.
Verification of Digital Input
When one of the two digital inputs is selected through the remote-control unit, the system automatically checks the pres-
ence of the signal.If the display starts blinking, this means that no digital signal has been found.
In such case, please check the connections between source and amplifier.
Speaker-Test
The system checks if the speaker-connections are correct. To this effect, press key “TEST” on the remote-control unit, so
that a 2-second-signal will flow into all channels.To interrupt this process, press “TEST”-key again.
Amplifier Shut-down system
The PH501 is equipped with a complete shut-down protection system.
This protection system reacts under the following circumstances:
1. Short-circuit
2. Over-powering
3. Amplifier temperature exceedingly high
4. Current-supply tension lower than 10 Volt
When the shut-down system activates because of the circumstances 1,2 or 3, the display will show the wording AMP PRO-
TECTION and Audio will disappear for 2 minutes. As soon as the circumstances are overcome, the amplifier will resume his
normal operation, after the given 2-minutes-brake, at a Volume lowered by 2 steps.
Réduction graduelle du volume quand on change la source
Afin d’éviter des dommages aux haut-parleurs, le système réduit le volume à chaque fois que la source change.
Vérification Entrée Digitale
Au moment de la sélection d’une des deux entrées digitales depuis l’unité de la télécommande, le système vérifie la pré-
sence du signal. Si le display commence à clignoter, aucun signal digital n’a été relevé.
Dans ce cas, il faut vérifier les connexions entre la source et l’amplificateur.
Essai Haut-Parleurs
Le système permet de vérifier si les haut-parleurs ont correctement été branchés. En appuyant sur la touche « TEST » de-
puis l’unité de télécommande, un signal de 2 secondes passera à travers tous les canaux.
Pour interrompre ce processus, appuyer à nouveau sur la touche TEST.
Eteindre l’Amplificateur
Le dispositif est doté d’un système de protection automatique s’activant dans les circonstances suivantes :
1. Court-circuit
2. Surintensité
3. Température amplificateur trop élevée
4. Tension d’alimentation inférieure à 10 Volt
VERIFICHE
IMPIANTO INSTALLATION
CHECKING CONTROLE DE
L’INSTALLATION ÜBERPRÜFUNG
DER ANLAGE
VERIFICACI
Ó
N
DE LA INSTALACI
Ó
N
I
GB
Quand l’ampli se met en protection à la suite des trois premiers cas, le display annonce AMP PROTECTION et l’audio se
désactive pendant 2 minutes.
Si entre temps le problème est résolu, l’amplificateur reprend à fonctionner normalement, s’installant à un volume de 2
niveaux inférieurs qu’avant (plus bas).
Langsame Reduzierung der Lautstärke, bei Umstellung auf eine andere Quelle.
Bei Umstellung auf eine andere Quelle, reduziert das System die Lautstärke automatisch, damit die Lautsprecher nicht
beschädigt werden können.
Kontrolle des Digital-Eingangs
Wählt man einen der beiden Digital-Eingänge anhand der Fernsteuerung, so prüft das System, ob das Signal vorhanden ist.
Beginnt das Display zu blinken, dann bedeutet dies, dass keinerlei Digital-Signal ausfindig gemacht wurde. In diesem Fall,
die Verbindungen zwischen Quelle und Verstärker kontrollieren.
Überprüfung der Lautsprecher
Das System überprüft, ob die Lautsprecher richtig angeschlossen worden sind. Drückt man auf die Taste „TEST“ der Fern-
bedienung, wird ein 2-Sekunden-Signal in alle Kanäle geleitet.
Um diesen Vorgang zu unterbrechen, nochmals auf die Taste TEST drücken.
Ausschalten des Verstärkers
Das Gerät verfügt über eine vollautomatische Schutzschaltung, die in folgenden Notfällen reagiert:
1. Kurzschluss
2. Mehrstrom
3. Überhitzter Verstärker
4. Strom-Spannung unter 10 Volt
Reagiert die Schutzschaltung unter den Bedingungen 1, 2 oder 3, so erscheint auf dem Display die Nachricht AMP PRO-
TECTION und der Ton schaltet 2 Minuten lang ab. Wird das Problem gelöst, so beginnt der Verstärker, nach dieser kurzen
Unterbrechung, wieder ganz normal zu funktionieren, jedoch bei einer um 2 Stufen reduzierten Lautstärke.
Disturbios de apantallado
Para evitar fastidiosos disturbios eléctricos de apantallado posicionar los cables de alimentación y de señal lejos entre
si.
Evitar además de acercarse a centralitas electrónicas, cable de antena o cables del sistema eléctrico del vehículo.
Verificación de la instalación
Reducción gradual del volumen al cambio de fuente de sonido
Para evitar dañar los altavoces del sistema, reduce el volumen cada vez que hay un cambio de fuente de sonido.
Verificación entrada Digital
Cuando se selecciona una de las dos entradas digitales desde el mando a distancia, el sistema verifica la presencia de
la señal.
En el caso de que el display empiece a parpadear significa que no ha sido encontrada ninguna señal digital.
Verificar las conexiones entre la fuente de sonido y el amplificador.
Test Altavoces
El sistema permite verificar la correcta conexión de los altavoces.
Presionando la tecla TEST en el mando a distancia se podrá oír durante 2 segundos, una señal en todos los canales.
Para interrumpir la operación presionar nuevamente la tecla TEST.
Apagado Amplificador
El dispositivo ofrece un completo sistema de protección. La protección se activa en los siguientes casos.
1. Cortocircuito
2. Sobrecarga
3. Temperatura elevada del amplificador
4. Tensión de alimentación del amplificador inferior a 10 Voltios
Con exclusión del 4º cuando interviene la protección, aparece en la pantalla AMP PROTECTION y se desactiva el audio
alrededor de 2 minutos.
Si se resuelve el problema pasado este tiempo el amplificador vuelve a funcionar normalmente reiniciándose automática-
mente con un volumen más bajo de 2 niveles.
F
E
D

1234
56
78
91011
12 13 14 15 16 17
18 19
FUNZIONI
AMPLIFICATORE AMPLIFIER
FUNCTIONS FONCTIONS
AMPLIFICATEUR VERSTÄRKER-
FUNKTIONEN FUNCIONES DEL
AMPLIFICADOR
1 - Led accensione amplificatore
2 - Ingresso sensore IR
3 - Tasto reset
4 - Uscite Video
5 - Ingresso Video
6 - Ingresso Aux IN 2
7 - Led protezione amplificatore
8 - Ingresso Digitale ottico Toshlink
9 - Ingresso Digitale coassiale
10 -Uscita Subwoofer Preamplificata
11 -Ingresso Aux IN 1
12 -Terminale alimentazione negativo
13 -Terminale alimentazione positivo
14 -Fusibili protezione
15 -Uscita altoparlante Subwoofer
16 -Uscita altoparlanti posteriori
17 -Uscita altoparlanti anteriori
18 -Accensione remote
19 -Uscita altoparlante Canale Centrale
1 - Switch-on Led
2 - Input for IR-sensor
3 - Reset-Switch
4 - Video-Exit
5- Video-Input
6 - Input Aux IN 2
7 - Amplifier protection show-down Led
8 - Digital Input Toshlink optical type
9- Digital coaxial Input
10 -Pre-amplified Subwoofer-Exit
11 -Input Aux IN 1
12 -Negative power-supply terminal
13 -Positive power-supply terminal
14 -Protection shut-off fuses
15 -Exit for subwoofer-speaker
16 -Exit for rear-speakers
17 -Exit for front-speakers
18 -Remote switch-on
19 -Speaker-exit for Central Channel
1 - Led d’allumage amplificateur
2 - Entrée senseur IR
3 - Touche Reset
4 - Sortie Vidéo
5 - Entrée Vidéo
6 - Entrée Aux IN 2
7 - Led protection amplificateur
8 - Entrée Digitale optique Toshlink
9 - Entrée Digitale coaxiale
10 - Sortie Subwoofer Pré amplifié
11 - Entrée Aux IN 1
12 - Terminal négatif d’alimentation
13 - Terminal positif d’alimentation
14 - Fusible de protection
15 - Sortie haut-parleur Subwoofer
16 - Sortie haut-parleurs arrière
17 - Sortie haut-parleurs avant
18 - Allumage remote
19 - Sortie haut-parleur Canal Central
1 - Verstärker-Einschalt-Led
2 - Eingang für IR-Sensor
3 - Reset-Taste
4 - Video-Ausgänge
5 - Video-Eingang
6 - Eingang Aux IN 2
7 - Verstärker Schutzschaltungs-Led
8 - Optischer Digital-Eingang Toshlink
9 - Coax Digital-Eingang
10 -Vorverstärkter Subwoofer-Ausgang
11 -Eingang Aux IN 1
12 -Stromversorgung Minus-Terminal
13 -Stromversorgung Plus-Terminal
14 -Schutzsicherung
15 -Ausgang für Subwoofer-Lautsprecher
16 -Ausgang für Heck-Lautsprecher
17 -Ausgang für Front-Lautsprecher
18 -Remote-Einschalten
19 -Ausgang für Center-Speaker
1 - Led de Encendido amplificador
2 - Entrada sensor IR
3 - Tecla de reset
4 - Salida video
5 - Entrada video
6 - Entrada AUX – IN 2
7 - Led protección amplificador
8 - Entrada Digital óptica Tos link
9 - Entrada Digital coaxial
10 - Salida Subwoofer preamplificada
11 - Entrada AUX-IN 1
12 - Terminal alimentación negativo
13 - Terminal alimentación positivo
14 - Fusibles de protección
15 - Salida altavoz Subwoofer
16 - Salida altavoces traseros
17 - Salida altavoces delanteros
18 - Encendido remoto
19 - Salida altavoz Canal Central
FUNZIONI
AMPLIFICATORE AMPLIFIER
FUNCTIONS FONCTIONS
AMPLIFICATEUR VERSTÄRKER-
FUNKTIONEN FUNCIONES DEL
AMPLIFICADOR
I
GB
F
D
E

FUNZIONI
TELECOMANDO
REMOTE-CONTROL
FUNCTIONS FONCTIONS
TELECOMMANDE
FERNBEDIENUNGS-
FUNKTIONEN
FUNCIONES DEL
MANDO A DISTANCIA
DESCRIZIONE
MENÚ MENU
DESCRIPTION DESCRIPTION
MENU MENÜ-
BESCHREIBUNG DESCRIPCION
MENU
1 - Tasto Mute
2 - Attiva ingresso Digitale Ottico
3 - Tasti movimento nel Menù
4 - Attiva ingresso Digitale Coassiale
5 - Attiva ingresso AUX-IN 2
6 - Menù di Setup
7 - Uscita menù o Setup precedente
8 - Attiva modalità audio MATRIX da utilizzare quando la
sorgente musicale è mono.
9 - Attiva modalità audio MUSIC da utilizzare quando la
sorgente musicale è stereo
10 - Attiva modalità audio MOVIE
da utilizzare per la visione di un film
11 - Cambia la modalità di ascolto da Stereo a Surround
12 - Attiva segnale TEST sui canali
13- Visualizza codifica audio attiva
14 - Attiva ingresso AUX IN 1
15 - Tasto conferma selezione nei Menù
1 - Mute-key
2 - Activates Digital Optical Input
3 - Moves cursor within the Menu
4 - Activates Digital Coaxial Input
5 - Activates Input AUX-IN 2
6 - Set-up Menu
7 - Leave Menu or previous Set-up
8 - Activates audio-MATRIX-function.
To be used when musical source is MONO.
9 - Activates audio-MUSIC-function.
To be used when musical source is STEREO.
10 - Activates audio-MOVIE-function. To be used for films.
11 - Changes from Stereo to Surround-listening
12 - Activates TEST-signal on the channels
13 - Visualizes when audio-codification is active
14 - Activates Input AUX IN 1
15 - Confirmation-key for selections made within Menu
1 - Touche « Mute »
2 - Activation Entrée Digitale Optique
3 - Touches de sélection dans le cadre du Menu
4 - Activation Entrée Digitale Coaxiale
5 - Activation Entrée AUX-IN 2
6 - Menu de Setup
7 - Sortie Menu ou Setup précédent
8 - Activation fonction Audio MATRIX, à utiliser quand la
source musicale est mono
9 - Activation fonction Audio MUSIC, à utiliser quand la
source musicale est stéréo
10 - Activation fonction Audio MOVIE, à utiliser pour vision
ner des films
11 - Change d’écoute Stéréo / Surround
12 - Activation signal TEST sur les canaux
13 - Visualise l’activation du code Audio
14 - Activation entrée AUX IN 1
15 - Touche de confirmation des sélection dans le Menu
1- Mute-Taste (Stummschaltung)
2- Aktivierung des optischen Digital-Eingangs
3- Bewegungstasten im Menü
4- Aktivierung des Coax-Digitaleingangs
5- Aktivierung des Eingangs AUX-IN 2
6- Setup-Menü
7- Verlassen des Menüs bzw. vorheriges Setup
8- Aktivierung der Modalität Audio-MATRIX: bei Mono-
Musikquelle verwenden.
9- Aktivierung der Modalität Audio-MUSIC:
bei Stereo-Musikquelle verwenden.
10- Aktivierung der Modalität Audio-MOVIE: bei Film-Wie
dergabe verwenden.
11- Umschalten der Wiedergabe von Stereo auf Surround
12- Aktivierung des TEST-Signals auf den Kanälen
13- Ausweisung der aktivierten Audio-Codifizierung
14- Aktivierung des Eingangs AUX IN 1
15- Bestätigungstaste nach Menü-Wahl
1 - Tecla Mute
2 - Activa entrada Digital Óptica
3 - Teclas de desplazamiento en el menú
4 - Activa entrada Digital Coaxial
5 - Activa entrada AUX-IN 2
6 - Menú de setup
7 - Salida menú o Setup anterior
8 - Activa la modalidad audio Matrix para utilizar cuando
la fuente de sonido es monofónica
9 - Activa la modalidad audio Music para utilizar cuando
la fuente de sonido es estereofónica
10 - Activa la modalidad audio Move para utilizar cuando
la fuente de sonido es monofónica
11 - Cambia la modalidad de escucha de Estereo a
Surround
12 - Activa la señal de TEST en los canales
13 - Visualiza codifica audio activa
14 - Activa entrada AUX_IN 1
15 - Tecla de confirmación en los menús
CROSSOVER
E’ regolabile solo se il canale subwoofer è attivato. La frequenza di incrocio interessa i canali satellite (FRONT/SUR-
ROUND) come passa alto e il subwoofer (WOOFER) come passa basso. Nel caso il subwoofer non sia stato attivato i
segnali dei canali FRONT e SURROUND sono FULL RANGE. Il canale CENTRALE è filtrato come passa alto a 150 Hz
AUX INPUT LEVEL
Il sistema permette di regolare segnali analogici compresi tra 0.2V e 6V.
CHANNEL LEVEL
Permette l’accesso alle regolazioni dei livelli +/- 10 dB dei canali FRONT, CENTER, SURROUND e SUBWOOFER (WOOFER).
SPEAKER SETTING
Permette di attivare (ON) o disattivare (OFF) il canale centrale (CENTER) o il subwoofer (WOOFER).
CROSSOVER
Can be regulated only while subwoofer-channel is activated. The cross-frequency of high-pass goes with the satellite-
channels (FRONT/SURROUND); the low-pass with the subwoofer (WOOFER). Whenever the subwoofer is not activated,
the signals of FRONT and SURROUND-channels are FULL RANGE. The CENTRAL-channel is filtered as high-pass, at 150Hz.
AUX INPUT LEVEL
The system allows analogical signals to be regulated between 0.2V and 6V.
CHANNEL LEVEL
To enter the level-regulation +/- 10 dB of the channel FRONT, CENTER, SURROUND, SUBWOOFER (WOOFER).
SPEAKER SETTING
To activate (ON) and de-activate (OFF) the central channel (CENTER) and the subwoofer (WOOFER).
CROSSOVER
Le filtre est réglable uniquement si le canal du sub est activé. La fréquence de croisement intéresse les canaux satellites
(FRONT/SURROUND) comme passe-haut, le subwoofer (WOOFER) comme passe-bas. Si le sub n’est pas activé, les si-
gnaux des canaux FRONT et SURROUND seront FULL RANGE.
Le canal CENTRAL est filtré comme passe-haut à 150 Hz.
AUX INPUT LEVEL
Le système permet de régler les signaux analogiques entre 0,2V et 6V.
CHANNEL LEVEL
Cette fonction permet l’accès aux réglages des niveaux +/- 10 dB des canaux FRONT, CENTER, SURROUND et SUBWOOFER (WOOFER).
SPEAKER SETTING
Cette fonction permet d’activer (ON) ou désactiver (OFF) le canal central (CENTER) ou le sub (WOOFER).
CROSSOVER
Der Crossover ist nur einstellbar, wenn der Subwoofer-Kanal aktiviert ist. Die Trenn-Frequenz hat im High-Pass-Bereich
Einfluss auf die Satelliten-Kanäle (FRONT/SURROUND); im Low-Pass-Bereich auf den Subwoofer (WOOFER).
Ist der Subwoofer nicht aktiviert, dann befinden sich die Kanäle FRONT und SURROUND in FULL RANGE.
Der Center Speaker-Kanal wird als High-Pass bei 150 Hz abgetrennt
AUX INPUT LEVEL
Das System ermöglicht die Einstellung von Analog-Signalen zwischen 0,2V und 6V.
CHANNEL LEVEL
Hiermit lässt sich das Niveau auf +/- 10 dB einstellen , der Kanäle FRONT, CENTER, SURROUND und SUBWOOFER
(WOOFER).
SPEAKER SETTING
Für die Aktivierung (ON) bzw. Deaktivierung (OFF) des Center Speaker-Kanals (CENTER) bzw. Subwoofers (WOOFER).
I
1234
5
6
7
8
9
10
11
12
15
14
13
GB
F
D
E
I
GB
F
D

CROSSOVER
Es ajustable solo si el del subwoofer es activo.
La frecuencia de cruce interesa los canales satélite (FRONT/SURROUND) como paso alto y el subwoofer (woofer) como
paso bajo
En el caso de que el subwoofer no haya sido activado las señales de los canales FRONT, Y SURROUND se encuentran
en FULLRANGE.
El canal CENTRAL es filtrado como paso alto a 150 Hz
AUX-IN INPUT LEVEL
El sistema permite regular las señales analógicas comprendida entre 0.2 V y 6 Voltios
CHANNEL LEVEL
Permite el acceso a los ajustes de los niveles +/- 10 dB de los canales FRONT, (delanteros) CENTER (central) SUR-
ROUND y SUBWOOFER (woofer)
SPEAKER SETTING
Permite de activar (ON) o desactivar (OFF) el canal central (CENTER) o el subwoofer (woofer)
E
Il tasto “MODE” permette di cambiare le modalità di ascolto tra stereo e sorround indipendentemente dalla selezione degli
altoparlanti
Modalità Stereo
I segnali anteriori e posteriori (SURROUND) sono uguali, mentre il canale centrale viene escluso. Il subwoofer risulterà attivo
se selezionato all’interno del Menù «WOOFER».
Se la modalità audio della sorgente è PCM (CD musicale) il Dolby Prologic II è disattivato. Se invece la modalità audio è
impostata su Dolby Prologic / DTS (Film) i segnali vengono miscelati in un segnale stereo.
Modalità Sorround
Abilita la codifica Pro Logic II, nella quale si potrà selezionare MOVIE per la visione dei film, MUSIC per l’ascolto di brani
musicali o MATRIX per l’ascolto di sorgenti MONO.
Note: Nella visione di film, la codifica 5.1 della sorgente è la stessa dei canali di uscita dell’amplificatore.
In caso di ascolto di un CD musicale stereo, il Dolby Prologic II produce comunque un segnale con codifica 5.1. Se il canale
centrale non è installato, disattivarlo dal menù «CENTER» ed il segnale verrà distribuito nei canali anteriori (Effetto Phantom
Center).
MOVIE, MUSIC e MATRIX, sono attive quando l’impostazione MODE è in SURROUND ed il segnale della sorgente è stereo.
Se manca una di queste due condizioni la modalità Pro Logic II è disinserita.
MODALITÁ
D’ASCOLTO LISTENING
FUNCTION MODALITES
D’ECOUTE ARTEN DER
WIEDERGABE MODALID DE
ESCUCHA
I
The “MODE”-key allows to choose between stereo and surround listening-mode, without having to determine the speak-
ers.
Stereo-Mode
The front and rear signals (SURROUND) are equal, while the central channel is excluded. The subwoofer will be active, when
selected within the Menu “WOOFER”.
If the source audio-mode is PCM (music CD) the Dolby Prologic II is de-activated. If the audio-mode is set on Dolby Pro-
logic / DTS (Film), the signals are mixed to become a stereo-signal.
Surround-Mode
This mode activates the Pro-Logic II-code necessary for the following selections: MOVIE (for films); MUSIC (for musical
tracks); MATRIX (for mono-source listening).
Note: when watching films, the 5.1 source-codification is the same as for the amplifier exit-channels. In the case of a stereo
musical CD, the Dolby Prologic II will, in any case, produce a signal having a 5.1-codification. De-activate the central
channel from the “CENTER”-Menu, if the central channel is not installed, so that the signal will be distributed on the front
channels (Phantom Centre Effect).
MOVIE, MUSIC and MATRIX are active when the MODE-function is set on SURROUND and when the source-signal is
stereo. As long as one of the two pre-conditions are missing, the Pro Logic II-Mode will not work.
GB
Modalité Stéréo
Les signaux avant et arrière (SURROUND) sont égaux, tandis que le canal central est exclu. Le sub résultera actif s’il est
sélectionné dans le cadre du Menu « WOOFER ».Si la modalité Audio de la source est de type PCM (CD musical), le Dolby
Prologic II est désactivé. Si, d’autre part, la modalité Audio est réglée sur Dolby Prologic / DTS (Film), les signaux sont
mélangés en signal stéréo.
Modalité Surround
Cette fonction active la codification Pro Logic II, permettant la sélection MOVIE pour la vision des films ; la fonction MUSIC
pour l’écoute musical ; la fonction MATRIX pour l’écoute des sources MONO.
Note : pendant la visualisation de films, la codification 5.1 de la source est la même que les canaux de sortie de l’amplifi-
cateur.
Pendant l’écoute d’un CD musical stéréo, le Dolby Prologic II procure, quand même un signal codifié 5.1. Si le canal central
n’est pas installé, il faut le désactiver depuis le Menu « CENTER » afin que le signal soit distribué sur les canaux avant (Effet
Phantom Centre).
MOVIE, MUSIC et MATRIX sont actifs quand la fonction MODE se trouve en SURROUND et quand le signal de la source
est stéréo.
Si il manque d’une de ces deux conditions, la modalité Pro Logic II ne marche pas.
MODALITÁ
D’ASCOLTO LISTENING
FUNCTION MODALITES
D’ECOUTE ARTEN DER
WIEDERGABE MODALID DE
ESCUCHA
Die Taste „MODE“ schaltet um zwischen Stereo und Surround, ganz unabhängig von der eigentlichen Wahl der Lautspre-
cher.
Stereo-Modalität
Die Signale für Front und Heck (SURROUND) sind gleichgestellt. Der Center Speaker-Kanal wird dabei ausgeschlossen. Der
Subwoofer aktiviert sich, indem man, innerhalb des Menüs, „WOOFER“ anwählt.
Angesichts einer PCM-Audio-Quelle (Musik-CD), bleibt der Modus Dolby Prologic II unaktiviert.
Wurde die Audio-Modalität Dolby Prologic / DTS (Film) angewählt, dann werden die Signale zu einem Stereo-Signal ver-
mischt.
Surround-Modalität
Hier findet die Aktivierung der Pro Logic II-Codifizierung statt, bei der man folglich die Wahl treffen kann zwischen MOVIE
(für die Film-Betrachtung), MUSIC (für die Wiedergabe von Musikstücken) und MATRIX (für die Wiedergabe von MONO-
Quellen).
Wichtig: Bei Filmen ist die 5.1-Codifizierung der Quelle dieselbe wie die der Ausgangskanäle des Verstärkers.
Bei Wiedergabe einer Stereo-Musik-CD, ergibt die Dolby Prologic II-Modalität in jedem Fall ein 5.1-codifiziertes Signal.
Falls der Center Speaker-Kanal nicht installiert ist, dann aus dem „CENTER“-Menü deaktivieren, damit das Signal auf die
Front-Kanäle verteilt werden kann (Phanto-Center-Effekt).
MOVIE, MUSIC und MATRIX sind dann aktiviert, wenn die MODE-Funktion auf SURROUND eingestellt ist und das Signal
der Quelle Stereo zu hören ist.
Solange nicht beide Bedingungen erfüllt sind, bleibt die Pro Logic II-Modalität unaktiviert.
D
La touche « MODE » permet de choisir entre l’écoute Stéréo et l’écoute Surround, de manière indépendante de la sélection
des haut-parleurs.
F
La tecla MODE permite cambiar el modo de escucha entre estereo y surround independientemente de la selección de los
altavoces
Modo Estereo
Las señales delanteras y traseras (SURROUND) son iguales mientras que el canal central viene excluido. El subwoofer
resultará activado si seleccionado en el interior del Menú “WOOFER”
En el caso de que el modo audio de la fuente es PCM (CD musical) El Dolby Prologic II esta desactivado. Mientras que si
el modo audio esta puesto en Dolby Prologic / DTS (Películas) las señales vienen mezcladas en una señal estereo.
Modo Surround
Habilita la codifica Pro-Logic II en la cual se podrá seleccionar MOVIE para la visión de las películas, MUSIC para escuchar
canciones o MATRIX para la escucha de fuentes en MONO.
Nota; En la visión de las películas, la codifica 5.1 de la fuente es la misma de los canales de salida del amplificador.
En la escucha de un CD musical Estereo, el Dolby Prologic II reproduce de todas formas una señal con codifica 5,1
En el caso de que el canal central no estuviera instalado, desactivado del menú “CENTER” la señal vendrá distribuida en
los canales delanteros (Efecto Phanton Center)
MOVIE, MUSIC, y MATRIX están activadas cuando la configuración MODE está en SURROUND y la señal de la fuente
es Estereo.
Si falta una de estas dos condiciones el modo Pro-Logic no está activo.
E
DESCRIZIONE
MENÚ MENU
DESCRIPTION DESCRIPTION
MENU MENÜ-
BESCHREIBUNG DESCRIPCION
MENU

Codifica Audio
La seguente tabella mostra la codifica audio attiva in base alle impostazioni di sorgente e amplificatore.
Audio codification
The following table shows the active audio codification, on the basis of the source and amplifier-setting.
Codification Audio
La table, ci-après indiquée, montre la codification Audio active, par rapport aux sélections de la source et de l’amplifica-
teur.
Audio-Codifizierung
Die nachfolgende Tabelle gibt, je nach Einstellung der Quelle und des Verstärkers, die aktive Audio-Codifizierung bekannt.
Codificación Audio
La siguiente tabla muestra la codifica audio activa en base a la configuración de la fuente y del amplificador.
DVD PH501 ACTIVE CODEC
DOLBY DIGITAL 5.1 * DOLBY DIGITAL
DOLBY DIGITAL 2.0 SURROUND DOLBY SURROUND
STEREO DOLBY DIGITAL
DTS * DTS
PCM SURROUND PRO LOGIC II
STEREO PCM
*
I-Qualsiasi impostazione MODE
GB - Every kind of MODE-setting
F-Toutes les fonctions MODE possibles.
D-Jede beliebige MODE-Einstellung
F-Cualquier configuración
MODALITÁ
D’ASCOLTO LISTENING
FUNCTION MODALITES
D’ECOUTE ARTEN DER
WIEDERGABE MODALID DE
ESCUCHA
CON INGRESSO DIGITALE – (DVD con uscita digitale ottica o coassiale)
1. Senza inserire dischi posizionare il volume del DVD a circa ¾ del livello
2.
Premere il tasto “SETUP” sul telecomando dell’amplificatore e selezionare “CHANNEL LEVEL”. Portare a 0 dB tutti i canali
3. Portare il volume dell’amplificatore a livello 10
4. Verificare il funzionamento degli altoparlanti tramite il tasto “TEST”
5. Inserire il disco e portare il volume ad un livello medio (circa 30)
6. Agire sui livelli dei canali “CENTER”, “SURROUND” e “WOOFER” (subwoofer) secondo le proprie esigenze
ATTENZIONE: Regolare il livello del canale centrale in base alla potenza dell’altoparlante installato.
Il canale centrale regolato a 0 dB eroga 35 Watt RMS quando il volume dell’amplificatore è a livello 60, a +10 dB
eroga ben 100 Watt RMS.
CON INGRESSO ANALOGICO (DVD/Autoradio/Lettore MP3)
1. Mantenere il volume delle sorgenti al minimo
2. Premere il tasto “SETUP” sul telecomando dell’amplificatore e selezionare “AUX1/AUX2 INPUT LEVEL” secondo la
connessione effettuata.
3. Portare il livello di ingresso al valore indicato dalle specifiche tecniche del dispositivo collegato
(Autoradio 2-6 Volt, Lettori Mp3 0,5-1 Volt, DVD 2-4 Volt)
4. Tornare al menù di SETUP premendo il tasto “ESC”
5. Selezionare “CHANNEL LEVEL” e portare a 0 dB tutti i canali
6. Uscire dal SETUP premendo il tasto ESC due volte.
7. Aumentare il volume della amplificatore al massimo (livello 60)
8. Verificare il funzionamento degli altoparlanti tramite il tasto “TEST”
9. Aumentare il volume della sorgente fino a ¾ del volume massimo
10. Entrare nuovamente nel menù SETUP e selezionare AUX1/AUX2 INPUT LEVEL e regolare la
sensibilità in modo da ottenere un suono senza distorsione al volume attuale.
11. Tornare alla selezione dei canali (SETUP – CHANNEL LEVEL) e regolare i livelli “FRONT”(Altoparlanti anteriori),
“CENTER”(canale centrale), “SURROUND”(Altoparlanti posteriori) e “WOOFER”(subwoofer) secondo le proprie esigenze.
ATTENZIONE: Regolare il livello del canale centrale in base alla potenza dell’altoparlante installato.
Il canale centrale regolato a 0 dB eroga 35 Watt RMS, a +10 dB eroga ben 100 Watt RMS.
REGOLAZIONE
IMPIANTO SETTING
INSTALLATION REGLAGE DE
L’INSTALLATION EINSTELLUNG
DER HIFI-ANLAGE AJUSTE DEL
EQUIPO
WITH DIGITAL INPUT – (DVD having optical digital exit or coaxial exit)
1. Without inserting any disc, set the DVD-volume to about ¾ of its range.
2. Press the “SET-UP”-key on the amplifier remote-control unit and select “CHANNEL LEVEL”. Set all channel at 0 dB.
3. Take the amplifier-volume to level 10.
4. Check the speakers by pressing the “TEST”-key.
5. Insert the disc and choose a medium volume (around 30).
6. Choose the channel-levels “CENTER”, “SURROUND” and “WOOFER” (subwoofer), per your own requirements.
ATTENTION: regulate the central channel in due relation with the power of the installed speaker. When the central
channel is regulated at 0 dB, the supplied power will be 35 Watt RMS, with the amplifier-volume at level 60. When
regulated at +10 dB, the supplied power will be as high as 100 Watt RMS.
WITH ANALOGICAL INPUT (DVD/Car-Radio/MP3-Player)
1. Keep the source-volume at its minimum
2. Press the “SET-UP”-key on the amplifier remote-control unit and select “AUX1/AUX2 INPUT LEVEL”, in due relation
with the existing connection.
3. Check and set the input-level as specified in the Technical Specifications of the connected appliance
(car-radio 2-6 Volt; MP3-Players 0.5-1 Volt; DVD 2-4 Volt).
4. Return to the SET-UP-menu, by pressing the key “ESC”
5. Select “CHANNEL LEVEL” and set all channels to 0 dB.
6. Leave the SET-UP-mode by pressing the ESC-key twice.
7. Increase the amplifier volume to its maximum (level 60)
8. Check if the speakers are working, by pressing the “TEST”-key
9. Increase the source-volume to ¾ of the maximum volume.
10. Enter again into the SET-UP-Menu and select AUX1/AUX2 INPUT LEVEL. Regulate the sensitivity until an undistorted
sound is obtained at the chosen volume.
11. Return to the channel-selection (SETUP – CHANNEL LEVEL) and set the levels “FRONT” (front speakers); “CENTER”
(central channel); “SURROUND” (rear speakers); “WOOFER” (subwoofer), per your own requirements.
ATTENTION: regulate the central channel in due relation with the power of the installed speaker.
When the central channel is set at 0 dB, it will supply 35 Watt RMS. At +10 dB, as much as 100 Watt RMS.
I
GB

MIT DIGITAL-EINGANG – (DVD mit Digital-Ausgang, optisch oder coax)
1. Ohne die DVD einzulegen, die DVD-Lautstärke auf ¾ einstellen
2.
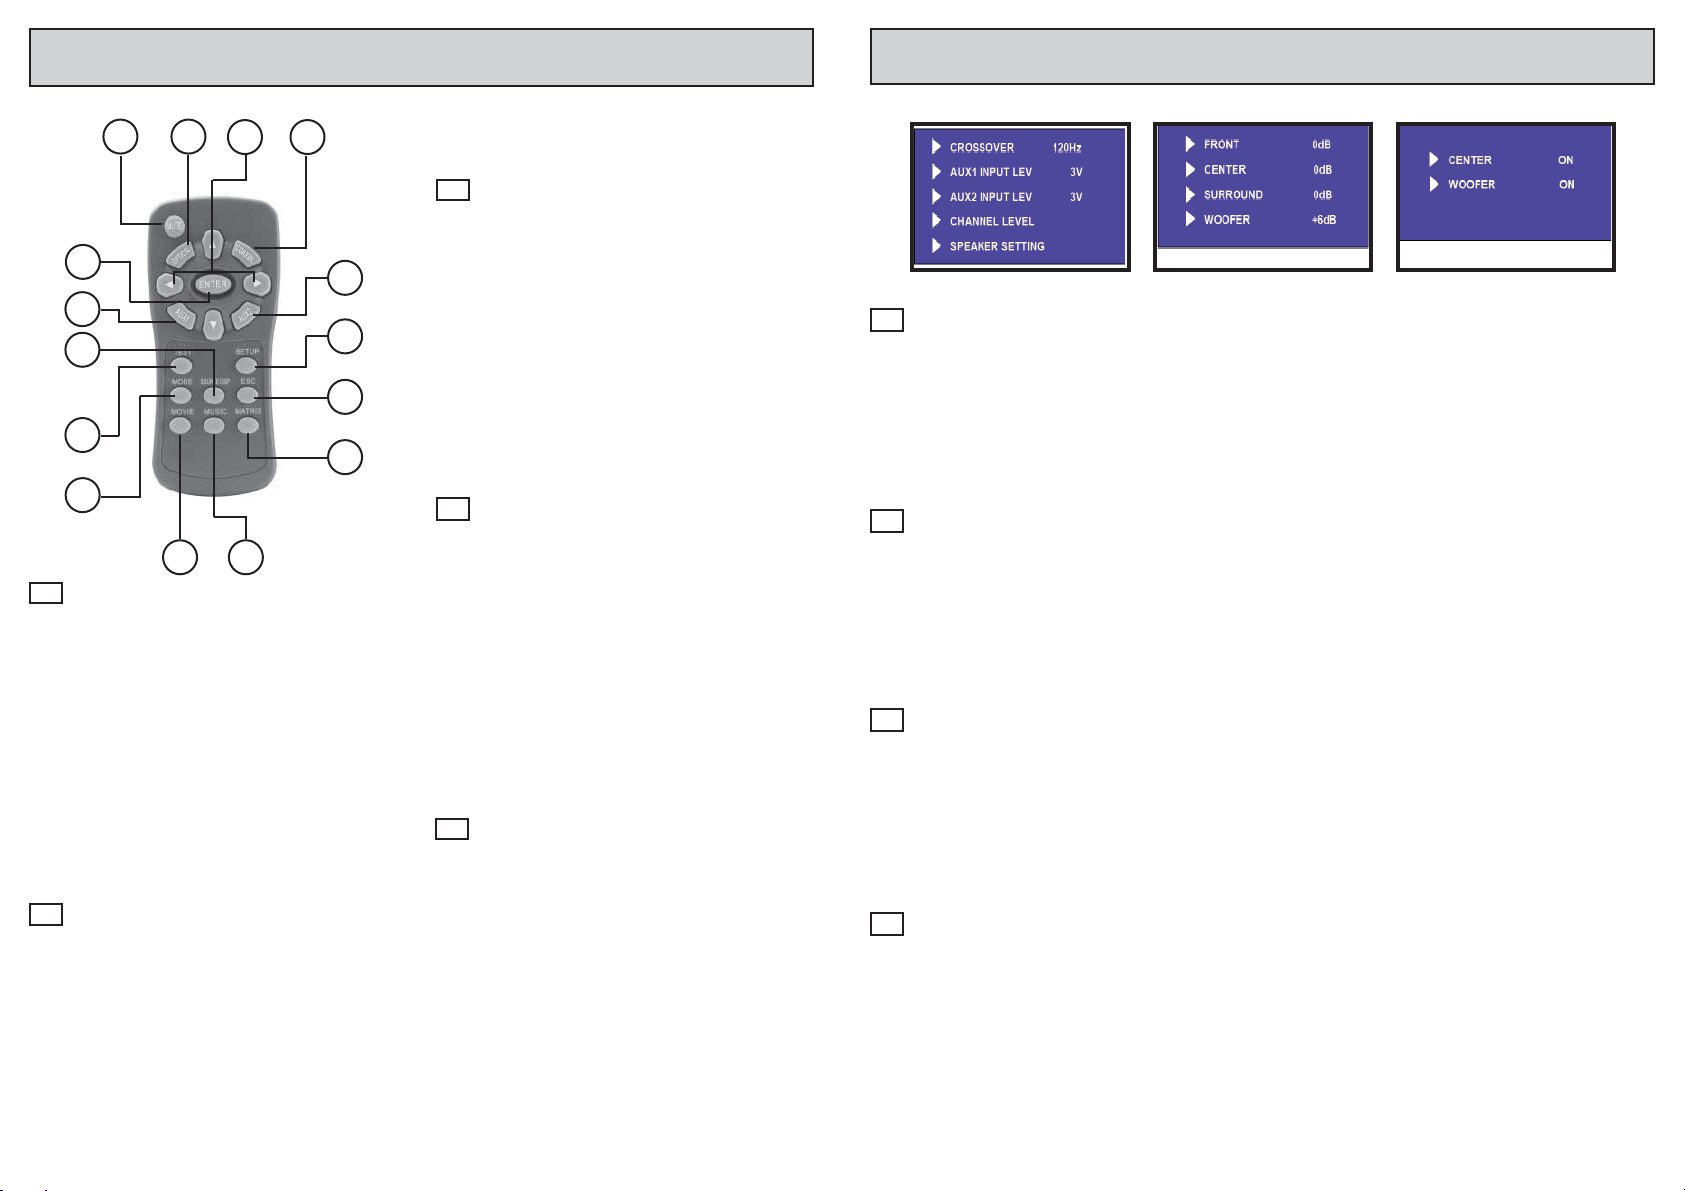
Auf der Fernbedienung des Verstärkers, „SETUP“-Taste drücken und „CHANNEL LEVEL“ wählen. Alle Kanäle au 0 dB schalten.
3. Verstärker-Lautstärke auf 10 einstellen.
4. Die Lautsprecher durch Taste „TEST“ kontrollieren
5. DVD einlegen und Lautstärke auf ein mittleres Niveau einstellen (um die 30)
6.
Die Niveaus der Kanäle „CENTER“, „SURROUND“ und „WOOFER“ (Subwoofer), nach eigenem Geschmack einstellen.
BITTE BEACHTEN: das Niveau des Center Speaker-Kanals, unter Rücksichtnahme des installierten Lautsprechers
einstellen. Auf 0 dB eingestellt, produziert der Zentral-Kanal, bei Verstärker-Lautstärke 60, eine Leistung von 35 Watt
RMS. Auf +10 dB eingestellt, ganze 100 Watt RMS.
MIT ANALOG-EINGANG (DVD/Autoradio/MP3-Player)
1. Sämtliche Quellen auf die Mindest-Lautstärke einstellen.
2. Auf der Fernsteuerung des Verstärkers, Taste „SET-UP“ drücken und, je nach vollzogener Verbindung, wählen
zwischen AUX1 / AUX2 INPUT LEVEL.
3. Eingangs-Niveau auf die technischen Daten des angeschlossenen Geräts anpassen. (Autoradio 2-6 volt;
MP3-Player 0,5-1 Volt; DVD 2-4 Volt).
4. Durch Druck auf die Taste „ESC“ ins SETUP-Menü zurückgehen.
5. „CHANNEL LEVEL“ wählen und alle Kanäle auf 0 dB setzen.
6. „ESC“-Taste zwei Mal drücken, um SET-UP-Menü wieder zu verlassen.
7. Verstärker-Lautstärke voll aufdrehen (Stufe 60)
8. Durch Taste „TEST“, Lautsprecher kontrollieren
9. Die Quellen-Lautstärke auf ¾ der maximalen Lautstärke erhöhen
10. Nochmals ins SETUP-Menü gehen und AUX1/AUX2 INPUT LEVEL wählen. Dann Sensibilität so einstellen, dass bei
der gegebenen Lautstärke keine Verzerrungen zu hören sind.
11. Nochmals in die Kanal-Wahl gehen (SETUP – CHANNEL LEVEL) und die Niveaus „FRONT“ (Front-Lautsprecher),
„CENTER“ (Center Speaker-Kanal), „SURROUND“ (Heck-Lautsprecher) und „WOOFER“ (Subwoofer), je nach Gesch
mack einstellen.
BITTE BEACHTEN: das Niveau des Center Speaker-Kanals auf die Leistung des installierten Lautsprechers anpas-
sen. Auf 0 dB eingestellt, produziert der Zentral-Kanal 35 Watt RMS. Auf +10 dB eingestellt, ganze 100 Watt RMS.
CON ENTRADA DIGITAL – (DVD con salida óptica o coaxial)
1. Sin insertar los discos, posicionar el volumen del DVD a ¾ del nivel
2. Presionar la tecla SETUP del mando a distancia del amplificador y seleccionar “CHANNEL LEVEL” regular a 0 dB
todos los canales
3. Ajustar el nivel del volumen a 10
4. Verificar el funcionamiento de los altavoces a través de la tecla “TEST”
5. Insertar el disco y poner el volumen a un nivel medio (alrededor de 30)
6. Ajustar los niveles de los canales “CENTER”,”SURROUND”,”WOOFER” (subwoofer según las propias exigencias)
ATENCIÓN: Ajustar el volumen del canal central en base a la potencia del altavoz instalado.
El canal central ajustado a 0 dB eroga 35 WATT RMS cuando el volumen del amplificador esta a 60, a + 10 dB eroga
100 WATT RMS.
CON ENTRADA ANALOGICA (DVD/ Autoradio/ reproductor MP3)
1. Mantener el volumen de las fuentes al mínimo
2. Presionar la tecla “SETUP” del mando a distancia del amplificador y seleccionar “AUX1, AUX2 INPUT LEVEL” según
la conexión efectuada
3. Ajustar el nivel de entrada según los valores indicados en las indicaciones técnicas del dispositivo conectado
(Autoradio 2-6 voltios, reproductores MP3 0,5-1 voltio DVD 2-4 Voltios)
4. Volver al menú de “SETUP” presionando la tecla “ESC”
5. Seleccionar “CHANNEL LEVEL” y ajustar a 0 dB todos los canales
6. Salir de “SETUP” presionando la tecla “ESC” 2 veces.
7. Aumentar el volumen del amplificador al máximo nivel (Nivel 60)
8. Verificar el funcionamiento de los altavoces a través de la tecla “TEST”
9. Aumentar el volumen del reproductor hasta ¾ del volumen máximo
10. Entrar nuevamente en el menú “SETUP” y seleccionar “AUX1, AUX2 INPUT LEVEL” y ajustar la sensibilidad en
modo de obtener un sonido sin distorsión al volumen actual
11. Volver a la selección de los canales (“SETUP” – CHANNEL LEVEL) y ajustar los niveles “FRONT” (Altavoces
delanteros) “CENTER” (canal central) “SURROUND “(Altavoces traseros) y “WOOFER” (subwoofer) según las propias exigencias.
ATENCIÓN:
Ajustar el volumen del canal central en base a la potencia del altavoz instalado.
El canal central ajustado a 0 dB eroga 35 WATT RMS cuando el volumen del amplificador está a 60, a + 10 dB eroga
100 WATT RMS.
D
EF
AVEC ENTREE DIGITALE – (DVD avec sortie digitale optique ou coaxiale)
1. Sans introduire le disque, positionner le volume d’écoute DVD à environ ¾ de l’échelle
2. Appuyer sur la touche « SET-UP » depuis l’unité de télécommande de l’ampli, et sélectionner « CHANNEL LEVEL ».
Porter tous les canaux à 0 dB.
3. Porter le volume de l’ampli au niveau 10.
4. Vérifier le fonctionnement des haut-parleurs, en utilisant la touche « TEST »
5. Introduire le disque et porter le volume au niveau moyen (au tours de 30)
6. Régler les niveaux des canaux « CENTER », « SURROUND » et « WOOFER » (subwoofer) selon vos exigences.
ATTENTION : il faut régler le canal central en relation avec la puissance du haut-parleur installé.
Réglé à 0 dB, le canal central donne une puissance de 35 Watt RMS, avec le volume de l’amplificateur au niveau 60.
Réglé à +10 dB, il donne tant que 100 Watt RMS.
AVEC ENTREE ANALOGIQUE (DVD/Autoradio/Lecteur MP3)
1. Maintenir le volume des sources au minimum
2. Appuyer sur la touche « SET-UP » depuis l’unité de télécommande de l’amplificateur, et sélectionner « AUX1/AUX2
INPUT LEVEL », selon la connexion effectuée.
3. Porter le niveau d’entrée au niveau indiqué dans les Données Techniques de l’appareil branché (Autoradio 2-6 Volt ;
Lecteur MP3 0,5-1 Volt ; DVD 2-4 Volt).
4. Retourner au Menu du SET-UP, en appuyant sur la touche « ESC »
5. Sélectionner « CHANNEL LEVEL » et amener à 0 dB tous les canaux
6. Quitter le SET-UP, en appuyant, deux fois, sur la touche ESC
7. Augmenter le volume de l’ampli au maximum (niveau 60)
8. Vérifier le fonctionnement des haut-parleurs, en appuyant sur la touche « TEST »
9. Augmenter le volume de la source jusqu’à ¾ du maximum
10. Rentrer, de nouveau, dans le Menu SET-UP ; sélectionner AUX1/AUX2 INPUT LEVEL; régler la sensibilité jusqu’à
obtenir un bon résultat sonore sans distorsions.
11. Retourner à la sélection des canaux (SET-UP – CHANNEL LEVEL) ; régler les niveaux « FRONT » (haut-parleurs
avant) ; « CENTER » (canal central) ; « SURROUND » (haut-parleurs arrière) ; « WOOFER » (sub), selon les
exigences personnelles.
ATTENTION : Régler le niveau du canal central, en relation avec la puissance du haut-parleur installé. S’il est réglé à
0 dB, le canal central donne 35 Watt RMS. S’il est réglé à +10 dB, il donne 100 Watt RMS.
REGOLAZIONE
IMPIANTO SETTING
INSTALLATION REGLAGE DE
L’INSTALLATION EINSTELLUNG
DER HIFI-ANLAGE AJUSTE DEL
EQUIPO REGOLAZIONE
IMPIANTO SETTING
INSTALLATION REGLAGE DE
L’INSTALLATION EINSTELLUNG
DER HIFI-ANLAGE AJUSTE DEL
EQUIPO
Table of contents
Other Phonocar Car Amplifier manuals