manuals.online logo
Brands
  1. Home
  2. •
  3. Brands
  4. •
  5. Phonocar
  6. •
  7. Digital Camera
  8. •
  9. Phonocar VM490 User manual

Phonocar VM490 User manual

This manual suits for next models

3

Other Phonocar Digital Camera manuals

Phonocar VM 287 User manual

Phonocar

Phonocar VM 287 User manual

Phonocar VM269 User manual

Phonocar

Phonocar VM269 User manual

Phonocar VM166 User manual

Phonocar

Phonocar VM166 User manual

Popular Digital Camera manuals by other brands

Canon WP-DC35 user guide

Canon

Canon WP-DC35 user guide

Xiaomi 70mai Dash Cam Lite user manual

Xiaomi

Xiaomi 70mai Dash Cam Lite user manual

Samsung PL70 Quick start manual

Samsung

Samsung PL70 Quick start manual

GE E1680W user manual

GE

GE E1680W user manual

Canon EOS 1200D instruction manual

Canon

Canon EOS 1200D instruction manual

Tevion MD 86497 user guide

Tevion

Tevion MD 86497 user guide

Exakta VX Features

Exakta

Exakta VX Features

Kodak Digital Science DC120 user guide

Kodak

Kodak Digital Science DC120 user guide

Nikon FM3A Specifications

Nikon

Nikon FM3A Specifications

Vectra Fitness H1 Quick reference guide

Vectra Fitness

Vectra Fitness H1 Quick reference guide

Nikon COOLPIX 775 quick start guide

Nikon

Nikon COOLPIX 775 quick start guide

Olympus IR 500 - 4MP Digital Solutions Camera Manuel de Référence

Olympus

Olympus IR 500 - 4MP Digital Solutions Camera Manuel de Référence

Samsung EC-L100ZBBA brochure

Samsung

Samsung EC-L100ZBBA brochure

FujiFilm FINEPIX BL01124-201 owner's manual

FujiFilm

FujiFilm FINEPIX BL01124-201 owner's manual

Panasonic DMC-L10KPP Service manual

Panasonic

Panasonic DMC-L10KPP Service manual

Hyundai Electric HYU-CC-CHBF12001 Quick installation guide

Hyundai Electric

Hyundai Electric HYU-CC-CHBF12001 Quick installation guide

Sony DSC-WX80 specification

Sony

Sony DSC-WX80 specification

Nikon Nuvis S - Point & Shoot instruction manual

Nikon

Nikon Nuvis S - Point & Shoot instruction manual

manuals.online logo
manuals.online logoBrands
  • About & Mission
  • Contact us
  • Privacy Policy
  • Terms and Conditions

Copyright 2025 Manuals.Online. All Rights Reserved.

WI-FI DVR
CAMERA
MANUALE ISTRUZIONI
INSTRUCTIONS MANUAL
NOTICE DE MONTAGE ET D’EMPLOI
GEBRAUCHSANWEISUNGEN
MANUAL DE INSTRUCCIONES
VM490 - VM491
VM492 - VM499
Collegamenti • Connections • Connexion • Anschluß • Conexion
GIALLO / YELLOW
NERO / BLACK
ROSSO / RED
+ 12 V
+ 12 V
Sottochiave / Injection Key
USCITA / OUTPUT
VIDEO
Il DVR è un registratore video per auto che viene utilizzato quando si desidera viaggiare in sicurezza. I video registrati
verranno salvati sulla SD Card e le nuove registrazioni verranno incise sulle meno recenti. La durata di registrazione
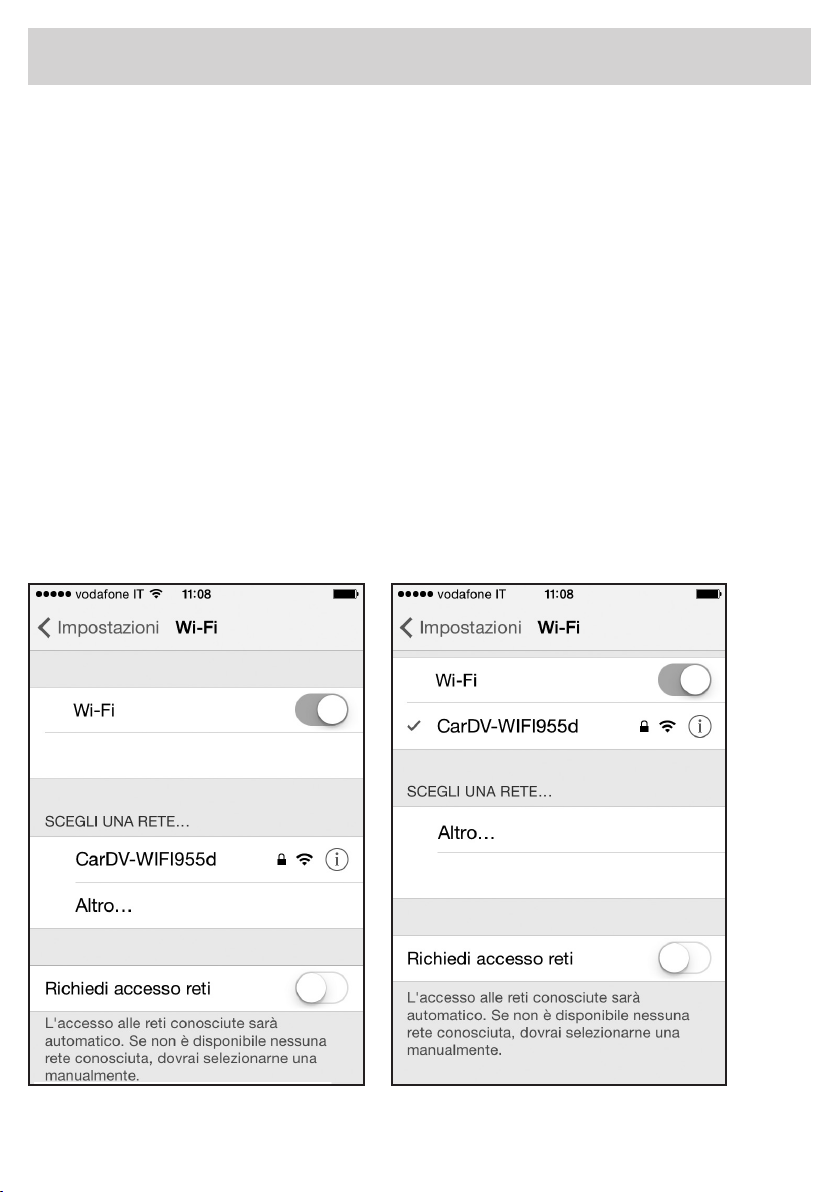
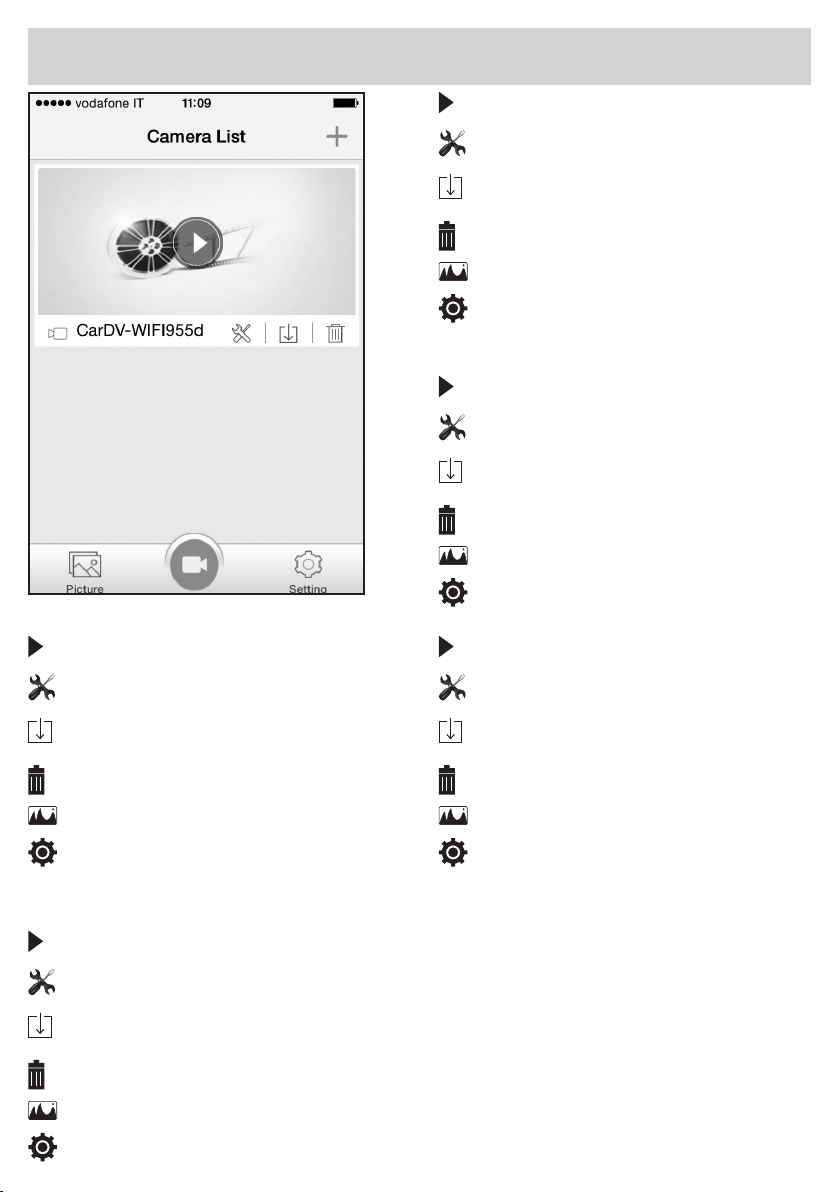
impostata di fabbrica è di 3 minuti. Altre funzioni: • Funzione Wi - Permette di visualizzare le registrazioni anche tramite
APP su smartphone con configurazione minima hardware: CPU 1GHz - Dual Core - RAM 512 MB.
• Funzione di rilevamento collisione - Un sensore G è integrato nel DVR. Se l’apparecchio è sottoposto ad urti in fase
di registrazione, il video in corso verrà bloccato in automatico, verrà salvato come file speciale e non potrà essere sovra
registrato. • Funzione di rilevamento dei movimenti - Quando il DVR rileva un movimento nelle vicinanze, inizierà a
registrare. In assenza di movimento per 5 secondi, la registrazione si arresta.
• Phonocar non si ritiene responsabile per l’utilizzo improprio delle registrazioni.
•
Phonocar will not be liable for any improper use of records.
• Phonocar n’est pas responsable pour toute utilisation impropre des enregistrements.
• Phonocar ist nicht verantwortlich für unsachgemäße Verwendung der Videoaufnahmen.
. • Phonocar no se hace responsable por el uso indebido de las grabaciones.
Le DVR est un enregistreur pour voiture, nécessaire pour un voyage en toute sécurité. Les vidéos enregistrées sont mémori-
sées sur la Carte SD, et les nouveaux enregistrements sont mémorisés sur ceux moins récents. La durée de l’enregistrement
d’origine est de 3 minutes. Autres fonctions : • Fonction Wi-Fi - Permet de visualiser les enregistrements même à travers
l’APP du smartphone, avec conguration hardware minimum : CPU 1GHz - Dual Core - RAM 512 MB. • Fonction détec-
tion de collision - Un senseur G est intégré dans le DVR. Si l’appareil est soumis à des chocs pendant l’enregistrement,
la vidéo en cours sera automatiquement bloquée et sauvegardée comme chier spécial, et dans ce cas, il sera impossible
enregistrer dessus. • Fonction détection de mouvement - Quand le DVR détecte un mouvement à proximité immédiate, il
commence à enregistrer. Si aucun mouvement n’est signalé pendant 5 seconds, l’enregistrement s’arrête.
DVR ist ein Videorecorder für Autos, der zum sicheren Fahren beiträgt. Videoaufnahmen werden auf SD-Karte gespei-
chert, sodass neue Videos ältere Dateien ersetzen. Standardmäßig Höchstdauer ist 3 Minuten. Weitere Funktionen:
• Wi-Fi-Funktion - Videoaufnahmen können auch durch APP auf Smartphones mit Hardware-Mindestkonguration CPU
1GHz - Dual Core - RAM 512 MB angezeigt werden. • Kollisionserkennung-Funktion Ein G Sensor ist im DVR einge-
baut. Wird das Gerät während des Aufzeichnungsvorgangs belastet, wird diesen automatisch gestoppt und als Sonderda-
tei gespeichert. Keine Aufzeichnung ist darauf mehr möglich.
• Bewegungserkennung-Funktion - Wird eine Bewegung in der Umgebung vom DVR erkannt, beginnt das Gerät
aufzuzeichnen. Wird keine Bewegung 5 Sekunden lang festgestellt, hört die Aufzeichnung auf.
El DVR es un grabador de video para coche que se utiliza cuando se desea viajar con seguridad. Los videos grabados
serán guardados en la SD Card y cuando la memoria está agotada las nuevas grabaciones remplazan la más antiguas.
El tiempo de grabación que ha sido programado de fábrica es de 3 minutos. Otras funciones: • Función Wi - Permite
visualizar las grabaciones incluso mediante APP en el Smartphone con conguración mínima de hardware: CPU 1GHz -
Dual Core - RAM 512 MB. • Función de detección de colisión - Un sensor G está integrado en el DVR. Si el aparato
detecta un golpe en fase de grabación el video en curso será bloqueado en automático y será guardado como un archivo
especial y no podrá ser borrado. • Función de Detección - Cuando el DVR detecta un movimiento en su campo de
acción, iniciará a grabar. Si no se detectan movimientos durante 5 segundos el grabador se parará.
DVR is a video recorder for cars, useful for traveling in safety. Recorded videos will be stored on the SD Card. New recor-
dings will over-record older les. Recording time of 3 minutes is factory set. Other functions: • Wi-Fi function - allows
to display recordings also through APP on smartphone with hardware minimum conguration: CPU 1GHz - Dual Core
RAM 512 MB.• Collision detection function - The DVR is equipped with a built-in G sensor. If the device is subjected to
strong impacts while recording, the video will be automatically interrupted and stored as special le. Over-recording will
not be possible.• Movements detection function - When the DVR detects a close movement, it will start recording. If no
movement is detected for 5 seconds, the recording interrupts automatically.
Funzioni • Functions • Fonctions • Funktionen • Funciones
Installazione • Installation • Installation • Installation • instalación
• Adattabile su diversi modelli di auto.
• Adaptable to different car models.
• Adaptable à plusieurs modèles de voitures.
• Passend zu unterschiedlichen Fahrzeugmodellen
• Adaptable en diferentes modelos de coche
1 2 3 4
1. Accensione/Spegnimento
Avvia e ferma registrazione
2. Cambia sorgente
Attiva o disattiva WI-FI
3. Slot Micro-SD
4. Non abilitato.
1. Einschalten/Ausschalten
Aufzeichnung starten und stoppen
2. Quelle wechseln
WI-FI Aktivieren oder Deaktivieren
3. Slot Micro-SD
4. Nicht aktiviert.
1. Power on/ Power off
Start and stop recording
2. Change source
Activate or deactivate WI-FI
3. Slot Micro-SD
4. Disabled.
1. Encendido/Apagado
Inicia y para la grabación
2. Cambia fuente
Activa o desactiva WI-FI
3. Ranura Micro-SD
4. No habilitado.
1. Allumage/extinction
Mise en marche et interruption
de l’enregistrement
2. Changement de la source
Activation ou désactivation du WI-FI
3. Slot Micro-SD
4. Non activé.
VM499 UNIVERSAL
Funzioni • Functions • Fonctions • Funktionen • Funciones
Installazione • Installation • Installation • Installation • instalación
1. Accensione/Spegnimento
Avvia e ferma registrazione
2. Cambia sorgente
Attiva o disattiva WI-FI
3. Slot Micro-SD
Aprire la telecamera ed inserirla fra le staffe dello specchietto retrovisore.
Open the camera and put it among the brackets of the rearview mirror.
Ouvrir la caméra et l’insérer entre les supports du rétroviseur.
Die Kamera öffnen und diese zwischen den Bügeln des
Rückspiegels einsetzen.
Desenganchar la caja e introducirla entre los soportes del espejo retrovisor.
NON SMONTARE LO SPECCHIETTO RETROVISORE
DO NOT DISASSEMBLE THE REARVIEW MIRROR.
NE PAS DEMONTER LE RETROVISEUR.
RÜCKSPIEGEL NICHT DEMONTIEREN
NO DESMONTAR EL ESPEJO RETROVISOR
1. Einschalten/Ausschalten
Aufzeichnung starten und stoppen
2. Quelle wechseln
WI-FI Aktivieren oder Deaktivieren
3. Slot Micro-SD
1. Power on/ Power off
Start and stop recording
2. Change source
Activate or deactivate WI-FI
3. Slot Micro-SD
1. Encendido/Apagado
Inicia y para la grabación
2. Cambia fuente
Activa o desactiva WI-FI
3. Ranura Micro-SD
VM490 VOLKSWAGEN HIGH CONFIGURATION
CON SENSORE DI PIOGGIA / WITH RAIN SENSOR / AVEC DETECTEUR DE PLUIE
MIT REGENSENSOR / CON SENSOR DE LLUVIA
1
2
3
1. Allumage/Extinction. Mise en marche
et interruption de l’enregistrement
2. Changement de la source
Activation ou désactivation du WI-FI
3. Slot Micro-SD
Funzioni • Functions • Fonctions • Funktionen • Funciones
Installazione • Installation • Installation • Installation • instalación
1. Accensione/Spegnimento
Avvia e ferma registrazione
2. Cambia sorgente
Attiva o disattiva WI-FI
3. Slot Micro-SD
1. Power on/ Power off
Start and stop recording
2. Change source
Activate or deactivate WI-FI
3. Slot Micro-SD
1. Einschalten/Ausschalten
Aufzeichnung starten und stoppen
2. Quelle wechseln
WI-FI Aktivieren oder Deaktivieren
3. Slot Micro-SD
1. Encendido/Apagado
Inicia y para la grabación
2. Cambia fuente
Activa o desactiva WI-FI
3. Ranura Micro-SD
VM491 VOLKSWAGEN LOW CONFIGURATION
SENZA SENSORE DI PIOGGIA / WITHOUT RAIN SENSOR / SANS DETECTEUR DE PLUIE
OHNE REGENSENSOR / SIN SENSOR DE LLUVIA
1
2
3
Staffa di raccordo regolabile.
Adjustable tting bracket.
Support de montage réglable.
Flexible Halterung Halterung.
Soporte de montaje ajustable.
Aprire la telecamera ed inserirlo fra le staffe dello specchietto
retrovisore applicando ad incastro la staffa di raccordo.
Open the box and put it between the brackets of the rearview mirror,
by interlocking the connecting bracket.
Ouvrir la caméra et l’insérer entre les supports du rétroviseur.
En encastrant le support de raccord.
Die Kamera öffnen und diese zwischen den Bügeln des Rückspiegels,
durch den Verbindungsbügel einsetzen.
Desenganchar la caja e introducirla entre los soportes del espejo
retrovisor. Poniendo encajado el soporte de conexión.
NON SMONTARE LO SPECCHIETTO RETROVISORE
DO NOT DISASSEMBLE THE REARVIEW MIRROR.
NE PAS DEMONTER LE RETROVISEUR.
RÜCKSPIEGEL NICHT DEMONTIEREN
NO DESMONTAR EL ESPEJO RETROVISOR
1. Allumage/Extinction. Mise en marche
et interruption de l’enregistrement
2. Changement de la source
Activation ou désactivation du WI-FI
3. Slot Micro-SD
Funzioni • Functions • Fonctions • Funktionen • Funciones
Installazione • Installation • Installation • Installation • instalación
VM492 VOLKSWAGEN GOLF VII
1
2
3
ORIGINAL
Agganciare al supporto originale.
Fix it on the original bracket.
Fixer sur le support original
Auf dem ursprünglichen Halter befestigen.
Enganchar al soporte original.
1. Accensione/Spegnimento
Avvia e ferma registrazione
2. Cambia sorgente
Attiva o disattiva WI-FI
3. Slot Micro-SD
1. Power on/ Power off
Start and stop recording
2. Change source
Activate or deactivate WI-FI
3. Slot Micro-SD
1. Einschalten/Ausschalten
Aufzeichnung starten und stoppen
2. Quelle wechseln
WI-FI Aktivieren oder Deaktivieren
3. Slot Micro-SD
1. Encendido/Apagado
Inicia y para la grabación
2. Cambia fuente
Activa o desactiva WI-FI
3. Ranura Micro-SD
1. Allumage/Extinction. Mise en marche
et interruption de l’enregistrement
2. Changement de la source
Activation ou désactivation du WI-FI
3. Slot Micro-SD
Connessione • Connection • Connexion • Anschlüss • Conexión WI-FI
APP Final Cam
Con iOS Scaricare dall’ APPLE STORE l’applicazione gratuita “FINAL CAM”.
Con ANDROID Scaricare da PLAY STORE l’applicazione gratuita “FINAL CAM”.
Aprire il menù settaggi ed entrare nel menù wi-fi, selezionare l’ID denominato CarDV.... digitare la password 12345678 per
connettersi.
Connessione effettuata. • Connection has been es-
tablished. • Connexion effectuée. • Die Verbindung
wurde hergestellt. • Conexión efectuada.
Ricerca WI-FI e seleziona CarDV... • Search for WI-
FI and choose CarDV... • Rechercher WI-FI et sé-
lectionner CarDV... • Nach WI-FI suchen und CarDV
wählen ... • Búsqueda WI-FI y selecciona CarDV...
With iOS Download the free application “FINAL CAM” from the APPLE STORE
With ANDROID Download the free application “FINAL CAM” from the PLAY STORE
Open the setting menu and enter the Wi-Fi menu, choose the CarDV ID…. enter the password 12345678 for connecting.
Avec iOS Télécharger l’app gratuite “FINAL CAM” de l’APPLE STORE.
Avec ANDROID Télécharger l’app gratuite FINAL CAM” du PLAY STORE.
Ouvrir le menu des réglages et accéder au menu Wi-Fi, sélectionner l’ID CarDV…entrer le mot de passe 12345678 pour
se connecter.
Mit iOs Die kostenlose App « FINAL CAM” vom APPLE STORE herunterladen.
Mit ANDROID Die kostenlose App “FINAL CAM” vom PLAY STORE herunterladen.
Das Menü Einstellungen öffnen um ins Wi-Fi Menü zu gelangen. Die ID CarDV wählen und das Passwort 12345678 zur
Aktivierung der Verbindung.
Con iOS descargar desde el APPLE STORE la aplicación gratuita “FINAL CAM”.
Con ANDROID descargar desde el PLAY STORE la aplicación gratuita “FINAL CAM”.
Abrir el menú de ajustes y entrar en el menú wi-, seleccionar el ID denominado CarDV.... digitar la password 12345678
para conectarse.
Esempio • Example • Exemple • Beispiel • Ejemplo iOS Apple
Avvio applicazione • Start application • Démarrage application
Apps- Starten • Inicio aplicación
• Avviare l’applicazione FINAL CAM.
• Start the application FINAL CAM.
• Démarrer l’application FINAL CAM.
• Die App FINAL CAM starten.
• Iniciar la aplicación FINAL CAM.
• Schermata d’avvio FINAL CAM.
• Start screen FINAL CAM.
• Ecran de démarrage FINAL CAM.
• Startbildschirm FINAL CAM.
• Pantalla de inicio FINAL CAM.
• Avviare la ricerca della telecamera
premendo sull’icona.
• Start the search for the camera by
pressing on the icon.
• Déclencher la recherche de la caméra
en appuyant sur l’icône.
• Nach der Kamera suchen, indem
auf den Ikon gedrückt wird.
• Iniciar la búsqueda de la cámara
presionando encima del icono.
• L’applicazione ricercherà la telecamera
e si connetterà automaticamente.
• The application will search for the
camera and connect automatically.
• L’application recherche la caméra
et se connecte automatiquement.
• Die App wird nach der Kamera suchen
und sich automatisch verbinden.
• La aplicación buscará la cámara
y se conectará automáticamente.
Utilizzo FINAL CAM • Using FINAL CAM • Verwendung FINAL CAM
Utillisation FINAL CAM • Utilización FINAL CAM
Visualisation en directe de l’enregistrement.
Réglages du système.
Télécharger sur le smartphone les photos et/ou
enregistrements présents sur la Carte SD.
Eliminer la caméra.
Liste des enregistrements téléchargés.
Réglages FINAL CAM.
Direkte Anzeige der Aufnahme.
System-Einstellungen.
Bilder/Aufnahmen auf SD-Karte vom Smartphone
herunterladen.
Die Kamera löschen.
List der heruntergeladenen Aufzeichnungen.
FINAL CAM Einstellungen.
Visualizzazione diretta della ripresa.
Impostazioni di sistema.
Scarica sullo smartphone foto/registrazioni presenti
sulla SD Card.
Elimina la telecamera.
Elenco delle registrazioni scaricate.
Impostazioni FINAL CAM
Visualización directa de la grabación.
Ajuste del sistema.
Descarga en el Smartphone foto/grabaciones
presentes en la SD Card.
Elimina la cámara.
Listado de las grabaciones descargadas.
Ajustes FINAL CAM.
Direct displaying of recorded les.
System settings.
Download on the smartphone pictures/records
on the SD Card.
Delete the camera.
List of the downloaded records.
FINAL CAM Settings