Phrozen Sonic User manual

1
Phrozen Sonic User Guide
Thank you for purchasing Phrozen products!

2
INDEX
I. CONTENTS ............................................................................................................... 3
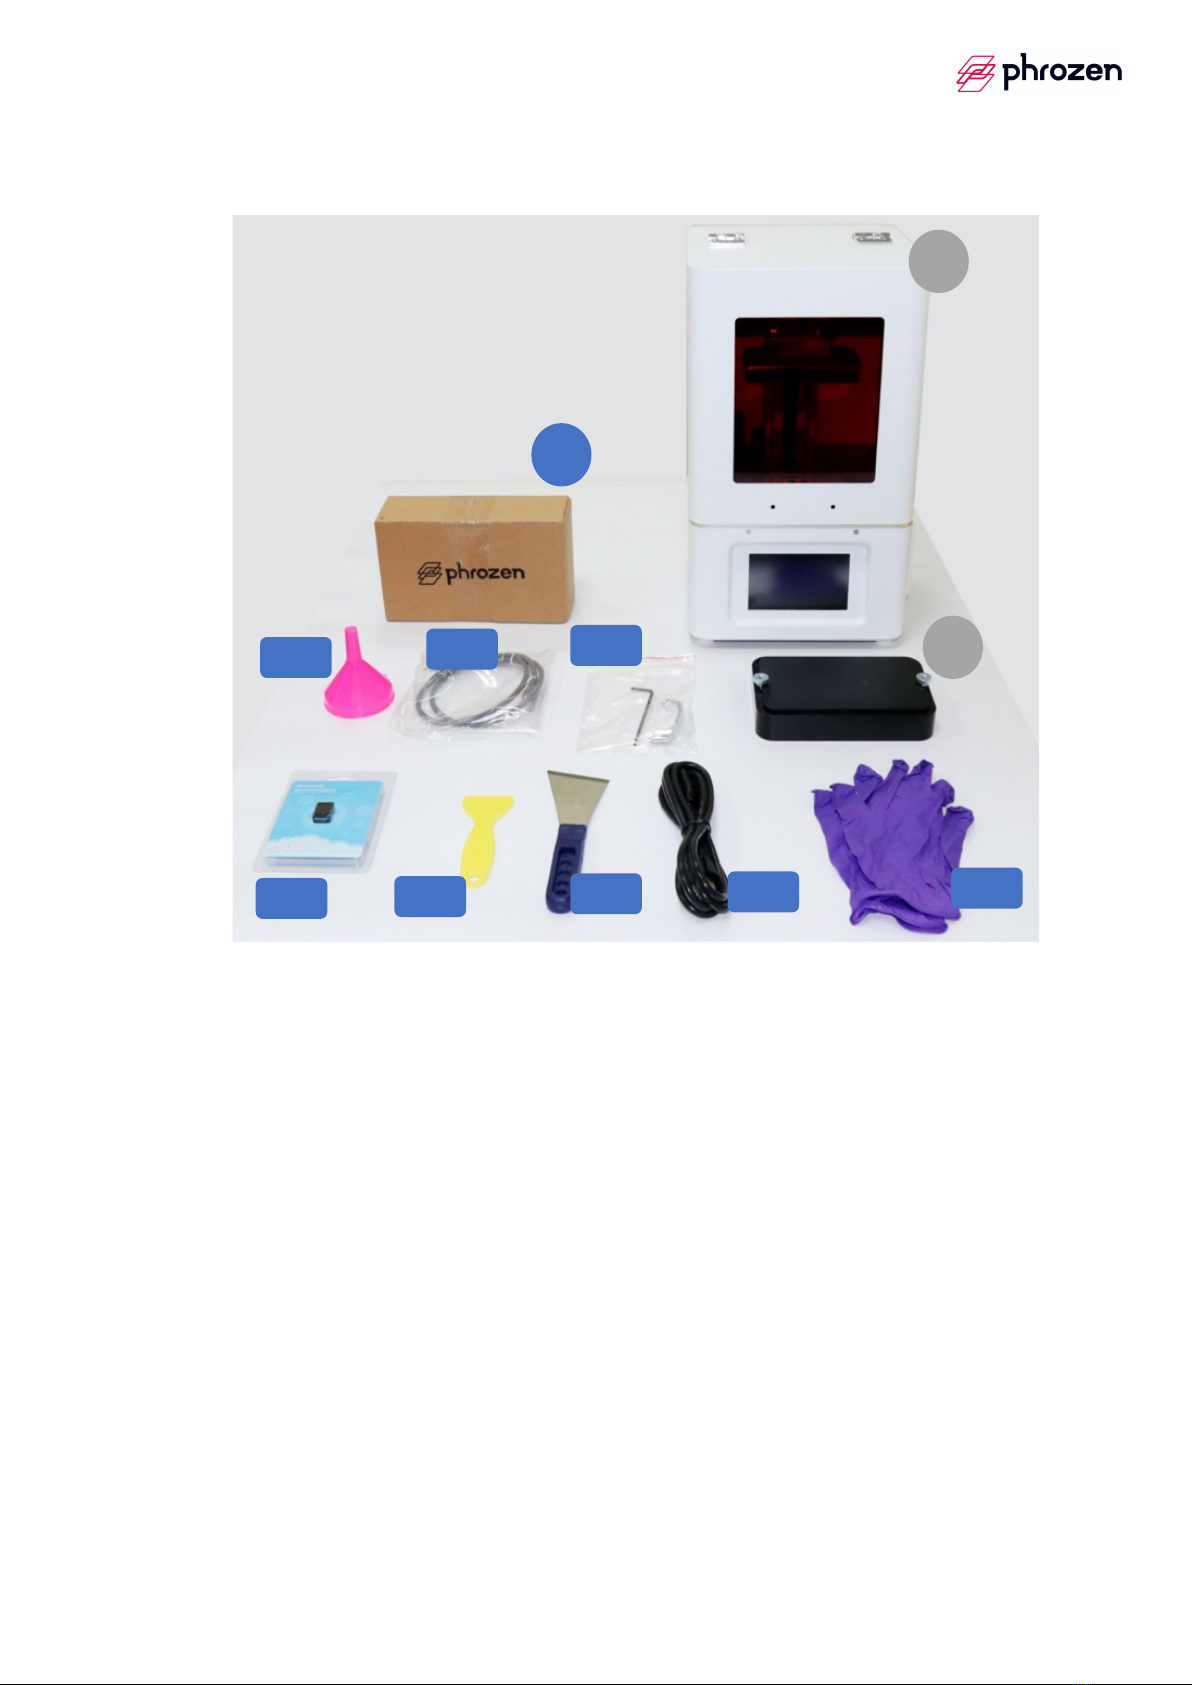
II. BEFORE YOU START… ............................................................................................ 4
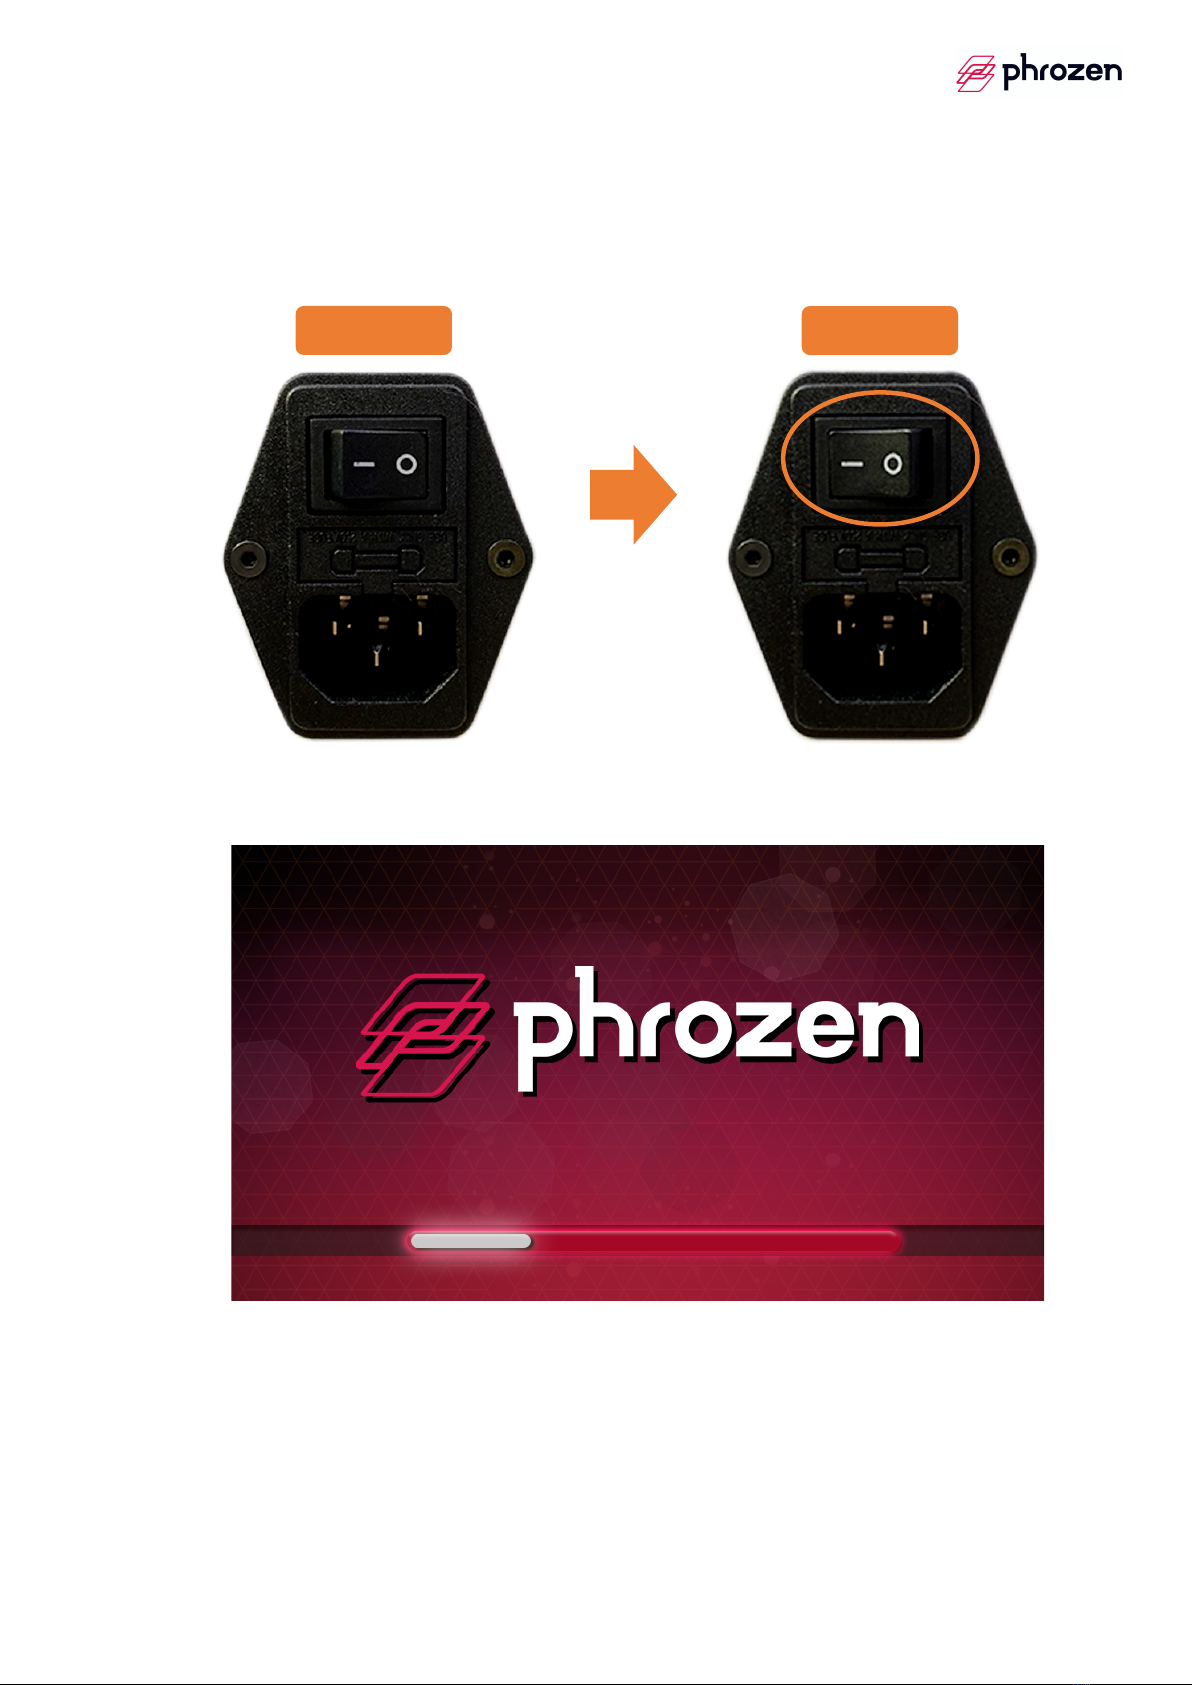
III. POWER ON/POWER OFF ...................................................................................... 5
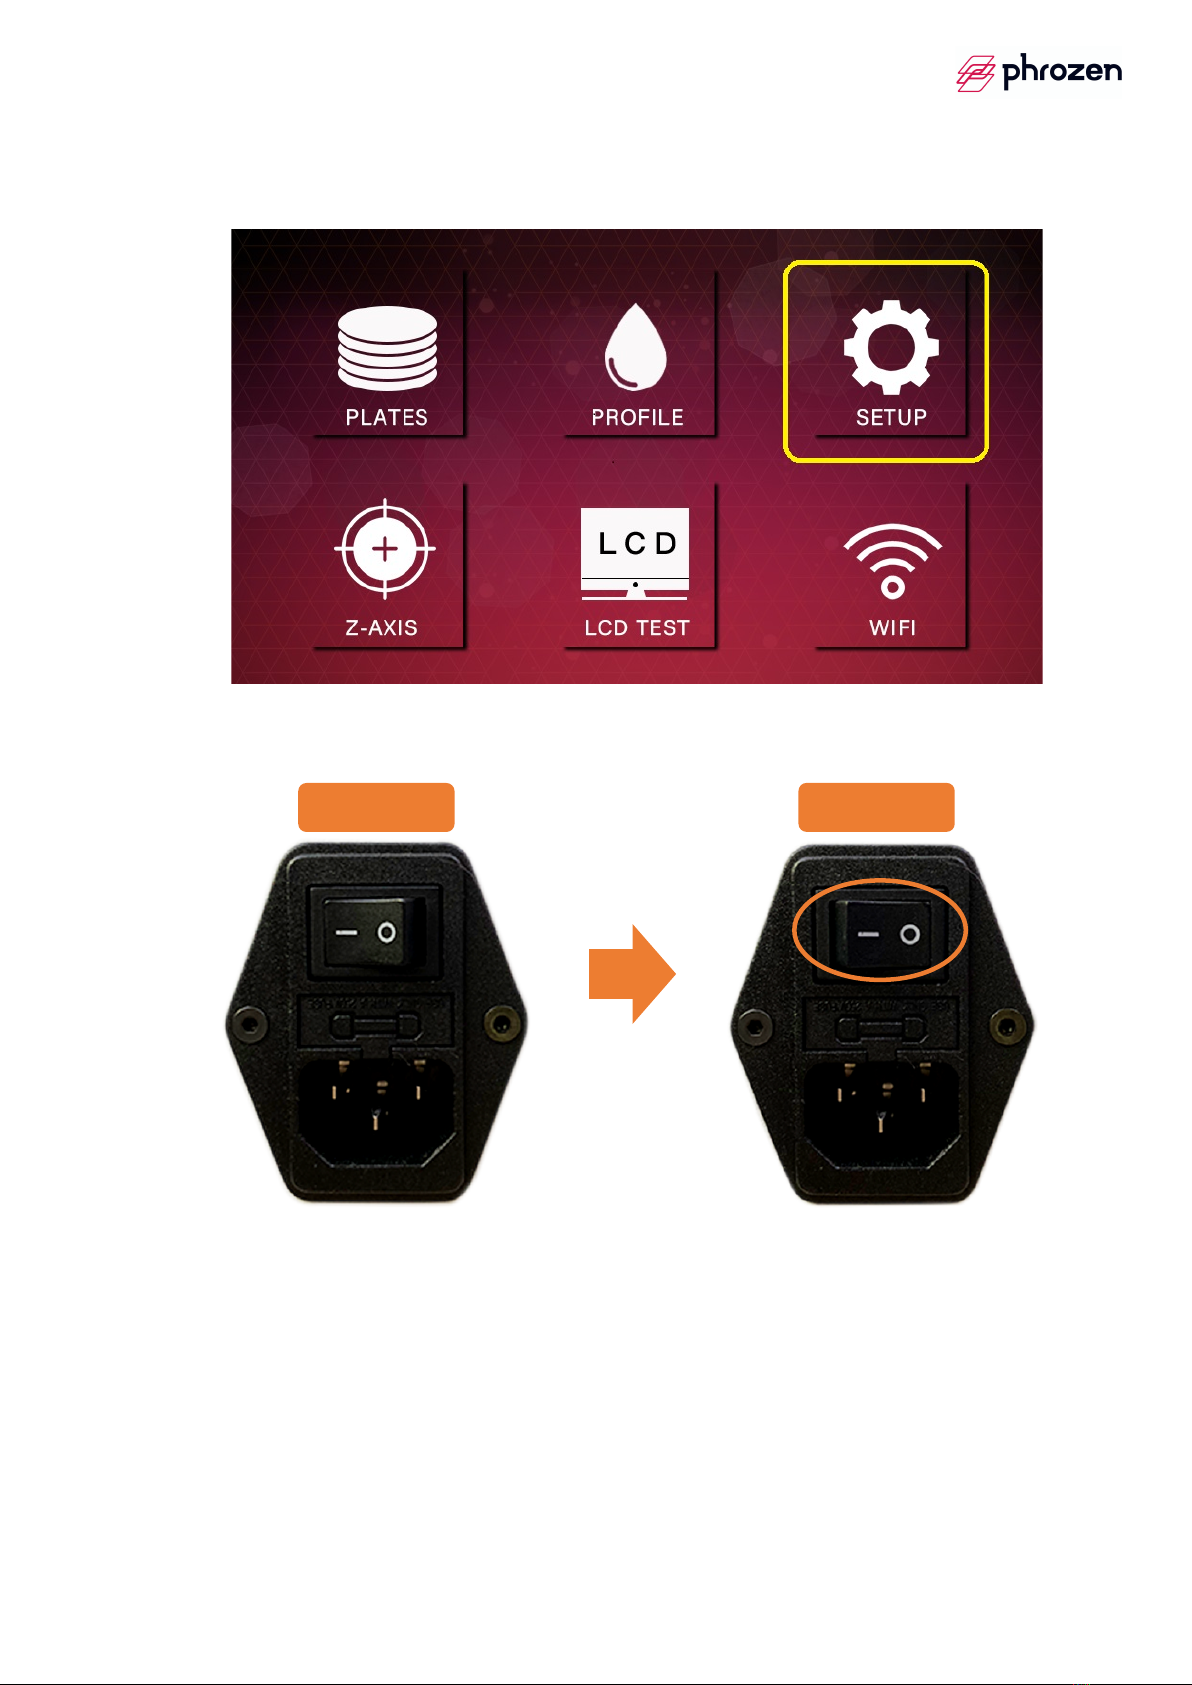
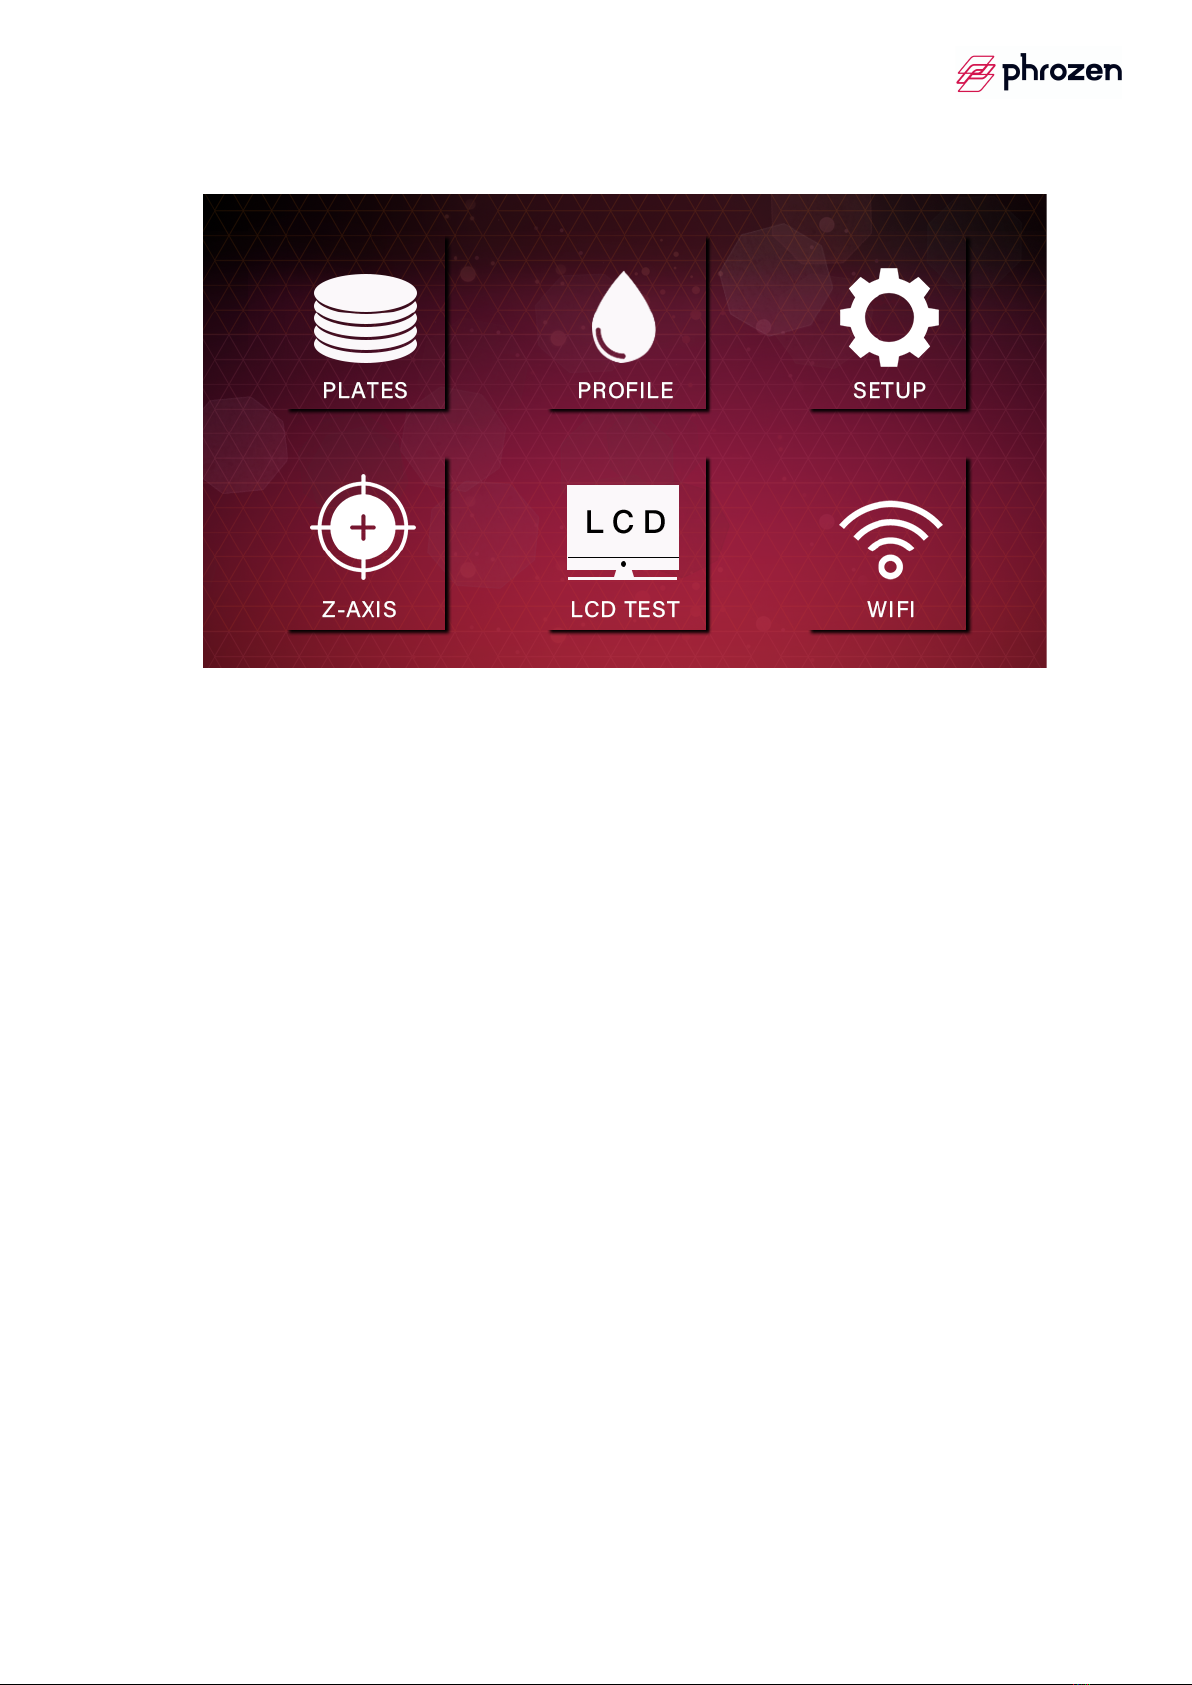
IV. PHROZEN OS FUNCTION ..................................................................................... 7
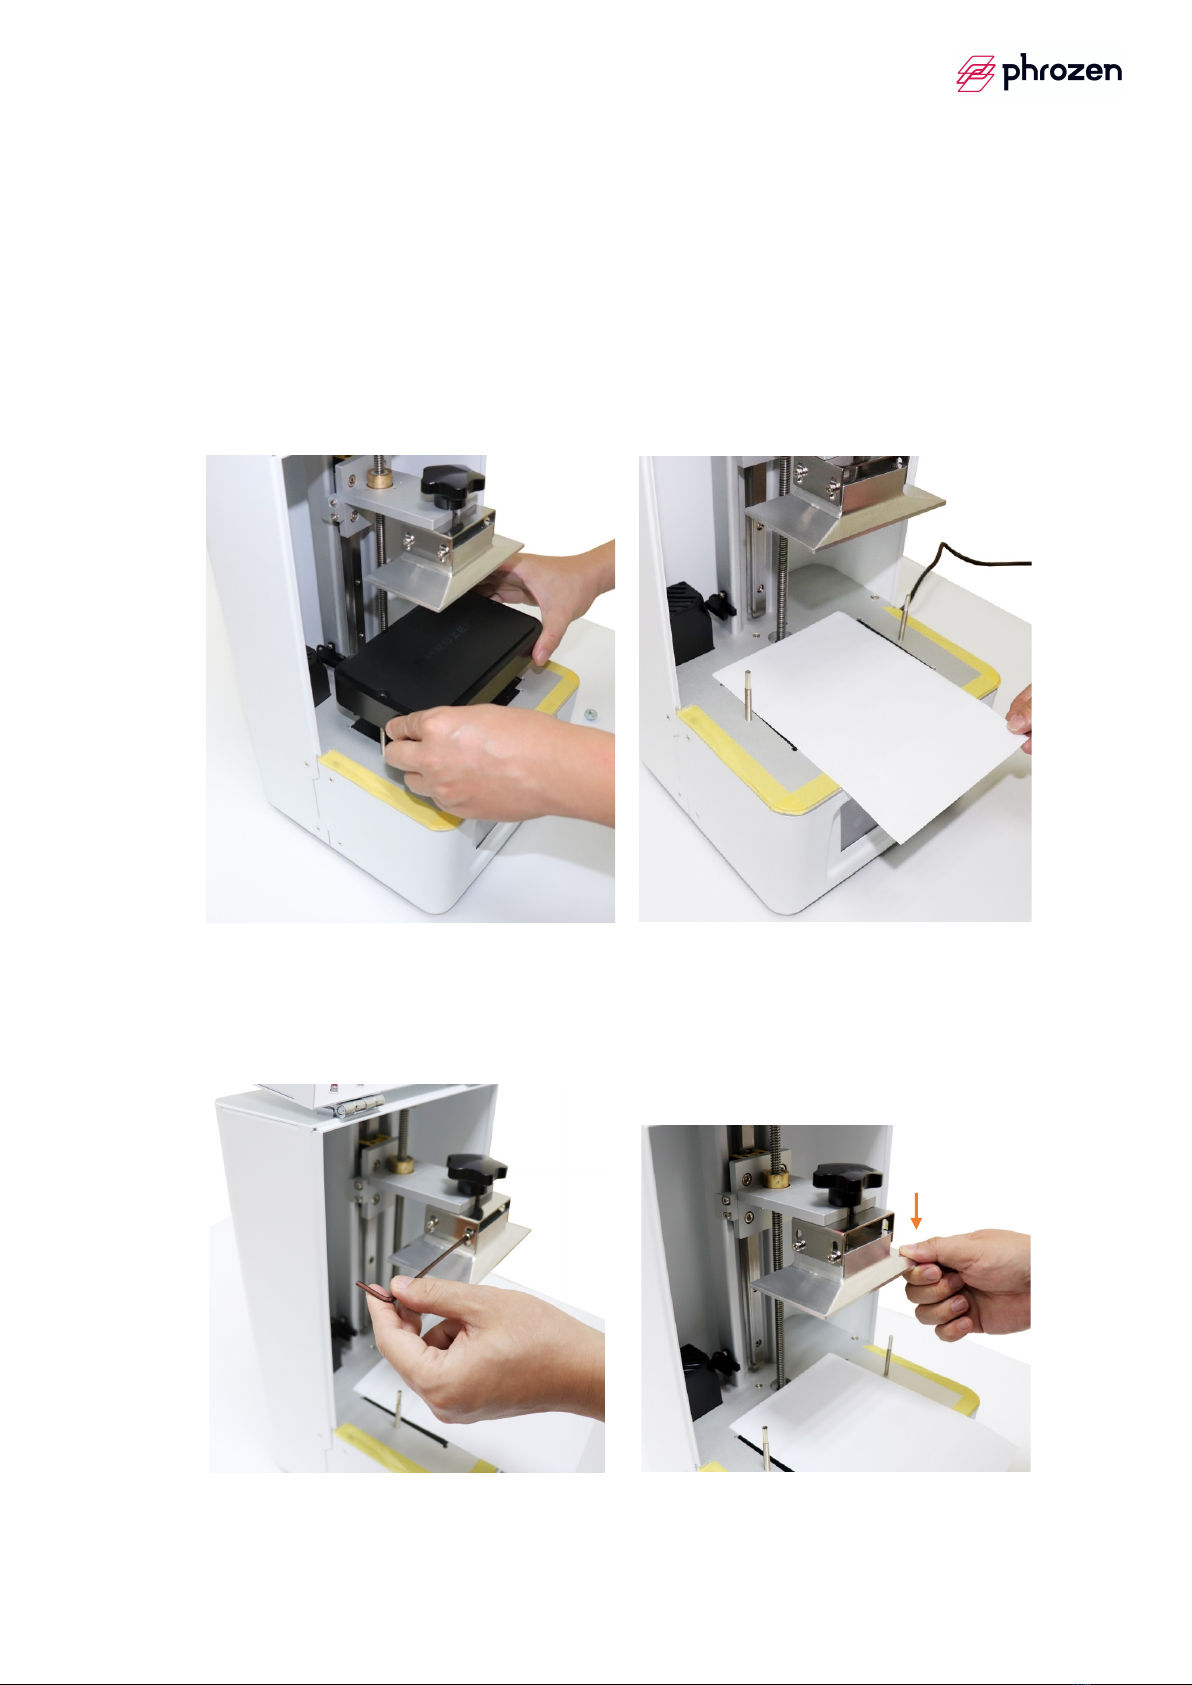
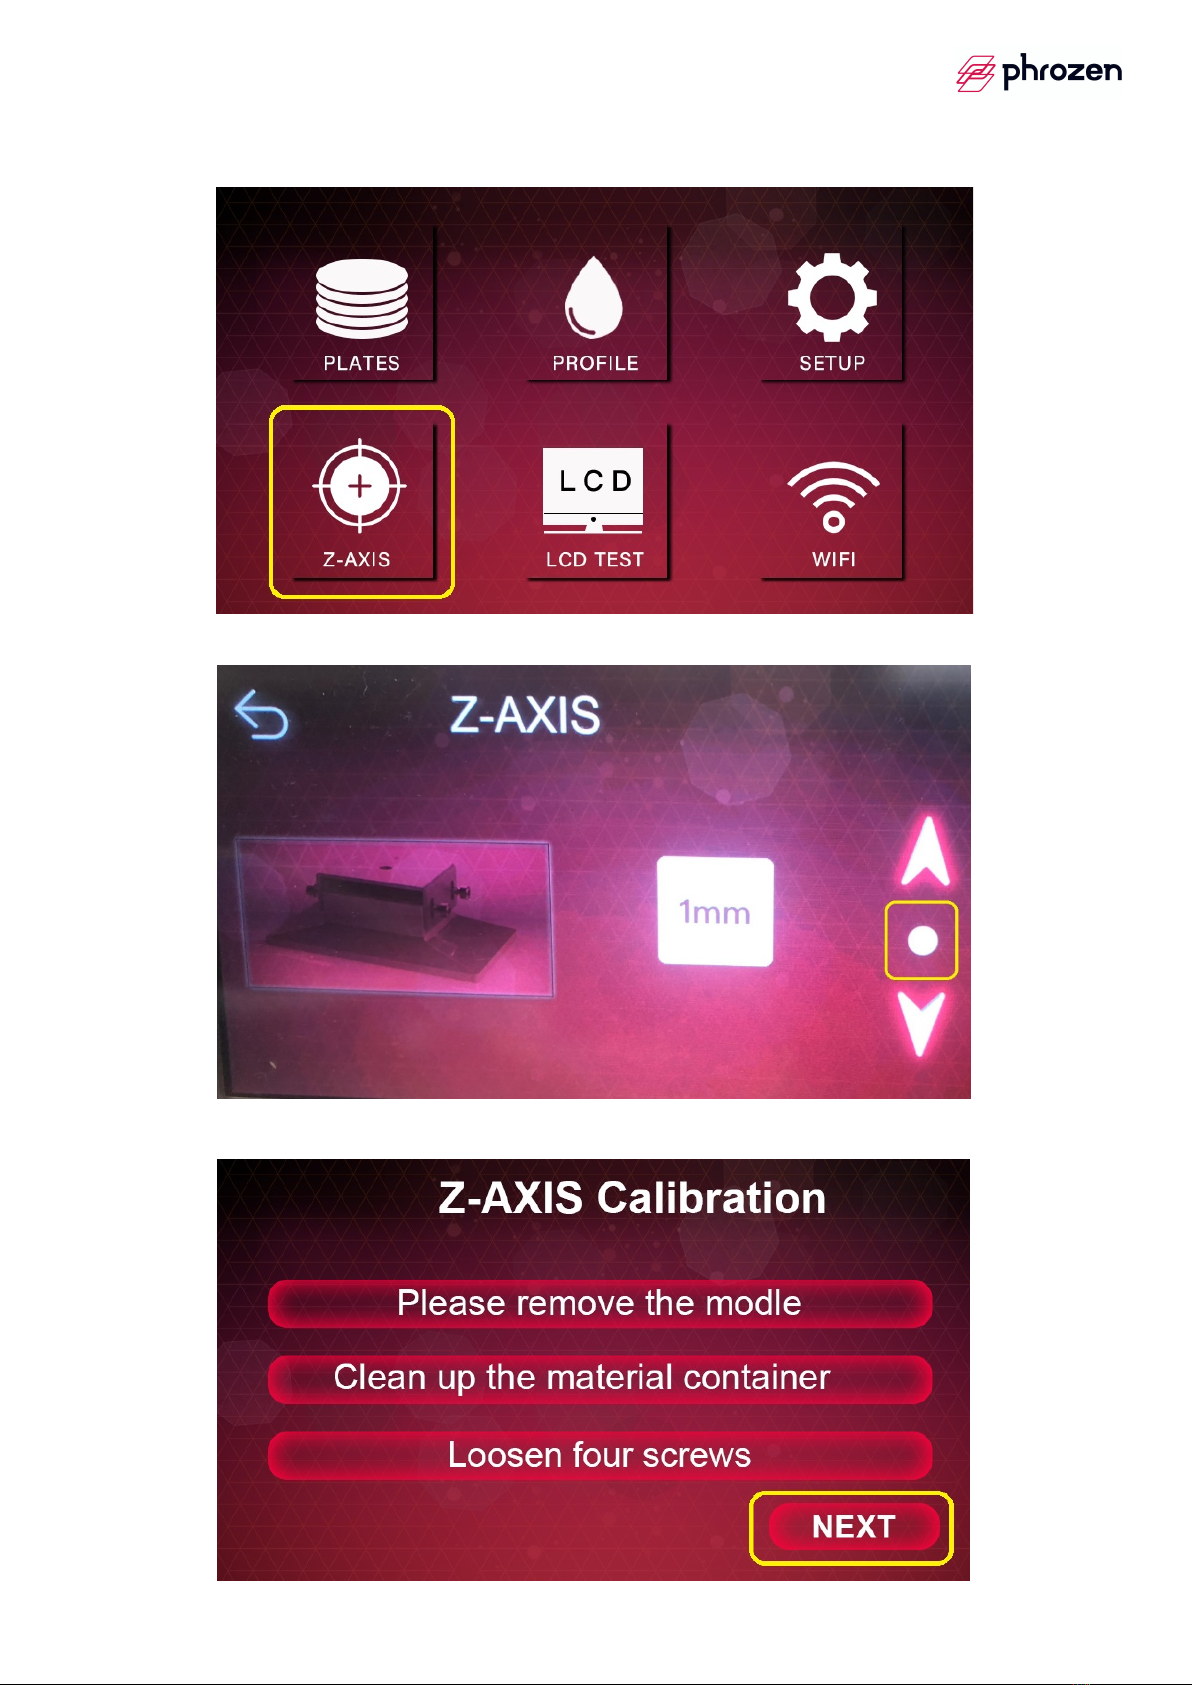
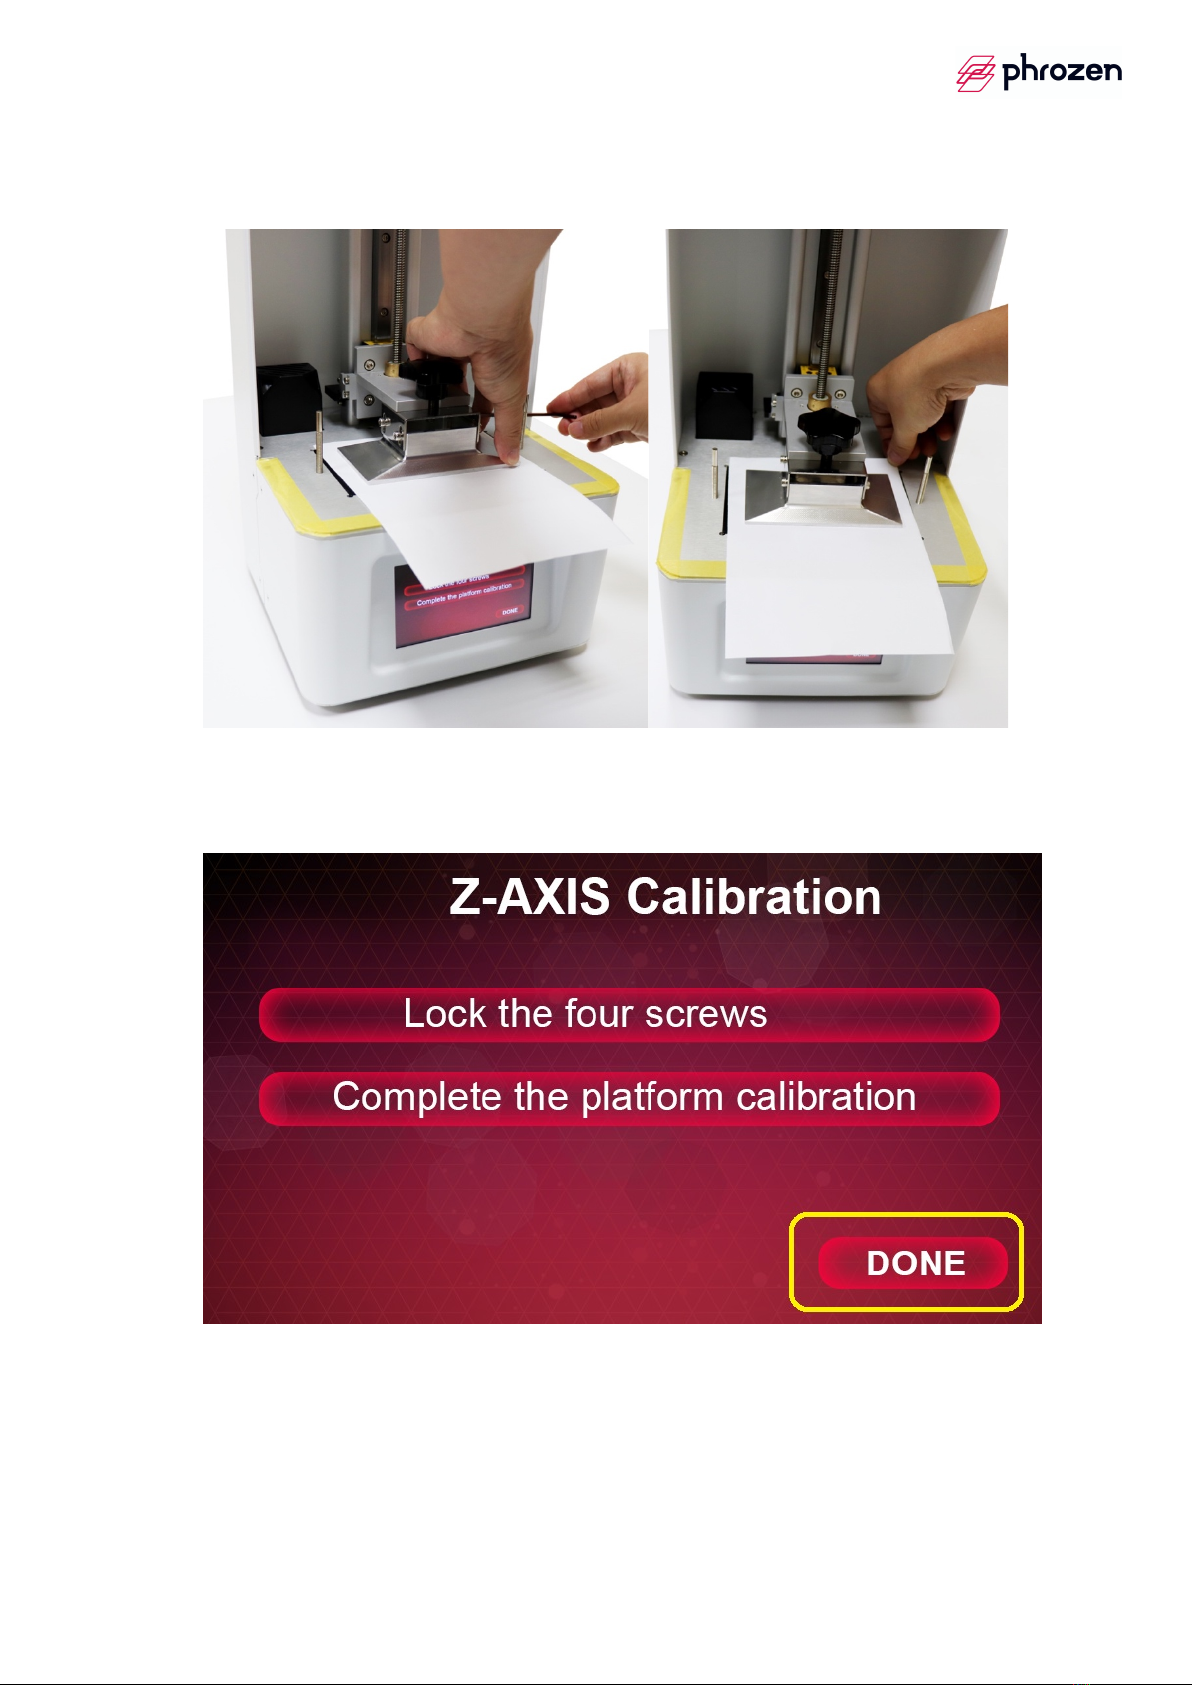
V. CALIBRATION .......................................................................................................... 8
VI. RESIN PROFILE SETTING ..................................................................................... 11
VII. UPLOARD PRINTING FILES ................................................................................. 13
VIII. START TO PRINT ................................................................................................... 16
IX. AFTER PRINTING PROCESS ................................................................................ 19
X. SOFTWARE ............................................................................................................. 20
XI. CONTACT US ......................................................................................................... 32

3
I. CONTENTS
1. Phrozen Sonic LCD 3D Printer (with building platform) * 1 pc
2. Resin Vat with Cover and Preinstalled FEP film
3. Phrozen Printing Toolkits Box
3.1 Funnel * 1 pc
3.2 Ethernet Cable* 1 pc
3.3 Doorknob & Hex Wrench* 1 set
3.4 WiFi USB Dongle* 1 pc
3.5 Plastic Scraper * 1 pc
3.6 Metal Scraper * 1 pc
3.7 AC Power Cord * 1 pc
3.8 Gloves * 1 pair
1
2
3
3.1
3.4
3.2
3.5
3.3
3.6
3.7
3.8

4
II. BEFORE YOU START…
1. Assemble the Doorknob
Use the hex wrench to assemble the doorknob on Phrozen Sonic.
2. Plug-in AC Power Cord
3. Insert WiFi USB Dongle or Ethernet Cable

5
III. POWER ON/POWER OFF
1. Power On
Switch AC power from OFF to ON.
Phrozen OS will be ready in 45 secs.
ON
OFF

6
2. Power Off
Step 1
è
Click【SETUP】è Click【Shutdown】èClick【✓】.
Step 2
è
Switch AC power from ON to OFF.
ON
OFF

7
IV. PHROZEN OS FUNCTION
【PLATES】èTo choose your printing file.
【PROFILE】èTo manually adjust the resin profile.
【SETUP】èPower off, reboot and status checking.
【Z-AXIS】èZ-axis calibration.
【LCD TEST】èLCD quality checking.
【WIFI】: WiFi setting.

8
V. CALIBRATION
Z-axis calibration is an essential process to make your 3D prints
successfully printed with good quality, please do start your printing
process after a proper Z-axis calibration.
Ø Tips
Gently pull the build platform to see
if it’s moveable and well-loosened.
Step 1è Take off the resin vat and
make sure no objects on the LCD.
Step 2è Put 1 piece of A4 paper on
the LCD platform.
Step 3è Loosen 4 screws on both
sides of the build platform.

9
Step 4è Click 【Z-AXIS】button to start the calibration process.
Step 5è Click the manual dot icon at the right side.
Step 6è Click 【NEXT】, kindly wait the build platform down to the BOTTOM.

10
Step 7è Tighten the screws with slightly pressing the build platform to
make sure the A4 paper is still and IMMOVABLE.
Step 8è Click 【DONE】, kindly wait the build platform back to the top.

11
VI. RESIN PROFILE SETTING
1. Connect your 3D printer to the internet via Ethernet Cable or WiFi.
2. Input the IP address showed at the top of Phrozen OS display on your web
browser.
3. Click 【PROFILE】of the navigation bar
IP Address (XXX.XX.X.XXX)
Input the IP Address showed at touch panel here

12
4. Add new resin profile by inputting name and profile setting
Ø Tip 1 Check Phrozen Resin profiles of all models here!
è https://reurl.cc/0zy6Xk
Ø Tip 2
è
1 second = 1000 ms
è
1 um =0.001 mm
Ø Tip 3 Please name your resin profile with ONLY EN ALPHABET.
ADD

13
VII. UPLOARD PRINTING FILES
1. Upload Printing Files via USB
Step 1
è
Make sure the printing file in your USB has been sliced to .phz
or .zip format.
Ø Tips Please name your printing file with ONLY EN ALPHABET.
Step 2
è
Insert your USB into the socket at the back of the printer.
Step 3
è
Click 【PLATES】.
Step 4
è
Click USB icon at the top of the screen.

14
Step 5
è
Choose your printing file to start uploading process.
2. Upload Printing Files via Internet
Step 1
è
Connect your 3D printer to the internet via Ethernet Cable or
WiFi.
Step 2
è
Input the IP address showed at the top of Phrozen OS display on
your web browser.
Input the IP Address showed at touch panel here
IP Address (XXX.XX.X.XXX)

15
Step 3
è
Click 【PLATES】of the navigation bar.
Step 4
è
Select your printing file (.phz or .zip format) and upload it.
Ø Tips Please name your printing file with ONLY EN ALPHABET.
1
2

16
VIII. START TO PRINT
Ø Tip 1 Always wear gloves, goggles, long-sleeved clothing during your
printing process.
Ø Tip 2 Resin is a kind of chemical material, if feeling any uncomfortable
during using it or, moreover, accidently eating it, please go to the nearest
medical unit asap for further help.
Ø Tip 3 Always wash out completely if any contact between resins and your
body, furthermore, if feeling any uncomfortable, please go to the nearest
medical unit asap for further help.
Ø Tip 4 KEEP THE RESIN SAFELY AWAY FROM CHILDREN.
Ø Tip 5 Please shake the resin properly before using it.
Ø Tip 6 Kindly keep the resin capacity below 1/2 height of the resin vat.
Ø Tip 7 Always stir the vat-stored resin properly before starting your printing
process.
Ø Tip 8 Make sure there’s NO OBJECT ON THE LCD OR IN RESIN VAT except
resin.
Ø Tip 9 Kindly keep your printing environment under 25°C.
Ø Tip 10 If refilling resins is required during printing process, please refill the
resin during the UV light off with platform raising-up.
Ø Tip 11 Always clean the resin immediately if it spills out.

17
1. Do Your Printing via Phrozen OS
Step 1
è
Click 【PLATES】.
Step 2
è
Choose the file you would like to print.
Step 3
è
Check the printing details, NAME, LAYER, PROFILE on 【PREVIEW】
page and click 【✓】to start your printing process.
Ø Tips Resin profile can be manually adjusted by +/- and confirmed by O.

18
2. Do Your Printing via Internet
Step 1
è
Click 【PLATES】of the navigation bar.
Step 2
è
Select the file you would like to print and click 【PRINT】 to start
the printing process.
Ø Tips Update your resin profile if there’s any changed choice.

19
IX. AFTER PRINTING PROCESS
PLEASE KINDLY FOLLOW THE ENVIRONMENT PROTECTION
RULES IN YOUR LOCAL AREA WHILE YOU DO THE CLEANING
PROCESS AFTER PRINTING.
1. Clean Your Prints
Step 1
è
Take off your print slightly from the build platform with metal
scraper.
Ø Tips Always wear gloves and be aware of any danger operations with
the metal scraper.
Step 2
è
Clean your prints by Phrozen Wash/IPA/95% alcohol until no
resin on your print.
Ø Tips Phrozen Washè https://reurl.cc/8lOv0o
Ø Tips Ultra-sonic Clearè https://reurl.cc/Gklj43
Step 3
è
Place it until the external surface dry enough.
Step 4
è
Post cure your print by Phrozen Cure/405nm UV light.
Ø Tips Phrozen Cureè https://reurl.cc/NaEQQq
2. Tidy Up Your 3D Printer
(a) Safely shutdown your Phrozen 3D printer
Ø Tip 1 Please kindly see the description of Ⅲ.2 POWER OFF for more
Information.
Ø Tip 2 ALWAYS SHUTDOWN YOUR 3D PRINTER FIRST before you
clean the build platform & resin vat for avoiding static electricity
damaging your printer.
(b) Clean the build platform
Step 1
è
Take off your print slightly from the build platform with metal
scraper.
Ø Tips Always wear gloves and be aware of any danger
operations with the metal scraper.
Step 2
è
Clean your build platform by Phrozen Wash/IPA/95% alcohol
until no resin on the platform.
(c) Clean the resin vat
Step 3
è
Store your used resin with a whole black, well-sealed bottle
in a dark and cool place.

20
Ø Tip 1 Funnel, filter paper and plastic scraper will be the
helpful toolkits to store your resins.
Ø Tip 2 Always keep new resin and used resin stored in
separated container.
Step 4
è
Clean your resin vat by Phrozen Wash/IPA/95% alcohol until
no resin on the resin vat.
X. SOFTWARE
1.Basic setting
(a) Open the software
(b) Choose language
Step 1
è
Choose language
Step 2
è
Apply
(C) Machine type
Table of contents
Popular Dental Equipment manuals by other brands

Dental Wings
Dental Wings 3 Series Instructions for use

Carestream DENTAL
Carestream DENTAL CS 1500 quick start guide

Ivoclar Vivadent
Ivoclar Vivadent Programat EP 3010 G2 Short instructions

KaVo
KaVo DSEclinical 5197 Instructions for use

Bien Air
Bien Air 1601098-001 Instructions for use

Sirona
Sirona Intego operating instructions