Pioneer NXS-GW User manual

NXS-GW
NETWORK GATEWAY
PASSERELLE DE RÉSEAU
NETWORK GATEWAY
NETWORK GATEWAY
NETWORK GATEWAY
PUERTA DE ENLACE
СЕТЕВОЙ ШЛЮЗ
Operating Instructions
Mode d’emploi
Bedienungsanleitung
Istruzioni per l’uso
Handleiding
Manual de instrucciones
Инструкции по эксплуатации
http://pioneerdj.com/support/
The Pioneer DJ support site shown above offers FAQs, information on software and various other types of
information and services to allow you to use your product in greater comfort.
Le site de support DJ de Pioneer indiqué ci-dessus propose une FAQ, des informations sur le logiciel et divers
types d’informations et de services qui permettent une utilisation plus confortable de ce produit.
Die oben gezeigte Pioneer DJ-Support-Website enthält häufig gestellte Fragen, Informationen über Software
und andere wichtige Informationen und Dienste, die Ihnen helfen, Ihr Produkt optimal zu verwenden.
Il sito di supporto DJ Pioneer indicato qui sopra offre una sezione FAQ, informazioni sul software ed
informazioni e servizi di vario tipo, per permettere un uso più confortevole dei nostri prodotti.
De bovengenoemde Pioneer DJ ondersteuningswebsite biedt een overzicht van de vaak gestelde vragen,
informatie over software en allerlei andere soorten informatie en diensten die u in staat stellen dit product met
meer gemak te gebruiken.
El sitio de asistencia Pioneer DJ mostrado arriba ofrece las preguntas frecuentes, información del software y
varios otros tipos de información y servicios que le permitirán usar su producto con mayor confort.
На указанном выше сайте поддержки Pioneer DJ содержатся раздел часто задаваемых вопросов,
информация по программному обеспечению, а также различные другие типы информации и услуг,
позволяющие использовать ваше изделие более лучшим образом.
Español
Français DeutschItalianoEnglish NederlandsРусский

2En
Thank you for buying this Pioneer product. Please read through these operating instructions so you will know how to operate your model properly. After
you have finished reading the instructions, put them away in a safe place for future reference.
CAUTION
TO PREVENT THE RISK OF ELECTRIC SHOCK, DO NOT
REMOVE COVER (OR BACK). NO USER-SERVICEABLE
PARTS INSIDE. REFER SERVICING TO QUALIFIED
SERVICE PERSONNEL. D3-4-2-1-1_B1_En
NOTE:
This equipment has been tested and found to comply with the limits for a Class B digital device, pursuant to Part 15
of the FCC Rules. These limits are designed to provide reasonable protection against harmful interference in a
residential installation. This equipment generates, uses, and can radiate radio frequency energy and, if not installed
and used in accordance with the instructions, may cause harmful interference to radio communications. However,
there is no guarantee that interference will not occur in a particular installation. If this equipment does cause
harmful interference to radio or television reception, which can be determined by turning the equipment off and on,
the user is encouraged to try to correct the interference by one or more of the following measures:
— Reorient or relocate the receiving antenna.
— Increase the separation between the equipment and receiver.
— Connect the equipment into an outlet on a circuit different from that to which the receiver is connected.
— Consult the dealer or an experienced radio/TV technician for help. D8-10-1-2_A1_En
WARNING
This equipment is not waterproof. To prevent a fire or
shock hazard, do not place any container filled with
liquid near this equipment (such as a vase or flower
pot) or expose it to dripping, splashing, rain or
moisture. D3-4-2-1-3_A1_En
WARNING
This product equipped with a three-wire grounding
(earthed) plug - a plug that has a third (grounding) pin.
This plug only fits a grounding-type power outlet. If you
are unable to insert the plug into an outlet, contact a
licensed electrician to replace the outlet with a properly
grounded one. Do not defeat the safety purpose of the
grounding plug. D3-4-2-1-6_A1_En
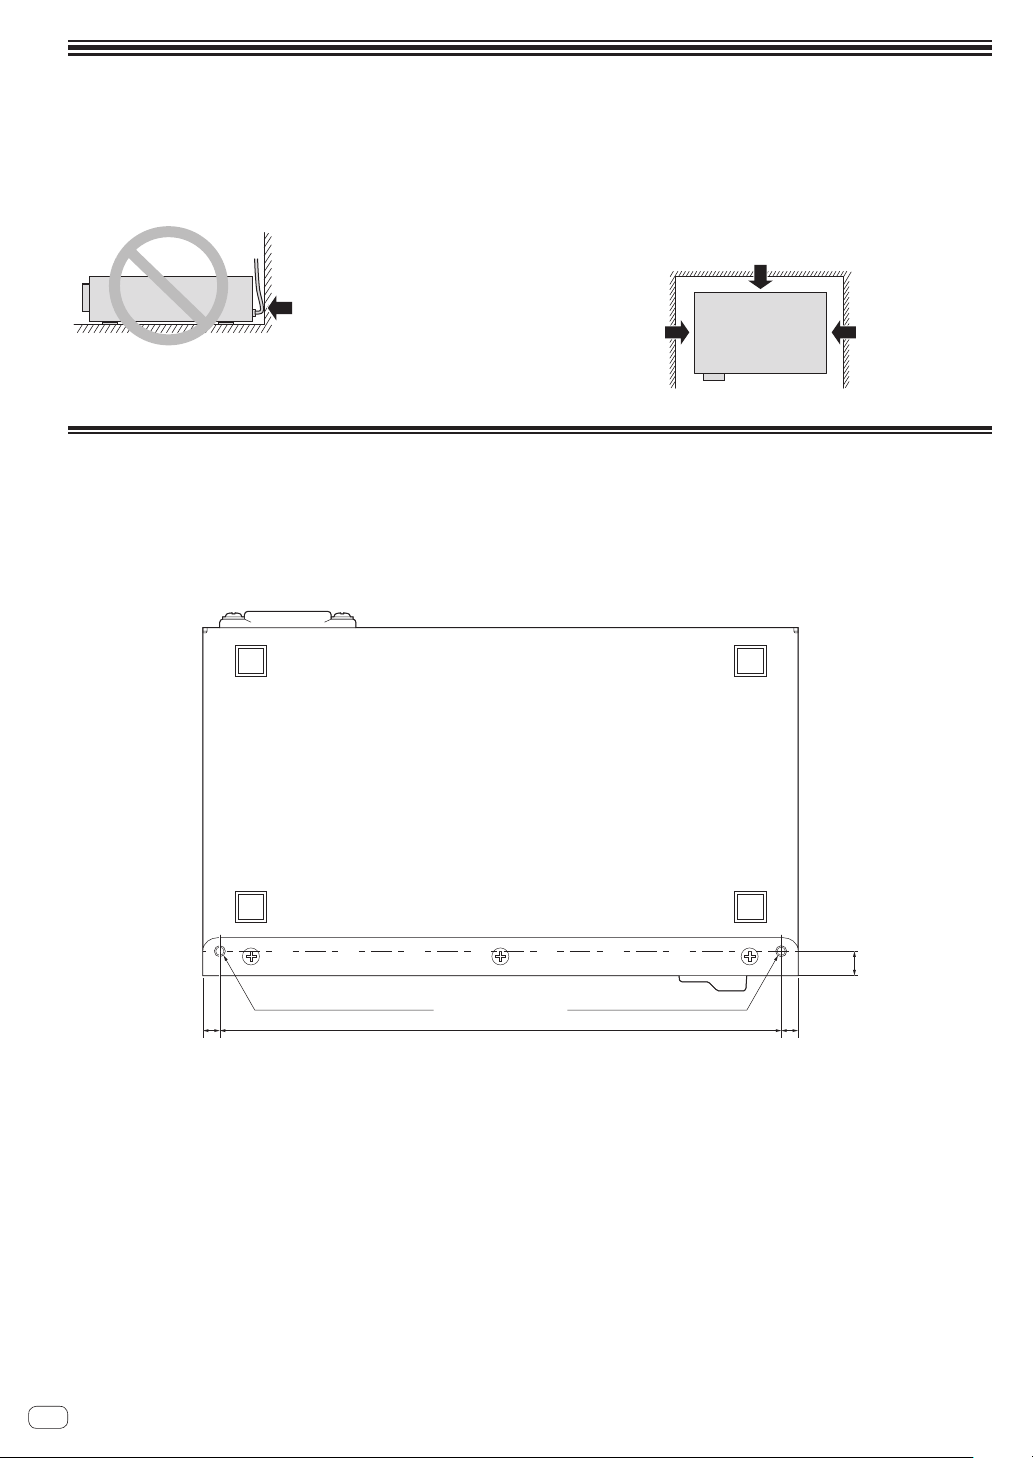
VENTILATION CAUTION
When installing this unit, make sure to leave space
around the unit for ventilation to improve heat radiation
(at least 1 cm at top, 3 cm at rear, and 1 cm at each
side). D3-4-2-1-7d*_A1_En
POWER-CORD CAUTION
Handle the power cord by the plug. Do not pull out the
plug by tugging the cord and never touch the power
cord when your hands are wet as this could cause a
short circuit or electric shock. Do not place the unit, a
piece of furniture, etc., on the power cord, or pinch the
cord. Never make a knot in the cord or tie it with other
cords. The power cords should be routed such that they
are not likely to be stepped on. A damaged power cord
can cause a fire or give you an electrical shock. Check
the power cord once in a while. When you find it
damaged, ask your nearest PIONEER authorized
service center or your dealer for a replacement.
S002*_A1_En
Information for users on collection and disposal of old equipment and used batteries
These symbols on the products, packaging, and/or accompanying documents mean
that used electrical and electronic products and batteries should not be mixed with
general household waste.
For proper treatment, recovery and recycling of old products and used batteries,
please take them to applicable collection points in accordance with your national
legislation.
By disposing of these products and batteries correctly, you will help to save valuable
resources and prevent any potential negative effects on human health and the
environment which could otherwise arise from inappropriate waste handling.
For more information about collection and recycling of old products and batteries,
please contact your local municipality, your waste disposal service or the point of sale
where you purchased the items.
These symbols are only valid in the European Union.
For countries outside the European Union:
If you wish to discard these items, please contact your local authorities or dealer and
ask for the correct method of disposal. K058a_A1_En
Symbol examples
for batteries
Symbol for
equipment
Pb
CAUTION
The /ON switch on this unit will not completely
shut off all power from the AC outlet. Since the power
cord serves as the main disconnect device for the
unit, you will need to unplug it from the AC outlet to
shut down all power. Therefore, make sure the unit
has been installed so that the power cord can be
easily unplugged from the AC outlet in case of an
accident. To avoid fire hazard, the power cord should
also be unplugged from the AC outlet when left
unused for a long period of time (for example, when
on vacation). D3-4-2-2-2a*_A1_En
CAUTION
This product satisfies FCC regulations when shielded cables and connectors are used to connect the unit to other
equipment. To prevent electromagnetic interference with electric appliances such as radios and televisions, use
shielded cables and connectors for connections. D8-10-3a_A1_En

3
En
Contents
How to read this manual
In this manual, names of channels and buttons indicated on the prod-
uct, names of menus in the software, etc., are indicated within square
brackets ([ ]). (e.g. [MASTER] channel, [ON/OFF], [File] menu)
Before start
Features....................................................................................................... 4
What’s in the box ........................................................................................ 4
System setup example ............................................................................... 4
Names of Parts
Front panel .................................................................................................. 5
Rear panel ................................................................................................... 5
Installation guidelines
Installation on an EIA standard rack shelf board .................................... 6
Connections
Connecting to Pioneer DJ devices............................................................ 7
Registering the club information
Registration procedure .............................................................................. 9
Additional information
Troubleshooting........................................................................................ 10
About trademarks and registered trademarks ...................................... 10
External dimensions diagram ................................................................. 11
Specifications............................................................................................ 11
D3-4-2-1-6b_A1_En
Laite on liitettävä suojamaadoituskoskettimilla
varustettuun pistorasiaan
For Finland customers
For Norway customers
For Sweden customers
Apparatet må tilkoples jordet stikkontakt
Apparaten skall anslutas till jordat uttag

4En
Before start
Features
This product is a network gateway device for installation in a club to use
a club network system operated by Pioneer. When installed, information
on the club, its DJs’ playback information, etc., can be distributed to
people throughout the world via the Internet.
Main features
1Playback information, etc., sent from Pioneer DJ devices is received
via PRO DJ LINK and sent in real time to the web server.
2The product offers both the robustness needed to withstand even the
rough club environment and high reliability.
3Connection is simple and can be done by anyone, and because of its
compact size the product can be installed anywhere.
What’s in the box
!Power cord
!Operating instructions (this document)
System setup example
12 12
12 12
0
0
ON TALK
OVER
OFF
9
6
-
26/
6
-
26/
6
-
26/
9
6
-
26/
6
-
26/
6
-
26/
9
6
-
26/
6
-
26/
6
-
26/
9
6
-
26/
6
-
26/
6
-
26/
0
NXS-GW
LAN hub
LAN
LAN
Pioneer
Home
PRO DJ LINK compatible Pioneer DJ devices
Router for Internet connection
(commercially available product)
Management computer
Web server
Club
Smartphones 1
Smartphone or computer1
Internet
1Customers at the club or other people interested in club music can see the information on the club, its DJs’ playback information, etc., on their
smartphones.
For detailed information on the system, see our website below.
http://djclubnetwork.com/

5
En
English
Names of Parts
Front panel
NXS-GW
ON ALERTPRO DJ LINKINTERNET
1 2 3 4 5
1 /ON switch
Press to turn the power on and off.
2 ON indicator
Lights when this unit’s power is on.
3 ALERT indicator
!Flashing: This unit’s functions are restricted. Contact your store of purchase or a service center (page 10).
!Off: The indicator is off when the power is off, or when the power is on and the unit is operating normally.
4 PRO DJ LINK indicator
!Lit: This indicator lights when a PRO DJ LINK compatible DJ device is connected to this unit and this system can be used.
!Flashing: The indicator flashes when a PRO DJ LINK compatible DJ device is connected to this unit but this system cannot be used (page 10).
!Off: The indicator is off when nothing is connected or when the power of the device connected to this unit is off.
5 INTERNET indicator
!Lit: This indicator lights when communications with the web server have been verified and this system can be used.
!Flashing: The indicator flashes when communications with the web server have been verified but registration of the club information has not
been completed (page 10).
!Off: The indicator is off when nothing is connected or communications with the web server cannot be verified.
Rear panel
AC IN
INTERNET
PRO DJ LINK
1 2 3 4
1 AC IN
Connects to a power outlet using the included power cord. Wait until all connections between the equipment are completed before connecting the
power cord.
2 INTERNET terminal
Connect to a router, etc., that is connected to the Internet.
3 PRO DJ LINK terminal
Connect to the [LINK] terminal of a PRO DJ LINK compatible Pioneer DJ mixer or to a switching hub (commercially available).
Use a 100Base-TX-compatible switching hub. Some switching hubs may not operate properly.
4 Kensington security slot
CAUTION
Do not connect the LAN port to any network which are subject to overvoltages.

Installation guidelines
!Do not place this unit on objects radiating heat, such as an amplifier, or expose it to a spotlight for an extended period of time, as this may damage
this unit.
!Install this unit away from a tuner or a TV. Otherwise, image distortion or noise may result. Also, image distortion or noise can easily occur if an
indoor antenna is used. In such cases, use an outdoor antenna or turn off the power of this unit.
!Place this unit on a level surface and a stable platform.
!Do not place heavy objects on top of this unit.
Do not allow contact with vibrating
surfaces.
To assure proper heatdissipation, be
sure to maintain this open space.
To assure proper
heatdissipation, be
sure to maintain
this open space.
To assure proper
heatdissipation, be
sure to maintain
this open space.
Installation on an EIA standard rack shelf board
This unit is half the size of an EIA standard rack (1U). When mounting it on a rack, install it on general purpose rack mount shelf or the like. Holes (for
M3 meter screws 6 mm or less in length) for fixing this unit onto a mount shelf are provided on the bottom panel, as shown on the diagram below. Use
these holes to fix this unit by screw to the shelf. Note that this unit has a depth of 138.6 mm.
!Do not install this unit directly above a power amplifier. Heat radiating from the power amplifier may damage this unit. Also, noise (hum noise, etc.)
may be generated.
!When transporting this unit, remove it from the rack. Transporting this unit without removing it from the rack may damage this unit.
!If you transport this unit without removing it from the rack, make sure vibration or shock is not applied to this unit.
(unit:mm)
1986 6
Rack mount screw hole (M3)Rack mount screw hole (M3)
9
6En

7
En
English
Connections
Be sure to turn off the power and unplug the power cord from the power outlet whenever making or changing connections.
Refer to the operating instructions for the component to be connected.
Connect the power cord after all the connections between devices have been completed.
Connecting to Pioneer DJ devices
This unit can be connected to PRO DJ LINK compatible Pioneer DJ devices equipped with a [LINK] terminal (e.g. DJM-900NXS, DJM-2000NXS).
For details on connections, also refer to the respective DJ devices’ operating instructions.
!A separate contract with and payment to a provider offering Internet services is required.
Example of connection with the DJM-900NXS
OFF
RETURN
L
L
L
1 GND2 HOT
3 COLD
L
R
LL
IN
CH3
CH4
CH1CH2
R
R
R
R
L
R
R
PHONO
CH 4CH 3
CD/ LINE
L
R
PHONO
CH 1
CD/ LINE
SIGNAL GNDSIGNAL GND
TRS
CD/ LINELINE
MASTER1MASTER2
REC OUT BOOTH
MIC2
MIDI OUT
DIGITAL
MASTER
OUT
LINK
L
R
CH 2
CD/ LINELINE
(MONO)
LR
(MONO)
SEND
POWER
AC IN
ON
CDJ-2000NXS CDJ-2000NXS CDJ-2000NXS CDJ-2000NXS
DJM-900NXS
POWERCONTROL
LINK
AUDIO OUT
RL
CONTROL DIGITAL
OUT
rekordbox
AC IN
INTERNET
PRO DJ LINK
Internet
Router for
Internet connection
To power outlet Power cord
Switching hub
Computer
LAN cable
LAN cable
Rear panel
!Set the DJ player’s player number to the same number as the channel to which the audio cable is connected.
This product satisfies electromagnetic noise regulations when it is connected to other equipment through shielded cables and connectors.
CAUTION
Risk of major electromagnetic interference. Use an STP cable for the LAN cable.

Example of connection with the DJM-2000NXS
CDJ-2000NXS CDJ-2000NXS CDJ-2000NXS CDJ-2000NXS
POWERCONTROL
LINK
AUDIO OUT
RL
CONTROL DIGITAL
OUT
DJM-2000NXS
SIGNAL GND
CD
CD
L
R
L
R
PHONOCDLINE
CONTROL
OUTIN
RL
RL
R
LRL(MONO) RL(MONO)
COMPUTER 1
COMPUTER 2
LINK
CH 3CH 1
CH 4 CH 2
CH2CH3CH4CH1
DIGITAL
SIGNAL GND
CD
1GND
-6dB -3dB 0dB
2HOT
3COLD
CD
L
R
PHONO
POWEROFF
ON
MASTER
ATT.
DIGITAL CD DIGITAL
L
R
CDLINE
CONTROL
CD DIGITAL
CH 3CH4
MASTER1
MASTER2
REC OUTBOOTH SENDRETURN
DIGITAL
CH1CH2
USB
MIDI OUT
TRS
AC IN
rekordbox
To this unit’s [PRO DJ LINK] terminal
Switching hub
rekordbox
Computer
!To connect two computers to the [LINK] terminal for computer connection, use a switching hub.
!Set the channel number of the audio cable or coaxial digital cable and the player number to the same number.
8En

9
En
English
Registering the club information
In order to distribute information to clubbers throughout the world, this unit’s main feature, it is necessary to register this unit’s customer ID and the
club information (club name, location information, e-mail address, etc.).
!A separate contract with and payment to a provider offering Internet services is required.
Registration procedure
Before registering the club information, make the preparations below.
!Prepare a computer that can be connected to the Internet.
!Make a note of the customer ID attached to this unit’s side panel.
Once preparations are completed, access the website below and register the club information.
http://djclubnetwork.com/clubsignup
NXS-GW
ON ALERTPRO DJ LINK INTERNET
CUSTOMER ID :

Additional information
Troubleshooting
!Incorrect operation is often mistaken for trouble or malfunction. If you think that there is something wrong with this component, check the points
below. Sometimes the trouble may lie in another component. Inspect the other components and electrical appliances being used. If the trouble
cannot be rectified after checking the items below, ask your nearest Pioneer authorized service center or your dealer to carry out repair work.
!The player may not operate properly due to static electricity or other external influences. In such cases, normal operation may be restored by
unplugging the power cord then plugging it back in.
Problem Check Remedy
The power is not turned on. Is the power cord properly connected? Plug in the power cord to an AC outlet.
The [INTERNET] indicator is flashing. Have you completed registration of the club
information?
Register the club information. (page 9)
The [INTERNET] indicator is off. Are the Internet side LAN terminal and the router
for Internet connection properly connected?
Properly connect the Internet side LAN terminal and the router for Internet
connection.
Is a DJ mixer connected to the Internet side LAN
terminal?
Properly connect the Internet side LAN terminal and the router for Internet
connection.
Is the power of the switching hub connected to the
Internet side or the router for Internet connection
turned on?
Turn on the power of the switching hub connected to the Internet side or the
router for Internet connection.
Is the firmware of the connected router for Internet
connection the latest version?
Update the firmware of the connected router for Internet connection to the latest
version.
Are you using a LAN cable of Cat 5 or greater for
connection?
Use a LAN cable of Cat 5 or greater for connection.
The [PRO DJ LINK] indicator is
flashing.
Is the connected DJ device a PRO DJ LINK com-
patible Pioneer DJ device?
Connect a PRO DJ LINK compatible Pioneer DJ device.
Is the firmware of the connected DJ device the
latest version?
Update the firmware of the connected DJ device to the latest version.
Are you using a LAN cable of Cat 5 or greater for
connection?
Use a LAN cable of Cat 5 or greater for connection.
Is the PRO DJ LINK compatible DJ player con-
nected directly to the [PRO DJ LINK] terminal?
Connect the DJ player to a switching hub or a PRO DJ LINK compatible DJ mixer
with a built-in hub.
Are both a PRO DJ LINK compatible DJ player
and DJ mixer connected to the [PRO DJ LINK]
terminal?
Operation will not be normal if only the DJ player or only the DJ mixer is con-
nected. Connect both.
The [PRO DJ LINK] indicator is off. Are the PRO DJ LINK side LAN terminal and DJ
mixer or switching hub properly connected?
Properly connect the PRO DJ LINK side LAN terminal and DJ mixer or switching
hub.
Is the router for Internet connection connected to
the PRO DJ LINK side LAN terminal?
Properly connect the PRO DJ LINK side LAN terminal and DJ mixer or switching
hub.
Is the power of the PRO DJ LINK side LAN termi-
nal and the DJ mixer or switching hub turned on?
Turn on the power of the PRO DJ LINK side LAN terminal and the DJ mixer or
switching hub.
The [ALERT] indicator is flashing. —This unit’s functions are restricted.
Contact your store of purchase or a service center to request repairs.
About trademarks and registered
trademarks
!Pioneer is a registered trademark of PIONEER CORPORATION.
The names of companies and products mentioned herein are the trade-
marks of their respective owners.
10 En

11
En
English
External dimensions diagram
NXS-GW
ON ALERTPRO DJ LINK INTERNET
AC IN
INTERNET
PRO DJ LINK
138.6
127 6.25.4
42.5
41.3
210
40
(unit:mm)
Specifications
General
Power............................................................AC 100 V to 240 V, 50 Hz/60 Hz
Power consumption............................................................................. 60 mA
Main unit weight ...................................................................................0.8 kg
Max. external dimensions ....210 mm (W) × 42.5 mm (H) × 138.6 mm (D)
Tolerable operating temperature ........................................+5 °C to +35 °C
Tolerable operating humidity ...................... 5 % to 85 % (no condensation)
Input / Output terminals
PRO DJ LINK terminal and INTERNET terminal
LAN terminal (100Base TX), (LAN cable: Cat 5 or greater)........... 2 sets
!The specifications and design of this product are subject to change
without notice.
!©2013 PIONEER CORPORATION. All rights reserved.

2Fr
Nous vous remercions d’avoir acquis un produit Pioneer. Veuillez lire attentivement ce mode d’emploi afin de connaître la manière d’utiliser l’appareil
comme il convient. Cela fait, conservez le mode d’emploi de façon à pouvoir vous y référer en cas de nécessité.
ATTENTION
POUR ÉVITER TOUT RISQUE D’ÉLECTROCUTION, NE
PAS ENLEVER LE COUVERCLE (NI LE PANNEAU
ARRIÈRE). AUCUNE PIÈCE RÉPARABLE PAR
L’UTILISATEUR NE SE TROUVE À L’ INTÉRIEUR.
CONFIER TOUT ENTRETIEN À UN PERSONNEL
QUALIFIÉ UNIQUEMENT.
D3-4-2-1-1_B1_Fr
AVERTISSEMENT
Cet appareil n’est pas étanche. Pour éviter les risques
d’incendie et de décharge électrique, ne placez près de
lui un récipient rempli d’eau, tel qu’un vase ou un pot
de fleurs, et ne l’exposez pas à des gouttes d’eau, des
éclaboussures, de la pluie ou de l’humidité.
D3-4-2-1-3_A1_Fr
AVERTISSEMENT
Cet appareil est muni d’une fiche de mise à la terre
(masse) à trois fils. Comme la fiche présente une
troisième broche (de terre), elle ne peut se brancher
que sur une prise de courant, prévue pour une mise à
la terre. Si vous n’arrivez pas à insérer la fiche dans la
prise de courant, contactez un électricien qualifié pour
faire remplacer la prise par une qui soit mise à la terre.
N’annulez pas la fonction de sécurité que procure cette
fiche de mise à la terre.
D3-4-2-1-6_A1_Fr
PRÉCAUTION DE VENTILATION
Lors de l’installation de l’appareil, veillez à laisser un
espace suffisant autour de ses parois de manière à
améliorer la dissipation de chaleur (au moins 1 cm sur
le dessus, 3 cm à l’arrière et 1 cm de chaque côté).
D3-4-2-1-7d*_A1_Fr
ATTENTION
L’interrupteur /ON de cet appareil ne coupe pas
complètement celui-ci de sa prise secteur. Comme le
cordon d’alimentation fait office de dispositif de
déconnexion du secteur, il devra être débranché au
niveau de la prise secteur pour que l’appareil soit
complètement hors tension. Par conséquent, veillez à
installer l’appareil de telle manière que son cordon
d’alimentation puisse être facilement débranché de
la prise secteur en cas d’accident. Pour éviter tout
risque d’incendie, le cordon d’alimentation sera
débranché au niveau de la prise secteur si vous
prévoyez une période prolongée de non utilisation
(par exemple avant un départ en vacances).
D3-4-2-2-2a*_A1_Fr
NOTE IMPORTANTE SUR LE CABLE
D’ALIMENTATION
Tenir le câble d’alimentation par la fiche. Ne pas
débrancher la prise en tirant sur le câble et ne pas
toucher le câble avec les mains mouillées. Cela risque
de provoquer un court-circuit ou un choc électrique. Ne
pas poser l’appareil ou un meuble sur le câble. Ne pas
pincer le câble. Ne pas faire de noeud avec le câble ou
l’attacher à d’autres câbles. Les câbles d’alimentation
doivent être posés de façon à ne pas être écrasés. Un
câble abîmé peut provoquer un risque d’incendie ou un
choc électrique. Vérifier le câble d’alimentation de
temps en temps. Contacter le service après-vente
PIONEER le plus proche ou le revendeur pour un
remplacement.
S002*_A1_Fr
K058a_A1_Fr
Pb
Information à destination des utilisateurs sur la collecte et l’élimination des
équipements et batteries usagés
Ces symboles qui figurent sur les produits, les emballages et/ou les documents
d’accompagnement signifient que les équipements électriques et électroniques et
batteries usagés ne doivent pas être jetés avec les déchets ménagers et font l’objet
d’une collecte sélective.
Pour assurer l’enlèvement et le traitement appropriés des produits et batteries
usagés, merci de les retourner dans les points de collecte sélective habilités
conformément à la législation locale en vigueur.
En respectant les circuits de collecte sélective mis en place pour ces produits, vous
contribuerez à économiser des ressources précieuses et à prévenir les impacts
négatifs éventuels sur la santé humaine et l’environnement qui pourraient résulter
d’une mauvaise gestion des déchets.
Pour plus d’information sur la collecte et le traitement des produits et batteries
usagés, veuillez contacter votre municipalité, votre service de gestion des déchets
ou le point de vente chez qui vous avez acheté ces produits.
Ces symboles ne sont valables que dans les pays de l’Union Européenne.
Pour les pays n’appartenant pas à l’Union Européenne :
Si vous souhaitez jeter ces articles, veuillez contacter les autorités ou revendeurs
locaux pour connaître les méthodes d’élimination appropriées.
Exemples de marquage
pour les batteries
Marquage pour les
équipements

3
Fr
Sommaire
Comment lire ce manuel
Dans ce manuel, les noms de canaux et de touches indiqués sur le
produit, les noms de menus dans le logiciel, etc. sont indiqués entre
crochets ([ ]). (ex. canal [MASTER], menu [ON/OFF], menu [File])
Informations préliminaires
Caractéristiques.......................................................................................... 4
Contenu du carton d’emballage ............................................................... 4
Exemple de configuration du système ..................................................... 4
Noms des éléments
Face avant ................................................................................................... 5
Panneau arrière .......................................................................................... 5
Instructions d’installation
Installation sur une étagère rack standard EIA ....................................... 6
Raccordements
Raccordement à des appareils DJ Pioneer.............................................. 7
Enregistrement des informations du nightclub
Procédure d’enregistrement ..................................................................... 9
Informations supplémentaires
En cas de panne ....................................................................................... 10
À propos des marques commerciales et des marques déposées....... 10
Schéma des dimensions externes.......................................................... 11
Spécifications............................................................................................ 11

4Fr
Informations préliminaires
Caractéristiques
Ce produit est une passerelle de réseaux destinée à être installée dans
un nightclub pour permettre d’utiliser un système de réseaux de night-
clubs géré par Pioneer. Lorsque cette passerelle est installée, les infor-
mations du nightclub, les informations concernant les réalisations des
DJ, etc. peuvent être distribuées à d’autres personnes dans le monde
entier par Internet.
Caractéristiques principales
1Les informations de lecture, etc. envoyées par des appareils DJ
Pioneer sont reçues via la liaison PRO DJ LINK et envoyées en temps
réel au serveur web.
2Ce produit est à la fois robuste, comme il se doit pour un nightclub,
un environnement très exigeant, et extrêmement fiable.
3Son raccordement est simple et peut être effectué par n’importe qui,
et du fait de sa compacité, cet appareil peut être installé n’importe
où.
Contenu du carton d’emballage
!Cordon d’alimentation
!Mode d’emploi (ce document)
Exemple de configuration du système
12 12
12 12
0
0
ON TALK
OVER
OFF
9
6
-
26/
6
-
26/
6
-
26/
9
6
-
26/
6
-
26/
6
-
26/
9
6
-
26/
6
-
26/
6
-
26/
9
6
-
26/
6
-
26/
6
-
26/
0
NXS-GW
Concentrateur LAN
LAN
LAN
Pioneer
Maison
Appareils DJ Pioneer compatibles PRO DJ LINK
Routeur pour connexion Internet
(en vente dans le commerce)
Ordinateur de gestion
Serveur web
Club
Smartphones 1
Smartphone ou ordinateur1
Internet
1Les clients du nightclub, ou les personnes s’intéressant à la musique disco, peuvent voir les informations du nightclub, les réalisations des DJ, etc.
sur leurs smartphones.
Pour plus de détails sur le système, consultez le site web suivant.
http://djclubnetwork.com/

5
Fr
Français
Noms des éléments
Face avant
NXS-GW
ON ALERTPRO DJ LINKINTERNET
1 2 3 4 5
1 Commutateur /ON
Sert à mettre le lecteur en ou hors service.
2 Indicateur ON
S’éclaire lorsque cet appareil est allumé.
3 Indicateur ALERT
!Clignotant : Les fonctions de cet appareil sont restreintes. Contactez votre magasin ou un service après vente (page 10).
!Éteint : Cet indicateur est éteint lorsque l’appareil est éteint, ou s’il est éclairé quand il fonctionne normalement.
4 Indicateur PRO DJ LINK
!Éclairé : Cet indicateur s’allume lorsqu’un appareil DJ compatible PRO DJ LINK est raccordé à cet appareil et que ce système peut être utilisé.
!Clignotant : Cet indicateur clignote lorsqu’un appareil DJ compatible PRO DJ LINK est raccordé à cet appareil mais que ce système ne peut pas
être utilisé (page 10).
!Éteint : Cet indicateur est éteint lorsque rien n’est raccordé ou lorsque l’appareil raccordé à cet appareil est éteint.
5 Indicateur INTERNET
!Éclairé : Cet indicateur s’allume lorsque les communications avec le serveur web ont été vérifiées et que ce système peut être utilisé.
!Clignotant : Cet indicateur clignote lorsque les communications avec le serveur web ont été vérifiées mais que l’enregistrement des informa-
tions du nightclub n’est pas terminé (page 10).
!Éteint : Cet indicateur est éteint lorsque rien n’est raccordé ou que les communications avec le serveur web n’ont pas pu être vérifiées.
Panneau arrière
AC IN
INTERNET
PRO DJ LINK
1 2 3 4
1 AC IN
À relier à une prise d’alimentation avec le cordon d’alimentation fourni. Avant de brancher le cordon d’alimentation, assurez-vous que tous les
autres appareils sont raccordés.
2 Prise INTERNET
À relier à un routeur, etc. connecté à Internet.
3 Prise PRO DJ LINK
À relier à la prise [LINK] d’une table de mixage DJ Pioneer compatible PRO DJ LINK ou à un concentrateur-commutateur (en vente dans le
commerce).
Utilisez un concentrateur-commutateur compatible 100Base-TX. Certains concentrateurs-commutateurs peuvent ne pas fonctionner correctement.
4 Fente de sécurité Kensington
ATTENTION
Ne pas relier le port LAN à un réseau exposé à des surtensions.

Instructions d’installation
!Ne pas placer cet appareil sur des objets dégageant de la chaleur, par exemple sur un amplificateur, et ne pas l’exposer trop longtempas à un
projecteur, sous peine de l’endommager.
!Installer cet appareil à l’écart d’un tuner ou d’un téléviseur. Sinon, l’image présentera de la distorsion ou des parasites. De la distorsion ou des
parasites se produisent facilement lorsqu’une antenne intérieure est utilisée. Le cas échéant, utiliser une antenne extérieure ou éteindre cet
appareil.
!Posez cet appareil sur une surface plane et stable.
!Ne posez pas d’objets lourds sur cet appareil.
Ne posez pas cet appareil sur une
surface vibrante.
Pour une meilleure dissipation de la
chaleur, veillez à maintenir cet espace
libre.
Pour une meil-
leure dissipation
de la chaleur,
veillez à maintenir
cet espace libre.
Pour une meil-
leure dissipation
de la chaleur,
veillez à maintenir
cet espace libre.
Installation sur une étagère rack standard EIA
Cet appareil correspond à la moitié d’une étagère rack standard EIA (1U). Lorsque vous le montez en rack, installez-le sur une étagère rack polyvalente
ou similaire. Les trous (pour vis métriques M3 6 mm ou moins de longueur) pour la fixation de cet appareil sur une étagère se trouvent sur le panneau
inférieur, comme indiqué dans le schéma suivant. Utilisez ces trous pour fixer cet appareil à l’étagère avec les vis. La profondeur de cet appareil est de
138,6 mm.
!Ne pas installer cet appareil directement au-dessus d’un amplificateur de puissance. La chaleur dégagée par l’amplificateur de puissance peut
endommager cet appareil. De plus, du bruit (ronflement, etc.) peut se produire.
!Pour transporter cet appareil, le retirer du rack. L’appareil risque d’être endommagé s’il est transporté avec le rack.
!Si l’appareil doit être transporté sans être retiré du rack, faire attention de ne pas l’exposer à des vibrations ou chocs.
(unité:mm)
1986 6
Trou de vis de montage en rack (M3)Trou de vis de montage en rack (M3)
9
6Fr

7
Fr
Français
Raccordements
Veillez à toujours éteindre les appareils et à débrancher le cordon d’alimentation de la prise secteur avant de raccorder un appareil ou de changer les
liaisons.
Reportez-vous au mode d’emploi de l’appareil devant être raccordé.
Lorsque tous les appareils ont été raccordés, vous pouvez brancher le cordon d’alimentation.
Raccordement à des appareils DJ Pioneer
Cet appareil peut être raccordé à des appareils DJ Pioneer compatibles PRO DJ LINK pourvus d’une prise [LINK] (ex. DJM-900NXS, DJM-2000NXS).
Pour plus de détails sur les raccordements, reportez-vous aussi aux modes d’emploi des appareils DJ utilisés.
!Il est nécessaire de contracter un abonnement auprès d’un fournisseur de services Internet.
Exemple de raccordement avec la DJM-900NXS
OFF
RETURN
L
L
L
1 GND2 HOT
3 COLD
L
R
LL
IN
CH3
CH4
CH1CH2
R
R
R
R
L
R
R
PHONO
CH 4CH 3
CD/ LINE
L
R
PHONO
CH 1
CD/ LINE
SIGNAL GNDSIGNAL GND
TRS
CD/ LINELINE
MASTER1MASTER2
REC OUT BOOTH
MIC2
MIDI OUT
DIGITAL
MASTER
OUT
LINK
L
R
CH 2
CD/ LINELINE
(MONO)
LR
(MONO)
SEND
POWER
AC IN
ON
CDJ-2000NXS CDJ-2000NXS CDJ-2000NXS CDJ-2000NXS
DJM-900NXS
POWERCONTROL
LINK
AUDIO OUT
RL
CONTROL DIGITAL
OUT
rekordbox
AC IN
INTERNET
PRO DJ LINK
Internet
Routeur pour
connexion Internet
À une prise
d’alimentation Cordon d’alimentation
Concentrateur
commutateur
Ordinateur
Câble LAN
Câble LAN
Panneau arrière
!Réglez le numéro du lecteur DJ sur le même numéro que le canal auquel le câble audio est raccordé.
Ce produit satisfait la réglementation relative au bruit électrique lorsqu’il est raccordé à l’équipement par des câbles et connecteurs blindés.
ATTENTION
Risque d’interférence électromagnétique majeure. Utiliser un câble STP comme câble LAN.

Exemple de raccordement avec la DJM-2000NXS
CDJ-2000NXS CDJ-2000NXS CDJ-2000NXS CDJ-2000NXS
POWERCONTROL
LINK
AUDIO OUT
RL
CONTROL DIGITAL
OUT
DJM-2000NXS
SIGNAL GND
CD
CD
L
R
L
R
PHONOCDLINE
CONTROL
OUTIN
RL
RL
R
LRL(MONO) RL(MONO)
COMPUTER 1
COMPUTER 2
LINK
CH 3CH 1
CH 4 CH 2
CH2CH3CH4CH1
DIGITAL
SIGNAL GND
CD
1GND
-6dB -3dB 0dB
2HOT
3COLD
CD
L
R
PHONO
POWEROFF
ON
MASTER
ATT.
DIGITAL CD DIGITAL
L
R
CDLINE
CONTROL
CD DIGITAL
CH 3CH4
MASTER1
MASTER2
REC OUTBOOTH SENDRETURN
DIGITAL
CH1CH2
USB
MIDI OUT
TRS
AC IN
rekordbox
À la prise [PRO DJ LINK] de cet appareil
Concentrateur
commutateur
rekordbox
Ordinateur
!Pour raccorder deux ordinateurs à la prise [LINK], utilisez un concentrateur-commutateur.
!Réglez le numéro de canal du câble audio ou du câble coaxial numérique et le numéro de lecteur sur le même numéro.
8Fr

9
Fr
Français
Enregistrement des informations du
nightclub
Pour pouvoir distribuer des informations aux clubbers du monde entier, la principale fonctionnalité de cet appareil, le numéro d’identification de
l’appareil et les informations du nightclub (nom, lieu, adresse email, etc.) doivent être enregistrées.
!Il est nécessaire de contracter un abonnement auprès d’un fournisseur de services Internet.
Procédure d’enregistrement
Avant d’enregistrer les informations du nightclub, effectuez les préparatifs suivants.
!Préparez un ordinateur pouvant être connecté à Internet.
!Notez le numéro d’identification de l’appareil sur le panneau latéral de cet appareil.
Lorsque ceci est fait, accédez au site web suivant et enregistrez les informations du nightclub.
http://djclubnetwork.com/clubsignup
NXS-GW
ON ALERTPRO DJ LINK INTERNET
NUMÉRO D’IDENTIFICATION DE L’ APPAREIL (CUSTOMER ID) :

Informations supplémentaires
En cas de panne
!Une erreur de commande est souvent prise pour une anomalie de fonctionnement ou une panne. Si vous estimez que cet appareil ne fonctionne
pas correctement, vérifiez les points ci-dessous. Parfois, le problème peut provenir d’un autre composant. Examinez les autres composants et les
appareils électriques utilisés. Si le problème persiste malgré les vérifications des points suivants, confiez les réparations au service après-vente
Pioneer le plus proche ou à votre revendeur.
!De l’électricité statique ou des interférences externes ont peut être déréglé le lecteur. Dans ce cas, il suffit probablement de débrancher puis de
rebrancher le cordon d’alimentation pour que le lecteur fonctionne de nouveau.
Problème Vérification Solution
L’appareil ne s’allume pas. Est-ce que le cordon d’alimentation est correcte-
ment raccordé ?
Branchez le cordon d’alimentation sur une prise secteur.
L’indicateur [INTERNET] clignote. Est-ce que les informations du nightclub ont
toutes été enregistrées ?
Enregistrez toutes les informations du nightclub. (page 9)
L’indicateur [INTERNET] est éteint. Est-ce que la prise LAN côté Internet et le routeur
pour la connexion Internet sont correctement
reliés ?
Reliez correctement la prise LAN côté Internet et le routeur pour la connexion
Internet.
Est-ce qu’une table de mixage DJ est raccordée à
la prise LAN côté Internet ?
Reliez correctement la prise LAN côté Internet et le routeur pour la connexion
Internet.
Est-ce que le concentrateur-commutateur
raccordé au côté Internet ou le routeur pour la
connexion Internet est allumé ?
Allumez le concentrateur-commutateur raccordé au côté Internet ou le routeur
pour la connexion Internet.
Est-ce que vous possédez la dernière version du
prologiciel du routeur raccordé pour la connexion
Internet ?
Faites la mise à jour du prologiciel du routeur raccordé pour la connexion
Internet.
Est-ce que vous utilisez un câble LAN de Cat 5 ou
plus pour la connexion ?
Utilisez un câble LAN de Cat 5 ou plus pour la connexion.
L’indicateur [PRO DJ LINK] clignote. Est-ce que l’appareil DJ raccordé est un appareil
DJ Pioneer compatible PRO DJ LINK ?
Raccordez un appareil DJ Pioneer compatible PRO DJ LINK.
Est-ce que vous possédez la dernière version du
prologiciel de l’appareil DJ raccordé ?
Mettez à jour le prologiciel de l’appareil DJ raccordé.
Est-ce que vous utilisez un câble LAN de Cat 5 ou
plus pour la connexion ?
Utilisez un câble LAN de Cat 5 ou plus pour la connexion.
Est-ce que le lecteur DJ compatible PRO DJ LINK
est raccordé directement à la prise [PRO DJ LINK] ?
Raccordez le lecteur DJ à un concentrateur-commutateur ou à une table de
mixage DJ compatible PRO DJ LINK pourvue d’un concentrateur.
Est-ce qu’un lecteur DJ et une table de mixage
DJ compatibles PRO DJ LINK sont raccordés à la
prise [PRO DJ LINK] ?
Le fonctionnement ne sera pas normal si le lecteur DJ ou la table de mixage DJ
seulement est raccordé. Raccordez les deux.
L’indicateur [PRO DJ LINK] est éteint. Est-ce que la prise LAN côté PRO DJ LINK et la
table de mixage DJ ou le concentrateur-commuta-
teur sont correctement reliés ?
Reliez correctement la prise LAN côté PRO DJ LINK et la table de mixage DJ ou
le concentrateur-commutateur.
Est-ce que le routeur pour la connexion Internet
est raccordé à la prise LAN côté PRO DJ LINK ?
Reliez correctement la prise LAN côté PRO DJ LINK et la table de mixage DJ ou
le concentrateur-commutateur.
Est-ce que la prise LAN côté PRO DJ LINK et la
table de mixage DJ ou le concentrateur-commuta-
teur sont alimentés ?
Alimentez la prise LAN côté PRO DJ LINK et la table de mixage DJ ou le
concentrateur-commutateur.
L’indicateur [ALERT] clignote. —Les fonctions de cet appareil sont restreintes.
Contactez votre magasin ou un service après vente pour les réparations.
À propos des marques commerciales
et des marques déposées
!Pioneer est une marque déposée de PIONEER CORPORATION.
Les noms de sociétés et de produits mentionnés ici sont des marques
commerciales de leurs détenteurs respectifs.
10 Fr
Other manuals for NXS-GW
1
Table of contents
Languages:
Other Pioneer Gateway manuals