Plamen International TERMO User manual

PLAMENINTERNATIONAL d.o.o.
LJEVAONICA @ELJEZA I TVORNICA KU]ANSKIH APARATA
TEHNIČKA UPUTA ZA
ŠTEDNJAK ZA CENTRALNO GRIJANJE
HR
05.2010.
ТЕХНИЧКО УПУТСТВО ЗА
ШТЕДЊАК ЗА ЦЕНТРАЛНО ГРЕЈАЊЕ
SRB
ТЕХНИЧКО УПАТСТВО ЗА
ШПОРЕТ ЗА ЦЕНТРАЛНО ГРЕЕЊЕ
MK
TECHNICKÝ NÁVOD
KE SPORÁKU PRO ÚSTŘEDNÍ TOPENÍ
CZ
TECHNISCHE ANLEITUNG FÜR
DEN ZENTRALHEIZUNGSOFEN
D
INSTALLATIOIN AND OPERATING INSTRUCTIONS
COOKER FOR CENTRAL HEATING
GB
TEHNIČNO NAVODILO ZA
ŠTEDILNIK ZA CENTRALNO GRETJE
SLO
INSTRUKCJE TECHNICZNE DOTYCZĄCE
KUCHENKI DO OGRZEWANIA CENTRALNEGO
PL
TERMO/TEPMO


3
IZJAVA O SUKLADNOSTI
Izjavljujemo da ovaj proizvod udovoljava bitnim zahtjevima EN 12 815:2001 / A1:2004,
te nosi oznaku, u skladu s direktivom 89/106 EEC.
Požega, 05. 2009.
www.plamen.hr
PLAMEN d.o.o.
HR-34000 Požega, Njemačka 36, HRVATSKA
Uređ
aj je predviđen za nekontinuirano loženje.
Intermittent burning appliances
EN 12 815:2001 / A1:2004
Štednjak za centralno grijanje
Residental cookers for central heating
Typ: TERMO Typ: TERMO
Minimalna udaljenost od zapaljivih materijala:
Minimum distance to adjacent combustible materials: [mm]
Ispred/front: 800 Bočno/side: 150 Straga/back: 150 Iznad/top: 500
Koncentracija CO svedenih na 13%O2:
Emission of CO in combustion products calc. to 13%O2:
0,56 [%]
Temperatura dimnih plinova: Flue gas temperature: 235 [°C]
Nazivna snaga: Nominal output:
6,5 [kW]
Stupanj iskorištenja (gorivo): Energy efficiency (fuel): 75,7 [%]
Drvo
Wood
Tvornički broj: Serial No:
Proučite uputstvo za uporabu. Koristite preporučena goriva.
Read
and follow the operating instructions. Use only recommended fuels.
Gore spomenute vrijednosti vrijede samo u ispitnim uvjetima.
The above mentioned values are valid only in proof conditions.
03217-1-71/09
Certificate:
Maksimalni radni tlak:
Maximum operating pressure:
: 2 [bar]
zagrijavanje prostora space heating output
zagrijavanje vode water heating output 7,5 [kW]

TERMO-štednjak za centralno grijanje nazivne snage 14 kW je jedan tip iz palete
PLAMEN-ovih proizvoda koji može na najbolji način udovoljiti Vašim potrebama. Konstruiran je
tako da može zadovoljiti sve osnovne toplinske potrebe jedne manje obiteljske kuće ili stana.
Stoga Vas pozivamo da PAŽLJIVO PROČITATE OVE UPUTE, koje će Vam omogućiti
postizanje najboljih rezultata već kod prve uporabe ovog štednjaka.
Kao štednjak koristi se za kuhanje, pečenje, prženje i grijanje, a kao kotao služi za centralno
grijanje i pripremu potrošne tople vode.
Ložište štednjaka smješteno je unutar čeličnog kotla izrađenog od lima debljine 5 mm. Na
stražnjem dijelu kotla nalaze se priključci 3/4” za polazni i povratni vod grijanja. Unutar ložišta
ugrađena je rešetka (rost). U zimskom periodu koristi se cijeli volumen ložišta, a preko ljeta se
rešetka treba podići u gornji položaj da manje grije vodu u kotlu. Na vratima ložišta nalazi se
ručni regulator za dovođenje zraka za izgaranje.
Vanjski izgled štednjaka prikazan je na naslovnoj stranici ovih uputa. Osnovni dijelovi
štednjaka su izrađeni iz emajliranih i pocinčanih čeličnih limova i odljevaka od kvalitetnog sivog
ljeva. Štednjake izrađujemo u lijevoj i desnoj izvedbi dimnog priključka.
Tehnički podaci
Mjere: V x Š x D = 82,5 x 84,5 x 60 cm
Masa: 155 kg
Nazivna snaga: 14 kW
- direktno grijanje 6,5 kW
- toplina na vodu 7,5 kW
Dimni priključak: straga i gore: Ø 120 mm
Visina dimnog priključka od poda: H=725 mm
Potrebni podtlak dimnjaka: 10-20 Pa
Srednja temperatura dimnih plinova na priključku: 235 °C
Maseni protok dimnih plinova kod nazivne snage: 16,2 gr/sek
Maksimalni radni tlak: 2 bara
Količina vode u kotlu: 8,5 l
Priključci za vodu: 3/4”
Preporučeno gorivo za nazivnu snagu:
cijepana drva i drveni briketi 4 - 5 kg/h
ugljeni briketi 3 - 4 kg/h
Optimalna dimenzija drveta:
opseg 20-30 cm
duljina 25-30 cm
4

Uputa za postavljanje
Prilikom postavljanja štednjaka potrebno je pridržavati se lokalnih, nacionalnih i
europskih propisa (normi).
Kada štednjak oslobodite ambalaže, potrebno ga je detaljno pregledati u cilju otkrivanja
eventualnih oštećenja nastalih pri transportu. Uočena oštećenja je potrebno odmah
reklamirati, jer naknadne reklamacije nećemo moći uvažiti. Na štednjak stavite poklopac tako,
da izdanke šarki utaknete u vodilice na gornjoj ploči. U ladici za drva se nalazi pribor: Lopatica
za čišćenje, žarač, zaštitna rukavica s logom PLAMEN.
U ladici za drva se nalazi galerija koju je potrebno montirati na okvir ploče prema slici broj
1.
Na odgovarajuće mjesto postavite dimni nastavak. Potrebno je voditi računa da spoj
štednjaka i dimnjaka bude izveden čvrsto i nepropusno. Štednjak se priključuje na dimnjak
standardnom cijevi promjera 120 mm. Dimovodne cijevi moraju imati na svim mjestima
odgovarajući uspon. Ne povezujte štednjak s dimnjakom na kojem je već priključeno neko
drugo trošilo. Potrebno je pregledati dimnjak, da nema oštećenja i pukotina. U prostoriju u koju
se instalira štednjak mora biti osiguran dovoljan dotok zraka za izgaranje. Ukoliko je u
prostoriju ugrađen nekakav aspirator (napa) ili neko drugo trošilo zraka, potrebno je kroz
poseban otvor sa zaštitnom mrežom, koja se ne može začepiti, osigurati redovan dotok
svježeg zraka.
Voditi računa da se štednjak postavi na mjesto gdje je moguć jednostavan pristup zbog
čišćenja dimovodnih kanala i dimnjaka.
Paziti da u neposrednoj blizini štednjaka nema zapaljivih materijala i da se štednjak smije
ugraditi samo u uobičajen prostor, gdje nema opasnosti od požara i eksplozije. Ako takva
opasnost postoji, štednjak se mora isključiti.
Potrebno je osigurati minimalne udaljenosti štednjaka od zapaljivih predmeta, kao što
su: drvo, heraklit, iverica, pluto i sl. i to 800 mm ispred štednjaka i 150 mm u ostalim pravcima.
Ako su materijali još lakše zapaljivi, kao što su: PVC, poliuretan, drvena vlakna i sl. ili su
nepoznate zapaljivosti ove razmake je potrebno udvostručiti.
Kod instaliranja štednjaka na pod od zapaljivog materijala mora se štednjak postaviti na
izolacijsku negorivu podlogu. Ona mora biti u tlocrtu 800 mm s prednje strane i po 150 mm u
ostalim pravcima oko štednjaka.
Slika 1
5

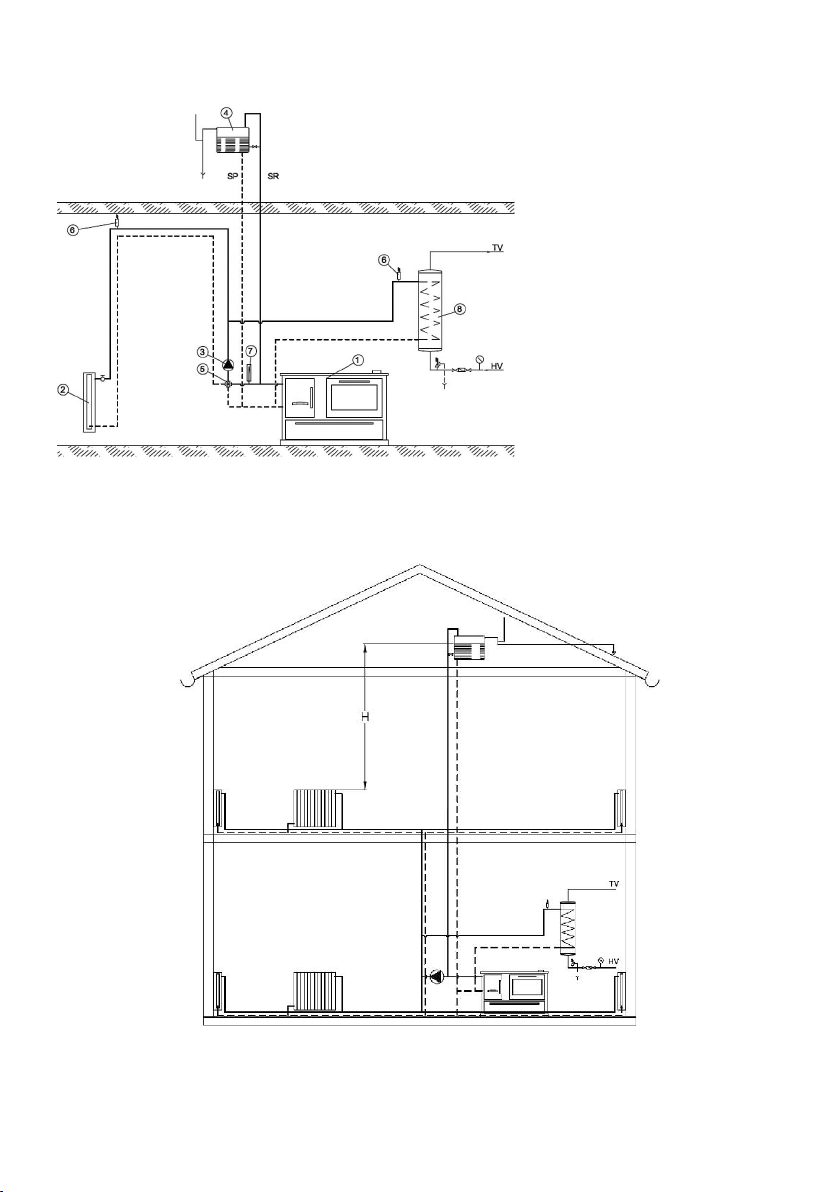
Priključak kotla u sustav centralnog grijanja
Kotao se mora priključiti u sustav centralnog grijanja s otvorenom ekspanzionom
posudom kako u slučaju pregrijanja vode ne bi došlo do povećanja tlaka u sustavu (slika 5).
Preporučujemo ugradnju 4-krake mješajuće slavine (miš ventila) koja omogućava
reguliranje temperature u polaznom vodu grijanja, a da pritom temperatura vode u kotlu bude
dovoljno visoka (60 – 70°C) da se ne pojavljuje znojenje kotla i da ne dolazi do
niskotemperaturne korozije. Na slici br. 6 prikazano je kako se kotao treba priključiti na
instalaciju centralnog grijanja. Visinom H osigurati dovoljan tlak u sistemu da se osigura dobra
cirkulacija kroz grijaća tijela.
U sistemu se može (i poželjno je) priključiti bojler. Dobro ga je priključiti tako da se
osigura prirodna (odnosno gravitacijska) cirkulacija koja je neovisna o pumpi. Bojler mora biti
iznad nivoa peći, sa što manjim otporima za cirkulaciju vode (što kraće cijevi s usponom prema
bojleru).
Prije puštanja u pogon (prije prvog loženja) provjerite da li je sustav grijanja napunjen
vodom i dobro odzračen. Otvorite sve zaporne organe. Uključite optočnu crpku. Položaj
rešetke (rosta) izaberite zavisno o potrebi topline u sustavu centralnog grijanja.
Uputa za uporabu
Prije prve potpale vlažnom, pa suhom krpom prebrišite sve emajlirane plohe i ploču za
kuhanje. Isprobajte kako funkcionira regulator zraka i zaklopka dimovodnog kanala poz. 15.
Funkcioniranje štednjaka i kvaliteta izgaranja ovise o kvaliteti goriva i dimnjaka, dobrom
podešavanju jačine vatre, čistoći štednjaka, te pravilnom loženju. Štednjak je predviđen za
loženje drvima, drvenim briketima i briketima od smeđeg ugljena. Ložite samo suhim drvima.
Kod loženja vlažnim drvima nastaje čađa koja može uzrokovati začepljenje dimnjaka. Ne
spaljujte nikakav otpad, posebice plastiku. U mnogim otpadnim materijalima nalaze se
škodljive tvari, koje su štetne za štednjak, dimnjak i okoliš. Za postizanje željene snage
preporučujemo, da dodate po dva-tri komada drva ili briketa svakih pola sata, a regulator zraka
otvorite na poziciju koja Vam za jačinu vatre najbolje odgovara.
Pepeljaru treba redovito prazniti. Ne dopustite da pepeo dodiruje rešetku ložišta, jer bi u
tom slučaju moglo doći do oštećenja rešetke. Za potpalu možete koristiti novinski papir i suha
sitnija drva.
Regulator zraka tada treba biti maksimalno otvoren, a dugme poluge zaklopke, poz. 154
dimovodnog kanala izvučemo prema van. Kod potpaljivanja vatre, kada su vanjske
temperature više od 15 °C, može se dogoditi da u dimnjaku nema podtlaka (dimnjak slabo
vuče). U tom slučaju pokušajte potpaljivanjem dimnjaka ostvariti potreban podtlak. Za
potpaljivanje vatre ne koristite špirit, benzin ili nekakvo drugo slično gorivo. Ne držite nikakve
zapaljive tekućine u blizini štednjaka.
Vrata ložišta moraju uvijek biti dobro zatvorena, osim kod dodavanja goriva. Štednjak
treba redovito čistiti i vršiti kontrolu od strane dimnjačara ili druge stručne osobe. Dimnjak,
dimovodne kanale i cijevi potrebno je godišnje čistiti minimalno 6 puta. Štednjak čistite s
izuzetnom opreznošću. Čistiti ga samo kad je hladan, tako da se skine i očisti gornja ploča i
dimovodna cijev. Odgovarajućom četkom se stepe sloj čađe s unutrašnjosti, a kroz otvor za
čišćenje ispod vrata pećnice, odgovarajućom grabilicom izvuče pepeo i čađa van.
6

Potrebno je predhodno skinuti vrata pećnice, i to na slijedeći način:
• vrata potpuno otvoriti slika 1A
• osigurače na polugama šarki odvijačem podići prema gore, do kraja, u pravcu strelice,
detalj "A"
• lagano pritvoriti vrata, te ih izvući iz nosača šarki, u pravcu strelice, slika 1B
• vrata postaviti natrag tako, da poluge šarki stavimo natrag u ureze, te vratimo osigurače
na polugama prema dolje
Čišćenje i pregled štednjaka je potrebno i obavezno obaviti nakon dužeg prekida
loženja.
Snagu štednjaka regulirate dodavanjem određene količine goriva i zraka pomoću
regulatora zraka na vratima ložišta. Minimalnu snagu (laganu vatru) postići ćete kada smanjite
dovod zraka za izgaranje na minimum. U slučaju preopterećenja (prejake vatre) zatvorite
regulator zraka na minimum da se vatra postepeno stiša.
Kada koristite pećnicu, naročito kod pečenja kruha ili drugog dizanog tijesta, da odozgo
ne izgori, postupite na slijedeći način:
• Poluga zaklopke za dimne plinove mora biti gurnuta unutra.
• Prije stavljanja pripravka u pećnicu, ona mora biti zagrijana na 170-190 °C.
• Na vatru dodajete samo po 1 manji komad drveta i pecite cijelo vrijeme na slaboj vatri da
pripravak bude odozgo i odozdo jednako pečen. Preporuka je da se u tijeku pečenja
tepsija sa pripravkom jedanput okrene.
• Brzo zakuhavanje i jače zagrijavanje ploče za kuhanje postići ćete ako zaklopka dimnih
plinova bude otvorena, tj. dugme povučeno prema van.
Vodite računa da su dijelovi štednjaka, naročito gornja ploča, INOX ručke vrata ložišta i
pećnice, rukohvat, dugme zaklopke vrući, te da se štednjakom smiju koristiti samo odrasle
osobe. ZBOG TOGA KORISTITE ZAŠTITNU RUKAVICU!
Na štednjaku se ne smiju raditi nikakvi popravci i preinake. Bilo kakve zahvate na
štednjaku smiju raditi samo ovlaštene osobe, a ugrađivati se smiju samo originalni rezervni
dijelovi.
Slika 2
7

Za vrijeme normalnog pogona, naročito s vlažnim gorivom dolazi do taloženja čađe i
katrana. Ako se zanemari redovna kontrola i čišćenje dimnjaka povećava se opasnost od
požara u dimnjaku. U slučaju pojave vatre u dimnjaku postupite na slijedeći način:
• ne upotrebljavajte vodu za gašenje
• zatvorite sve dolaze zraka u štednjak i dimnjak
• nakon što se vatra ugasila pozovite dimnjačara da pregleda dimnjak
• pozovite servisnu službu, odnosno proizvođača da pregleda štednjak.
Štednjak će najbolje i najekonomičnije raditi kada je opterećen snagom 10-15 kW.
Instalirana snaga u sustav grijanja mora biti 8 kW ili veća, ako je rost u donjem položaju.
Ukoliko nemamo dovoljno instalirane snage rost treba dići na gornji nivo. Isto treba učiniti
u prijelaznom i ljetnom periodu grijanja.
8
Poz. Poz.NAZIV DIJELA NAZIV DIJELA
22
0-03
05.1
06
07
08.1
09
01.1
12
13.1
14
15
16
17
18.1
19
20
21.1
25
27
30
40
41
46
51
52
53
54
55
02-058
Začelje
Kotao
Tijelo vrata ložišta
Regulator zraka
Klapna za zrak
Štitnik vrata ložišta
Nosač vrata ložišta
Prednjica
Poklopac dimnog otvora
Dimni nastavak
Pregrada
Zaklopka
Poklopac
Prsten
Rost
Pravokutni uložak
Ploča
Okvir
Šarka poklopca štednjaka
Šarka vrata pećnice
Termometar
Staklo vanjsko
Staklo unutarnje
Poluga zaklopke
Postolje
Bočnica unutarnja do pećnice
Kutnik bočnice unutarnje
Bočnica unutarnja do ložišta
Centralni lim
Sklop pećnice
62
63
65.2
66.1
68
69
71
72
74
75
76
78
82
87
94
98
99
151
153
154
155
156
157
160
801
803
804
806
Dimna pregrada
Plašt ladice
Obloga ladice unutarnja
Obloga ladice vanjska
Obloga vrata ložišta
Blenda
Bočnica vanjska
Maska
Pepeljara
Poklopac štednjaka
Obloga vrata pećnice vanjska
Obloga vrata pećnice unutarnja
Poklopac otvora za čišćenje
Tepsija
Regal
Regal bočni
Zaštita pećnice
Ručka vrata ložišta - IR
Ručka vrata pećnice - IR
Dugme poluge zaklopke
Galerija
Nosač galerije
Ručka ladice - IR
Distantni profil
Pribor:
Žarač
Lopatica za čišćenje
Ručka za posluživanje
Zaštitna rukavica s logom PLAMEN-crvena
Rezervni dijelovi i pribor (slika 3, stranica ):59

MONTAŽA ŠTEDNJAKA (shematski prikaz):
1. ŠTEDNJAK
2. POTROŠAČ TOPLINE
3. CIRKULAC. CRPKA
4. EKSPANZIVNA OTVORENA
POSUDA
5. SLAVINA ZA MJEŠANJE VODE
6. ODZRAČNI VENTIL
7. TERMOMETAR
8. GRIJAČ POTROŠNE VODE
slika 5
INSTALACIJA CENTRALNOG GRIJANJA (shematski prikaz):
slika 6
9
ZADRŽAVAMO PRAVO NA PROMJENE KOJE NE UTJEČU NA FUNKCIONALNOST
I SIGURNOST APARATA!

KONFORMITÄTSERKLÄRUNG
Wir erklären, dass dieses Erzeugnis allen wichtigen Anforderungen von
EN 12 815:2001 / A1:2004 entspricht, und die Kennzeichnung gemäß Richtlinie
89/106 EEC trägt.
Požega, 05. 2009
E I S E N G I E S S E R E I U N D H A U S G E R Ä T E F A B R I K
www.plamen.hr
PLAMEN d.o.o.
HR-34000 Požega, Njemačka 36, KROATIEN
Dieses Gerät ist für eine unkontinuierliche Beheizung vorgesehen.
Intermittent burning appliances
EN 12 815:2001 / A1:2004
Zentralheizungsofen
Residental cookers for central heating
Typ: THERMO Typ: THERMO
Mindestabstand zu brennbaren Materialien:
Minimum distance to adjacent combustible materials: [mm]
Vorderseite/front:
800
Seitlich/side:
150
Rückseite/back:
150
Oben/top:
500
Auf 13% O reduzierte CO-Konzentration:
2
Emission of CO in combustion products calc. to 13%O :
0,56 [%]
Abgastemperatur: Flue gas temperature: 235 [°C]
Nennleistung: Nominal output:
6,5 [kW]
Nutzungsgrad (Brennstoff): Energy efficiency (fuel): 75,7 [%]
Holz
Wood
Werknummer: Serial No:
Lesen Sie die Gebrauchsanweisung durch!
Verwenden Sie die empfohlenen Brennstoffe.
Read
and follow the operating instructions. Use only recommended fuels.
Die oben erwähnten Werte gelten nur unter getesteten Bedingungen.
The above mentioned values are valid only in proof conditions.
03217-1-71/09
Certificate:
Maximaler Betriebsdruck:
Maximum operating pressure:
: 2 [bar]
Raumbeheizung space heating output
Wasserbeheizung water heating output 7,5 [kW]
2
10

Der THERMO-Zentralheizungsofen mit der Nennleistung von 14 kW ist ein Typ aus der
Palette der PLAMEN-Produkte, der Ihren Bedürfnissen am besten entspricht. Er ist so
konstruiert, dass er alle grundlegenden Heizbedürfnisse eines kleinen Familienhauses oder
einer Wohnung befriedigt.
Deshalb bitten wir Sie, DIESE ANLEITUNG SORGFÄLTIG DURCHZULESEN, welche Ihnen
ermöglicht, bereits bei dem ersten Gebrauch dieses Ofens beste Resultate zu erzielen.
Der Ofen wird zum Kochen, Braten, Backen und Heizen verwendet. Der Kessel dient für
die Zentralheizung und die Aufbereitung des Warmwassers.
Der Feuerraum des Ofens befindet sich innerhalb des 5 mm dicken, aus Blech gefertigten
Stahlkessels. Auf der Kesselrückseite befinden sich die 3/4” Anschlüsse für den Zu- und
Rücklaufdurchfluss der Heizung. Innerhalb des Feuerraums ist ein Rostgitter eingebaut. In der
Winterzeit wird das gesamte Feuerraumvolumen verwendet. Über dem Sommer muss der Rost
in die obere Position gestellt werden, um weniger Wasser im Kessel aufzuheizen. An der
Ofentür befindet sich ein manueller Luftschieber für die Luftzufuhr.
Der Ofen ist auf der Vorderseite dieser Anleitung abgebildet. Die Hauptteile des Ofens
bestehen aus emailliertem und verzinktem Stahlblech sowie Abgüssen aus qualitativ
hochwertigem Grauguss. Die Öfen werden je nach Wunsch mit Abgasanschluss an der linken
oder rechten Ofenseite angeboten.
Technische Angaben
Maße: H x B x T = 82,5 x 84,5 x 60 cm
Masse: 155 kg
Nennleistung: 14 kW
- Direktbeheizung 6,5 kW
- Wasserbeheizung 7,5 kW
Rauchgasanschluss: rückseitig und oben: Ø 120 mm
Höhe des Rauchgasanschlusses
vom Boden aus gemessen: H=725 mm
Benötigter Förderdruck des Schornsteins: 10-20 Pa
Durchschnittliche Abgastemperatur beim Anschluss: 235 °C
Massenabgasdurchfluss bei Nennleistung: 16,2 gr/sek
Maximaler Betriebsdruck: 2 bara
Wassermenge im Kessel: 8,5 l
Wasseranschluss: 3/4”
Empfohlener Brennstoff für die Nennleistung:
Holzscheitel und Holzbriketts 4 - 5 kg/h
Kohlenbriketts 3 - 4 kg/h
Optimale Holzdimension:
Umfang 20-30 cm
Länge 25-30 cm
11

Aufstellungsanleitung
Bei der Aufstellung des Ofens muss man sich an die örtlichen, nationalen und
europäischen Vorschriften (Normen) halten.
Beim Auspacken des Ofens müssen Sie diesen detailliert überprüfen, um eventuelle
Beschädigungen, die beim Transport entstanden sein könnten, festzustellen. Festgestellte
Beschädigungen müssen sofort reklamiert werden, da nachträgliche Reklamationen nicht
mehr möglich sind. Legen Sie einen Deckel auf den Herd auf die Weise, dass Sie den
Scharnieransatz in die, an der oberen Platte befindlichen Leitschiene einsetzen. In der Lade für
das Holz befindet sich das Zubehör: Putzschaufel, Sch reisen, Schutzhandschue mit dem
PLAMEN - Logo.
In der Schublade, in der das Holz untergebracht wird, befindet sich ein Galerie, der auf
den Plattenrahmen (siehe Abbildung 1) montiert werden muss.
Setzen Sie den Abgasstutzen auf die entsprechende Stelle. Man muss darauf achten,
dass die Verbindung zwischen dem Ofen und dem Schornstein fest und dicht ist. Der Ofen wird
an den Schornstein mit einem Standardrohr von 120 mm Durchmesser angeschlossen. Die
Rauchrohre müssen an allen Stellen eine entsprechende Steigung aufweisen. Verbinden Sie
den Ofen nicht an einen Schornstein, an welchem bereits ein anderer Verbraucher
angeschlossen ist! Es ist notwendig, den Schornstein nach Beschädigungen und Sprüngen zu
durchsuchen. Der Raum, in welchem der Ofen aufgestellt wird, muss über genügend
Frischluftzufuhr verfügen. Inwiefern in dem Raum irgendein Aspirator (Luftabzug) oder ein
anderer Luftverbraucher angeschlossen ist, ist es notwendig, durch eine Sonderöffnung mit
einem Schutznetz, das nicht verstopft werden kann, eine ordentliche Luftzufuhr
sicherzustellen.
Man muss darauf achten, dass sich in der unmittelbaren Ofennähe keine leicht
entzündlichen Materialien befinden und der Ofen nur in gewöhlichen Räumen aufgestellt wird,
wo keine Explosions - und Brandgefahr besteht. Falls eine solche Gefahr besteht, muss der
Ofen ausgeschaltet werden.
Ein Mindestabstand zwischen dem Ofen und leicht entzündlich Gegenständen, wie zum
Beispiel: Holz, Heraklith, Spanplatte, Kork u. Ä. muss sichergestellt werden, und zwar 800 mm
vor dem Ofen und 150 mm in die übrigen Richtungen. Wenn die Materialien noch leichter
entzündlich sind, wie zum Beispiel: PVC, Polyurethan, Holzfasern und Ä. oder deren
Entzündlichkeit unbekannt ist, muss doppelter Abstand eingehalten werden.
Bei der Aufstellung des Ofens auf einem Boden, der aus entzündlichem Material besteht,
muss der Ofen auf eine unbrennbare Isolationsunterlage gestellt werden. Sie muss sich im
Grundriss 800 m auf der Vorderseite und je 150 mm in den übrigen Richtungen um den Ofen
befinden.
ü
Abbildung 1
12

Kesselanschluss an das Zentralheizungssystem
Der Kessel muss an ein Zentralheizungssystem mit einem offenen Expansionsbehälter
angeschlossen werden, damit es nicht im System im Falle einer Überhitzung des Wassers zu einer
Erhöhung des Druckes (Abbildung 5) kommt.
Wir empfehlen den Einbau eines Vierwege-Mischventils, das eine Temperaturregelung in der
Ausgangsleitung der Heizung ermöglicht und dabei die Wassertemperatur im Kessel genügend heiß
(60 – 70°C) bleibt, um ein zum Schwitzen des Kessels und einer Niedertemperaturkorrosion zu
vermeiden. Auf der Abb. Nr. 6 ist angeführt, wie der Kessel an die Zentralheizungsinstallation
angeschlossen werden muss. Mit der Höhe H muss genügend Druck im System sichergestellt
werden, um eine gute Zirkulation durch die Heizkörper gewährleisten zu können.
An das System kann (und was auch wünschenswert ist) ein Boiler angeschlossen werden. Es
ist gut, ihn anzuschließen, um eine natürliche, von der Pumpe unabhängige Zirkulation (bzw.
Gravitationszirkulation) sicherzustellen. Der Boiler muss sich über dem Ofenniveau mit
kleinstmöglichem Widerstand für die Wasserzirkulation (Rohre mit kleinstmöglicher Länge, mit
einem Anstieg zum Boiler) befinden.
Vor der Inbetriebnahme (vor dem ersten Heizen) müssen Sie nachprüfen, ob das
Heizungssystem mit Wasser gefüllt und gut durchgelüftet ist. Öffnen Sie alle Absperrorgane.
Umlaufpumpe einschalten. Wählen Sie die Position des Rostgitters abhängig von dem Wärmebedarf
in dem Zentralheizungssystem.
Bedienungsanleitung
Vor dem ersten Anheizen müssen Sie alle emaillierten Flächen und die Kochplatte zuerst mit
einem feuchten und dann mit einem trockenen Tuch wischen. Probieren Sie aus, wie der
Luftschieber und die Drosselklappe des Abgaskanals (Pos. Nr. 15) funktioniert.
Die Funktionsfähigkeit des Ofens und die Verbrennungsqualität hängen von der Brennstoff-
und Schornsteinqualität, einer guten Regelierung der Feuerintensität, der Sauberkeit des
Schornsteins und von einer ordnungsgemäßen Feuerung ab. Der Ofen ist für das Beheizen mit Holz,
Holzbriketts und Braunkohlenbriketts vorgesehen. Bitte nur mit trockenem Holz beheizen! Beim
Beheizen mit feuchtem Holz entsteht Ruß, was zu einer Verstopfung des Schornsteins führen kann.
Bitte keinen Abfall, vor allem nicht Plastik verbrennen! In vielen Abfallmaterialien befinden sich
Schadstoffe, die dem Schornstein, Ofen und der Umwelt schaden. Um die Nennleistung erreichen zu
können, empfehlen wir Ihnen, jede halbe Stunde je zwei oder drei Stück Holz oder Briketts
hinzuzufügen. Öffnen Sie den Luftregler in die Position, die Ihnen zur Erreichung des gewünschten
Feuers am meisten entspricht.
Der Aschekasten muss regelmäßig entleert werden. Achten Sie darauf, dass die Asche den
Rost nicht berührt, weil es ansonsten zu einer Beschädigung des Rostes kommen könnte. Zum
Anheizen können Sie Zeitungspapier und trockene, kleinere Holzspäne verwenden.
Der Luftregler muss dabei maximal geöffnet sein und der Hebelknopf der Klappe des
Abgaskanals, Pos. 154., muss nach Außen gezogen werden. Wenn die Außentemperaturen über
15°C betragen, kann es beim Anheizen vorkommen, dass es im Schornstein keinen Förderdruck gibt
(der Schornstein zieht schlecht). Versuchen Sie in diesem Falle durch Anheizen des Schornsteins
den nötigen Förderdruck zu erzielen. Verwenden Sie zum Anheizen keinen Spirit, kein Benzin oder
irgendeinen ähnlichen Brennstoff. Flüssige Brennstoffe dürfen nicht in der Nähe des Ofens gelagert
werden.
Die Feuerraumtür muss, außer beim Zufügen von Brennstoff, immer gut verschlossen bleiben.
Der Ofen muss von dem Schornsteinfeger oder einer anderem Experten regelmäßig gesäubert und
kontrolliert werden. Der Schornstein, die Abgaskanäle und die Rohre müssen jährlich mindestens 6
Mal gesäubert werden. Der Ofen muss mit besonderer Vorsicht gesäubert werden. Er darf nur im
kalten Zustand, und zwar auf diese Weise gesäubert werden, dass die obere Platte und das
Abgasrohr abgenommen und gesäubert werden. Mit einer entsprechenden Bürste wird der Ruß aus
dem Inneren abgebürstet und durch die unter der Ofentür befindliche Öffnung werden Asche und
Ruß mit einem entsprechenden Greifgerät entfernt.
13

Dabei ist es notwendig, die Ofentür schon vorher auf folgende Weise abzunehmen:
• Die Tür muss ganz geöffnet sein. (Abb. 1A)
• Die an dem Scharnierhebel befindlichen Sicherungen mit einem Schraubenzieher bis
ganz nach oben, in Pfeilrichtung ziehen (Detail "A").
• Die Tür leicht anlehnen und sie aus dem Scharnierträger in Pfeilrichtung herausziehen
(Abb.1B)
• Die Tür legen Sie so nach hinten, dass Sie die Scharnierhebel in die Kerbe zurücksetzen
und die an den Hebeln befindlichen Sicherungen nach unten wieder einsetzen.
Der Ofen muss unbedingt nach einer längeren Benützungspause gesäubert und
kontrolliert werden.
Die Ofenleistung kann durch Zufügen einer bestimmten Brennstoff- und Luftmenge mit
Hilfe des am Aschekasten befindlichen Luftreglers reguliert werden. Die Minimalleistung
(kleines Feuer) erreichen Sie, indem Sie die Verbrennungsluftzufuhr auf Minimum stellen. Im
Falle einer Überbelastung (zu starkes Feuer) Luftregler schließen, damit das Feuer langsam
abflaut.
Gehen Sie bei der Benützung des Ofens und besonders beim Backen von Brot oder
ähnlichem Hefeteig auf folgende Weise vor:
• Der Hebel der Abgas-Drosselklappe muss nach Innen geschoben werden.
• Bevor Sie das Gericht in den Ofen schieben muss dieser auf 170° - 190° C vorgewärmt
werden.
• Auf das Feuer immer nur 1 kleineres Holzstück hinzufügen und während der gesamten
Zeit bei kleiner Flamme backen, damit die Speise oben und unten gleichmäßig
gebacken wird. Es wird empfohlen, das Backbleck während des Backens ein Mal
umzudrehen.
• Ein schnelles Aufkochen und eine stärkere Beheizung der Platte erreichen Sie, indem
Sie die Abgas- Drosselklappe offen halten, d.h. der Knopf nach Außen gezogen ist.
Achten Sie darauf, dass die Ofenteile, besonders aber die obere Platte, die INOX Türgriffe
des Feuerraums und des Ofens, der Handgriff und der Knopf der Drosselklappe heiß werden.
Der Ofen darf nur von Erwachsenen benützt werden! VERWENDEN SIE DESHALB
SCHUTZHANDSCHUHE!
Am Ofen dürfen keine Reparaturen und Änderungen vorgenommen werden! Eingriffe
dürfen nur von ermächtigten Personen durchgeführt werden! Es dürfen nur Original-Ersatzteile
eingebaut werden!
14
1А 1BAbb. 2

Während des normalen Betriebs, kommt es besonders bei feuchtem Brennstoff, zu einer
Ablagerung von Ruß und Teer. Erfolgt keine regelmäßige Kontrolle und wird der Schornstein
nicht regelmäßig gesäubert, erhöht sich die Gefahr eines Brands im Schornstein. Für den Fall,
dass Feuer im Schornstein entsteht, müssen Sie auf folgende Weise vorgehen:
• Verwenden Sie kein Wasser zum Löschen des Feuers!
• Schließen Sie alle Luftzugänge zum Ofen und Schornstein.
• Nachdem das Feuer zu brennen aufgehört hat, müssen Sie den Schornsteinfeger
zu sich bestellen, damit dieser den Schornstein überprüft.
• Rufen Sie den Servicedienst beziehungsweise den Hersteller an, um den Ofen zu
überprüfen.
Der Ofen wird am besten und sparsamsten funktionieren, wenn er mit einer Leistung von
10-15 kW belastet wird.
Die in dem Heizungssystem installierte Leistung muss mindestens 8 kW betragen, wenn
sich der Rost in der unteren Position befindet.
Inwiefern ungenügend installierte Leistung vorhanden ist, muss der Rost auf das obere
Niveau gestellt werden. Dasselbe muss in der Übergangs - und Sommerzeit erfolgen.
Pos. BEZEICHNUNG BEZEICHNUNG
Ersatzteile und Zubehör (Abbildung 3, Seite ):59
Pos.
15
22 Rückseite
0-03 Kessel
05.1 Feuerraumtürkörper
06 Luftregler
07 Luftklappe
08.1 Schutzschild der Feuerraumtür
09 Feuerraumtürträger
01.1 Vorderseite
12 Rauchrohröffnungsdeckel
13.1 Abgasstutzen
14 Trennwand
15 Klappe
16 Deckel
17 Ring
18.1 Rost
19 Rechteckiger Einlegeteil
20 Platte
21.1 Rahmen
25 Deckelscharnier
27 Ofentürscharnier
30 Thermometer
40 Außenscheibe
41 Innenscheibe
46 Klappenhebel
50 Schublade scharnier
51 Sockel
52 Innere, neben dem Ofen befindliche Seitenwand
53 Eckteil der inneren Seitenwand
54 Innere, neben dem Feuerraum befindliche
Seitenwand
55 Zentralblech
02-058 Ofenkleidung
62 Rauchtrennwand
63 Schubkastenmantel
65.2 Innerer Schubkastenmantel
66.1 Äußerer Schubkastenma
68 Feuerraumtürumkleidung
69 Blende
71 Äußere Seitenwand
72 Maske
74 Aschekasten
75 Ofendeckel
76 Äußerer Ofentürmantel
78 Innerer Ofentürmantel
82 Ptzöffnungsdeckel
87 Backform
94 Regal
98 Seitenregal
99 Ofenschutz
151 Feuerraum Türgriff - IR
153 Offen Türgriff - IR
154 Button hebel
155 Galerie
156 Galerie Träger
157 Schaublade Griff - IR
160 Distanzprofil
Zubehör:
801 Handgriff
803 Ascheschaufel
804 Griff bedienung
806 Schutzhandschue logo PLAMEN - rot

OFENMONTAGE (Schemadarstellung):
1. OFEN
2. WÄRMEVERBRAUCHER
3. ZIRKULATIONSPUMPE
4. OFFENER
EXPANSIONSBEHÄLTER
5. MISCHBATTERIE
6. ENTLÜFTUNGSVENTIL
7. THERMOMETER
8. WASSERERHITZER
Abbildung 5
INSTALLATION DER ZENTRALHEIZUNG (Schemadarstellung):
Abbildung 6
WIR BEHALTEN DAS RECHT AUF ÄNDERUNGEN, DIE AUF DIE FUNKTIONSFÄHIGKEIT
UND SICHERHEIT DES APPARATS NICHT EINFLUSS NEHMEN, VOR.
16

DECLARATION OF COMFORMITY
We hereby declare that this product meets all relevant criteria of the standard
EN 12 815: 2001/A1:2004, and has marking affixed to it in accordance with the Council
Directive 89/106 EEC.
Požega, 05. 2009
IRON FOUNDRY & HEATING APPLIANCES MANUFACTURERS
www.plamen.hr
PLAMEN d.o.o.
HR-34000 Požega, Njemačka 36, HRVATSKA
Uređ
aj je predviđen za nekontinuirano loženje.
Intermittent burning appliances
EN 12 815:2001 / A1:2004
Štednjak za centralno grijanje
Residental cookers for central heating
Typ: TERMO Typ: TERMO
Minimalna udaljenost od zapaljivih materijala:
Minimum distance to adjacent combustible materials: [mm]
Ispred/front: 800 Bočno/side: 150 Straga/back: 150 Iznad/top: 500
Koncentracija CO svedenih na 13%O2:
Emission of CO in combustion products calc. to 13%O2:
0,56 [%]
Temperatura dimnih plinova: Flue gas temperature: 235 [°C]
Nazivna snaga: Nominal output:
6,5 [kW]
Stupanj iskorištenja (gorivo): Energy efficiency (fuel): 75,7 [%]
Drvo
Wood
Tvornički broj: Serial No:
Proučite uputstvo za uporabu. Koristite preporučena goriva.
Read
and follow the operating instructions. Use only recommended fuels.
Gore spomenute vrijednosti vrijede samo u ispitnim uvjetima.
The above mentioned values are valid only in proof conditions.
03217-1-71/09
Certificate:
Maksimalni radni tlak:
Maximum operating pressure:
: 2 [bar]
zagrijavanje prostora space heating output
zagrijavanje vode water heating output 7,5 [kW]
17

TERMO residential cooker for central heating, of a rated output 14 kW, is one of the
models from PLAMEN product range that can fully meet your requirements. It has been
designed to satisfy basic thermal energy needs of a flat or a small family house. Please READ
CAREFULLY THESE INSTRUCTIONS in order to achieve the best results with the very first use
of this cooker.
As a cooker, it can be used for cooking, baking, toasting, frying and heating, while as a
boiler it can serve as a component part of the central heating system and for warm water
preparation.
The firebox of the cooker is enclosed in a boiler made of 5 mm thick sheet steel. At the rear
side of the cooker 3/4" outlets for outgoing and return heating pipes are provided. Inside the
firebox a grate is installed. During the winter season, the full volume of the firebox is used, while
during the summer season, the grate should be raised to the upper position to reduce the water
heating temperature in the boiler. Manual air supply control is provided on the firebox door.
The appearance of the cooker is illustrated on the cover page of these Instructions. Main
component parts of the cooker are made of enameled or galvanized sheet steel and of high
quality cast iron. The cooker is available with left or right side flue connection.
Technical data
Measurements: H x W x D = 82,5 x 84,5 x 60 cm
Weight: 155 kg
Rated output: 14 kW
- direct heating 6,5 kW
- water heating 7,5 kW
Flue outlet: rear and top: Ø 120 mm
Height of the flue outlet from the floor: H=725 mm
Required negative draught in the chimney: 10-20 Pa
Mean flue gas temperature at the flue connection: 235 °C
Flue gas flow at the rated output: 16,2 gr/sek
Max. operating pressure: 2 Bar
Quantity of water in the boiler: 8,5 l
Water connections: 3/4”
Recommended fuel loads for rated output:
logs and wood briquettes 4 - 5 kg/h
coal briquettes 3 - 4 kg/h
Optimum log size:
- perimeter 20-30 cm
- length 25-30 cm
18

Installation instructions
When installing the cooker, make sure that relevant local, national and European
regulations are fully complied with.
After having unpacked the cooker, inspect it carefully for possible damages in transport.
Any such damages should be immediately reported, because late claims will not be taken into
consideration. To install the cover, insert the hinge pins into the respective guides on the top
plate. In the log drawer, you will find the following accessories: a cleaning shovel, a poker and a
protective glove with PLAMEN logo. In the log drawer you will also find a gallery that should be
installed on the top plate frame as shown in the Figure 1.
Install the flue collar in its position making sure that the connection between the cooker
and chimney is firm and tight. The cooker is connected to the chimney with a standard flue pipe
dia. 120 mm. The flue pipes should have adequate rise at all points. Do not connect the cooker
to a chimney to which another appliance has already been connected. Prior to connecting the
cooker to the chimney, make sure that the chimney is free from any cracks and / or other
damages. The cooker should be installed in a room with sufficient supply of fresh air to support
the combustion. If an exhauster (hood) or similar air-consuming unit is installed in the same
room, regular supply of fresh air should be provided through a separate opening, protected with
a non-clogging grid.
Make sure that the cooker is installed in a place allowing easy access for flue and chimney
cleaning operations.
Make sure that there are no combustibles in the immediate vicinity of the cooker. The
cooker may be installed only in a room where there is no risk of fire or explosion.
Minimum clearances between the cooker and combustibles, such as wood, chipboard,
corkboard, etc. should be strictly observed, in particular 800 mm in front of the cooker and 150
mm in other directions. In case of highly flammable materials, such as PVC, polyurethane,
pressed wood fibreboards, etc. or materials of unknown flammability, these clearances should
be doubled.
If the cooker is to be installed in a room with combustible or heat sensitive flooring, it shall
be placed on a solid, non-combustible floor protector. The floor protector must be dimensioned
to extend at least 800 mm to the front of the cooker and 150 mm to other directions.
Figure 1
19

Boiler connection to the central heating system
The boiler should be connected to the central heating system with open expansion tank to
prevent the creation of excessive pressure within the system in case of water overheating
(Figure 5).
Installation of a 4-way mixer tap is recommended to achieve adequate temperature
control in the outgoing heating conduit while keeping the temperature of the water inside the
boiler at a sufficiently high level (60 – 70°C) to avoid creation of condensate on the boiler surface
and low-temperature corrosion. Figure 6 shows how to connect the boiler to the central heating
system. The height H should be such as to ensure sufficient pressure within the system and thus
good circulation through heating units (radiators).
Installation of a separate boiler in the system is possible (and desirable). It should
preferably be installed so to ensure natural (gravity) circulation which is not dependent on a
pump. The boiler should be installed above the cooker level with all factors impeding water
circulation reduced to minimum (in particular, the pipes should be as short as possible, rising
towards the boiler).
Before putting into operational use (i.e. before the first firing), make sure that the heating
system is filled with water and well deaerated. Open all locking devices. Put the circulating
pump on. Select the grate position depending on the required temperature in the central heating
system.
Operating instructions
Before the first firing, wipe all enameled surfaces and cooking plate first with a wet and
then with a dry cloth. Check the air supply control and flue damper (pos.15) for proper
functioning.
The cooker performance and combustion depend on the fuel quality, adequate chimney
design, proper flame adjustment, cleanliness of the cooker and correct firing and reloading. The
cooker is designed to burn wood, wood briquettes and brown coal briquettes. Use only well-
seasoned, dry wood with low moisture content to reduce the likelihood of greasy soot (creosote)
buildup on the chimney walls, which may cause clogging of the chimney. Do not burn household
waste, especially not any plastic material. Many waste materials contain substances that are
harmful to the cooker, the chimney and the environment. For best performance, i.e. to achieve
the rated output, add two-three logs or briquettes at 30 minute intervals and set the air supply
control to the position that suits best the desired flame level.
Empty the ash pan regularly. The ash in contact with the firebox grate may cause damage
to the grate.
Start the fire with a small amount of crumpled newspaper and well-seasoned dry kindling.
Set the air supply control to fully open position and the pull the flue damper rod knob (154)
outwards. At outdoor temperatures above 15°C there might be some problems with the firing
due to insufficient negative draught inside the chimney (poor draught). In that case, try to
achieve sufficient negative draught by firing the chimney directly. Never use spirit, petrol or
similar flammable liquids to start the fire. Do not keep flammable liquids near the cooker.
Keep the firebox always firmly closed, except when reloading the cooker. The cooker
should be regularly cleaned and inspected by a chimney sweeper or some other qualified
person. The chimney, the flue channels and pipes should be cleaned at least 6 times a year.
Clean the cooker with maximum caution and only when completely cooled down. To clean the
cooker, remove the top plate and flue pipe first. Brush off the soot built up on the internal walls
and discharge the ash and soot with a shovel through the opening below the oven door.
20
This manual suits for next models
1
Table of contents
Languages:
Other Plamen International Cooker manuals
Popular Cooker manuals by other brands

Indesit
Indesit KD3G11/G Instructions for installation and use

Smeg
Smeg Classica CG90IANT9 Translation of the original instructions

Creda
Creda CB43E Installation and user instructions

Elba
Elba E K55 X 220 Instructions for the use

inventum
inventum VFI5042ZWA instruction manual

Hatco
Hatco IRNG-PC1-14 Installation and operating manual