Plamen Termo Glas User manual

13.04.2018.
Termo Glas
TEHNIČKA UPUTA ZA
ŠTEDNJAK ZA CENTRALNO GRIJANJE
HR
ТЕХНИЧКО УПУТСТВО ЗА
ШТЕДЊАК ЗА ЦЕНТРАЛНО ГРЕЈАЊЕ
SRB
TECHNICKÝ NÁVOD
KE SPORÁKU PRO ÚSTŘEDNÍ TOPENÍ
CZ
TECHNISCHE ANLEITUNG FÜR
DEN ZENTRALHEIZUNGSOFEN
D
INSTALLATIOIN AND OPERATING INSTRUCTIONS
COOKER FOR CENTRAL HEATING
GB
TEHNIČNO NAVODILO ZA
ŠTEDILNIK ZA CENTRALNO GRETJE
SLO
INSTRUKCJE TECHNICZNE DOTYCZĄCE
KUCHENKI DO OGRZEWANIA CENTRALNEGO
PL
ТЕХНИЧЕСКИ ИНСТРУКЦИИ ЗА ГОТВАРСКА
ПЕЧКА ЗА ЦЕНТРАЛНO
BG

2
IZJAVA O SUKLADNOSTI
Izjavljujemo da ovaj proizvod udovoljava bitnim zahtjevima EN 12 815:2001 / A1:2004,
te nosi oznaku, u skladu s direktivom EU 305/2011.
Požega, 23.02.2018.
HR-34000 Požega, Njemačka 36
tel.: +385 (0)34 254 600, 254 602, fax: +385 (0)34 254 710
www.plamen.hr
Uređaj je predviđen za povremeno loženje. Intermittent burning appliances.
Tip/Typ: Termo Glas
Minimalna udaljenost od zapaljivih materijala:
Minimum distance to adjacent combustible materials: [mm]
Ispred/front: 800 Bočno/side: 400 Straga/back: 400 Iznad/top: 500
11
HR-34000 Požega, Njemačka 36
d.o.o.
Proučite uputstvo za uporabu. Koristite preporučena goriva.
Read
and follow the operating instructions. Use only recommended fuels.
Gore spomenute vrijednosti vrijede samo u ispitnim uvjetima.
The above mentioned values are valid only in proof conditions.
Zemlja podrijetla: R. Hrvatska Made in Croatia
Godina proizvodnje/year of production:
EN 12 815:2001 / A1:2004
Štednjak za centralno grijanje
Residental cookers for central heating
Koncentracija CO svedenih na 13%O2:
Emission of CO in combustion products calc. to 13%O2:
0,10 [%]
Temperatura dimnih plinova: Flue gas temperature: 219 [°C]
Nazivna snaga: Nominal output:
6,5 [kW]
Stupanj iskorištenja (gorivo): Energy efficiency (fuel): 81,3 [%]
Drvo Wood
Tvornički broj: Serial No:
Maksimalni radni tlak:
Maximum operating pressure:
: 2 [bar]
zagrijavanje prostora space heating output
zagrijavanje vode water heating output 7,5 [kW]
Broj Izjave o svojstvima/Number of the DoP: 0041-CPR-2018/03/30
Broj laboratorija za testiranje/Number of the notified test laboratory: NB 1015
Uređaj ne može biti korišten sa zajedničkim dimnjakom.
Do not use the appliance in a shared flue.

Termo Glas-štednjak nazivne snage 14 kW je jedan tip iz palete PLAMEN-ovih proizvoda koji
može na najbolji način udovoljiti Vašim potrebama. Konstruiran je tako da može zadovoljiti sve
osnovne toplinske potrebe jedne manje obiteljske kuće ili stana. Stoga Vas pozivamo da
PAŽLJIVO PROČITATE OVE UPUTE, koje će Vam omogućiti postizanje najboljih rezultata već
kod prve uporabe ovog štednjaka.
Kao štednjak, koristi se za kuhanje, pečenje, prženje i grijanje, a kao kotao, služi za centralno
grijanje i pripremu potrošne tople vode.
Ložište štednjaka smješteno je unutar čeličnog kotla izrađenog od kotlovskog lima debljine 4
mm. Na stražnjem dijelu kotla nalaze se priključci 3/4” za polazni i povratni vod grijanja. Unutar
ložišta ugrađena je rešetka (rost).Na vratima ložišta nalazi se ručni regulator za dovođenje
zraka za izgaranje.
Vanjski izgled štednjaka prikazan je na naslovnoj stranici ovih uputa. Osnovni dijelovi štednjaka
su izrađeni iz emajliranih i pocinčanih čeličnih limova i odljevaka od kvalitetnog sivog ljeva.
Štednjake izrađujemo u lijevoj i desnoj izvedbi dimnog priključka. Zbog toga, kod narudžbe
štednjaka ili rezervnih dijelova to treba navesti. Desni štednjak ima dimni priključak na desnoj
strani, a lijevi štednjak na lijevoj strani, kada štednjak gledamo s prednje strane.
Tehnički podaci
Mjere Š x V x D: 84,5 x 83,8 x 59,4 cm
Masa: 133 kg
Nazivna snaga: 14 kW
- direktno grijanje 6,5 kW
- toplina na vodu 7,5 kW
Dimni priključak - gore i straga: Ø 120 mm
Potrebni podtlak dimnjaka: 10-20 Pa
Srednja temperatura dimnih plinova: 219 °C
Maseni protok dimnih plinova kod nazivne snage: 12,1 g/s
Maksimalni radni tlak: 2 bara
Količina vode u kotlu: 8,5 l
Priključci za vodu: 3/4”
Preporučeno gorivo za nazivnu snagu:
cijepana drva i drveni briketi 4 - 5 kg/h
Optimalna dimenzija drveta:
opseg 20-30 cm
duljina 25-35 cm
3

Uputa za postavljanje
Prilikom postavljanja štednjaka potrebno je pridržavati se lokalnih, nacionalnih i europskih
propisa (normi).
Kada štednjak oslobodite ambalaže, potrebno ga je detaljno pregledati u cilju otkrivanja
eventualnih oštećenja nastalih pri transportu. Uočena oštećenja je potrebno odmah reklamirati,
jer naknadne reklamacije nećemo moći uvažiti.
U ladici za drva nalazi se pribor (lopatica za čišćenje, žarač i zaštitna rukavica s logom
PLAMEN) i galerija koju je potrebno montirati na okvir ploče prema slici broj 1.
Na odgovarajuće mjesto postavite dimni nastavak. Potrebno je voditi računa da spoj štednjaka i
dimnjaka bude izveden čvrsto i nepropusno. Štednjak se priključuje na dimnjak standardnom
cijevi promjera Ø120 mm. Dimovodne cijevi moraju imati na svim mjestima odgovarajući uspon.
Ne povezujte štednjak s dimnjakom na kojem je već priključeno neko drugo trošilo. Potrebno je
pregledati dimnjak, da nema oštećenja i pukotina.
U prostoriju, u koju se instalira štednjak, mora biti osiguran dovoljan dotok zraka za izgaranje.
Ukoliko je u prostoriju ugrađen nekakav aspirator (napa) ili neko drugo trošilo zraka, potrebno je
kroz poseban otvor sa zaštitnom mrežom, koja se ne može začepiti, osigurati redovan dotok
svježeg zraka.
Vodite računa da se štednjak postavi na mjesto gdje je moguć jednostavan pristup zbog
čišćenja dimovodnih kanala i dimnjaka.
Paziti da u neposrednoj blizini štednjaka nema zapaljivih materijala i da se štednjak smije
ugraditi samo u uobičajen prostor, gdje nema opasnosti od požara i eksplozije. Ako takva
opasnost postoji, štednjak se mora isključiti.
Potrebno je osigurati minimalne udaljenosti štednjaka od zapaljivih predmeta, kao što
su: drvo, heraklit, iverica, pluto i sl. i to 800mm ispred štednjaka i 150mm u ostalim
pravcima. Ako su materijali još lakše zapaljivi, kao što su: PVC, poliuretan, drvena vlakna
i sl. ili su nepoznate zapaljivosti ove razmake je potrebno udvostručiti.
Kod instaliranja štednjaka na pod od zapaljivog materijala, mora se štednjak postaviti na
izolacijsku negorivu podlogu. Ona mora biti u tlocrtu 800mm s prednje strane i po
150mm u ostalim pravcima oko štednjaka.
Slika 1
4

Instalacija termo proizvoda mora biti u skladu sa svim aktualnim normama i odredbama te u skladu sa
zakonima na snazi. Montažu, priključivanje na sustav, puštanje u rad i provjeru ispravnog rada moraju
biti izvršeni u skladu s pravilima struke, od strane ovlaštenog stručnog osoblja, uz potpuno poštivanje
normi na snazi, kako na državnoj tako i na regionalnoj i općinskoj razini zemlje u kojoj se uređaj
montira. Montažu smije vršiti samo ovlašteno osoblje koje izdaje kupcu ispunjenu i ovjerenu
potvrdu/radni nalog. Kupac je obavezan potvrdu/radni nalog čuvati te dati na uvid proizvođaču na
njegov zahtjev kao dokaz o izvršenoj instalaciji termo proizvoda od strane ovlaštene osobe.
Tvrtka Plamen d.o.o. ne smatra se odgovornom u slučaju kršenja gore navedenoga te ne
odgovara za eventualne nastale poteškoće u radu proizvoda i nastale troškove, ukoliko termo
proizvod nije instaliran od strane ovlaštene osobe.
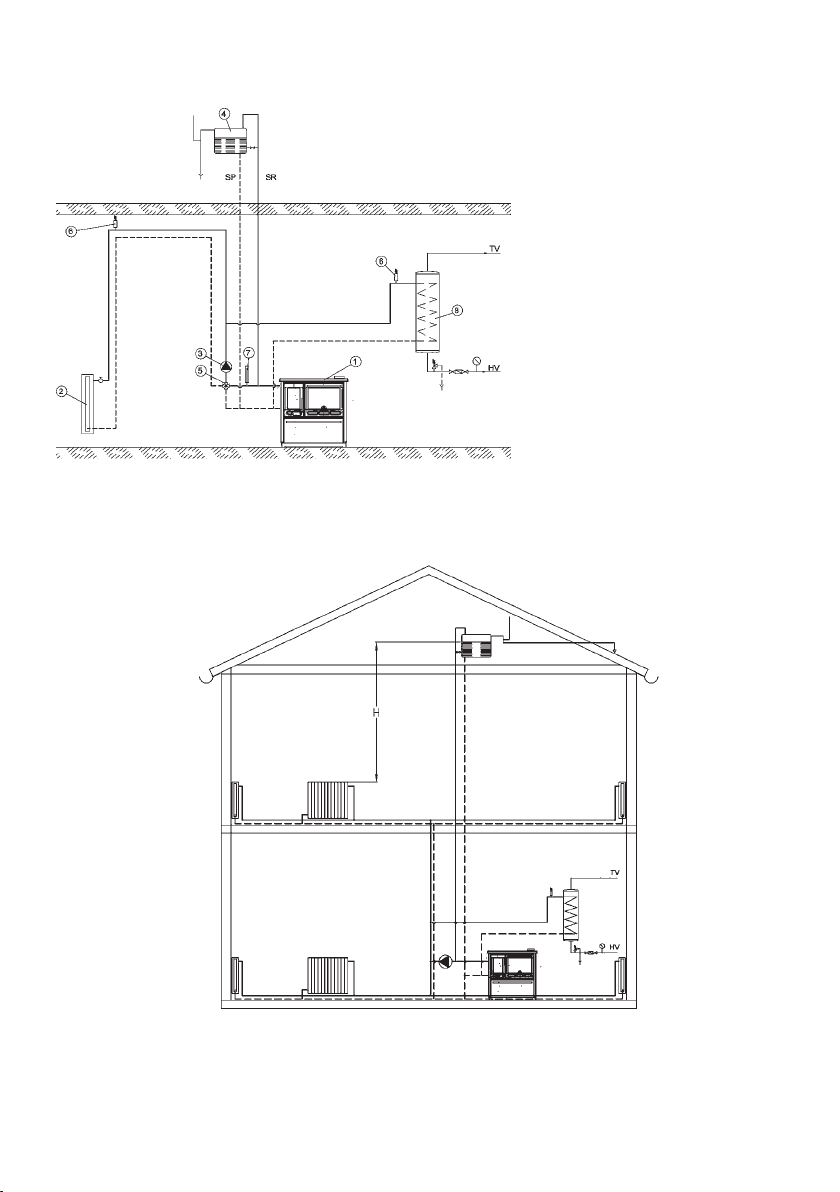
Priključak kotla u sustav centralnog grijanja
Kotao se mora priključiti u sustav centralnog grijanja s otvorenom ekspanzivnom posudom kako u
slučaju pregrijanja vode ne bi došlo do povećanja tlaka u sustavu (slika 4).
Preporučujemo ugradnju 4-krake mješajuće slavine (miš ventila) koja omogućava reguliranje
temperature u polaznom vodu grijanja, a da je pri tome temperatura vode u kotlu dovoljno visoka (60 –
70°C) da se ne pojavljuje znojenje kotla i da ne dolazi do niskotemperaturne korozije. Na slici br. 5
prikazano je kako se kotao treba priključiti na instalaciju centralnog grijanja. Visinom H osigurati
dovoljan tlak u sistemu, da se osigura dobra cirkulacija kroz grijaća tijela. U sistemu se može (i
poželjno je) priključiti bojler. Dobro ga je priključiti tako da se osigura prirodna (odnosno gravitacijska)
cirkulacija koja je neovisna o pumpi. Bojler mora biti iznad nivoa peći, sa što manjim otporima za
cirkulaciju vode (što kraće cijevi s usponom prema bojleru).
Prije puštanja u pogon (prije prvog loženja) provjerite da li je sustav grijanja napunjen vodom i dobro
odzračen. Otvorite sve zaporne organe. Uključite optočnu crpku.
Uputa za uporabu
Prije prve potpale, vlažnom, pa suhom krpom prebrišite sve emajlirane plohe i ploču za kuhanje.
Isprobajte kako funkcionira regulator zraka i zaklopka dimovodnog kanala.
Dijelovi štednjaka su obojani bojom otpornom na visoku temperaturu. Kod prvog loženja ova boja
postupno stvrdnjava, pa može doći do dimljenja i karakterističnog mirisa. Zbog toga se pobrinite za
dobro provjetravanje prostorije.
Upozorenje! Ako prvo loženje nije umjereno može doći do oštećenja boje.
Zbog toga prilikom prvih loženja (najmanje 10 sati) ložite umjerenijom vatrom (punjenja trebaju biti
najviše pola preporučene količine goriva za nazivnu snagu).
Funkcioniranje štednjaka i kvaliteta izgaranja ovise o kvaliteti goriva i dimnjaka, dobrom podešavanju
jačine vatre, čistoći štednjaka, te pravilnom loženju. Štednjak je predviđen za loženje drvima, drvenim
briketima i briketima od smeđeg ugljena. Ložite samo suhim drvima. Kod loženja vlažnim drvima
nastaje čađa koja može uzrokovati začepljenje dimnjaka. Ne spaljujte nikakav otpad, posebice
plastiku. U mnogim otpadnim materijalima nalaze se škodljive tvari, koje su štetne za štednjak,
dimnjak i okoliš. Za postizanje nazivne snage preporučujemo, da dodate po dva komada drva ili briketa
svakih pola sata, a regulator zraka otvorite na poziciju koja Vam za jačinu vatre najbolje odgovara.
Pepeljaru treba redovito prazniti. Ne dopustite da pepeo dodiruje rost ložišta, jer bi u tom slučaju moglo
doći do njegovog oštećenja. Za potpalu vatre možete koristiti novinski papir i suha sitnija drva.
UPOZORENJE! Ne koristiti alkohol i benzin za potpaljivanje ili ponovno potpaljivanje.
Regulator zraka kod potpale treba biti maksimalno otvoren, a dugme poluge zaklopke, dimovodnog
kanala izvučemo prema van. Kod potpaljivanja vatre, kada su vanjske temperature više od 15°C,
može se dogoditi da u dimnjaku nema podtlaka (dimnjak slabo vuče). U tom slučaju pokušajte
potpaljivanjem dimnjaka ostvariti potreban podtlak. Za potpaljivanje vatre ne koristite špirit, benzin ili
nekakvo drugo slično gorivo. Ne držite nikakve zapaljive tekućine u blizini štednjaka.
Vrata ložišta moraju uvijek biti dobro zatvorena, osim kod dodavanja goriva. Štednjak treba redovito
čistiti i vršiti kontrolu od strane dimnjačara ili druge stručne osobe. Štednjak čistite s izuzetnom
opreznošću.
5

Čistiti ga samo kad je hladan, tako da se skine i očisti gornja ploča i dimovodna cijev.
Odgovarajućom četkom se stepe sloj čađe s unutrašnjosti, a kroz otvor za čišćenje ispod vrata
pećnice, odgovarajućom grabilicom izvuče pepeo i čađa van. Čišćenje i pregled štednjaka
potrebno je obavezno obaviti nakon dužeg prekida loženja.
Za čišćenje emajliranih i bojanih dijelova koristite vodu i sapun, neabrazivne ili kemijski
neagresivne deterdžente.
Snagu štednjaka regulirate dodavanjem određene količine goriva i zraka pomoću regulatora
zraka na vratima ložišta. Minimalnu snagu (laganu vatru) postići ćete kada smanjite dovod
zraka za izgaranje na minimum. U slučaju preopterećenja (prejake vatre) zatvorite regulator
zraka na minimum da se vatra postepeno stiša.
Kada koristite pećnicu, naročito kod pečenja kruha ili drugog dizanog tijesta, da odozgo ne
izgori, postupite na slijedeći način:
- Poluga zaklopke za dimne plinove mora biti gurnuta unutra.
- Prije stavljanja pripravka u pećnicu, ona mora biti zagrijana na 170-190°C.
- Na vatru dodajete samo po 1 manji komad drveta i pecite cijelo vrijeme na slaboj vatri da
pripravak bude odozgo i odozdo jednako pečen. Preporuka je da se u tijeku pečenja
tepsija sa pripravkom jedanput okrene.
- Brzo zakuhavanje i jače zagrijavanje ploče za kuhanje postići ćete ako zaklopka dimnih
plinova bude otvorena, tj. dugme povučeno prema van.
Vodite računa da su dijelovi štednjaka, naročito gornja ploča, INOX ručke vrata ložišta i pećnice,
rukohvat, dugme zaklopke vrući, te da se štednjakom smiju koristiti samo odrasle osobe. ZBOG
TOGA KORISTITE ZAŠTITNU RUKAVICU!
Na štednjaku se ne smiju raditi nikakvi popravci i preinake. Bilo kakve zahvate na štednjaku
smiju raditi samo ovlaštene osobe, a ugrađivati se smiju samo originalni rezervni dijelovi.
Za vrijeme normalnog pogona, naročito s vlažnim gorivom dolazi do taloženja čađe i katrana.
Ako se zanemari redovna kontrola i čišćenje dimnjaka povećava se opasnost od požara u
dimnjaku. U slučaju pojave vatre u dimnjaku postupite na slijedeći način:
- ne upotrebljavajte vodu za gašenje
- zatvorite sve dolaze zraka u štednjak i dimnjak
- nakon što se vatra ugasila pozovite dimnjačara da pregleda dimnjak
- pozovite servisnu službu, odnosno proizvođača da pregleda štednjak
Instalirana snaga u sustav grijanja mora biti 7,5 kW.
6

7
Poz. Poz.NAZIV DIJELA NAZIV DIJELA
12
13.1
16
17
19
20
46
62
63
88
66.1
87
94
98
129
134
136
135
137
109
122
130
155
156
157
239
213
200
303
313
317
401
402
01-000
03-000
801
803
804
806
Rezervni dijelovi i pribor (slika 2, 3, stranica 58):
Dimni nastavak
Poklopac
Prsten
Pravokutni uložak
Ploča
Poluga zaklopke
Dimna pregrada
Plašt ladice
Obloga ladice unutarnja
Obloga ladice vanjska
Tepsija
Regal
Regal bočni
Postolje
Prednjica
Vrata ložišta
Vrata pećnice
Regulator zraka
Okvir
Rost
Okvir dimnog nastavka
Galerija
Nosač galerije
Ručka ladice za drva-IR
Zaštita pećnice
Poklopac otvora za čišćenje
Držač stakla
Rukohvat-dugme
Termometar
Staklo ložišta
Staklo pećnice
Sklop pećnice
Kotao Termo Glas
Pribor:
Žarač
Lopatica za čišćenje
Ručka za posluživanje
Zaštitna rukavica s logom PLAMEN-crvena
Poklopac dimnog otvora
228
230.1
231
233
234.1
Lim regulatora zraka
Plašt
Centralni lim
Kutnik kotla
Zaštitni lim
216
218
219
220
222
226
Bočnica
Pepeljara
Začelje ladice
Lim sekundarnog zraka
Prečka maske
Vodilica ladice
Zaštitna kapica bočnice
57
Vodilica pepeljare
14
Zaklopka
15
Pregrada
06-000
07-000
Ručka vrata lijeva
Ručka vrata desna
240 Nosač kotla

MONTAŽA ŠTEDNJAKA (shematski prikaz):
1. ŠTEDNJAK
2. POTROŠAČ TOPLINE
3. CIRKULAC. CRPKA
4. EKSPANZIVNA OTVORENA
POSUDA
5. SLAVINA ZA MJEŠANJE VODE
6. ODZRAČNI VENTIL
7. TERMOMETAR
8. GRIJAČ POTROŠNE VODE
slika 4
INSTALACIJA CENTRALNOG GRIJANJA (shematski prikaz):
slika 5
8
ZADRŽAVAMO PRAVO NA PROMJENE KOJE NE UTJEČU NA FUNKCIONALNOST
I SIGURNOST APARATA!

KONFORMITÄTSERKLÄRUNG
Wir erklären, dass dieses Erzeugnis allen wichtigen Anforderungen von
EN 12 815:2001 / A1:2004 entspricht, und die Kennzeichnung gemäß Richtlinie
EU 305/2011 trägt.
Požega, 23.02.2018
Dieses Gerät ist für eine unkontinuierliche Beheizung vorgesehen.
Intermittent burning appliances
EN 12 815:2001 / A1:2004
Zentralheizungsofen
Residental cookers for central heating
Typ/Typ: Termo Glas
Mindestabstand zu brennbaren Materialien:
Minimum distance to adjacent combustible materials: [mm]
Vorderseite/front:
800
Seitlich/side:
400
Rückseite/back:
400
Oben/top:
500
Auf 13% O reduzierte CO-Konzentration:
2
Emission of CO in combustion products calc. to 13%O :
Abgastemperatur: Flue gas temperature:
Nennleistung: Nominal output:
Nutzungsgrad (Brennstoff): Energy efficiency (fuel):
Holz
Wood
Werknummer: Serial No:
Lesen Sie die Gebrauchsanweisung durch!
Verwenden Sie die empfohlenen Brennstoffe.
Read
and follow the operating instructions. Use only recommended fuels.
Die oben erwähnten Werte gelten nur unter getesteten Bedingungen.
The above mentioned values are valid only in proof conditions.
Maximaler Betriebsdruck:
Maximum operating pressure:
:
Raumbeheizung space heating output
Wasserbeheizung water heating output
2
9
HR-34000 Požega, Njemačka 36
tel.: +385 (0)34 254 600, 254 602, fax: +385 (0)34 254 710
www.plamen.hr
HR-34000 Požega, Njemačka 36
d.o.o.
Ursprungsland: Kroatien Made in Croatia
Baujahr/year of production:
Nummer der Leistungserklärung/Number of the DoP: 0041-CPR-2018/03/30
Nummer des Untersuchungslabors/Number of the notified test laboratory: NB 1015
11
0,10 [%]
219 [°C]
6,5 [kW]
81,3 [%]
2 [bar]
7,5 [kW]
Die Anlage kann nicht mit einem gemeinsamen Schornstein verwendet werden.
Do not use the appliance in a shared flue.

Der Zentralheizungsofen mit dem Heizleistung von 14 kW ist einer von PLAMEN Öfen,
der auf alle Ihre Bedurfnisse eingeht. Er ist so konstruiert, dass er alle grundlegenden
Heizbedürfnisse eines kleinen Familienhauses oder einer Wohnung befriedigt.
Wir bitten Sie, DIESE ANWEISUNG GENAU DURCHZULESEN, wodurch Sie die besten Resultate
bereits bei der ersten Verwendung erzielen können.
Der Ofen wird zum Kochen, Braten, Backen und Heizen verwendet. Der Kessel dient für die
Zentralheizung und die Aufbereitung des Warmwassers.
Der Feuerraum des Ofens befindet sich innerhalb des 4 mm dicken, aus Blech gefertigten
Stahlkessels. Auf der Kesselrückseite befinden sich die 3/4” Anschlüsse für den Zu - und
Rücklaufdurchfluss der Heizung. Innerhalb des Feuerraums ist ein Rostgitter eingebaut. An der
Ofentür befindet sich ein manueller Luftschieber für die Luftzufuhr.
Die Ofenaußenseite ist auf der ersten Seite dieser Anleitung zu finden. Die Grundteile des Ofens
wurden aus den emaillierten und verzinkten Stahlblechen und Gussteilen aus dem hochwertigen
Grauguss gemacht. Die Öfen werden in zwei Varianten des Abgasstutzens produziert – links und
rechts, was bei der Bestellung des Ofens oder der Ersatzteile wichtig zu nennen ist. Der rechte Ofen
hat den Abgasstützen an der rechten Seite, wenn von der vorderen Seite gesehen, und der linke an
der linken Seite.
Technische Angaben
Maße B x H x T: 84,5 x 83,8 x 59,4 cm
Masse: 133 kg
Nennleistung: 14 kW
- Direktbeheizung 6,5 kW
- Wasserbeheizung 7,5 kW
Rauchgasanschluss - oben und rückseitig: Ø 120 mm
Benötigter Förderdruck des Schornsteins: 10-20 Pa
Durchschnittliche Abgastemperatur: 219 °C
Massenabgasdurchfluss bei Nennleistung: 12,1 g/s
Maximaler Betriebsdruck: 2 bara
Wassermenge im Kessel: 8,5 l
Wasseranschluss: 3/4”
Empfohlener Brennstoff für die Nennleistung:
Holzscheitel und Holzbriketts 4 - 5 kg/h
Optimale Holzdimension:
Umfang 20-30 cm
Länge 25-35 cm
Termo Glas
10

Aufstellungsanleitung
Bei der Aufstellung des Ofens muss man sich an die nationalen, europäischen und lokalen
Vorschriften für diese Geräteart halten.
Nach dem Auspacken muss der Ofen auf Bruch im Transport geprüft werden. Falls etwas
gefunden wurde, muss man gleich reklamieren, weil die spätere Reklamationen nicht
anerkannt werden.
Im Holzfach befindet sich der Zubehör (Putzschaufel, Schüreisen und Schutzhandschue mit
dem PLAMEN – Logo) und der Griff, der auf den Plattenrahmen zu montieren ist (Abbildung 1.).
Setzen Sie den Abgasstutzen auf die entsprechende Stelle. Der Rauchrohrknie muss fest und
undurchlässig mit dem Abgasstutzen des Ofens verbunden sein. Der Nenndurchmesser des
Rauchrohrs beträgt Ø 120 mm. Die Rauchröhren müssen an allen Stellen die selbe Steigung
aufweisen. Verbinden Sie den Ofen mit dem Schornstein, falls schon ein anderes Gerät an ihn
verbunden ist. Der Schornstein soll auf Bruch geprüft werden.
Der Aufstellungsort muss über ausreichend frische Verbrennungsluft verfügen. Inwiefern in
dem Raum eine Saugvorrichtung oder ein anderes luftverbrauchendes Gerät aufgestellt ist,
muss mittels einer, mit einem Schutznetz ausgestatteten, unverstopfbaren, gesonderten
Öffnung eine regelmäßige Frischluftzufuhr sichergestellt werden.
Der Ofen sollte wegen Abgasstutzen- und Schornsteinreinigung leicht erreichbar sein.
Passen Sie auf, dass es in der Nähe des Ofens keine leicht entzündlichen Materialien befinden.
Der Ofen darf nur in den hitzebeständigen Raum aufgebaut werden. Im Gefahrfall muss der
Ofen abgesteckt werden.
Der Mindestabstand zwischen den temperaturempfindlichen Materialien (Holz, Heraklit,
Spanplatte, Kork, etc. nach den technischen Daten) muss gesichert sein. Das heißt 800
mm vor dem Ofen und 150 mm in die übrigen Richtungen.
Falls die Materialien noch empfindlicher sind, wie z.B. PVC, Polyurethan, Holzfasern
usw., soll der Abstand verdoppelt werden.Bei der Aufstellung des Ofens auf einem
Boden, der aus entzündlichem Material besteht, muss der Ofen auf eine unbrennbare
Isolationsunterlage gestellt werden. Sie muss sich im Grundriss 800 mm auf der
Vorderseite und je 150 mm in den übrigen Richtungen um den Ofen befinden.
Abbildung 1.
11

Die Installation des Thermoprodukts muss gemäß aller aktuellen Normen und Verordnungen und gemäß
aller geltenden Gesetze durchgeführt werden. Die Montage, die Anschließung an das System, die
Inbetriebnahme und die Prüfung vom richtigen Betrieb müssen gemäß Fachregeln vom zuständigen
Fachpersonal mit völliger Beachtung der geltenden Normen durchgeführt werden, die auf der Ebene des
Staats, der Region und der Gemeinde vom Land gelten, in dem das Gerät montiert wird.
Die Montage darf nur vom zuständigen Fachpersonal durchgeführt werden, das dem Käufer die
ausgefüllte und beglaubigte Bescheinigung/Arbeitsauftrag ausstellt. Der Käufer ist verpflichtet die
Bescheinigung/den Arbeitsauftrag aufzubewahren und dem Hersteller auf seinen Antrag als Beweis für
durchgeführte Installation des Thermoprodukts vom zugelassenen Personal zur Einsichtnahme zu geben.
Die Firma Plamen GmbH ist für das Nichtbeachten der oben genannten Regeln nicht
verantwortlich, und haftet nicht für eventuell entstandene Schwierigkeiten beim Produktbetrieb
und damit entstandene Kosten, wenn das Thermoprodukt vom zuständigen Personal nicht
installiert wurde.
Kesselanschluss an das Zentralheizungssystem
Der Kessel muss an ein Zentralheizungssystem mit einem offenen Expansionsbehälter
angeschlossen werden, damit es nicht im System im Falle einer Überhitzung des Wassers zu einer
Erhöhung des Druckes (Abbildung 4.) kommt.
Wir empfehlen den Einbau eines Vierwege-Mischventils, das eine Temperaturregelung in der
Ausgangsleitung der Heizung ermöglicht und dabei die Wassertemperatur im Kessel genügend heiß
(60–70°C) bleibt, um ein zum Schwitzen des Kessels und einer Niedertemperaturkorrosion zu vermeiden.
Auf der Abbildung 5. ist angeführt, wie der Kessel an die Zentralheizungsinstallation angeschlossen
werden muss. Mit der Höhe H muss genügend Druck im System sichergestellt werden, um eine gute
Zirkulation durch die Heizkörper gewährleisten zu können. An das System kann (und was auch
wünschenswert ist) ein Boiler angeschlossen werden. Es ist gut, ihn anzuschließen, um eine natürliche,
von der Pumpe unabhängige Zirkulation (bzw. Gravitationszirkulation) sicherzustellen. Der Boiler muss
sich über dem Ofenniveau mit kleinstmöglichem Widerstand für die Wasserzirkulation (Rohre mit
kleinstmöglicher Länge, mit einem Anstieg zum Boiler) befinden.
Vor der Inbetriebnahme (vor dem ersten Heizen) müssen Sie nachprüfen, ob das Heizungssystem mit
Wasser gefüllt und gut durchgelüftet ist. Öffnen Sie alle Absperrorgane. Umlaufpumpe einschalten.
Wählen Sie die Position des Rostgitters abhängig von dem Wärmebedarf in dem Zentralheizungssystem.
Gebrauchsanweisung
Vor dem ersten Gebrauch wischen Sie alle emaillierten Oberflächen und die Herdplatte zuerst mit einem
nassen und dann mit einem trockenen Lappen.
Die Teile von Ofen sind mit einer hitzebeständigen Farbe gestrichen. Beim ersten Heizen erlangt die Farbe
schrittweise an Festigkeit, so dass es zu einer Rauchbildung und einem charakteristischen Geruch kommen
kann. Sorgen Sie deshalb für eine gute Belüftung des Aufstellraumes.
Achtung! Wenn das erste Anzünden nicht mäßig ist, kann es zu Beschädigungen der Farbe
kommen.
Aus diesem Grund beim ersten Anzünden (mindestens 10 Stunden) mäßiges Feuer anlegen (die
Füllungen dürfen die Hälfe der empfohlenen Kraftstoffmenge für die Nennleistung nicht überschreiten).
Prüfen Sie den Luftschieber und die Drosselklappe des Abgaskanals. Wie der Ofen funktioniert und die
Qualität der Verbrennung hängt von der Kraftstoffqualität und dem Schornstein ab, wie auch von der
Feuerregulierung, Ofensauberkeit und dem ordnungsgemäßen Verheizen. Der Ofen ist für das Beheizen
mit Holz, Holzbriketts und Braunkohlenbriketts vorgesehen. Bitte nur mit trockenem Holz beheizen! Beim
Beheizen mit feuchtem Holz entsteht Ruß, was zu einer Verstopfung des Schornsteins führen kann. Bitte
keinen Abfall, vor allem nicht Plastik verbrennen! In vielen Abfallmaterialien befinden sich Schadstoffe, die
dem Schornstein, Ofen und der Umgebung schaden. Um die Nennleistung zu erreichen, empfehlen wir
Ihnen, jede halbe Stunde je zwei Stück Holz oder Briketts hinzuzufügen. Öffnen Sie den Luftregler in die
Position, die Ihnen zur Erreichung des gewünschten Feuers am meisten entspricht.
Der Aschekasten muss regelmäßig entleert werden. Achten Sie darauf, dass die Asche den Rost nicht
berührt, weil es ansonsten zu einer Beschädigung des Rostes kommen könnte. Zum Anheizen verwenden
Sie Zeitungspapier und dünnes Kleinholz. Der Oberhalb des Aschenraums befindliche Luftregler muss
dabei maximal geöffnet sein und der Hebelknopf des Abgaskanals muss eingedrückt bleiben.
WARNUNG! Verwenden Sie keinen Alkohol und Benzin für die Anfeuerung oder Wiederzündung.
12

Wenn die Außentemperaturen über 15 °C betragen, kann es beim Anheizen vorkommen, dass es
im Schornstein keinen Förderdruck (der Schornstein zieht schlecht) gibt. Versuchen Sie in
diesem Falle durch Anheizen des Schornsteins den nötigen Förderdruck zu erzielen. Verwenden
Sie zum Anheizen keinen Spirit, kein Benzin oder irgendeinen ähnlichen Brennstoff. Flüssige
Brennstoffe dürfen nicht in der Nähe des Ofens gelagert werden.
Die Feuerraumtür muss, außer beim Zufügen von Brennstoff, immer gut verschlossen bleiben.
Der Ofen muss von dem Schornsteinfeger oder einer anderem Experten regelmäßig gesäubert
und kontrolliert werden. Der Ofen muss mit besonderer Vorsicht gesäubert werden.
Er darf nur im kalten Zustand, und zwar auf diese Weise gesäubert werden, dass die obere Platte
und das Abgasrohr abgenommen und gesäubert werden.
Mit einer entsprechenden Bürste wird der Ruß aus dem Inneren abgebürstet, der im Ofen
befindliche Blechboden wird herausgezogen und durch diese Öffnung werden der Ruß und die
Asche herausgenommen. Der Ofen muss unbedingt nach einer längeren Benutzungspause
gesäubert und kontrolliert werden.
Die Ofenleistung kann durch Zufügen einer bestimmten Brennstoff- und Luftmenge mit Hilfe des
Luftreglers reguliert werden. Die Minimalleistung (kleines Feuer) erreichen Sie, indem Sie die
Verbrennungsluftzufuhr auf Minimum stellen. Im Falle einer Überbelastung (zu starkes Feuer)
Luftregler auf Minimum stellen, damit das Feuer langsam abflaut.
Gehen Sie bei der Benutzung des Ofens und besonders beim Backen von Brot oder ähnlichem
Hefeteig auf folgende Weise vor, um es nicht zu verheizen:
- Der Abgasklappenhebel muss nach außen gezogen sein.
- Bevor Sie die Speise in den Ofen schieben, muss dieser auf 170 -190°C vorgewärmt
sein.
- Auf das Feuer immer nur ein kleineres Holzstück hinzufügen und während der
gesamten Zeit bei kleiner Flamme backen, damit die Speise oben und unten
gleichmäßig gebacken wird. Es wird empfohlen, das Backblech während des
Backens einmal umzudrehen.
- Ein rascheres Aufkochen und ein stärkeres Erhitzen der Kochplatte erreichen Sie, indem
Sie die Luftklappe geöffnet lassen bzw. der Knopf eingedrückt bleibt.
Achten Sie darauf, dass die Ofenteile, besonders aber die obere Platte, die INOX Türgriffe, der
Abgasklappenhebel heiß sind. Der Ofen darf nur von Erwachsenen benutzt werden! Benutzen
Sie die Schutzhandschuhe!
Am Ofen dürfen keine Reparaturen und Änderungen vorgenommen werden! Eingriffe dürfen nur
von ermächtigten Personen durchgeführt werden! Es dürfen nur Original- Ersatzteile eingebaut
werden!
Während des normalen Betriebs, besonders mit feuchtem Brennstoff, kommt es zu einer
Ablagerung von Ruß und Teer. Erfolgt keine regelmäßige Kontrolle und wird der Schornstein nicht
regelmäßig gesäubert, erhöht sich die Gefahr eines Brands im Schornstein. Für den Fall, dass
Feuer im Schornstein entsteht, müssen Sie auf folgende Weise vorgehen:
- Verwenden Sie kein Wasser zum Löschen des Feuers.
- Schließen Sie alle Luftzugänge zum Ofen und Schornstein.
- Nachdem das Feuer aufgehört hat, bestellen Sie den Schornsteinfeger, um den
Schornstein zu überprüfen.
- Rufen Sie das Service bzw. den Hersteller an, um den Ofen zu überprüfen.
Die in dem Heizungssystem installierte Leistung muss mindestens 7,5 kW betragen.
Zur Reinigung von emaillierten und lackierten Teile verwenden Sie Wasser und Seife, keine
Schleifmittel oder chemisch aggressive Reinigungsmittel.
13

Pos. Pos.BEZEICHNUNG BEZEICHNUNG
12
13.1
16
17
19
20
46
62
63
88
66.1
87
94
98
129
134
136
135
137
109
122
130
155
156
157
239
213
200
303
313
317
401
402
01-000
03-000
801
803
804
806
Ersatzteile und Zubehör (Abbildung 2, 3, Seite 58):
Rauchrohröffnungsdeckel
Abgasteil
Deckel
Ring
Rechteckige Einlage
Platte
Klappenhebel
Rauchtrennwand
Schubkastenmantel
Innerer Schubkastenmantel
Äußerer Schubkastenmantel
Backform
Regal
Seitenregal
Gestell
Vorderseite
Feuerraumtür
Ofentür
Lufrregulierung/regler
Rahmen
Rost
Ramen abgasteil
Griff
Griffträger
Schaublade Griff – IR
Ofenschutz
Deckel der Reinigungsöffnung
Glasträger
Handgriffknopf
Ofenthermometer
Feuerraumglas
Ofenscheibe
Ofenset
Kessel Termo Glas
Zubehör:
Schüreisen
Reinigungsbesen
Bedienungsgriff
Schutzhandschuh (rot, PLAMEN Logo)
14
228
230.1
231
233
234.1
Luftreglerblech
Mantell
Zentraler Ofenblech
Kesselwinkel
Schutzmantell
216
218
219
220
222
226
Seitenwand
Aschenkasten
Schubladenrückseite
Sekundäres Luftzufuhrblech
Crossbar-Maske
Schubladenführungsschiene
Schutzkappe der Herdseite
57
Aschenbecherschiene
14
Absperrung
15
Abgasklappe
Türgriff links
Türgriff rechts
06-000
07-000
240 Kesselunterstützung

OFENMONTAGE (Schemadarstellung):
1. OFEN
2. WÄRMEVERBRAUCHER
3. ZIRKULATIONSPUMPE
4. OFFENER
EXPANSIONSBEHÄLTER
5. MISCHBATTERIE
6. ENTLÜFTUNGSVENTIL
7. THERMOMETER
8. WASSERERHITZER
Abbildung 4.
INSTALLATION DER ZENTRALHEIZUNG (Schemadarstellung):
Abbildung 5.
WIR BEHALTEN DAS RECHT AUF ÄNDERUNGEN, DIE AUF DIE FUNKTIONSFÄHIGKEIT
UND SICHERHEIT DES APPARATS NICHT EINFLUSS NEHMEN, VOR.
15

DECLARATION OF COMFORMITY
We hereby declare that this product meets all relevant criteria of the standard
EN 12 815: 2001/A1:2004, and has marking affixed to it in accordance with the Council
Directive EU 305/2011.
Požega, 23.02.2018
16
HR-34000 Požega, Njemačka 36
tel.: +385 (0)34 254 600, 254 602, fax: +385 (0)34 254 710
www.plamen.hr
Uređaj je predviđen za povremeno loženje. Intermittent burning appliances.
Tip/Typ: Termo Glas
Minimalna udaljenost od zapaljivih materijala:
Minimum distance to adjacent combustible materials: [mm]
Ispred/front: 800 Bočno/side: 400 Straga/back: 400 Iznad/top: 500
11
HR-34000 Požega, Njemačka 36
d.o.o.
Proučite uputstvo za uporabu. Koristite preporučena goriva.
Read
and follow the operating instructions. Use only recommended fuels.
Gore spomenute vrijednosti vrijede samo u ispitnim uvjetima.
The above mentioned values are valid only in proof conditions.
Zemlja podrijetla: R. Hrvatska Made in Croatia
Godina proizvodnje/year of production:
EN 12 815:2001 / A1:2004
Štednjak za centralno grijanje
Residental cookers for central heating
Koncentracija CO svedenih na 13%O2:
Emission of CO in combustion products calc. to 13%O2:
0,10 [%]
Temperatura dimnih plinova: Flue gas temperature: 219 [°C]
Nazivna snaga: Nominal output:
6,5 [kW]
Stupanj iskorištenja (gorivo): Energy efficiency (fuel): 81,3 [%]
Drvo Wood
Tvornički broj: Serial No:
Maksimalni radni tlak:
Maximum operating pressure:
: 2 [bar]
zagrijavanje prostora space heating output
zagrijavanje vode water heating output 7,5 [kW]
Broj Izjave o svojstvima/Number of the DoP: 0041-CPR-2018/03/30
Broj laboratorija za testiranje/Number of the notified test laboratory: NB 1015
Uređaj ne može biti korišten sa zajedničkim dimnjakom.
Do not use the appliance in a shared flue.

Termo Glas
part of our assortment of PLAMEN cookers which can completely satisfy your needs. The
central heating residential cookers are designed to meet the demands for thermal energy of a
smaller house or a flat. In order to achieve the best performance of the cookers, please READ
THESE INSTRUCTIONS CAREFULLY.
As a cooker, it can be used for cooking, baking, toasting, frying and heating, while as a boiler it
can serve as a component part of the central heating system and for warm water preparation.
The firebox is enclosed in a boiler made of 4 mm thick sheet steel. At the rear side of the cooker
3/4" outlets for outgoing and return heating pipes are provided. Inside the firebox a grate is
installed. Manual air supply control is provided on the firebox door.
The appearance of the cooker is shown on the cover page. The basic parts are made of
enamelled and galvanized steel sheet and of high quality cast iron. The cookers with a right and
left side flue connection are both available. This should be specified when ordering the entire
appliance or spare parts thereof. A right side flue connection cooker is the one which has the
connection on the right viewed from the front side of the cooker and vice versa in terms of left
side flue connection cookers.
Technical data
Measurements W x H x D: 84,5 x 83,8 x 59,4 cm
Weight: 133 kg
Rated output: 14 kW
- direct heating 6,5 kW
- water heating 7,5 kW
Flue outlet - top and rear: Ø 120 mm
Required negative draught in the chimney: 10-20 Pa
Mean flue gas temperature: 219 °C
Flue gas flow at the rated output: 12,1 g/s
Max. operating pressure: 2 bar
Quantity of water in the boiler: 8,5 l
Water connections: 3/4”
Recommended fuel loads for rated output:
logs and wood briquettes 4 - 5 kg/h
Optimum log size:
- perimeter 20-30 cm
- length 25-35 cm
central heating residential cookers with a nominal output of 14 kW are only a small
17

Installation Instructions
When installing the cooker, make sure that relevant local, national and European regulations
are fully observed.
After having unpacked the cooker, inspect it carefully for possible damages in transport. Any
such damages should be immediately reported, because late claims will not be taken into
consideration.
In the log drawer, you will find a handrail and accessories (a cleaning shovel, a poker and a
protective glove with a PLAMEN logo), which should be fixed to the top frame as shown in
Figure 1.
Install the flue collar in its position making sure that the connection between the cookstove and
chimney is firm and tight. The cooker is connected to the chimney with a standard flue pipe dia.
120 mm. The flue pipes should have adequate rise at all places. Do not connect the cooker to a
chimney to which another appliance has already been connected. Make sure that the chimney
is free from any cracks and damages.
The cooker should be installed in a room with sufficient fresh air to support the combustion. If an
exhauster (hood) or similar air-consuming unit is installed in the same room, regular inflow of
fresh air should be provided through a separate opening, protected with a non-clogging grid.
Make sure that the cooker is installed in a place allowing easy access for flue and chimney
cleaning operations.
Make sure that there are no combustibles in the immediate vicinity of the cooker. The cooker
may be installed only in a room where there is no risk of fire or explosion. In case of presence of
potential risk, the cooker must be unplugged.
Minimum clearances between the cooker and combustibles, such as wood, chipboard,
corkboard etc. should be strictly observed; in particular 800 mm in front of the cooker
and 150 mm in other directions. In case of highly inflammable materials, such as PVC,
polyurethane, pressed wood fibreboards etc., or materials of unknown inflammability,
these clearances should be doubled.
If the cooker is to be installed in a room with combustible or heat sensitive flooring, it
shall be placed on a solid, non-combustible floor protector. The floor protector must be
dimensioned to extend at least 800 mm to the front of the cooker and 150 mm to other
directions.
Figure 1
18

The installation of the thermal product must be in compliance with all current norms and provisions as well
as with applicable laws. Fitting, connecting, putting into operation and testing for proper operation must be
carried out in accordance with the professional rules by authorised professionals while fully observing the
current norms at the national, regional and municipal levels of the country where the device is being fitted.
Fitting may be performed only by authorised professionals who are required to issue a completed and
verified certificate/work order to the customer. The customer is required to keep such certificate/work order
and present it to the manufacturer at its request as the proof that the installation of the thermal product was
carried out by an authorised professional.
The company Plamen d.o.o. will not be held responsible in case of breaching the above and will not
be liable for any difficulty in the operation of the product and cost arising from this if the thermal
product was not installed by an authorised professional.
Boiler connection to the central heating system
The boiler should be connected to the central heating system with open expansion tank toprevent the
creation of excessive pressure within the system in case of water overheating (Figure 4). Installation of a 4-
way mixer tap is recommended to achieve adequate temperature control in the outgoing heating conduit
while keeping the temperature of the water inside the boiler at a sufficiently high level (60 – 70°C) to avoid
creation of condensate on the boiler surface and low-temperature corrosion. Figure 5 shows how to
connect the boiler to the central heating system. The height H should be such as to ensure sufficient
pressure within the system and thus good circulation through heating units. Installation of a separate boiler
in the system is possible (and desirable). It should preferably be installed so to ensure natural (gravity)
circulation which is not dependent on a pump. The boiler should be installed above the cooker level with all
factors impeding water circulation reduced to minimum (in particular, the pipes should be as short as
possible, rising towards the boiler). Before putting into operational use (i.e. before the first firing), make
sure that the heating system is filled with water and well deaerated. Open all locking devices. Put the
circulating pump on.
Operating Instructions
Before the first firing, wipe all enamelled surfaces and cooking plate first with a wet and then with a dry
cloth. Check the air supply control and flue damper for proper operation.
The cooker parts are painted with a heat resistant paint. With the first firing, this paint gradually sets and
some fumes of a characteristic odour may be given off in the process. Therefore ventilate the room during
this phase.
Warning! The paint might be damaged if the first firing is not at moderate heat.
Therefore, with first firing of the stove (at least 10 hours), burn moderate fire (charging should not be more
than half the recommended amount of fuel for the rated power).
The cooker performance and combustion depend on the fuel quality, adequate chimney design and
maintenance, proper flame adjustment, cleanliness of the cooker and correct firing and reloading. The
cooker is designed to burn wood, wood briquettes and brown coal briquettes. Use only well-seasoned, dry
wood with low moisture content to reduce the likelihood of greasy soot (creosote) built-up on the chimney
walls, which may cause clogging of the chimney. Do not burn the household waste, especially not any
plastic material. Many waste materials contain substances that are harmful to the cooker, the chimney and
the environment.
For best performance, i.e. to achieve the above nominal output, add two logs or briquettes every half hour
and set the air control to the position that suits best the desired flame level.
Empty the ash pan regularly. The ash in contact with the firebox grate may cause damage to the grate.
Start the fire with a small amount of crumpled newspaper and well-seasoned dry kindling.
Set the air control to fully open position and pull out the damper rod. At outdoor temperatures above 15 °C
there might be some problems with the firing due to insufficient negative pressure within the chimney (poor
draught). In that case, try to achieve the sufficient negative pressure by firing the chimney directly. Never
use spirit, petrol or similar fuel to start the fire. Do not keep inflammable liquids near the cooker.
Keep the firebox door always firmly shut, except when reloading the cooker.
WARNING! Do not use alcohol and petrol or for ignition or re-ignition.
19

The cooker should be regularly cleaned and inspected by a chimney sweeper or some other
qualified person. Clean the cooker with maximum caution and only when completely cooled
down. Remove and clean the top plate and flue pipe. Brush off the soot built up on the internal
walls and pull the oven bottom plate out to discharge soot and ash. Clean and inspect the cooker
every time after a prolonged suspension of operation.
To control the flame, add fuel as necessary and control the air supply by means of the air control.
Minimum output (low flame) is achieved by setting the air supply to minimum. In case of
overload (flame too high), set the air control to minimum and wait for the flame to abate
gradually.
When using the oven, particularly for bread and other leavened dough baking, proceed, in order
to avoid burning on top, as follows:
- Flue damper rod shall be pushed inwards.
- Pre-heat the oven to 170-190 °C
- Add only one smaller log at a time to keep the fire at a moderate level for even baking on
all sides. It is recommendable to turn the baking pan once during the baking.
- Fast boiling and better cook plate heating is achieved with the flue damper in open
position, i.e. with the knob being pulled out.
Always bear in mind that the cooker parts, and particularly the top plate, INOX knobs, firebox
door, handrail and damper rod, are hot and that only adults may operate the cooker. FOR THAT
PURPOSE USE A PROTECTIVE GLOVE!
The cooker must not be subject to any unauthorised repairs and/or modifications. Such
operations may be performed only by qualified persons and only original spare parts should be
used.
During normal operation, particularly if the cooker is fired with wet wood, soot and tar build up,
posing a risk of fire in the chimney if it is not regularly inspected and cleaned. If the chimney
catches fire, proceed as follows:
- Do not use water to extinguish the fire
- Close all air inlets to the cooker and chimney
- After the fire has gone out, call a chimney sweeper to inspect the chimney
- Call an authorised maintenance workshop, i.e. the manufacturer to inspect the
cooker
The installed power in the heating system should be 7,5 kW.
It's used for cleaning enamel and painted parts using soap and water, non-abrasive or
chemically non-aggressive detergents.
20
Table of contents
Languages:
Other Plamen Range manuals