Plant Extracts H2EO Instruction Manual


E
O
AIRCARE
R
Ultrasonic Diffuser for Essential Oils
USER HANDBOOK
Copyright © 2016 Plant Extracts International Inc.
For a short
video on how to
set up and use your
diffuser, visit:
www.
plantextractsinc.com
/video.php
Copyright © 2016 Plant Extracts International Inc.
2
Congratulations on purchasing the world's
nest ultrasonic bowl diffuser...the only diffuser
fully assembled and tested in the USA!
Your new H2EO Diffuser offers you features and
benets optimized for the most satisfying experience
attainable from the diffusion of ne essential oils.
Using the water in the bowl of the diffuser as the “carrier”
for the essential oil, each nano-droplet of water is covered
with a molecule-thin coating of the essential oil, which
rapidly becomes part of your room’s atmosphere.
Select colored display lights to set the mood for your
essential oils adventure. For peaceful sleep, all lights can
be turned off while diffusion continues.
Depending on the timer mode and volume settings you
choose, a single ll can last through the night.
Diffuse our nest grade essential oils and blends day and
night. Enhance your sense of well-being. Set the mood in
your environment. Bring balance to the air you breathe.
Contact us with any questions…we’re here to help.
We wish you well!
The Sales and Service Team at Plant Extracts International
Parts List……………………………….......……………………..3
Specications………………………………......………………..3
Unpacking and Preparing Your Diffuser for Use….............5
Ready to Diffuse ...................................................................6
How to Use the Control Panel Buttons ....………......…...…7
Cleaning Your Diffuser……………………….….........…….…8
Careful Operation and Safety Instructions ........…………...9
Troubleshooting…………………………….........……………10
H2EO®AirCare Ultrasonic Diffuser Warranty….........……11
CONTENTS
YOUR DIFFUSER PACKAGE
H2EO Diffuser, Diffuser Lid, Two Director Nozzles (be sure to
keep one as a spare), Power Adapter, User Handbook/Warranty.
SPECIFICATIONS
DIFFUSER DIMENSIONS 7 x 6 x 4 ¼ in (175 x 150 x110 mm)
TRANSFORMER 120–240V AC/24V DC @ 1000mA–24 VA
MAXIMUM WORKING
VOLTAGE/CURRENT 24V DC/650mA–15.6 VA
OPERATION FREQUENCY 1.7 MHz
ATOMIZING RATE 1/3 oz-2 oz (10 to 60 ml) per hour.
Rate is extended using intermittent
settings (Modes 3, 4 and 5)
DROPLET SIZE 3-5 microns
CAPACITY OF TANK 8 oz (240 ml) of water (to maximum ll
level indicated by VERTICAL LINE inside
diffuser bowl)
WATER LEVEL SAFETY Activated when water level falls
SHUT-OFF to approximately 2-4 oz. in bowl
3
Director Nozzle with
adjustable Directional Vane Diffuser Lid Custom, Lightweight
Energy-Efcient
Power Adapter
(US and EU adapters - style may vary)
Water Level Sensor
MODE and Timer
Settings Button
Control Panel
Cover Display
LIGHTS Button
Mist Output
VOLUME Button
Colored
Display
Lights
Transducer Air Duct Cover
Maximum
Water Level
Fill Line
Mist Output Volume Level and Mode Indicator Panel
(defaults to indicate Mode after 2 seconds)
4
Important:
Under this cover are
two air vents. Do not
allow essential oil and
water to spill into
these vents.
Important:
Do not ll above
this vertical ll
level indicator

UNPACKING AND SETTING UP YOUR DIFFUSER
Remove the diffuser from its box. Lift the lid off the diffuser.
Take the director nozzle pack from inside the diffuser bowl.
Remove one director nozzle from the pack and place it at side
down in the recessed hole at the top of your diffuser’s lid. Be
sure to store the extra director nozzle to use as a spare.
Remove the power adapter from its box. DO NOT PLUG THE
ADAPTER IN BEFORE YOU HAVE CORRECTLY FILLED THE BOWL
WITH WATER.
WE STRONGLY RECOMMEND USING ANY OF THE FOLLOWING:
DISTILLED; DEMINERALIZED; DEIONIZED; STERILE; PURIFIED
BOTTLED WATER; OR R.O. (reverse osmosis) WATER. Use of
untreated tap water may cause a build-up which will affect the
performance of the diffuser, is very difcult to remove without
causing damage, and may void your warranty.
IMPORTANT: DO NOT OVERFILL THE DIFFUSER. Overlling will
result in water and essential oil running down the air tube,
which may damage the electronic circuitry of the diffuser and
void your warranty.
DO NOT CARRY THE DIFFUSER WITH WATER IN IT. Bring the
water to the diffuser, so that you don't have to carry the
diffuser with water in it. This is the most common cause of
water damage. To empty the diffuser, bring a bowl or glass to
the diffuser and carefully tip the remaining water out of the
diffuser. Pour the water out over the back of the diffuser, not
over the Control Panel in front.
USE ONLY PURE ESSENTIAL OILS FROM A REPUTABLE SOURCE.
DO NOT USE VEGETABLE OR MASSAGE OILS OR BLENDS,
PERFUMES, OR “FRAGRANCES”, WHICH CONTAIN MOSTLY
SYNTHETIC CHEMICALS AND CAN HARM YOUR DIFFUSER.
56
READY TO DIFFUSE
Carefully pour up to one cupful (8 oz/240 ml) of clean, ltered
water into your diffuser’s bowl. Again, do not overll! Your
maximum water ll line is the top of the VERTICAL LINE on the
back of the diffuser’s bowl.
Onto the surface of the water drip 5-10 drops of any pure
essential oil, or a blend or combination of pure essential oils.
You can control the amount of essential oil diffused by varying
the volume output setting and the number of drops you use.
Place the lid on your diffuser. Point the Director Nozzle away
from diffuser’s Control Panel to prevent damage caused by mist.
Now plug the adapter output (24 volts DC when powered) into
the socket at the back of the diffuser.
Then plug the adapter into the AC power outlet. Now you are
ready to begin diffusing.
Press the POWER button (the center button on the Control
Board Cover) to turn your diffuser to “on/ready”.
Press the VOLUME button (left button) once to begin diffusing
at LOW volume output. To diffuse at MEDIUM output, press the
Volume button twice. To diffuse at HIGH volume, press the
Volume button three times.
TO TURN YOUR DIFFUSER OFF, PRESS AND HOLD DOWN THE
POWER BUTTON FOR 3 SECONDS. The lights will shut off and
diffusion will stop. Note: on new production models the fan
will continue to run for a few seconds to clear remaining mist.
Use no more than 15 drops of essential oil in your diffuser.
If you use more, it’s likely that not all of the essential oil will diffuse by
the time the machine turns itself off. If you see oil residue in the
remaining 2-4 oz of water, that oil was not diffused, which means you
are using too much essential oil. This can damage the director nozzle
and lid, and the transducer seal in the bottom of the bowl.
1.
2.
3.
5.
4.
7.
6.
HOW TO USE THE CONTROL PANEL BUTTONS
POWER/DISPLAY LIGHTS Button (Blue Lights Model)
1. Press POWER button to turn on solid blue display lights.
2. Press POWER button again to turn all lights off (while still
diffusing).
POWER/DISPLAY LIGHTS Button (Multi-Colored Lights Model)
1. Press POWER button once to turn on solid blue display lights.
2. Press again for solid green display lights. 3. Press a third time
for solid red display lights. 4. Press a fourth time for display lights
that cycle through a multi-color sequence. 5. Press a fth time to
turn all lights off (while still diffusing).
MIST OUTPUT VOLUME Button
Press to cycle through and choose from three mist output
volumes…LOW, MEDIUM and HIGH. LOW will be indicated by the
left green bar lit. MEDIUM will be indicated by three green bars lit.
HIGH will be indicated by all ve green bars lit. After two seconds,
the Volume indicator lights default to show you which Mode you
are in (even though your diffuser continues diffusing at the volume
you chose).
MODE and TIMER SETTINGS Button
Mode 1. If you do not touch the MODE button, your diffuser will
automatically operate in Mode 1 (you’ll know you’re in Mode 1
because the left green indicator bar will remain lit). In Mode 1 your
diffuser will diffuse continuously until low water level is detected,
and it will automatically shut itself off.
Mode 2. By pressing the MODE button once, your diffuser is in
Mode 2 (second green bar will remain lit). In Mode 2 your diffuser
will diffuse continuously for two hours, and then automatically turn
itself off.
Mode 3. By pressing the MODE button twice, your diffuser is in
Mode 3 (third green bar will remain lit). In Mode 3 it will diffuse
intermittently: on for 3 seconds, then rest for 40 seconds, until low
water level is reached, and it will automatically shut itself off.
7
Mode 4. By pressing the MODE button three times, your diffuser is
in Mode 4 (fourth green bar will remain lit). In Mode 4 your
diffuser will diffuse intermittently: on for 15 seconds, then rest for
50 seconds, until low water level is reached, and it will automatically
turn itself off.
Mode 5. Pressing the Mode button a fourth time puts your diffuser
in Mode 5 (fth green bar from the left will remain lit). In Mode 5
your diffuser will diffuse for 30 minutes, then rest for 15 minutes,
until low water level is reached, and it will automatically turn itself
off. Note: With display lights on, they will stay on even after the
diffuser shuts itself off. If you want the display lights off after
diffuser stops, press the Power/Lights button at any time during
operation.
8
CLEANING YOUR DIFFUSER
At least once a week, empty your diffuser's bowl and wipe it out
with an alcohol wipe, a soft, damp cloth, or a facial tissue. Use a
Q-tip or a small, soft brush to gently clean hard to reach places.
Look to make sure the fan on the bottom of your diffuser is free
of dust and hair. Pet owners nd that occasional gentle vacuuming
of the fan area will keep the fan clean and free to rotate.
Some essential oils may contain small amounts of natural plant
waxes or resins. These may build up over time unless removed by
occasional cleaning.
Clean your diffuser by lling the bowl with 8 ounces of pure water
and adding a few drops of a mild dish detergent or vinegar. Run
the diffuser for a few minutes. Empty the bowl, and carefully rise
with clean water. Empty again and rell to operating level. Add
your essential oil and enjoy!
Certain essential oils, for example, clove and cinnamon bark, will
cause permanent discoloration of the bowl; however, this does not
affect diffusion.
Do not use abrasives or chemical cleaners in the bowl or on the
transducer in the bottom of the bowl.

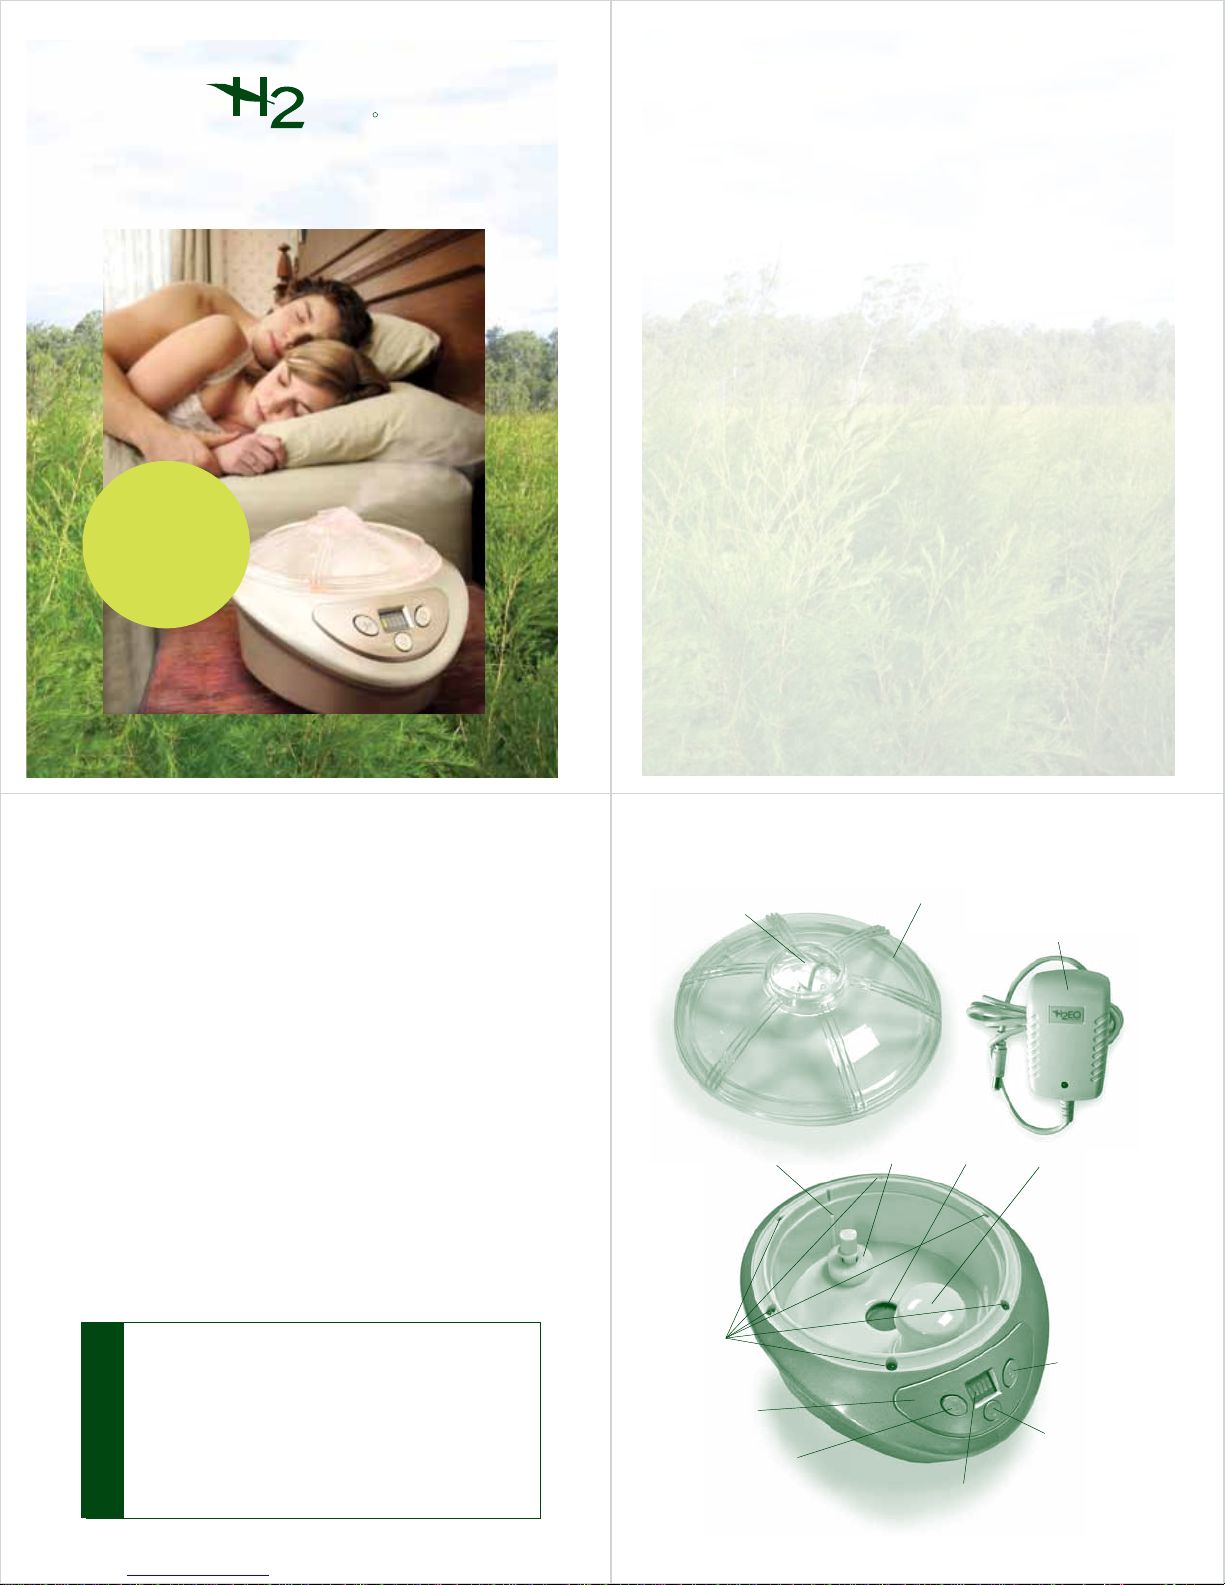
CAREFUL OPERATION AND SAFETY INSTRUCTIONS
1. Please watch the video and read the operating instructions
We will be happy to offer you assistance.
2. Only use the H2EO® power adapter supplied with this diffuser.
3. Never plug in the adapter before lling the diffuser to the correct
level with water.
4. DO NOT OVERFILL WITH WATER. DO NOT MOVE THE DIFFUSER
WITH WATER IN IT. ESSENTIAL OIL/WATER SPILLAGE IS THE
MAIN CAUSE OF ELECTRONIC DAMAGE TO THE DIFFUSER,
AND IS NOT COVERED UNDER WARRANTY.
5. Use only pure essential oils from a reputable source. DO NOT use
vegetable or massage oils, perfumes, or “fragrances” which
contain mostly synthetic chemicals.
6. Operate the diffuser on a hard, at, level surface. Do not operate
on a carpet, towel, cloth or other soft surface that may restrict
air ow to the fan in your diffuser’s base.
7. Unplug and empty the diffuser before moving it.
8. Should a fault arise (lights ash, diffuser does not work correctly),
unplug the diffuser, wait for a minute, plug adapter back in, and
press the POWER button. In most cases, this “re-boot” will solve
the problem automatically.
9. Do not attempt to disassemble the diffuser. There are no user-
serviceable parts, and opening the diffuser will void your warranty.
10. Clean your diffuser with alcohol wipes or a soft, damp cloth.
Do not use abrasive cleaners or sharp objects.
11. The diffuser automatically stops when the water level is low.
Rell and restart to resume. Sometimes users don’t realize that the
low water level has been reached and they believe their diffuser is
not working, so check to make sure you have sufcient water for
your diffuser to operate.
12. Only use your diffuser indoors. Keep it safely away from young
children and animals.
9
POWER Light is on, no mist appears when you press VOLUME:
• Check that there is enough water in the bowl to begin diffusion
• Check that you are using the H2EO power adapter. • Check that the
power adapter is securely plugged into the wall outlet. • Check that
the power cord is securely plugged into the socket at the back of the
diffuser. • Users can accidentally get water inside the diffuser by:
overlling; bumping; moving the diffuser while full; or operating
with the director nozzle upside down, broken, or missing altogether.
Essential oil/water spilled into the electronics will damage the
diffuser. Before sending it in for service: empty the diffuser, unplug it,
and let it sit for a day or two to "dry out". Then rell and try it again.
Often the moisture will evaporate and the diffuser will work again,
saving you the expense and inconvenience of sending it in for service.
However, if this does happen to you, please try to be more careful, as
essential oil/water inside the diffuser will, over time, cause it harm.
Less mist appears, mist comes from underneath the diffuser, or
water in diffuser is very warm:
• Check that there is enough water in the bowl to begin diffusion
• Check that you are using the H2EO power adapter. • Remove any
hair or other object caught in the fan, so that the fan inlet is not
obstructed, and the fan is free to rotate. • Only operate the diffuser
on a level, hard surface. • Check to see if the water level sensor is
stuck to the post, or to the buttom of the diffuser bowl. It should be
free to oat to the top of the sensor post. • Check to see if the
transducer is clean; NEVER use abrasive cleaning agents or sharp
objects. Remove any oil or wax with a soft moistened cloth or Q-tip.
• Check mist output VOLUME setting. • Be sure that the lid and
director nozzle are securely tted. • Turn POWER off, unplug, wait
one minute. Plug in, rell, and restart the diffuser. If diffuser will not
restart, it has been damaged by the overlling and must be repaired.
10
Essential oil/water spilled into the electronics is the most common
service issue. Before sending it in for service, try this: • Empty the
diffuser, unplug it, and let it sit for a day or two to "dry out". Then
rell and try it again. Often the moisture will evaporate and the
diffuser will work again, saving you the expense and inconvenience
of sending it in for service.
TROUBLESHOOTING
11
H2EO®PRODUCT WARRANTY
Plant Extracts International Inc., subject to the exclusions noted
below, warrants its H2EO®AirCare Ultrasonic Diffuser Product to be
free from defects in materials and workmanship under normal
consumer usage for a period of 12 calendar months from the date
of purchase. Warranty is transferable with original invoice.
This warranty does not cover:
1. Defects or damage resulting from use of the diffuser in other than
its normal and customary manner;
2. Defects or damage from misuse, accident, or neglect;
3. Defects or damage from use of other than distilled, demineralized,
deionized, or puried bottled water;
4. Defects or damage from use of impure or adulterated essential
oils, or blends containing vegetable or massage oils, or synthetic
carrier oils;
5. Defects or damage from improper testing, operation,
maintenance, installation, adjustment, or any alteration or
modication of any kind;
6. Breakage or damage caused by use of other than the specied
mains supply voltage (120/240 VAC country-specic), or use of
other than the as-supplied power adapter;
7. Diffusers disassembled or repaired by other than Plant Extracts
International Inc. so as to adversely affect performance or prevent
adequate inspection, verication, and testing to verify any
warranty claim;
8. Diffusers with labels removed or illegible serial numbers;
9. Defects or damage due to overlling or spilling;
10. Marring such as scratches on any plastic surfaces and externally
exposed parts resulting from normal use; and/or
11. Damage resulting from normal wear and tear.
This warranty is the Buyer's exclusive remedy, and applies to new
diffusers purchased from Plant Extracts International Inc., or its
approved distributors and resellers.
(continued on back cover)
E
O
AIRCARE
R
www.plantextractsinc.com
Copyright © 2016 Plant Extracts International Inc.
Keep your purchase invoice in case you should need repair, warranty
service, or purchase of spare parts. Before sending your diffuser in for
service, try all the troubleshooting tips on page 10. Be sure to unplug
and empty your diffuser and let it sit for a day or two. In many cases
this will allow minor EO/water spillage inside the machine to dry out.
Try it again and if it still does not diffuse, send the diffuser AND
adapter, lid and nozzle to Plant Extracts International Inc. (PEI). For
best service, print and complete the Service Request Form on our
website at: www.plantextractsinc.com/sales_service.php and include it
with your diffuser. We must know your name, address, diffuser
problem, email and telephone number to contact you when we have
evaluated your diffuser.
Warranty Claim Determination of the origin of any fault is the sole
responsibility of PEI. Repair or full replacement is at the sole
discretion of PEI. Shipping cost to PEI is the responsibility of the
owner. On service for a manufacturing fault, the diffuser will be
shipped back to the customer at PEI’s expense.
Non-Warranty Repair Damage to the diffuser or power adapter will
be assessed by PEI, and an invoice for repair and return shipping will
be issued. Upon acceptance and payment of the invoice, the serviced
diffuser will be returned to the owner. Non-warranty repair costs of
shipping to and from PEI are the owner’s responsibility.
After-Sale Service and Accessories (director nozzles, lids and power
adapters) are available through www.plantextractsinc.com
Other manuals for H2EO
1
Table of contents
Other Plant Extracts Accessories manuals