Puesta en marcha:
– Riegue bien el sustrato de las plantas.
– Sumerja en agua fría el cabezal del sensor (7) con filtro durante unos 3
minutos.
– Conexión: mantenga pulsado el botón «PRESS» (1) hasta que el piloto
de alarma parpadee una vez.
– Regulación del nivel de humedad: tras encender la unidad se
muestran tres posibles niveles de humedad:
1 gota = plantas que requieren una humedad moderada o sequedad
2 gotas = plantas que requieren una humedad moderada
3 gotas = plantas que requieren una humedad continua
El valor preajustado de 3 gotas parpadea y, tras unos 5 segundos, el
programa queda activado. Si desea seleccionar otro nivel de humedad,
pulse brevemente el botón «PRESS» mientras parpadea el símbolo del
nivel actual hasta que el símbolo del nivel deseado comience a
parpadear. Después espere hasta que el ajuste quede activado.
– Selección del programa para interiores o exteriores: una vez
configurado el nivel de humedad, el símbolo de la casita comienza a
parpadear para el modo de interiores (3) y, tras unos 5 segundos, el
programa queda activado. Si desea seleccionar el modo de exteriores
(símbolo del sol), pulse brevemente el botón «PRESS» mientras
parpadea y espere hasta que el símbolo del modo deseado quede
activado.
– Colocación de Moistick digital en el sustrato: Realice un orificio en la
zona de las raíces e introduzca la unidad como máximo hasta el borde
inferior de la cubierta (8). Tenga en cuenta que el cabezal del sensor
(7) debe tener un buen contacto con el sustrato. En el programa de
exteriores, debe tenerse en cuenta que la unidad no quede expuesta
a pleno sol.
– Modificación de la configuración: apague y vuelva a encender la
unidad. En ese momento, puede volver a programarse la unidad.
Humedad actual del sustrato: la primera medición del nivel de
humedad tiene lugar unos 15 minutos después de haber programado la
unidad. Después se muestra una escala en la pantalla (4) con un
máximo de 6 columnas, que muestran el nivel de humedad actual del
sustrato. Posteriormente, tiene lugar la medición automática de la
humedad: cada 6 horas en el modo de interiores y cada 3 horas en el
modo de exteriores.
Alarma de riego: el piloto de alarma (5) parpadea una vez cada 4
segundos. En ese caso, debe regarse la totalidad del sustrato de
manera uniforme y también alrededor de la unidad Moistick digital.
Moistick digital puede regarse sin ningún problema con agua.
IMPORTANTE: cuando haya terminado de regar, pulse brevemente
el botón «PRESS» para apagar el piloto de alarma (dejar que
parpadee el piloto innecesariamente hace que las pilas se agoten más
rápidamente).
Moistick digital XL: Moistick digital XL es apto para macetas de más de
cerca 30 cm de altura, así como para plantas con raíces más profundas.
Estado de las pilas: el símbolo de la pila (6) indica que deben
cambiarse las pilas. Con un manejo óptimo de la unidad, la vida útil de
las pilas suele ser de un año y medio.
Cambio de las pilas: tire hace arriba de la solapa delantera de la
cubierta (8) y extráigala. Tire cuidadosamente hacia arriba del portapilas.
Tenga en cuenta la polaridad correcta de las nuevas pilas a la hora de
colocarlas en el portapilas. A continuación, introduzca con cuidado el
portapilas en el hueco. Deseche las pilas antiguas siempre conforme a
las normativas locales.
Desconexión: mantenga pulsado el botón «PRESS» (1) hasta que el
piloto de alarma (5) 2x.
Sugerencia: comience seleccionando el nivel de humedad con 3
gotas. Si la alarma de riego parpadea demasiado pronto para un
tipo determinado de plantas, reduzca el nivel de humedad a 2
gotas o incluso a 1 gota.
Garantía: El comerciante le concede a este producto un año de garantía
(a partir de la fecha de compra). Esta garantía se refiere a todos los
defectos essenciales del producto que tengan de origen defectos de
materiales o de fabricación. La garantía ce efectúa mediante
intercambio por un producto en perfectas condiciones o mediante la
reparacíon graduita de la pieza enviada, según o criterio, sólo en el caso
de que ce hayan cumplido los siguientes requisitos:
– El produto fue manipulado correctamente y según la indicaciones del
manual de instrucctiones.
– Ni el comprador ni terceras personas han intentado reparar el
producto.
Exención de responsabilidad: El distribuidor no asume ninguna
responsabilidad por los daños resultantes de un uso incorrecto del
producto.
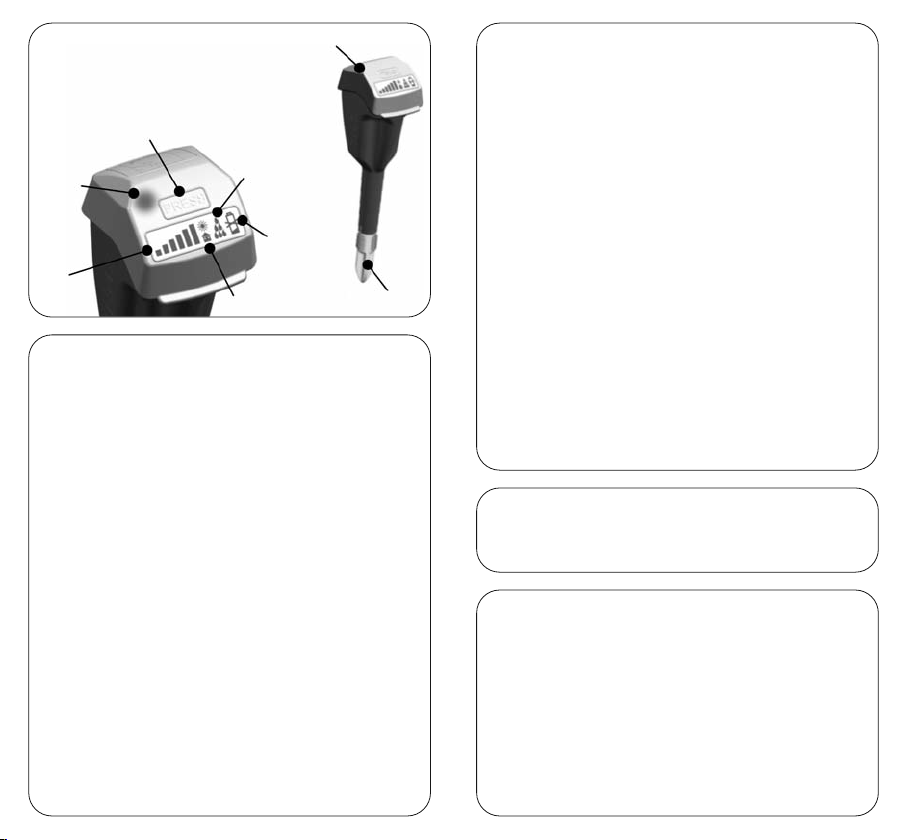
Botón «PRESS»:
• Encendido / Apagado
• Selección de programa:
• Nivel de humedad
• Interiores / Exteriores
• La alarma se reajusta después del riego
1
2
Nivel de
humedad
8
Cubierta
7
Cabezal
del sensor
6
Estado de las
pilas
3
Ineriores/Exteriores
4
Humedad
actual
Piloto de
alarma
5