PlantCare Plantomat PRO User manual

Instructions for use
PlantCare Plantomat®PRO
The intelligent, long-term watering system.

2
Contents
1. Safety pointers................................................................................................................... 3
2. Scope of supply/optional accessories........................................................................... 4
3. Operating principle........................................................................................................... 4
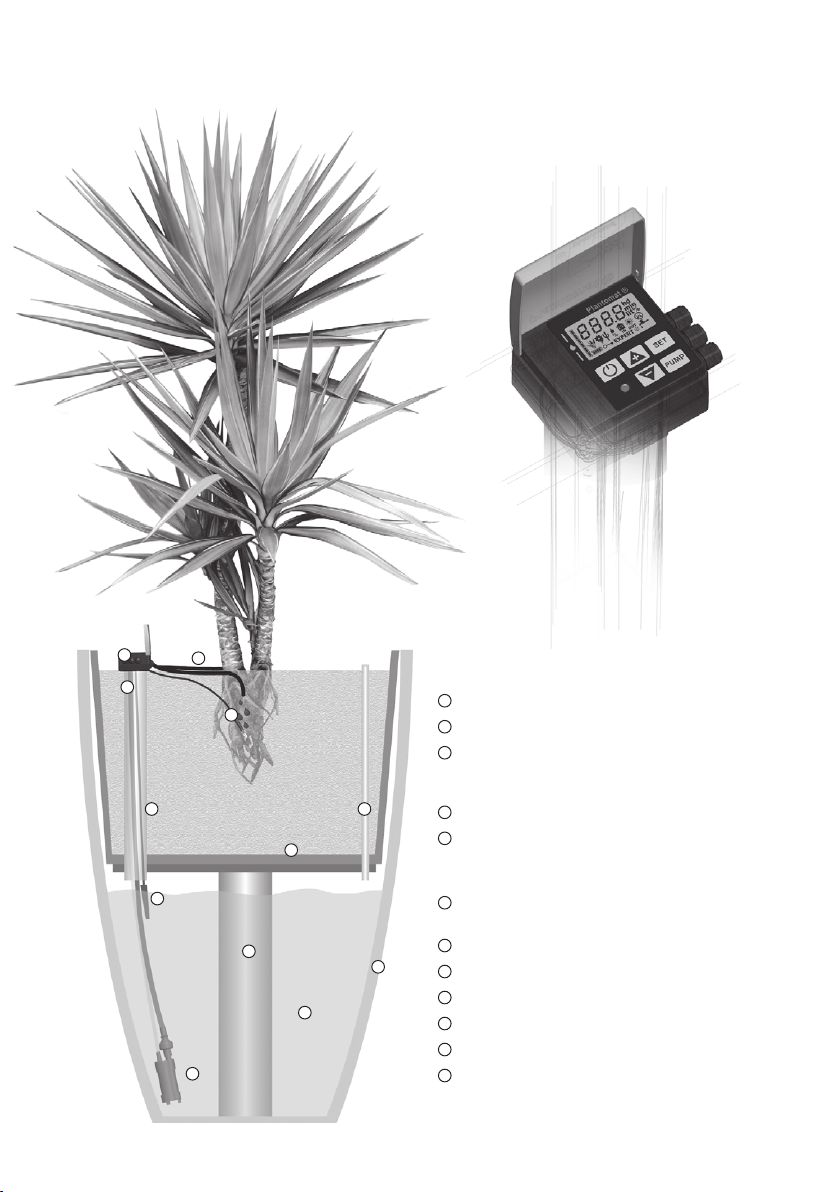
3.1 General overview: Container and Plantomat® PRO ....................................................................... 5
4. Plantomat® PRO conguration and controls ............................................................... 6
4.1 Equipment overview................................................................................................................................. 6
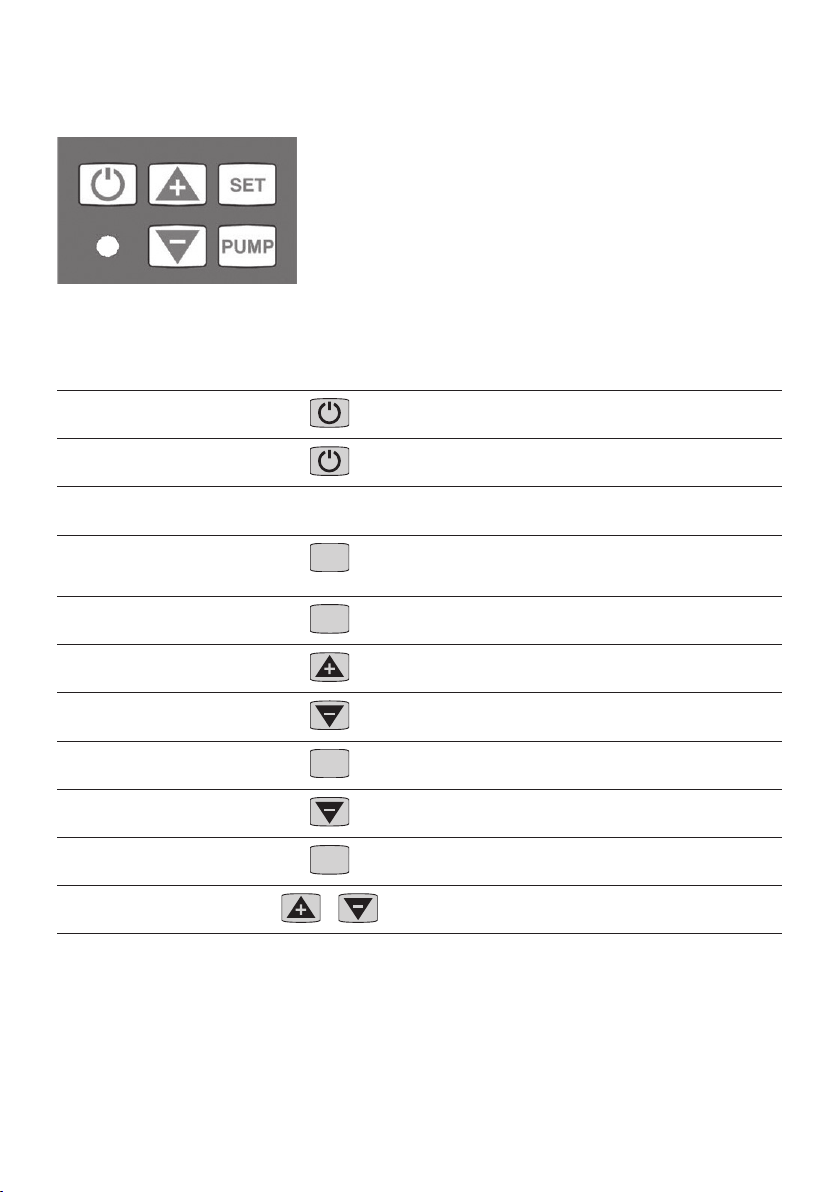
4.2 Key functions ............................................................................................................................................... 7
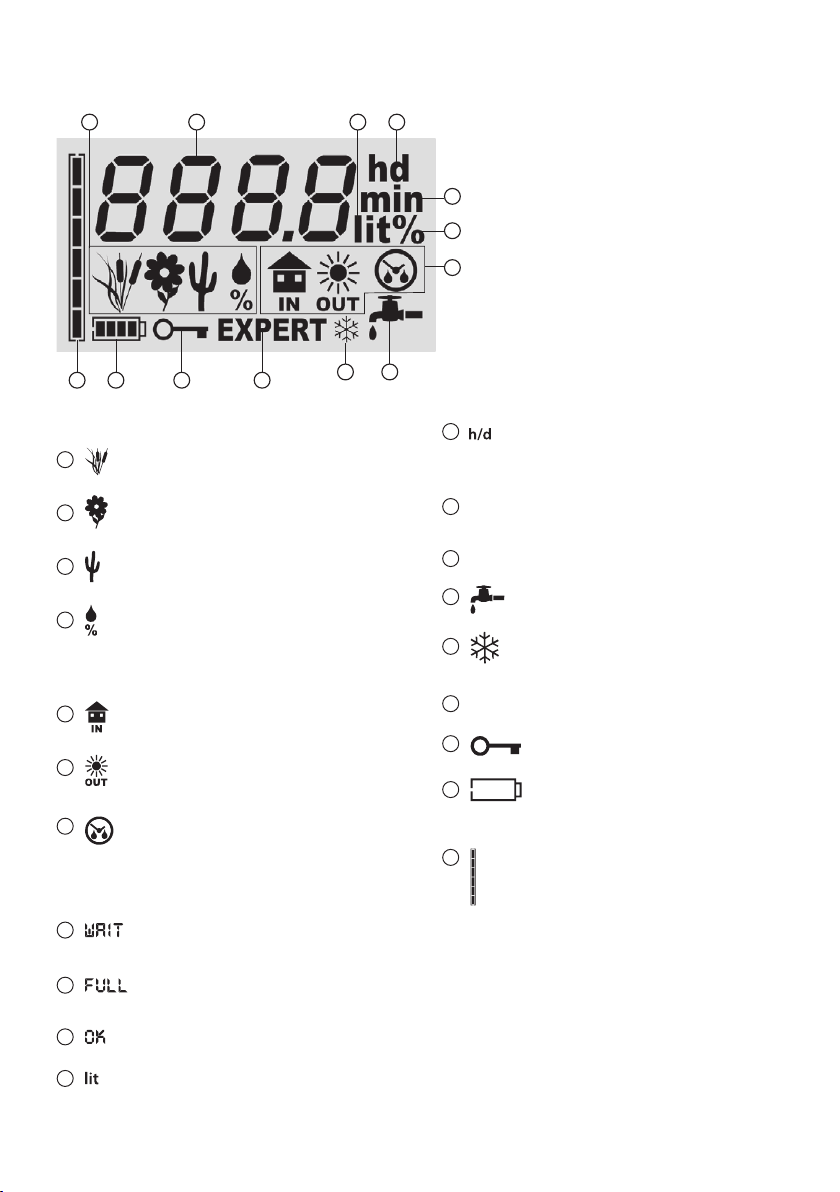
4.3 Display symbols..........................................................................................................................................8
5. Select and prepare the plant container ........................................................................ 9
5.1 Container options ...................................................................................................................................... 9
5.2 Preparing the container.........................................................................................................................10
6. Installing your Plantomat® PRO.................................................................................... 11
6.1 Preparing your Plantomat® PRO .........................................................................................................11
6.2 Connecting the moisture sensor........................................................................................................12
6.3 Power supply .............................................................................................................................................12
6.4 Inserting your Plantomat® PRO and planting the container....................................................13
7. Operation.......................................................................................................................... 14
7.1 Switching on/o.......................................................................................................................................14
7.2 Filling the water reservoir .....................................................................................................................14
7.3 Settings - Overview .................................................................................................................................14
7.3.1 Possible moisture settings.................................................................................................................15
7.3.2 Possible watering cycle settings .....................................................................................................15
7.3.3 Watering amount..................................................................................................................................15
7.4 Programming.............................................................................................................................................16
7.4.1 Standard mode......................................................................................................................................16
7.4.2 EXPERT mode.........................................................................................................................................16
7.4.3 Additional functions in EXPERT mode ..........................................................................................17
7.5 Alarm displays ...........................................................................................................................................18
8. Troubleshooting .............................................................................................................. 18
9. Maintenance/care ........................................................................................................... 19
10. Putting out of operation.............................................................................................. 19
11. Disposal/environmental protection.......................................................................... 20
12. Technical specications ............................................................................................... 20
13. Appendix ........................................................................................................................ 20

3
1. Safety pointers
• Please read these instructions carefully and note the pointers given. Use these instructions to familiarize
yourself with the Plantomat®PRO, its correct use as well as the safety instructions.
• Ensure that only watertight plant containers are used for indoor applications and use a protective
underlay if necessary.
• Use only original PlantCare accessories.
• If using an optional original power adapter, please note the following points:
• Inspect all accessories for any damage. A damaged power adapter must not be used and
needs replacing.
• The Plantomat® PRO must only be installed while unplugged.
• Power cable extensions must be located where there is no risk of tripping over them.
• Maintenance and plant care work should only be carried out after disconnecting your
Plantomat® PRO from the power supply.
• The Plantomat® PRO should only be repaired or modified by qualified specialists.
• If the Plantomat® PRO is damaged or fails to work properly, it must be switched off.
Proper use:
The Plantomat® PRO is intended for the automatic irrigation of indoor and outdoor plants. It must only be used
for water or for water with fertiliser.
Important: Before lling the water reservoir, make sure that the Plantomat® PRO has been
correctly installed and switched on. This is the only way that the level sensor can warn
against overlling the water reservoir.

4
2. Scope of supply/optional accessories
Scope of supply
Please check the contents of the pack for completeness.
• Plantomat® PRO with attached water pump and level sensor
• Moisture sensor
• Pump tube (1 m)
• Perforated watering tube
• Plantomat® PRO non-slip guide tube (anti-slip protection packed separately)
• Servicing tube with cap and anti-slip protection (anti-slip protection packed separately)
• 2 cable ties for pump power cable
• Replacement tip with felt for moisture sensor
Optional accessories
• Relay box to control solenoid valves by means of isolated switch
• Extension cable for moisture sensor (5 m)
• Photovoltaic cell
• Power adapter
• GSM modem for water and battery alarm transmission using SMS
• External water pump with Plantomat connection to refill the water reservoir
• Data export cable and software to export the logbook
3. Operating principle
Plantomat® PRO measures moisture levels in the plant substrate at regular intervals. As soon as the minimum
moisture level set by the user is reached, water is pumped up from the reservoir and distributed over the
substrate by means of perforated watering tube.
Plantomat® PRO is easy to use and is ready to use only a few seconds after installation in the plant container.
The factory settings in standard mode thus assist less experienced users.
EXPERT mode permits full system exibility. Fine adjustments can be made to moisture settings here and the
desired time interval between two watering cycles can also be freely selected. In addition, measurement of
the current substrate moisture level can be made and this value set for subsequent watering sessions (see also
section 7.4.3 “Magic Finger”).
Initially, it is recommended that you observe the plants and adjust the settings as necessary.

5
3.1 General overview: Container and Plantomat® PRO
1Electronics
2Moisture sensor
3Battery compartment
2 x 6 AA batteries. A photovoltaic cell or a power
adapter are optional alternatives*.
4Watering tube
5Level sensor
Prevents the water reservoir from being
overlled
6Water pump
Solenoid valve connection as an option*
7Plantomat® PRO guide tube
8Servicing tube
9Watertight outer container
10 Plant insert
11 Water reservoir
12 Supporting element if required
* Optional accessories
1
2
3
4
5
6
7 8
9
10
11
12

6
1Protective cover
2Electronics
3Opening for battery compartment
4Battery compartment
5Pump tubing
6Watering tube connection
7Level sensor
Prevents the water reservoir from being overlled
8Water pump power cable
9Water pump
10 Level sensor cable
4. Plantomat® PRO conguration and controls
4.1 Equipment overview
11 Display
12 ON/OFF key
13 Selector keys
14 SET/OK key
15 Manual pump switch on
16 Alarm LED
17 Moisture sensor connection
18 GSM modem (SMS) or
data export cable connection
19 Photovoltaic cell, power adapter or
external rell pump connection
20 Watering tube outlet
(Illustrations may dier from original product.)
1
2
3
4
5
6
7
8
9
10
11
12
13
14
16 15
17
18
19
20

7
4.2 Key functions
Basic functions Key Action
Switching on Press briey
Switching o Press until display goes out
Select standard mode Appears automatically when rst switched on
Select or exit EXPERT mode SET Keep pressing until «EXPERT» appears in the display
or disappears to exit that mode
Programming SET Press briey
Select a function/increase
a setting value
Press several times until the desired symbol
or gure appears in the display (conrm with SET)
Reduce a setting value Press several times until the desired symbol
or gure appears in the display (conrm with SET)
Conrming a function SET Press briey
Keypad lock/keypad unlock Keep pressing until the key symbol appears
or disappears in the display
Switch on the water pump
manually PUMP Keep pressing for as long as needed
Acknowledge alarms
or
Press briey

8
4.3 Display symbols
Setting the moisture level
1Continuously
moisture-loving plant
1Moderately
moisture-loving plant
1Moderately
moisture- to dry-loving plant
1Set moisture level manually
(EXPERT mode)
Setting the watering cycle
2Watering cycle, indoors:
every 5 days
2Watering cycle, outdoors:
every 24 hours
2Set watering cycle manually
(EXPERT mode)
Input or display panel
3Plantomat® PRO is now
measuring the moisture level
3The water has now reached the
level sensor.
Stop lling immediately!
3Programming completed
4
Litres
(watering amount per watering cycle)
5
h/d for hours/days
(setting for the watering cycle)
6min Watering time in minutes
(only with solenoid valve operation)
7% Moisture level in %.
8Water alarm: water reservoir
needs relling!
9Frost alarm: substrate
temperature is below 3°C.
10 EXPERT «EXPERT» programming mode
11 Keypad locked
12 Battery alarm:
please replace the batteries
13 Moisture display: current
moisture level in the substrate
6 bars = substrate is very moist
1 bar = substrate is fairly dry
1
2
3 4 5
6
7
89
10111213

9
5. Select and prepare the plant container
5.1 Container options
Installing a Plantomat® PRO is very easy and possible in almost all the plant containers available on the market.
The only adjustment to be made is to drill two holes in the plant insert using standard tools. These holes are
needed to insert the Plantomat® PRO guide tube as well as the servicing tube.
Various container options are possible for indoor or outdoor use:
Indoor - option 1
Leakproof container
with integral plant insert.
Indoor - option 2
Leakproof container with
separate plant insert and
supporting elements.
Outdoor - option 1
Leakproof container with
integral plant insert.
An additional overow
tube, which must be
mounted leakproof,
drains o rainwater.
Outdoor - option 2
Container is not leakproof.
A separate plant insert and
supporting element are
used. A leakproof inner
pot is used as the water
reservoir.
A single Plantomat® PRO can also water several plants on a balcony or terrace simultaneously.
This requires a water reservoir as well as the corresponding watering tubing/valves and a
power connection for the best results. Further information on this is available at
www.plantcare.ch.
1Container
2Plantomat®guide tube
3Servicing tube
4Plant insert
5Supporting element if required
6Overow tube
7Inner pot
1
2 3
4
5
6 7

10
1
2
A
B
1
2
3
4 4
1Adhesivetape long
2Cablefixer 1x
3Adhesivetape short
4Cablefixer 1x
PC_PM_IFU012
Instruction forTube Preparation
1
2
3
4
5.2 Preparing the container
Suggested plant inserts and supporting elements
Plant inserts
If your plant container does not have an integral plant insert, you can use a soft plant
insert available from garden centres.
Supporting elements for plant inserts
If using a separate, soft plant insert, it must be supported with a supporting element. An
inexpensive solution for a supporting element is given below. The individual elements can
be obtained from any garden centre or DIY store.
1Soft plant insert
2Flower-pot saucer
3Standard plastic tube larger than for example Ø110mm, depending on the size of the
container and the weight of your planted plant insert. The length of the standard tube
can be adjusted to t.
4Holes drilled in the plant insert and saucer for the Plantomat and servicing tube
(q.v. below)
Drilling holes in the plant insert:
ADrilling a hole for the Plantomat® PRO guide tube
BDrilling a hole for the servicing tube
For soft plant inserts: Drill 2-3 holes with a diameter of approx. 2 mm so that excess water
can drain away. Cover the holes with standard non-woven fabric.
Standard hole saw Standard punch
for hard plant insert or saucer for soft plant insert
Preparing the tubes
Q.v. separate installation information enclosed for the Plantomat’s
guide & servicing tubes.
Fitting the plant insert and tubes
1Insert the plant insert and, if required, the supporting element into
the outer container
2Fit the guide and servicing tubes prepared according to the separate installation
information through the holes drilled in the plant insert
Note: The point where the tubes enter the plant insert does not require sealing.
Excess water or rainwater can thus drain away into the reservoir.
Both of the tubes supplied are standard sizes. If these are too short for your plant
insert, you can obtain longer tubes in any hardware store.
Aø53mm
Bø25mm
Aø50mm
Bø22mm

11
a
1
2
3
6. Installing your Plantomat® PRO
6.1 Preparing your Plantomat® PRO
Adjust your Plantomat® PRO to the height of your container:
1Clamp the cable and tubing to the shaft.
2Wind the level sensor cable around the shaft
to the right length a.
3Connect the perforated watering tube
to the pump tubing.

12
1
2
3
4
5
1
2
6.2 Connecting the moisture sensor:
Battery operation
Note: Ensure that the moisture sensor is connected (q.v. section 6.2).
1Open the snap-tting top carefully with a at screwdriver.
2Remove the battery holder and insert 12 AA batteries.
3Ensure that both connectors are inserted at position B
(the rst contact pin on the left must be visible).
Operation with photovoltaic cell and rechargeable batteries
1Open the snap-tting top carefully with a at screwdriver..
2Remove the battery holder and insert a maximum of 6 rechargeable AA batteries.
4Ensure that both connectors are inserted at position R
(the rst contact pin on the right must be visible).
5Insert the photovoltaic connector into the corresponding connection socket.
Operation with power adapter and rechargeable batteries
Proceed as in «Operation with photovoltaic cell».
Important: When opening the battery compartment, avoid getting any earth
or dirt in the electronics casing. Clean the surface of the seal before closing.
6.3 Power supply
Important: When a photovoltaic cell or a power adapter is used,
no more than 6 rechargeable batteries may be tted.
Insert the moisture sensor connector into the corresponding socket.

13
31cm
6.4 Inserting your Plantomat® PRO and planting the container
1Insert your Plantomat® PRO into the guide tube until it
sits properly. Avoid any kinking of the watering tubing.
2Close o the servicing tube with the stopper supplied.
3Add the substrate, leaving enough room for the root
ball. Insert the plant as usual and top up with the
remaining substrate. The guide and servicing tubes
must protrude above the substrate by approx. 1 cm.
4Insert the perforated end of the watering tube
approx. 4-6 cm into the root ball.
5Insert the moisture sensor to a depth of around 12 cm
directly below the watering tube. If the
moisture sensor cable is not long enough, a sensor
extension cable can be used.
6Water the substrate thoroughly and copiously.
1
2
Important: The sensor tip must be positioned in the vicinity of the root ball and directly below
the watering tube. It must be completely surrounded on all sides by substrate.
Tip: Use a standard, stainless steel wood screw (3.5 x 15 mm) to secure
your Plantomat® PRO to the guide tube and to protect it against theft.
4
5
6
Hydroponics application: Position the moisture sensor as deep as possible in the
plant insert and punch additional wholes in the watering tube for a better wetting
of the expanded clay.

14
7. Operation
Important: Only rell the water reservoir when the water level falls below the level sensor.
Check the water level with a ruler if necessary.
7.1 Switching on/o
1First connect the moisture sensor supplied.
2Switching on: Press the ON/OFF key briey.
Switching o: Press the ON/OFF key for 1 second.
7.2 Filling the water reservoir
1Switch on your Plantomat® PRO to activate the level sensor.
2Fill the water reservoir using the servicing tube.
Keep the water pressure low when relling with a garden hose.
Note: Always pay attention to the display!
As soon as the water reservoir is full, «FULL» appears in the display and the LED
alarm starts ashing. Stop lling immediately.
3To test whether the watering tube has been laid correctly,
manually activate the PUMP key.
Optional accessories:
As an alternative to manual relling, an «External rell pump» can be used.
1
2
1
2
3
7.3 Settings – Overview
Plantomat PRO enables three parameters to be set that are important for the correct watering of plants:
moisture level, watering cycle and watering amount.
Tip: Please note that, besides correct watering, additional factors such as location, lighting,
fertilizer, repotting in larger containers at the right time, etc. will all inuence how well your
plant thrives. Get advice from an expert on this.

15
Type of plant Symbol Watering takes place
Always moisture-loving plant as soon as the relative remaining moisture
in the substrate falls below 50%
Moderately moisture-loving plant as soon as the relative remaining moisture
in the substrate falls below 35%
Moderately moisture- to dry-loving plant as soon as the relative remaining moisture
in the substrate falls below 20%
Setting the moisture level manually
as soon as the relative remaining moisture
in the substrate falls below the moisture level set
(EXPERT mode)
Important: The ideal moisture level is heavily dependent on the type of plant and substrate.
You should therefore observe your plant and adjust the moisture level setting for watering.
Watering cycle Symbol Explanation
Every 5 days Ideal for indoor plants
(Plants in a roofed area and not exposed to extreme heat)
Every 12 hours Ideal for outdoor plants
(Plants in the open air may be exposed to extreme heat)
User-dened watering
cycle
In EXPERT mode, the watering cycle can be set manually
to between 6 hours and 99 days
7.3.2 Possible watering cycle settings
7.3.1 Possible moisture settings
7.3.3 Watering amount
Plantomat® PRO waters the amount set by the user. However, this amount is automatically adjusted to the
plant’s actual water requirements by your Plantomat® PRO if:
• the amount has been set too high or too low by the user
• seasonal temperature fluctuations affect the plant’s water requirements
• the plant is growing or has been cut back

16
1. Setting the moisture level for watering
SET key
Select with PLUS key
Conrm with SET key
2. Selecting the watering cycle
Select with PLUS key
Conrm with SET key
3. Setting the watering amount
PLUS or MINUS key
Conrm with SET key
7.4.2 EXPERT mode
You are in EXPERT mode if «EXPERT» is showing on the display.
In addition to standard mode, EXPERT mode allows the moisture level and watering cycle to be set manually.
You can thus be even more specic in meeting your plant’s requirements. The additional «Magic Finger»
function (q.v. section 7.4.3) is also available in EXPERT mode.
1. Select EXPERT mode
Keep SET key depressed until «EXPERT» appears
2. Setting the moisture level for watering
SET key
Select with PLUS key
Conrm with SET key
if is selected:
Set the moisture level with PLUS or MINUS key
Conrm with SET key
3. Selecting the watering cycle
Select with PLUS key
Conrm with SET key
if is selected:
Set the watering cycle with PLUS or MINUS key
Conrm with SET key
4. Setting the watering amount
PLUS or MINUS key
Conrm with SET key
7.4 Programming
7.4.1 Standard mode
You are in standard mode if «EXPERT» is not showing on the display.

17
7.4.3 Additional functions in EXPERT mode
Function Keys Comments
«Magic Finger» function:
Measures current substrate
moisture and automatically
uses this measurement as the
moisture level for irrigation.
Keep PLUS key depressed
until appears
If you feel that your Plantomat® PRO should be watering
at the current plant and substrate situation, you can start
up the «Magic Finger» function.
Your Plantomat® PRO measures the moisture level (dura-
tion approx. 4 minutes). The moisture level measured is
automatically used for future watering requirements
Measuring current substrate
moisture
Press PLUS key twice briey
until appears
Your Plantomat® PRO will measure the moisture level.
After approx. 4 minutes, the current moisture level
appears for around 30 seconds.
Changing the measuring in-
terval of the moisture sensor
Hold down MINUS and SET
keys simultaneously for
approx. 2 seconds.
EXPERT ashes
Press PLUS key once briey.
Set the desired measuring
interval using PLUS or MINUS
keys.
Conrm with SET key
The measuring interval is set at 2 hours by the
manufacturer.
Switching from water pump
to solenoid function
Hold down MINUS and SET
keys simultaneously for
approx. 2 seconds.
«EXPERT»ashes
Press PLUS key briey three
times.
Use PLUS or MINUS keys to
switch from «IP 1» to «IP 0».
Conrm with SET key
«IP 0» means that the pump is switched o and that
watering is being handled by an external solenoid valve.
The watering period is now displayed in minutes.
Switching to the solenoid function will deactivate
the level sensor.
Data export Your Plantomat® PRO will record all activities during
the previous 6 months. This data can be exported and
analysed using the optional accessory data export cable.
More information on this is available in the data export
cable operating instructions or at www.plantcare.ch.

18
7.5 Alarm displays
Display Alarm What you need to do Alarm reset Section
+ LED ashes
Water alarm Fill up the water reservoir
or
7.2
+ LED ashes
Level sensor Stop lling up the water reservoir
or
7.2
+ LED ashes
Battery alarm Replace all batteries 6.3
Frost alarm Substrate temperature is below 3°C. Switch o your
Plantomat® PRO if temperatures remain below 3°C for a
longer period of time.
10
ERROR Q.v. «Troubleshooting» 8
8. Troubleshooting
Your Plantomat® PRO will continue to water your plant despite ERROR messages according to the most recent
settings except for ERR 3 and ERR 5.
Error message Possible cause Remedy
ERR 1
(Moisture sensor)
Moisture sensor disconnected or
incorrectly connected.
Connect the moisture sensor correctly.
ERR 2
(Level sensor)
Level sensor fails to operate. Faulty cable connection.
Contact your vendor.
ERR 3
(Water pump)
The water pump fails to operate. Faulty cable connection.
Contact your vendor.
ERR 4
(Moisture sensor)
The moisture sensor is faulty. Replace the moisture sensor.
ERR 5
(Water pump)
The water pump is blocked. Remove your Plantomat® PRO from the plant container
and clean the water pump.
ERR 6
(The moisture sensor
measures excessively
dry substrate despite
watering.)
The moisture sensor is not located
in the watering area.
Position the moisture sensor in the watering area.
(q.v. section 6.4)
The water supply has been
interrupted.
Check the pump tubing and the watering tube for kinks. In
the event of solenoid operation, check the water supply.
Watering amount too low. Increase the watering amount.

19
Problem Possible cause Remedy
Watering cuts in
although the substrate
is moist.
The moisture sensor is not
located in the watering area.
Position the moisture sensor in the watering area.
(q.v. section 6.4)
Moisture level too high. Reduce the moisture level.
The watering fails to cut
in although it is dry.
The moisture sensor is
positioned too deep in the
substrate.
Position the moisture sensor in the correct place.
(q.v. section 6.4).
Moisture level too low. Increase the moisture level.
is indicated
although the water
reservoir has not been
relled.
The integral level sensor
reacts very sensitively to
temperature uctuations in
the water reservoir.
No correction is required as the ashing display and the
alarm LED will go out after a certain time.
9. Maintenance/care
Your Plantomat® PRO operates maintenance-free apart from changing at batteries as well as the sensor felt.
Cleaning your Plantomat® PRO:
Corrosive or abrasive cleaning agents must not be used. Clean the keypad with a damp cloth (do not use any
solvents). Your Plantomat® PRO is splashproof but not waterproof and therefore must not be cleaned under
running water or immersed in water.
Cleaning the sensor tip/replacing the sensor felt:
If the moisture sensor has been removed and retted several times, the sensor tip should be cleaned with
clean water. Replace the felt if damaged and after 2 years’use (unscrew the sensor tip).
Cleaning the water reservoir:
Please avoid any contamination of the water reservoir. This may block the water pump and result in your
Plantomat® PRO malfunctioning. We therefore recommend checking the water reservoir periodically for any
dirt and cleaning if necessary.
10. Putting out of operation
Storage/winter storage
• Your Plantomat® PRO must not be operated when temperatures are consistently below 3°C.
• Emptying the water reservoir: the water can be pumped out of the reservoir by pressing the PUMP key.
To do this, disconnect the perforated watering tube from the pump tubing (see section 6.1 5) and
connect a suitable piece of tubing.
• Remove the batteries and store your Plantomat® PRO in a dry and frostfree location.

20
PC_PM_IFU011_Rev.B | © PlantCare AG
11. Disposal/environmental protection
Do not dispose of the equipment or the batteries in your normal household waste at the
end of their service life. They should be returned to an ocial collection point for recycling.
In this way, you will help to protect the environment.
12. Technical specications
Moisture sensor cord: 0.5 m
Level sensor cord: 0.6 m
Pump cord: 1.0 m
Pump tubing: 1.0 m
Voltage supply: 9 VDC / max. 12 VDC
Temperature range: 3 - 60 °C
Batteries: 6 or 12x AA batteries
Service life of the batteries: Dependent on the size of the plant and its location
Operation with a power adapter: Only with 6 rechargeable AA batteries and an original PlantCare
power adapter 90 - 264V
Operation using a photovoltaic cell: Only with 6 rechargeable AA batteries and an original PlantCare
photovoltaic cell.
Plantomat® PRO dimensions: ca. 65 x 70 x 200 mm
13. Appendix
Declaration of conformity:
As the distributor of the equipment described in these instructions for use, PlantCare Inc. conrms its
compliance with the requirements of EU directives 2004/108/EC.
Guarantee:
Your local representative guarantees this product for 2 years (from the date of purchase). This guarantee refers
to all essential defects in the equipment that are demonstrably attributable to faulty material or manufacturing.
Defective equipment will be replaced at our discretion either by a replacement unit in perfect working order or by
the repair free of charge of the equipment after its return conditional on fullment of the following prerequisites:
• The equipment has been operated correctly and in accordance with the recommendations in the operating instructions.
• No attempt has been made either by the buyers or a third party to repair the equipment.
• In the event of parts being replaced, original PlantCare parts or parts released by us have been used. T
his also applies to additional parts and accessories.
The equipment is designed for private use as well as use in oces. The guarantee is invalid in the event of indus-
trial as well as inappropriate use (q.v. 1. Safety pointers).
Disclaimer:
No liability can be accepted for consequential damage caused by faulty operation or by a malfunction of the
equipment.
Spare parts/after-sales service
Table of contents
Other PlantCare Measuring Instrument manuals
Popular Measuring Instrument manuals by other brands

Amprobe
Amprobe TMD Series operating instructions

Brooks
Brooks 0254 Installation and operation manual

Pelstar
Pelstar Health O Meter Professional 209HR User instructions

Zenner
Zenner EnergieTechnik installation manual

Hanna Instruments
Hanna Instruments HI 98171 instruction manual

Hardy Process Solutions
Hardy Process Solutions HI8200IS Series Technical manual