manuals.online logo
Brands
  1. Home
  2. •
  3. Brands
  4. •
  5. Platinum Spas
  6. •
  7. Hot Tub
  8. •
  9. Platinum Spas VL400 User manual

Platinum Spas VL400 User manual

This manual suits for next models

1

Other Platinum Spas Hot Tub manuals

Platinum Spas TP800 User manual

Platinum Spas

Platinum Spas TP800 User manual

Platinum Spas Control TP600 User manual

Platinum Spas

Platinum Spas Control TP600 User manual

Platinum Spas Balboa TP500 User manual

Platinum Spas

Platinum Spas Balboa TP500 User manual

Platinum Spas VL260 User manual

Platinum Spas

Platinum Spas VL260 User manual

Popular Hot Tub manuals by other brands

Jacuzzi Flow Instructions for preinstallation

Jacuzzi

Jacuzzi Flow Instructions for preinstallation

Jacuzzi Premium J-315 owner's manual

Jacuzzi

Jacuzzi Premium J-315 owner's manual

Jacuzzi J-145 owner's manual

Jacuzzi

Jacuzzi J-145 owner's manual

Bestway Lay-Z-Spa 54189 manual

Bestway

Bestway Lay-Z-Spa 54189 manual

Everyday Hot Tubs 530 owner's manual

Everyday Hot Tubs

Everyday Hot Tubs 530 owner's manual

Softub PRESTIGE Owners Manual Water Treatment Guide

Softub

Softub PRESTIGE Owners Manual Water Treatment Guide

JNJ SPAS SPA-318 Programming instructions

JNJ SPAS

JNJ SPAS SPA-318 Programming instructions

KIRAMI Comfort Family Instructions for use

KIRAMI

KIRAMI Comfort Family Instructions for use

QCA Spa VS501 PAK (VL260 TOPSIDE) owner's manual

QCA Spa

QCA Spa VS501 PAK (VL260 TOPSIDE) owner's manual

HoMedics FB-655HJ-GB manual

HoMedics

HoMedics FB-655HJ-GB manual

Jacuzzi alimia instructions

Jacuzzi

Jacuzzi alimia instructions

Jacuzzi ARGA ARG101C0110 Use & maintenance

Jacuzzi

Jacuzzi ARGA ARG101C0110 Use & maintenance

CalderaSpas CalderaSpas Utopia Series owner's manual

CalderaSpas

CalderaSpas CalderaSpas Utopia Series owner's manual

anko SS-601A user manual

anko

anko SS-601A user manual

CalderaSpas CANTABRIA owner's manual

CalderaSpas

CalderaSpas CANTABRIA owner's manual

Dimension One Spas HYDRO SPORT Installation and owner's guide

Dimension One Spas

Dimension One Spas HYDRO SPORT Installation and owner's guide

Bestway Lay-Z-Spa Maldives HydroJet Pro manual

Bestway

Bestway Lay-Z-Spa Maldives HydroJet Pro manual

Dimension One Spas Nautilus Specifications

Dimension One Spas

Dimension One Spas Nautilus Specifications

manuals.online logo
manuals.online logoBrands
  • About & Mission
  • Contact us
  • Privacy Policy
  • Terms and Conditions

Copyright 2025 Manuals.Online. All Rights Reserved.

01
Control
VL260 + VL400
Hot Tub Manual
02 03
GREAT
NEWS
ON YOUR
NEW SPA
PURCHASE.
Your Hot Tub is designed and manufactured with the nest components available
and is engineered for comfort, low maintenance, and durability in mind.
This manual will help you to determine the best way to take care of your spa based on the
amount of use and the type of environment your spa is installed.
It is very important that you take me to read the enre manual before using your spa.
Within in this manual are important start-up guidelines and maintenance procedures as well
as safety precauons that must be followed to ensure the prolonged life of your spa and the
safety of the people using the hot tub.
Failure to follow start-up procedures may result in damage to your Hot Tub and void your
warranty. Please feel free to call Superior Spas Ltd if you have any further quesons aer
reading this manual. Your Hot Tub comes with a warranty, informaon relang to your
warranty can be found in Secon 13 of this manual.
We hope you enjoy many years of fun and relaxaon in your new Hot Tub.
04 05
CONTENTS
1610
24
06
18
12
25
08
20
13
26
Secon 5
Control panel
operaons
Secon 3
Electrical
requirements
Secon 9
Prepare your spa
for holiday
Secon 1
Important safety
informaon
Secon 7
Maintenance
Secon 4
Delivery of
your spa
Secon 10
Spa
winterizaon
Secon 2
Pre-installaon
& set-up
Secon 8
Water care
Secon 5
Checklist before
seng up your spa
Secon 11 / 12
Servicing
& Warranty
06 07
1. WARNING: To reduce the risk of
injury, do not permit children to use
this product unless they are closely
supervised at all mes
2. DANGER: Risk of accidental drowning.
Extreme cauon must be exercised to
prevent unauthorized access by children.
To avoid accidents, ensure that children
cannot use this spa unless they are
supervised at all mes
3. DANGER: Risk of injury. The sucon
ngs in this spa are sized to match
specic water ow created by the pump.
Should the need arise to replace the
sucon ng or the pump, ensure that the
ow rates are compable.Never operate
the spa if sucon ngs are broken or
missing. Never replace a sucon ng
with one rated less than the ow rate
marked on the original sucon ng
4. DANGER: Risk of Electrical Shock.
Install at least 5 feet (1.5m) from all
metal surfaces. As an alternave, spa
may be installed within 5 feet (1.5m) of
metal surfaces if each metal surface is
permanently connected (bonded) by a
minimum ground wire
5. DANGER: Risk of Electrical Shock. Do
not permit any electrical appliance such
as a light, telephone, radio, television, etc.
within 5 feet (1.5m) of a spa unless such
appliances are installed and built-in by the
manufacturer
6. ELECTRICAL SUPPLY: The electrical
supply for this product must include a
suitably rated switch or circuit breaker to
open all ungrounded supply conductors
to comply with the naonal electrical
standards. This disconnect must be readily
accessible and visible to the spa occupant
but installed at least 5 feet (1.5m), from the
spa water
7. WARNING: To reduce the risk of injury:
a) The water in the spa should never
exceed 40°C (104°F). Water temperature
between 38°C (100°F) and 40°C (104°) is
considered safe for a healthy adult
Lower water temperatures are
recommended for young children and
when the spa use exceeds 10 minutes
b) Since excessive water temperatures
have a high potenal for causing foetal
damage during early months of pregnancy,
pregnant women should limit spa water
temperatures to 38°C (100°F)
c) Before entering a spa, the user
should measure the water temperature
with an accurate thermometer since
the tolerance of water temperature
regulang devices varies
d) The use of alcohol, drugs, or
medicaon before or during spa use
may lead to unconsciousness with the
possibility of drowning
e) Obese persons and persons with a
history of heart disease, low or high blood
pressure, circulatory system problems, or
diabetes should consult a physician before
using a spa
f) Persons using medicaon should consult
a physician before using a spa since some
medicaon may induce drowsiness while
other medicaon may aect heart rate,
blood pressure, and circulaon
8. AUDIO/VIDEO EQUIPMENT
WARNINGS (Oponal equipment based
on model)
CAUTION: Risk of Electrical Shock. Do not
leave compartment door open
9. CAUTION: Risk of Electrical Shock. Replace
components only with idencal components
10. WARNING: Prevent Electrocuon.
Do not connect any auxiliary components
(for example cable, addional speakers,
headphones, addional audio/video
components, etc.) to system
11. CAUTION: Risk of Electrical Shock.
Do not service this product yourself as
opening or removing audio covers may
expose you to dangerous voltage or
other risk of injury. Refer all servicing to
qualied service personnel
12. CAUTION: Risk of Electrical Shock. When
the power supply connecons or power
supply cord(s) are damaged; if water is
entering the audio / video compartment
or any electrical equipment compartment
area; if the protecve shields or barriers
are showing signs of deterioraon; or if
there are signs of other potenal damage
to the unit, turn o the unit and refer the
servicing to a qualied service personnel
13. MAINTAIN: This unit should be subject to
periodic roune maintenance (for example,
once every 3 months) to make sure that
the unit is operang properly
14. CAUTION: Do not operate audio video
controls while inside the spa
15. INSTALLATION of the spa for other than a
residenal dwelling will result in voiding the
manufacturer’s warranty
16. CAUTION: Do not bring any object into
the spa that could damage the spa shell
17. CAUTION: Never insert any object into
any opening
18. WARNING: Do not sit on the spa cover or
place objects on it
19. MAINTAIN: Remove any water or debris
that may collect on the spa cover
20. WARNING: Do not use the spa
immediately aer strenuous exercise
21. WARNING: If you feel pain or dizziness at
any me while using the spa, disconnue
use and contact a physician
22. WARNING: To reduce risk of injury it is
especially important that persons with pre-
exisng health condions or problems such
as obesity, heart disease, high or low blood
pressure, circulatory problems, pregnancy
or diabetes to consult their doctor before
using the spa
23. WARNING: Observe reasonable me
limits when using the spa. Long exposures
at high temperatures can cause high body
temperatures. Symptoms may include
dizziness, nausea, fainng, drowsiness, and
reduced awareness. These eects could
possibly result in drowning
24. WARNING: The spa jets produce a stream
of water with relavely high pressure
Prolonged exposure of localized area of the
body may cause bruises to the skin
25. IMPORTANT: The include warning sign
must be posted where all users of the spa
can see and read it
26. WARNING: To avoid risk of drowning. The
Spa cover should be in place and properly
latched when spa is not in use
27. IMPORTANT: Read and understand the
warnings on the spa cover
28. MAINTAIN: Proper water chemistry is
necessary to maintain the water and prevent
possible damage to spa components
When installing and using this electrical equipment be sure to
follow these basic safety precauons:
Secon 2
IMPORTANT SAFETY INFORMATION
08 09
Selecng a site for your spa
Choose an area in your garden that will be
suitable for your Hot Tub, you may wish to
consult your electrician to ensure the correct
electrical supply can be provided before
preparing the base for the hot tub to sit on. An
area in front of your hot tub should be clear so
that grass and debris are not transferred to the
water. Allow access for steps.
Preparing your base
An un-level base may cause your spa to run
ineciently and cause major ongoing faults.
When creang your base remember it must
be; at, rm and reinforced if you plan to
place your hot tub on a raised plaorm, such
as decking. Please take into consideraon the
average weight of lled hot tub is 1500kg, you
will then need to account for the weight of 4-6
people, plus it will be placed here for a long
period of me.
PLEASE NOTE – If you decide to posion
your hot tub in the ground/pit or with decking
built around it, you will need a design plan
to allow access to all side for maintenance
and repairs, 600mm around each side
is required to ALL sides of the spa, any
obstacle’s blocking the access may result in
rescheduling. Revisits may be chargeable.
When you have decided on the posioning
of your hot tub, it is fundamental that a
solid foundaon is in place, grass will not be
suitable. Please note, it is the responsibility of
the customer to provide a suitable base that is
at, level and solid to prevent distoron from
occurring. Any structural damage caused by
improper base or base failure may invalidate
manufacturer’s warranty.
An ideal base would be concrete 100 –
150mm thick. However, exisng pao slabs
and block paving may also be used. Wooden
decking is also a popular base, however,
please ensure your base can hold the weight
of the hot tub, water and people in it. Please
refer to Secon 1 for the weight details of
your spa. Using “packers” to level the spa is
not acceptable
Please Note: Bases must be prepared in
plenty of me prior to delivery, thus allowing
me for the concrete, etc to fully cure. Any
revisits will be chargeable
Service Access
Access is required around the hot tub for
any future maintenance, ideally 600mm. If
this is not praccal then the hot tub must be
emped of water prior to our visit so that the
hot tub can be moved to allow access.
Think about
When deciding on the nal locaon of your
hot tub, please take into consideraon what
accessories you have ordered for your spa.
For example…
• Have you allowed enough space (8 inches
is needed) to let your cover fall behind your
spa when using your cover lier?
• Have you prepared the base to allow room
for the steps? 700mm is what we recomend
Secon 3
PRE-INSTALLATION & SET-UP
Access to the desired nal hot tub posion
It is very important that you have adequate
access for the size of the spa you have chosen.
Obtain the dimensions of your chosen hot
tub and check the route of access for the hot
tub. Check the widths & heights of doorways,
passages and gates to make sure the hot tub can
pass through. Gates, fences and doors may need
to be removed prior to delivery, the delivery
team will not do this for you.
Make sure that there is nothing protruding
such as drainage pipes, steps or sills that could
obstruct the way.
Check to see if there are any low roofs or
branches that would hinder vercal clearance.
If there are any corners on the path to your
designated installaon site, check to see the
hot tub will pass. The route to where the hot
tub is to be sited should be at and level and
not so ground. Check and inform us if there
are any slopes, retaining walls, steps or level
dierences that may cause problems. Any
extra resources required such as cranes or hiab
vehicles would be an addional charge and
would need arranging by yourselves through a
third party company.
Under special circumstances, where there is
no clear or easy route, a crane can be used to
posion your hot tub. Please contact a local
crane company to arrange this service if you
think it may be necessary. Please note that
the cost of the crane would be charged to you
and not included in our price.
Personnel
We supply a suitable amount of personnel
to deliver the hot tub on our hot tub cart or
spa sled and posion in place, should any
further personnel be required then this would
be down to yourselves to arrange for your
delivery date.
Our colleagues will NOT be able to remove
the hot tub from the hot tub cart/ sledge
unl it reaches the base where it will be
permanently situated.
10 11
Electrical Requirements and Connecons
Before installing a hot tub, the appropriate
electrical supply must be installed, inspected
and conrmed as in line with government
Regulaons. Below is a simple guide to make
sure your electrical supply is in line with the
appropriate regulaons.
Please see Secon 1 for the electrical
requirements of your hot tub.
Hot tubs must have a suitable electrical supply
in order to run, as they have a specic secon
in the 16th edion IEE (Instute of Electrical
Engineers) Regulaons. Do not aempt to
install the electrics yourself unless you are a
fully qualied electrician as the government
introduced a law in January 2005 which states
that most electrical work in UK households
must be carried out by a ‘competent person.
This means that Electrical safety requirements
have been included in a new Part P of the
Building Regulaons.
What is Part P?
The law introduced by the Government in
2005 states that anyone carrying out xed
electrical installaons in English and Welsh
households must ensure they are:
• Designed and installed to aord appropriate
protecon against Damage, whether that is
mechanical or thermal, so that they do not
present any danger in the form of electric
shocks or re hazards
• Suitably inspected and tested in order to
verify that they meet the relevant equipment
and installaon requirements.
• If you have a new circuit installed in your
home, it is a legal obligaon to have it
inspected and tested to ensure that it is
compliant with Part P. This can be achieved
in one of two ways:
1. Appoint an electrical contractor who
is registered with a competent person
scheme. Visit the websites of the following
organisaons if you are unsure of who is Part
P qualied:
NICEIC – www.niceic.org.uk
NAPIT – www.napit.org.uk
ELECSA – www.elecsa.co.uk
BSI – www.bsi-global.com/kitemark
BRE – www.partp.co.uk
OR
2. Appoint a contractor who is not Part P
registered, but contact your local authority’s
Building Control Department rst as the work
will have to be inspected and tested by your
local authority before it can be conrmed and
signed o. There is a charge for this service.
Whichever route you choose to take, you will
receive a Part P cercate to conrm that
the electrical work in line with government
regulaons. From post 2007 this paperwork
must be kept on le and presented, even
if you sell your house as part of the Home
Seller’s Packs.
We, as your hot tub retailer, can liaise with
your electrical contractor regarding the
exact specicaon for your chosen hot
tub model. However, you must meet the
following specicaon:
• The hot tub must be hard wired on its
own fused spur back to your household
consumer unit (i.e. the hot tub should not
share a supply with any other appliances.)
• The hot tub should be appropriately
protected by a suciently rated MCB
(mains circuit breaker) and should cover
the maximum amperage pull of the hot
tub plus 25% to allow for brake torque (i.e.
the rush of current when pumps are rst
turned on.) So, for example, a hot tub that
has a maximum current draw of 20 amps
should be ed with a 25amp MCB.
• Your hot tub should be protected against
earth faults also, by an RCD (residual
current device). This is a trip switch which
works to prevent the danger of electric
shocks from damaged or waterlogged
cables and connecons. A suitable rated
30Ma RCD is what is recommended
• Any outdoor cabling should be suitably
protected from damage by either laying
protecve ducng (pc pipe) below ground
or by using SWA (steel wired armored)
cable. Your electrician will calculate the size
of cable required dependent upon loading
and the distance from the mains supply.
‘Plug & Play’ Hot Tubs (13 AMP)
Electrical Requirements
13AMP (plug & play) hot tubs come ed
with a 3 pin plug which is equipped with an
RDC protector, this RCD protector means the
plug is much larger than a standard plug so
adequate water protecon will be needed. We
recommend waterproof casings such as:
The plug will simply plug into a standard
domesc power supply.
32 AMP and 40AMP Electrical Requirements
A 6mm² 3-core SWA cable is needed for a
32AMP hot tub and a 10mm² 3-core SWA
cable is needed for a 40AMP hot tub. An IP65
Rotary Isolator Switch is recommended in order
for the hot tub to be isolated outdoors in an
emergency or for service work. This is a rotary
on/o switch must be sited at least 2 meters
away from the hot tub so that users cannot be
in the hot tub whilst touching the switch.
A suitable weather proof block connector
can be ed to the end of the tail from the
isolator in order for the hot tub to then be
directly hard wired into the weatherproof
block connector inside the hot tub.
Waterproof gland packs should be used to
prevent ingress of water on all electrical
connecons (2 at the isolaon switch).
It must be ensured that all earth cables
are clearly colour coded with green/yellow
insulang tape, or an earth sleeve.
If you have booked our full installaon package,
our installaon team will commission the Hot
Tub and check everything is fully operaonal
before the hot tub is ‘handed over’ to you, give
you instrucon on the control operaon and
provide chemical training.
If you are in any doubt about the required
electrical guidelines you should seek professional
advice from a fully qualied electrician.
Please note: Your electrician should leave 4
meters of spare cable leading from the isolator.
Our technicians are qualied to connect this
cable to the inside of the Hot Tub.
Our delivery team will NOT hardwire your hot
tub to the mains supply. We advise you seek
a professional electrician to be present on the
delivery day.
Secon 4
ELECTRICAL REQUIREMENTS
12 13
Access + Delivery
Prior to delivery you must check that you
have the relevant access for your spa. This
informaon can be found in the product
specicaon in Secon 1.
Please consider the following when checking
your access
• Vehicle access for 3.5 tonne van
• The route the spa will need to take
• Any obstrucons, such as electricity boxes,
overhanging trees, gates, steps up or down.
If access is not possible than a crane will be
required, this may require redelivery. Redelivery
and crane will incur addional costs.
Hiab Cranes organized by us will include
1 hour labour for the crane company. Any
addional me required be changeable to the
customer.
If you are unsure and have any queries
regarding your access, we will be happy to
assist by reviewing photo’s/videos sent by you.
Site visits may incur an addional charge.
For any support on this maer please contact
our oce on 01246 559071.
Oce opening hours are…
Mon-Fri 9am-5pm
Saturday 9am-2pm
Alternavely please email us on
[email protected]o.uk
Fill It Up
1. Place a garden hose into the lter area
(Let your hose run for 5 mins before
pung into the spa to clear out any
stagnant water in the hose before pung
it into the hot tub.) Also, it’s a good idea
to use a hose-ended lter/water soner,
this will ll your spa from the pumps and
pipework rst to prevent any airlocks in
the system. Also, it’s a good idea to use a
hose-end lter/water soener will make
balancing water easier and to reduce the
amount of impuries that can contaminate
your water. At this point your hot tub
should be turned o at the isolator.
2. Fill water to recommended water level as
indicated by the minimum water level in
your hot tub. Low water levels can cause
damage to the pump and heater element
so is good pracce to top up your spa on
a weekly basis. If there is no water level
indicator, you should t your hot tub to 1
inch above the top of the back jets
3. Remove side panel and check for any
leaks around the plumbing. It is not
unusual for ngs to come lose during
shipment. If you do detect any small leaks,
you’ll want to hand-ghten them right
away. (Using a wrench can easily crack the
nut and cause the leak to worsen).
Power up the Spa
Aer checking all the ngs are ght and
are sure no leaks are occurring, you can
re-t the side panel and turn the power on
at the isolator point. Read Secon 7 on how
to operate your new spa controls and how to
turn on the hot tub.
Hot tubs can take approximately 12 – 24
hours to rise to temperature. Heat me
depends on spa size, voltage and other factors
such as outside temperature. Plug & Play hot
tubs take longer to heat than 32AMP.
Balance Your Water
Test and balance your hot tub water before
you introduce any sanizers. It is important
to balance prior to adding sanizers to avoid
unwanted problems such as cloudiness,
discoloraon or foul smelling water. Also,
keeping your water balanced is crucial
to promote long equipment life, and
healthy, clean, clear spa water. Poor water
management which results in components
of your spa degrading/failing can invalidate
your warranty.
More informaon on treang your water can
be found in Secon 9.
The control panel operaon (Secon 7) is lled with valuable informaon to
give you an idea of how your spa works and how to prevent any mishaps or
damage to your new hot tub before you get to use it.
Secon 5 Secon 6
DELIVERY OF YOUR SPA CHECKLIST BEFORE USING YOUR SPA
14 15
16 17
CONTROL PANEL OPERATIONS VL260
CONTROL PANEL  VL260
01.2015 7
FIRST RUN
The control of the spa starts with the Priming mode indicated on the display
screen with the„ ” sign.
This mode takes less than 5 minutes, then the spa begins to heat and keep
the water temperature in Standard mode.„St”
JETS - STARTING THE ENGINES
Press the JET button to start the pump at low speed. When you press
the button second time, the pump operates at
a higher speed. Press the button the third time and it will shut the pump
down.
The control program contains a safety shut-down function, which shuts
down the engines after 4 hours at low rotating speed and after 15 minutes
at high rotating speed.
The system starts the engine automatically every 30 minutes and operates
for a minimum of
two minutes. It is intended to check the water
temperature and turns on the heater if needed (depending on the set
operating mode).
When the system turns on automatically at low speed, it cannot be turned
off from the control panel, but the second gear can be turned on.
COOL WARM – SETTING THE
TEMPERATURE
AT FIRST START THE DEFAULT TEMPERATURE IS 37°C. THE LAST MEASURED
TEMPERATURE IS CONTINUOUSLY DISPLAYED ON THE CONTROL PANEL.
REMEMBER, THE CONTROL PANEL ONLY DISPLAYS THE CURRENT
TEMPERATURE IF THE ENGINE HAS BEEN OPERATING FOR AT LEAST 2
MINUTES.
The default temperature can be reduced by pressing the COOL button
and increased by pressing the WARM button. In this case the value of
the temperature will flash on the display screen.
When you have completed the setting, after 3 seconds the screen will
continuously display the current temperature again.
LIGHT
Press the LIGHT button to turn on the lighting in the spa. The power
lights turn off
automatically after 4 hours.
MODES
To change modes press the following buttons sequentially:
„Light” and„Cool” or „Light” and „Warm”.
STANDARD MODE
In normal mode the spa water will be heated to the set temperature. The
sign on display will be „ ”
ECONOMY MODE
In economy mode the spa water is only heated in filtration cycles so it
reaches the set temperature more slowly. The Economy mode sign on
display will be „ ”
SLEEP MODE
In this mode the spa water is heated to maximum 10°C
(frost protection). The sign on display will be „ ”
SETTING FILTERING TIME
The first filtration cycle begins 6 minutes after the spa is powered.
e second ltration cycle begins 12 hours later.
e ltration cycle is programmable for 1-8 hours or to continuous ltration
(e sign on display will be )
For programming press the COOL or WARM button, then the JETS
button.
To set the ltering time press COOL or WARM .
Press the JETS button to stop.
FROST PROTECTION
If the temperature sensors detect water temperature below 6.7°C, the engine
and heating will start automatically to prevent the spa water
from freezing. When the sensors detect 7.2°C, the system will shut down.
CONTROL PANEL  VL260
8
Error messages on display
Sign Meaning Message / necessary actions
There is no message on the screen.
The spa is not plugged in.
The control panel is only usable if the spa is plugged in. The
settings are stored in the memory until the system is turned
on again.
Unknown temperature The actual temperature will appear on the screen 2 minutes
after the engine has been turned on.
"Overheat" - Excessive water temperature,
the spa has stopped. One of the sensors has
detected 48°C (118°F)
DO NOT STEP INTO THE SPA.
Remove the spa cover to allow the water to cool. Press any
button on the control panel. If the system does not reset,
turn it o and call the ocial service provider.
"Overheat" - Excessive water temperature,
the spa has stopped. One of the sensors has
detected 43°C (108°F)
DO NOT STEP INTO THE SPA.
Remove the spa cover to allow the water to cool. Press any
button on the control panel. If the system does not reset,
turn it o and call the ocial service provider.
"Ice" - Possible freezing condition. No action should be taken. The engine start regardless the
state of the spa and runs for 4 minutes until the sensors
sense 7,2 °C or higher water temperature
The spa is shutting down.
Sensor A is out of service.
If the problem comes up repeatedly, contact the ocial
service provider.
The spa is shutting down.
Sensor B is out of service.
If the problem comes up repeatedly, contact the ocial
service provider.
The sensors are out of sync. If it is displayed
together with the temperature, the problem
is temporary. If it is displayed alone and
ashing, the spa will shut down.*
If the problem comes up repeatedly, contact the ocial
service provider.
There is a signicant dierence between
sensor values.
This could indicate a ow problem.
Check the water level - it should be 2-3cm below the head-
rests. Pour in more water if necessary.
Check if the engine has been primed.
If the problem comes up repeatedly, contact the ocial
service provider.
Recurring ow problem.
The heating unit shuts down, but all other
functions of the spa are serviceable.
Follow the instructions detailed here . Check the cleanli-
ness of the lter. If necessary, clean
or change the lter.
Press any button to
reset.
Low water in the heating unit. Slow ow or
air bubbles in the heating unit. The spa will
shut down for 15 minutes.
the water level is OK, check if all the engines have been
primed. Press any button to reset. If the problem comes up
repeatedly, contact the ocial service provider.
Low water in the heating unit. Low water in
the heating unit. (appears if is displayed
3 times.)*
Follow the instructions detailed at the sign.
Press any button to reset.
* Some functions may turn on when the spa is shut down when there is a need for frost protection.
Secon 7
18 19
Daily: It is possible to select how many
ltraon cycles a day you want to your hot tub
to perform. We advise to set your ltraon
seng to run twice per day, for at least an
hour each me.
Weekly: It is good pracce to test your
water a couple of mes a week, then adjust
alkalinity, pH, sanizer, and calcium hardness
as required to bring the levels back in line
with the ‘okay’ range on your test strip pack.
If you’ve added sanizer during the week, you
may not need to add a weekly dose, so always
be sure to test before adding anything.
Every Three Months: It is advised to drain
your hot tub every three months and rell
with fresh water. Before you drain your hot
tub, add some hot tub ush to your hot tub
and let this circulate through the lines and
jets, this will eliminate any build up of bacteria
and prevent biolm.
Aer the bacteria in your lines is dead and
circulang, completely drain the dirty water
out of your spa. Rinse with clean water then
drain. Clean your hot tub, wash or replace
your lter cartridges, then rell your spa with
fresh water (Let your hose run for 5 mins
before pung into the spa to clear out any
stagnant water in the hose before pung it
into the hot tub). Consider using a hose lter/
water soener to prevent metals and other
contaminants from entering your spa in the
rst place.
Aer you rell your hot tub, balance the
water chemistry and use a shock treatment
to rid of any non-organic compounds that
have entered via the hose pipe. Be sure to
test the water one last me before stepping
into it the rst me. This will ensure your
spa contains the correct amount of sanizer
to destroy contaminants quickly.
Draining Your Spa
Approximately every 3 months it is
recommended to replace your water, the
frequency of which you replace your spa
water depends on regularity of use, care taken
in maintaining the water quality etc.
It will be apparent when your water is
ready for a change when you can no longer
control sud, scum and cloudiness of the
water even though the key water balance
measurements are all within the proper
parameters. Another alternave is to use
a submersible pump, this will allow you to
drain your hot tub much quicker.
NOTE: Always power o the spa before draining
it. Do not power on unl the spa has been
lled to the water level line.
Even though the spa is empty do not allow it
to sit in direct sunlight and always return the
spa cover.
If you intend to drain to shut down for winter,
please follow the steps in Secon 11.
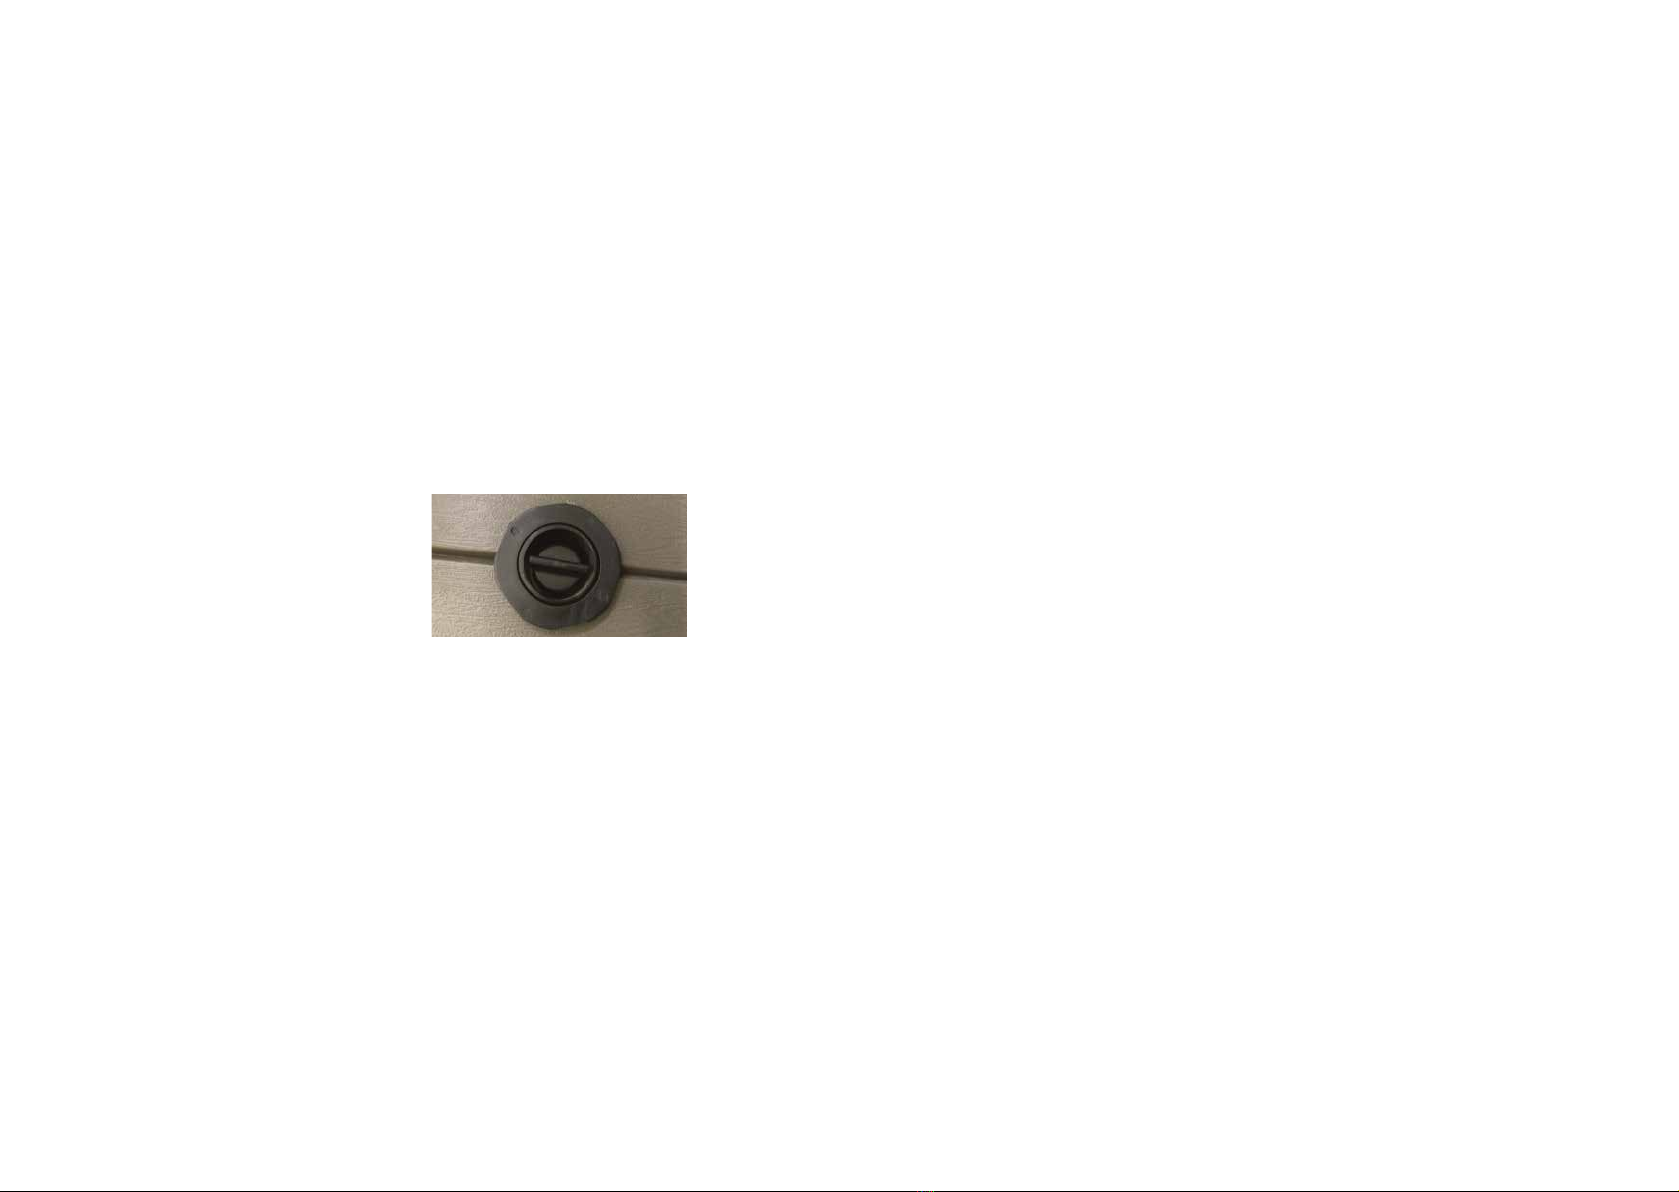
Your drain valve will look something like this. To
operate, unscrew the center secon and screw
in the drain valve adapter that arrived with
your hot tub. The acon of screwing in the
drain valve adapter releases the water ow.
You may wish to aach a hose to the adapter
to run the water away.
Filter Care
Cleaning your hot tub lter is a vital part of
hot tub maintenance and plays a key role in
keeping your hot tub’s water safe and clean.
While cleaning your hot tub lter may seem
complex and cumbersome, it can actually be
quite simple. This will walk you through the
most common ways to keep your hot tub’s
lter spotless.
Tip 1: Filter Replacement
Regardless of how clean you keep your
spa’s lter, it is imperave that you replace
it at least every 6 – 9 months. In addion
to pung a severe strain on your hot tub’s
pump, worn-out lters are unable to properly
trap contaminants.
Tip 2: Basic Rinsing
Your spa’s lter should be given a thorough
rinsing once every 2 weeks. If you make
frequent use of your spa, however, you may
want to ulize this method of lter-cleaning
on a somewhat more frequent basis. This
method is very simple and can oen be
accomplished with nothing more than a
garden hose and an old tooth brush. Taking
care to remove every speck of dirt, use the
hose to give your lter a vigorous soaking and
use the tooth brush to carefully brush out in
between the lters paper pleats.
If the lter is parcularly dirty, all-natural
cleaning products can be used in conjuncon
with this method. It is also important to rinse
your lter o in this fashion whenever you
change the water in your spa, regardless of
how recently its last cleaning took place.
Tip 3: Cleaning Products
If your spa’s lter is exceponally dirty you
may want to consider incorporang the aid
of cleaning products. Filter/cartridge cleaner
has proven extremely eecve in laying waste
to caked-on dirt and calcium. Please follow
instrucons on packaging. Ensure you rinse
the lter thoroughly and leave to dry out
completely before placing back in your spa.
Tip 4: Mistakes to Avoid
When cleaning your hot tub lter, there are
several things you should avoid. First o, do
not aempt to clean your hot tub lter in a
washing machine, dish washer or pressure
washer as the immense water pressure can
damage the lter irreparably. Secondly, do not
try to clean your lter with bleach or laundry
detergents, as they will cause severe foaming
problems with your hot tub’s water, much like
other commercial cleaning products.
General Care
Vacuuming the spa: Debris from wind, trees
and spa users will occasionally accumulate on
the boom of your spa. Your spa’s ltraon
system will remove the smaller debris. Debris
that is too large or too heavy for the ltraon
system will have to be removed by the use of
a spa vacuum or net.
Headrest Care: Remove and clean the
headrest cushion as needed with soapy water
using a cloth or so sponge or brush.
Tip: always remove the pillows when adding
chemical treatments to the spa water. Replace
aer 30 minutes of running the chemicals
through the system with the spa cover o. This
will prolong their life and avoid reduce damage.
Maintaining the Cover: Use a household
hosepipe to gently rinse the spa cover of
any debris.
Using a so brush or sponge clean the cover
with soapy water or a hot tub cover detergent.
Do NOT use on the inside of the cover.
Tip: To prolong the life of the spa, handle with
care or use a hot tub cover lier and clean
regularly.
NOTE: Do not use solvents, abrasive products
or aggressive detergents e.g. containing
alcohol or bleach.
NEVER allow anyone to stand or sit on the
spa cover.
Panel Maintenance: Panels do not require
any special maintenance regime. To clean,
simply wipe down with a wet cloth. Never
spray water against the panels as directly
behind are electrical components.
Spa Shell Surface: To maintain the sheen of
your spa shell, it is crucial that you do not
use any abrasive cleaners. Only use specic
surface cleaners.
NOTE: Regardless of your chosen cleaning
method always ensure all the residue has been
removed from the surface as this could result in
your spa having to be drained and relled.
Secon 8
MAINTENANCE