Platinum 7096653 CM4117T User manual

INSTRUCTION MANUAL
1.5LCOFFEEMAKER
MODEL:7096653 (CM4117T)EAN:6001001432450
INDOORHOUSEHOLDUSEONLY
Pleasesaveand readthisinstruction manualcarefullybeforeuse.

ENGLISH
INTRODUCTION
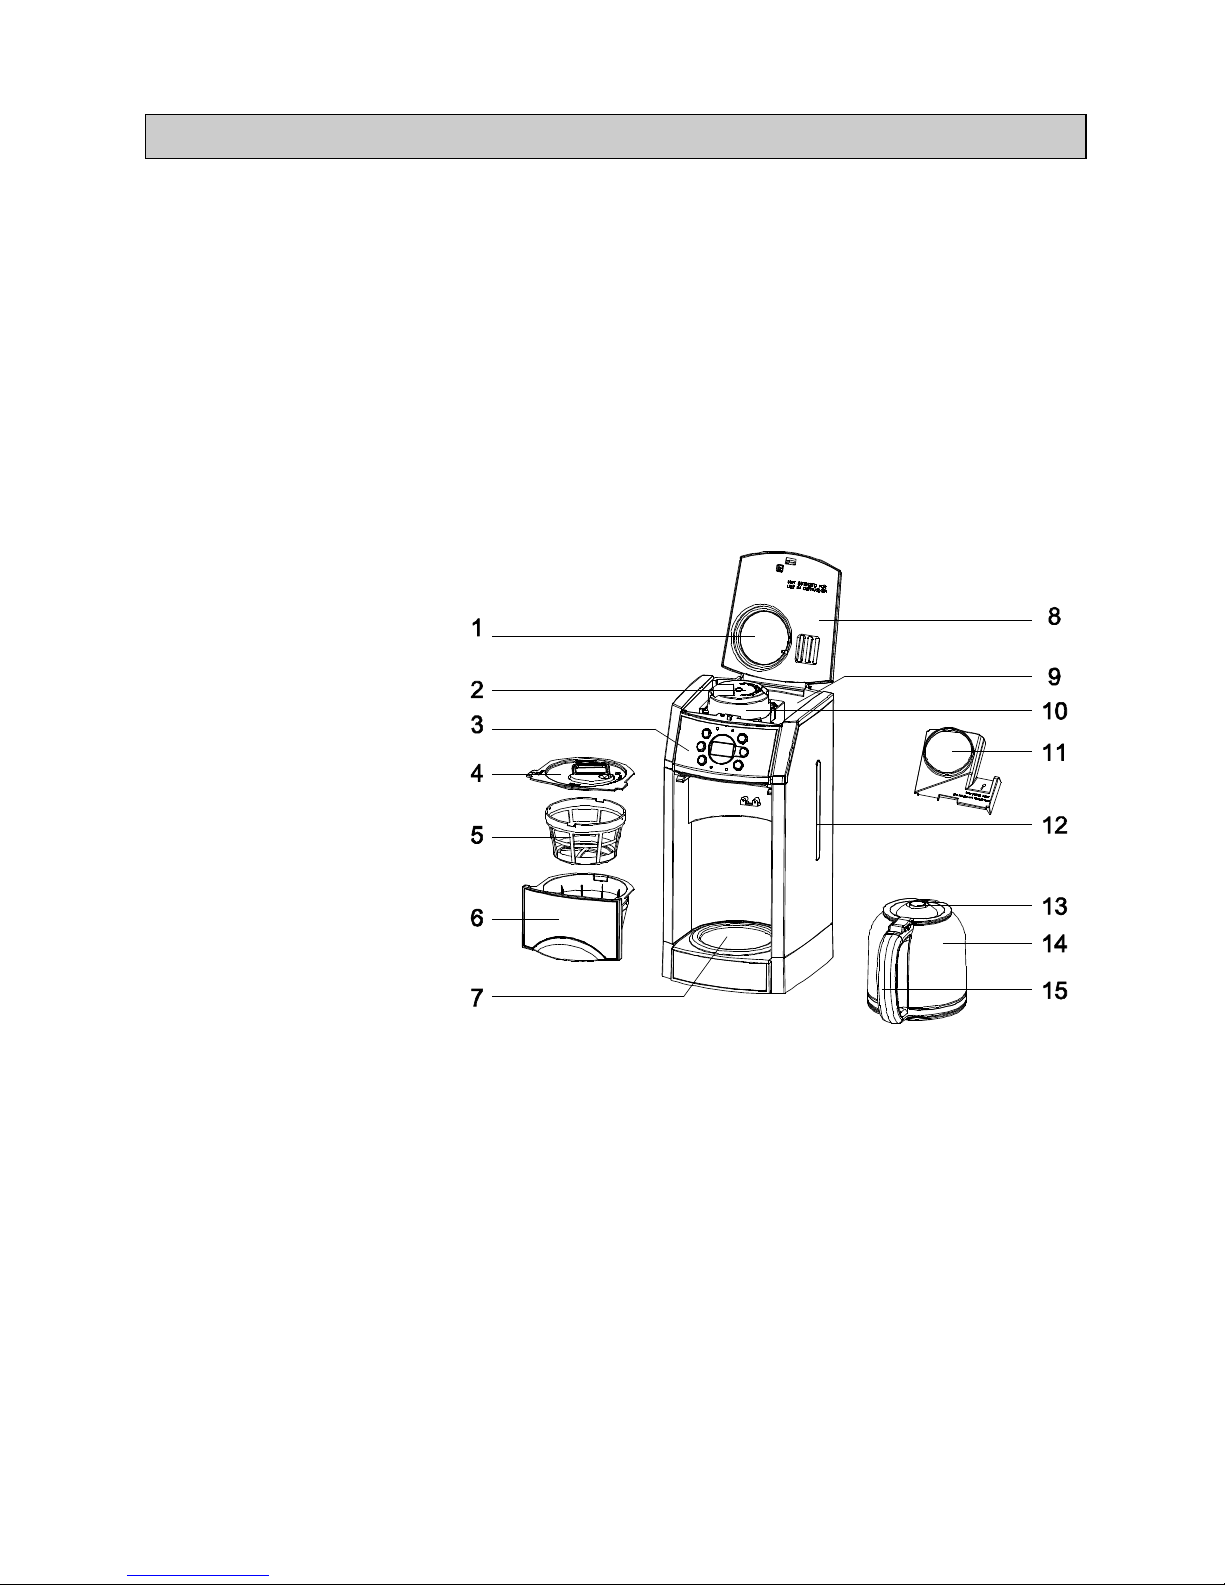
Thankyou forpurchasing our Platinum”Coffee Maker.Eachunithasbeen
manufactured toensuresafety,reliability,and easyofuse.Beforeuse,please
read theseinstructionscarefullyand savethemforfuturereference.
IMPORTANTSAFEGUARDS
When using your Platinum”Coffee Maker, basicprecautionsshouldalwaysbe
followed, including the following:
lThisapplianceisnotintended forusebypersons(includingchildren)with
reduced physical,sensory ormentalcapabilities,orlack ofexperienceand
knowledge concerning the useof thisproduct,unless theyaresupervised or
havebeen given instruction concerning useofthe appliancebyaperson
responsiblefortheirsafety.
lChildrenshouldbe supervised toensurethattheydo notplaywiththe
appliance.
lAlwaysensurethatthe voltage on the rating labelcorrespondstothe voltage
inyourhome.
lCheck the powercordand plug regularlyforanydamage.If thecordorthe
plug isdamaged,itmustbe replaced bythe manufactureroraqualified
person inordertoavoidan electrical hazard.
lThisapplianceisintended forhouseholduseonly.Industrial orcommercial
usewillvoidthe warranty,andthe suppliercan notbeheldresponsiblefor
injuryordamage caused when using the applianceforanyotherpurpose
than thatintended.
lIncorrectoperationand improperusecan damage the applianceand cause
injurytothe user.
lDo not usethe applianceifit hasbeen dropped ordamaged inanyway.In
caseofdamage,taketheunitinforexaminationand/orrepairbyan
authorized serviceagent.
lToreducethe risk ofelectricshock,donotimmerseorexposethe motor
assembly, plug orthepowercordtowateroranyotherliquid.
lNeverimmersethe unit inwateroranyotherliquidforcleaning purposes.
lRemovethe plug fromthe socketbygripping the plug.Do notpullon the
cordtodisconnecttheappliance.Alwaysunplug theunitwhen notinuse,
beforecleaningorwhen adding orremovingparts.
lThe useof accessory attachmentsthatarenotrecommended orsupplied by
the manufacturermayresult ininjuries,fireorelectricshock.
lDo notletthe cordhang overthe edge ofatableorcounter.Ensurethat
the cordisnot inaposition whereitcan be pulled on inadvertently.
lDo notallowthe cordtotouchhotsurfacesand do notplaceon ornearahot
gasorelectricburnerorinaheated oven.
lUseofan extension cordwiththisapplianceisnotrecommended.
However,ifitisnecessary tousean extension lead,ensurethatthelead is
suited tothe powerconsumption ofthe appliancetoavoidoverheating ofthe
extension cord, applianceorplug point.Do not placethe extension cordin
aposition whereitcan be pulled on bychildren oranimalsortripped over.

ENGLISH
lThisapplianceisnotsuitableforoutdooruse.Do not usethisappliancefor
anything otherthan itsintended use.
lDo not carrythe appliancebythe powercord.
lDo not touchhotsurfacesdirectly.Usehandlesorknobs.
lDo not leavethisapplianceunattended during use.Alwaysunplug the unit
whennotinuse.Allowittocool beforeputting on ortakingoffparts,and
beforecleaningthe appliance.
lAlwaysoperatethe applianceon asmooth,evenand stablesurface.Do
not placethe unit on ahot surface.
lThe manufacturerdoesnotacceptresponsibilityforanydamage orinjury
caused bythe improperorincorrectuseofthe appliance,orbyrepairs
carried outbyunauthorizedpersonnel.
lIncaseof technicalproblems,switchoffthe machine and do notattemptto
repairityourself. Returnthe appliancetoan authorized servicefacilityfor
examination,adjustmentorrepair.Alwaysinsistonthe useoforiginal
spareparts.Failuretocomplywiththe abovementioned precautionsand
instructions, couldaffectthe safeoperation of thismachine.
lDo notusethisAppliancenearbathtubs,showers,basinsorothervessels
containing water.
lAlwaysattachplug toappliancefirst, then plug cordintothe wall outlet. To
disconnect, turnanycontrolto Off”, then removeplug fromwall outlet.
lDo not set the carafeon ahotorcoldsurface.
lDo not usethe carafehavingalooseorweakened handle.
lNeverleavethe emptycarafeon the keeping warmplateotherwisethe carafeis
liabletocrack.
lDo not clean the carafewithcleaners, steel woolpads, orotherabrasive
materials.
lAvoidcontacting moving parts.
lBladesaresharp. Handlecarefully.
lCheck the grinderboxforpresenceofforeign objectsbeforeusing.
lNeverleavethe emptycarafeon the keeping warmplateotherwisethe carafeis
liabletocrack.
lChildren shouldbe supervised toensurethat theydo not playwiththe
appliance.
lThe containerisdesigned forusewiththisappliance.It mustneverbe used
on arange top.
lThisapplianceisintendedtobeused inhouseholdandsimilarapplications
suchas:
-Staffkitchen areasinshops,officesandotherworkingenvironments;
-Farmhouses;
-By clientsinhotels, motelsandotherresidentialtypeenvironments;
-Bed andbreakfast typeenvironments.

ENGLISH
KNOWYOURCOFFEE MAKER
1.Viewwindow
2.Grinderboxlld
3.Controlpanel(see
below)
4.Filtercover
5.Filter
6.Filterholder
7.Warming plate
8.Tankcover
9.Watertank
10.Grinderbox
11.Innercover
12.Watergauge
13.Carafelld
14.Carafe
15.Carafehandle

ENGLISH
SPECIFICATIONS
Capacity:
1.5Liters/ 12 cups(125 ml/ cup)
Voltage :
AC220-240V/ 50Hz
Wattage :
1000W
Cord :
3-pingrounded plug. (toreduceriskofelectricshock)
USINGYOUR COFFEE MAKER
Beforefirst use, pleasefollowtheseinstructions:
1. Removeallpackaging and anylabels,
2.Filltothe maximumlevelmarkwithfreshwater,boiland emptythecoffee
makeratleast2timestoclearcoffee makerofanytinyparticles.Do notdrink
the water.
3.Cleaning allthe detachableparts,suchasthe grinderbox,filter, filterholder
and soon completely.
Settheclock
1.Oncethe applianceisconnected topowersupply,88:88 willdisplayand flashon
the LEDdisplay,after5s,the LEDwilldisplay12:00.
Note:If you do notset theclock,you cango directlytoothersettings.
2.Press the program”button once(see LEDdisplay). You arenowinthe
TimeSet”mode and can operateeither hr”or min”button toachievethe
desired setting.
3.Confirmtheclock setting bywaiting for15 seconds.
4.The buttonscan be helddowntoscrollthrough the digits, orpressed and
released lightlytoadvanceone digit atatime.
Note:The timecycleis24 hours(thedetailsrefertothe LEDdisplay).
To settheprogramtime
Ifyou do notwant the coffee makerstartoperation immediately, youmaysetthe
automaticstart function asfollows:
1.Afterset the clock(supposethe current timeis13:30).Press the program”
button twice.You willenterthe stateof presetthe automaticstart time”(see
LEDdisplay).The desired timecan be set bypressing the”hr”and min”
buttonstoscrollforwardthrough the digits.
2.Whenthe desired timesetting approaches, press the on/off button twice.
The indicatorofprogramwillbe illuminated.Whenthe preset timeachieves
and the indicatorof programwillbe extinguished.The indicatorof on/off will
be illuminated and the coffee makerwillstart tobrew.
Note:you can see the automaticstarttimebypressing the program”.You
can determinethe displaytimeisprogrammed timeorcurrenttimeby
seeing the lowerindicatoron the LED(the detailsrefertothe LEDdisplay)
3.Ifyouwant tocancel the preset program,press the on/off button twice.The
appliancewill start tobrewimmediately.
4.Reset the automaticstart”mode,onlyfollowing the steps1-2again.

ENGLISH
TO USE YOUR COFFEE MAKER
Beforeyou makethe firstpotofcoffee inyournewappliance,werecommend
operating the coffee makeronce,using onlywaterand paperfilter.Thiswill
removeanydustorresidueswhichremaininthe systemfromthe
manufacturing process.
1.Add beans: Open the tankcoverbypushing the releasebutton and lifting
up,and removethe grinderbox,then open the grinderboxlidbyscrewing it,fill
the grinderboxwiththe desired quantityofbeansaccording tothe markson
the grinderbox.The marksindicatethe coffee bean whichmaking
corresponding coffee (see fig.1).Generallyload the grind box2OZbeansmost.
Do not overfillorthe Grinderboxmaybe blocked and/orthe coffeemakermay
overflow.And assemblethe grinderboxintothe coffeemaker,itmust be noted
the connectorgroovemust be locked intothe motorshaft(see fig.2), otherwise
the grinderboxwillnotbe assembled inplaceproperly,and itmaydamage the
grinderbox.
Note: the grinderboxmustbe removed foradding beans.
2. Andreplacethegrinderboxcover(see fig.3),firstplaceintoposition from
the ”position,then turnthe grinderboxlidinclockwiseuntil it lock intothe
”position), otherwisethe appliancewillnot operate.
Proportions
exaggerated
forclarity
Fig.3

ENGLISH
3.Fillthe tank:afteradd beans,then pouring the desired amount ofwaterinthe
tankfromthe indication on the innercover(see fig.4),and the waterlevel
shall accordingtothe gauge located atthe right of the tank.
Note: beforefilling water, the innercovermust be assembled inplace.
4.Pulloutthe filterholder:Placeitselfpermanentfilterinthe filterholderand
replacethe filtercover.Then pushthe filterholderinplace.
Note: apermanentfiltermayallowsomeground coffee toflowintocarafe.
5.Closethe tankcover:Press downtolock.Theapplianceisequipped witha
safetyinterlock system.The detailsrefertothe section of PROBLEM
SOLVING”.
6.Beforebrewing coffee:Makesureyou havereplaced the carafeinits
position on the keeping warm plate.
7.Plug the cordintoan electricaloutlet. 88 88”willdisplayand flashon the
LED, after5s, 12:00”will appearuntilyou set the time.Set the current clock
according tothe Set theclock”sectionon the above.
8. Makesurethe indicatorof grindoffmust be extinguished.
Note: Ifthe indicatorofgrind offisilluminated,itmeansthatthe applianceison
the makecoffee withpre-ground bean”mode.The appliancewill omit the step
of grinding bean.
9.SelectCupsSetting:The 1-4cup setting button isused tocontrolthe timeof
grinding bean,ifyou wantmake1-4cup coffee,pressthe button and the
indicatorof 1-4cup willbe illuminated.Thetimeof grinding bean isabout 30s.
Ifyou do notpress the button,the defaultsetis5-12 cups.The timeof
grinding bean isabout 40s.
Note:the 1-4cup button onlyuseinthe makecoffee withbean”mode.Inother
words,the indicatoraboveofthe button ofgrind offmustbe extinguished.In
the makecoffeewithpre-ground bean”mode,itisunused.And during
operation,the button isnot activated.
Proportions
exaggerated
forclarity
Fig.4

ENGLISH
10. Starttooperate:
Immediategrindingand brewing: Press the on/off button,the indicatorof run
willlightand the process willbegin.
②Programmed brewing:If you do not want the coffeemakerstart operation
immediately, youmaysetthe automaticstartfunction according tothe Setthe
programtime”on theabove.
11.When finishgrindingbean, the brewing process begins.
Note:During operation,youcan takeoutcarafe,pourand serveatanytime.
The appliancewillstop dripping automatically.Butthe timecannotexceed 30
seconds.
Caution:when the brewing hasalmostfinished,thequantityofsteamwill be
muchmore,and the steammayrun outfromcontrol panel,filterholderand
othergap.Itisnormal,you onlyneed tocareof notbeburned bysteam, itwill
not affectthe normaloperation.
12.Oncethecoffeehasbeen finished brewing,stiritbeforeserving toblend
the flavors.The coffee atthe bottomofthe carafewillbe somewhat
strongerthan the coffee atthe top.Afterbrewing,the unitwillkeep warm
for2Hoursand then automaticallyshut poweroff.
Orpress the on/off button twicetoshut poweroffand unplug the poweroutlet.
Make CoffeewithPre-groundBeans
1.Fillthe tank:Open the tankcoverbypushing the releasebutton and lifting up.
Makesurethe innercoverisinplace,then pouring the desired amountof
waterinthe tankaccording tothe gauge located atthe right of thereservoir.
2.Pulling outthe filterholder.Add ground coffee toourpermanentfilter.Our
recipe suggestion:Use1levelscoop ofground coffeepercup.Adjustthe
recipe according toyourindividual.
Note:The maximumcapacityforgroundcoffeeis10levelscoops,using a
permanentfilter.Exceeding thatamountmaycauseoverflowif thecoffee istoo
finelyground.
3. Replacethe filtercoverand pushthe filterholderinplace.
4.Beforebrewing coffee:Makesureyou havereplaced the carafeinits
position on the keeping warm plateand haveplaced afilterinthe filterholder,
replacethe filtercover.
5.Plug the cordintoan electricaloutlet. 88 88”willdisplayand flashon the
LED, after5s, 12:00”will appearuntilyou set the time.Set the current clock
according tothe Set theclock”sectionon the above.
6.Press the grind off”buttonand theindicatorofgrindoffwill be illuminated.
The appliancewillomitthestep ofgrinding bean and enterthebrewing
operation onceyou press the on/off button orthepreset timeachieves.
7. Followinstructions9through 11fromthe MakeCoffeewithbean section.

ENGLISH
Pause serve
Thisfeatureallowsyou topouracup of coffee beforethe entirebrewcyclehas
completed.By removing the Carafe,the flowofcoffeefromthe bottomofthe
filterwillstop.
Caution:Returncarafetowarming platewithin30seconds.Hotwater
continuestoflowintothe filterwhen thisfeatureisused.Overflowing coffee
and hot waterwouldbe aburnhazard.
Automaticshutoff
The AutomaticShutofffeatureshutsoffthe warming plate2hoursafterbrew
cyclebegins.Alwaysturncoffeemakeroff and unplug whenfinished.
CAREAND CLEANING
Completelyclean and dryalldetachablepartsaftereveryuse.Itmustbe
maintainfor30 minuteseverytwocycles. The purposeisletthe appliancecool
down completely.
1.Alwaysturncoffeemakeroffand removethe plug fromthe electricaloutlet
beforecleaning.
2.Removeallthedetachableparts.
3.Afterremovethe carafefromthe warming plate,discardanyremaining
coffee.Thecarafeand lidcan bewashed inwarm soapywaterand rinsed
thoroughly,orplaced inadishwasher.The carafeand carafelidshouldbe
placed on the upperrackonly.
4.Pulloutthe filterholder. Removefiltercoverand filter.
5.The grinderbox,grinderboxlid,filter,filterholderand filtercovercan be
washedinwarm soapywaterand rinsed thoroughly,orcleaned inthe upper
rack ofthe dishwasher. Dry allpartsaftereveryuse.
6.Do notputanywaterinthe unitoncethe grinderboxhasbeen removed.
Wipethearea underthegrinderboxwithadampcloth. If watergetsintothe
grindermotor,the motormaybecomedamaged and maymalfunction.
7.Onceaftercleaning, reversethe abovesteps.
Note:
a) Do not usescouring agentialorharshcleanserson anypart ofthe coffee
maker.
b) Neverimmersebaseunit inwaterorotherliquid.Toclean base, simply
wipe withaclean,dampclothand drybeforestoring.
c) Wipethe keepingwarmplatewithaclean, dampcloth.Neveruserough,
abrasivematerialorcleanerstoclean theresting plate.
d) Do not dry the inside of thetankwithacloth, aslint mayremain.

ENGLISH
PROBLEMSOLVING
During operation,ifthe watertankcover/grinderbox/carafearenotinplace
separately,the motorwillbe cutoff, the buzzerwillalarm,and the LEDwill
displayand flash.The detailsofdisplayaccording tothefollowing:
(1)Ifthe tankcoverisnotinplace,the displaywillshow OPN1”and alarm
soundwill beheard.
(2)Ifthegrinderboxisnotinplace,the displaywill show OPN2”and alarm
soundwill beheard.
a.Ifon the stateofgrinding bean,replacethe grinderbox, and closethe water
tankcoverwithin5s,theappliancewillcontinue toworking,Ifthe time
exceed 5s, the appliancewillstop.
b.Ifon the stateofheating,replacethe grinderboxand watertankatanytime,
the appliancewillcontinue toworking.
DECALCIFICATION
Decalcification referstoremoving the calciumdepositswhichformovertimeon
the metal partsofthe coffeemaker.
Forbest performancefromyourcoffeemaker, decalcifythe baseunitfromtime
totime.Thefrequencydependsupon the hardness ofyourtap waterandhow
often you usethe coffee maker.
Toclean,fillthewaterreservoirtocapacitywithamixtureof1/3whitevinegar
and 2/3water.Turnthe coffee makeron bypressing theONbutton.One cycle
shouldbe sufficienttoadequatelyclean thecoffeemaker.When the cycleis
completed and the fivebeepssound,turncoffee makeroff. Repeatoperation,
thistimeusing freshcoldwater.

ENGLISH WARRANTY
PLEASE AFFIXYOURRECEIPT/PROOFOFPURCHASE HERE.
INTHEEVENTOFACLAIMUNDERTHISWARRANTYTHE
AFORESAIDRECEIPT/PROOFOFPURCHASE MUSTBE
PRODUCEDTOGETHERWITHTHISWARRANTY.
Modelnumber (Lotnumber:)
Productname
Dateof purchase
Placeof purchase
1. Thepartysellingtheproduct( the seller”)totheoriginalpurchaserof
thisproduct( thecustomer”)herebywarrantsthatthisproductwill beof
good qualityand,ingood workingorderand,free ofdefectsand
suitableforitsintendedpurposeundernormalhouseholduse,fora
period of 1(one)yearfromthe dateof purchase( warrantyperiod”)of
thisproduct.
2. Inthe eventthatthe warrantyperiod hasnotlapsed and theproductis
notof agood quality,oringood workingorderor,isdefectiveorisnot
suitableforitsintendedpurposeundernormalhouseholduse,the
customermay,subjecttoparagraph3below,returnthe producttothe
sellerand havethefollowingoptionsavailable:
2.1 Withinthe first6(six)monthsofthe warranty:toreceivea
refund ofthe actualpricepaidortoexchangethe product forthe
sameorsimilarproduct ofthe samepurchased value;
2.2 Withinthe second6(six)monthsofthewarranty:tohavethe
productexchanged forthesameorsimilarproductofthe same
purchased value.
3. The sellerwillnotreplacethe productorrefund the customerintermsof
thiswarrantyifthe product:
3.1 hasbeen altered contrarytothe instructionsprovided inthe
productmanual;
3.2 hasbeen misused, abused ortampered with;
3.3 isdefectiveornotinworkingorderdue toordinarywearand
tear;
3.4 isdamaged resultingfromthe customer’sgrossnegligence,
recklessness, maliciousbehaviororcriminalconduct;
3.5 hasbeen utilised forcommercialuse.
4. Thiswarrantyappliesonlytotheproductthat hasbeen purchased from
the sellerandnottoanyexpendablesattached toorinstalled on the
product bythe customer.
5. Anyclaimintermsofthiswarrantymustbesupported bytheoriginal
proofofpurchase.

PORTUGU S
INTRUÇÃO
Obrigado pelasua comprada nossa Platinum”Máquina de café.Cada
unidade foimanufaturada paraassegurarasegurança,aconfiabilidade,ea
facilidade de utilização.Antesde usar,porfavorleia estasinstruçõescom
cuidado econserve-asparaareferênciafutura.
PROTEÇÕES IMPORTANTES
Quando usarasua Platinum”Máquina de café,asprecauçõesbásicasdevem
sempreserseguidas, incluindo oseguinte:
lEstedispositivonãodestina-seaserutilizada porpessoas(incluindo
crianças)compotencialidadesfísicas,sensóriasou mentaisreduzidas,ou
faltada experiênciaedo conhecimento,amenosque forem
supervisionadosou foremdadosainstruçãoarespeitodo usodo
dispositivoporumapessoa responsávelparasua segurança.
lAscriançasdevemsersupervisionadasparaassegurar-sede que não
joguemcomoapparatus.
lCertifique-sede que avoltagemusada na casacorresponde àvoltagem
indicada na etiqueta.
lVerifique regularmenteocabo de forçaeoplugue paraversehátodosos
danosSeocabo dealimentaçãoou oplugue estiverdanificado,deveser
substituído pelofabricante,ou porpessoa qualificado afimde evitarum
perigo elétrico.
lEsteprodutodestina-seao usodomésticosomente.Ousoindustrialou
comercialanularáagarantia,eofornecedornão éresponsávelpara
ferimentoou danoscausadosao usarodispositivoparanenhumaoutra
finalidade.
lOperaçãoeusoincorretospodemdanificaroaparelho ecausardanosao
usuário.
lNãouseoaparelho seelecaiuou foidanificado de algumamaneira.Em
casode dano, examine oaparelho e/ ou repareporumagenteautorizado.
lParareduziroriscode choque elétrico, nãosubmergirou exponha omotor,
oplugue ou ocabo de alimentação àágua ou qualqueroutrolíquido.
lNuncasubmergiroaparelho na água ou outrolíquido paralimpeza.
lRetireoplugue da tomada segurando oplugue.Nãopuxeocabo para
desconectaroaparelho.Sempredesligue oaparelho quando nãoestiver
emuso, antesde limparou quando adicionarou removerpeças.
lOusodosacessóriosnãorecomendado pelofabricantedo dispositivopode
causarosferimentos,,incêndioou choque elétrico.
lNãodeixeocabo pendurarsobreaborda da mesaou do balcão.Garantir
que ocabo nãoestáemumaposiçãoonde elepode serpuxado
descuidadosamente.
lNãodeixeocabo tocaremsuperfíciesquentesenãocoloque sobreou
pertode umgásquenteou queimadorelétricoou emforno aquecido.
lOusodeumcabo deextensãocomesteaparelhonão érecomendado.
No entanto, sefornecessáriousarumcabo de extensão, certifique-seque

PORTUGU S
ocabo éapropriado paraoconsumo.de energiado aparelho paraevitaro
sobreaquecimentodo cabo de extensão,equipamentoou ponto.Não
coloque ocabo de extensãoemumaposiçãoonde elepode serpuxado por
criançasou animais.
lEsteprodutodestina-seao usodomésticosomente.Nãouseeste
aparelho paraoutrafinalidade.
lNãotransporteoaparelho pelocabo de alimentação.
lNãotoque assuperfíciesquentesdiretamente.Useospunhosou os
botões.
lNãodeixeesteaparelho semsupervisãoduranteouso. Sempredesligue o
aparelho quando nãoestiveremuso.Deixeesfriarantesde colocarou
retirarpeçaseantesde limparoaparelho.
lSempreopereoaparelho sobreumasuperfícielisa,plana eestável.Não
coloque oaparelho sobreumasuperfíciequente.
lOfabricantenãoseresponsabilizaporqualquerdanoou prejuízocausado
pelousoindevido ou incorretodo aparelho,ou reparaçõesefectuadaspor
pessoalnãoautorizado.
lEmcasode problemastécnicos,desligaroaparelho enãotenterepará-lo
parasimesmo.Retorno oaparelhoaumaassistênciatécnicaautorizada
paraexame,ajusteou reparo.Sempreuseaspeçassobresselentes
originais..Afalha de operarde acordo comasprecauçõeseasinstruções
mencionadasacima, podiaafetaraoperaçãoseguradestamáquina.
lNãouseesteaparelho pertode banheiras,chuveiros,lavatóriosou outros
recipientesque contenham água.
lSempreanexarafichaao aparelho,emseguida,conectarocabona
tomada.Paradesconectar,transformarqualquercontrolepara"Off",em
seguida, removaoplugue da tomada
lNãodefina agarrafasobreumasuperfíciequenteou fria.
lNãouseajarracomumaalçasoltaou enfraquecido.
lNuncadeixeagarrafavaziana placademanterquentecasocontrário,a
garrafa ésusceptível de crack.
lNãolimpe agarrafacomprodutosde limpeza,esponjade açoou outros
materiaisabrasivos.
lEvitarcontatocompartesmóveis.
lLâminassãoafiadas. lidarcomcuidado
lAntesde usar,marque acaixamoedorparaapresençadeobjetos
estranhos
lNuncadeixeagarrafavaziana placademanterquentecasocontrário,a
garrafa ésusceptível de crack
lAscriançasdevemsersupervisionadasparagarantirque nãobrincamcom
oaparelho
lOrecipiente éprojetado parausocomesteaparelho.Nuncadevemser
usadosno topo de umafaixa.

PORTUGU S
lEstedispositivodestina-seaserusado na casaeemaplicaçõessimilares
como.
- Áreasdacozinha naslojas,nosescritóriosenosoutrosendereços
trabalho.
-Casasde habitaçãoemherdade
-Porclientesnoshotéis,nosmotéisenosoutrosambientesde tipo
residential
-Ambientesde tipo decamaede pequeno almoço.
CONHEÇAASUAMÁQUINADECAFÉ
1.Janelade visualização
2.Caixade quebra
3.Painel de controle(veja
abaixo)
4.Tampa do filtro
5.Filtro
6.Suportedo filtro
7.Placadeaquecimento
8.Coberaçao odo tanque
9.Tanque de água
10.Caixade quebra
11.Tampa interna
12.Medidorde água
13.Tampa garrafa
14.Jarro
15.Alçado jarro

PORTUGU S
ESPECIFICAÇÕES
capacidade
1,5litros/ 12 copos(125 ml/copo)
tensão
AC220-240V/ 50Hz
potência
1000W
cordão
3pinosaterrada plug.(parareduziroriscode choque
elétrico)
CONHEÇAASUAMÁQUINADECAFÉ
Antesda primeirautilização,,siga estasinstruções,porfavor,:
1.Retiretodasasembalagenseosrótulos
2.Preencha amarcadenívelmáximocom água fresca,ferveremaior
fabricantedecafévazia,pelomenos,duasvezesparalimparmáquina de
caféde qualquerminúsculaspartículas. Nãobeba a água.
3.Limpezade todasaspartesdestacáveis,comoacaixade quebra,titular,
filtrodo filtroeassimpordiantecompletamente.
Settheclock
Acertarorelógio
1.Umavezque oaparelho estáligado àfontede alimentação,,88:88 serãoexibidos
eflashno displayLED, após5s, oLEDirámostrar12:00.
Nota:Sevocênãoacertarorelógio,vocêpode irdiretamenteparaoutras
configurações.
2.Pressione o"programa"botãoumavez(vejaodisplayLED). Estáagorana "Hora
marcada"modo epode operartanto"hr"ou "min"paraatingirocenáriodesejado.
3.Confirmaroajustedo relógio, esperando por15 segundos.
4.Osbotõespodemserpressionadasparapercorrerosdígitos,oulevemente
pressionado eliberado paraavançarumdígitoporvez.
5.Nota:Otempo de ciclo éde 24 horas(osdetalhesconsulteodisplayLED).
Paradefinirotempodeprograma
Sevocênãoquerque omáquina de cafécomeçaraoperaçãoimediatamente, você
pode definirafunçãode inícioautomáticoda seguinteforma
1.Depoisde acertarorelógio(suponha que otempo atual é13:30).Pressione
o"programa"botãoduasvezes.Vocêvaientrarno estado de "tempo deo
inícioautomáticopreset"(vejaodisplayLED).Otempo desejado pode ser
definido,pressionando o"hr"e"min"botõesparaavançaratravésdos
dígitos.
2.Quando aconfiguraçãodesejada abordagenstempo,pressione obotãoon/
offduasvezes.Oindicadordo programaseráiluminado.Quando otempo
programado alcançaeoindicadordo programaseráextinto. O Indicadorde
on / offiluminado sorosemáquina de cafévaicomeçarafabricar.
Nota:vocêpode verahorade inícioautomático, pressionando o"programa".
Vocêpode determinarotempo de exibiçãoestáprogramada tempo ou
tempo atual,vendooindicadorinferior àLED(osdetalhesconsulteodisplay
LED)

PORTUGU S
3.Sevocêquisercancelaroprogramapredefinido,pressione obotãoon /off
duasvezes.O aparelho começaráafabricarimediatamente.
4.Redefiniro"automáticostart"modo,apenasseguindo ospassos1-2
novamente.
USARASUAMÁQUINADECAFÉ
Antesde fazeroprimeiropotede caféemseu novoaparelho,recomendamos
utilizarocaféumavez,usando apenas águaefiltrodepapel.Istoiráremover
qualquerpoeiraou resíduosque permanecemno sistemado processode
fabrico.
1.Adicione ofeijão:Abraacaixamoedorempurrando obotãode liberaçãoe
levantando,eremoveracaixamoedor,emseguida,abraatampada caixa
moedorrodando,encheracaixamoedorcomaquantidade desejada de
feijãode acordo comasmarcasna caixamoedor.
Asmarcasindicamogrãode caféque fazerocafécorrespondente(ver
fig.1).Geralmentecarregaracaixade moer2feijãoOZ mais.Nãoencha
demaisou acaixade moedorpode serbloqueado e/ou amáquina de café
pode transbordar.Emontaracaixaparamáquina de café,deve-senotaro
sulcoconectordevesertravado no eixodo motor(verfig.2),casocontrário,
acaixade moedornãoserãomontadosadequadamenteno lugar,eisso
pode danificaracaixade moedor.
Nota: acaixade moedordeveserremovido paraaadiçãode feijão.
2.Esubstituiratampada caixade moedor(verfig.3),oprimeirolugarna
posiçãoda "",emseguida,vireatampada caixamoedoremsentido
horárioatéque eletravana ""),casocontráriooaparelho nãoirá
operar.

PORTUGU S
3.Encherotanque:apósadicionarofeijão,emseguida,despejara
quantidade desejada de água no tanque da indicaçãonatampainterna (ver
fig.4),eonívelda água devede acordo comomedidorlocalizado àdireita
do tanque.
Nota: antesde encherde água, atampainterna devesermontado no local.
4.Puxeosuportedo filtro:Posicione-sefiltropermanenteno porta-filtroe
substituiratampado filtro. Emseguida, empurreosuportedo filtronolugar
Nota:umfiltropermanentepode permitirque algumascafémoído afluirem
garrafa
5.Feche atampado tanque:Pressione parabaixoparatravar.Oaparelho
estáequipado comumsistemade intertravamentode segurança.Os
detalhesconsulteaseçãode "Resoluçãode Problemas
6.Antesde fazercafé:Certifique-sede tersubstituído agarrafana sua
posiçãosobreopratomantendo quente
7.Conecteocabo aumatomada elétrica."88:88"irámostrareflashno LED,
após5s, "12:00"iráapareceratéque vocêdefina otempo.Acerteorelógio
atualde acordo como"Acerteorelógio"na acima.
8.Verifique seoindicadorde moagemoff deveserextinto.
Nota:Seoindicadorde moagemoff éiluminado,issosignificaque o
aparelho estáem"fazerocafépré-moídocomfeijão"mode.Oaparelho vai
omitiraetapade moagemde feijão.
9.Selecione DefinirCups:Obotãode configuração1-4taça éusado para
controlarotempo de moagemde feijão,sevocêquiserfazer1-4taçade
café,pressione obotãoeo indicadorde 1-4taçaseráiluminado.Otempo
de moagemdefeijão éde cercade30s. Sevocênãopressionarobotão,o
conjuntopadrão é5-12copos. O tempo demoagemdefeijão édecercade
40 s.
Nota:obotão1-4copo usarsomenteno "fazercafécomfeijão"mode.Em
outraspalavras, oindicadoracimado botãodemoagemoff deveserextinto.
No "fazercafécompré-moído feijão"modo,elanão éutilizada.Edurantea
operação, obotãonãoestáativado.
10.Começaraoperar:
①Imediatodemoagemefabricação:Pressione obotãoon /off,oindicadorde
execuçãoseráde luzireoprocessocomeçará.
②Fabricaçãoprogramada:Sevocênãoquerque omáquina de cafécomeçara
operaçãoimediatamente,vocêpodedefinirafunçãodeinícioautomáticode
acordo como"Defina otempo deprograma"naacima.

PORTUGU S
11.Quando terminarde moagemde feijão,oprocessode fabricaçãocomeça.
Nota:Duranteaoperação,vocêpode tirarcarafe,derrameeservira
qualquermomento. O aparelho vai pararde pingarautomaticamente.Mas
otempo nãopode exceder30 segundos.
Cuidado:quando afabricaçãoestáquaseterminado,aquantidade de
vaporserámuitomais,eovaporpode funcionarforadopainelde controle,
suportedo filtroeoutralacuna. Énormal,vocêsóprecisaocuidado de
nãoserqueimado pelovapor,nãovaiafectarofuncionamentonormal
12.Umavezque ocafétenha sido concluído fabricação, mexaantesde servir
paramisturarossabores.Ocaféno fundoda garrafaseráumpoucomais
fortedo que ocaféno topo. Apósafervura,aunidade irámanteraquecido
por2horaseemseguida,desligarautomaticamentedesligado.Ou
pressione obotãoon /offduasvezesparafechardesligaredesconectar
da tomada
Façacafécompré-moídoBeans
1.Encherotanque:Abraatampado tanque,empurrando obotãode
liberaçãoelevantando.Certifique-seque atampainterna estáno local e,
emseguida despejando aquantidade desejada de água no tanque de
acordo comomedidorlocalizado àdireitado reservatório.
2.Puxando paraforado porta-filtro.Nossasugestãoreceita:Useumacolher
do cafémoído porxícara.Ajustarareceitade acordo comsua individual.
Nota:Acapacidade máximaparacafémoído éde10 colheres,usando umfiltro
permanente.
Que ultrapasseessemontantepode causarestouroseocaféémoído muito
fino
3.Recoloque atampado filtroeempurreosuportedo filtrono lugar
4.Antesde fazercafé:Certifique-sede tersubstituído agarrafana sua
posiçãona placade manterquenteetercolocado umfiltrono suportedo
filtro, substituiratampado filtro
5.Conecteocabo aumatomada elétrica.88:88 "irámostrareflashna
LED,Depoisde 5s,"12:00"iráapareceratéotempoque vocêdefina.Acerte
orelógioatual de acordo como"Acerteorelógio"na acima.
6.Pressione o"grind off"botãoeoindicadorde moagemoffseráiluminado.O
aparelho vaiomitiraetapade moagemde feijãoeentrarno processode
infusão,umavezque vocêpressionarobotãoon /offou otempo
predefinido alcança.
7.Siga asinstruçõesde 9a11de Façacafécomseçãode feijão.
Pausa servir
Esterecursopermiteque vocêderramarumaxícarade caféantesdo ciclode
moageminteirafoiconcluída.Removendo oGarrafa, ofluxode cafédo fundo
do filtrovaiparar.
Atenção:Retornarogarrafaparaplacade aquecimentodentrode30
segundos. Água quentecontinua afluirparadentrodo filtroquando esse
recurso éusado.Transbordandode cafée água quenteseriaumriscode
queimadura.

PORTUGU S
Desligamentoautomático
2horasdepoisde ciclocomeçaorecursode desligamentoautomáticodesliga
aplacade aquecimento.Semprerecorrercafeteiraeretirequando terminar.
CUIDADOSELIMPEZA
Completamentelimpaesecatodasaspartesdestacáveisapóscada utilização.
Estadevesermantida por30 minutosacada doisciclos. O objetivo édeixaro
aparelho esfriarcompletamente.
1.Semprerecorrermáquina de caféeretireoplugue da tomada antesde
limpar.
2.Removatodasaspeçasdestacáveis.
3.Depoisde removeragarrafada placade aquecimento,descartarqualquer
caférestante.Agarrafaeatampapodemserlavadosem água morna e
sabãoenxaguarbem, oucolocado emumamáquina delavarlouça.Ajarra
ea tampagarrafadevesercolocada no cestosuperiorapenas.
4.Puxeosuportedo filtro. Removaatampado filtroefiltro.
5.Acaixade moedor,moedorde tampada caixa,porta-filtro,filtroetampado
filtropode serlavado em água morna esabãoeenxaguarbem,ou limpo no
cestosuperiorda máquina.Seque todasaspeçasapóscada utilização.
6.Nãocoloque toda a água na unidade umavezque acaixade moedorfoi
removido.Limpe a área sob acaixademoedorcomumpano úmido.Se
entrar água no motormoedor, omotorpode serdanificado epode avariar.
7.Umavezque apósalimpeza,invertaospassosacima.
Nota:
a)Nãouseprodutosde limpezalavagemagencial ou duraemqualquerparte
da máquina de café.
b)Nuncamergulhe unidade baseem água ou outrolíquido.Paralimparbase,
limpe simplesmentecomumpano úmido esecoantesde guardar
c) Limpe aplacade manterquentecomumpano limpoe úmido.Nuncauseo
material ásperoabrasivoouprodutosde limpezaparaparalimparaplacade
descanso
d)N osecarointeriordotanquecomumpano, como fiapospodempermanecer.
RESOLU ÃODE PROBLEMAS
Duranteaoperação,sea água do tanque caixadecobertura/moedor/
garrafanãoestãoemlugarseparado,omotorserácortado,oalarmesonoro
éde alarme, eosLEDserãoexibidoseflash.Osdetalhesda exibiçãoacordo
comoseguinte:

PORTUGU S
(1)Seatampadotanque nãoestáemvigor,ovisorirámostrar"OPN1"e
somde alarmeseráouvido.
(2)Seacaixademoedornãoestiverno lugar,ovisorirámostrar"OPN2"e
somde alarmeseráouvido.
a.Sesobreoestado de feijãomoagem,substituiracaixade moedor,e
feche atampado reservatóriode água dentrode5s,oaparelho
continuaráatrabalhar.Seotempo exceder5s, oaparelho iráparar.
a.Sesobreoestado de aquecimento,substituiracaixade moedore
tanque de água aqualquermomento, oaparelho continuaráafuncionar.
DESCALCIFICAÇÃO
Descalcificaçãorefere-searemoverosdepósitosdecálcioqueformamao longo
do tempo sobreaspartesde metalda máquina de café.
Paraummelhordesempenho da sua cafeteira,descalcificaraunidade basede
temposemtempos.Afreqüênciadepende da durezada água da torneiraecom
que freqüênciavocêusaamáquina de café.
Paralimpar,encheroreservatóriode água comacapacidade comuma
misturade 1/3de vinagrebrancoe2/3de água.Ligue amáquina de café,
pressionando obotãoON.Umciclodevesersuficienteparalimpar
adequadamenteamáquinade café.Quando ocicloeoscincosinaissonoros
de somestãoconcluídos,porsua vezmáquinade caféfechada.Repitaa
operação, destavezusando água fria.
This manual suits for next models
1
Table of contents
Languages:
Other Platinum Coffee Maker manuals