Playback Designs MPD-6 User manual

Version 1.1
MPD-6
Digital to Analog Converter
USER MANUAL
EDELWEISS SERIES

MPD-6 User Manual
2

MPD-6 User Manual
3
IMPORTANT SAFETY INSTRUCTIONS
Read and follow these instructions and keep this manual in a safe place.
Do not use this apparatus near water.
Do not block any ventilation openings.
Do not install near any heat sources such as radiators, heaters, or other apparatus (including pre-
amplifiers and amplifiers) that produce heat.
Do not install this apparatus in a confined space such as book cases or closed cabinets.
Unplug this apparatus from the mains during lightning storms or when unused for long periods of
time.
!
CAUTION: TO REDUCE THE RISK OF ELECTRIC
SHOCK, DO NOT REMOVE COVER. NO USER
SERVICEABLE PARTS INSIDE. REFER SERVICING
TO QUALIFIED SERVICE PERSONNEL.
The lightning flash with arrowhead symbol within an equilateral triangle is intended to alert
the user to the presence of uninsulated “dangerous voltage” within the product’s enclosure
that may be of sufficient magnitude to constitute a risk of electric shock to persons.
!
The exclamation point within an equilateral triangle is intended to alert the user to the
presence of important operating and maintenance (servicing)instructions in the literature
accompanying the appliance.
INFORMATION TO THE USER
Alteration or modification carried out without appropriate approval may invalidate the user’s right to operate
the equipment.
WARRANTY
Playback Designs warrants the MPD-6 product against defects in material and workmanship under normal
use and service for a period of time specified by the product’s serial number from the date of first delivery to
the owner. The warranty time period is for 30 days. If within the first 30 days of ownership you register your
Playback Designs product, by sending us a copy of your sales receipt, your name, address, city, state, zip
code, phone number, email address and your dealer’s store name, we will extend the warranty to 2 years.
This warranty is limited to the original owner.
Playback Designs will pay for return shipping charges (domestically) back to the owner when the product is
sent to Playback Designs within the first 30 days after purchase and the fault can be confirmed by Playback
Designs. Otherwise, owner will be responsible for all shipping charges to and from Playback Designs.
International customers must deal with their local dealer or distributor.
For all warranty claims, a copy of the original invoice must accompany the product.
Opening the product or modifying it in any way by the owner, including but not limited to cryogenic treatment,
will void any warranty.
Please contact Playback Designs for a RA (Return Authorization) number and shipping instructions before
shipping any product to Playback Designs.

MPD-6 User Manual
4
Playback Designs products are sold worldwide through authorized dealers with restricted territories. If any
Playback Designs product is purchased from non-authorized dealers or from a dealer selling outside his / her
authorized territory all warranties will be void.
If you purchased this product from a dealer please take a moment and send us an email to
info@playbackdesigns.com so we can register you for the warranty. If this product has been shipped to you
directly from Playback Designs you are automatically registered.
BEFORE USING THE PRODUCT
What is in the box: MPD-6 playback system
Remote control unit with installed batteries
Power cord (100-120V countries only)
User manual
Registration Please take a moment and send us an email to
info@playbackdesigns.com so we can register you for the warranty.
Installation: Before connecting your MPD-6 to the AC mains, make sure you select the
correct voltage on the rear panel (100V, 120V or 230-240V).
Operating this machine at the wrong AC voltage will cause serious
damage.
Do not place the MPD-6 over an amplifier or any other equipment that
generates heat.
As this product may become warm during operation, always leave
sufficient space around the MPD-6 for ventilation. Always allow adequate
air circulation around the product.
!
Before connecting the MPD-6 to AC power make sure you select the correct voltage for
your country on the Voltage Selector switch located on the rear panel.
MPD-6 User Manual
5
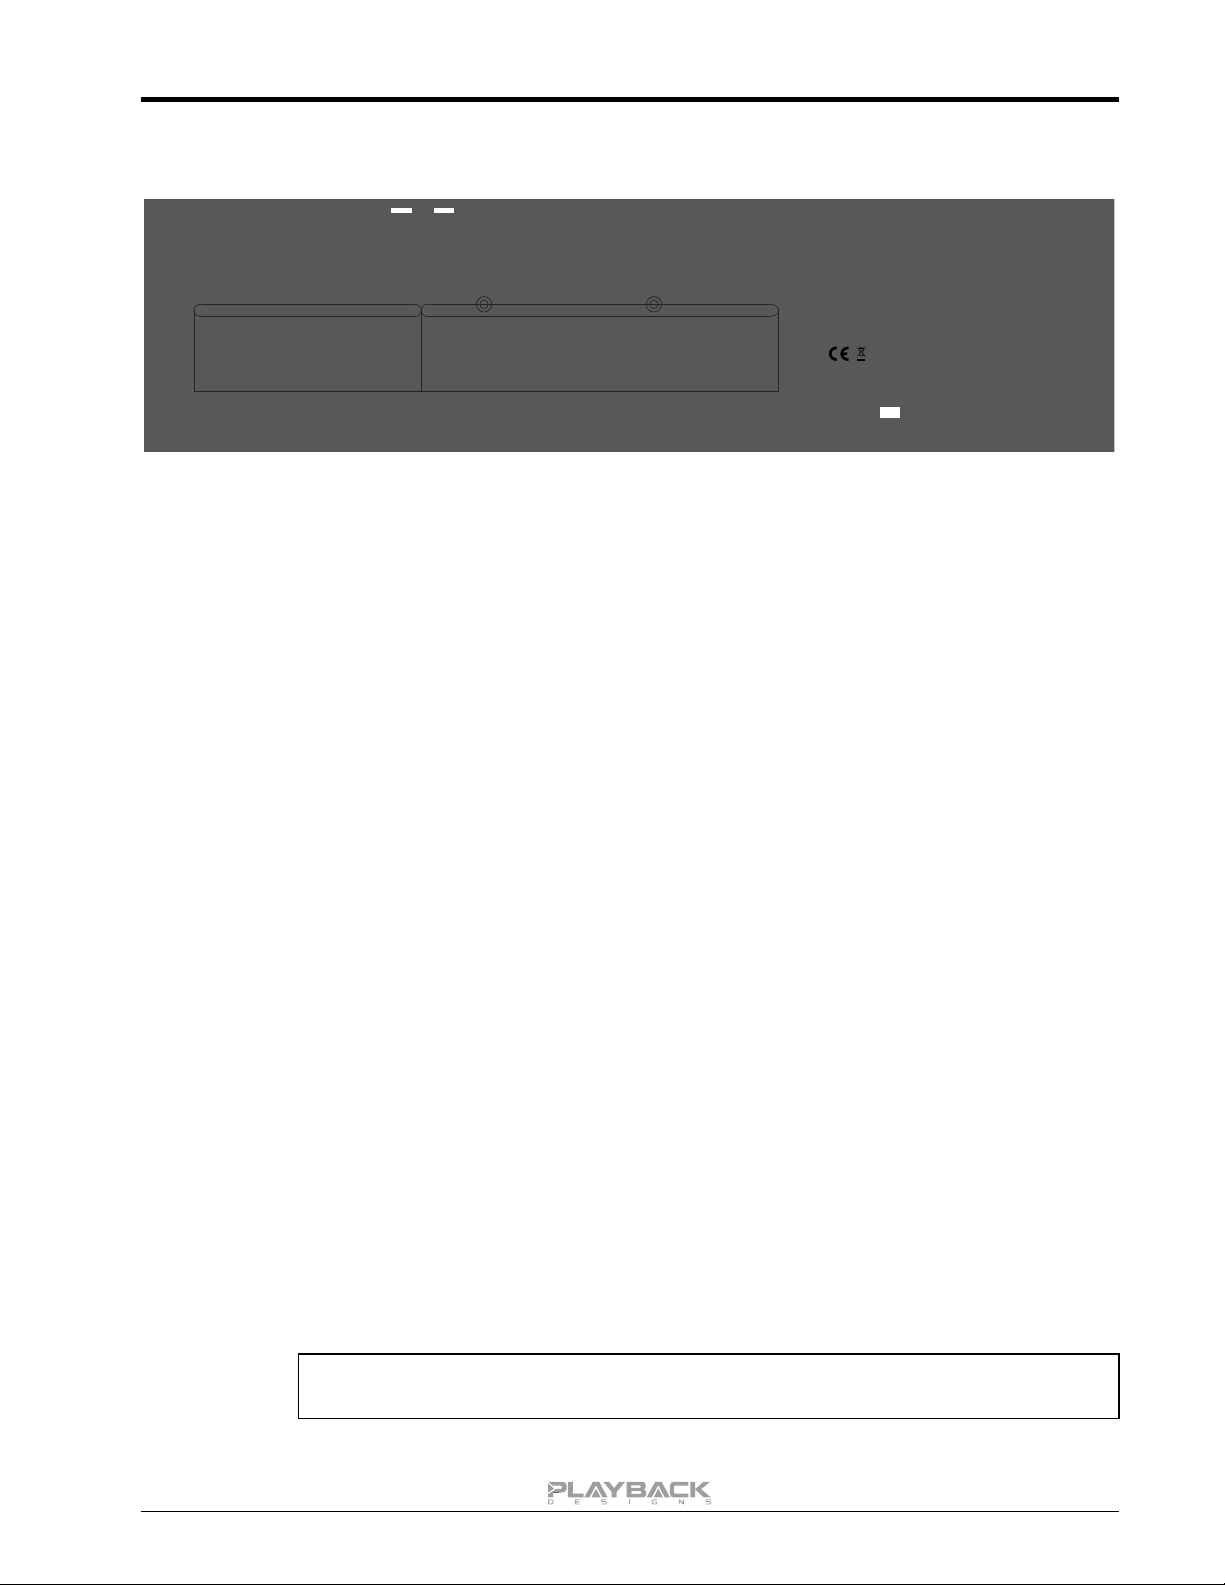
CONNECTIONS
MODEL: MPD-6
MADE IN U.S.A.
TOSLINKCOAX
LEFTRIGHTLEFTRIGHT AES
RESET
USB
AUDIO
DIGITAL I/O AND CONTROLANALOG OUTPUTS
PLAYLINK
OUT IN
50/60 Hz
100W max.
USB
MEMORY
N
E
T
W
K
Digital outputs: PLINK OUT: Proprietary optical link to other Playback Designs equipment. This
connection supports multiple audio formats natively for PCM and DSD.
Digital inputs: AES: XLR connector for AES/EBU formatted stereo linear PCM data, up to
24bits / 192kHz, and single rate DSD encoded in DoP.
COAX: same as AES, but S/PDIF formatted on RCA connector.
TOSLINK: same as COAX, but on optical connector, limited to 96kHz max.
PLINK IN: Proprietary and high quality optical link to other Playback Designs
equipment. This connection supports multiple audio formats natively for
PCM and DSD.
Cable specs: ST-ST fiber optic, multimode, 62.5/125µm.
USB AUDIO: Direct USB connection to computers and servers for PCM at sample
rates up to 384kHz and DSD up to 11.2MHz.
STREAMER NETWORK: Only available when Stream-X2 option is installed. Input from network
sources. See Stream-X2 manual for more details.
STREAMER USB: Only available when Stream-X2 option is installed. Input for USB flash
sticks (no HDD supported). See Stream-X2 manual for more details.
Analog outputs: XLR: Balanced, pin 2 hot, 4.1Vrms @ 1kHz full level sine wave and output
level set to 0db fixed.
RCA: Unbalanced, 4.1Vrms @ 1kHz full level sine wave and output level set
to 0db fixed.
System Control: RESET: Used in connection with the software update procedure. When pressed
during normal operation it resets the MPD-6, similar to a power cycle.
Power: Before connecting the MPD-6 to the AC mains, please make sure you select the correct
voltage for your country on the Voltage Selector switch located on the rear panel.
Operating the MPD-6 at the wrong voltage will damage the unit.
NOTE: you should always switch power to standby first before turning off the main
power switch on the back.
MPD-6 User Manual
6
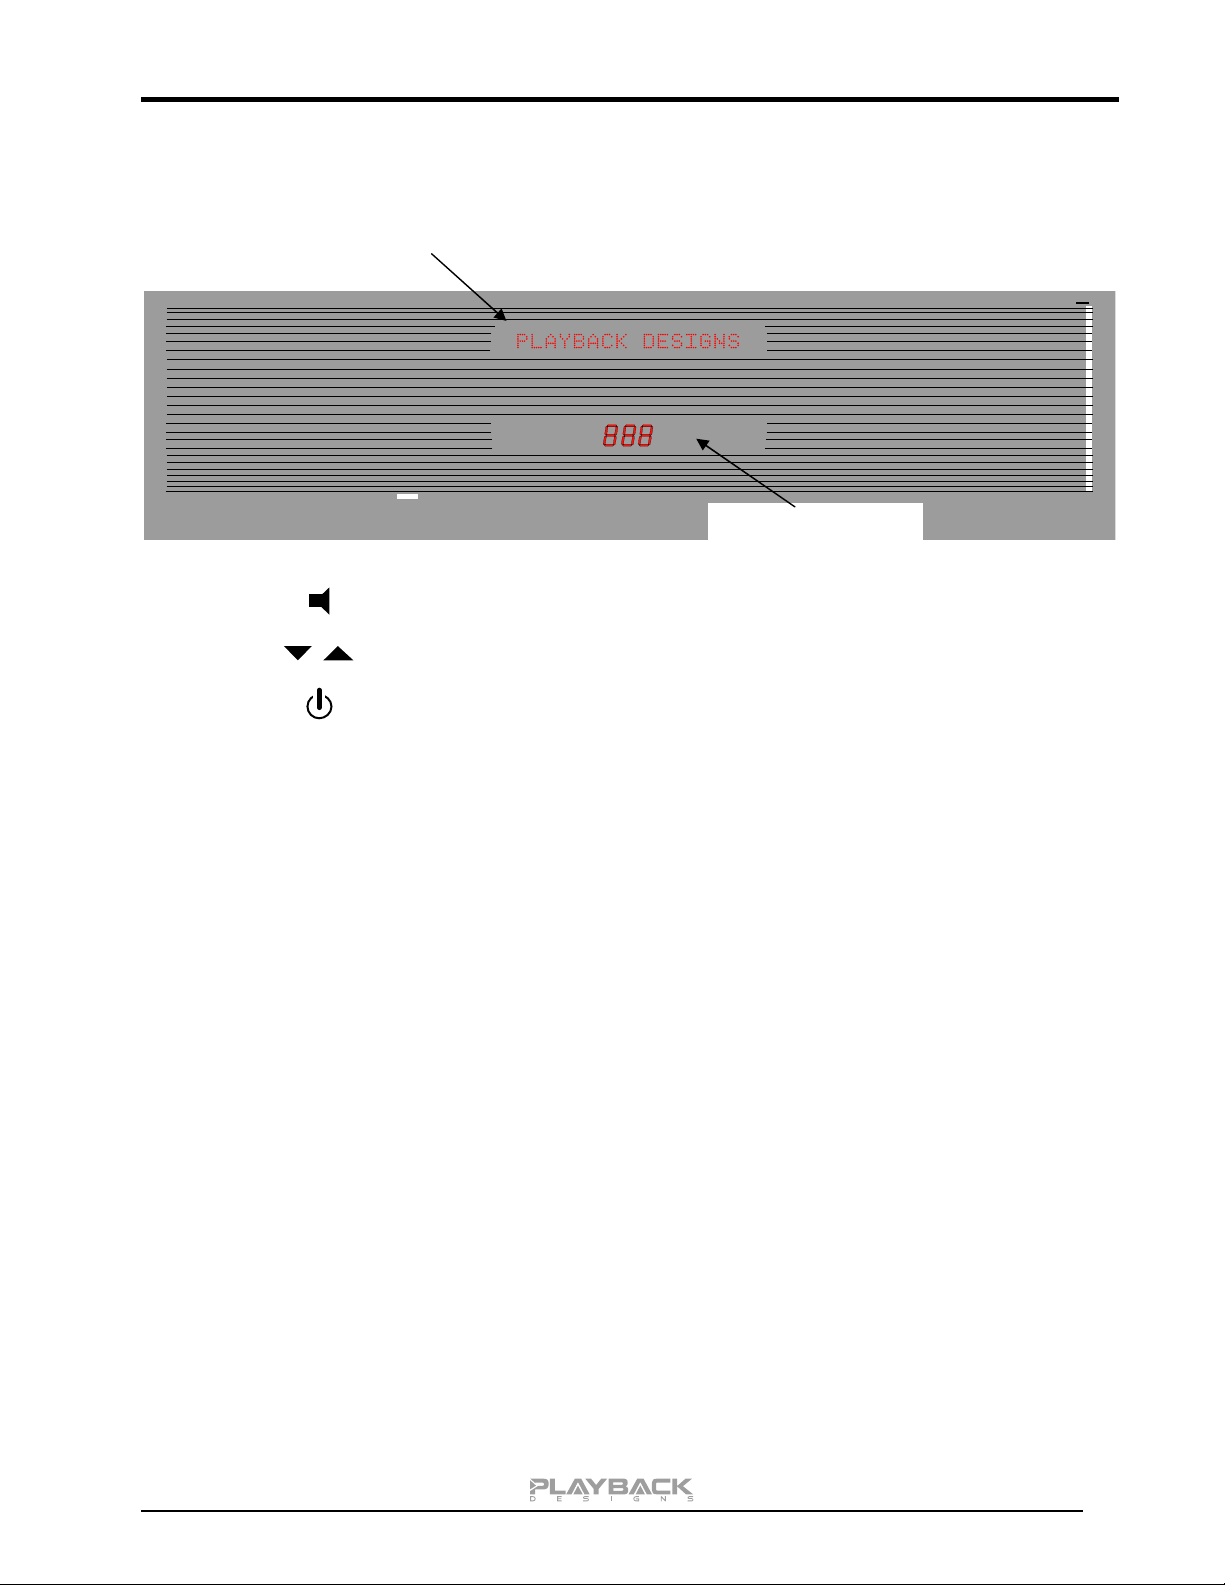
FRONT PANEL FUNCTIONS
Buttons:
Mute toggle on / off.
Analog volume control when variable output level is activated.
Standby power on / off.
CONTROL OF ANALOG OUTPUT LEVELS
The MPD-6 is equipped with a very high quality analog volume control that is controlled from the remote. If
this analog volume control is not desired it can be bypassed in the settings menu. In addition the output level
in bypassed mode can be selected between 5 values to optimally match it with your other equipment (see
settings and specification chapter for more details).
Alphanumeric status display
Volume level display

MPD-6 User Manual
7
REMOTE CONTROL UNIT
DISC
MUTE
DAC PRE
PHSE
DIM
MUTE
VOL +/-
All others
Opens the settings menu on front panel. Press the DAC button first to
select the MPD-6 settings.
During normal operation these up and down arrows directly below the
DAC button toggle through the active inputs of the MPD-6.
During settings display these buttons toggle through the settings
menu.
Inverts the phase on both analog outputs.
Dims the display on front panel.
Mutes all analog outputs.
Analog output volume control. Need to enable variable output level
(see settings menu).
No function on MPD-6.
MPD-6 User Manual
8
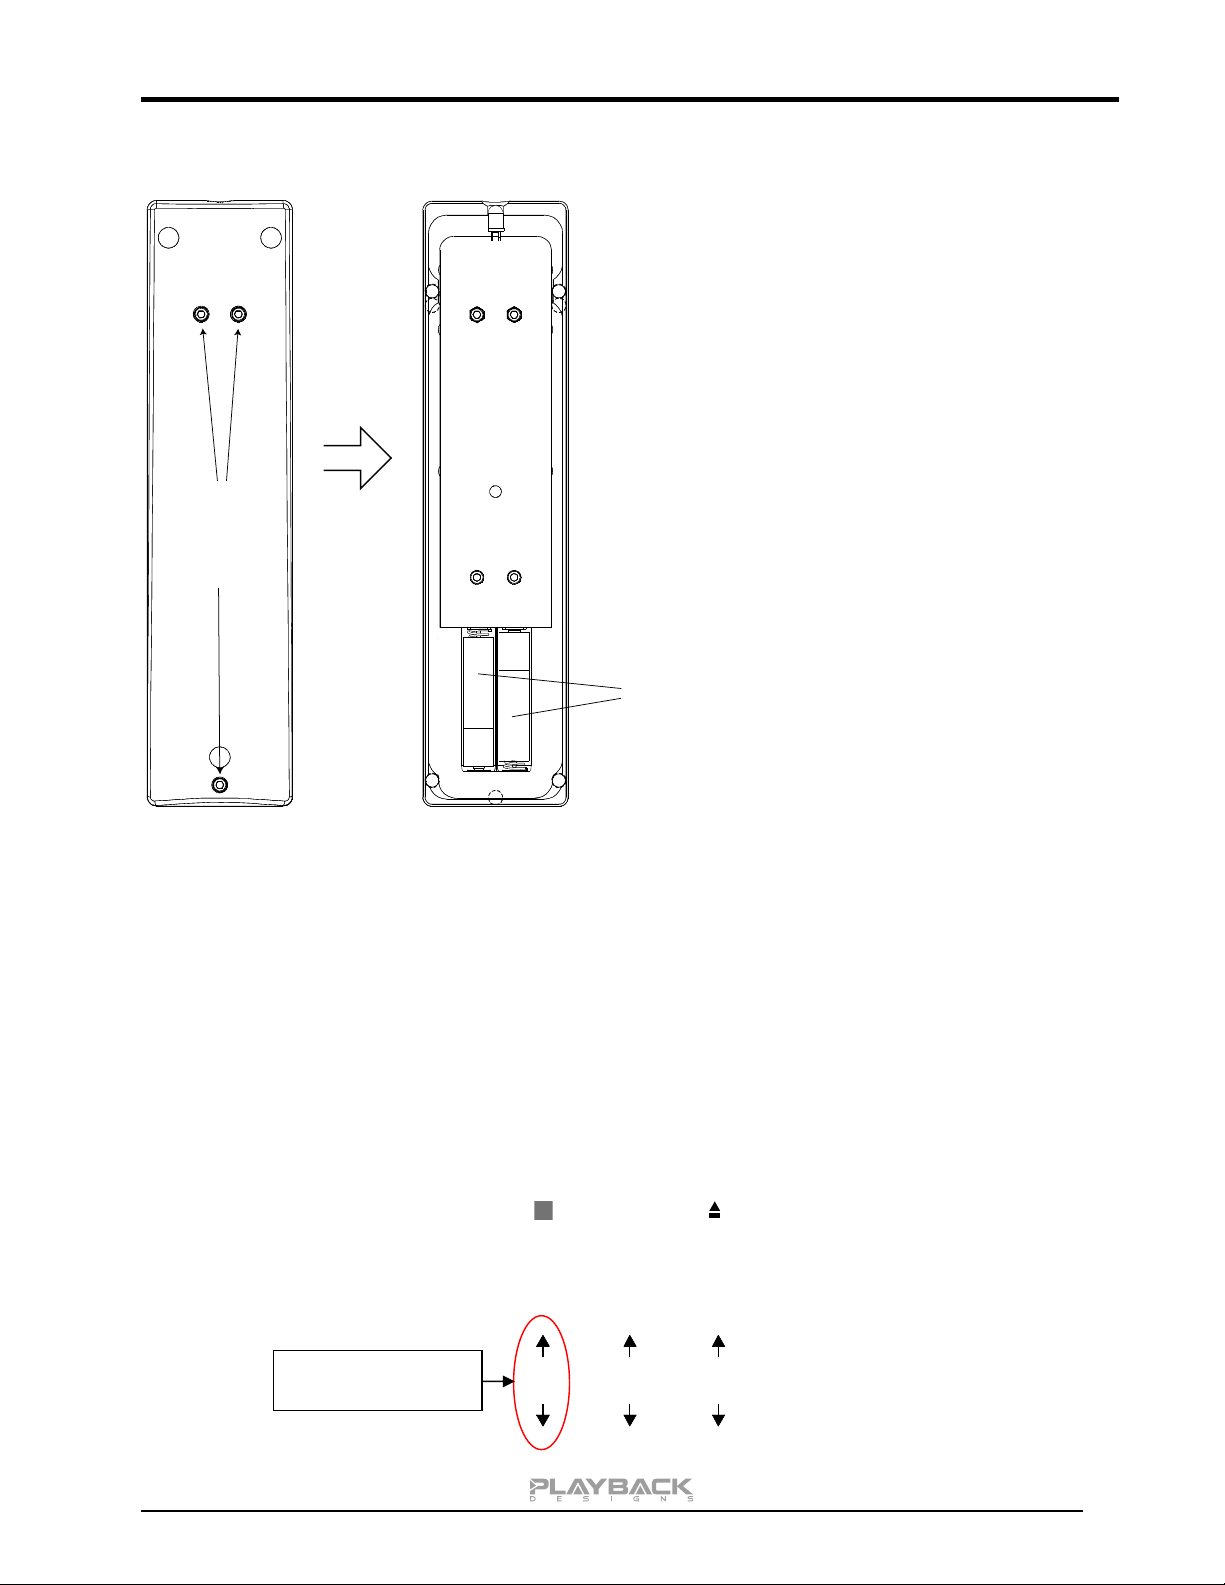
CHANGING BATTERIES ON REMOTE
Use 3/32"
hex key to
open
-
+
+
-
Back cover removedBackside of remote
AAA Batteries
The remote operates with 2 AAA size
batteries. In order to change them the
back cover needs to be removed as
shown in picture on the left. Make sure
that replacement batteries are inserted
with their polarities as indicated in the
picture. The screws can be opened with
a hex 3/32 inch key.
SETTING UP AND SELECTING DIGITAL INPUTS
For selecting digital inputs the IR remote provides buttons with up and down arrows right below the DAC
button. With these buttons you can select any of the six digital inputs on the MPD-6 by toggling up and down
through the list.
You can drastically shorten the list of selectable digital inputs by deactivating those that you don't use (see
setup menu for further details). For instance, if you only use the USB and AES inputs you can deactivate all
others and then use either the up or down arrow button below the DAC button on your remote to switch back
and forth between USB and AES input.
DISC
MUTE
DAC PRE
Input selection
buttons on remote

MPD-6 User Manual
9
CONNECTING THE MPS-6 TO A WINDOWS, MAC OR LINUX BASED PC
Supported resolutions: PCM: all sample rates up to 384kHz and word lengths up to 24 bits.
DSD: native up to 11.2MHz and DoP up to 5.6MHz
Connection protocol and method: USB 2.0 / Audio class 2.0 compliant, asynchronous mode where MPD-
6 generates high precision clock master and computer is clock slaved.
PC requirements: Windows 7 or later, ASIO compatible player software such as JRiver
etc.
Mac requirements: OS X (10.6.6 or later)
Linux computer requirements: Any Linux version with kernel-integrated USB driver (not ALSA).
In order for your computer to communicate with the MPD-6 and to exchange audio data a custom driver
software needs to be installed before you can connect it to the MPD-6. If your computer is a Mac running
OSX 10.6.6 or later or you are using a Linux computer you don’t need any driver software. DSD file playback
is supported on Mac via the DoP standard, and on Linux computers natively up to DSD4x. A driver has to be
installed on all Windows based PCs for any kind of audio playback via the MPD-6.
Driver software installation and first time connection on Windows based computers:
1. Download the latest USB driver from the support section on our website:
www.playbackdesigns.com
2. Double click on the installer and follow instructions on your screen.
3. Power on the MPD-6 and connect the included USB cable between the USB AUDIO connector on
your MPD-6 and your computer.
4. Select USB Input on your MPD-6.
5. The computer will take a moment to enumerate the MPD-6 on
its USB bus and notify you when it is installed successfully. You
can check successful driver installation and connection in the
device manager, where the driver will show up as AKDesign
USB Audio under the Sound, Video and Game Controllers tab.
It will not be listed in the Sound Control panel.
6. Configure your player software to send audio data to the ASIO
interface. Depending on your player software this may be
identified as “AKDesign USB ASIO” or simply as “ASIO”. Some
players may need a plug-in for ASIO compatible playback.
7. For best performance and bit perfect reproduction make sure to set all volume controls in the
computer playback software to exactly 0db (wide open), turn off all effects or equalizer that might be
running in your playback software. Control the volume only with your analog pre-amp.
Connecting Apple or Linux computers:
No driver needs to be installed. If you are planning to play DSD files on a Mac make sure your playback
software sends them via DoP to the MPD-6. Linux supports DSD playback natively without DoP.
During playback with PC
When changing songs from within your player software running on your computer, the USB protocol
automatically communicates all necessary sample rate changes to the MPD-6. The front panel of the MPD-6

MPD-6 User Manual
10
always indicates the true sample rate during file playback. This system will never perform any sample rate
conversion or any signal processing that could adversely affect the sonic performance, but rather use the
exact bits from your file and convert them directly to analog.
During playback with Mac
The native OSX operating system and iTunes do not understand the needs of audiophile consumers and
insist on sample rate conversion. When connecting the MPD-6 OSX will automatically select the highest
possible sample rate (384kHz) and convert all your songs to this rate before playing them out through USB.
This will result in degraded performance. You can manually select the sample rate in the Audio/MIDI Setup
utility to correspond with the native sample rate of the song, but this can be a tedious process if your library
contains songs with more than 1 sample rate. Alternatively, 3rd party plug-ins for iTunes exist that automate
this process and always select the correct sample rate for bit perfect playback.
Playback of DSD files
The driver software and MPD-6 hardware are designed to support playback of DSD files at sample rates up
to 11.2MHz. You will need a playback software running on your computer that can read DSD files and play
them to the USB driver. On the Mac platform you will have to use a playback software that supports the DoP
standard for playing DSD files.
General notes
1. For best performance and bit perfect reproduction make sure to set all volume controls in the
playback software, control panel to exactly 0db (wide open), turn off all operating system sounds,
effects or equalizer that might be running in your playback software or Windows / OSX. Control the
volume only with your analog pre-amp or the internal analog volume inside the MPD-6.
2. While the MPD-6 has no problem supporting playback via USB while it is switched to a different input
(i.e. disc playback, AES or Coax input) it is a good idea to stop playback on your computer before
selecting another input. The clock management in the MPD-6 may not provide the correct frequency
to the USB port if it is not selected. The computer software may have a problem with that and may
malfunction. So when not listening to the USB input, stop playback on your computer.
Table of contents
Other Playback Designs Media Converter manuals


Popular Media Converter manuals by other brands


H&B
H&B TX-100 Installation and instruction manual

Bolin Technology
Bolin Technology D Series user manual

IFM Electronic
IFM Electronic Efector 400 RN30 Series Device manual

GRASS VALLEY
GRASS VALLEY KUDOSPRO ULC2000 user manual

Linear Technology
Linear Technology DC1523A Demo Manual

Lika
Lika ROTAPULS I28 Series quick start guide

Weidmuller
Weidmuller IE-MC-VL Series Hardware installation guide

Optical Systems Design
Optical Systems Design OSD2139 Series Operator's manual

Tema Telecomunicazioni
Tema Telecomunicazioni AD615/S product manual

KTI Networks
KTI Networks KGC-352 Series installation guide

Gira
Gira 0588 Series operating instructions

Lika
Lika SFA-5000-FD user guide