2
3AA X 1.5V (LR6)
EN- REPLACEABLE BATTERIES
FR- BATTERIES REMPLAÇABLES
DE- AUSWECHSELBARE BATTERIEN
NL- VERVANGBARE BATTERIJEN
ES- BATERÍAS SUSTITUIBLES
IT- BATTERIE SOSTITUIBILI
PT- PILHAS SUBSTITUÍVEIS
EN- BATTERIES NOT INCLUDED
FR- BATTERIES NON INCLUSES
DE- ‘BATTERIEN NICHT EINGESCHLOSSEN
NL- ‘INBEGREPEN NIET BATTERIJEN
ES- ‘BATERÍAS NO INCLUIDAS
IT- BATTERIE NON INCLUSE
PT- PILHAS NÃO INCLUÍDAS
X3
1.5V AA
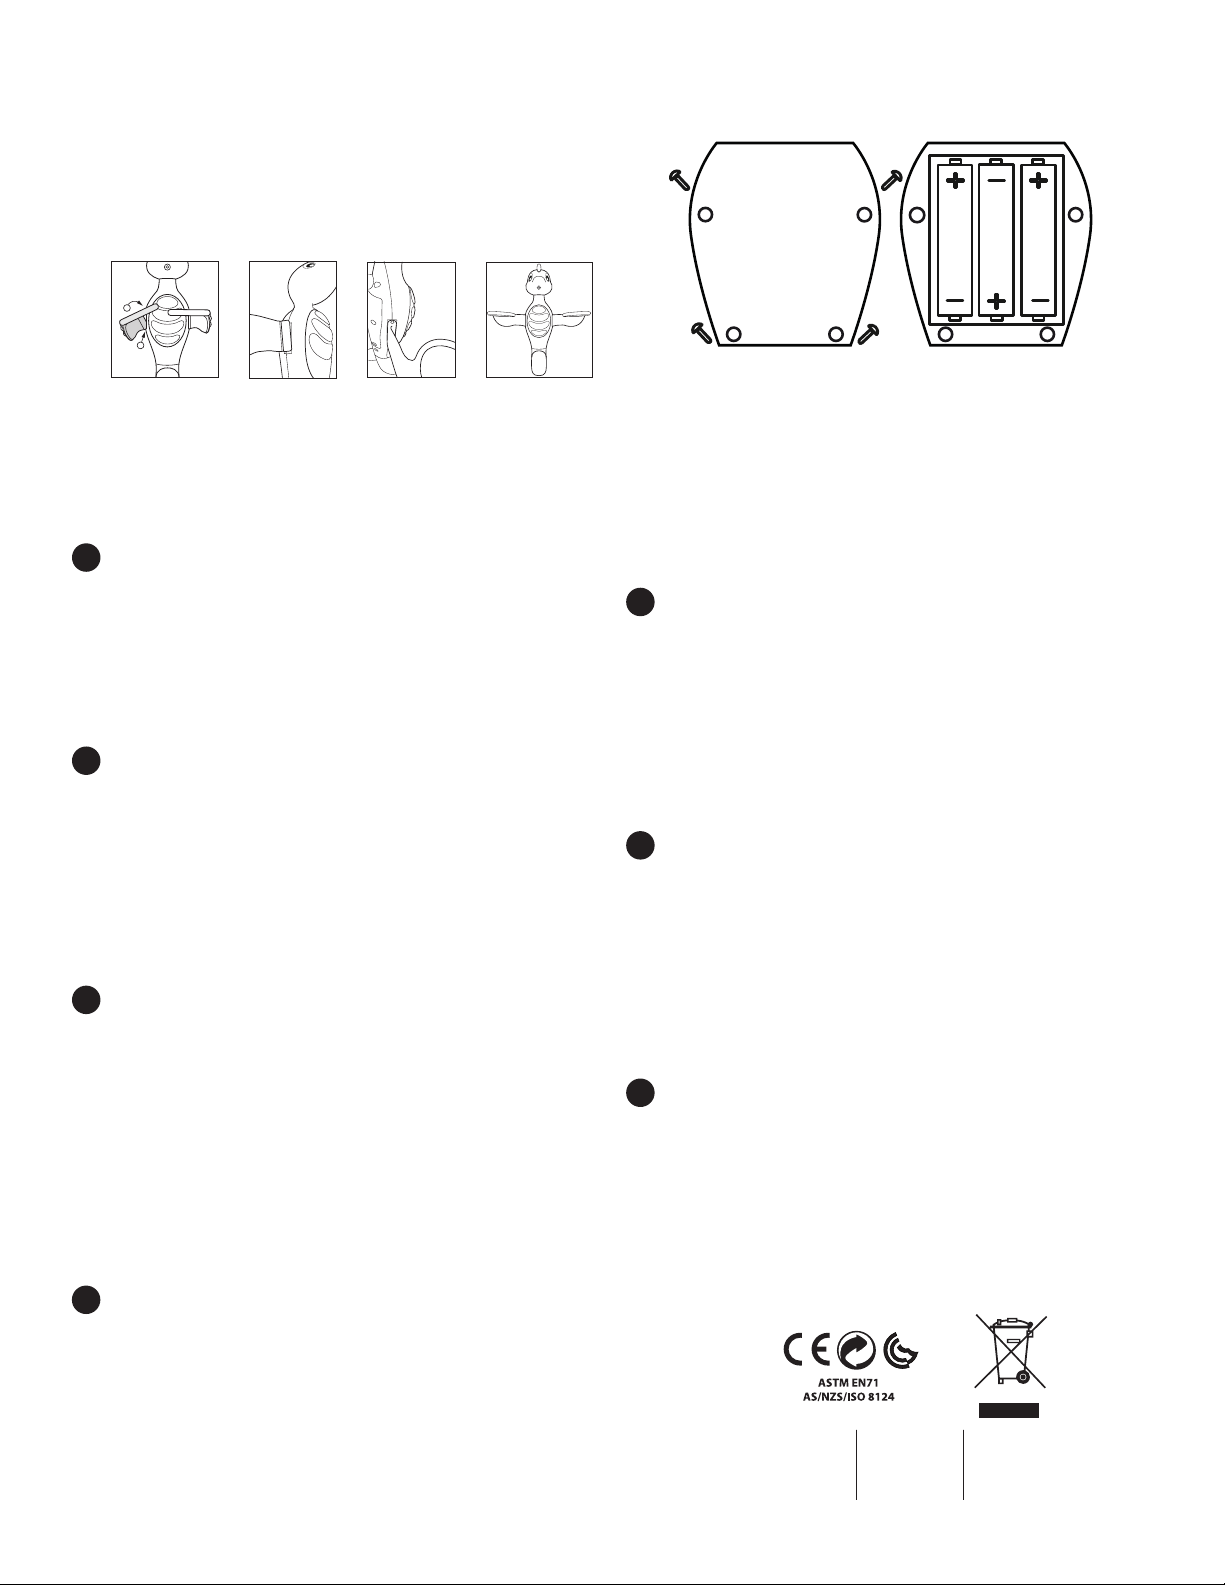
ADULT ASSEMBLY REQUIRED / HOW TO REMOVE AND INSERT BATTERIES /
BATTERY REPLACEMENT INSTRUCTIONS:
1. Remove 4 screws from battery door. Do not remove screws outside the battery door
which gains access to the internal mechanism. 2. Remove door and insert batteries as
shown. Observe polarity. 3. Close battery door and screw closed. BATTERY SAFETY
INFORMATION: Adult supervision is recommended when changing batteries. Only use
recommended batteries. DO NOT USE RECHARGEABLE BATTERIES. Batteries are to be
inserted with the correct polarity. Do not mix old and new batteries. Do not mix alkaline or
standard batteries. Do not attempt to charge non-rechargeable batteries. Do not dispose
of batteries in re, batteries may explode or leak. Dispose of batteries safely and correctly.
Remove batteries if the toy will not be used for a long period of time. The supply terminals
are not to be short-circuited. Exhausted batteries should be removed from the toy.
LE PRODUIT DOIT ÊTRE ASSEMBLÉ PAR UN ADULTE / COMMENT RETIRER ET IN-
SÉRER LES BATTERIES/ INSTRUCTIONS POUR LE REMPLACEMENT DES PILES:
1. Retirer 4 vis du clapet pour les piles. Ne pas retirer la vis qui se trouve en-dehors du
clapet pour les piles car elle donne accès au mécanisme interne. 2. Retirer le clapet et
insérer les piles comme indiqué. Respectez les polarités. 3. Refermer le clapet pour les piles
et revisser. INSTRUCTIONS DE SECURITE POUR LES PILES: Une surveillance par un adulte
est nécessaire lors du changement des piles. Utiliser uniquement les piles recommandées.
NE PAS UTILISER LES PILES RECHARGEABLES. Les piles doivent être insérées en
respectant la polarité correcte. Ne pas mélanger les piles anciennes et les piles nouvelles.
Ne pas mélanger les piles standards et les piles alcalines.
Ne pas essayer de recharger des piles non-rechargeables. Ne pas jeter les piles au feu, elles
peuvent exploser ou suinter. Recycler les piles de manière sure et correcte. Retirer les piles
si le jouet n’est pas utilisé pendant une longue durée. Les sources d’alimentation ne doivent
pas être court-circuitées. Les piles usées doivent être retirées du jouet.
EN
FR
EL MONTAJE HA DE SER REALIZADO POR UN ADULTO / CÓMO QUITAR Y PONER
PILAS/ INSTRUCCIONES DE SUSTITUCION DE LA BATERÍA:
1. Retire 4 tornillos único de la puerta del compartimento para pilas. No quite los tornillos
de la puerta que da acceso al mecanismo interno. 2. Quite la puerta del compartimento
e inserte las pilas como se muestra. Observe la polaridad. 3. Cierre la puerta del
compartimento para pilas y apriete el tornillo. INFORMACIÓN DE SEGURIDAD REFERENTE
A PILAS: Se recomienda que las pilas se cambien bajo la supervisión de un adulto. Use
sólo pilas recomendadas. NO USE PILAS RECARGABLES. Las pilas deben ser insertadas
con la polaridad correcta. No mezcle pilas viejas con nuevas. No mezcle pilas alcalinas
con pilas normales. No intente recargar pilas no recargables. No acerque las pilas al fuego;
pueden explotar o presentar fugas. Deshágase de las pilas de forma segura y correcta.
Retire las pilas si el juguete va a estar sin usar durante un largo período de tiempo. No debe
producirse un cortocircuito entre los bornes eléctricos. Las pilas agotadas deberían retirarse
del juguete.
È NECESSARIO IL MONTAGGIO DA PARTE DI UN ADULTO / COME RIMUOVERE E
INSERIRE LE BATTERIE / ISTRUZIONI PER LA SOSTITUZIONE BATTERIE:
1. Rimuovere 4 viti dallo sportello del vano batterie. Non rimuovere le viti fuori dallo sportello
del vano batterie che da accesso al meccanismo interno. 2 Rimuovere lo sportello e
inserire le batterie come illustrato. Osservare la polarità. 3 Chiudere lo sportello e serrare
la vite. INFORMAZIONI DI SICUREZZA SULLE BATTERIE: Si raccomanda la supervisione
di un adulto durante la sostituzione delle batterie. Usare solo le batterie consigliate. NON
UTILIZZARE BATTERIE RICARICABILI. Le batterie devono essere inserite con la polarità
corretta. Non utilizzare insieme batterie nuove e vecchie. Non utilizzare insieme batterie
alcaline e standard. Non tentare di ricaricare le batterie non ricaricabili. Non smaltire le
batterie nel fuoco, pericolo di esplosione o perdite. Smaltire le batterie correttamente
e in sicurezza. Rimuovere le batterie se il giocattolo non viene utilizzato per un periodo
prolungato. I terminali di alimentazione non devono essere sottoposti a cortocircuito.
Rimuovere le batterie esauste dal giocattolo.
REQUER MONTAGEM POR PARTE DE UM ADULTO / COMO RETIRAR E COLOCAR
PILHAS / INSTRUÇÕES PARA SUBSTITUIR AS PILHAS:
1. Retire 4 parafusos único da tampa das pilhas. Não retire os parafusos do exterior da
tampa das pilhas com acesso ao mecanismo interno. 2. Retire a tampa e insira as pilhas
conforme indicado. Observe a polaridade. 3. Feche a tampa das pilhas e aparafuse-a para
fechar. INFORMAÇÕES DE SEGURANÇA ACERCA DAS PILHAS: Ao substituir as pilhas
recomenda-se a supervisão de um adulto. Utilizar somente pilhas recomendadas. NÃO
UTILIZAR PILHAS RECARREGÁVEIS. Inserir as pilhas com a polaridade correcta. Não
misturar pilhas antigas com pilhas novas. Não misturar pilhas alcalinas com pilhas standard.
Não carregar pilhas não recarregáveis. Não eliminar as pilhas no fogo, as pilhas podem
explodir ou derramar uído. Eliminar as pilhas de forma segura e correcta. Retirar as pilhas
se o brinquedo não for utilizado por um longo período de tempo. Não colocar os terminais
de alimentação em curto-circuito. As pilhas gastas devem ser retiradas do brinquedo.
ZUSAMMENBAU DURCH EINEN ERWACHSENEN ERFORDERLICH / WIE MAN
BATTERIEN ENTFERNT UND EINLEGT / ANLEITUNG ZUR AUSWECHSLUNG DER
BATTERIEN:
1. Entfernen Sie 4 Schrauben von der Batteriefachabdeckung. Lösen Sie NICHT die
Schrauben die sich außerhalb der Batterieabdeckung bendet, da diese den Zugang zum
inneren Mechanismus ermöglicht. 2. Önen Sie die Batterieabdeckung und wechseln
Sie, wie vorgegeben, die Batterien aus. Achten Sie bitte auf den richtigen Anschluss
der Pole. 3. Schließen Sie die Batterieabdeckung und befestigen Sie die Schraube.
SICHERHEITSINFORMATON FÜR BATTERIEN: Beim Wechseln von Batterien wird die
Aufsicht durch Erwachsene dringend angeraten. Verwenden Sie ausschließlich empfohlene
Batterien. VERWENDEN SIE KEINE WIEDERAUFLADBAREN BATTERIEN. Batterien müssen
in der richtigen Weise eingebracht und angeschlossen werden. Verwenden Sie keine alte und
neue Batterien gleichzeitig. Verwenden Sie nicht gleichzeitig Alkalien und Standardbatterien.
Versuchen Sie nicht um nicht-wiederauadbare Batterien zu herladen. Werfen Sie Batterien
niemals in Feuer. Die Batterien können explodieren oder lecken. Entsorgen Sie die Batterien
entsprechend den örtlichen Vorschriften. Entfernen Sie die Batterien, wenn das Spielzeug
für längere Zeit nicht benutzt wird. Die Anschlüsse dürfen niemals kurzgeschlossen werden.
Leere Batterien müssen aus dem Spielzeug entfernt werden.
MONTAGE DOOR EEN VOLWASSENE VEREIST / HOE VERWIJDER EN PLAATS JE
BATTERIJEN/ AANWIJZINGEN OM DE BATTERIJ TE VERVANGEN:
1. Verwijder4 schroeven uit de klep van de batterijen. Verwijder niet de Schroeven buiten de
klep van de batterij die toegang geeft tot het interne mechanisme. 2. Verwijder de klep en
monteer de batterijen zoals is afgebeeld. Let op de polen. 3. Sluit de klep van de batterijen
en draai de schroef vast. VEILIGSHEIDSINFORMATIE VOOR BATTERIJEN: Vervang de
batterijen bij voorkeur onder het toezicht van een volwassene. Gebruik alleen de aanbevolen
batterijen. GEBRUIK GEEN OPLAADBARE BATTERIJEN. Monteer de batterijen met hun
polen aan de goede kant. Gebruik geen nieuwe en oude batterijen door elkaar. Gebruik
geen alkaline en gewone batterijen door elkaar. Probeer niet-oplaadbare batterijen nooit
op te laden. Gooi batterijen niet weg door ze te verbranden, batterijen kunnen ontploen
of lekken. Gooi batterijen op een veilige en correcte manier weg. Verwijder de batterijen
als het speelgoed voor langere tijd niet wordt gebruikt. Veroorzaak geen kortsluiting in de
voedingsklemmen. Lege batterijen moeten uit het speelgoed worden verwijderd.
ES
IT
PT
DE
NL
Playgro Pty Ltd
49-51 Sunmore Close
Heatherton 3202
Vic. Australia
Playgro Europe B.V.
P.O. Box 2
5280 AA Boxtel
The Netherlands
Playgro USA LLC
7200 Greenleaf Ave
Suite 390
Whittier, CA 90602
Assembly Instructions
A
B
EN: How to connect detachable arms. FR: Comment relier les bras amovibles DE: Abnehmbare Arme anbringen. NL: Hoe
je de armen eraf haalt.ES: Cómo conectar los brazos desmontables. IT: Come collegare i braccioli smontabili
PT: Como estabelecer a ligação dos braços destacáveis.
Push
arm in
rmly


