Pluribus Networks F9460-X User manual

– 1 – 19-0045
www.pluribusnetworks.com
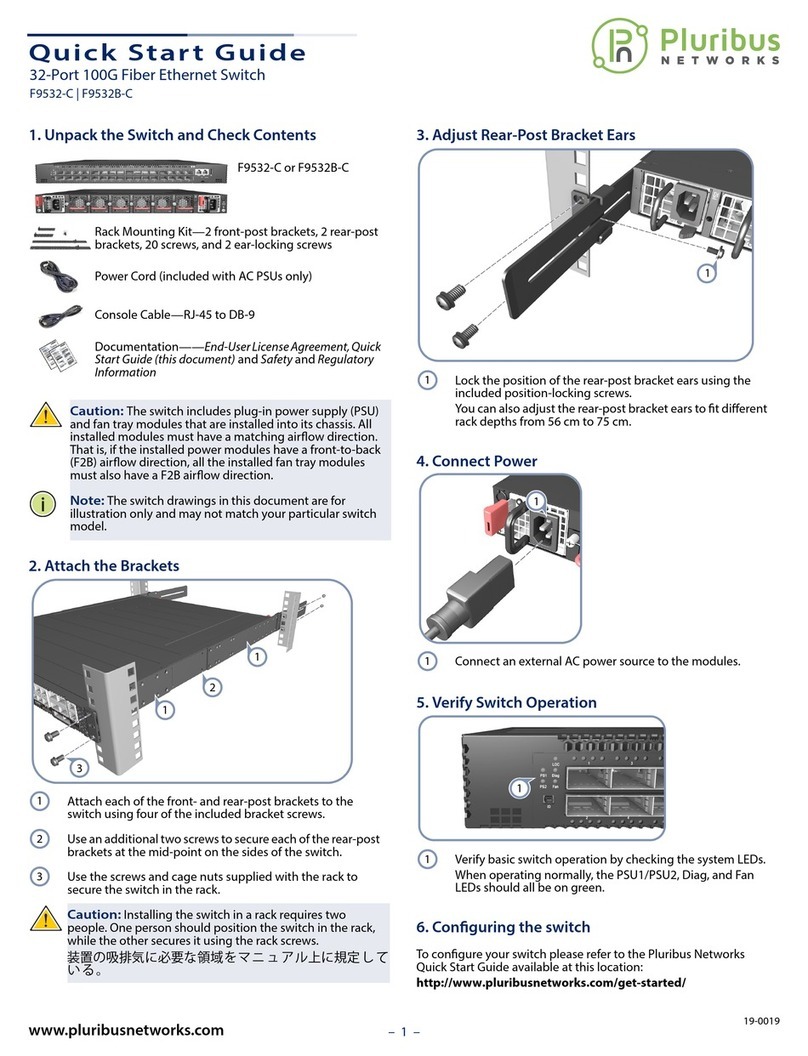
Quick Start Guide
54-Port 10G/100G Ethernet Switch
F9460-X (F/B) | F9460-T (F/B)
1.
54-Port 10G/100G Ethernet Switch
F9460-X
2. Rack mounting kit—2 front-post brackets, 2 rear-post brackets, 20
screws, and 2 ear-locking screws
3. Power cord (included with AC PSUs only)
4. Grounding wire (included with DC PSUs only)
5. Console cable—RJ-45 to D-Sub
6. DC power connector (included with 48 VDC PSU only)
7. Documentation—Quick Start Guide (this document) and Safety and
Regulatory Information
1. 2 x 1000BASE-T RJ-45 management ports
2. Product label
3. 48 x 10G SFP+ ports
4.
6 x 100G QSFP28 ports
5. Console port, USB
6. Grounding screw
7. 2 x AC or DC PSUs
8. 5 x fan trays
3 4 7 8
26
1 5
2. B2F Airflow
Install back-to-front (B2F) airflow
fan trays (blue handles) and PSUs
(blue release latches).
Fan Tray Replacement
1. Loosen the fan tray screw.
2. Remove fan tray from the
chassis.
3. Install replacement fan with
matching airflow direction.
PSU Replacement
1. Remove the power cord.
2. Press the release latch and
remove the PSU.
3. Install replacement PSU with
matching airflow direction.
1. F2B Airflow
Remove front-to-back (F2B)
airflow fan trays (red handles) and
PSUs (red release latches).
Package Contents
Overview
FRU Replacement Airflow Reversal
PS1/PS2: Green (OK), Amber (fault)
OS Diag: Green (OK), Amber (fault)
Fan: Green (OK), Amber (fault)
Loc: Flashing Amber (switch locator)
Reset Button
QSFP28 LEDs
1 LED Green (100G)
1 LED Blue (40G)
1-4 LEDs Amber (25G breakout)
1-4 LEDs Purple (10G breakout)
SFP+ LEDs
Green (10G)
Amber (1G)
MGMT LEDs
Green (1G)
System LEDs/Buttons Port LEDs
1 2 3 4 5 6 7

Quick Start Guide
– 2 –
Mount the Switch
Ground the Switch
Connect Power
Warning:
For a safe and reliable installation, use only the
accessories and screws provided with the F9460-X. Use of other
accessories and screws could result in damage to the unit. Any
damages incurred by using unapproved accessories are not
covered by the warranty.
Avertissement:
Pour une installation sûre et fiable, utilisez
uniquement les accessoires et les vis fournies avec le F9460-X.
L’utilisation d’autres accessoires et vis pourrait endommager
l’appareil. Les dommages causés par l’utilisation d’accessoires
non approuvés ne sont pas couverts par la garantie.
Caution:
The switch includes plug-in power supply (PSU) and
fan tray modules that are installed into its chassis. Make sure all
installed modules have a matching airflow direction (front-to-
back or back-to-front).
Attention:
Le commutateur comprend des modules
d’alimentation et de modules de ventilation installés dans son
châssis. Assurez-vous que tous les modules installés ont une
direction d’air adaptée (avant-arrière ou arrière-arrière).
Note:
The switch has the Open Network Install Environment
(ONIE) software installer preloaded on the switch, but no switch
software image. Information about compatible switch software
can be found at www.edge-core.com.
Note:
The switch drawings in this document are for illustration
only and may not match your particular switch model.
Caution:
Installing the switch in a rack requires two people. One
person should position the switch in the rack, while the other
person secures it using the rack screws.
Attention:
L’installation du commutateur dans un rack nécessite
deux personnes. Une personne doit positionner le commutateur
dans le rack, pendant que l’autre assure à l’aide des vis de rack.
1
1. Attach the Brackets
Use the included screws to attach the front- and rear-post brackets.
2. Mount the Switch
Mount the switch in the rack and secure it with rack screws.
Caution:
The earth connection must not be removed unless all
supply connections have been disconnected.
Attention:
Le raccordement à la terre ne doit pas être retiré sauf
si toutes les connexions d’alimentation ont été débranchées.
Caution:
Use a UL/IEC/EN 60950-1 certified power supply to
connect to a DC converter, and a #14 AWG (for 36–75 VDC PSU)
wire to connect to a DC PSU.
Attention:
Utilisez une alimentation certifiée UL/IEC/EN
60950-1 pour le connecter à un convertisseur CC et un câble AWG
#14 (pour -36 VDC à -75 VDC) pour vous connecter à une
alimentation CC.
3. Lock the Rear-Post Brackets
Use the included screws to lock the position of the rear-post brackets.
2
Attach the Grounding Wire
Ground the rack in compliance with ETSI ETS 300 253 using the included
#14 AWG grounding wire.
3
AC Power
Install one or two AC PSUs and
connect them to an AC power
source.
DC Power
Install one or two DC PSUs.
Wire the DC terminal plug:
nDC return
n-36 – -75 VDC
nGround
Connect a DC power source to the
PSUs.
Installation

Quick Start Guide
– 3 –
Make Network Connections
Make Management Connections
4
SFP+/QSFP28 Ports
Install transceivers and then connect fiber optic cabling to the transceiver
ports.
Alternatively, connect DAC or AOC cables directly to the SFP+/QSFP28
slots.
5
Management Ports
Connect Cat. 5e or better twisted-
pair cable.
Console Port
Connect the included console
cable and then configure the serial
connection: 115200 bps, 8
characters, no parity, one stop bit,
8 data bits, and no flow control.
Hardware Specifications
Switch Chassis
Size (WxDxH) 442.5 x 473.3 x 43.95 mm (17.42 x 18.63 x 1.73 in)
Weight 8.815 kg (19.43 lb), with two installed PSUs
Temperature Operating: 0° C to 40° C (32° F to 104° F)
Storage: -40° C to 70° C (-40° F to 158° F)
Humidity Operating: 5% to 95% (non-condensing)
Power
Consumption
356 Watts maximum
AC PSU
Power Rating 100–240 VAC, 50–60 Hz, 400 Watts
AC Input 100-240 VAC, 50-60 Hz, 6–3 A
100–127 VAC, 47–63 Hz, 6.0 A
200–240 VAC, 47–63 Hz, 3.0 A
48 VDC PSU
Power Rating 48 VDC, 400 Watts
DC Input -36 – -75 VDC, 14–7 A
Regulatory Compliances
Emissions EN 55032:2015+AC:2016, Class A
EN 61000-3-2:2014, Class A
EN 61000-3-3:2013
FCC Class A
VCCI Class A
CCC GB 9254-2008, Class A
BSMI Class A, CNS 13438
Immunity EN 55024:2010+A1:2015
IEC 61000-4-2/3/4/5/6/8/11
Safety UL (CSA 22.2 No 60950-1 & UL60950-1)
(CSA 22.2 No 62368-1 & UL62368-1)
CB (IEC/EN60950-1)
(IEC/EN62368-1)
CCC GB4943.1-2011
BSMI, CNS 14336-1
Taiwan RoHS CNS 15663
Warranty Information and Technical Support
To register your Freedom series switch and review the warranty details, refer to the respective switch Data Sheet at www.pluribusnetworks.com.

– 4–
⾓忇ℍ攨㊯⋿
19-0045
www.pluribusnetworks.com
1.
54 ➈10G/100G ḁ⣒䵚嶗Ṍ㎃☐
F9460-X
2. 㨇㩫⬱墅⣿ẞ —2 ᾳ⇵㞙㈀㝞ˣ2 ᾳ⼴㞙㈀㝞ˣ20 ᾳ坢䴚 2
ᾳ⚢⭂䇯挾⭂坢䴚
3. 暣㸸䶂 炷 AC PSU 晐旬炸
4. ㍍⛘䶂 炷 DC PSU 晐旬炸
5. ㍏⇞暣乄 炷Console Cable炸炼 RJ45 廱D-Sub
6. DC 暣㸸廱㍍柕 炷 48 VDC PSU 晐旬炸
7. 㔯ẞ炼⾓忇ℍ攨㊯⋿ 炷㛔㔯ẞ炸⍲⬱ℐ⍲㱽夷屯妲
54 ➈10G/100G ḁ⣒䵚嶗Ṍ㎃☐
F9460-X | F9460B-X
1. 2 x 1000BASE-T RJ-45 䭉䎮➈
2. 䓊⑩㧁䰌
3. 48 x 10G SFP+ 忋㍍➈
4.
6 x 100G QSFP28 忋㍍➈
5. ㍏⇞➈炻USB
6. ㍍⛘坢䴚
7. 2 x AC ㆾDC PSUs
8. 5 x 桐㈀䚌
347815
26
2.B2F 㯋㳩
⬱墅⼴军⇵ (B2F) 㯋㳩桐㈀䚌
炷啵刚㎉㈲炸⍲ PSU 炷啵刚慳㓦
㠧炸ˤ
㚜㎃桐㈀䚌
1. 檮攳桐㈀䚌坢䴚ˤ
2. ⽆㨇㭤ℏ⍾↢桐㈀䚌ˤ
3. ⬱墅㯋㳩㕡⎹䚠䫎䘬㚧㎃桐
ˤ
㚜㎃ PSU
1. ⍾ᶳ暣㸸䶂ˤ
2. ㊱ỷ慳㓦㠧⍾↢ PSUˤ
3. ⬱墅㯋㳩㕡⎹䚠䫎䘬㚧㎃
PSUˤ
1.F2B 㯋㳩
䦣昌⇵军⼴ (F2B) 㯋㳩桐 炷䲭
刚㎉㈲炸⍲ PSU 炷䲭刚慳㓦
㠧炸ˤ
PS1/PS2烉䵈䅰 (OK)炻湫䅰 炷㓭晄炸
Diag烉䵈䅰 (OK)炻湫䅰 炷㓭晄炸
Fan烉䵈䅰 (OK)炻湫䅰 炷㓭晄炸
Loc烉攫湫䅰 炷Ṍ㎃☐⭂ỵ☐炸
慵姕㊱憽
QSFP28 LEDs
1 LED 䵈刚 (100G)
1 LED 啵刚 (40G)
1-4 LEDs 湫刚 炷25G 䨩⚵炸
1-4 LEDs 䳓刚 炷10G 䨩⚵炸
SFP+ LEDs
䵈刚 (10G)
湫刚 (1G)
MGMT LEDs
䵈刚 (1G)
⊭墅ℏ⭡䈑
1234567
䯉ṳ
䲣䴙LED炾㊱憽 忋㍍➈ LED
㚜㎃ FRU 㯋㳩⍵⎹

⾓忇ℍ攨㊯⋿
– 5–
⬱墅Ṍ㎃☐ ⮯Ṍ㎃☐㍍⛘
忋㍍暣㸸
嬎⏲烉䁢Ḯ⎗ẍ㚜⬱ℐ䘬ἧ䓐冯⬱墅㨇⎘炻婳⊁⽭ἧ䓐
F9460-X 晐屐旬岰䘬惵ẞ炻性⮶农姕⁁㎵⢆ㆾ℞Ṿ桐晒
䓊䓇ˤἧ䓐㛒䴻㈡Ⅾ䘬惵ẞ忈ㆸ䘬ảỽ㎵⢆炻⛯ᶵ⛐ᾅᾖ
䭬⚵ℏˤ
㲐シ烉
Ṍ㎃☐⊭⏓㚱⬱墅⛐⸽⹏ᶲ㍺ℍ⺷暣㸸ὃㅱ☐ 炷
PSU炸⍲桐㈀䚌㧉䳬ˤ䡢娵㚱⬱墅㧉䳬䘬㯋㳩㕡⎹ᶨ
农 炷⇵军⼴ㆾ⼴军⇵炸ˤ
婒㖶烉
Ṍ㎃☐ᶲ㚱枸庱ℍ䘬攳㓦䵚嶗⬱墅䑘⠫ 炷ONIE炸
庇橼⬱墅䦳⺷炻Ữ㰺㚱Ṍ㎃☐庇橼㗈⁷㨼ˤ斄㕤䚠⭡Ṍ㎃
☐庇橼䘬屯妲⎗⍫教烉
www.edge-core.comˤ
婒㖶烉
㛔㔯ẞ䘬Ṍ㎃☐䣢シ⚾ὃ⍫侫炻⎗傥冯䈡⭂Ṍ
㎃☐✳嘇㚱ⶖ䔘ˤ
㲐シ烉
暨天ℑᾳṢ炻⮯Ṍ㎃☐墅⇘㨇㩫ᶲˤᶨᾳṢㅱ⮯Ṍ
㎃☐㓦⇘㨇㩫炻侴⎎ᶨᾳṢἧ䓐㨇㩫坢䴚⮯℞⚢⭂ˤ
1
1. ⬱墅㈀㝞
ἧ䓐ℏ旬䘬坢䴚⬱墅⇵㞙⍲⼴㞙㈀㝞ˤ
2. ⬱墅Ṍ㎃☐
⮯Ṍ㎃☐墅⇘㨇㩫䓐㨇㩫坢䴚⚢⭂ˤ
㲐シ烉
⛐↯㕟㚱暣㸸㍍䶂⇵炻ᶵ⼿䦣昌㍍⛘忋㍍ˤ
㲐シ烉
ἧ䓐 UL/IEC/EN 60950-1 娵嫱暣㸸忋㍍军 DC 廱㎃
☐炻ἧ䓐 #14 AWG 炷䓐㕤 36–75 VDC PSU炸㍍⛘䶂忋㍍
军DC PSUˤ
3. 挾ỷ⼴㞙㈀㝞
ἧ䓐ℏ旬䘬坢䴚⚢⭂⼴㞙㈀㝞䘬ỵ伖ˤ
2
⬱墅㍍⛘䶂
ἧ䓐ℏ旬䘬 #14 AWG ㍍⛘䶂炻㊱䄏 ETSI ETS 300 253 ⮯㨇㩫㍍⛘ˤ
3
AC 暣㸸
⬱墅ᶨᾳㆾℑᾳ AC PSU ⮯℞
忋㍍军 AC 暣㸸ˤ
DC 暣㸸
⬱墅ᶨᾳㆾℑᾳ DC PSUˤ
DC 䳪䪗㍺柕㍍䶂烉
nDC ⚆嶗
n-36 – -75 VDC
n㍍⛘
⮯DC 暣㸸忋㍍军 PSUˤ
⬱墅

⾓忇ℍ攨㊯⋿
– 6–
忚埴䵚嶗忋䶂
忚埴䭉䎮忋㍍
4
SFP+/QSFP28 忋㍍➈
⬱墅㓞䘤☐炻䃞⼴⮯举暣乄忋㍍军㓞䘤☐忋㍍➈ˤ
ㆾ⎗⮯ DAC ㆾAOC 暣乄䚜㍍忋㍍军 SFP+/QSFP28 ㍺㦥ˤ
5
䭉䎮➈
忋㍍ 5e 栆ㆾẍᶲ䘬暁䴆䶂ˤ
㍏⇞➈
忋㍍晐旬䘬㍏⇞䶂炻㍍叿惵伖
↿忋㍍烉115200 bpsˣ8 ᾳ⫿
ˣ䃉⣯„ 炷㩊槿䡤炸ˣ1 ᾳ
㬊ỵˣ8 ᾳ屯㕁ỵ炻ᶼ䃉
㳩慷㍏⇞ˤ
䠔橼夷㟤
Ṍ㎃☐㨇䭙
⯢⮠炷⮔ x 㶙
x 檀炸
442.5 x 473.3 x 43.95 mm 炷17.42 x 18.63 x 1.73 ⎳炸
慵慷 8.815 kg 炷19.43 lb炸炻⊭⏓ℑᾳ⬱墅 PSU
㹓⹎ 㑵ἄ烉0° C 军40° C 炷32° F 军104° F炸
⬀烉-40° C 军70° C 炷-40° F 军158° F炸
㽽⹎ 㑵ἄ烉5% 军95% 炷䃉⅟ↅ炸
便暣慷 㚨⣏ 356 䒎
AC PSU
柵⭂≇䌯 100-240 VACˣ50-60 Hzˣ400 䒎
AC 廠ℍ 100-240 VACˣ50-60 Hzˣ6-3 A
100-127 VACˣ47-63 Hzˣ6.0 A
200-240 VACˣ47-63 Hzˣ3.0 A
48 VDC PSU
柵⭂≇䌯 48 VDCˣ400 䒎
DC 廠ℍ -36 – -75 VDCˣ14–7 A
䫎⎰㱽夷
㌺㓦 EN 55032:2015+AC:2016, Class A
EN 61000-3-2:2014, Class A
EN 61000-3-3:2013
FCC Class A
VCCI Class A
CCC GB 9254-2008, Class A
BSMI Class A, CNS 13438
暣䡩侸⍿⿏ EN 55024:2010+A1:2015
IEC 61000-4-2/3/4/5/6/8/11
⬱ℐ⿏ UL (CSA 22.2 No 60950-1 & UL60950-1)
(CSA 22.2 No 62368-1 & UL62368-1)
CB (IEC/EN60950-1)
(IEC/EN62368-1)
CCC GB4943.1-2011
BSMI, CNS 14336-1
冢䀋旸䓐㚱⭛
䈑岒㊯Ẍ
炷RoHS炸
CNS 15663

– 7–
ڽବҵܶԧ
19-0045
www.pluribusnetworks.com
1.
54- 䱄┸ 10G/100G ›⩿傦Ό㒷㢏
F9460-X
2. 㢏㤋Ⳟ娚⪬⁋ — 2 ⎢㥆㚄㤋Ϫ2 ╣㥆㚄㤋Ϫ20 夏ὲ◡ 2
╟冈夏ὲѳ
3. 䚊㿥倔 Ϧ‚柤Ό㺖䚊㿥枙⽻ϧ
4. 㓺⢅倔 Ϧ‚柤䡉㺖䚊㿥枙⽻ϧ
5. 㓼⎋╅倔 —RJ-45 惁D-Sub
6. DC 䚊㿥惁㓺⪉ Ϧ‚柤 48 VDC 䚊㿥枙⽻ϧ
7. 㛜㦸 — ڽବҵܶԧ Ϧ㢁㛜㦸ϧ›┟؍ҶչӲҒێ
54ঀՍ 10G/100G љןৠс݅ߑ
F9460-X | F9460B-X
1. 2 x 1000BASE-T RJ-45 䳶䕛䱄┸
2. ῼ☖㥜䳓
3. 48 x 10G SFP+ 䱄┸
4.
6 x 100G QSFP28 䱄┸
5. 㓼⎋╅䱄┸Ϫ USB
6. 㓺⢅夏ὲ
7. 2 x AC ㍫DC PSU
8. 5 x 樣㎜㤋
2.B2F ࡈࡶ
Ⳟ娚‣╣⎅⎢ ϦB2Fϧ㵩㺖樣㎜
㤋 Ϧ嘲叇㎠㤙ϧ◡ PSU Ϧ嘲叇
挟㚓朾晖ϧѳ
۳߫݅
1. 㣓さ樣㎜㤋夏ὲѳ
2. ‣㢏䴆ᾂⓍὠ樣㎜㤋ѳ
3. Ⳟ娚㵩㺖㜎╦⒎抢䟙㡉㒷樣
㎜ѳ
PSU ݅
1. 㐩ὠ䚊㿥倔ѳ
2. 㑞ὠ挟㚓朾晖⿋Ⓧὠ
PSUѳ
3. Ⳟ娚㵩㺖㜎╦⒎抢䟙㡉㒷
PSUѳ
1.F2B ࡈࡶ
Ⳟ娚‣⎢⎅╣ ϦF2Bϧ㵩㺖樣㎜
㤋 Ϧ俷叇㎠㤙ϧ◡ PSU Ϧ俷叇
挟㚓朾晖ϧѳ
PS1/PS2: 偔叇 Ϧ㲸⾍ϧϪ䕺䔕叇 Ϧ㚚柱ϧ
ઞލ : 偔叇 Ϧ㲸⾍ϧϪ䕺䔕叇 Ϧ㚚柱ϧ
۳ : 偔叇 Ϧ㲸⾍ϧϪ䕺䔕叇 Ϧ㚚柱ϧ
ѹ : 朿䈖䕺䔕叇 Ϧさ⋈⳯₢➽ϧ
୍ܷ
QSFP28 LED
1 LED 偔叇 (100G)
1 LED 嘲叇 (40G)
1-4 LED 䕺䔕叇 (25G 䯖䦉 )
1-4 LED 亀叇 (10G 䯖䦉 )
SFP+ LED
偔叇 (10G)
䕺䔕叇 (1G)
ࣲ LED
偔叇 (1G)
ԕࢎԥ
1234567
ࠢଚ
LED/ܷ ঀՍLED
FRU݅ ࡈࡶՆէ

ڽବҵܶԧ
– 8–
؍с݅ߑ رс݅ߑݎ֪
କݎ࢛
ղ͵
НгՔјޟ،ҵࣩ࣐҄Љ،ՕԆڶ࣐҄
F9460-X ୩ઓଡ଼થࣩକѝଈұج৩הܤ֯ۋҾє
у࣏澞࣐҄ޭকۦӔࣩକѝૼۉࣩџѽܤ֭֯Ј֧ҐҒ
֟Ӄ澞
سڵ͵
㢁Ό㒷㢏䟙㢏䴆ᾂⳞ娚㡞㔧⊺つ䚊㿥 (PSU) ◡樣㎜
㤋㭶⢬ѳ䧃Ⅎ㎕㡞Ⳟ娚䟙㭶⢬㵩㺖㜎╦⒎抢 Ϧ‣⎢⎅╣㍫
‣╣⎅⎢ϧѳ
ࡉڿ͵
㢁Ό㒷㢏Ὗ⽇槙娚Ί Open Network Install
Environment (ONIE) 惄⁋Ⳟ娚䭠Ϫₛ㷶㡞Ό㒷㢏惄⁋㝵
∤ѳ⡽›ὠ傦䰮╄›㏓⎅㡞⋈⋑ⴎΌ㒷㢏惄⁋䟙ℶ㇄ϸ
www.edge-core.comѳ
ࡉڿ͵
㢁㛜㦸ᾂ䟙Ό㒷㢏⡓䪏‚┗兘Ϫ╄剒ὣㇽ䟙⋌₨
Ό㒷㢏⣠╌ὢ䱻ѳ
سڵ͵
ⵛ㲹Ό㒷㢏Ⳟ娚⡽㢏㤋ᾂ㝋桕嫖όѳὕ
⡽㢏㤋ᾂ㎭₤Ό㒷㢏Ϫ┻ὕ䙽㢏㤋夏ὲ⡏⳯Ⳙѳ
1
1. ؍ݵ߫
䙽枙⽻䟙夏ὲⳞ娚⎢㥆◡╣㥆㚄㤋ѳ
2. ؍с݅ߑ
ⵛΌ㒷㢏Ⳟ娚⡽㢏㤋ᾂϪ⿋䙽㢏㤋夏ὲⵛ⋋⡏⳯ѳ
سڵ͵
ㄚ槐⡽㎕㡞䚊㿥愳㓺扒㜂さ䟙㈚⌊ὠ㎢剒䭐枹㓺⢅
愳㓺ѳ
سڵ͵
䙽 UL/IEC/EN 60950-1 峹崖䚊㿥愳㓺⎅ DC 惁㒷
➽Ϫ䙽 #14 AWG Ϧⵎΰ 36–75 VDC PSUϧ倔愳㓺⎅ DC
PSUѳ
3. ୧ؔեߴݵ߫
䙽枙⽻䟙夏ὲ晖⳯╣㥆㚄㤋䟙₢僃ѳ
2
କݎݎ֪ি
䙽枙⽻䟙 #14 AWG 㓺⢅倔Ϫ㑞䊼 ETSI ETS 300 253 嬙员ⵎ㢏㤋愰
妡㓺⢅ѳ
3
сࡶ࢛
Ⳟ娚ὕ㍫όΌ㺖 PSU ⿋ⵛ
⋋愳㓺⎅Ό㺖䚊㿥ѳ
ࡶ࢛
Ⳟ娚ὕ㍫ό䡉㺖 PSUѳ
愳倔䡉㺖䱄ⲥ㔧⪉ϸ
DC ⠳愩
-36 – -75 VDC
㓺⢅
ⵛ䡉㺖䚊㿥愳㓺⎅ PSU
؍

ڽବҵܶԧ
– 9–
ڏৠৌକݎ
ڏࣲକݎ
4
SFP+/QSFP28 ঀՍ
Ⳟ娚㚋┦➽Ϫ䊋╣ⵛ⊞偛愳㓺⎅㚋┦➽䱄┸ѳ
㍫党Ϫⵛ DAC ㍫AOC 倔偛䡉㓺愳㓺⎅ SFP+/QSFP28 㔧㭒ѳ
5
ࣲঀՍ
愳㓺 5e ䷐㍫㡉⫒┡倳倔偛ѳ
ݏӲՖঀՍ
愳㓺枙⽻䟙㓼⎋╅倔偛Ϫ䊋╣抢
僃ᾇ妡愳㓺ϸ115200 bpsϪ8
Ⲭ䱻Ϫ㜵⪜⇋㥶毡Ϫὕ↱㲷
₢Ϫ 8 㛅㓃₢Ϫ㜵㺖挤㓼⎋ѳ
ўઁࠀ
с݅ߑߑঔ
ⶏⵍ (WxDxH) 442.5 x 473.3 x 43.95 mm Ϧ17.42 x 18.63 x 1.73 呆
ⵍϧ
挢挤 8.815 kg (19.43 lb)ϪⳞ娚㡞ό PSU
㽾⿻ ⼺₱㝋ϸ0° C ⎅40° C Ϧ32° F ⎅104° Fϧ
ⲭ㚓㝋ϸ-40° C ⎅70° C Ϧ-40° F ⎅158° Fϧ
㿔⿻ ⼺₱㝋ϸ5% ⎅95% Ϧ㜵⌌⌲ϧ
⏴公 㡕⩼ 356 W
AC PSU
䚊㿥槲⳯↑ 100–240 VACϪ50-60 HzϪ400 W
Ό㺖惨⊺ 100-240 V Ό㺖Ϫ50-60 HzϪ6-3 A
100-127 V Ό㺖Ϫ 47-63 HzϪ3.0 A
200-240 V Ό㺖Ϫ 47–63 HzϪ3.0 A
48 VDC PSU
䚊㿥槲⳯↑ 48 VDCϪ400 W
䡉㺖惨⊺ -36 – -75 VDCϪ14–7 A
Ӳঅՠۅ
惥ⵙ EN 55032:2015+AC:2016, Class A
EN 61000-3-2:2014, Class A
EN 61000-3-3:2013
FCC Class A
VCCI Class A
CCC GB 9254-2008, Class A
BSMI Class A, CNS 13438
㏬⿇㏅ㅼ EN 55024:2010+A1:2015
IEC 61000-4-2/3/4/5/6/8/11
Ⳟ⊽ UL (CSA 22.2 No 60950-1 & UL60950-1)
(CSA 22.2 No 62368-1 & UL62368-1)
CB (IEC/EN60950-1)
(IEC/EN62368-1)
CCC GB4943.1-2011
BSMI, CNS 14336-1
╅㿓 RoHS CNS 15663
This manual suits for next models
1
Table of contents
Languages:
Other Pluribus Networks Network Router manuals
Popular Network Router manuals by other brands

TP-Link
TP-Link TL-WA850RE Quick installation guide

Allied Telesis
Allied Telesis TurboStack AT-TS90TR installation manual

Juniper
Juniper E SERIES BROADBAND SERVICES ROUTERS 11.3.X - E120 AND E320 HARDWARE GUIDE REV... Hardware guide

KT-Elektronik
KT-Elektronik SOL3-7 Installation and operating manual

Technicolor
Technicolor TG582n Configuration guide

Tenda
Tenda FH305 user guide