PM BRIDGE4 User manual
THINK LESS. CREATE MORE.
BRIDGE4
MIDI CONTROLLER
USER MANUAL (V2.0.0)

This device was created and
designed to empower your
creativity.
It is the result of many long nights and
early mornings. It is born from the desire
to bridge the gap between musician
and instrument, and we want to say a
huge thank you for your support. Our
brand is built around a strong
community and we hope you love your
new MIDI controller as much as we do.
The PIRATE MIDI Team

© PIRATE MIDI 2023 - Firmware v2.0.0 www.learn.piratemidi.com
3
1. Device Interface 14
Footswitches ...........................................................................................................14
OLED Display .........................................................................................................14
RGB LEDs ................................................................................................................ 14
2. Power & Navigation 15
Powering Your Bridge4 .........................................................................................15
Switching Power Sources ...................................................................................... 15
Basic Navigation ....................................................................................................15
Opening the Menu ................................................................................................ 16
Second-Screen Settings ........................................................................................ 17
3. Overview of Connectors 18
4. Flexiports 20
Flexiport Modes Summary ...................................................................................20
MIDI Out .................................................................................................................22
Expression Pedal In ................................................................................................22
Exp-Doubler In .......................................................................................................23
Tap Tempo Output .................................................................................................24
Aux Switch In ..........................................................................................................24
Switch Out ..............................................................................................................25
Strymon Fav Switch Out ........................................................................................25
MS Relay ..................................................................................................................25
Pulse Clock Out ......................................................................................................26
Device Link ............................................................................................................. 26
5. MIDI In/Out/Thru 28
MIDI Out .................................................................................................................28
MIDI In .....................................................................................................................28
MIDI Thru ................................................................................................................28
6. USB MIDI 30
USB (type-C) ...........................................................................................................30
7. Messages & Modes 31
MIDI Messages .......................................................................................................31
Smart Messages .....................................................................................................31
Primary Footswitch Modes ....................................................................................32
Secondary Footswitch Modes ..............................................................................36
Expand & Improve Your MIDI Routing ................................................................37
TABLE OF CONTENTS

© PIRATE MIDI 2023 - Firmware v2.0.0 www.learn.piratemidi.com
4
LFOs ........................................................................................................................38
Expression Pedals .................................................................................................. 38
Expression Ladder Messages ...............................................................................39
Aux Switches ..........................................................................................................40
Boot Messages & Boot Delay ...............................................................................40
Device Link ............................................................................................................. 40
8. Message Stacks 41
MIDI Messages Onboard ...................................................................................... 41
9. MIDI Clock 46
MIDI Clock Onboard ............................................................................................. 46
10. LFOs 49
Setting LFOs ...........................................................................................................49
11. Switch Out 53
Setting TRS Out ......................................................................................................53
12. Aux Switch In 54
Setting Up Auxiliary Switches ............................................................................... 54
13. Switch Groups 56
Accessing and Editing Switch Groups ................................................................56
14. Interface - LEDs 59
LED Color Selection ..............................................................................................59
Custom LED Colors ............................................................................................... 59
LED Behaviour ........................................................................................................ 60
External LED Control .............................................................................................61
LED Brightness ....................................................................................................... 61
15. Interface - Bank Names 62
Changing the Bank Name .................................................................................... 62
Scroll Acceleration ................................................................................................. 62
Inverting the Bank Name Color ...........................................................................62
16. Interface - UI Mode 63
How to change the UI ............................................................................................63
Simple UI ................................................................................................................. 63
TABLE OF CONTENTS (CONT.)

© PIRATE MIDI 2023 - Firmware v2.0.0 www.learn.piratemidi.com
5
Extended UI .............................................................................................................63
17. Interface - Switch Labels 65
Changing & Customising Switch Labels ..............................................................65
18. Bank Navigation 66
19. Other Global Settings 67
MIDI Channel ...........................................................................................................67
Persistent Switch States ..........................................................................................67
Transmit Switch States ............................................................................................67
Program Change (PC) Bank Output .....................................................................68
Switch Hold Time ....................................................................................................68
20. Resetting or Updating 69
Factory Reset ...........................................................................................................69
Global Settings Reset .............................................................................................69
Updating Firmware .................................................................................................69
Troubleshooting ......................................................................................................70
21. MIDI Implementation 71
22. Support & Warranty 73
TABLE OF CONTENTS (CONT.)
© PIRATE MIDI 2023 - Firmware v2.0.0 www.learn.piratemidi.com
6
BRIDGE4 OVERVIEW
The Bridge4 is a 4-switch MIDI foot controller with RGB LEDs, an OLED screen,
and a super tough aluminium enclosure. It’s made in New South Wales, Australia
and was the result of a successful Kickstarter campaign in 2020. Now PIRATE
MIDI builds and sells MIDI devices all over the world.
The Bridge4 can send stacks of MIDI messages through dierent footswitch press
types (Press, Hold, Double-Press etc.) with 100 dierent bank of switches to scroll
through. This means that the 400+ MIDI messages on each bank can be
individually assigned across the whole device for a total over more than 40,000
unique messages and controls.
To help you connect to a wide variety of music gear, we’ve included two Flexiports
of our own design. These ¼” (6.35mm) TRS jacks can be set to whatever mode
best suits your setup. From expression pedals to beat sync pulse to switch
emulation, you can use this MIDI controller to control devices that don’t even
have MIDI!
With all settings available to easily edit using the onboard display and menus as
well as with the web editor, we hope you’ll agree that this is perfect for
performing live or playing at home.

© PIRATE MIDI 2023 - Firmware v1.3.1 www.learn.piratemidi.com
7
LINKS TO DOWNLOADS:
https://learn.piratemidi.com
It’s important that rmware updates are installed when they
are available. Old rmware may not be supported by the
web editor.
Firmware updates are released frequently and offer new
features, bug xes and other improvements.
User manuals are updated for each rmware update
according to new features and changes.
DIMENSIONS
Metric (112x94x63 mm)
Imperial (4.4”x 3.7”x 2.5”)
DISPLAY
OLED (3.2”)
WEIGHT
Metric (335g)
Imperial (11.8v oz.)
POWER REQUIREMENT
9v DC or USB (200mA)
TECHNICAL INFORMATION
BOX CONTENTS
1x Bridge4 MIDI Foot Controller
1x USB Cable
4x Self-Adhesive Rubber Feet
© PIRATE MIDI 2023 - Firmware v2.0.0 www.learn.piratemidi.com
8
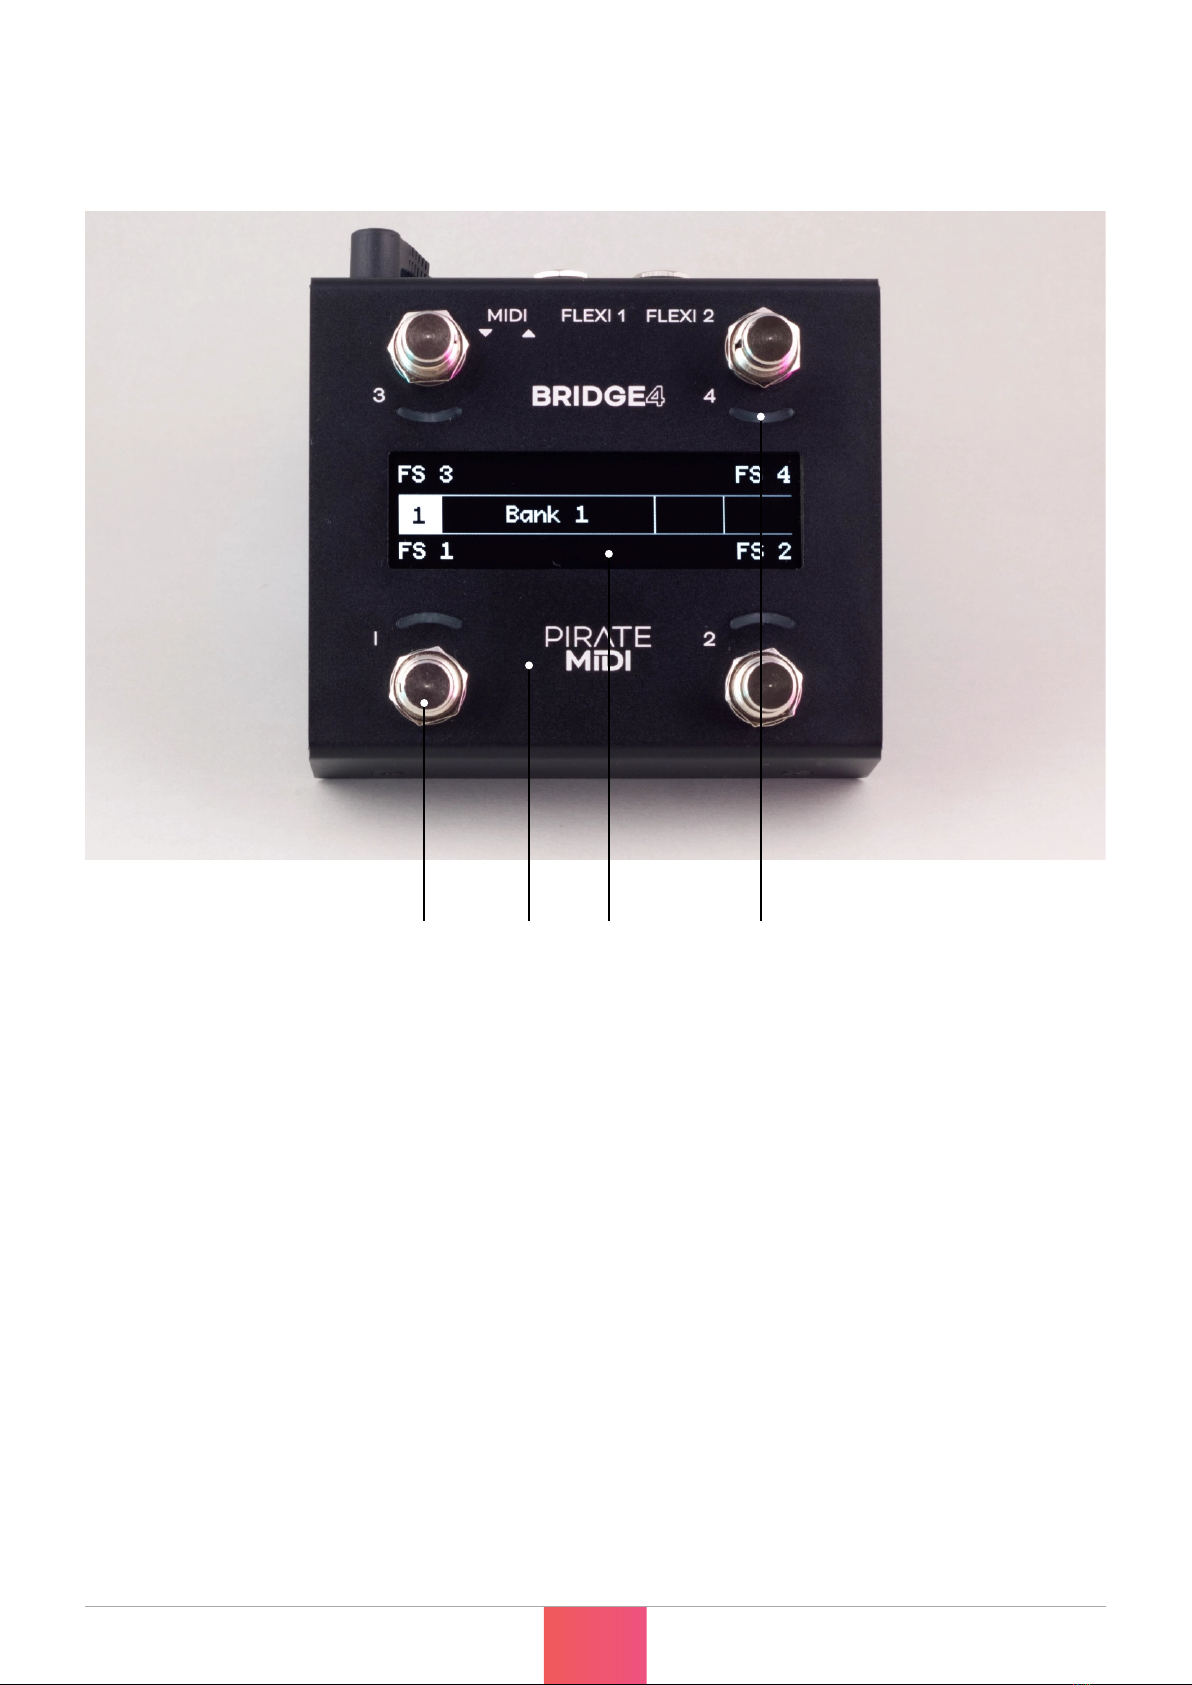
HARDWARE LAYOUT
4 soft-touch footswitches. No clicking. Work with multiple press types
(double-press, hold, etc).
8 RGB LEDs which you can assign to any colour you like for any function
you like. Flashing, solid, dim etc.
Heavy-duty aluminium enclosure with black anodising.
Scratch-resistant and no ex.
Bright, crisp, and easy to read OLED graphical display.
Menus, icons, scribble strips are all a breeze on this beautiful display
1
1
2
2
3
3
4
4

© PIRATE MIDI 2023 - Firmware v2.0.0 www.learn.piratemidi.com
9
HARDWARE LAYOUT (CONT.)
Flexiports 1 and 2. Multi-function ¼” (6.35mm) TRS jacks which can
be used in a number of different modes.
2.1mm 9v DC barrel jack - as standard on most effects pedals and
power supplies.
Dedicated 3.5mm TRS MIDI In conforming to the MIDI.org
specication (Type A).
Dedicated 3.5mm TRS MIDI Out conforming to the MIDI.org
specication (Type A).
USB type C for USB MIDI, using the web editor, and powering the
device.
5
5
6
6
7
7
8
8
9
9

© PIRATE MIDI 2023 - Firmware v2.0.0 www.learn.piratemidi.com
10
QUICK START
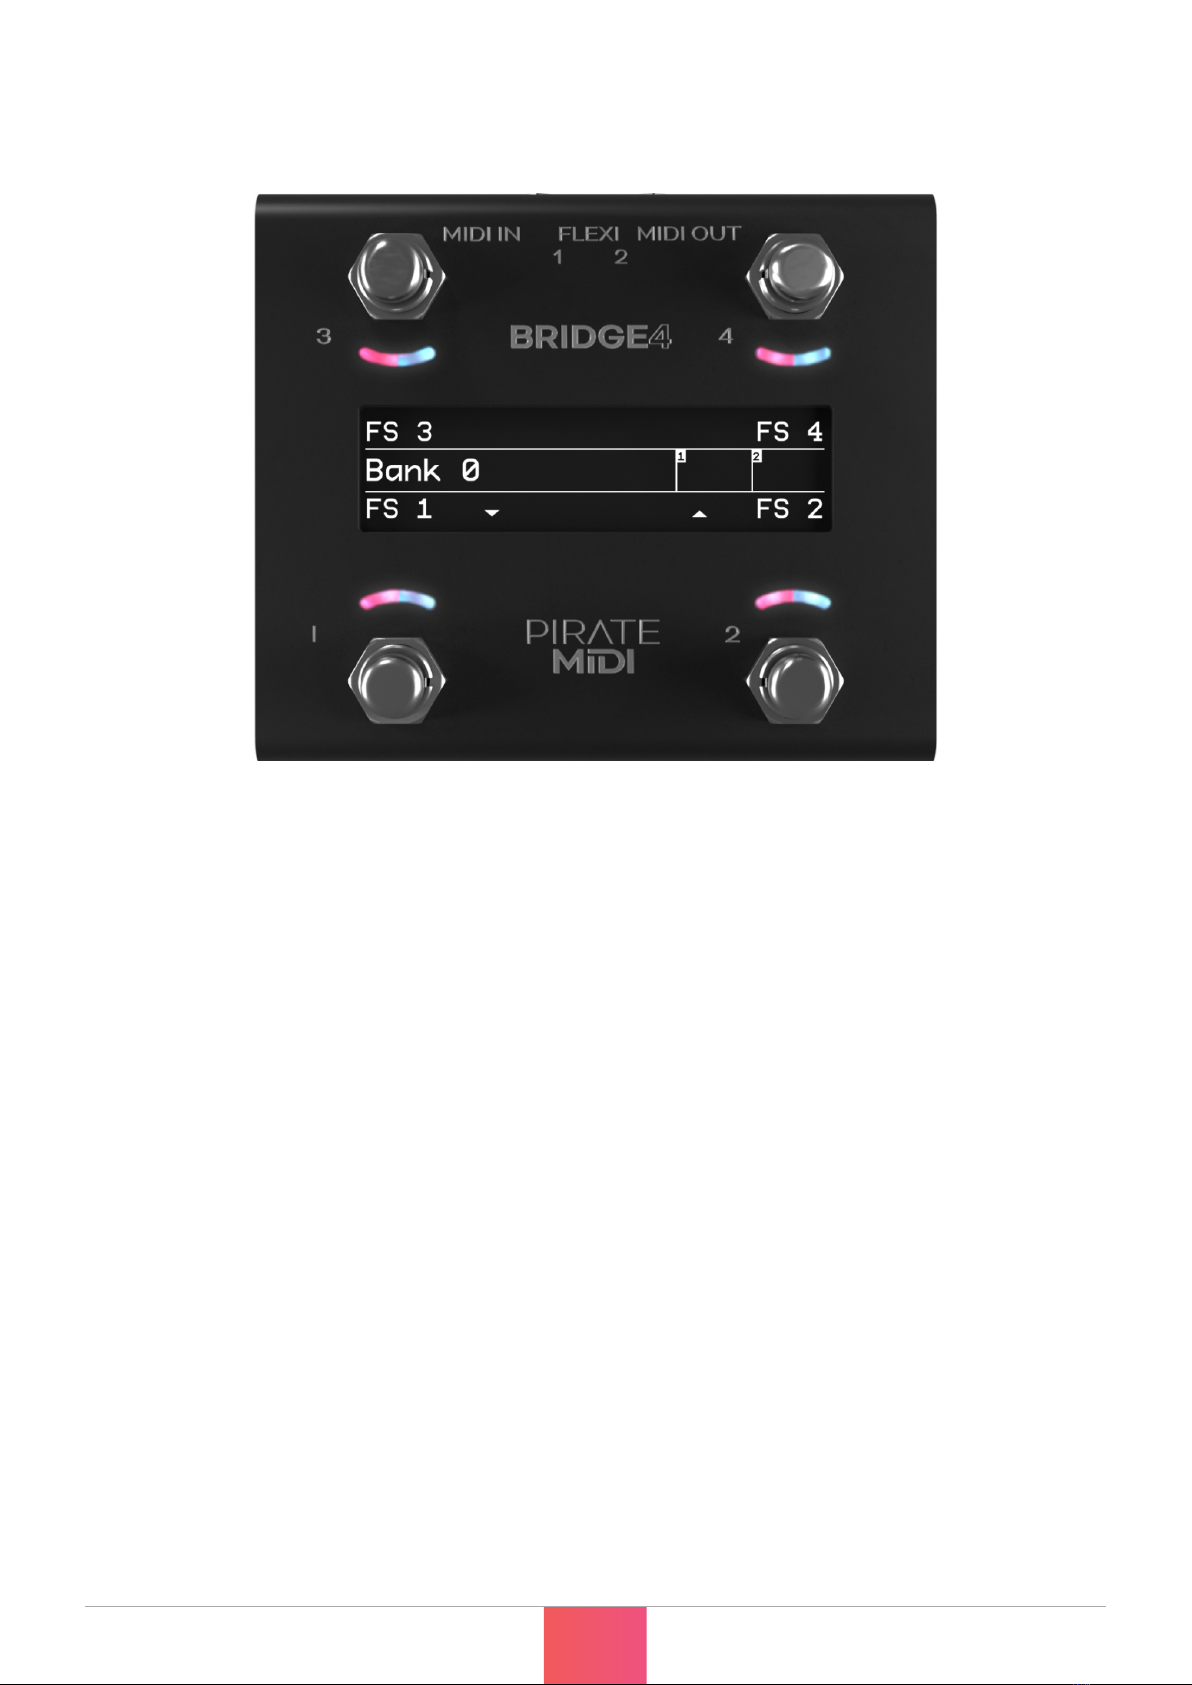
1. Bank Up/Down
To go to the next bank, press switch 3 and switch 4 together.
To go to the previous bank, press switch 1 and switch 2 together.
These can be customised or turned off (See chapter 18).
2. Entering the Menu
To enter the onboard menu, hold switch 1 and switch 3 simultaneously.
All settings can be changed with onboard menus as well as the editor.
Hold switches 3 & 4 to exit the menu.
Table of contents
Other PM Recording Equipment manuals


