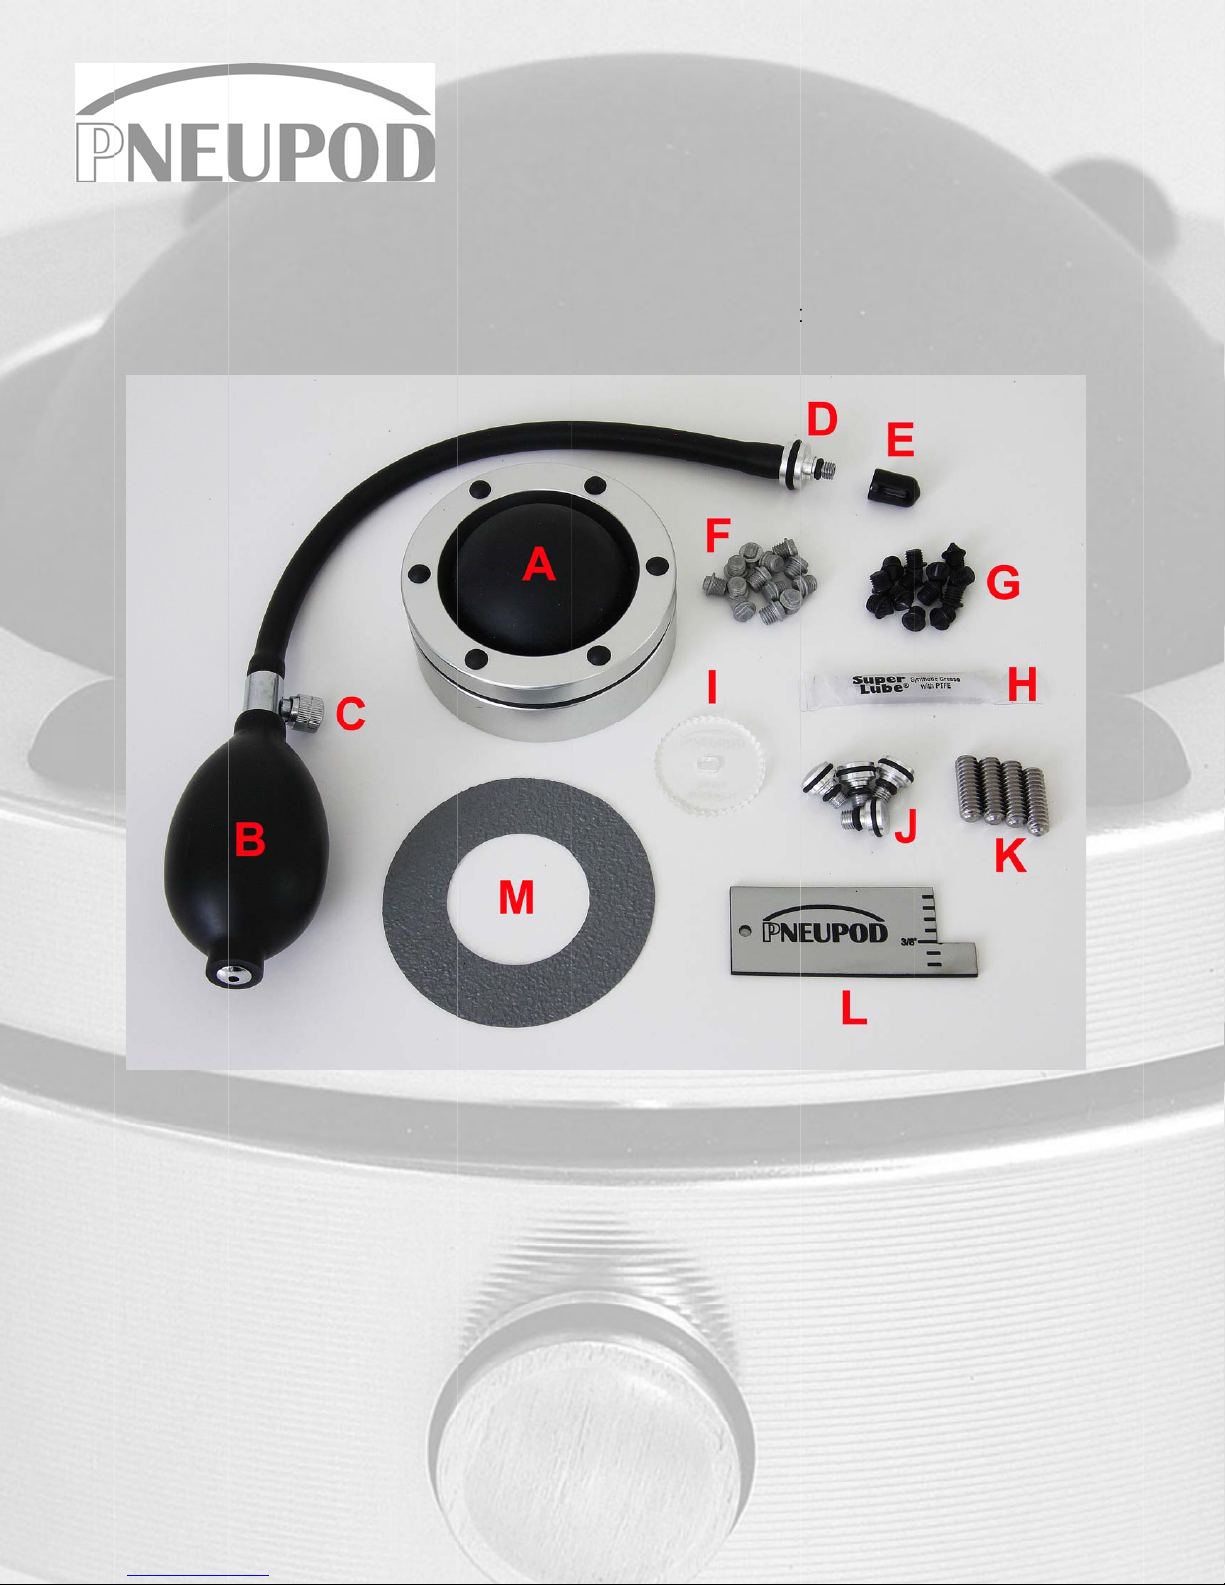
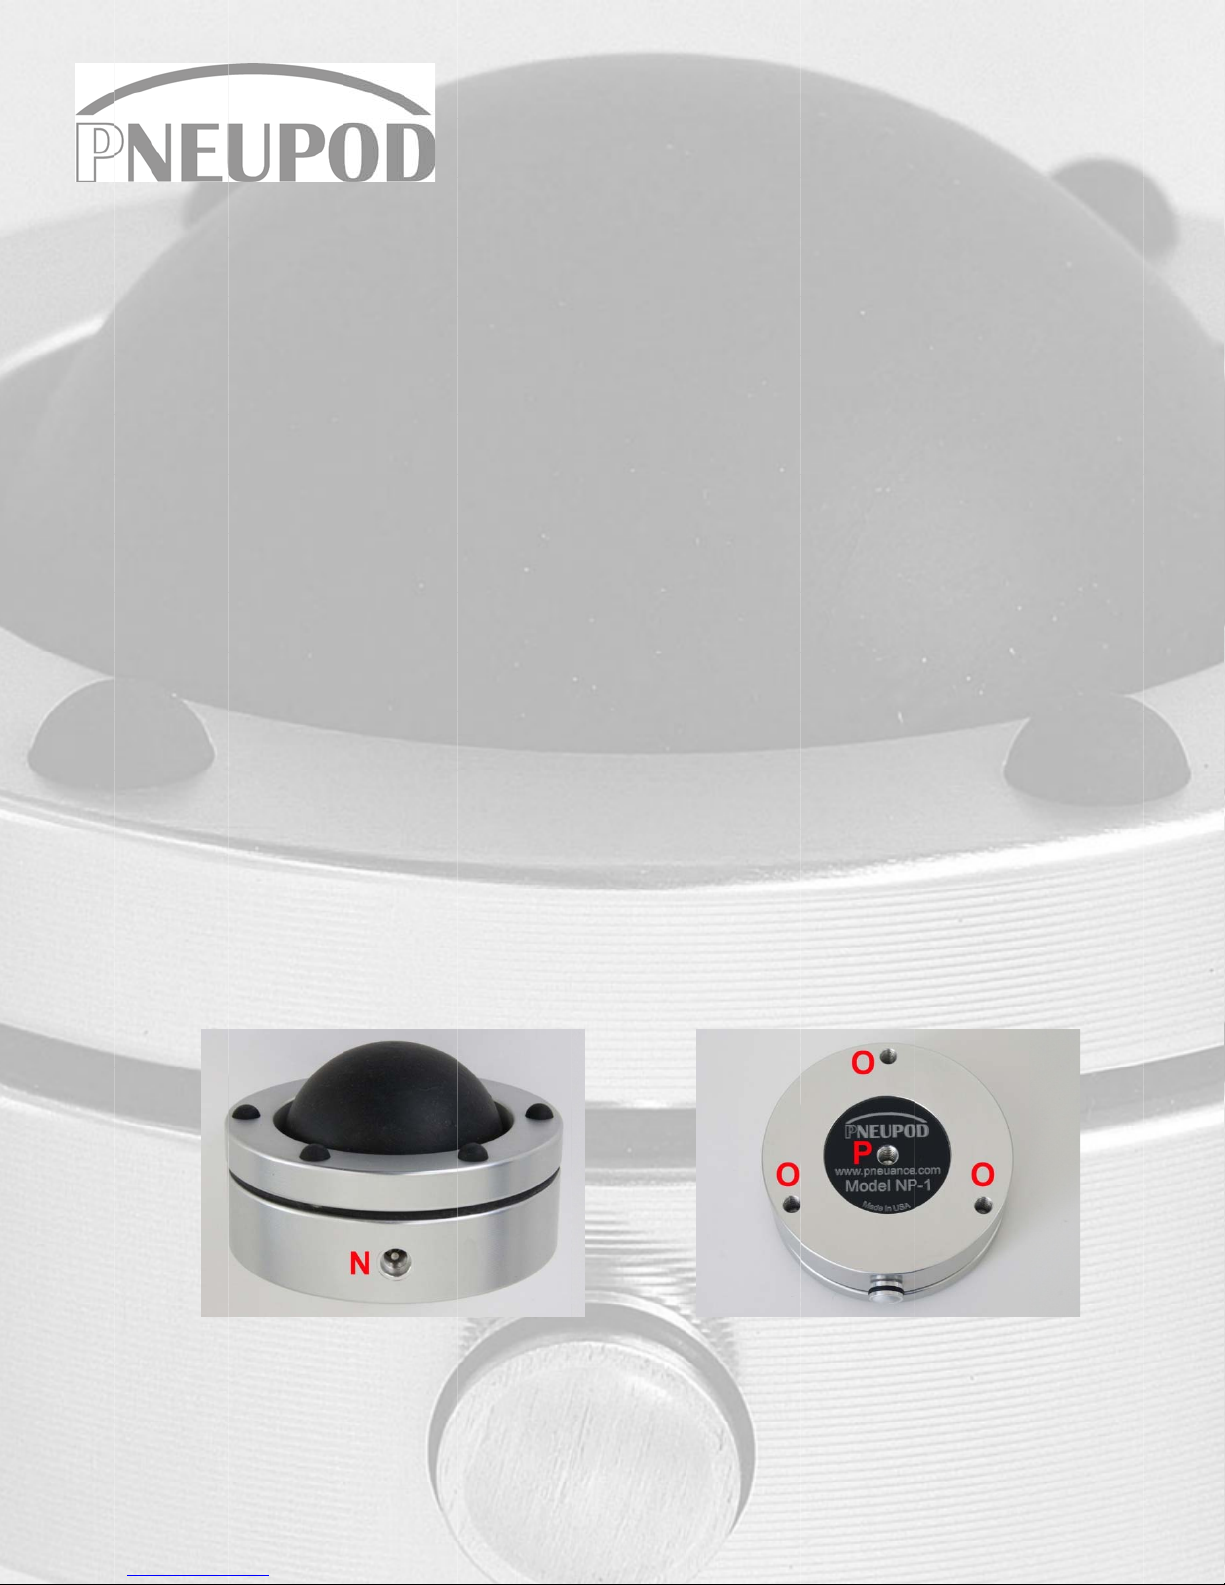
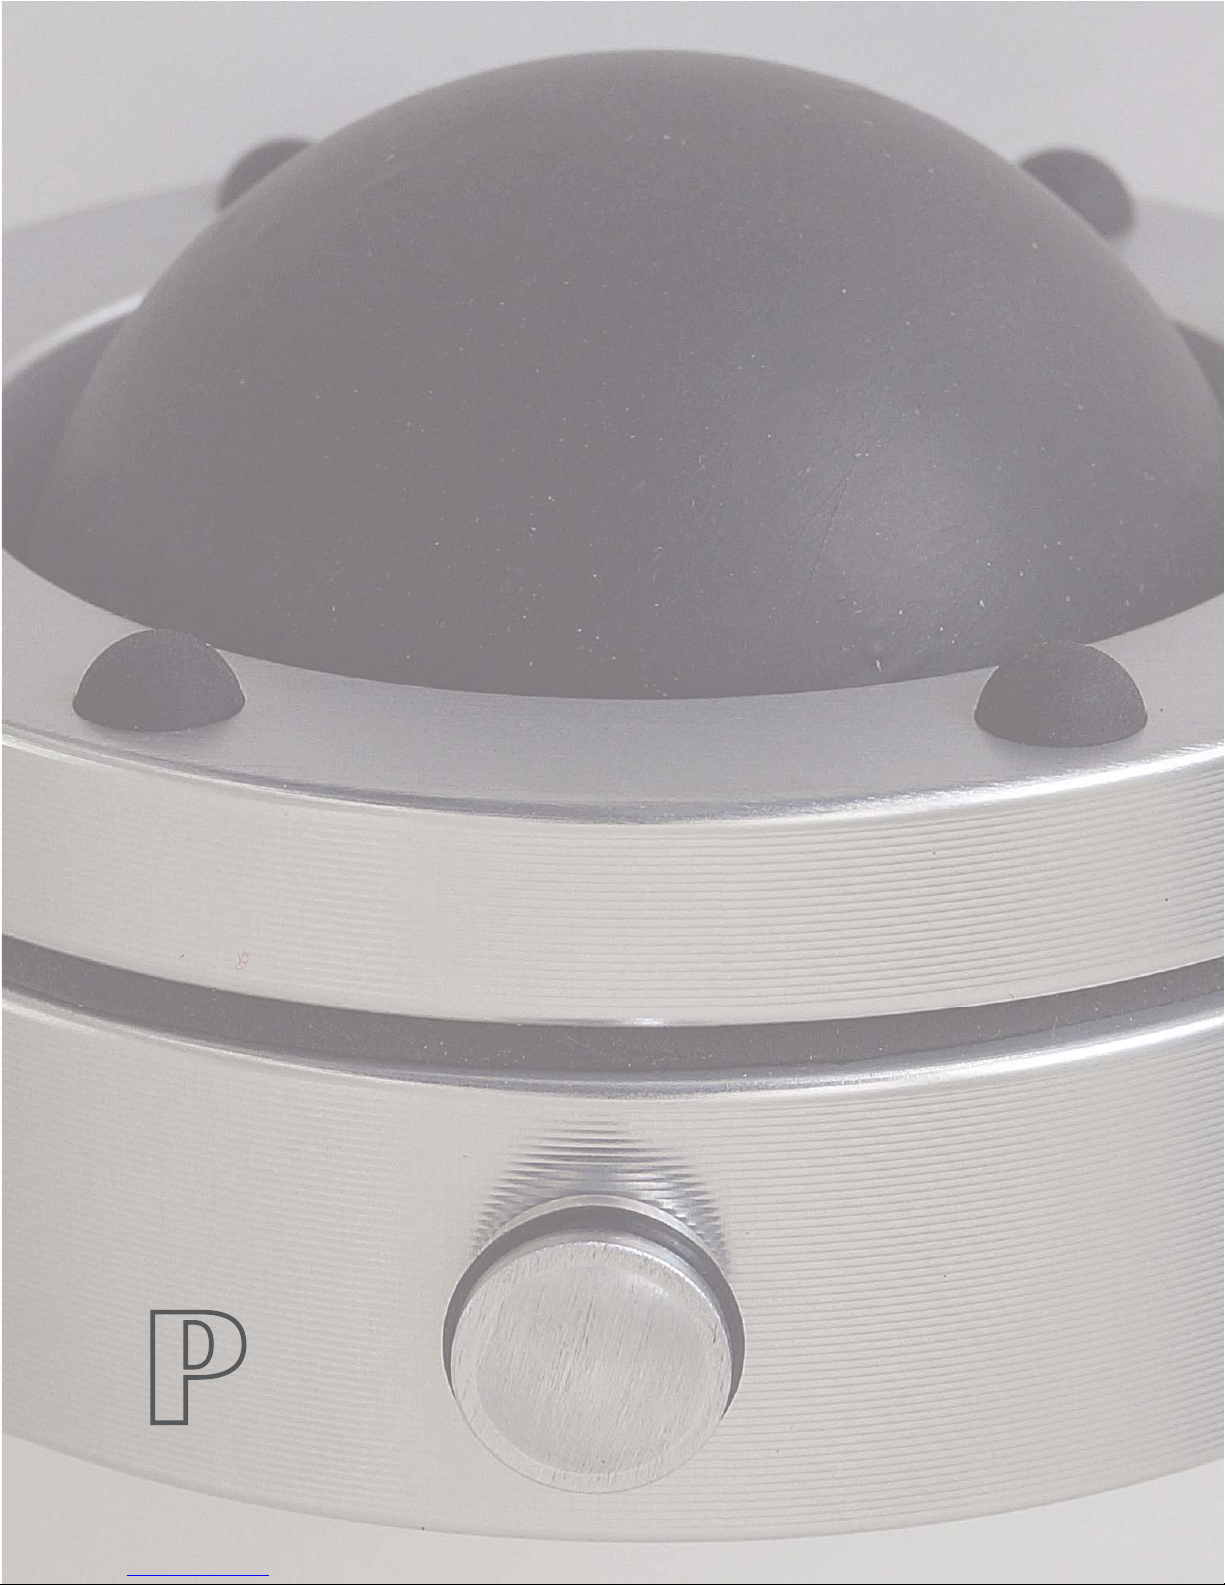
Pneuance Audio Pneupod NP-1 Parts list manual

NP-1
SETUP GUIDE
V. 1.1, 11-17

SE
T
Tha
Bel
o
[
[
[
[
[
[
[
[
[
[
[
[
[
T
UP INST
R
nk you for
p
o
w is a list
o
[
A] p
[
B]
A
[
C]
A
[
D]
M
[
E]
M
[
F]
C
[
G]
C
[
H]
G
[
I]
S
[
J]
A
[
K]
S
[
L]
F
[
M]
S
R
UCTIONS
p
urchasing
o
f what's in
NEUPOD
N
A
IR PUMP
(
A
IR RELEA
S
M
ALE AIR
F
M
ALE AIR
F
C
ERAMIC
F
C
ERAMIC 1
G
REASE P
A
S
PIKE WR
E
A
IR CAP (p
r
S
TAINLES
S
F
OOT HEI
G
S
ELF STIC
K
N
FOR THE
a pNEUP
O
the box al
o
N
P-1 ISOL
A
(
for inflatin
g
S
E VALVE
F
ITTING (f
o
F
ITTING P
R
F
LAT SPIK
E
/8 INCH S
P
A
CKET (fo
r
E
NCH (for t
r
otects the
S
STEEL S
T
G
HT GAUG
K
RUBBE
R
N
P-1
P
a
pNEUPO
D
O
D NP-1 p
n
o
ng with a
d
A
TION FO
O
g
the air bu
(for contr
o
o
r connecti
n
R
OTECTIV
E
FOOT (
S
P
IKE FOO
T
r
lubricatin
g
ightening t
h
air intake
a
T
UDS (use
E (for setti
n
R
PAD (for
p
a
ge1of6
D
NP-1 ISO
L
n
eumatic i
s
d
escription
O
T
bble)
o
lled releas
e
n
g the air p
E CAP (to
S
ilver in Col
T
(Black in
g
the O-Rin
h
e Cerami
c
a
nd acts as
d for moun
n
g the corr
e
p
lacing on
f
L
ATION F
E
s
olation de
v
of the par
t
e
of air in t
h
ump to the
keep the t
h
or)
Color)
gs)
c
Spike Fe
e
a second
a
ting the fo
o
e
ct height
o
f
oot bottom
E
ET:
v
ice.
t
s:
h
e foot)
foot)
h
reads clea
e
t)
a
ry air seal)
o
t using a 1
o
f the foot)
to protect
n)
/4-20 thre
a
surface)
a
d)

SE
T
IMP
pra
c
DE
C
A
B
DE
C
A
B
C
D
T
UP INST
R
ORTANT:
c
tice run co
C
ISION 1:
T
A
. The us
u
rubber
a
the bott
o
of cont
a
added t
o
lowers t
h
B
. The op
t
with th
e
touchin
g
of any s
version
compon
of conta
C
ISION 2:
F
A
. The alu
m
B
. The do
n
protects
C
. A ¼-20
to the
b
rubber
p
D
. Two dif
f
Cerami
c
three 1
2
base. T
h
uneven.
surface.
the cer
a
[I] to ge
is used
w
feet.
R
UCTIONS
Before pro
c
mpleted.
T
wo differe
n
u
al way is
t
a
ir bubble
f
o
m of the
c
a
cting. Thi
s
o
the mas
s
h
e fundam
e
t
ional way
e
rubber ai
r
g
the unde
r
harp objec
t
is easy to
s
ent on a r
e
cting the a
l
F
ive differe
n
m
inum bas
e
n
ut shaped
the surfac
e
thread hol
e
b
ottom of a
p
ad [M] ca
n
f
erent cera
c
flat botto
2
-32 threa
d
h
is creates
Please t
e
A
clear p
a
mic feet.
S
ntly snug
e
w
ith the p
N
N
FOR THE
c
eeding to
n
t ways to
u
o place th
e
f
acing do
w
c
omponent
s
method
w
s
of your
c
e
ntal reson
is to plac
e
r
bubble f
a
r
side of yo
u
t
s that coul
s
et up and
e
gular basi
s
l
uminum to
n
t ways to
s
e
[A] is pla
self stick
e
and the
a
e
[P] is pro
compone
n
n
also be u
s
mic feet (
1
m SILVE
R
d
ed holes
a stable t
h
e
st this m
e
lastic spik
e
S
crew thes
e
e
ach foot t
o
N
EUPOD l
o
N
P-1
P
a
PNEUPO
D
the setup i
u
se your n
e
e
foot und
e
w
n and the
. See DE
C
w
ill allow t
h
c
omponent.
ance of th
e
e
the alumi
a
cing up.
T
u
r compon
e
d puncture
preferred i
s
. See DE
C
the platfor
s
et the alu
m
ced directl
y
rubber pa
d
a
luminum f
o
vided (and
n
t with this
s
ed at this
t
1
/8 inch C
e
R
spike [F]
[O] on th
h
ree point
c
e
thod as
i
e
wrench [
e
feet in by
o
the base.
o
go facing
u
a
ge2of6
D
NP-1 ISO
nstructions
e
w pNEUP
O
e
r your co
m
aluminum
C
ISION 2 f
o
h
e mass o
This is a
e
compone
n
num base
T
he air bu
b
e
nt, which
n
the rubbe
r
f you need
C
ISION 2 f
o
m.
m
inum bas
e
y
on the su
r
d
[M] can
b
o
ot while p
r
a supplie
d
standard
t
t
ime.
e
ramic BL
A
) can be
s
e bottom
o
c
ontact wh
i
t may m
a
I] is suppli
hand, the
n
The clear
p
u
p. Do not
u
LATION F
E
a few dec
i
O
D NP-1 f
e
m
ponent wi
t
body cont
a
o
r different
f the feet
good thing
n
t.
on the pl
a
b
ble will n
o
n
eeds to b
e
r
air bubble
to remov
e
o
r different
e
on a surf
a
r
face.
b
e applied
r
oviding gri
p
d
¼-20 stu
d
t
hread mo
u
A
CK spike
s
crewed in
o
f the alu
m
en the sur
f
ar
the con
t
ed for tigh
n
use the
w
p
lastic wre
n
u
se any ot
h
E
ET:
i
sions sho
u
e
et.
t
h the
a
cting
ways
to be
as it
a
tform
o
w be
e
free
. This
e
your
ways
a
ce.
to the alu
m
p
.
d
[K]) so th
e
u
nt. The d
o
[G] or
to the
m
inum
f
ace is
t
acting
tening
w
rench
n
ch [I]
h
er tool to i
u
ld be mad
e
m
inum ba
s
e
foot can
o
nut shap
e
nstall or re
m
e
fi
r
st and
a
s
e [A]. Thi
s
be screwe
d
e
d self stic
k
m
ove thes
e
a
s
d
k
e

PR
A
Bef
o
val
v
1
2
3
4
[N]
[O]
[P]
A
CTICE R
U
o
re actuall
y
v
e is recom
m
1
. Take o
n
2
. Unscre
w
3
. Remov
e
the mal
e
carefull
y
and bul
b
Gently t
on the
m
4
. Make s
u
closed (
releasin
high ab
o
(counte
r
achieve
d
lower th
A
IR IN
T
12-32 T
H
1/4-20
T
U
N:
y
using the
f
m
ended.
n
e of the fe
e
w
and rem
o
e
the black
e
air fitting
[
y
screw it i
n
b
to rotate
urn the m
a
m
ale fitting
[
u
re the ch
r
tighten in
a
g the rubb
e
o
ve the al
u
r
clockwise)
d
quickly cl
e air bubbl
e
T
AKE POR
T
H
READED
T
HREADE
D
N
f
eet for the
e
t [A] and
s
o
ve the sid
e
protective
c
[
D] straigh
t
n
to the fe
m
freely. Cr
o
a
le fitting [
D
[
D] will not
r
ome air r
e
a
clockwis
e
e
r pump b
u
u
minum to
p
till you se
e
ose the air
e
on the fo
o
T
(the air p
u
HOLES (
a
D
HOLE (a
c
N
P-1
P
a
i
r
intended
s
et it rubbe
r
e
air cap [J
]
c
ap [E] on
t
in before
t
m
ale air int
a
o
ss thread
D
](clockwi
s
be visible)
.
e
lease val
v
e
direction).
u
lb. Do not
p
ring. Now
e
the air bu
b
release v
a
o
t [A] in a
p
u
mp male f
a
ccept the
B
c
cepts stan
a
ge3of6
purpose a
r
bubble u
p
]
on the fo
o
the end of
t
urning. Gr
a
a
ke port [N
]
ing this fit
t
s
e) till it co
m
.
Once it c
o
v
e knob [C
Pump up
inflate the
very slowl
b
ble on th
e
a
lve [C] (cl
o
p
recisely c
o
itting [D] c
o
B
lack [G] o
r
dard threa
d
practice ru
p
on a tabl
e
o
t.
the air pu
m
a
sping the
a
]
on the si
d
t
ing will p
e
m
es to a d
e
o
mes to a s
]on the b
the air bub
rubber bu
b
y start to
u
e
foot [A] d
e
o
ckwise). P
o
ntrolled m
a
o
nnects he
r
r
Silver [F]
d
or Stainl
e
n using th
e
e
.
m
p hose [D
]
a
ir fitting [
D
d
e of the f
o
e
rmanently
e
fined stop
top do not
t
ulb end of
ble by rep
e
b
ble on the
u
nscrew th
e
e
flate. Wh
e
ractice thi
s
a
nner. Pra
c
r
e)
Ceramic f
e
e
ss Steel st
e
air pump
a
]
. Make su
r
D
]by the la
r
o
ot [A].
A
ll
o
damage t
h
(the small
e
t
ighten an
y
the pump
e
atedly sq
u
foot [A] o
v
e
ai
r
relea
s
e
n the desir
s
procedur
e
c
tice make
s
e
et)
ud [K])
a
nd releas
e
r
e you alig
n
r
ge O-Ring
o
w the hos
e
h
e foot [A
]
er
tip O-rin
g
y
further.
[B] is full
y
u
eezing an
d
v
er one inc
h
s
e valve [C
ed height i
s
e
till you ca
n
s
perfect.
e
n
g
,
e
]
.
g
y
d
h
]
s
n

SE
T
1
2
3
4
5
6
7
T
UP INST
R
1
. Take all
If there
in anot
h
using t
h
stability
situatio
n
be reve
r
way to
c
access
f
2
. Unscre
w
3
. Remov
e
air fittin
g
female
a
threadi
n
comes
t
any furt
h
4
. Make s
u
bulb [B
]
repeate
d
Use the
the gau
g
aluminu
the sm
a
can slo
w
pump (
c
to lowe
r
quickly
c
[B] fro
m
page 5.
5
. Repeat
gauge [
L
6
. When a
air cap
s
dust an
d
cap str
a
the fem
a
the foot
.
ring on
t
7
. For aes
t
R
UCTIONS
:
four feet [
A
are existin
g
h
er location
h
ree feet y
o
based o
n
n
s have tw
o
r
sed. The
a
c
ontact the
f
o
r
the air
p
w
and rem
o
e
the black
g
[D] strai
g
a
ir intake
p
n
g this fittin
g
t
o a define
d
h
er.
u
re the air
]
is turned
f
d
ly and wa
t
supplied
h
g
e will just
m ring, m
a
a
ll rubber b
w
ly turn t
h
c
ountercloc
r
the foot.
c
lose the
v
m
the foot. I
Step 3 wit
L
]to re-ch
e
ll feet are
a
s
[J] into th
d
also serv
e
a
ight in bef
o
a
le air inta
k
.
Gently tu
r
t
he air cap
w
t
hetic reas
o
N
:
A
]out of t
h
g
feet they
. Do not st
a
o
u will ne
e
n
the weig
o
feet near
a
ir bubble
aluminum
p
ump male
o
ve the sid
e
protective
g
ht in befo
r
p
ort [N] o
n
g
will perm
a
d
stop (the
release v
a
f
ully close
d
t
ch the air
b
h
eight gau
g
fit betwee
n
king sure t
umpers. If
h
e air rele
a
kwise) to r
e
When the
v
alve [C] (c
f you are
h
h the rem
a
e
ck all fou
r
a
t the corr
e
e side air i
e
as secon
d
o
re turning.
k
e port [N]
r
n the air c
a
w
ill not be
v
o
ns you m
a
N
P-1
P
a
h
e box and
should be
a
ck the pN
e
d to plac
e
ht distribu
t
the front le
should be
base to th
e
fitting [D].
e
air cap [J
]
cap [E] on
r
e turning.
n
the foot
a
nently da
m
smaller O-
a
lve knob
d
(clockwis
e
b
ubble sta
r
g
e [L] and
n
the platfo
hat it does
you ove
r
i
n
a
se valve
e
lease a s
m
desired h
e
lockwise).
W
h
aving trou
b
a
ining thre
e
(or three) f
e
e
ct height
y
ntake port
s
d
ary seals
Grasping
on the foo
a
p [J] (cloc
v
isible). O
n
a
y want to r
a
ge4of6
place the
m
removed,
o
EUPODs
u
e
them in
a
t
ion of yo
u
ft and righ
t
facing do
w
e
compone
n
]
on the fo
o
the male
a
Grasping
t
[A]. Allow
m
age the f
o
ring on the
[C] on th
e
e
). Pump t
h
r
t to raise t
h
raise the
f
rm and un
d
not interfe
n
flate the f
o
knob [C]
m
all amou
n
e
ight is a
c
W
hen this
b
le pumpin
g
e
(or two)
f
e
et for cor
r
y
ou can fin
s
[N]. Thes
to prevent
the air cap
t. Cross th
kwise) till i
t
n
ce it come
otate each
m
under th
e
o
r the pN
E
u
nder the c
a
triangula
r
u
r compo
n
t
and a thir
d
w
n. See D
E
n
t. Orient t
h
o
t [A].
a
ir fitting [
D
t
he air fitti
n
the hose
o
ot. Turn th
male [D]
w
e
pump
h
e bulb
h
e foot.
f
oot so
d
er the
re with
o
ot you
on the
n
t of air
c
hieved
job is com
p
g
up the f
o
f
eet. Whe
n
r
ect height.
ish by scr
e
e caps ke
e
any air lea
k
, by the la
r
reading thi
s
t
comes to
s to a stop
foot to hid
e
e
four corn
e
E
UPOD fee
t
omponent'
s
r
pattern t
h
n
ent. This
d
foot near
E
CISION 2
h
e air intak
e
D
]. Make s
u
n
g [D], car
e
and bulb
t
e male fitti
n
w
ill not be
v
p
lete you
c
o
ot see TR
O
n
this is co
m
e
wing the f
o
e
p the air i
n
k
age. Mak
e
r
ge O-Ring
,
s
fitting wil
l
a defined
s
do not tigh
e
the air ca
e
rs of your
c
t
should b
e
s
stock fee
t
h
at gives t
h
can be t
r
the rear m
i
above for
e
port [N]
s
u
re you ali
g
e
fully scre
w
t
o rotate fr
e
n
g [D] (clo
c
v
isible). D
o
c
an unscre
w
O
UBLESH
O
m
plete us
e
o
ur (or thr
e
n
take ports
e
sure you
a
,
carefully
s
l
permane
n
s
top (the s
m
ten any fur
t
p from sig
h
c
omponen
t
e
positione
d
t
. If you ar
e
h
e greate
s
r
icky. Man
y
i
ddle or ca
n
the corre
c
s
o you hav
e
g
n the mal
e
w
it into th
e
e
ely. Cros
s
c
kwise) till i
o
not tighte
n
w
the pum
p
O
OTING o
n
e
the heigh
e
e) supplie
d
clean fro
m
a
lign the ai
s
crew it int
o
n
tly damag
e
m
aller tip O
t
her.
h
t.
t
.
d
e
s
t
y
n
c
t
e
e
e
s
i
t
n
p
n
t
d
m
r
o
e
-

TR
O
PU
M
1
2
3
4
MA
I
A
G
the
A
ir
C
app
l
wh
e
wh
e
Fitti
n
Por
t
SP
E
Foo
t
Foo
t
Foo
t
Foo
t
Ma
x
O
UBLESH
O
M
P NOT IN
1
. If you h
a
the foot
the pu
m
under t
h
j
ust fit
b
interfer
e
2
. Make s
u
3
. Make s
u
4
. Check
f
diaphra
g
I
NTENAN
C
rease Pac
k
O-Ring's o
C
aps [J].
A
l
ied to th
e
e
n and if
y
e
n making
t
n
g [D] or
A
t
[N].
E
CIFICATI
O
t
diamete
r
t
Height (d
e
t
Height (p
r
t
Weight
x
weight ca
p
O
OTING:
FLATING
R
a
ve a heav
y
from unde
r
m
p (do not
h
e compon
e
b
etween t
h
e
with the s
m
u
re the mal
e
u
re the air
r
f
or any ri
p
g
ms kits ar
e
C
E:
k
et [H] is
s
n the Mal
e
A
thin film
o
e
O-Rings
y
ou feel to
t
he connec
t
A
ir Cap [
J
O
NS:
e
flated)
r
operly infl
a
p
acity per
f
N
R
UBBER
A
y
compone
r
the comp
o
raise the r
u
e
nt. Use t
h
h
e platfor
m
m
all rubbe
r
e
air fitting
r
elease kn
o
p
s or pun
c
e
available
.
s
upplied to
e
Air Fitting
o
f grease s
h
(see red
o
much r
e
t
ion of the
J
]to the
A
3 i
1.
2
a
ted) 1.
5
1/
2
f
oot 2
0
of
fe
e
m
a
kg
of
n
o
N
P-1
P
a
A
IR BUBBL
E
nt on the f
o
o
nent, with
u
bber bub
b
h
e supplied
m
and und
e
r
bumpers.
[D] is fully
o
b [C] on t
h
c
tures in t
h
.
lubricate
[D] and
h
ould be
arrows)
e
sistance
Male Air
A
ir Intake
nches (76.
2
2
5 inches (
3
5
0 inches (
3
2
lb. (.23 k
g
0
lbs. (9 kg
)
the comp
o
e
t is allowe
a
ximum 80
) for each
the comp
o
o
t allowed.
a
ge5of6
E
o
ot and it i
s
care, and
b
le higher
t
height ga
u
e
r the alu
m
screwed cl
o
h
e air pump
h
e rubber
2
mm)
3
1.75 mm)
3
8.1 mm)
g
)
)
(each ind
o
nent a m
a
d. It is pos
s
lbs. (36.3
individual
f
o
nent is un
e
s
difficult to
place it on
t
han one i
n
u
ge [L] an
d
m
inum rin
g
o
ckwise till
[B] is fully
bubble.
R
ividual foo
t
a
ximum of
8
s
ible to ha
v
kg) but go
f
oot. This i
s
e
ven. This
raise the f
o
a table. O
v
n
ch above
d
lower the
g
, making
it makes
a
closed co
u
R
eplaceme
n
t
) With per
f
8
0 lbs. (3
6
v
e a comp
o
over the
m
s
because
overweigh
t
o
ot with th
e
v
er inflate t
the ring) t
h
foot so th
e
sure that
a
positive s
t
u
nterclock
w
n
t Rubber
f
ect weight
6
.3 kg) tota
o
nent that i
m
aximum
o
the weight
t
(per foot)
e
pump tak
e
he foot wit
h
h
en place
i
e
gauge wi
l
it does n
o
t
op.
w
ise.
Air Bubbl
e
distributio
n
l using fou
s within th
e
o
f 20 lbs. (
9
distributio
n
situation i
s
e
h
i
t
l
l
o
t
e
n
r
e
9
n
s

WA
R
pN
E
as
d
wor
k
Thi
s
una
u
nor
m
fro
m
be
n
A
ud
Thi
s
of
u
righ
t
limi
t
rest
r
TE
C
The
R
RANTY:
E
UANCE
Au
d
esigned.
p
k
manship t
o
s
warrant
y
u
thorized
r
m
al wear a
m
an autho
r
n
ecessary,
io.
s
warranty i
u
se of the
p
t
s and you
t
ations on
r
ictions ma
y
C
HINICAL
S
pNEUPO
D
u
dio manu
f
p
NEUANC
E
o
the origi
n
y
does n
o
r
epair, shi
p
nd tear, c
o
r
ized deale
please D
O
s non-tran
s
p
roduct, o
r
may also
implied
w
y
not appl
y
S
UPPORT
D
NP-1 is d
e
N
f
actures its
E
Audio wa
n
al owner, f
o
o
t extend
p
ping dam
a
mmercial
u
r within th
e
O
NOT retu
r
s
ferable. p
N
r
damages
have othe
r
w
arranties
o
y
to you.
& CONTA
C
e
signed an
N
P-1
P
a
products t
o
rrants its p
o
r a period
to dama
g
a
ge or los
s
u
se, or pur
c
e
warranty
p
r
n the pro
d
N
EUANCE
caused b
y
r
rights whi
o
r the ex
c
C
T INFOR
M
d manufac
t
pNEUA
N
4301 Or
c
Suite 18
0
West Bl
o
Office 2
4
info@pn
e
www.pn
e
a
ge6of6
o
very high
roducts ag
of one ye
a
g
e caused
s
, abuse,
c
hase from
p
eriod is r
e
d
uct withou
t
A
udio will
n
y
this prod
ch vary fr
o
c
lusion of
M
ATION:
t
ured in th
e
N
CE Audio,
c
hard Lake
0
-B163
o
omfield, M
I
4
8-682-468
6
e
uance.co
m
e
uance.co
m
standards
ainst man
u
a
r from the
o
by impr
o
accidents,
an unaut
h
e
quired for
t
first cont
a
n
ot pay for
uct. This
w
o
m state to
conseque
n
e
USA by:
Inc.
Rd.
I
48323
6
m
m
and is con
f
u
facturing
d
o
riginal da
t
o
per inst
a
lightning
o
h
orized de
a
warranty s
a
cting your
loss of tim
w
arranty gi
v
state. So
m
n
tial dama
f
ident they
w
d
efects in
m
t
e of purch
a
a
llation, m
o
o
r other a
c
a
ler. Proof
o
ervice. Sh
o
dealer o
r
p
e, inconve
n
v
es you s
p
m
e states
d
ges, there
w
ill perfor
m
m
aterial an
d
a
se.
o
dification
s
c
ts of God
o
f purchas
e
o
uld servic
e
p
NEUANC
E
n
ience, los
s
p
ecific leg
a
d
o not allo
w
fore, thes
e
m
d
s
,
d
,
e
e
E
s
a
l
w
e

NEUANCE
AUDIO
Table of contents