PNI NS989 User manual

DVD Player PNI NS989
User manual / Manual de usuario / Használati utasítás /
Manuale utente / Instrukcja obsługi / Manual de utilizare

EN
2
SECURITY NOTES
To avoid risk of re or electroshock please follow the instructions bellow:
- Read the user manual carefully before using the device
- Do not use the device in the rain, in high humidity environment or near water sources
- Do not store the device near heat sources such as radiators, ovens, or other appliances that release heat
- Unplug the device from the power source during thunder and lightning storms or when you don’t use it for a long time
- Unplug the device from the power source before cleaning it and use a moist clean cloth
- Use only accessories specied by the manufacturer
- Don’t try to open or repair the device by yourself. If the device doesn’t work properly please refer to an authorised service
- Don’t use damaged or scratched discs to avoid damaging the optic unit
PACKAGE CONTENT
• Portable DVD player with 9 inch display
• Remote control
• 12V car power adapter
• Wall power adapter
• AV cable
• Earphones
• User manual
POWER CONNECTION
If you want to recharge the internal battery of the device you have to connect the it to a 12V car plug, with the car adapter
included, or to the house 220V electric system with the wall adapter.
ATTENTION: The car power adapter can only be used with a 12V plug.
NOTE: The built-in battery takes about 6 hours to recharge. While charging you will see a red light near the IR receiver of the
device. When the battery is full the light will automatically turn o.
DEVICE DESCRIPTION
1. LCD screen
2. CD/DVD door
3. CD/DVD door open button
4. DVD/AV selection button
5. Setup button
6. Menu button
7. Volume- button
8. Play/Pause button
9. Previous le button
10. Ok button
11. Fast forward/backward buttons
12. Next le button
13. Volume+ button
14. Stop button
15. Audio button
16. DVD/USB/SD selection button
17. IR receiver / state LEDs
18. USB port
19. SD card slot
20. Earphone plug
21. AV out
22. AV in
23. ON/OFF button
24. Power input

EN
3
REMOTE CONTROL
1. Mute button
2. DVD/AV selection button
3. Setup button
4. Search button
5. OSD button
6. Menu button
7. Zoom button
8. Numeric buttons
9. Prev/Next buttons
10. Screen on/o button
11. DVD/USB/SD selection button
12. Audio button
13. Subtitle/Copy button:
- select subtitle language during DVD play
- copy function when browsing les on DVD, USB or SD
card
14. Show title button
15. Ok button
16. Direction button for menu browsing
17. Volume buttons
18. Repeat button
19. Show all les button
20. Stop button
21. Play/Pause button
22. Fast forward/backward buttons
Before using the remote you must rst insert 2 AAA batteries in the back.
When using the remote control make sure it is pointed to the IR receiver of the device. The maximum distance between the
device and the remote control must be within 3m .
NOTES:
1. Avoid dropping the remote control on the oor or placing it in damp environments.
2. Shield the IR receiver of the device from direct sunlight
3. Replace the batteries if the remote control doesn’t work
BASIC OPERATION
Audio and video playback
1. If you use multiple le sources use the DVD/USB/CARD button to select the one you want to use
2. Browse through the le list using the ◄▲▼► buttons then select the desired le pressing the OK button. The le will begin
playing.
3. You can control the le playback with the ■ and ►II buttons.
If you don’t use the device for an extended period of time we suggest to turn it o from the on/o button.
Copy function
This function allows you to copy les from the CD/DVD onto an USB memory or SD card.
1. Insert a CD/DVD and a USB memory or SD card in the device.
2. Select the desired folder on the CD/DVD then press the COPY button on the remote. You will see the following options on
the screen:
• Select all - select all les in the current directory
• Deselect all - deselect all les in the current directory
• Copy - copying les
• Exit - cancellation

EN
4
3. If you wish to copy all the les in the folder select the option “Select all”. If you wish to copy only some les press ◄ button
on the remote to browse the les then press OK button to select the desired ones.
4. After selecting the desired les press COPY button again.
5. A new menu will appear on the screen where you can select the destination of the les, USB or SD card.
6. After you select the destination select NEXT to begin copying the les or BACK to return to the previous menu.
7. To cancel the copy function press the COPY button again.
ATTENTION: The copy function can’t be used with original or audio type CD/DVD.
You can also copy les between USB and SD card. In addition you have the option to delete a le from USB or SD card
selecting the option “DELETE” from the menu after pressing the COPY button on the remote.
ATTENTION: Do not disconnect the USB memory or SD card during the copy process to avoid losing data and damaging the
memory device.
Repeat function
During audio or video playback you can select to repeat a chapter, a title or the entire disc/folder.
1. During CD/DVD playback press REPEAT button on the remote to repeat the current chapter. Press the button again to
repeat the title, and if you press the button a third time the device will repeat the entire disc. If you press the button a forth time
you will cancel the repeat function.
2. During USB/CARD playback press REPEAT button on the remote to repeat the curent le. Press the button again to repeat
the entire folder and if you press it a third time you will cancel the repeat function.
Zoom function
When playing video or image les you can press the ZOOM button on the remote to zoom in the image. Press the button
again to enlarge further.
Pressing the button for the forth time the image will zoom out. Press it repeatedly and the image will return to normal status.
NOTE: when the image is enlarged you can use ◄▲▼► button to move it on the screen.
SYSTEM SETUP
Press the SETUP button, on the device or remote control, to access the settings
menu of the device.
The General Setup Page looks like the adjacent image.
Use ◄► button to select a setup menu, the ▲▼ button to browse through the
settings and the OK button to select an option.
TV Display:
Set display ration.
This option depends on the image source or the TV you wish to use.
Angle Mark:
This function allows you to view a scene from multiple angles if the video le
allows it.
Default is ON.
OSD Language:
Select desired language for the menu.
Captions:
Select subtitle on/o.
Default is OFF.

EN
5
Screen saver:
Select screen saver on/o.
Default if ON..
Last memory:
Select this to ON to remember the last position of the disc. The next time you turn
the device on it will play from where you left o.
NOTE: do not remove the disc from the device for the function to work.
MP3 lyric:
Display song lyrics on screen.
Default is o.
Speaker setup:
Set downmix.
Downmix:
Default is stereo.
DRC:
Default is auto.
Here you can set image quality or video output.
Available options are:
sharpness, brightness, contrast, hue, saturation..
TV Type:
PAL / AUTO / NTSC
Audio:
Select preferred language for DVD audio..
Default is Italian.
NOTE: this option must be available on the DVD.

EN
6
Subtitle:
Select preferred language for DVD subtitle.
Default is o.
NOTE: this option must be available on the DVD.
Disc menu:
Select preferred language for DVD menu.
Default is Italian.
NOTE: this option must be available on the DVD.
Parental:
Set parental control level.
Default is Adult.
Password:
Set a 4 digit password for parental control purposes.
Default is 0000.
Default:
Reset all device settings to factory defaults.
TROUBLESHOOTING
• No sound or distorted sound: check device connections.
• Can’t advance through movie: you can’t advance through the opening credits and warning information that appear at the
beginning of movies because disc are programmed to prohibit i.
• Distorted image: the disc may be damaged
TECHNICAL SPECIFICATIONS
Compatible discs DVD/DVD+/-R CD-R / CD-RW
Disc supported les MPEG4/JPEG/MP3
USB/CARD supported les MPEG4/DVD/JPEG/WMA/MP3
Available connections AV IN / AV OUT / earphones / USB2.0 / CARD
TV PAL/NTSC/AUTO
Display 9 inch LCD
Frequence response 20 Hz ~ 20 kHz
Video output 1Vp-p/75 Ohm
Audio output 1.8Vrms/10 kOhm
S/N ratio ≥ 80 dB
Power voltage 9-12V
Power consumption max 18W

EN
7
Operating temperature -26°C ~ +60°C
Built-in battery 3.7V / 1300 mA
Battery working time ~ 2 hours
Charging time ~ 6 hours
Size 250 x 180 x 40 mm
Weight 850 g

ES
8
INSTRUCCIONES DE SEGURIDAD
Para utilizar el dispositivo en condiciones de seguridad os pedimos por favor a que respetéis las siguientes indicaciones:
- lee con atención el manual de instrucciones antes de utilizar el dispositivo.
- no utilice el dispositivo bajo la lluvia, tampoco en medios con alta humedad o cerca de fuentes de agua.
- no almacene o utilice el dispositivo cerca de fuentes de calor cerca de calefactores, radiadores, hornos u otros aparatos
que emiten calor.
- desconecte el dispositivo de la fuente de alimentación durante tormentas con relámpagos y truenos o cuando no se utiliza
durante mucho tiempo.
- para limpiar el dispositivo, desconéctelo de la fuente de alimentación y u t i l i c e un p a ñ o l im p i o y h úm e do .
- utilice solamente accesorios recomendados por el fabricante.
- no intente abrir o reparar el dispositivo. Si tiene problemas de funcionamiento, llame a un centro especializado.
- no utilice CD deteriorados para evitar danos en la unidad óptica
CONTENIDO DEL PAQUETE
• Reproductor DVD portátil con pantalla de 9 pulgadas
• Mando a distancia
• Alimentador auto 12V
• Alimentador 220V
• Cable AV
• Auriculares / Manual de instrucciones
LA FUENTE DE ALIMENTACIÓN PARA EL DISPOSITIVO
Para alimentar o recargar la batería interna del dispositivo, debe enchufarlo a una fuente de alimentación, mediante el
alimentador auto al enchufe destinado para encender los cigarrillos o a través de la fuente de alimentación de 220V de la red
eléctrica doméstica.
ATENCIÓN: El cargador para automóvil solo se puede utilizar en tomas de encendedor de cigarrillos de 12 V.
NOTA: El tiempo de cargar la batería interna es de aproximadamente 6 horas. Durante la carga, verá una LED roja encendida
cerca del receptor IR de su dispositivo. Cuando la carga se haya completado, se apagará.
DESCRIPCIÓN DISPOSITIVO
1. Pantalla LCD
2. Compartimento CD/DVD
3. Botón apertura compartimento CD/DVD
4. Botón selección DVD/AV
5. Botón acceso conguraciones
6. Botón acceso menú
7. Botón ajuste volumen
8. Botón reproducción/pausa
9. Botón Atrás
10.Botón conrmación selección
11.Botón reproducir hacia delante/atrás
12.Botón Adelante
13.Botón ajuste volumen
14.Botón stop redare
15.Botón conguración audio mono/estéreo
16.Botón selección DVD/USB/tarjeta de memoria
17.Receptor IR / LED de estado
18. Puerto USB
19.Ranura para la tarjeta SD
20.Toma para auriculares
21. Salida AV
22. entrada AV
23. Botón de encendido / apagado
24. Entrada de energía

ES
9
MANDO A DISTANCIA
1. Botón de silencio
2. Botón de selección DVD/AV
3. Botón accesoalasconguracionesdelsistema
4. Botón búsqueda título/capitulo/momento durante la
reproducción de CD/DVD
5. Botón visualización de informaciones en la pantalla
6. Botón acceso menú
7. Botón zoom
8. Botones numéricos
9. Botones Delante/Atrás
10. Botón Encender/Apagar pantala
11. Botón selección DVD/USB/tarjeta de memoria
12. Botón conguración modo audio mono/estéreo
13. Botón Subtitulo/Copiar:
- seleccione el idioma del subtitulo durante la reproducción
DVD
- la función copiar durante la navegación por los archivos
de DVD, USB o tarjeta de memoria SD
14. Botón visualización titulo
15. Botón conrmación selección
16. Botones navegación menú
17. Botones ajuste volumen
18. Botón reproducción archivo/capitulo
19. Botón visualización lista con todos los archivos
delDVD/USB/tarjeta
20. Botón stop reproducción
21. Botón reproducción/pausa
22. Botones deAvance/Retroceso
Para poder utilizar el mando a distancia primero debe introducir 2 baterías alcalinas tipo AAA en el sitio especial que está en
su parte posterior.
Cuando utilice el mando a distancia, asegúrese de que está apuntando hacia el receptor IR del reproductor de DVD. La
distancia máxima entre el dispositivo y el control remoto no debe superar los 3m.
NOTE:
1. No coloque el control remoto sobre supercies mojadas o donde pueda caerse fácilmente.
2. Protege el receptor IR del dispositivo de la luz directa del sol.
3. Si el mando a distancia no funciona correctamente, reemplace las baterías
INSTRUCCIONES DE UTILIZACIÓN
Reproducción de archivos audio y video
1. Si tiene más fuentes de archivos insertadas en el dispositivo, use el botón DVD/ USB/TARJETA DE MEMORIA para
seleccionar la fuente que desea reproducir.
2. Navega a través de la lista de archivos usando los botones ◄▲▼► y luego seleccione el archivo que desee pulsando el
botón OK. Empezara la reproducción del archivo seleccionado.
3. Puedes controlar la reproducción de los archivos con la ayuda de los botones ■ stop y reproducción/pausa
Si ya no usa el dispositivo, le recomendamos que lo apague a través del botón encender/apagar.
Copiar archivos
Esta función le permite copiar archivos de un CD/DVD a una memoria USB o una tarjeta de memoria SD.
1. Inserte el CD/DVD del que desea copiar un archivo, luego la memoria USB o la tarjeta SD en la que desea realizar la copia.
2. Vaya a la carpeta deseada del CD/DVD y luego presione el botón COPIAR en el control remoto. En la pantalla aparecerá

ES
10
un menú con las siguientes opciones: Select all - seleccione todos los archivos de la carpeta actual
Deselect all - deseleccionar todos los archivos de la carpeta actual Copy – copiar archivos
Exit – cancelación
3. Si desea copiar todos los archivos del directorio, seleccione la opción “Select all”. Si desea copiar ciertos archivos del
directorio, presione el botón◄ en el control remoto para navegar por el archivo y luego con el botón OK seleccione los
archivos que desea copiar.
4. Tras seleccionar los archivos deseados, elige la opción “Copy”.
5. En la pantalla aparecerá un menú del cual se puede seleccionar el destino de los archivos, USB o tarjeta SD.
6. Seleccione el destino deseado y luego la opción “NEXT” para comenzar copiar o “BACK” para volver al menú anterior.
7. Para cancelar el proceso de copiar, pulse de nuevo el botón “COPY”
ATENCIÓN: La función de copiar no se puede utilizar con CD/DVD originales o de tipo audio (con track- pistas).
Se pueden copiar archivos de la memoria USB a la tarjeta SD. Además, en estos casos tenéis la opción de borrar un archivo,
seleccionando “DELETE” del menú, que aparece pulsando el botón “COPY” del mando a distancia.
ATENCIÓN: No desconecte la memoria USB o la tarjeta SD durante el proceso de copia para evitar danos.
Repetir la reproducción
Durante la reproducción de los archivos audio o video el usuario tiene la posibilidad de seleccionar la repetición de un capitulo,
de un título o de todo el disco/directorio.
1. Durante la reproducción de un CD/DVD pulse el botón REPEAT del mando a distancia para reproducir el capítulo. Pulse
de nuevo para repetir el título y pulse una tercera vez para repetir todo el disco. Si pulsa el botón para la cuarta vez cancelara
la función de repetir.
2. Durante la reproducción de USB o tarjeta SD pulse el botón REPEAT del mando a distancia para que se repita el archivo
actual. Pulse de nuevo para que se repita todo el directorio y pulse la tercera vez para cancelar la función de repetir.
Zoom
Durante la reproducción de los archivos video o imagen pulse el botón ZOOM del mando a distancia para ampliar la imagen
de 2x. Apriete una vez más el botón para ampliar la imagen de 3x y pulsando la tercera vez ampliaras la imagen de 4x.
Apretando el botón ZOOM una cuarta vez comenzaras a reducir la imagen.
Para volver al tamaño de imagen normal, debe presionar el botón 7 veces.
NOTA: Cuando la imagen esta ampliada, puedes utilizar los botones ◄▲▼►para mover la imagen en la pantalla.
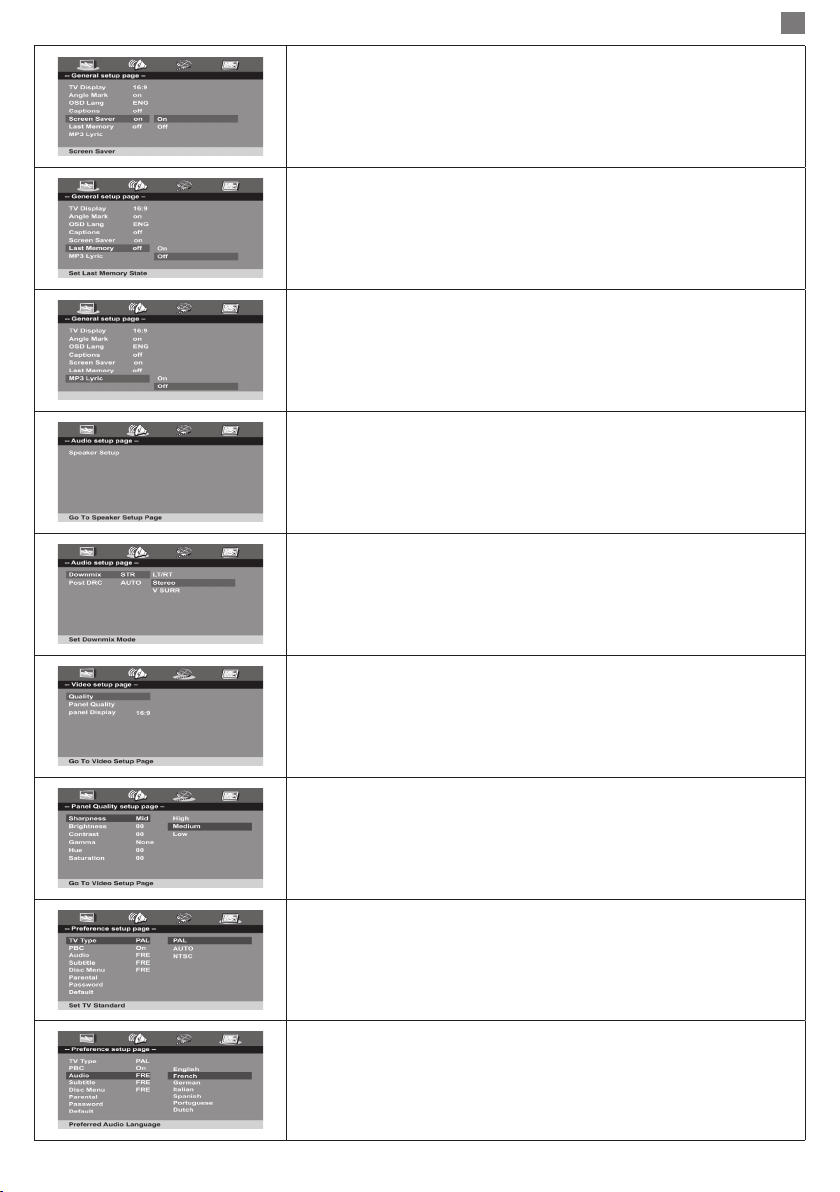
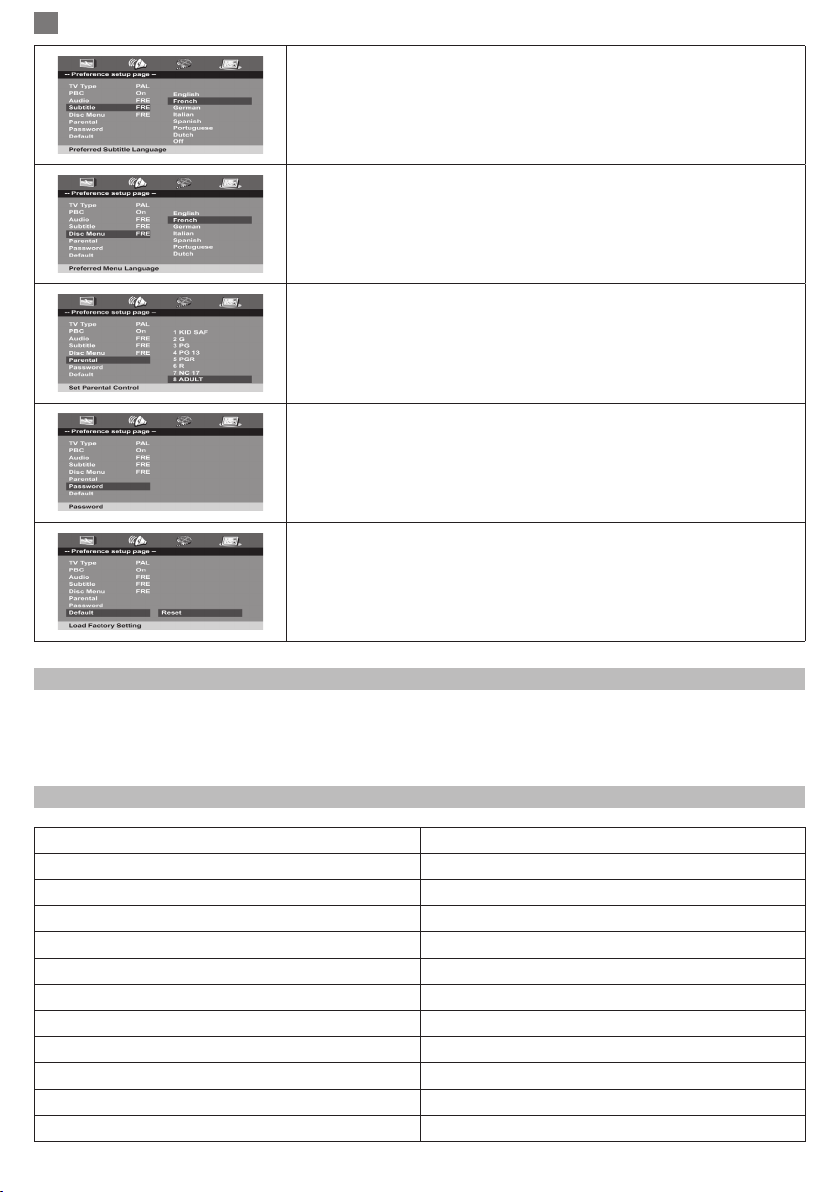
CONFIGURACIONES DE SISTEMA
Para tener acceso al menú de conguraciones de sistema pulse el botón “SETUP”
del DVD o de su mando a distancia.
La página de inicio de conguración se ve como la de la imagen de al lado.
Utilice los botones ◄► para seleccionar submenú de conguraciones, los
botones ▲▼ para navegar por las conguraciones disponibles y el botón OK para
seleccionar una opción.
Pantalla TV:
Seleccione el informe de visualización de la imagen. Esta opción depende de
la fuente de la imagen o del televisor donde deseas visualizar la reproduccióna.
Angle Mark (Elige el ángulo):
Esta función le permite visualizar ciertas escenas desde varios ángulos, si esto
está permitido por el archivo video que esta visionando.
De forma predeterminada, esta función esta activada.
OSD Language (Idioma):
Seleccione el idioma deseado para visualizar el menú.

ES
11
Captions (Leyenda):
Seleccione activar/desactivar subtítulos.
Esta opción está disponible si está incluida en el archivo reproducido.
Screen saver (Protector de pantalla):
Seleccione activar/desactivar la imagen de protección de pantalla cuando no
utilizáis el dispositivo durante un tiempo.
Last memory (Último recuerdo):
Active esta funcion para memorar la última posición del disco, de modo que, la
próxima vez que encienda el dispositivo, la reproducción del disco comenzara de
donde se ha quedado.
NOTA: no hay que sacar el disco del dispositivo.
MP3 lyric (Letra):
Seleccione la visualización de las letras de las canciones en la pantalla, si el
archivo audio incluye esta opción.
De forma predeterminada, esta función está deshabilitada.
Speaker setup (Conguración de altavoz):
Seleccione el modo de reproducción del sonido.
Downmix:
El ajuste predeterminado es estéreo.
DRC:
El ajuste predeterminado es auto.
En este menú puede ajustar la calidad de la imagen de la salida video.
Las opciones incluidas son:
claridad, luminosidad, contraste, gamma, colores, saturación.
TV Type (Tipo):
Seleccione el tipo TV: PAL / AUTO / NTSC

ES
12
Audio:
Seleccione el idioma preferido para la reproducción de DVD. El ajuste
predeterminado es el italiano.
NOTA: esta opción está disponible en función del DVD.
Subtitle (Subtítulo):
Seleccione el idioma preferido para los subtítulos. El ajuste predeterminado es
el italiano.
NOTA: esta opción está disponible en función del DVD.
Disc menu:
Seleccione el idioma del menú en el disco. El ajuste predeterminado es italiano.
NOTA: esta opción está disponible en función del DVD.
Parental:
Seleccione el nivel de control parental para proteger a los niños de algunas
escenas inadecuadas de algunos DVD.
El ajuste predeterminado es Adulto.
Password (Contraseña):
Establece una contraseña (de 4 cifras) para el control parental.
La contraseña predeterminada es 0000.
Default:
Seleccione esta opción para restablecer su dispositivo a la conguración de
fábrica.
PROBLEMAS Y SOLUCIONES
• Falta sonido o sonido distorsionado: compruebe las conexiones del dispositivo.
• No puedo avanzar o retroceder durante la reproducción de la película: la opción de reproducir no está disponible
durante la visualización de las advertencias o los créditos del principio de las películas dado que de esta manera son
programados los DVD originales.
• La imagen esta distorsionada: eldisco puede estar defectuoso.
ESPECIFICACIONES TÉCNICAS
Discos compatibles DVD/DVD+/-R CD-R / CD-RW
Formatos de discos compatibles MPEG4/JPEG/MP3
Formatos compatibles de USB/SD MPEG4/DVD/JPEG/WMA/MP3
Conexiones disponibles EntradaAV/salidaAV/salida auriculares/USB2.0/tarjetaSD
Sistemas TV PAL/NTSC/AUTO

ES
13
Pantalla LCD 9 inch
Respuesta frecuencia 20 Hz ~ 20 kHz
Salida video 1Vp-p/75 Ohmi
Salida audio 1.8Vrms/10 kOhmi
Rata señal/ruido ≥ 80 dB
Fuente alimentación 12V
Consumo máximo 18W
Temperatura de uso -26°C ~ +60°C
Batería incorporada 3.7V / 1300 mA
Autonomía de la batería ~ 2 horas
Tiempo de carga de la batería ~ 6 horas
Dimensiones 250 x 180 x 40 mm
Peso 850 g

HU
14
ÓVINTÉZKEDÉSEK
Ahhoz, hogy biztonságba használják a készüléket tartsák be a következő lépéseket:
- Olvassák el gyelmesen a használati útmutató mielőtt használnák a készüléket
- Ne hasznájlják esőben , nedves vagy vízes helyeken a készüléket.
- Ne raktározzák vagy használják a készüléket meleg helységekben mint példál radiátorok, sütők vagy más készülékek ami
hőséget vagy meleget okoznak.
- Kapcsolja ki a készüléket az áramforrásból villámlás és vihar esetén vagy ha több ideje nincs használva.
- Ahhoz, hogy kitisztítsa a készülélket kapcsolja ki az árramforrásból és használjanak egy nedves tiszta törlőt.
- Olyan tartózékokat használjanak amit a gyártó ajánl.
- Ne probálják felnyitni vagy megjavítani a készüléket . Ha problémák akadnak a készülékkel akkor forduljón egy
engedélyezett szervízhez.
- Na használjanak sérült cd-ket, hogy a készülék ne sérüljen meg
CSOMAG TARTALMA
• Hordozható DVD lejátszó , 9 átmérőjü képernyővel
• Tá virányító
• Autótöltő
• 220V töltő
• AV kábel
• Fülhallgató
• Használati útmutató
KÉSZÜLÉK FELTÖLTÉSE
Ahhoz, hogy feltöltse vagy újratöltse a készülék belső elemét egy tápegységhez kell csatlakoztatni, autótöltőhöz vhagy egy
szívargyújtótöltőhöz vagy egy 220 V otthoni áramforráshoz.
Megjegyzés: Az autótöltőt csak egy 12 V szivargyútó foglalathoz tudja használni.
Megjegyzés: Belső elem 6 órán belül töltödik fel. A feltöltés idején egy piros LED-et fognak látni kigyulva a készülék IR
vételezőjénél. Amikor a feltöltés készen van ez ki fog kapcsolni.
KÉSZÜLÉK LEIRÁSA
1. LCD képernyő
2. CD/DVD rekesz
3. Rekeszkinyító CD/DVD gombja
4. DVD/AV kiválasztó gomb
5. Hozzáférő beállitási gomb
6. Meniü belépési gomb
7. Hangerő gomb
8. Lejátszás/szünet gomb
9. Vissza gomb
10. Kiválasztás gomb
11. Előre/hátra görgetési gomb
12. Előre gomb
13. Hangerő gomb
14. Lejátszási megálitási gomb
15. Audió mono stereo beállitási gomb
16. DVD/USB/memória kártya kiválasztási gomb
17. IR / LED-ek vevő beállitása
18. USB rész
19. Slot SD kártya
20. Csatlakozó fülhallgatónak
21. AV kimenet
22. AV bemenet
23. Ki/be
24. Töltő bemenet

HU
15
TÁVÍRÁNYÍTÓ
1. Némitási gomb
2. DVD/AV kiválasztási gomb
3. Hozzáférési beállitás gomb
4. Keresési gomb cím/lemez/ CD/DVD lejátszás idő alatt
5. Kipernyőre kimutatot információs gomb
6. Menü hozzáférési gomb
7.Nagyítás gomb 8.Számozási gomb
9. Előre/hátra gombok
10. Képernyő bekapcsolasi, kikapcsolási gomb
11. DVD/USB/memória kártya
12. Audió mono/stereo beállitási mód gomb
13. Feliratos/másolási gomb:
- válassza ki a felirat nyelvét DVD lejátszása ideje alatt
- másolási funkció , DVD, USB vagy SD kártya fájlok
navigálása alatt
14. Cím megjelenitési gomb
15. Kiválasztás megerősitési gomb
16. Navigálási gomba a menün keresztül
17. Hangerő beállitási gomb
18. Fájl/lemez ismétlési gomb
19. Összes lista kimutatása gomb DVD/USB/kártyákról
20. Lejátszás megállítási gomb
21. Lejátszási/szünetelési gomb
22. Előre/hátra haladási gomb
Ahhoz, hogy a távirányítót használni tudja, először két AAA típusú element kell elhelyezni a készülék hátulján az adott
helyre.
Amikor a távírányítót használják, bízonyosodjanak meg, hogy ez a DVD lejátszó IR vevő részhez van irányitva. A maximális
távolság a készülék és a távirányító között nem szabad, hogy meghaladja a 3 métert.
Megjegyzés:
1. Ne helyezzék a távirányítót nedves helyre vagy egy olyan helyre ahol leeshet.
2. Óvják meg az eszköz IR vevő részét a naptól.
3. Ha a távirányítót nem mükődik rendesen cseréljék ki az elemeket
HASZNÁLATI UTASÍTÁS
Audió és videó fájlok lejátszása
1. Ha több fájlok vanak a készülékbe behelyezve használják a DVD/USB/CARD a dalokat
DVD/USB/CARD gombot, hogy kiválasszák azt a forrást ahonnan le szeretne játszani
2. Navigáljanak a fájlok között ◄▲▼► gombok segítségével majd válasszak ki a
a kedvelt fájlt OK gomb megnyomásával. El fogja kezdeni lejátszani a kiválasztot fájlt.
3. Tudja a fájlok lejátszását vezérelni a megálitás gomb ■ é s lejátsz é s szünet gombbal.
Ha már nem használja az eszközt, azt ajánljuk, hogy kapcsolják ki a indítás/megálitás gombbal.
Fájlok másolása
Ez a funkció megengedi, hogy lemásolhasák a fájlokat CD/DVD-ről egy USB memóriájába vagy egy SD kártyára.
1. Heyezenek be egy DVD-é t amelyről szeretné a fájlokat lemásolni, majd másolják át egy USB memóriájára vagy SD
kártyára.
2. Lépjenek a CD/DVD be a kivánt mappába majd nyomja le a COPY gombot
A képernyőn meg fog jeleni egy menü a következő lehetőségekkel: Select all - az összes fájlok kiválasztása a jelen könyvtárból
Deselect all - az összes fájlok kikapcsolása a jelen könyvtárból Copy - fájlok másolása

HU
16
Exit - törlés
3. Ha át szeretné másolni az összes fájlokat a kijelölt könyvtárból válassza ki
“Select all” opciót.Ha csak egy fáljt szeretne kiválasztani nyomja le ◄ a távirányítóról a gombot ahhoz, hogy a fájlok között
navigáljon és kattinson az OK gombra válassza ki a kivánt fájlt a másoláshoz.
4. A kivánt fájl kiválasztása után válasszák ki a “Copy ”ópciót.
5. A képernyőn meg fog jeleni egy menü ahonnan ki tudja választani a kivánt fájlt és ahová szeretné másolni a fájlokat USB
vagy SD kártya.
6. Válassza ki a kivánt célt majd utána “NEXT” ópciót, hogy elkezdhesse vagy”BACK”
hogy visszatérjen az elöző menühöz.
7. Ahhoz, hogy semlegesítse a másolást nyomja meg újból a “COPY”gombot
Megjegyzés: A másolási funkció nem használható eredeti CD/DVD-hez vagy audió CD- hez( track)..
Tudnak másolni fájlokat USB memória és SD kártya között. Még , ezekben az esetekben opciójuk van a fájlok törléséhez,
kiválasztva “DELETE” a menüből megnyomva a “COPY” gombot a távirányitóról.
FIGYELEM: ne kapcsolja ki az USB memória vagy SD kártyát a másolás ideje alatt, hogy ne menjenek ezek tönkre.
Fájlok ismétlése
A fájlok az audió vagy videó lejátszás során, a felhasználó megismélheti egy könyvtárat, egy számot vagy a teljes lemezt/
mappát.
1. A CD/DVD lejátszása alatt nyomja le REPEAT gombot a távirányitóról ahhoz, hogy újra
lejátszhassa a mappát.Nyomja meg mégegyszer ahhoz, hogy újra ismételje a számot és nyomja meg harmadszóra, hogy az
összes mappát lejátszhassa. Ha negyedszerre megnyomja a gombot törölni fogja az ismézlési funkciót.
2. USB vagy SD kártya lejátszhassa alatt nyomja meg a REPEAT gombot a távirányitóról, ahhoz, hogy megismételje a fájlokat.
Nyomja meg mégegyszer, hogy megismételje a lemezt és nyomja meg harmadszor, hogy törölje az ismétlési funkciót.
Nagyítás
A videófájlok vagy képek lejátszássa alatt nyomja meg a ZOOM gombot a távirányítóról, hogy 2x megnagyítsa a képet.
Nyomja meg mégegyszer a gombot, hogy 3x megnagyítsa a képet harmadszóra pedig 4x nagyítja a képet.
Megnyomva a ZOOM gombot harmadszóra megkezdődik a kép kicsinyitása i.
Ahhoz, hogy visszatérjen a normális képmérethez, hétszer le kell nyomnia a gombot.
MEGJEGYZÉS: amikor a kép meg van nagyítva a következő gombokat használhassa ◄▲▼►hogy mozgatni tudja a képet
a képernyőn..
RENDSZERBEÁLLITÁS
Ahhoz, hogy be tudjon lépni a beállitás menü nyomja le a “SETUP” a DVD
lejátszóról vagy távirányitóról.
A beállitás főlap, úgy kell kinézen, mint a mellékelt képen.
Használja a ◄► gombokat, hogy kiválassza a alapmenü beállitástát, ▲▼
gombokkal lehet navigálni a beállitások között és az OK gombot, hogy kiválasszon
egy ópciót.
TV Display:
Válassza ki a képbeállitást.
Ez az opció függ a képforrástól vagy a TV-től ahol le szeretne játszani.
Angle Mark:
Ez a funkció lehetővé tesz egyes jeleneteket megnézését több szögekből, ha ez
megengedhető a videófájlok megnézésével
Abban az esetben ha ez a funkció be van kapcsolva.
OSD Language:
Válassza ki a kivánt nyelvet.

HU
17
Captions:
Válassza ki a feliratok engedélyezése/tiltása.
Ez az opció akkor lehetséges ha ez szerepel a lejátszót fáljban.
Screen saver:
Válassza ki a a képernyővédő kép engedélyezése / tiltása ha az eszközt már
régóta nem használja.
Last memory:
Aktiválja ezt a funkciót, hogy megmaradjon a memóriában az utólsó szám
lejátszása, í gy a következő alkalomkor amikor elinditják az eszközt , akkor data
viitoare cand porniti dispozitivul, lemez lejátszássa elindul ahonnan abbahagyta.
Megjegyzés: nem szabad a lemezt az eszközből kivenni.
MP3 lyric:
Válassza ki a szöveget a képernyőn ha az audiófájl tartalmazza ezt a lehetőséget.
Alapesetben ez a funkció ki van kapcsolva.
Speaker setup:
Válassza ki a lejátszás hangját.
Downmix:
Alapbeállitás stereo.
DRC:
Alapbeállitás auto.
Ebben a menüben beállíthatja a képminőséget .
A választási lehetőségek a következők: tisztaság, fényerő, kontraszt, gamma,
színtelítettség.
TV Type:
TV típus: PAL / AUTO / NTSC

HU
18
Audio:
Válassza ki a kívánt nyelvet a DVD lejátszásról. Az alapbeállitás az olasz nyelv.
MEGJEGYZÉS: ez a funkció függ a DVD lejátszótól.
Subtitle:
Válassza ki a kivánt nyelvet. Az alapbeállitás olasz nyelv.
MEGJEGYZÉS: ez a funkció függ a DVD lejátszótól.
Disc menu:
Válassza ki a kivánt nyelvet. Az alapbeállitás olasz nyelv.
MEGJEGYZÉS: ez a funkció függ a DVD lejátszótól.
Parental:
Válassza ki a szülői felügyeletet , hogy megyvédje a gyereket egyes nem kivánt
jelenetektől az egy DVD-ről.
Alapbeállitás Adult.
Password:
Állitson be egy jelszót ( 4 szám ) a szülői fegyülethez.
Alapjelszó 0000.
Default:
Válassza ezt a lehetőséget, hogy állítsa vissza a készüléket a gyári beállításokhoz.
PROBLÉMÁK ÉS MEGOLDÁSOK
• Nincs hang vagy torzítótt hang: ellenőrizék a készülék csatlakozását.
• Nem tudok görgetni előre/hátra lmek lejátszása alatt: A görgetési lehetőség nem lehetséges a kijelő gyelmeztetése
során vagy a lmek elején, mert így vanak beállitva az eredeti DVD-k.
• Képhibásodás: a lemez hibás
MŰSZAKI ADATOKE
Kompatibilis lemezek DVD/DVD+/-R CD-R / CD-RW
Támogatott formátumok a lemezen MPEG4/JPEG/MP3
Támogatott formátumok USB/SD MPEG4/DVD/JPEG/WMA/MP3
Lehetséges csatlakozások AV bemenet/ AV/kimenet füllhalgató/USB2.0/ SD kártya
TV rendszer PAL/NTSC/AUTO
Képernyő LCD 9 inch

HU
19
Frekvenciamenet 20 Hz ~ 20 kHz
Videókimenet 1Vp-p/75 Ohmi
Audiókimenet 1.8Vrms/10 kOhmi
Jel/zaj ≥ 80 dB
Töltés 12V
Fogyasztás maxim 18W
Üzemi hőmérséklet -26°C ~ +60°C
Beépitett elem 3.7V / 1300 mA
Elem nélküli használat ~ 2 óra
Elem feltöltése ~ 6 óra
Méretek 250 x 180 x 40 mm
Súly 850 g

IT
20
ISTRUZIONI DI SICUREZZA
Per utilizzare il dispositivo in sicurezza, si prega di osservare quanto segue:
- Leggere attentamente il manuale dell’utente prima di utilizzare il dispositivo
- Non utilizzare il dispositivo in ambienti con elevata umidità o in prossimità di fonti d’acqua
- Non conservare o utilizzare il dispositivo vicino a fonti di calore come radiatori, radiatori, forni o altri apparecchi che emettono
calore
- Disconnettere il dispositivo dall’alimentazione durante temporali o quando non viene utilizzato per un lungo periodo
- Per pulire il dispositivo, scollegarlo dall’alimentazione e utilizzare un panno pulito
- Utilizzare solo gli accessori specicati dal produttore
- Non tentare di aprire o riparare il dispositivo. In caso di problemi di funzionamento, contattare un centro di assistenza
autorizzato
- Non utilizzare CD danneggiati per evitare danni all’unità ottica
CONTENUTO DELLA CONFEZIONE
• Lettore DVD portatile portatile da 9 pollici
• Telecomando
• Caricabatteria da auto 12V
• Alimentazione 220V
• Cavo AV
• Cua / Manuale dell’utente
ACCENSIONE DEL DISPOSITIVO
Per alimentare o ricaricare la batteria interna del dispositivo è necessario collegarlo a una fonte di alimentazione, tramite il
caricatore per auto a una presa per accendisigari o tramite l’alimentatore da 220 V alla rete elettrica domestica.
ATTENZIONE: il caricabatteria per auto può essere utilizzato solo in prese per accendisigari da 12 V.
NOTA: la batteria interna si sta caricando in circa 6 ore. Durante la ricarica, verrà visualizzato un LED rosso illuminato vicino
al ricevitore IR del dispositivo. Quando la ricarica è completa, si spegnerà.
DESCRIZIONE DEL DISPOSITIVO
1. Schermo LCD
2. Scomparto CD / DVD
3. Pulsante apri vano CD / DVD
4. Pulsante di selezione DVD / AV
5. Impostazioni del pulsante di accesso
6. Pulsante di accesso al menu
7. Manopola di regolazione del volume
8. Pulsante riproduzione / pausa
9. Pulsante Indietro
10. Confermare il pulsante di selezione
11. Pulsanti anteriore / posteriore
12. Avanti
13. Manopola di regolazione del volume
14. Pulsante di interruzione della riproduzione
15. Pulsante audio mono / stereo
16. Pulsante selezione: DVD / USB / scheda di memoria
17. LED di ricezione / stato IR
18. Porta USB
19. Slot per scheda SD
20. Jack per cue
21. Uscita AV
22. Ingresso AV
23. Pulsante di accensione / spegnimento
24. Ingresso alimentazione
Other manuals for NS989
1
Table of contents
Languages: