PNI A437 User manual

PNI A437
EN User manual ......................................................... 2
BG Ръководство за употреба ............................. 9
DE Benutzerhandbuch .............................................. 16
ES Manual de usuario ............................................... 23
FR Manuel utilisateur ............................................... 30
HU Használati utasítás .............................................. 37
IT Manuale utente .................................................. 44
NL Handleiding ........................................................ 51
PL Instrukcja obsługi ............................................... 58
RO Manual de utilizare ............................................. 65

PNI A437 smoke detector
User manual

User manual - 3
Technical specifications
• Power supply: 9V DC alkaline battery (included)
• Stand-by current: < 20uA
• Alarm current: < 150mA
• Sensitivity: 0.107~0.138 dB/m
• Sound intensity: ≥ 85dB@3m
• Working temperature: -26°C ~ +80°C
Operating modes
Normal operating mode: the LED blinks once every 60
seconds. No sound.
Sensor error: LED is on. A short beep is heard.
Test: the LED blinks. 4 beeps are heard.
Smoke detection alarm: the LED blinks. Continuous beeps.
Smoke detection alarm, silent mode: the LED blinks. No
sound.
Low voltage: the LED blinks once every 1 hour. A beep is
heard once an hour.
Installing the battery
• Install the battery before mounting the device on the
wall.

User manual - 4
• Remove the plastic protection from the battery before
installing it.
• Insert the battery into the slot on the back of the smoke
sensor.
• Press the SILENCE/TEST button to check if the battery
has been correctly installed. If you do not hear any sound,
check the installation method or replace the battery.
Sensor testing
In the normal operating mode, press the SILENCE/TEST
button on the device. You will hear 4 beeps. The red LED
blinks.
Silent mode
In alarm state, press the SILENCE/TEST button on the
device. The sound will stop. The red LED continues to blink.
The device will automatically exit the alarm state when the
smoke concentration in the room decreases.

User manual - 5
Installation
Note: for safety reasons, we recommend fixing the smoke
sensor to the ceiling with screws and not with double-
adhesive tape.
1. Bring the sensor support closer to the wall and mark the
place for the holes with a pencil.
2. Remove the support and make holes in the wall with a drill.
3. Insert the dowels into the holes in the wall.
4. Bring the sensor support closer to the wall and fix it by
inserting the screws into the dowels. Tighten the screws well
with a cross screwdriver.
5. Bring the smoke sensor closer to the bracket fixed in the
wall and rotate it to fix it on the bracket.

User manual - 6
Warnings
• This product is intended for indoor use only.
• Do not install the detector in the bathroom, swimming
pools or other places with high humidity.
• Keep a distance of at least 50 cm between the smoke
detector and the lighting appliances.
• Keep a distance of at least 150 cm between the smoke
detector and the air conditioning or ventilation devices.
• Do not clean the smoke sensor with chemicals. The gases
emitted by them could damage the internal sensor.
• Periodically check the working status of the smoke
detector by pressing the SILENCE/TEST button.
• The battery comes with a lifespan of 1 year under normal
circumstance, which could be shortened in tough
environments like high temperature and high humidity
• Test the smoke detector before installing it.

User manual - 7
• When the smoke detector warns you that the battery is
discharged, replace it with a new battery of the same type
(alkaline 9V).
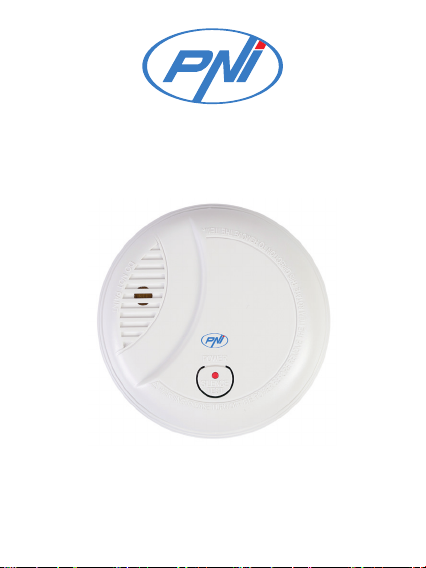
Installation recommendations
• Carefully choose the place to install the detector and
make sure that you will hear the alarm sound from your
bedroom.
• Install the smoke detector on the ceiling at a distance
of >10 cm from the side walls and at >50 cm from the
corners.
• If the wall length is greater than 10 meters, multiple
detectors need to be installed.
• Do not install the smoke detector in the room corners.
• The smoke detector can also be installed on the vertical
wall, at a distance of at least 10 cm from the ceiling.
Simplified EU declaration of conformity
SC ONLINESHOP SRL declares that the PNI A437
smoke sensor complies with the RED Directive 2014/53/
EU. The full text of the EU declaration of conformity is
available at the following internet address:
https://www.mypni.eu/products/8994/download/
certifications

User manual - 8
CERTIFICATE OF COMMERCIAL WARRANTY
The warranty period for individuals is 24 months from the
date of delivery for manufacturing and material defects.
The warranty period for legal entities is 12 months from the
date of delivery for manufacturing and material defects.
The commercial guarantee does not aect the rights of the
consumer provided by the applicable legislation in force,
namely Emergency Ordinance 140/28.12.2021 regarding
certainaspectsrelatedtocontractsforthesaleofgoods,OG
21/1992 regarding consumer protection with subsequent
amendments and additions and Law 296/2004 regarding
the consumption code with subsequent amendments and
additions.
Download the full version of the warranty certificate:

Детектор за дим PNI A437
Ръководство за употреба

Ръководство за употреба - 10
Технически спецификации
Захранване: 9V DC алкална батерия (включена)
Ток в режим на готовност: < 20uA
Ток на алармата: < 150mA
Чувствителност: 0.107~0.138 dB/m
Интензивност на звука: ≥ 85dB@3m
Работна температура: -26°C ~ +80°C
Режими на работа
Нормален режим на работа: светодиодът мига
веднъж на всеки 60 секунди. Без звук.
Грешка на сензора: LED свети. Чува се кратък звуков
сигнал.
Тест: светодиодът мига. Чуват се 4 бипкания.
Аларма за откриване на дим: светодиодът мига.
Непрекъснати звукови сигнали.
Аларма за откриване на дим, тих режим: светодиодът
мига. Без звук.
Ниско напрежение: светодиодът мига веднъж на
всеки 1 час. Веднъж на час се чува звуков сигнал.
Инсталиране на батерията
Поставете батерията, преди да монтирате

Ръководство за употреба - 11
устройството на стената.
Отстранете пластмасовата защита от батерията, преди
да я инсталирате.
Поставете батерията в слота на гърба на сензора за
дим.
Натиснете бутона SILENCE/TEST, за да проверите
дали батерията е поставена правилно. Ако не чувате
звук, проверете метода на инсталиране или сменете
батерията.
Тестване на сензори
В нормален режим на работа натиснете бутона
SILENCE/TEST на устройството. Ще чуете 4 бипкания.
Червеният светодиод мига.
Тих режим
В състояние на аларма натиснете бутона SILENCE/TEST
на устройството. Звукът ще спре. Червеният светодиод
продължава да мига. Устройството автоматично
ще излезе от аларменото състояние, когато
концентрацията на дим в помещението намалее.

Ръководство за употреба - 12
Инсталация
Забележка: от съображения за безопасност
препоръчваме да фиксирате сензора за дим към
тавана с винтове, а не с двойна самозалепваща лента.
1. Доближете опората на сензора до стената и
маркирайте с молив мястото за дупките.
2. Отстранете опората и направете дупки в стената с
бормашина.
3. Поставете дюбелите в дупките в стената.
4. Доближете опората на сензора до стената и я
фиксирайте, като поставите винтовете в дюбелите.
Затегнете добре винтовете с кръстата отвертка.
5. Приближете сензора за дим към скобата, фиксирана
в стената, и го завъртете, за да го фиксирате върху
скобата.

Ръководство за употреба - 13
Предупреждения
Този продукт е предназначен само за употреба на
закрито.
Не инсталирайте детектора в баня, басейни или други
места с висока влажност.
Спазвайте разстояние от най-малко 50 см между
детектора за дим и осветителните уреди.
Спазвайте разстояние от поне 150 см между детектора
за дим и климатичните или вентилационните устройства.
Не почиствайте сензора за дим с химикали. Изпусканите
от тях газове могат да повредят вътрешния сензор.
Периодично проверявайте работното състояние на
детектора за дим чрез натискане на бутона SILENCE/TEST.
Батерията се предлага с живот от 1 година при нормални
обстоятелства, който може да бъде съкратен в тежки
среди като висока температура и висока влажност
Тествайте детектора за дим, преди да го инсталирате.
Когато детекторът за дим ви предупреди, че батерията

Ръководство за употреба - 14
е разредена, сменете я с нова батерия от същия тип
(алкална 9V).
Препоръки за монтаж
Внимателно изберете мястото за инсталиране на
детектора и се уверете, че ще чуете звука на алармата от
спалнята си.
Инсталирайте детектора за дим на тавана на разстояние
>10 cm от страничните стени и на >50 cm от ъглите.
Ако дължината на стената е по-голяма от 10 метра, трябва
да се монтират множество детектори.
Не монтирайте детектора за дим в ъглите на помещението.
Детекторът за дим може да се монтира и на вертикална
стена, на разстояние най-малко 10 см от тавана.
Опростена ЕС декларация за съответствие
SC ONLINESHOP SRL декларира, че сензорът за дим PNI
A437 отговаря на RED Директива 2014/53/ЕС. Пълният
текст на ЕС декларацията за съответствие е достъпен
на следния интернет адрес:
https://www.mypni.eu/products/8994/download/
cercaons

Ръководство за употреба - 15
СЕРТИФИКАТ ЗА ТЪРГОВСКА ГАРАНЦИЯ
Гаранционният срок за физически лица е 24 месеца от
датата на доставка за производствени и материални
дефекти.
Гаранционният срок за юридически лица е 12 месеца
от датата на доставка за производствени и материални
дефекти.
Търговската гаранция не засяга правата на потребителя,
предоставени от приложимото действащо
законодателство, а именно Извънредна наредба
140/28.12.2021 г. относно някои аспекти, свързани с
договорите за продажба на стоки, ДВ 21/1992 г. относно
защитата на потребителите с последващи изменения
и допълнения и Закон 296/2004 относно кода на
потреблението с последващи изменения и допълнения.
Изтеглете пълната версия на гаранционния сертификат:

Rauchmelder PNI A437
Benutzerhandbuch

Benutzerhandbuch - 17
Technische Spezifikationen
Stromversorgung: 9 V DC Alkalibatterie (im Lieferumfang
enthalten)
Standby-Strom: < 20uA
Alarmstrom: < 150mA
Empfindlichkeit: 0,107 ~ 0,138 dB/m
Schallintensität: ≥ 85dB@3m
Arbeitstemperatur: -26 °C ~ +80 °C
Betriebsarten
Normaler Betriebsmodus: Die LED blinkt einmal alle 60
Sekunden. Keinen Ton.
Sensorfehler: LED leuchtet. Ein kurzer Piepton ist zu hören.
Test: Die LED blinkt. Es sind 4 Pieptöne zu hören.
Raucherkennungsalarm: Die LED blinkt. Kontinuierliche
Pieptöne.
Rauchmelder, Ruhemodus: Die LED blinkt. Keinen Ton.
Niederspannung: Die LED blinkt alle 1 Stunde einmal.
Einmal pro Stunde ertönt ein Signalton.
Batterie einbauen
Setzen Sie die Batterie ein, bevor Sie das Gerät an der Wand

Benutzerhandbuch - 18
montieren.
Entfernen Sie den Plastikschutz von der Batterie, bevor Sie
sie einbauen.
Setzen Sie die Batterie in den Schlitz auf der Rückseite des
Rauchsensors ein.
Drücken Sie die Taste SILENCE/TEST, um zu prüfen, ob
die Batterie richtig eingesetzt wurde. Wenn Sie keinen
Ton hören, überprüfen Sie die Installationsmethode oder
ersetzen Sie die Batterie.
Sensortest
Drücken Sie im normalen Betriebsmodus die Taste
SILENCE/TEST am Gerät. Sie hören 4 Pieptöne. Die rote
LED blinkt.
Silent-Modus
Drücken Sie im Alarmzustand die Taste SILENCE/TEST
am Gerät. Der Ton stoppt. Die rote LED blinkt weiter. Das
Gerät beendet automatisch den Alarmzustand, wenn die
Rauchkonzentration im Raum abnimmt.

Benutzerhandbuch - 19
Installation
Hinweis: Aus Sicherheitsgründen empfehlen wir, den
RauchmeldermitSchraubenund nichtmitDoppelklebeband
an der Decke zu befestigen.
1. Bringen Sie den Sensorträger näher an die Wand und
markieren Sie die Stelle für die Löcher mit einem Bleistift.
2. Entfernen Sie die Stütze und bohren Sie mit einem
Bohrer Löcher in die Wand.
3. Stecken Sie die Dübel in die Löcher in der Wand.
4. Bringen Sie den Sensorträger näher an die Wand
und befestigen Sie ihn, indem Sie die Schrauben in die
Dübel stecken. Ziehen Sie die Schrauben mit einem
Kreuzschraubendreher gut an.
5. Bringen Sie den Rauchsensor näher an die in der Wand
befestigte Halterung und drehen Sie ihn, um ihn an der
Halterung zu befestigen.

Benutzerhandbuch - 20
Warnungen
Dieses Produkt ist nur für den Gebrauch in Innenräumen
bestimmt.
Installieren Sie den Melder nicht im Badezimmer, in
Schwimmbädern oder an anderen Orten mit hoher
Luftfeuchtigkeit.
Halten Sie einen Abstand von mindestens 50 cm zwischen dem
Rauchmelder und den Beleuchtungsgeräten ein.
Halten Sie einen Abstand von mindestens 150 cm zwischen dem
Rauchmelder und den Klima- oder Lüftungsgeräten ein.
Reinigen Sie den Rauchsensor nicht mit Chemikalien. Die
von ihnen abgegebenen Gase könnten den internen Sensor
beschädigen.
Überprüfen Sie regelmäßig den Betriebsstatus des
Rauchmelders, indem Sie die Taste SILENCE/TEST drücken.
Die Batterie hat unter normalen Umständen eine Lebensdauer
von 1 Jahr, die in rauen Umgebungen wie hohen Temperaturen
Table of contents
Languages:
Other PNI Smoke Alarm manuals