PNI A023 User manual

1
PNI A023 vezeték nélküli füstérzékelő
Használati útmutató
Bevezetés
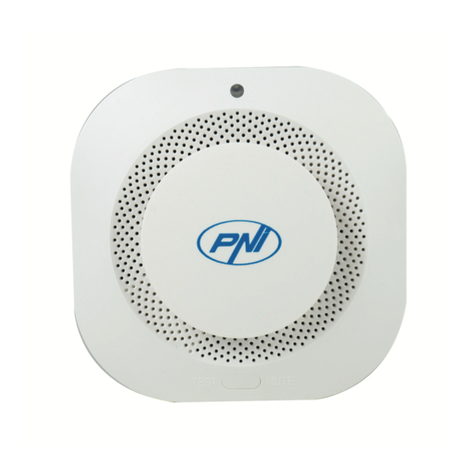
A termék egy fotoelektronikus vezeték nélküli füstérzékelő. Egyedülálló
tervezéssel és mikro-intelligens vezérlőegységgel, az érzékelő védett a
porrészecskékre vagy a fehér fény interferenciájára biztosítva stabilitását. Használható
vezeték nélküli riasztórendszerrel, többféle környezetben is telepíthető figyelmeztetve a
felhasználót riasztáskor.
Az érzékelő nagyon gyorsan reagál a lángoló tűz vagy láng által kibocsátott
füstre és lehet használni otthon, az irodákban , a bevásárlóközpontokban, szállodákban,
éttermekben, iskolákban, bankokban, könyvtárakban, raktárakban stb.
Termék leírása
Tulajdonságok
ŸVezeték nélküli kapcsolat egy riasztórendszerhez vagy független működés
ŸManuális tesztelés
ŸAutomatikus visszaállítás alaphelyzetbe miután eltávolította a kiváltó okot
ŸFotóelektronikus infravörös érzékelő
ŸAkusztikus és vizuális figyelmeztetés
ŸMegnövelt stabilitás
ŸImmun a fehér fény por és interferencia részecskékre
ŸBeltéri használatra
Műszaki adatok:
ŸVezeték nélküli kommunikációs frekvencia központi betöréssel: 433 MHZ
ŸTápellátás: 9V elem
ŸEnergiafogyasztás: standby: ≤ 10 uA / riasztáskor: ≤ 20 mA
ŸRiasztásjelző: piros LED
ŸRiasztási hangszint: ≥ 85dB/m
ŸFelületi érzékelés: 20 mp-ig
ŸVezeték nélküli kommunikációs távolság: 100m-ig nyilt területen
ŸFelhasználási környezet: hőmérséklet: -10 ~ 50 °C
ŸMéretek/súly: 105 x 30 mm / 125 g (elemmel együtt)Ø
Fényjelző
/ Tesztelési gomb
HU

2
Telepítési útmutató
1. Kerülje az érzékelő telepítését állandó füst, por, olaj, magas páratartalom vagy erős
szél esetén(>5m/s)
2. Válassza ki a megfelelő pozíciót az érzékelőnek , általában a védett terület helyének
felső részén.Rögzítse az érzékelő alapját a kiválasztott helyre.
3. Helyezze be az elemet az érzékelőbe.
4. Csavarja rá az érzékelőt az alapra.
5. Végezzen el egy manuális tesztelést, hogy ellenőrizze, hogy megfelelően működik az
érzékelő
Használati előírások
1. Érzékenység tesztelése :Rendszeresen ellenőrizni kell az érzékelő
tesztelését, hogy ne legyen gond a készülékkel.Hogy elvégezzék a mükődési tesztelést
nyomják meg a tesztelési gombot és tartsák lenyomva pár másodpercig. Ha a
riasztójelző gyorsan villog és a buzzer egy riasztói jelt ad le ez azt jelenti, hogy az
érzékelő megfelelően működik.
2. Riasztási mód és buzzer leállítása: amikor a füst sűrűsége eléri az érzékelő
riasztási küszöbét, buzzerul elkezd szólni,és a riasztójelző gyorsan villog.Amikor a füst
sűrűsége csökken, a tesztgombnak nincs hatása.Ha a füst sűrűsége csökken a
riasztási küszöb alá, a tesztelési gomb lenyomásával az érzékelő belép a teszt
üzemmódba. 10 perc után az érzékelő automatikusan visszatér a normál működési
állapotba.
3. Együtt használva egy riasztórendszerrel : amikor az érzékelő egy vezeték
nélküli riasztórendszerhez van kapcsolodva lenyomva a tesztelési gombot riasztást küld
a rendszer központi egységére.
Az érzékelő riasztórendszerbe történő programozásához, nyomják le
hosszasan a tesztelési gombot amikor a rendszer központi egységének eszköz-
tanulási módban van.
5. Ellenőrzés meghibásodás esetén:
Ÿha az érzékelő buzzer-je egy rövid hangod ad le 40 másodpercenként együtt a
riasztójelző villogásával , ez azt jelent, hogy az elem lemerült és ki kell cserélni.
Ÿha az érzékelő buzzer-je 2 rövid hangot ad le 40 másodpercenként együtt a
riasztójelző 2 villogásával , ez azt jelenti, hogy a fotoelektronikus infravörös érzékelő
meghibásodott. Ebben az esetben kérjük forduljanak egy helyi szolgáltatóhozI. Ne
próbálja meg eltávolítani vagy javítani az érzékelőt, hogy elkerülje az egyéb
eseményeket.
Megjegyzés:
ŸTisztítsa meg az érzékelő felülelét egy puha ronggyal félévente, hogy biztosítson egy
jó minöségű érzékenységet. Kérjük távolítsák el az elemet mielőtt elkezdik takaritani
a készüléket.
ŸHa hosszabb ideig nem használja az érzékelőt, távolítsa el a mennyezetről, vegye ki
az elemet és tartsa hűvös, száraz helyen.
ŸA füstérzékelő csökkentheti a katasztrófa mértékét de nem garantálja a 100% -os
biztonságot.
HU

3
Wireless smoke detector PNI A023
User manual
Introduction
This product is a photoelectronic wireless skoke detector. With a unique design
and an inteligent control unit, the detector is immune to dust particles and white light
interferences thus ensuring it’s stability.
You can use this detector within a wireless alarm system or by itself for local
alarming.
The detector detects very fast smoke from smothering fire or open flames, and it
can be used in the house, office, malls, hotels, restaurants, schools, banks, libraries,
warehouses, etc.
Product description
Features
ŸWireless connection to an alarm system or independent use
ŸManual testing
ŸAutomatic reset after smoke clears
ŸInfrared photoelectronic sensor
ŸVisual and sound alarm
ŸHigh stability
ŸDust particles and white light interferences immunity
ŸUse only indoor
Technical specifications:
ŸWireless communication frequency: 433 MHZ
ŸPower: 9V battery
ŸPower consumption: standby: ≤ 10 uA / alarm state: ≤ 20 mA
ŸAlarm indicator: red LED
ŸAlarm sound level: ≥ 85dB/m
ŸDetection area: up to 20mp
ŸWireless communication distance: up to 100m in open space
ŸWorking themperature: -10 ~ 50 °C
ŸSize/weight: 105 x 30 mm / 125 g (battery included)Ø
LED indicator
/ Test button
EN

4
Installing instructions
1. Avoid installing the detector in spaces with permanent smoke, a lot of dust, oil, high
humidity or strong wind (>5m/s)
2. Choose the right position for the detector, generally in the center of the ceiling of the
chosen space. Mount the detector base in the chosen position.
3. Insert and connect the battery in the detector.
4. Fix the detector in it’s base.
5. Carry out a manual test to check the detector.
Operating instructions
1. Sensitivity testing: the detector should be tested periodically to assure normal
operation ( once per month is recommended). Press and hold the
TEST button for more than 1s for the detector to enter into testing status. If the alarm
indicator flashes rapidly and the buzzer gives an alarm sound, then the detector works
properly.
2. Alarm and silence buzzer function: when smoke density in reaches the alarm
threshold of the detector, the buzzer gives out alarm sound and the alarm indicator
flashes rapidly. At this time, pressing the test button will make the detector enter into
mute status that lasts for 10 minutes. During this period, the indicator flashes once every
10s and if the density is still higher than the threshold, the test button is nonfunctional.
When the smoke density goes below the threshold, pressing the test button will activate
the detector to perform the testing operation. After the 10 minutes the detector recovers
automatically to normal working status .
3. Working with a wireless alarm system: if the detector is connected to a
wireless alarm system press the test button and the detector will send out an alarm
signal. To program the detector into a wireless alarm system, press the test button
when the alarm system is in the learning mode.
5. Malfunction check:
Ÿif the buzzer gives out a short sound every 40s with the alarm indicator flashing once,
it means that the battery is low and you have to replace it.
Ÿif the buzzer gives out a two short sounds every 40s with the alarm indicator flashing
twice, the infrared photo-electronic sensor has a malfunction. In this case please
contact your local dealer. Do not attempt to remove and repair the detector personally
to prevent incidents.
Note:
ŸClean the detector surface with soft bristled brush every 6 months to ensure the
detecting sensitivity. Remember to remove the battery before cleaning.
ŸIf the detector is not used for a long time, uninstall the detector, take out the battery
and store it in a cool and dry place.
ŸThe smoke detector can reduce the happening rate of disasters but it can not
guarantee your safety.
EN
Other manuals for A023
1
Table of contents
Languages:
Other PNI Smoke Alarm manuals