Polar Metalli mypizza User manual

FI: KÄYTTÖOHJE
EN: USER MANUAL
DE: GEBRAUCHSANLEITUNG
NL: GEBRUIKERSHANDLEIDING
IT: ISTRUZIONI PER L’USO

1 2 3
4
5 6
7
8
9

Kiitos, kun ostit kotimaisen MyPizzan!
Lue nämä ohjeet huolella ennen tuotteen käyttöä.
Käytä MyPizza-uunia aina palamattomalla alustalla ja
vähintään kahden metrin päässä rakennuksista. Avaa
MyPizza-uunin luukkkua vain, kun laitat uuniin pizzaa
tai otat pois; muulloin luukun tulee olla
suljettuna.
1. Nosta syöttöputkea.
2. Ota polttokaukalo pois uunista.
3. Täytä polttokaukalo pelleteillä.
Käytä vain laadukkaita puupellettejä:
laatuluokka 1, EN-koodi A1!
4. Täytä polttokaukalo niin, että polttokaukalon keski-
kolmiosta jää ilmarakoja näkyviin kuvan mukaisesti ja
syöttöputki pääsee laskeutumaan alimpaan asentoonsa.
5. Levitä sytytysgeeliä pellettien päälle molemmille
laidoille ja sytytä geeli.
6. Aseta polttokaukalo uunin sisälle, ja laita pelletti-
kauha takaisin syöttöputken päälle. Anna pellettien
palaa vapaasti noin 10 minuuttia. Älä koske enää tämän
jälkeen polttokaukaloon! Tarkista, että etuluukku on
suljettu.
7. Kun pelletit ovat palaneet noin 10 min ja syttyneet
kunnolla, laske syöttöputki aivan alimpaan asentoon ja
täytä syöttöputki pelleteillä. Kun putki on täynnä, nosta
putkea noin sentti. Anna uunin lämmetä noin 20-30 mi-
nuuttia. Lisää pellettejä syöttöputkeen aina tarvittaessa.
Vinkki: Lämpötilan säätöä on hyvä harjoitella. Älä nosta
syöttöputkea liikaa; muuten uuni kuumenee liikaa. Läm-
pötila pysyy sitä matalampana, mitä alempana syöttö-
putki on.
8. Levitä jauhoja pizzalapiolle ja ota pizza pizzalapion
päälle. Aluksi kannattaa käyttää reilummin jauhoja, jotta
oppii saamaan pizzan uuniin.
Vinkki: Kokeile karkeita vehnäjauhoja pizzalapiolle ja
pohjan alle. Karkeat jauhot eivät imeydy niin helposti
taikinaan, ja pizza liikkuu hyvin niiden päällä.
9. Aseta pizza paistumaan uuniin ja sulje luukku.
Pidä luukku suljettuna myös paiston aikana. Avaa se
vain, kun käännät pizzaa tai olet laittamassa pizzan
uuniin tai ottamassa sen pois. Paista pizzaa 2-5 minuut-
tia. Seuraa paistumista liekkilogon reiästä, ja käännä
pizzaa pizzalapion avulla paistumisen aikana 2-3 kertaa
niin, että pizza kypsyy tasaisesti joka puolelta. Käännet-
täessä pizzaa ota pizza pizzalapion päälle, käytä vähän
ulkona uunista ja käännä pizzaa pizzalapion päällä.
Aseta pizza takaisin uuniin ja sulje luukku.
Vinkki: Pizza kypsyy nopeammin syvemmällä uunissa ja
vastaavasti hitaammin lähempänä luukkua.
10. Ota pizza uunista ja paista seuraava!
11. Sammuttaminen: Anna pellettien palaa loppuun
luukku suljettuna ja pellettikauha paikoillaan. Kun
luukusta katsottuna ei näy enää liekkiä, voit todeta
hiilloksen sammumisen kurkkaamalla syöttöputkesta
polttokaukaloon.
MyPizzan parhaat vinkit
Luukun pitäminen auki saattaa aiheuttaa pellettien
turpoamisen.
Pidä pelletit aina lämpimissä sisätiloissa, muuten ne ke-
räävät kosteutta ja turpoavat syöttöputkeen laitettaes-
sa. Jos pelletit turpoavat, ne eivät mene palotilaan ja tuli
sammuu. Kosteutta keränneet pelletit eivät myöskään
lämmitä yhtä tehokkaasti.
Ilman suhteellinen kosteus voi vaikuttaa pellettien tur-
poamiseen. Jos syöttöputki tukkeutuu eivätkä pelletit
kulkeudu alaspäin, avaa syöttöputken kansi ja työnnä
pelletit eteenpäin syöttöputkessa tarpeeksi pitkän ke-
pin avulla. Tukkeutumista voi myös ehkäistä lisäämällä
pellettejä vähemmän kerrallaan.
Puhdista MyPizza-uuni käytön jälkeen, kun uuni on
jäähtynyt. Nosta syöttöputkea sen verran, että saat
polttokaukalon pois, kaada vanhat tuhkat pois ja puhdis-
ta polttokaukalon ilma-aukot. Ota paistokivi ulos ja pese
se.
MyPizza-uuni vaihtaa kuumuessaan väriä, ja teräs myös
taipuilee lämmön seurauksena. Nämä ovat tavallisia
ominaisuuksia teräkselle.
Vesi voi vahingoittaa kuumaa uunia.
VAROITUS: Uunin kaikki pinnat puukahvoja lukuunot-
tamatta ovat kuumia käytön aikana, joten älä koske
niihin.
TAKUU: MyPizzalla on 1 vuoden takuu ostopäivästä.
Takuu ei kuitenkaan koske pizzakiveä/vuolukiveä, koska
luonnonkivelle ei voida antaa kestävyystakuuta.
Lisätietoja:
www.mypizzamoments.com
Seuraa MyPizzaa sosiaalisessa mediassa:
Facebook: @MyPizzaMoments
Instagram: @MyPizzaMoments
Youtube: MyPizza
FI

1 2 3
4
5 6
7
8
9

Thank you for purchasing MyPizza from Lapland!
Read instructions carefully before using the product.
Always use MyPizza oven on a non-fl ammable surface
and at least two metres away from any buildings. Only
open the oven door when placing pizza into the oven
or when taking it out. Otherwise, keep the oven door
closed.
1. Lift the pellet hopper.
2. Take out the grate.
3. Fill the grate with pellets.
Use wood pellets suitable for barbeque (European
standardisation EN class A1)
4. Fill the grate so that you can still see the air circula-
tion holes in the middle as shown in the picture. This
enables you to lower the pellet hopper to its lowest
position.
5. Pour ethanol gel on pellets on both sides of the grate
and light the pellets.
6. Place the grate inside the oven, and put the pellet
shovel to its place on the pellet hopper. Let the pellets
burn freely for about 10 minutes. Do not touch the grate
after this. Make sure you have the oven door closed.
7. After letting the pellets burn for about 10 minutes,
lower the pellet hopper to its lowest position possible
and fi ll in the pellet hopper with pellets. When the pellet
hopper is full, lift the pellet hopper about 1 cm upwards.
Let the pizza oven heat up for about 20 to 30 minutes.
Add pellets when needed.
Hint: It takes some time to learn how to adjust the
temperature in a most effective way. Do not lift the
pellet hopper too high, as the oven might get too hot.
The lower the pellet hopper, the lower the temperature.
8. Sprinkle some fl our on the pizza paddle and place
your pizza on the paddle. You might like to use more
fl our at fi rst, to make it easier to place the pizza into the
oven.
Hint: Try using rough fl our on the pizza paddle and
under the pizza. Rough fl our does not get absorbed into
the pizza dough, and the pizza can be moved easily.
9. Use the pizza paddle to place the pizza inside the
oven. Close the oven door. Keep the door closed while
baking the pizza. Open the door only while rotating the
pizza or when placing it inside or taking it out. Bake the
pizza for about 2 to 5 minutes the oven door closed. You
can look through the fl ame logo to see how the pizza is
getting baked. Rotate the pizza 2 to 3 times during the
baking, so that the pizza gets evenly baked on all sides.
When rotating the pizza, put the pizza on the paddle,
take it out of the oven and rotate the pizza on the
paddle. Put the pizza back into the oven and close the
oven door.
Hint: The pizza gets baked quicker deeper inside the
oven and more slowly near the oven door.
10. Take your pizza out of the oven and bake the next
one!
11. Turning off: Let all the pellets burn with the oven
door closed and the pellet shovel on its place. If you
cannot see any fl ames when you look inside the oven
door, also check the pellet hopper to make sure the fi re
is gone.
General Advice and Hints
Store the pellets in a warm and dry place; otherwise
they might get damp and swell. If the pellets are damp,
they will not burn and the fi re will go out. Pellets that
have absorbed moisture might not heat as effectively.
The relative humidity might cause swelling of pellets.
If the pellets are stuck in the pellet hopper, use a long
enough stick to push the pellets downwards in the pellet
hopper. You can prevent clogging by using less pellets in
the pellet hopper.
Always clean MyPizza after use, after the oven has
cooled down. Lift the pellet hopper so that you can take
the grate out, remove the ashes and clean up the air
ventilation holes of the grate. Remove the baking stone
and wash it.
MyPizza oven changes colour when hot, and the stain-
less steel might bend. These are normal features of
stainless steel.
Water can damage a hot pizza oven.
WARNING: All the surfaces of the oven excluding the
wooden handles will become hot when the oven is in
use. Do not touch the hot steel.
WARRANTY: 1 year. Please note: The warranty does
NOT cover the Baking Stone/the soapstone, because
natural stone can’t be durability-guaranteed.
More information:
www.mypizzamoments.com/en
Follow MyPizza:
Facebook: @MyPizzaMoments
Instagram: @MyPizzaMoments
Youtube: MyPizza
EN

1 2 3
4
5 6
7
8
9

Danke, dass Sie sich für MyPizza entschieden haben!
Bitte lesen Sie vor dem Gebrauch die Bedienungs-
anleitung durch.
Verwenden Sie den MyPizza-Ofen immer auf einer
nicht brennbaren Oberfl äche und in mindestens zwei
Metern Entfernung von Gebäuden. Bitte halten Sie die
Ofenklappe geschlossen, während die Pizza im Ofen
ist. Öffnen Sie die Türe nur, wenn Sie die Pizza inner-
halb des Ofens drehen oder neuplatzieren wollen und
um sie am Ende herauszunehmen.
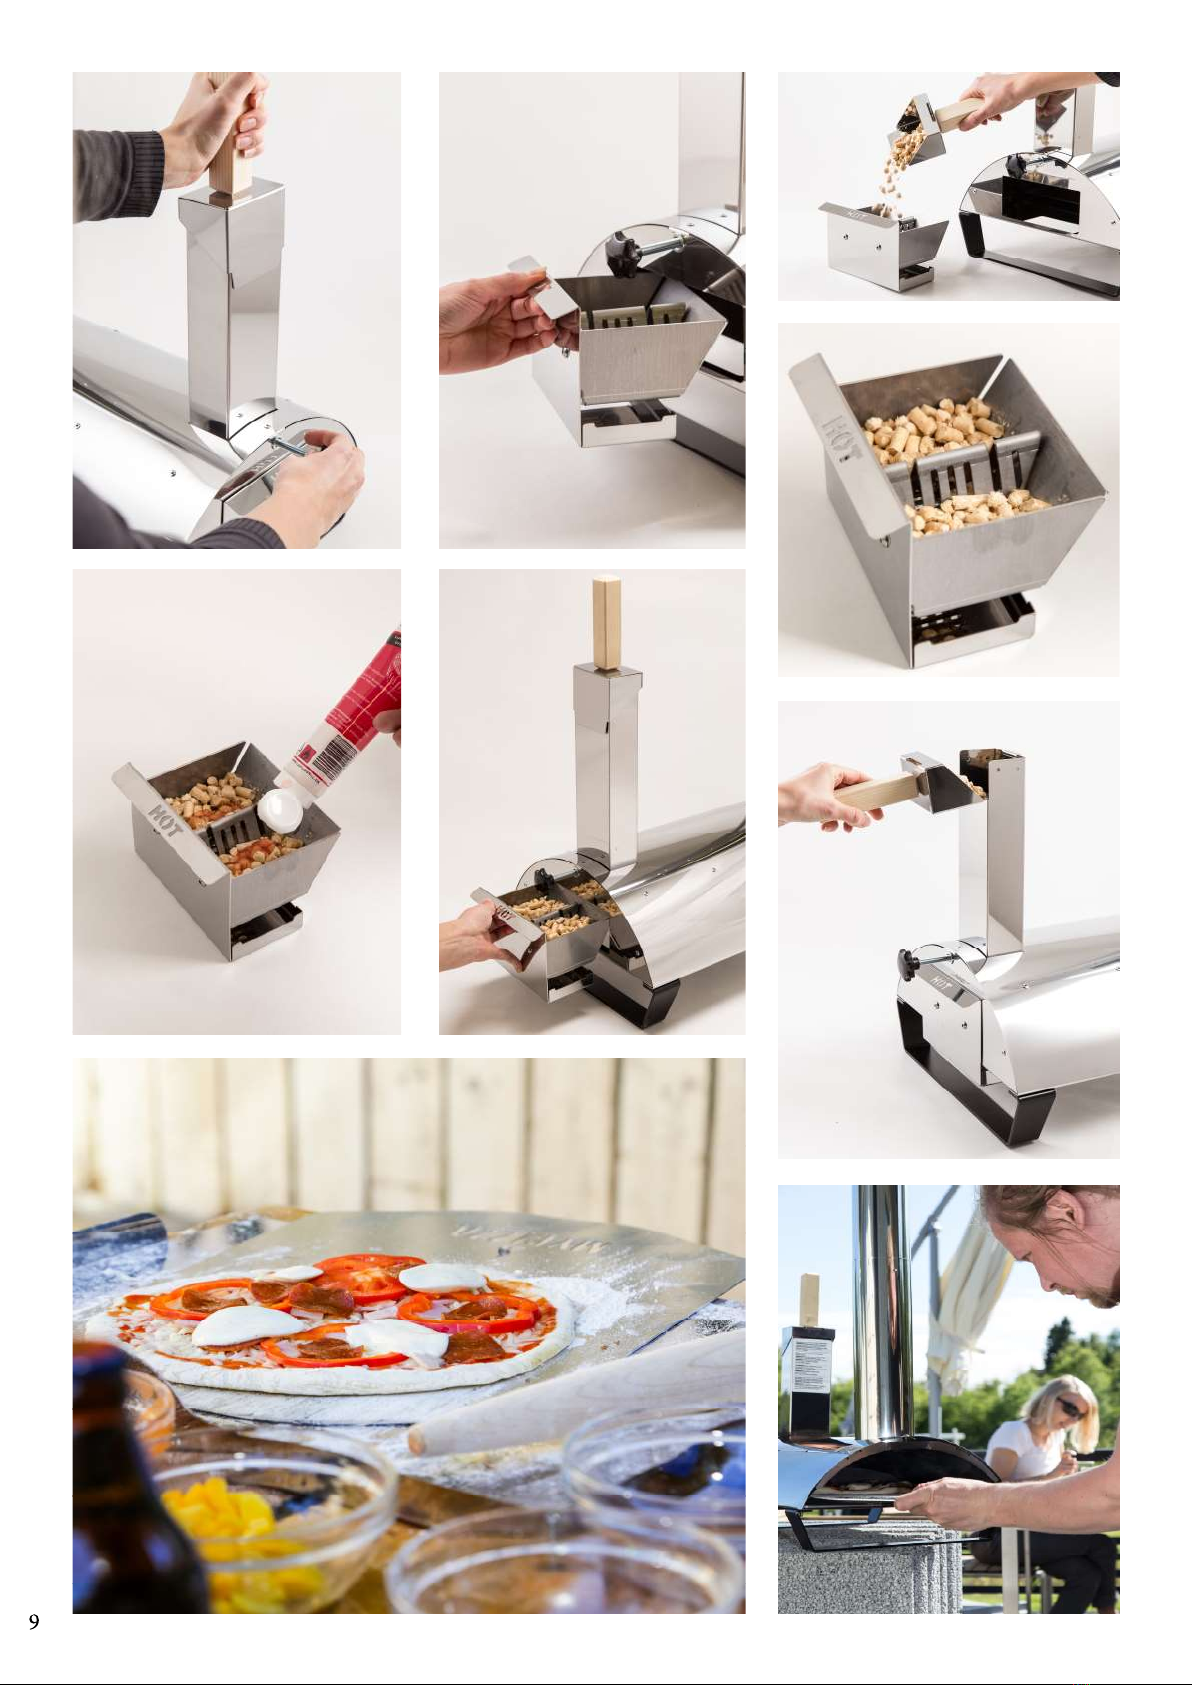
1. Heben sie das Zuführungsrohr hoch.
2. Nehmen Sie den Feuerrost aus dem Ofen.
3. Füllen Sie den Feuerrost mit Pellets.
Verwenden Sie Holzpellets, die sich für Barbecue
eignen (Europäische Norm EN Klasse A1)
4. Füllen Sie den Feuerrost so, dass Sie die Löcher für die
Luftzirkulation in der Mitte noch sehen können, wie im
Bild. Dies ermöglicht es Ihnen, das Zuführungsrohr in
seine niedrigste Position zu senken.
5. Tragen Sie auf beiden Seiten des Feuerrosts
Ethanol-Gel auf den Pellets auf und setzen Sie die
Pellets in Brand.
6. Schieben Sie den Feuerrost in den Ofen und
platzieren Sie die Pelletschaufel an ihrem Platz auf dem
Zuführungsrohr. Lassen Sie die Pellets circa 10 Minuten
lang frei brennen. Berühren Sie danach den Feuerrost
nicht mehr.Stellen Sie sicher, dass die Ofentür gut ver-
schlossen ist.
7. Nachdem die Pellets circa 10 Minuten lang gebrannt
haben, senken Sie das Zuführungsrohr in die niedrigste
mögliche Position und füllen Sie das Zuführungsrohr mit
Pellets. Wenn das Zuführungsrohr voll ist, heben Sie das
Zuführungsrohr circa 1 cm hoch. Lassen Sie den
Pizzaofen circa 20 bis 30 Minuten warm werden. Fügen
Sie bei Bedarf Pellets hinzu.
Hinweis: Es braucht etwas Zeit, um zu lernen, wie die
Temperatur am wirksamsten eingestellt wird. Heben Sie
das Zuführungsrohr nicht zu hoch an, da der Ofen sonst
zu heiß werden kann. Je niedriger das Zuführungsrohr,
desto niedriger die Temperatur.
8. Streuen Sie etwas Mehl auf die Pizzaschaufel und
legen Sie Ihre Pizza auf die Schaufel. Zu Beginn
empfi ehlt es sich, mehr Mehl zu verwenden, damit es
leichter ist, die Pizza in den Ofen zu befördern.
Hinweis: Testen Sie die Verwendung von grobem Mehl
auf der Pizzaschaufel und unter der Pizza. Grobes Mehl
wird nicht vom Pizzateig absorbiert und die Pizza kann
leicht bewegt werden.
9. Verwenden Sie die Pizzaschaufel, um die Pizza in den
Ofen zu befördern. Schließen Sie die Ofenklappe. Bitte
halten Sie die Türe geschlossen, während die Pizza im
Ofen ist. Öffnen Sie die Türe nur, wenn Sie die Pizza
drehen oder um sie am Ende herauszunehmen. Backen
Sie die Pizza circa 2 bis 5 Minuten lang mit ge-
schlossener Ofenklappe. Sie können durch das
Flammenlogo beobachten, wie die Pizza gebacken wird.
Drehen Sie die Pizza 2- bis 3-mal, damit sie auf allen
Seiten gleichmäßig gebacken wird. Wenn Sie die Pizza
drehen, geben Sie die Pizza auf die Schaufel, nehmen
Sie sie aus dem Ofen und drehen sie die Pizza auf der
Schaufel. Schieben Sie die Pizza zurück in den Ofen und
schließen Sie die Ofenklappe.
Hinweis: Die Pizza wird tiefer im Ofen schneller
gebacken und in der Nähe der Klappe langsamer.
10. Nehmen Sie Ihre Pizza aus dem Ofen und backen Sie
die nächste!
11. Abschalten: Lassen Sie die Pellets bei geschlossener
Ofenklappe und mit der Pelletschaufel an ihrem Platz
ausbrennen. Wenn Sie keine Flammen sehen, wenn Sie
durch die Ofenklappe schauen, kontrollieren Sie auch
das Zuführungsrohr, um sicherzustellen, dass das Feuer
erloschen ist.
Allgemeine Hinweise und Tipps
Lagern Sie die Pellets an einem warmen und
trockenen Ort, ansonsten können Sie feucht werden
und aufquellen. Wenn die Pellets feucht sind, brennen
sie nicht und das Feuer erlischt. Feuchte Pellets werden
nicht so effektiv erhitzt.
Die Luftfeuchtigkeit kann das Aufquellen von
Pellets beeinfl ussen. Falls die Pellets im Zuführungsrohr
stecken bleiben, können Sie die Pellets mit einem langen
Stock runter schieben. Sie können weniger Pellets im
Zuführungsrohr benutzen, um Blockierung zu
verhindern.
Reinigen Sie den MyPizza-Ofen immer nach dem Ge-
brauch, wenn der Ofen ausgekühlt ist. Heben Sie das
Zuführungsrohr, so dass Sie den Feuerrost heraus-
nehmen können, entfernen Sie die Asche und reinigen
Sie die Löcher für die Luftzirkulation im Feuerrost.
Entfernen Sie die Backplatte und waschen Sie sie.
Der MyPizza-Ofen wechselt die Farbe, wenn er heiß
wird, und der rostfreie Stahl kann sich verbiegen. Dies
sind normale Eigenschaften von rostfreiem Stahl.
Wasser kann den Pizzaofen beschädigen, wenn er heiß
ist.
WARNUNG : Alle Oberfl ächen des Ofens mit Ausnahme
der Holzgriffe werden heiß, wenn der Ofen in Gebrauch
ist. Berühren Sie den heißen Stahl nicht.
GARANTIE: 1 Jahr. Die Garantie gilt sowieso nicht für
den Pizzastein des MyPizzas.
Weitere Information:
www.mypizzamoments.com/de
Verfolgen Sie MyPizza in den sozialen Medien :
Facebook & Instagram: @MyPizzaMoments
Youtube: MyPizza
DE

1 2 3
4
5 6
7
8
9

Bedankt voor uw aankoop van de MyPizza oven!
Lees de instructies altijd aandachtig voordat u het
product gebruikt.
Gebruik uw MyPizza oven altijd op een niet-brandbaar
oppervlak en ten minste twee meter uit de buurt van
gebouwen. Open enkel de ovendeur wanneer u een
pizza in de oven plaatst of eruit haalt, laat verder de
ovendeur gesloten.
1. Verwijder de pellet schep.
2. Haal de houtpellet container uit de oven.
3. Vul de container met houtpellets.
Gebruik alleen houtpellets welke geschikt zijn voor
een barbecue (de Europese standaardisatie EN klasse
A1)
4. Vul de voorraad container zodanig dat de luchtcircu-
latie gaten in het midden zichtbaar blijven (zie foto). Dit
maakt het mogelijk om de pellet trechter op de laagste
stand te plaatsen.
5. Voeg een klein beetje ethanolgel toe op de
houtpellets, doe dit aan beide zijden van de container,
steek de ethanolgel aan.
6. Plaats de container in de oven en zet de pellet schep
op zijn plaats. Laat de houtpellets ongeveer 10 minuten
vrij branden. Raak de container tijdens het branden
niet aan, deze wordt tijdens gebruik heet! Zorg dat de
ovendeur gesloten is.
7. Wanneer de oven ongeveer 10 minuten vrij brand,
plaats dan de pellet schep tot de laagst mogelijke positie
en vul de container van bovenaf met houtpellets.
Wanneer de container volledig is gevuld, til dan de pel-
let trechter ongeveer 1 cm omhoog. Laat de pizzaoven
gedurende 20 tot 30 minuten opwarmen. Vul de
container bij met houtpellets wanneer dit nodig is.
Tip: Het verreist enige tijd om op de meest effectieve
manier te leren hoe de temperatuur kan worden
aangepast. Til de pellet trechter niet te hoog, de oven
kan dan te warm worden. Hoe lager de pellet schep, hoe
lager de temperatuur.
8. Strooi wat bloem op de pizzaschep en schuif uw pizza
op de pizzaschep. Wanneer je de eerste keer iets meer
bloem gebruikt plaats u de pizza gemakkelijker op de
plaats in de oven.
Tip: Strooi wat bloem op de pizzaschep en onder de
pizza. Bloem wordt niet geabsorbeerd in het pizzadeeg,
hierdoor kan de pizza gemakkelijk worden verplaatst.
9. Gebruikt de pizzaschep om de pizza in de oven te
plaatsen. Sluit hierna de ovendeur. Houdt de ovendeur
gesloten tijdens het bakken van de pizza, open deze
enkel om de pizza rond te draaien en voor het plaatsen
en uitnemen van de pizza. Bak de pizza in ongeveer
2 tot 5 minuten met een gesloten ovendeur. Door het
MyPizza logo van de ovendeur kunt u kijken hoe uw
pizza wordt gebakken. Draai de pizza 2-3 maal zodat
de pizza gelijkmatig en rondom wordt gebakken. Bij het
draaien van de pizza schuift u de pizza op de pizzaschep,
haalt u de pizza uit de oven en draait u de pizza op de
pizzaschep. Leg hierna de pizza weer terug in de oven en
sluit de ovendeur.
Tip: De pizza wordt sneller gebakken wanneer deze
dieper in de oven wordt gelegd en langzamer in de buurt
van de ovendeur.
10. Haal de pizza uit de oven en bak de volgende!
11. Uitdoen: Laat de houtpellets uitbranden met de
ovendeur gesloten en de pellet schep op zijn plaats.
Wanneer u door de ovendeur heen kijkt en geen
vlammen meer ziet, kijk dan ook in de pellet trechter
om er zeker van te zijn dat het vuur gedoofd is.
Algemeen advies en tips:
Bewaar de houtpellets in een warme en droge plaats.
Als de pellets vochtig zijn, zullen ze niet branden en het
vuur zal dan worden gedoofd. Pellets die vocht
hebben geabsorbeerd verwarmen mogelijk niet
effectief genoeg.
Vocht kan leiden tot zwelling van de houtpellets. Als
de pellets vastzitten in de pellet container, gebruik dan
een lange stok om de pellets naar beneden te duwen in
de pellet trechter. U kunt verstopping voorkomen door
minder pellets in de pellet trechter te deponeren.
Maak de MyPizza oven altijd na gebruik weer netjes
schoon. Doe dit nadat de oven volledig is afgekoeld. Til
de pellet trechter omhoog en neem de container uit de
oven, verwijder de as en maak de luchtcirculatiegaten
schoon. Verwijder het bakplateau en was deze af.
De MyPizza oven zal na verloop van tijd veranderen van
kleur en het RVS zou kunnen buigen, dit komt door de
warmte van de oven. Dit is normaal bij het gebruiken
van rvs.
Water kan een hete pizzaoven beschadigen.
WAARNING: Alle oppervlakken van de oven, met
uitzondering van de houten handvaten, worden warm
wanneer de oven in gebruik is. Raak nooit de oven aan
tijdens gebruik!
GARANTIE: 1 jaar. Let op: de garantie is NIET van
toepassing op de spekstenen bakplaat, omdat natuurs-
teen niet gegarandeerd duurzaam hoeft te zijn.
Meer informatie:
www.mypizzamoments.com/en
Volg MyPizza:
Facebook & Instagram: @MyPizzaMoments
Youtube: MyPizza
NL

1 2 3
4
5 6
7
8
9

Grazie per aver acquistato MyPizza!
Leggere attentamente le istruzioni prima di utilizzare il
prodotto.
Usa sempre il forno MyPizza su una superfi cie non
infi ammabile e ad almeno due metri di distanza dagli
edifi ci. Aprire la porta del forno solo quando si mette
o si toglie la pizza dal forno, altrimenti tenere la porta
del forno chiusa.
1. Apri il serbatoio pellet.
2. Estrai la griglia.
3. Riempi la griglia di pellet.
Usa pellet in legno adatti al barbecue (standard
europeo EN classe A1)
4. Riempi la grata assicurandoti che i fori per la circo-
lazione dell’aria centrali siano liberi e visibili (come in
fi gura). Questo permetterà di abbassare al massimo il
serbatoio pellet.
5. Spargi il gel di etanolo sui pellet da entrambi i lati della
griglia e accendi i pellet.
6. Posiziona la grata nel forno e riporre la paletta per
pellet nell’apposita posizione sul serbatoio pellet. Lascia
bruciare liberamente i pellet per circa 10 minuti. Non
toccare la grata. Assicurarsi di aver chiuso bene la porta
del forno.
7. Dopo aver lasciato bruciare i pellet per circa 10
minuti, abbassa al massimo il serbatoio pellet e riempi
nuovamente il serbatoio di pellet. Quando sarà pieno,
solleva di circa 1 cm il serbatoio. Lascia scaldare il forno
per 20 o 30 minuti. Se necessario, aggiungi altri pellet.
Consiglio: Ci vuole tempo per imparare a regolare la
temperatura in modo effi ciente. Non sollevare troppo
il serbatoio, o il forno potrebbe diventare troppo caldo.
Più basso è il serbatoio, più bassa sarà la temperatura
del forno.
8. Spargi della farina sulla pala, quindi posizionaci sopra
la tua pizza. Usa più farina per far scivolare più facilmen-
te la pizza nel forno.
Consiglio: Prova a usare farina grezza (semola) sulla
pala e sotto la pizza. La farina grezza non viene assorbita
dall’impasto e permette di spostare la pizza più facil-
mente.
9. Usa la pala per posizionare la pizza nel forno, quindi
chiudi lo sportello del forno. Temere chiusa la porta del
forno durante la cottura della pizza. Aprire la porta
solamente per ruotare, mettere o togliere la pizza dal
forno. Cuoci la pizza per 2-5 minuti con lo sportello
chiuso. Puoi osservare la cottura attraverso il logo a
fi amma. Ruota la pizza 2 o 3 volte nel forno per assi-
curarti che venga cotta uniformemente. Per ruotare la
pizza, raccoglila con la pala, estraila, ruotala e inseriscila
nuovamente nel forno.
Consiglio: La pizza si cuoce più velocemente sul fondo
del forno e più lentamente vicino allo sportello.
10. Tira fuori la tua pizza dal forno e prepara la
successiva!
11. Per spegnere il forno: Lascia bruciare tutti i pellet
rimasti tenendo lo sportello chiuso e la paletta per pellet
in posizione. Quando non vedi più fi amme guardando
nello sportello del forno, controlla il serbatoio pellet per
assicurarti che il fuoco sia completamente spento.
Altri avvisi e consigli:
Conserva i pellet in un luogo tiepido e asciutto per evita-
re che l’umidità li renda gonfi e bagnati. Se i pellet sono
bagnati non bruceranno e il fuoco si spegnerà. I pellet
che hanno assorbito umidità potrebbero non riscaldare
in modo effi cace.
L’umidità può causare gonfi ore del pellet. Se i pellet sono
bloccati nel serbatoio, utilizzare un utensile abbastanza
lungo per spingerlo verso il basso del serbatoio. Per evi-
tare l’intasamento utilizzare meno pellet nel serbatoio.
Pulisci con cura MyPizza dopo ogni utilizzo, quando
il forno si è raffreddato. Solleva il serbatoio per poter
estrarre la grata, rimuovi la cenere e pulisci i fori di ven-
tilazione. Rimuovi la pietra refrattaria e lavala.
Il forno MyPizza cambia colore quando è incandescente
e l’acciaio inossidabile potrebbe deformarsi. Si tratta del
normale comportamento dell’acciaio inossidabile.
Usare acqua sul forno caldo potrebbe danneggiarlo.
Tutte le superfi ci del forno, escluse le maniglie, divente-
ranno incandescenti mentre il forno è in funzione. Non
toccare l’acciaio incandescente.
ATTENZIONE: Tutte le superfi ci del forno, con
l’eccezione della maniglia dello sportello anteriore e di
quelle in legno, diventano roventi durante l’utilizzo. Non
toccare!
GARANZIA: Tutte le parti del Forno MyPizza sono
garantite per un anno contro i difetti di fabbrica. La
garanzia non si applica alle pietre refrattarie, che sono
fatte di materiali reperiti in natura, e la cui durata non
può essere garantita.
Per maggiori informazioni:
www.mypizzamoments.com/en
Seguici sui nostri social:
Facebook & Instagram: @MyPizzaMoments
Youtube: MyPizza
IT

Safety and Legal Disclaimer
Before assembling, installing and using MyPizza, please read the following legal disclaimer. Failure to comply with
these provisions may result in property damage, personal injury or even death.
• MyPizza is for outdoor use only. Never use MyPizza in an enclosed space. Check local laws and regulations for
specifi ed distance requirements between outdoor cookers and structures.
• MyPizza is not intended for and should never be used as a heater.
• Always place MyPizza on a sturdy and non-fl ammable surface away from any structures.
• Do not use MyPizza until it is fully assembled with all parts securely fastened.
• Keep MyPizza away from fl ammable or combustible materials, liquids and vapours.
• Do not add lighter fl uid/lighter gel on hot pellets.
• Always keep the oven door closed except when placing pizza into the oven or when taking one out.
• Please notice that fl ames can also blow from the oven door or from the back where the pellet grate is, or from
the top of the chimney. Flames can also blow from the top of the pellet hopper when the lid is opened.
• Toxic fumes can accumulate and may cause asphyxiation.
• When in use, MyPizza can reach up to 1040°F (560 °C). All metal surfaces will become hot when the oven is in
use. Do not touch the hot surfaces. Skin contact with hot metal surface can cause burns.
• Always use protective heat resistant gloves when handling MyPizza.
• Never leave MyPizza unattended when in use.
• MyPizza is to be used by responsible adults only. Always keep children and pets away from MyPizza.
• Do not use MyPizza in heavy wind.
• Keep electrical cords away from MyPizza.
• Do not attempt to move MyPizza when it is in use or still hot.
• Always clean MyPizza after use. Before cleaning it, make sure that it has cooled down properly. MyPizza will
remain hot for some time even after visible fl ames have died down. Allow minimum of 60–90 minutes for it to
cool down.
• Do not cover, move or store MyPizza until it has cooled down properly. Also make sure that all fi re and glowing
embers are gone from the burner before storing it.
• MyPizza is safe to use when used as intended and according to safety guidelines. It is the user’s responsibility to
maintain safe operation of MyPizza and to exercise reasonable standards of care at all times.
POLAR METALLI OY DOES NOT ACCEPT ANY RESPONSIBILITY, LEGAL OR OTHERWISE, FOR THE
INCIDENTAL OR CONSEQUENTIAL DAMAGE TO PROPERTY OR PERSONS RESULTING FROM THE USE OF
MYPIZZA WHICH DOES NOT OR DID NOT COMPLY WITH THE PROVISIONS OF THIS LEGAL DISCLAIMER.
POLAR METALLI OY SHALL IN NO EVENT BE LIABLE FOR ANY INDIRECT, SPECIAL, CONSEQUENTIAL OR
OTHER DAMAGES OF ANY NATURE WHATSOEVER IN EXCESS OF THE ORIGINAL PURCHASE PRICE OF
MYPIZZA.

Reseptejä / Recipes / Rezepte
FI: Yön yli kohonnut pizzataikina
(5 pizzapohjaa)
Taikinan kohottaminen kylmässä yön yli antaa pohjalle ainutlaatuisen, syvän maun. Valmista taikina 1–2 päivää
ennen pizzan tarjoamista.
Ainekset
500 g vehnäjauhoja
3,2 dl vettä
2 tl suolaa
5 g kuivahiivaa
2 rkl oliiviöljyyä
Valmistusohjeet
1. Sekoita keskenään jauhot, suola ja kuivahiiva. Lisää jauhoseos kädenlämpöiseen veteen. Lisää viimeisenä öljy.
2. Alusta noin 10 minuuttia, kunnes taikina on kimmoisaa. Yleiskoneella saat parhaan lopputuloksen.
3. Anna taikinan kohota liinan alla tai kannellisessa kulhossa 20 minuuttia. Kun taikina on kohonnut hieman, laita
taikina kohoamaan jääkaappiin. Anna kohota jääkaapissa 1–2 vuorokautta.
4. Ota taikina lämpenemään noin tunti ennen leipomista. Jaa taikina viideksi pienemmäksi palloksi. Venytä tai kauli
taikinapalat ohuiksi pizzapohjiksi.
Levitä päälle haluamasi täytteet ja paista!
EN: Overnight Pizza Dough
(5 pizza bases)
Letting the dough rise overnight in a cool place gives the base a unique, deep fl avour. Prepare the dough 1–2 days
before serving pizza.
Ingredients
500 g wheat fl our
3,2 dl water
2 tsp salt
5 g dry yeast
2 tbsp olive oil
Method
1. Combine fl our, salt and yeast in a bowl. Add the fl our mixture to lukewarm water. Add olive oil.
2. Knead for about 10 minutes, until it becomes slightly tacky. Using a stand mixer will help you to reach the optimal
result.
3. Let the dough rest and rise for 20 minutes, under a cloth or in a covered bowl. When the dough has risen slightly,
put it in the fridge. Let rise in the fridge for 1–2 days.
4. Take the dough out of the fridge about an hour before baking. Divide into 5 equal pieces. Place a dough ball on a
fl oured surface and stretch it with your fi ngers or with a rolling pin.
Top as you wish and bake!

Reseptejä / Recipes / Rezepte
DE: Pizzateig über Nacht
(5 Pizzaböden)
Den Teil an einem kühlen Ort über Nacht gehen zu lassen verleiht dem Boden einen einzigartigen intensiven
Geschmack. Den Teig 1–2 Tage vor dem Servieren der Pizza zubereiten.
Zutaten
500 g Mehl
3,2 dl Wasser
2 TL Salz
6 g Trockenhefe
2 EL Olivenöl
Zubereitung
1. Mehl, Salz und Hefe in eine Schüssel geben. In einer anderen Schüssel lauwarmes Wasser und Olivenöl mischen.
Die Mehlmischung zu dem Wasser hinzugeben. Ungefähr 10 Minuten kneten, bis der Teig leicht klebrig wird. Mit
einer Küchenmaschine kann das beste Ergebnis erzielt werden.
2. Den Teil 20 Minuten unter einem Tuch oder in einer zugedeckten Schüssel ruhen und gehen lassen. Wenn er
leicht aufgegangen ist, in den Kühlschrank stellen. Im Kühlschrank 1–2 Tage gehen lassen.
3. Den Teil ungefähr eine Stunde vor dem Backen aus dem Kühlschrank nehmen. In 5 gleich große Stücke teilen.
Eine Teigkugel auf eine bemehlte Fläche geben und mit den Fingern oder einem Nudelholz auswellen. Nach
Wunsch belegen und backen.
FI: MyPizzan tulinen tomaattikastike
Ainekset
500 ml paseerattua tomaattikastiketta (luomu)
1 tl suolaa
2 tl sokeria
1 tl oreganoa
ripaus mustapippuria
n. 3 rkl chilikastiketta
3–6 valkosipulinkynttä
Valmistusohje
1. Tee kastike noin 2 tuntia ennen pizzan täyttämistä, jotta kastike ehtii maustua jääkaapissa.
2. Sekoita kaikki ainekset keskenään.
3. Mausta oman makusi mukaan.
Vinkki
Kokeile sopiva tulisuusaste muuttamalla chilikastikkeen ja valkosipulin määrää.

EN: MyPizza Spicy Tomato Sauce for Pizza
Ingredients
500 ml tomato purée
1 teaspoon salt
2 teaspoons sugar
1 teaspoon oregano
black pepper
3 tablespoons chilli sauce
3 to 6 gloves of garlic
Method
1. Mix all ingredients in a bowl. Add spices according to your own taste.
2. Let the sauce rest for 2 hours in a refrigerator.
Hint
Try changing the amount of chilli sauce and garlic.
DE: MyPizza Pikante Tomatensauce
Zutaten
500 ml durchgesiebtes Bio-Tomatenpüree
1 TL Salz
2 TL Zucker
1 TL Oregano
Schwarzer Pfeffer
3 EL Chilli-Sauce
3–6 Knoblauchzehen
Zubereitung
1. Alle Zutaten in einer Schüssel mischen.
2. Gewürze nach Belieben hinzufügen
Tipp:
Vor dem Backen die Sauce für 2 Stunden im Kühlschrank ruhen lassen. Die Menge an Chilli-Sauce und Knoblauch
nach Belieben variieren.

Valmistaja/Manufacturer:
Teollisuuskylänraitti 5
FI-94450 Keminmaa
FINLAND
Tel. +358 400 284 400
info@polarmetalli.fi
www.polarmetalli.fi
Other manuals for mypizza
2
Table of contents
Languages:
Other Polar Metalli Oven manuals
Popular Oven manuals by other brands

Westinghouse
Westinghouse WFG612 quick start guide

Zanussi
Zanussi ZOU30601XU user manual

Whirlpool
Whirlpool AKZ 389 Instructions for use

Bosch
Bosch HBG674B 1B Series User manual and installation instructions

Siemens
Siemens HB33RB.50 instruction manual

Miele
Miele DG 6401 Operating and installation instructions