Polar Refrigeration CK640 User manual

NL Vriezer
Handleiding
16 IT Congelatori
Manuale di istruzioni
58
FR
Congélateurs
Mode d'emploi
30 ES Congeladores
Manual de instrucciones
72
DE Tiefkühltische
Bedienungsanleitung
44 PT Congeladores
Manual de instruções
86
Model • Modèle • Modell • Modello • Modelo • Malli:
CK640
Blast Chiller / Freezer
Instruction manual
CK640_ML_A5_v3_20190925.indb 1 2019/9/25 13:40

2
UK
Safety Tips
• Position on a flat, stable surface.
• A service agent/qualified technician should carry out
installation and any repairs if required. Do not remove any
components or service panels on this product.
• Consult Local and National Standards to comply with the
following:
- Health and Safety at Work Legislation
- BS EN Codes of Practice
- Fire Precautions
- IEE Wiring Regulations
- Building Regulations
• DO NOT use jet/pressure washers to clean the appliance.
• DO NOT use the appliance outside.
• DO NOT use this appliance to store medical supplies.
• DO NOT use electrical appliances inside the appliance
(e.g. heaters, ice cream makers, etc.)
• DO NOT allow oil or fat to come into contact with the plastic
components or door seal. Clean immediately if contact occurs.
• Always carry, store and handle the appliance in a vertical
position and move by holding the base of the appliance.
• Always switch off and disconnect the power supply to the unit
before cleaning.
• Keep all packaging away from children. Dispose of the
packaging in accordance with the regulations of local
authorities.
• If the power cord is damaged, it must be replaced by a POLAR
agent or a recommended qualified technician in order to avoid
a hazard.
CK640_ML_A5_v3_20190925.indb 2 2019/9/25 13:40

3
UK
• This appliance is not intended for use by persons (including
children) with reduced physical, sensory or mental capabilities,
or lack of experience or knowledge, unless they have been
given supervision or instruction concerning the use of the
appliance by a person responsible for their safety.
• Polar recommends that this appliance should be periodically
tested (at least annually) by a Competent Person. Testing
should include, but not be limited to: Visual Inspection,
Polarity Test, Earth Continuity, Insulation Continuity and
Functional Testing.
Caution Risk of Fire
• Do not store explosive substances such as aerosol cans with a
flammable propellant in this appliance.
Warning: Keep all ventilation openings clear of
obstruction. Unit should not be boxed in without
adequate ventilation.
• Warning: Do not use mechanical devices or other means
to accelerate the defrosting process, other than those
recommended by the manufacturer.
• Warning: Do not damage the refrigerant circuit.
• Warning: Do not use electrical appliances inside the food
storage compartments of the appliance, unless they are the
type recommended by the manufacturer.
Product Description
CK640 - POLAR Blast Chiller / Freezer
Introduction
Please take a few moments to carefully read through this manual. Correct maintenance and operation of
this machine will provide the best possible performance from your POLAR product.
Pack Contents
The following is included:
POLAR Blast Chiller /Freezer Instruction manual
POLAR prides itself on quality and service, ensuring that at the time of packaging the contents are
supplied fully functional and free of damage.
Should you find any damage as a result of transit, please contact your POLAR dealer immediately.
CK640_ML_A5_v3_20190925.indb 3 2019/9/25 13:40

4
UK
Installation
Note: If the unit has not been
stored or moved in an upright
position, let it stand upright for
approximately 12 hours before
operation. If in doubt allow to
stand.
1. Remove the appliance from the packaging.
Make sure that all protective plastic film and
coatings are thoroughly removed from all
surfaces.
2. Maintain a distance of 20cm (7 inches)
between the unit and walls or other objects for
ventilation. NEVER LOCATE NEXT TO OR
NEAR A HEAT SOURCE.
Note: Before using the appliance
for the first time, clean the
shelves and interior with soapy
water.
Operation
Storing Food
To get the best results from your POLAR appliance,
follow these instructions:
• It is important that food entering the Blast
Chiller/Freezer does not exceed a temperature
of 90°C.
• It is recommended that metal containers /
trays are used as other materials such as
plastic or polystyrene containers will act as an
insulator and extend blast chilling times.
• Sufficient space must be left between products
in order to guarantee a sufficient flow of cold
air. Ensure product is not in contact with the
internal walls of the unit, and leave sufficient
gaps between trays.
• Never obstruct the inlet of the evaporator fans.
• Products that are more difficult to chill because
of their composition and size should be placed
in the centre of the unit.
• Blast chilling data refers to standard products
(low fat content) with a thickness below
50 mm: therefore avoid overlaying products
on trays or the insertion of pieces with a
much higher thickness, as this will lead to
an extension of blast chilling times. Always
distribute the product well on the trays and in
the case of thick pieces decrease the amount
to blast chill.
• Limit the number of times and the duration of
time the doors are opened.
• The chiller should be used for storage for short
periods only.
• When removing product that has undergone
blast chilling/shock freezing, always wear
gloves to protect the hands from cold burns.
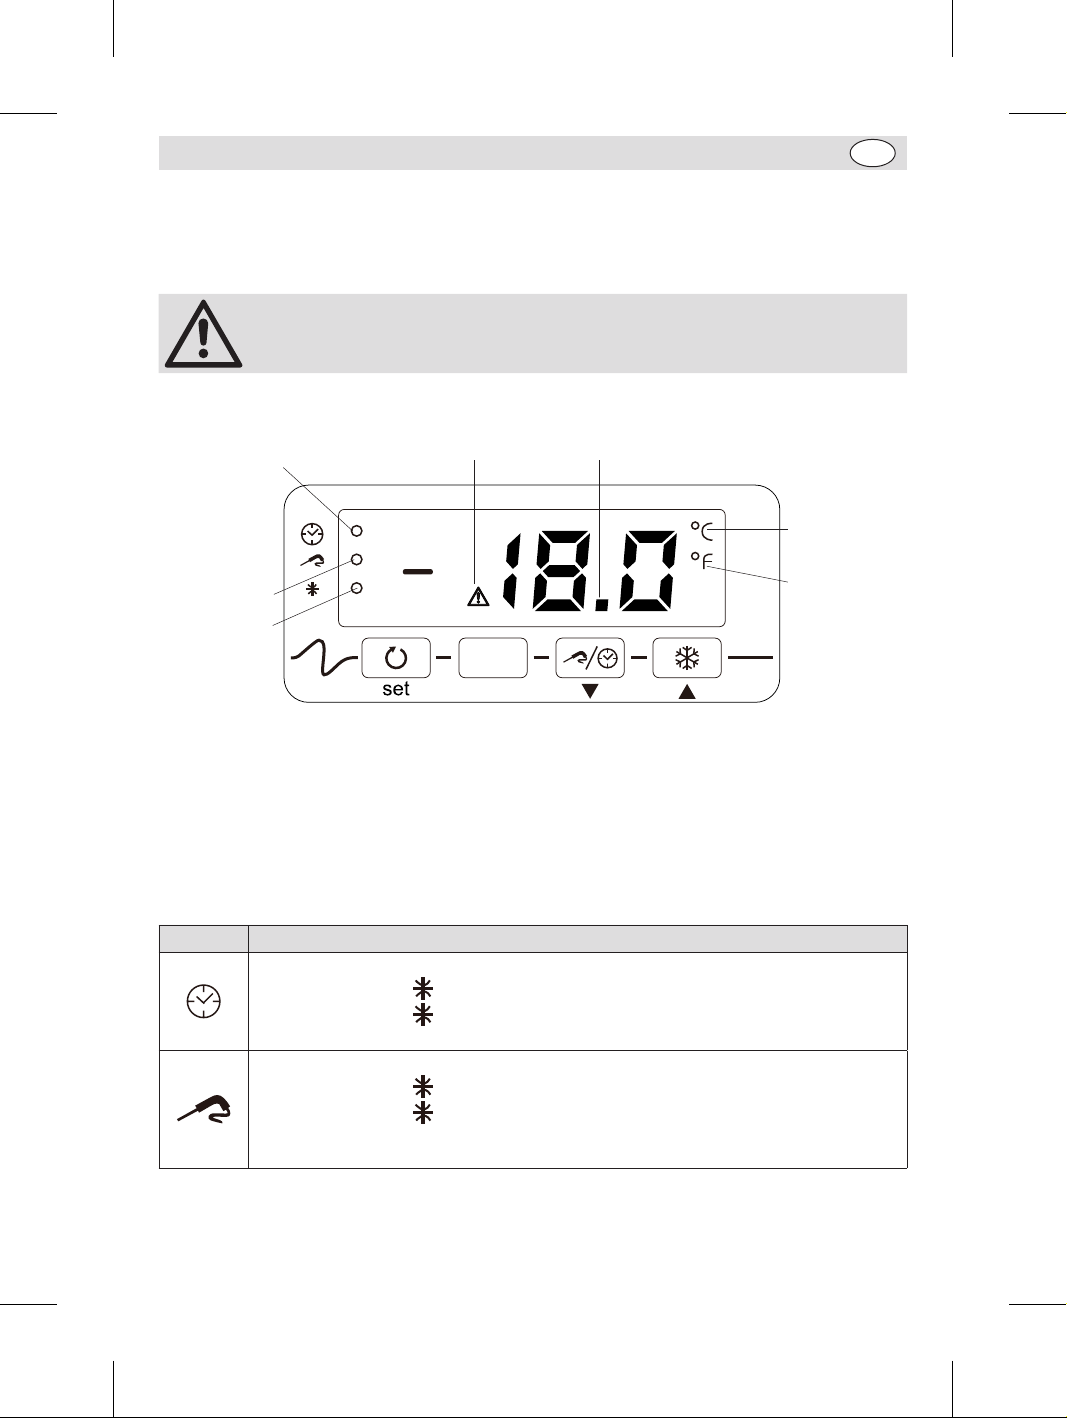
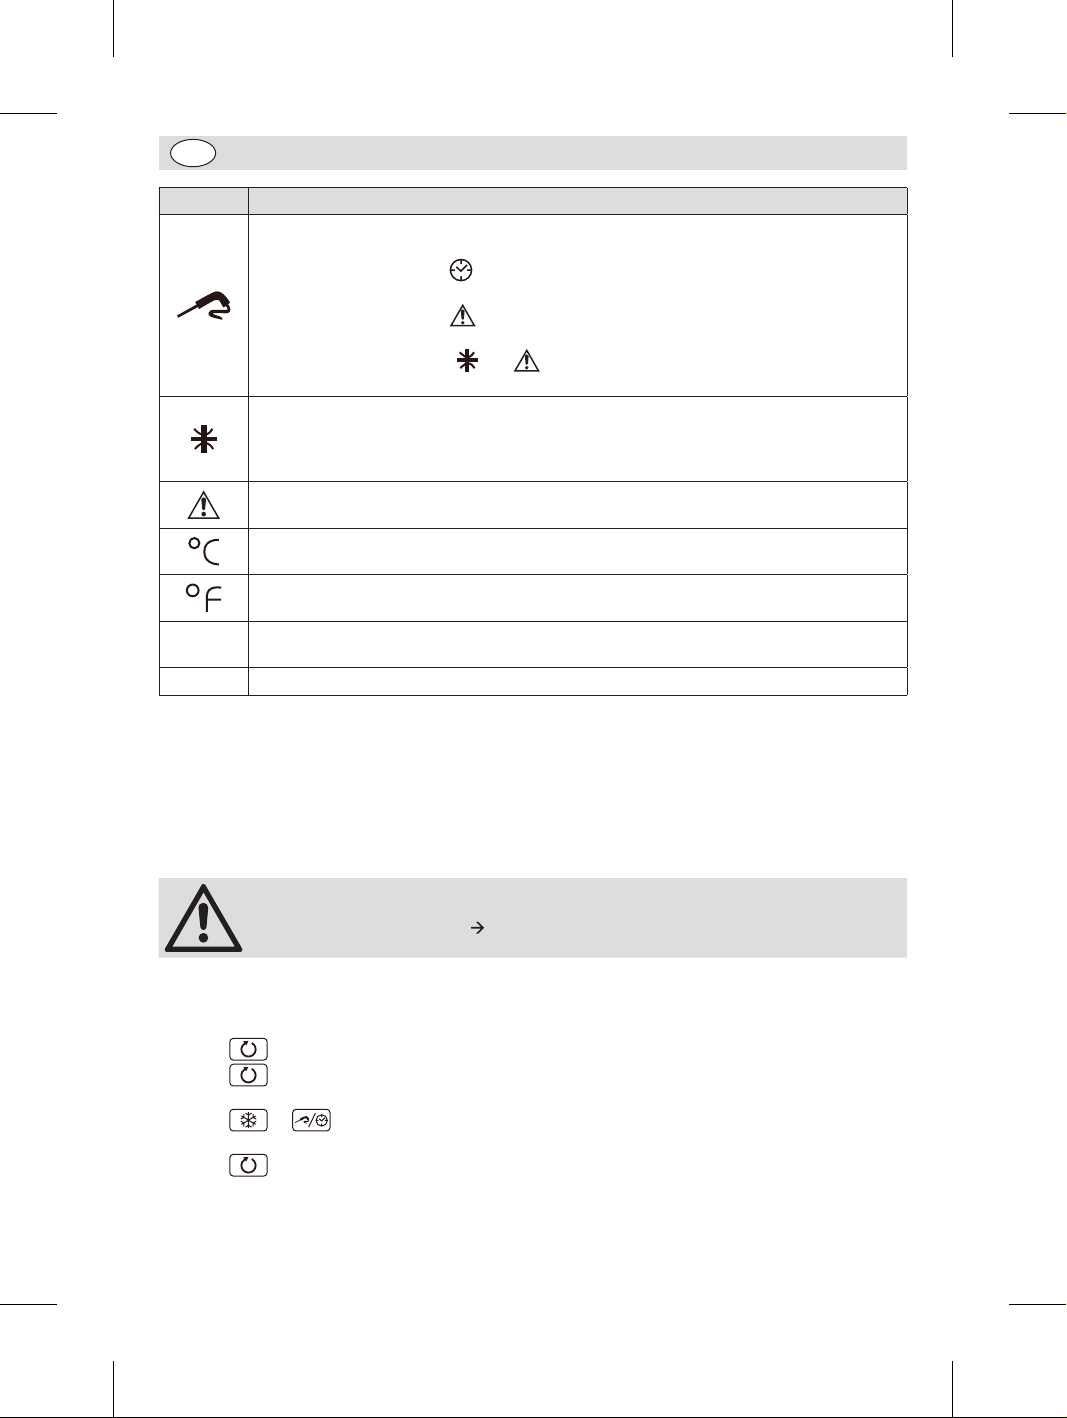
Introduction
The appliance has the following operational states:
On • The appliance is switched on and
an operating cycle is running
Standby • The appliance is switched on but
no operating cycle is running
Off • The appliance is not switched on
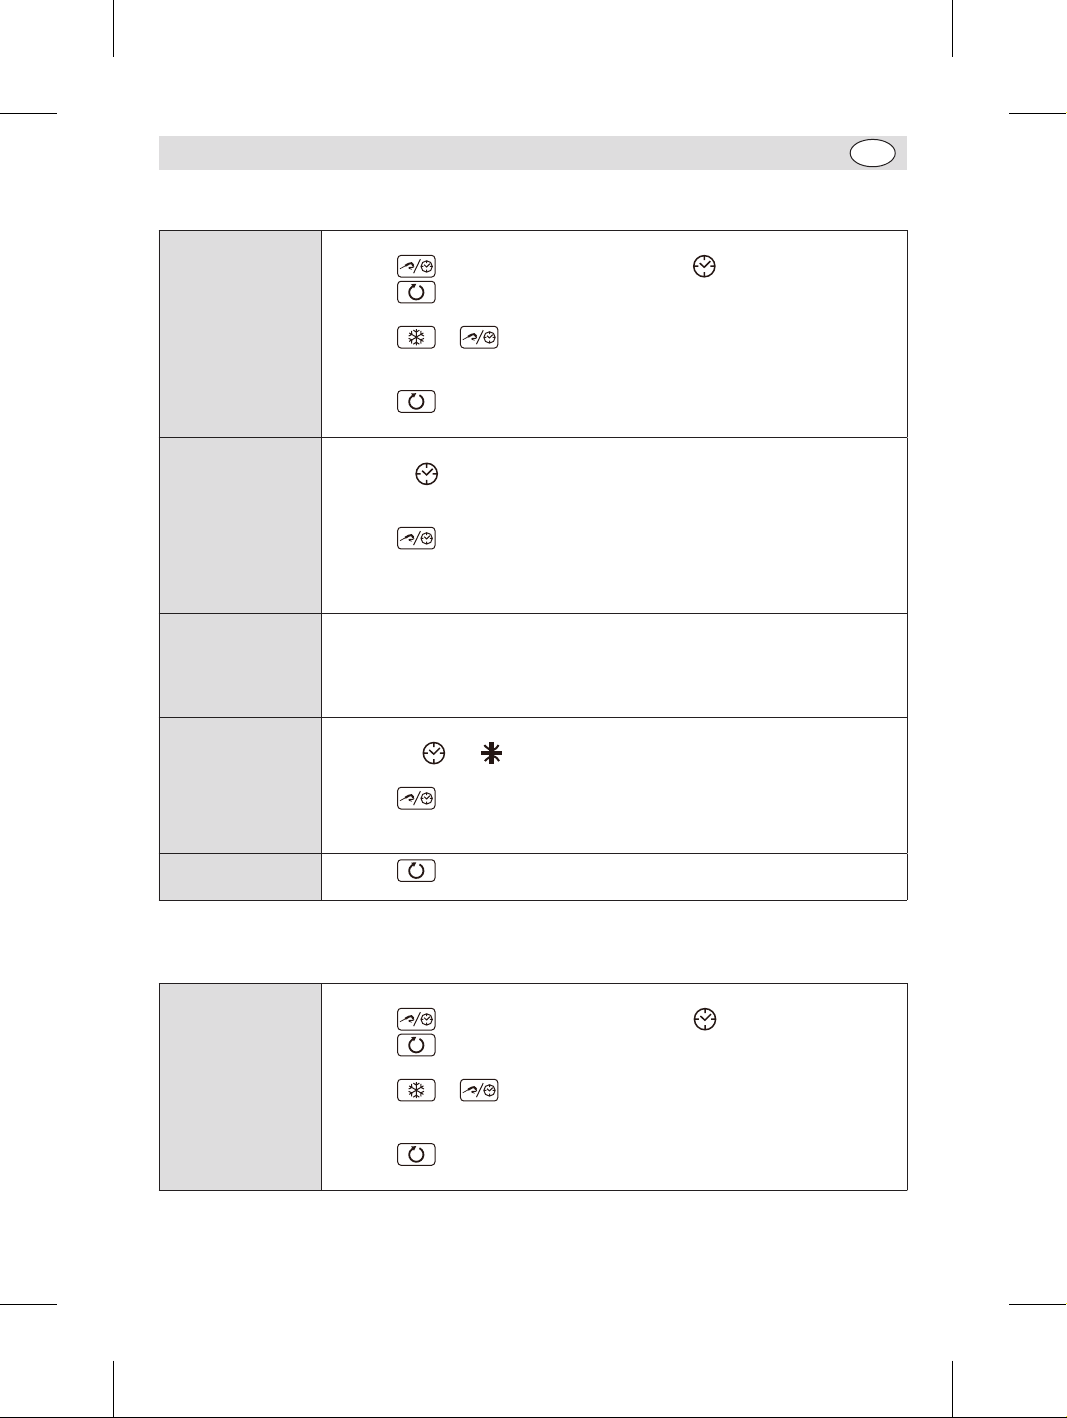
• If power is interrupted during a timed blast
chilling operation, when power is restored,
chilling will continue from the time point
at which the interruption occurred (with a
maximum error of 10 minutes).
• If power is interrupted during a set-
temperature blast chilling operation, when
power is restored, chilling will start again from
the beginning.
• If power is interrupted during a storage
operation, when power is restored the storage
operation will be reset.
• If power is interrupted while in “stand-by”
mode, when power is re- stored the device will
be in the same state.
Turn On
1. Ensure the power switch is set to [O] and turn
on at the socket.
2. Switch on the Power [I]. This will place the
unit in standby whilst waiting for the cycle to
be selected.
CK640_ML_A5_v3_20190925.indb 4 2019/9/25 13:40

5
UK
Insert the food probe
• Before selecting which cycle to use, the probe must be inserted into the food. This allows the internal
temperature of the food to be measured.
• It is important that the probe is correctly connected to the unit.
Note: To prevent bacterial contamination or contamination of any other
biological nature, the needle probe must be disinfected after use.
Control Panel
Alarm LED Minute LED
Degree
Celsius LED
Degree
Fahrenheit LED
Timed
Chilling LED
Set-Temperature
Chilling LED
Storage LED
In the “on” state, during normal operation, the display shows:
• the amount of time remaining for a timed blast chilling operation, if this is ongoing
• the temperature measured by the pin probe if a set-temperature chilling operation is ongoing
• the temperature of the cabinet, if storage is ongoing.
In “stand-by” mode, during normal operation, the display shows the temperature of the cabinet for ½
second every 3 seconds.
Signals
LED Message
Timed Chilling LED
• If on and the LED is off, a timed chilling operation is ongoing
• If on and the LED is also on, a post timed-chilling storage operation is ongoing
• If flashing, a timed chilling and storage cycle will have been selected
Set-temperature chilling LED
• If on and the LED is off, a set-temperature chilling storage operation is ongoing
• If on and the LED is also on, a post set-temperature chilling storage operation will
be ongoing
• If flashing, a set temperature chilling and storage cycle will have been selected
CK640_ML_A5_v3_20190925.indb 5 2019/9/25 13:40

6
UK
LED Message
• If it is on for ½ second every 3 seconds, the test to verify correct pin probe insertion
will be ongoing
• If flashing and the LED is on, then the test to verify correct pin probe insertion will
have had a negative outcome and the cycle will have been started in timed mode
• If flashing and the LED is on, the chilling stage will have had a negative outcome
and so this will continue
• If flashing and the LEDs and are on, the chilling stage will have had a negative
outcome, the device will have switched to storage mode and this will be ongoing
Storage LED
• If on, a storage operation will be ongoing
• If flashing then the operational set point will be being modified while a storage
operation is ongoing
Alarm LED
• If on, an alarm is ongoing
Degree Celsius LED
• If on the unit of measurement for temperature is degrees Celsius
Degree Fahrenheit LED
• If on the unit of measurement for temperature is degrees Fahrenheit
Decimal
Point Minute LED
• If flashing, the unit of measurement of magnitude displayed is the minute
d• Defrosting or drip draining is ongoing
Operational Cycles
The device has the following operational cycles:
• Timed positive chilling and storage
• Timed negative chilling and storage
• Set-temperature positive chilling and storage
• Set-temperature negative chilling and storage.
Set-temperature cycles are preceded by a test step in order to check correct
insertion of the pin probe ( “Test To Check Correct Pin Probe Insertion”)
To re-start using the same settings as the last cycle run:
• ensure that the device is in “stand-by” mode, that no procedures are running and that another cycle
has not been selected
• press for 2 seconds. The display will show the label of the last cycle run
• press within 60 seconds: in the case of a timed cycle, the display will show the duration of the
blast chilling step (in minutes) or in the case of a set-temperature cycle, the set target temperature
• press or within 15 seconds to change the value (the setting re- mains active until another
cycle is selected, when the value r1, r2, r3 or r4 is restored)
• press within 15 seconds and the cycle will be activated
CK640_ML_A5_v3_20190925.indb 6 2019/9/25 13:40

7
UK
Timed Positive Blast Chilling And Storage Cycle
To start the cycle: • ensure the device is in “stand-by” mode and no procedures are running
• press to select “PoS” and ensure the LED is flashing
• press within 15 seconds: the display will show the duration of the blast
chilling step (in minutes)
• press or within 15 seconds to change the value (the setting
remains active until another cycle is selected, when the value assigned by
parameter r1 is restored)
• press : after 2 minutes, the appliance will run timed positive blast
chilling and storage cycle
During chilling: • the display shows the residual chilling time remaining
• the LED is on
• parameter r1 sets the chilling time duration
• parameter r7 sets the operational set point
• press several times to:
- display the message “PoS”
- display the cabinet temperature
- exit the procedure, or leave for 15 seconds
Once the chilling
period has
elapsed:
• the device switches to storage mode
• the display shows the message “End”
• the buzzer sounds for the period of time set by parameter AA
• press any key to mute the buzzer; press once more to cancel the message
“End”
During storage: • the display shows the cabinet temperature
• the LEDs and are on
• the parameter r9 sets the operational set point
• press several times to:
- display the message “PoS”
- exit the procedure, or leave for 15 seconds.
To interrupt the
cycle: • press for 2 seconds
Timed Negative Chilling And Storage Cycle
To start the cycle: • ensure the device is in “stand-by” mode and no procedures are running
• press to select “nEg” and ensure the LED is flashing
• press within 15 seconds: the display will show the duration of the blast
chilling step (in minutes)
• press or within 15 seconds to change the value (the setting
remains active until another cycle is selected, when the value assigned by
parameter r2 is restored)
• press : after 2 minutes, the appliance will run timed negative chilling
and storage cycle
CK640_ML_A5_v3_20190925.indb 7 2019/9/25 13:40

8
UK
During chilling: • the display shows the residual chilling time remaining
• the LED is on
• parameter r2 sets the chilling time duration
• parameter r8 sets the operational set point
• press several times to:
- display the message “nEg”
- display the cabinet temperature
- exit the procedure, or leave for 15 seconds
Once the chilling
period has
elapsed:
• the device switches to storage mode
• the display shows the message “End”
• the buzzer sounds for the period of time set by parameter AA
• press any key to mute the buzzer; press once more to cancel the message
“End”
During storage: • the display shows the cabinet temperature
• the LEDs and are on
• the parameter rA sets the operational set point
• press several times to:
- display the message “nEg”
- exit the procedure, or leave for 15 seconds.
To interrupt the
cycle: • press for 2 seconds
Set-Temperature Positive Blast Chilling And Storage Cycle
Prior to starting
the cycle: • A test is run in order to check correct pin probe insertion
- if the outcome of the test is positive, the cycle will be started
- if the outcome of the test is negative, the cycle will be started in timed
mode.
To start the cycle: • ensure the device is in “stand-by” mode and no procedures are running
• press to select “PoS” and ensure the LED is flashing
• press or within 15 seconds to change the value (the setting
remains active until another cycle is selected, when the value assigned by
parameter r3 is restored)
• press : after 2 minutes, the appliance will run set-temperature positive
blast chilling and storage cycle
During chilling: • the display shows the temperature measured by the pin probe
• the LED is on
• the parameter r3 sets the blast chilling endpoint temperature
• the parameter r5 sets the maximum chilling time duration
• the parameter r7 sets the operational set point
• press several times to:
- display the maximum residual chilling time remaining
- display the message “PoS”
- display the flashing cabinet temperature
- exit the procedure, or leave for 15 seconds
CK640_ML_A5_v3_20190925.indb 8 2019/9/25 13:40

9
UK
If the temperature
measured by
the pin probe
reaches the
chilling endpoint
temperature prior
to expiry of the
maximum chilling
time duration:
• the device will switch to storage mode
• the display will show the message “End”
• the buzzer will sound for the period of time set by parameter AA
• press any key to mute the buzzer; press once more to cancel the message
“End”
If the temperature
measured by the
pin probe does
not reach the
chilling endpoint
temperature prior
to expiry of the
maximum chilling
time duration:
• chilling will continue
• the LED will flash and the LED will be on
• the buzzer will sound
• press several times to:
- mute the buzzer
- display the time elapsed since the maximum chilling time expired
- display the cabinet temperature
- display the message “PoS”
- exit the procedure, or leave for 15 seconds
When the
temperature
measured by
the pin probe
reaches the
chilling endpoint
temperature:
• the device switches to storage mode
• the LED will continue to flash and the LED will stay on
• the display will show the message “End”
• the buzzer will sound for the period of time set by parameter AA
• press any key to mute the buzzer; press once more to cancel the message
“End”
During storage: • the display shows the cabinet temperature
• if chilling had a positive outcome, the LEDs and will be on; if
chilling had a negative outcome, the LEDs and will be on and the
LED will flash.
• the parameter r9 sets the operational set point
• press several times to:
- display the message “PoS”
- exit the procedure, or leave for 15 seconds
To interrupt the
cycle: • press for 2 seconds
Set-Temperature Negative Chilling And Storage Cycle
Prior to starting
the cycle: • A test is run in order to check correct pin probe insertion
- if the outcome of the test is positive, the cycle will be started
- if the outcome of the test is negative, the cycle will be started in timed
mode
CK640_ML_A5_v3_20190925.indb 9 2019/9/25 13:40

10
UK
To start the cycle: • ensure the device is in “stand-by” mode and no procedures are running
• press to select “nEg” and ensure the LED is flashing
• press or within 15 seconds: the display will show the blast
chilling end-point temperature
• press or within 15 seconds to change the value (the setting
remains active until another cycle is selected, when the value assigned by
parameter r4 is restored)
• press : after 2 minutes, the appliance will run set-temperature negative
chilling and storage cycle
During chilling: • the display shows the temperature measured by the pin probe
• the LED is on
• the parameter r4 sets the chilling endpoint temperature
• the parameter r6 sets the maximum chilling time duration
• the parameter r8 sets the operational set point
• press several times to:
- display the maximum residual chilling time remaining
- display the message “nEg”
- display the flashing cabinet temperature
- exit the procedure, or leave for 15 seconds
If the temperature
measured by
the pin probe
reaches the
chilling endpoint
temperature prior
to expiry of the
maximum chilling
time duration:
• the device will switch to storage mode
• the display will show the message “End”
• the buzzer will sound for the period of time set by parameter AA
• press any key to mute the buzzer; press once more to cancel the message
“End”
If the temperature
measured by the
pin probe does
not reach the
chilling endpoint
temperature prior
to expiry of the
maximum chilling
time duration:
• chilling will continue
• the LED will flash and the LED will be on
• the buzzer will sound
• press several times to:
- mute the buzzer
- display the time elapsed since the maximum chilling time expired
- display the cabinet temperature
- display the message “nEg”
- exit the procedure, or leave for 15 seconds
If the temperature
measured by
the pin probe
reaches the
chilling endpoint
temperature:
• the device switches to storage mode
• the LED will continue to flash and the LED will continue to stay on
• the display will show the message “End”
• the buzzer will sound for the period of time set by parameter AA
• press any key to mute the buzzer; press once more to cancel the message
“End”
CK640_ML_A5_v3_20190925.indb 10 2019/9/25 13:40

11
UK
During storage: • the display shows the cabinet temperature
• if chilling had a positive outcome, the LEDs and will be on; if
chilling had a negative outcome, the LEDs and will be on and the
LED will flash.
• the parameter rA sets the operational set point
• press several times to:
- display the message “nEg”
- exit the procedure, or leave for 15 seconds
To interrupt the
cycle: • press for 2 seconds
Test To Check Correct Pin Probe Insertion
• Set-temperature cycles are preceded by a test step in order to check correct
pin probe insertion.
• If power is interrupted during the test, when power is restored, the test will
start again from the beginning.
The test has two stages:
• if the outcome of the first stage is positive, the second will not be run
• if the outcome of the first stage is negative, the second will be run.
• The outcome of the first stage is positive if “the temperature measured by the pin probe - the
temperature of the cabinet” is greater than the value set by parameter rc at least 3 times out of 5 (the
comparison is made every 10 s); if parameter rc is set to 0, neither the first nor second stages will be
run.
• The outcome of the second stage is positive if the difference “temperature measured by the pin probe
- temperature of the cabinet” is greater by at least 1ºC/1ºF (with respect to the previous comparison)
at least 6 times out of 8 (the comparison is made every “rd/8 s”)
If the outcome of the test is positive:
• the cycle will be activated
• the cycle will be started in timed mode
• the LED will flash
Setting The Configuration Parameters
The parameters are arranged on two levels.
To access the first
level: • ensure the device is in “stand-by” mode and no procedures are running
• press and for 4 s: the display will show “PA”
To access the
second level: • access the first level
• press or to select “PA”
• press
• press or within 15 s to set “-19”
• press or leave for 15 s
• press and for 4 s: the display will show “CA1”
CK640_ML_A5_v3_20190925.indb 11 2019/9/25 13:40

12
UK
To select a
parameter • press or
To modify a
parameter: • press
• press or within 15 s
• press or leave for 15 s
To exit the
procedure • press and for 4 s , or leave for 60 s
Note: Interrupt the power supply after altering the parameters.
Cleaning, Care & Maintenance
• Switch off and disconnect from the power supply before cleaning.
• Clean the interior of the appliance as often as possible.
• Do not use abrasive cleaning agents. These can leave harmful residues.
• Clean the door seal with water only.
• Always wipe dry after cleaning.
• Do not allow water used in cleaning to run through the drain hole into the evaporation pan.
• Take care when cleaning the rear of the appliance. Sharp edges can cut.
• A POLAR agent or qualified technician must carry out repairs if required.
Cleaning the condenser
• Periodically cleaning the condenser can extend the life of the appliance.
• POLAR recommend that a POLAR agent or qualified technician clean the condenser.
Cleaning the water pan
• The water pan is located underneath the evaporator at the back of the unit.
• To remove it for cleaning, simply slide out when necessary.
Alarms
Code Message Remedies Consequences
AL Minimum temperature
alarm • Check the cabinet temperature
• Check parameters A1 and A2 The device will continue
to function normally
AH Maximum temperature
alarm • Check the cabinet temperature
• Check parameters A3 and A4 The device will continue
to function normally
id Micro-port input alarm
(only in “stand-by” mode
and if parameter i0 is set
to 0 or 1)
• Check the causes which activated
the input
• Check parameters i0 and i1
The outcome set by
parameter i0
iA Compressor protection
input alarm (only if
parameter i0 is set to 2)
• Check the causes which activated
the input
• Check parameters i0 and i1
The compressor will be
shut down
Note: When the cause that triggered the alarm has been resolved, the device restores
normal operation.
CK640_ML_A5_v3_20190925.indb 12 2019/9/25 13:40

13
UK
Internal Diagnostics
Code Message Remedies Consequences
Pr1 Cabinet
probe error • See P0
parameter
• Check probe
integrity
• Check probe-
device
connection
• Check the
cabinet
temperature
Consequences if the error occurs while in “stand-by” mode:
• If parameter C11 is set to 0, it will not be possible to start
any of the cycles
• If parameter C11 is set to 1, the pin probe will function as
the cabinet probe and only timed cycles will be allowed to
start
Consequences if the error occurs during a timed chilling
operation:
• If parameter C11 is set to 0, the cycle will be interrupted
• If parameter C11 is set to 1, the pin probe will function as
the cabinet probe and the chilling operation will continue
Consequences if the error occurs during a set-temperature
chilling operation:
• If parameter C11 is set to 0, the cycle will be interrupted
• If parameter C11 is set to 1, the pin probe will function
as both the cabinet probe and pin probe and the chilling
operation will continue
Consequences if the error occurs during a storage operation:
• Parameter C11 is set to 0, the compressor activity will
depend on parameters C4, C5 and C6
• If parameter C11 is set to 1, the pin probe will function as
the cabinet probe and the storage operation will continue
Pr2 Pin probe
error • The same
as for the
previous case,
but in relation
to the pin
probe
Consequences if the error occurs while in “stand-by” mode:
• Only timed operation cycles will be allowed to start
Consequences if the error occurs during a timed chilling
operation:
• Chilling will continue
Consequences if the error occurs during a set-temperature
chilling operation:
• Chilling will continue in timed mode
Consequences if the error occurs during storage mode:
• Storage will continue
CK640_ML_A5_v3_20190925.indb 13 2019/9/25 13:40

14
UK
Troubleshooting
If your POLAR appliance develops a fault, please check the following table before making a call to the
Helpline or your POLAR dealer.
Fault Probable Cause Solution
The appliance is not
working The unit is not switched on Check the unit is plugged in correctly and
switched on
Plug and lead are damaged Call POLAR agent or qualified Technician
Fuse in the plug has blown Replace the fuse
Power supply Check power supply
Internal wiring fault Call POLAR agent or qualified Technician
The appliance is
leaking water The appliance is not properly
levelled Adjust the screw feet to level the appliance
(if applicable)
The discharge outlet is blocked Clear the discharge outlet
Movement of water to the drain is
obstructed Clear the floor of the appliance (if
applicable)
The water container is damaged Call POLAR agent or qualified Technician
The appliance is
unusually loud The appliance has not been
installed in a level or stable
position
Check installation position and change if
necessary
Loose nut/screw Check and tighten all nuts and screws
Technical Specifications
Model Voltage Power Current Capacity Dimensions
H x W x D Refrigerant Weight
(kg)
CK640 230V~ 50Hz 500W 4A 3 x GN 2/3 420 x 660 x 650 R290 42
CK640_ML_A5_v3_20190925.indb 14 2019/9/25 13:40

15
UK
Electrical Wiring
POLAR appliances are supplied with a 3 pin, moulded, BS1363 plug and lead, with a 13 amp fuse as
standard.
The plug is to be connected to a suitable mains socket.
POLAR appliances are wired as follows:
• Live wire (coloured brown) to terminal marked L
• Neutral wire (coloured blue) to terminal marked N
• Earth wire (coloured green/yellow) to terminal marked E
The appliances must be earthed.
If in doubt consult a qualified electrician.
Electrical isolation points must be kept clear of any obstructions. In the event of any emergency
disconnection being required they must be readily accessible.
Disposal
EU regulations require refrigeration product to be disposed of by specialist companies who remove or
recycle all gasses, metal and plastic components.
Consult your local waste collection authority regarding disposal of your appliance. Local authorities are
not obliged to dispose of commercial refrigeration equipment but may be able to offer advice on how to
dispose of the equipment locally.
Alternatively call the POLAR helpline for details of national disposal companies within the EU.
Compliance
The WEEE logo on this product or its documentation indicates that the product must
not be disposed of as household waste. To help prevent possible harm to human
health and/or the environment, the product must be disposed of in an approved and
environmentally safe recycling process. For further information on how to dispose of
this product correctly, contact the product supplier, or the local authority responsible for
waste disposal in your area.
POLAR parts have undergone strict product testing in order to comply with regulatory
standards and specifications set by international, independent, and federal authorities.
POLAR products have been approved to carry the following symbol:
All rights reserved. No part of these instructions may be produced or transmitted in any form or by any means, electronic,
mechanical, photocopying, recording or otherwise, without the prior written permission of POLAR.
Every effort is made to ensure all details are correct at the time of going to press, however, POLAR reserve the right to
change specifications without notice.
CK640_ML_A5_v3_20190925.indb 15 2019/9/25 13:40

16
NL
Veiligheidstips
• Plaatsen op een vlakke en stabiele ondergrond.
• De installatie en eventuele reparaties zijn door een
servicetechnicus/vaktechnicus uit te voeren. Verwijder geen
componenten of servicepanelen van dit product.
• Raadpleeg en volg de plaatselijke en nationale regelgeving op
m.b.t. tot het volgende:
- Wetgeving van gezondheid en veiligheid op de werkplaats
- Werkregels
- Brandpreventie
- IEE bekabelingsnormen
- Bouwverordeningen
• Dit product NIET reinigen met spuit-/drukreinigers.
• Uitsluitend geschikt voor gebruik binnenshuis.
• Dit product NIET gebruiken voor de berging van medische
producten.
• In dit product GEEN elektrische apparaten gebruiken (zoals
bijv. verwarmers, ijsmakers, etc.)
• Laat NIET toe dat olie of vet in contact komt met plastic
componenten of deurafdichtingen. Onmiddellijk reinigen indien
dit wel gebeurt.
• Dit product altijd in een verticale positie vervoeren, opbergen
en gebruiken. Het product aan de kastbasis vervoeren.
• Alvorens dit product te reinigen dient men altijd de
stroomvoorziening uit te schakelen.
• Laat verpakkingsmateriaal niet binnen handbereik van
kinderen. Verpakkingsmateriaal in overeenstemming met
de regelgeving van de plaatselijke overheden als afval laten
verwerken.
• Indien de stroomkabel beschadigd raakt, dient men deze door
een POLAR technicus of een aanbevolen vaktechnicus te laten
vervangen om gevaarlijke situaties te verhinderen.
CK640_ML_A5_v3_20190925.indb 16 2019/9/25 13:40

17
NL
• Dit apparaat is niet bedoeld voor gebruik door personen met
lichamelijke, zintuiglijke of mentale beperkingen (inclusief
kinderen) of met gebrek aan ervaring of kennis, tenzij zij hierin
worden begeleid of zijn opegeleid in het gebruik van het apparaat
door een persoon, die verantwoordelijk is voor hun veiligheid.
• Polar beveelt aan dat dit apparaat periodiek (minstens jaarlijks)
door een bevoegde persoon wordt getest. Tests moeten
omvatten, maar zijn niet beperkt tot: visuele inspectie, polariteit,
aardings continuïteit, isolatie continuïteit en functionele test.
Voorzichtig brandgevaar
• Heeft explosieve stoffen zoals spuitbussen niet slaan met een
brandbaar drijfgas in dit apparaat.
Waarschuwing: Hou alle ventilatieopeningen vrij
van obstakels. Het apparaat mag niet ingesloten
worden zonder adequate ventilatie.
• Waarschuwing: gebruikt geen mechanische apparaten of
andere middelen om het ontdooien te versnellen, anders dan
welke aanbevolen worden door de fabrikant.
• Waarschuwing: het koelcircuit niet beschadigen.
• Waarschuwing: Gebruik geen elektrische apparaten in de
bewaarruimte voor voedsel van het apparaat, tenzij ze het een
type betreft welke wordt aanbevolen door de fabrikant.
Productbeschrijving
CK640 - POLAR Blast koel-/vrieskast
Inleiding
Neem de tijd en lees deze handleiding aandachtig door. Een correct gebruik en onderhoud van deze
machine waarborgt de beste prestatie van uw POLAR product.
Verpakkingsinhoud
De verpakking bevat het volgende:
• POLAR Blast koel-/vrieskast
• Handleiding
POLAR is trots op de haar productkwaliteit en dienstverlening en controleer de inhoud van de
verpakkingen, tijdens de verpakkingsfase, op functionaliteit en schade.
Mocht u product door transport zijn beschadigd, neem dan onmiddellijk contact op met uw POLAR dealer.
CK640_ML_A5_v3_20190925.indb 17 2019/9/25 13:40

18
NL
Installatie
Opmerking: indien het apparaat
niet in een rechtopstaande
positie is opgeslagen of
vervoerd, dient men het
product 12 uur vóór gebruik in
de rechtopstaande positie te
plaatsen. Bij twijfel dient men het
product in een rechtopstaande
positie te plaatsen.
1. Haal het product uit de verpakking. Zorg ervoor
dat u de beschermingsfolie en -lagen van alle
oppervlakken heeft verwijderd.
2. Voor een adequate ventilatie dient men een
afstand van 20cm aan te houden tussen dit
product of muren en andere objecten. NOOIT
PLAATSEN NAAST OF DICHTBIJ EEN
PLAATSEN.
Opmerking: Voor het eerste
gebruik van dit product dient u
de lades en de binnenzijde met
zeepwater te reinigen.
Bediening
Opslag van levensmiddelen
Volg de volgende aanwijzingen voor de beste
resultaten met uw POLAR product:
• Het is belangrijk dat het voedsel dat in de Blast
koel-/vrieskast wordt geplaatst, niet warmer is
dan 90°C.
• Het wordt aanbevolen om metalen containers/
trays te gebruiken aangezien andere materialen
zoals plastic of polystyreen containers als een
isolator dienst doen en de koel/vriestijden
verlengen.
• Er moet voldoende ruimte voorzien worden
tussen de producten zodat een voldoende
stroom van koude lucht wordt voorzien. Zorg
dat het product niet in contact komt met de
interne wanden van het toestel en voorzie
voldoende ruimte tussen de trays.
• U mag de inlaat van de verdamperventilatoren
nooit belemmeren.
• Producten die omwille van hun samenstelling
en omvang moeilijker af te koelen zijn, moeten
in het midden van het toestel geplaatst
worden.
• De data voor koelen/vriezen verwijzen naar
standaardproducten (laag vetgehalte) van
minder dan 50 mm dik: daarom dient men
te vermijden om producten boven elkaar te
plaatsen op trays of veel dikkere stukken te
plaatsen, aangezien dit de koel-/vriestijden zal
verlengen. U dient het product steeds goed
te verdelen over de trays en in het geval van
dikke stukken dient u het te koelen/vriezen
volume te verminderen.
• Beperk het aantal keren en de tijd dat de
deuren worden geopend.
• De koelkast mag uitsluitend voor korte
bewaarperioden gebruikt worden.
• Wanneer een product wordt verwijderd dat
koelen-vriezen/shockvriezen heeft ondergaan,
dient u steeds handschoenen te dragen
om de handen te beschermen tegen koude
brandwonden.
Inleiding
Het toestel heeft de volgende bedrijfsstatussen:
aan • het toestel is ingeschakeld en er
is een bedrijfscyclus bezig
Stand-by • het toestel is ingeschakeld maar
er is geen bedrijfscyclus bezig
uit • het toestel is niet ingeschakeld
• Indien de stroom wordt onderbroken tijdens
een getimede koel/vriesoperatie, gaat het
koelen verder wanneer de stroom wordt
hersteld en dit vanaf het ogenblik waarop
de onderbreking zich voordeed (met een
foutmaximum van 10 minuten).
• Indien de stroom wordt onderbroken tijdens
een vaste-temperatuur koel/vriesoperatie,
begint het koelen opnieuw vanaf het begin
wanneer de stroom wordt hersteld.
• Indien de stroom wordt onderbroken tijdens
een opslagoperatie, wordt de opslagoperatie
gereset wanneer de stroom wordt hersteld.
• Indien de stroom wordt onderbroken in de
“stand-by” modus, blijft het toestel in dezelfde
status wanneer de stroom wordt hersteld.
Inschakelen
1. Controleer of stroomschakelaar in de positie [O]
staat en de steker in het stopcontact zit.
2. Zet de Power (Stroom) [I] aan. Dit zal het
apparaat in de stand-by modus plaatsen tot de
cyclus wordt geselecteerd.
CK640_ML_A5_v3_20190925.indb 18 2019/9/25 13:40

19
NL
Plaatsen de kern thermometer
• Alvorens het kiezen van de cyclus, moet de sonde in het voedsel ingebracht worden. Hierdoor kan de
interne temperatuur van het voedsel gemeten worden.
• Het is belangrijk dat de sonde correct is aangesloten op de eenheid.
Opmerking: Om bacteriële besmetting of contaminatie van elke andere
biologische aard te voorkomen moet de naaldsonde gedesinfecteerd worden na
ieder gebruik.
Bedieningspaneel
Alarm LED Minuut LED
Graden Celsius
LED
Graden
Fahrenheit LED
Tijd koelen LED
Insteltempera-
tuur koelen LED
Opslag LED
In de status “aan”, tijdens normale bediening, toont het scherm:
• de tijd die resteert voor een getimede koel/vriesoperatie, indien deze voortduurt
• de temperatuur gemeten door de pen-sonde wanneer een vaste-temperatuur koeloperatie bezig is
• de temperatuur van de kast indien de opslag bezig is.
In “stand-by” modus, tijdens normal bedrijf, toont het scherm de temperatuur van de kast gedurende ½
s om de 3s.
Signalen
LED Bericht
Tijd koelen LED
• Indien deze LED brandt en de LED uit is, is een getimede koeloperatie bezig
• Indien deze LED brandt en de LED aan is, is er een getimede opslagoperatie na het
koelen bezig
• Wanneer deze knippert, werd een getimede koel- en opslagcyclus geselecteerd
Insteltemperatuur koelen LED
• Indien deze LED brandt en de LED uit is, is een koel-opslag-operatie met vaste
temperatuur bezig
• Indien deze LED brandt en de LED aan is, is er een koel-opslagoperatie na de
ingestelde temperatuur bezig
• Wanneer deze LED knippert, werd koel- en opslagcyclus met vaste temperatuur
geselecteerd
CK640_ML_A5_v3_20190925.indb 19 2019/9/25 13:40

20
NL
LED Bericht
• Indien deze LED om de 3 seconden een ½ seconde aan gaat, is de test bezig voor het
controleren van het correct inbrengen van de pen-sonde
• Indien deze LED knippert en de LED brandt, heeft de test voor het controleren
van het correct inbrengen van de pen-sonde een negatief resultaat en de cyclus werd
gestart in de getimede modus
• Indien deze LED knippert en de LED aan is, heeft de koelfase een negatief
resultaat gehad en dus blijft dit aanhouden
• Indien deze LED knippert en de LED’s en zijn aan, heeft de koelfase een negatief
resultaat gehad, het toestel is overgeschakeld op opslagmodus en dit blijft voortduren
Opslag LED
• Indien deze LED aan is, is een opslagoperatie bezig
• Indien deze LED knippert, werd de operationele instelwaarde gewijzigd terwijl een
opslagoperatie bezig is
Alarm LED
• Indien deze LED aan is, is een alarm bezig
Graden Celsius LED
• Indien de meeteenheid voor temperatuur graden Celsius is
Graden Fahrenheit LED
• Indien de meeteenheid voor temperatuur graden Fahrenheit
Decimale
punt Minuut LED
• Indien deze LED knippert, is de weergegeven meeteenheid voor omvang minuten
d• Ontdooien of uitlekken is bezig
BEDRIJFSCYCLI
Het toestel heeft de volgende bedrijfscycli:
• getimed positief koelen en opslag
• getimed negatief koelen en opslag
• Vaste-temperatuur positief koelen en opslag
• Vaste-temperatuur negatief koelen en opslag
Vaste-temperatuurcycli worden voorafgegaan door een teststap om de correcte
plaatsing van de pen-sonde te controleren ( “test om te controleren of de pen-
sonde correct werd ingebracht”)
Om opnieuw te starten met dezelfde instellingen als de laatste cyclus:
• zorg dat het toestel in “stand-by” modus staat, dat geen procedures worden uitgevoerd en dat geen
andere cyclus werd geselecteerd
• druk gedurende 2 seconden in. Het scherm toont het label van de laatste cyclus
• druk op binnen 60 seconden: in het geval van een getimede cyclus, het scherm toont de duur
van de koel/vriesstap (in minuten) of in het geval van een vaste-temperatuur cyclus, de ingestelde
doeltemperatuur
• druk binnen 15 seconden op of om de waarde te veranderen (de instelling blijft actief
totdat een andere cyclus wordt geselecteerd, wanneer de waarde r1, r2, r3 of r4 is hersteld)
• druk binnen 15 seconden op en de cyclus wordt geactiveerd
CK640_ML_A5_v3_20190925.indb 20 2019/9/25 13:40
Other manuals for CK640
1
Table of contents
Languages:
Other Polar Refrigeration Freezer manuals

Polar Refrigeration
Polar Refrigeration U Series User manual

Polar Refrigeration
Polar Refrigeration CM530 User manual

Polar Refrigeration
Polar Refrigeration G Series User manual

Polar Refrigeration
Polar Refrigeration DN492-A User manual

Polar Refrigeration
Polar Refrigeration CM530 User manual

Polar Refrigeration
Polar Refrigeration CE210 User manual

Polar Refrigeration
Polar Refrigeration CM530-A User manual

Polar Refrigeration
Polar Refrigeration CE210-A User manual

Polar Refrigeration
Polar Refrigeration DN492-A User manual

Polar Refrigeration
Polar Refrigeration G591 User manual