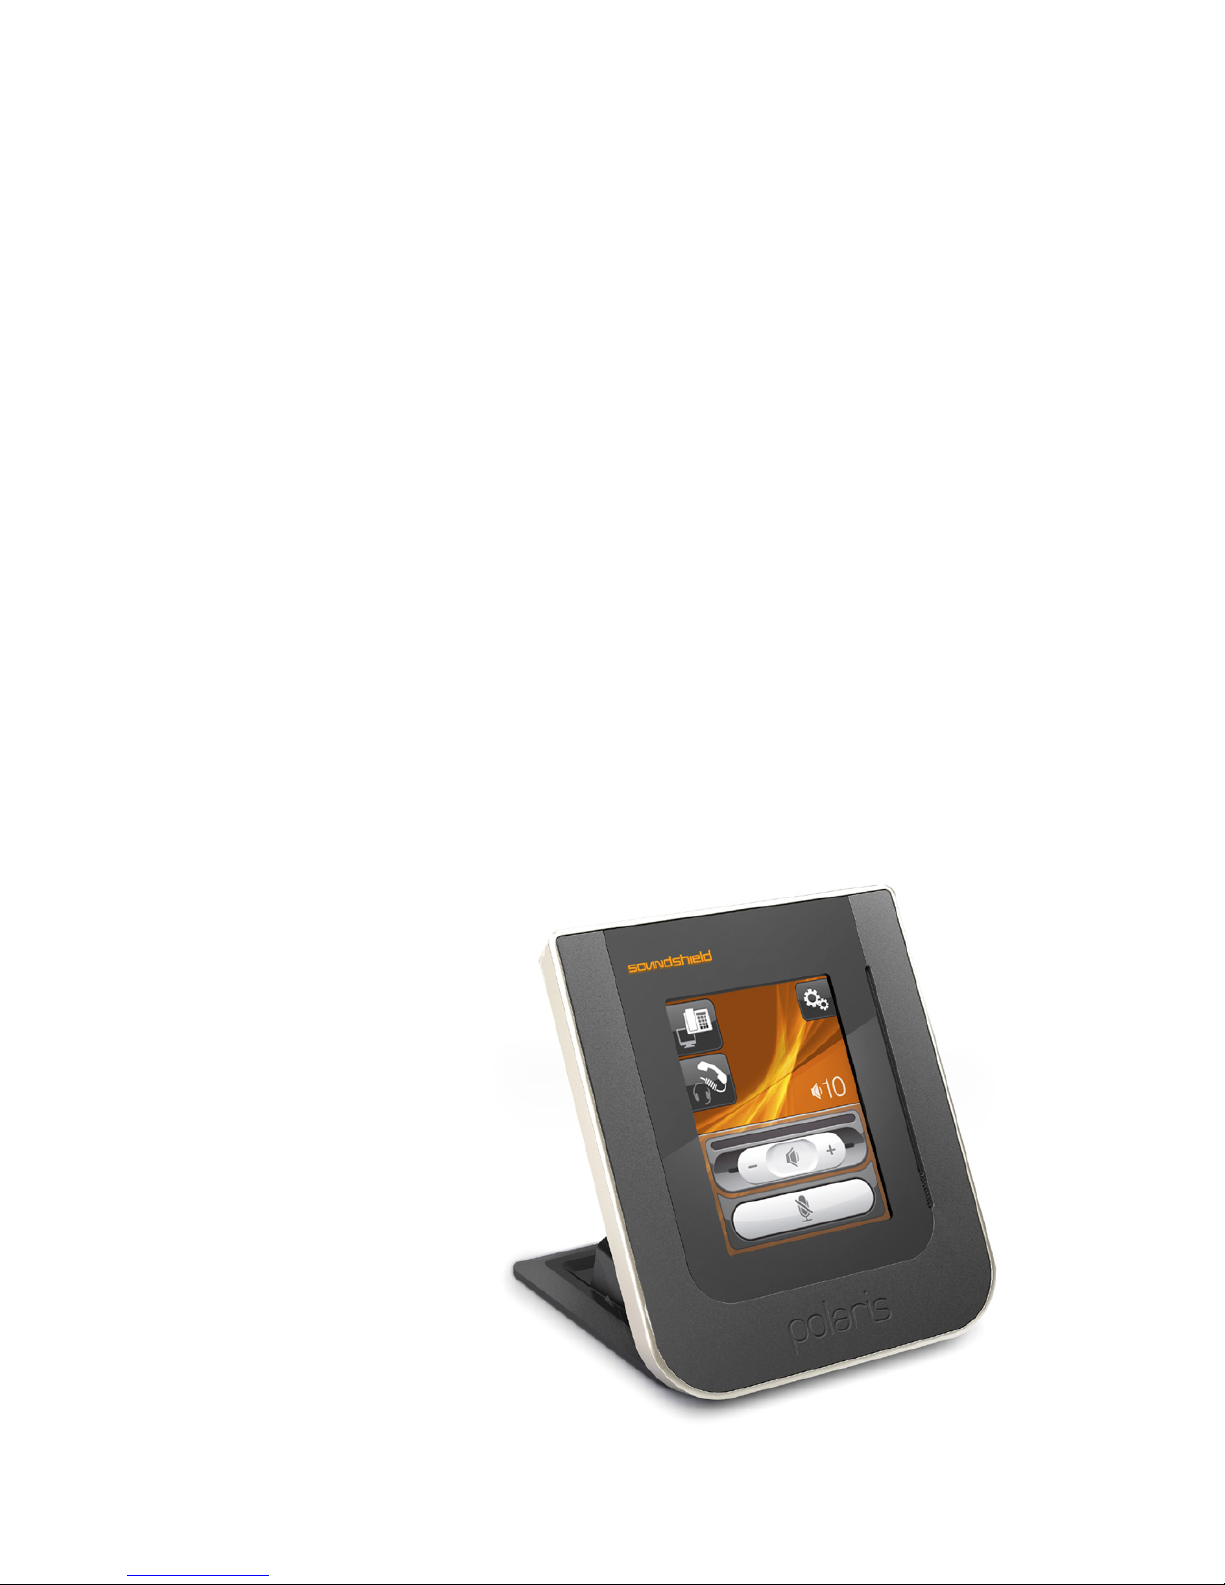
Polaris Soundshield 4G User manual

S A M P L E I M A G E
The Ultimate in Acoustic Safety and Comfort
USER GUIDE
Soundshield 4GTM

2
Contents
1. Introduction 3
2. Protecting your hearing with Sonaron TM 3
3. Care and Maintenance 4
4. Product Overview 5
4.1 Package Contents 5
4.2 Soundshield Diagram 5
5. System Setup and Connections 6
5.1 Connecting your Soundshield to a desk-phone
with a dedicated headset port 6
5.2 Connecting your Soundshield to a desk-phone
without a headset port 7
6. Touchscreen Display 9
6.1 Adjusting the Touchscreen Angle 9
6.2 Basic gestures required for touchscreen interaction 9
6.3 Standard Operation 9
6.4 Adjusting your Receive Volume 10
6.5 Microphone Mute 10
6.6 Setting User Preferences 11
6.7 Adjusting your Audio Tone 12
6.8 Adjusting your Microphone Level 13
6.9 Adjusting your Display Brightness 14
6.10 Adjusting your Display Timeout 15
7. Call Modes 16
7.1 Switching between your Headset or Handset 16
7.2 Switching between your Desk-phone and PC 16
7.3 How to make a call from your Desk-phone 17
7.4 How to make a call from your softphone 17
7.5 How to answer a call 18
7.6 How to end a call 18
8. Ergonomic guidelines for touchscreen usage 18
9. Frequently Asked Questions 19
10. Warranty and Safety Information 20

3
Soundshield 4G
1. Introduction
Congratulations on purchasing the Soundshield 4G.
The Soundshield 4G was developed by Polaris Communications, Australia’s leading supplier of
telecommunications products to both Contact Centres and Ofces, specialising in Acoustically Safe
Headset Solutions.
Soundshield 4G provides exceptional functionality, performance and undoubted Acoustic Safety and
Comfort.
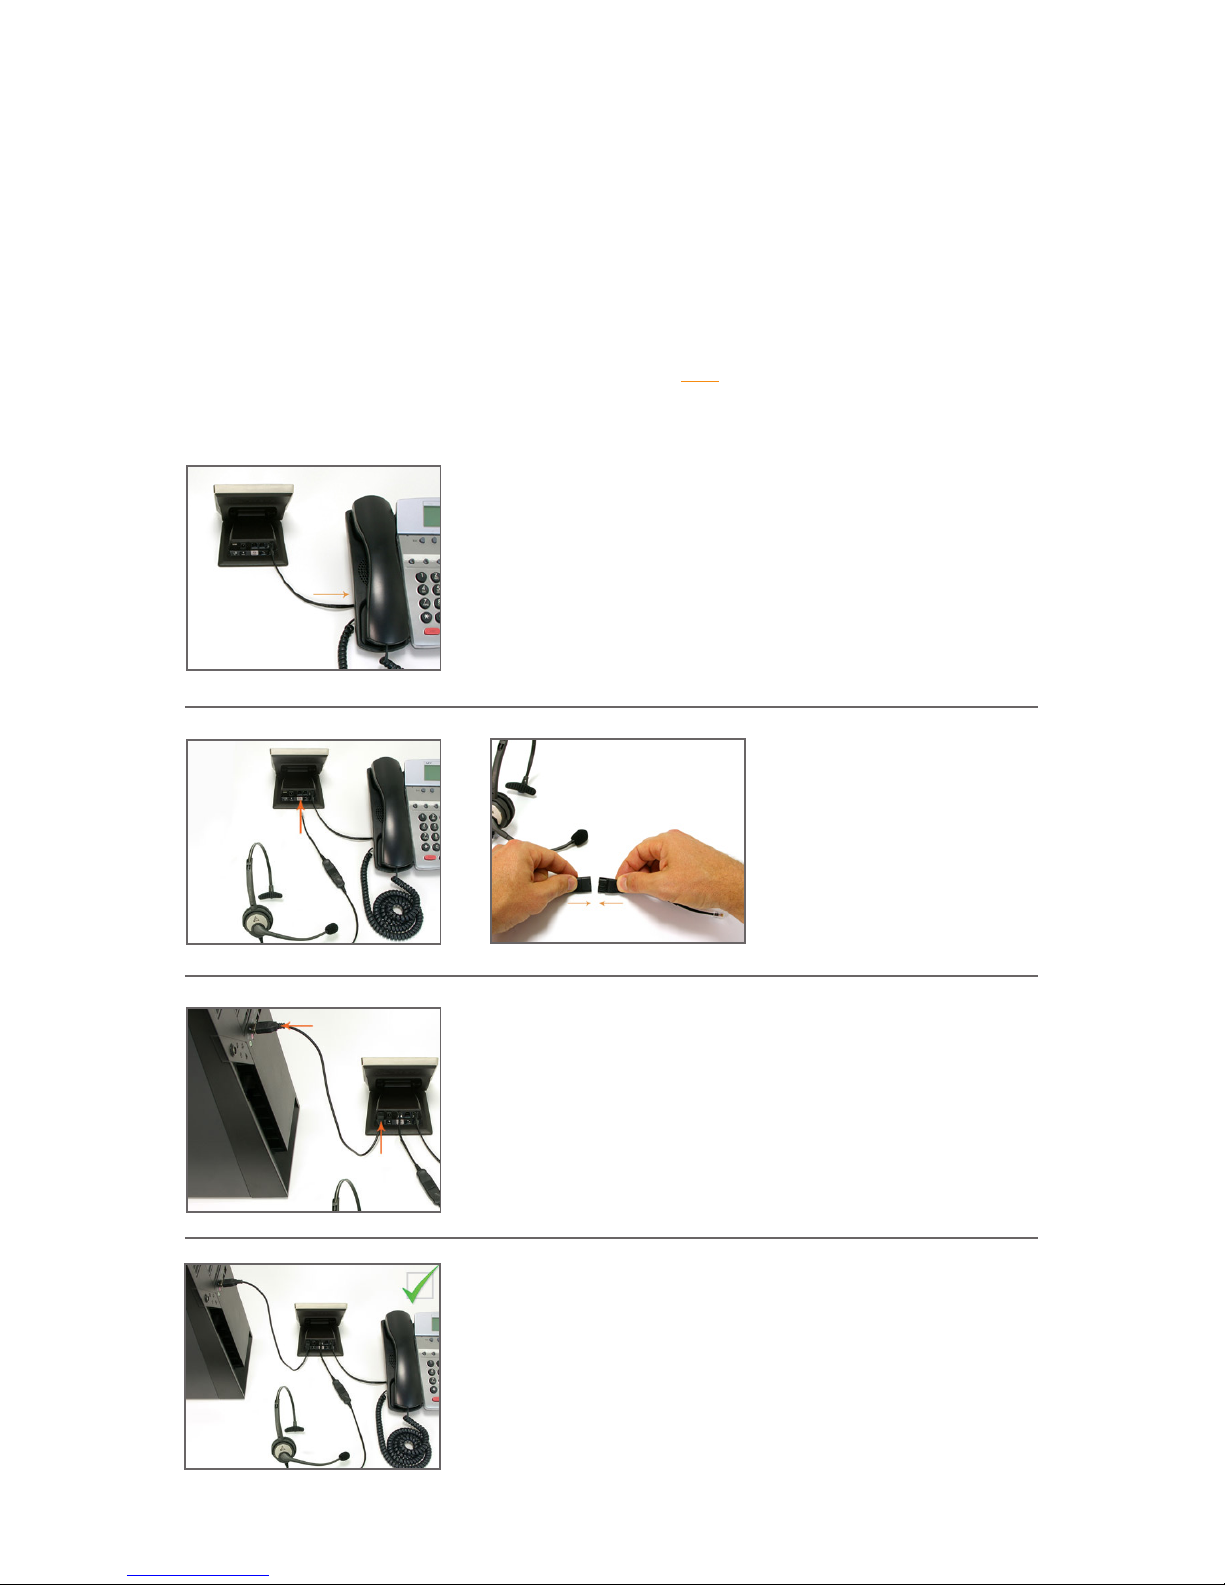
• Designed for headset users of both traditional & VoIP phone systems as well as PCs
• Provides complete protection against Acoustic Shrieks or high pitched tones
• Uses Polaris’ patented Sonaron™ software which provides unique Shriek Rejection™ protection
• Excellent audio quality
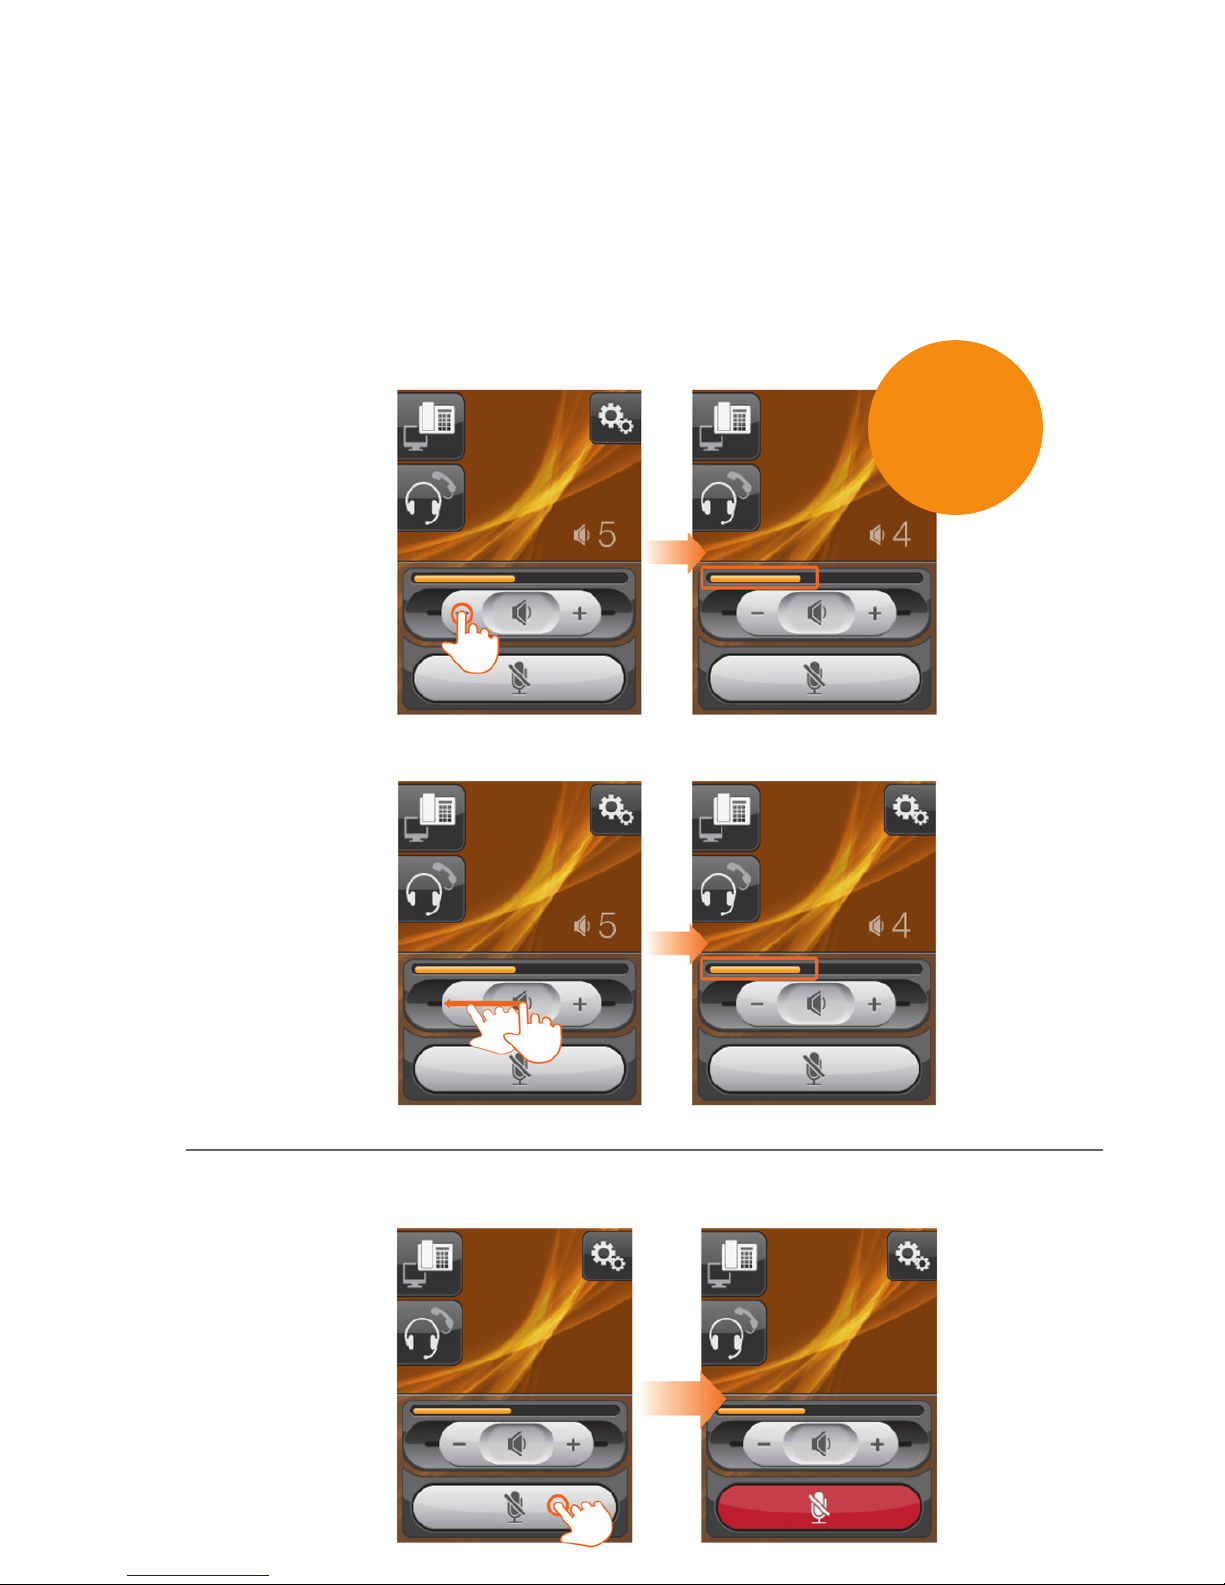
• Intuitive 3.5” colour touchscreen and smart ergonomics
• Compatible with all ofce phones
2. Protecting your hearing with Sonaron
Sonaron is the new Acoustic Safety and Comfort software developed by Polaris and used in all
Soundshield products. Sonaron software:
• Provides anti-shock protection which instantly rejects acoustic shrieks
• Uses Digital Signal Processing (DSP) and Wideband technology for excellence in audio quality
• Includes powerful noise dosimetry data collection and storage allowing pinpoint accuracy with the
recording of noise events.
Soundshield 4G is the ultimate in Acoustic Safety and Comfort.
If you have any questions about your Soundshield 4G contact our Firstpoint Customer Service &
Sales team on 1800 626 505.
TM
TM

4
3. Care and Maintenance
Protect your Soundshield and headset just as you would any other electronic equipment.
If your Soundshield or headset requires cleaning please consider the following:
• Do not use spray cleaning solutions directly onto your Soundshield or headset.
• Clean the product or cables by wiping with a damp cloth as required.
• Clean the touchscreen with standard computer-screen cleaning solution and soft cloth.
• When cleaning the back of the Soundshield, make sure not to place the damp cloth in or too
close to the ports.
• Ear cushions can be cleaned or replaced. Leatherette ear cushions should be removed and
wiped with a damp cloth. We recommend that you replace foam ear cushions as required.
• Avoid exposing the Soundshield and any ports to rain or other liquids.
• Do not immerse the product in water.

5
4. Product Overview
4.1 Package Contents
1. Soundshield
2. USB Cable
3. Tail Cord
4.2 Soundshield Diagram
1. Touchscreen
2. USB Port
3. Power Supply Port
4. Headset Port
5. Handset Port
6. Telephone Port
7. Supervisor Headset port
4.3 Optional Accessories
1. AC Power Supply
2
3
1
1
2 3 4 5 6
7

6
5. System Setup and Connections
This section describes how to connect your Soundshield 4G to your headset and other ofce
equipment. Before following these instructions, you will need to determine whether your desk-phone
has a headset port.
If you are unsure, please contact our Firstpoint Customer Service & Sales team on 1800 626 505 for
further assistance.
To power your Soundshield, connect the USB Cable to the USB
port on the back of the Soundshield and connect the USB cable
to your PC.
Note: Soundshield indicates successful power connection
by the touchscreen illuminating and presenting the Polaris
Communications logo on start-up.
Note: The Soundshield tail cord is already connected to the
Soundshield’s telephone port.
From the Soundshield connect the Soundshield tail cord to the
headset port on your desk-phone.
Connect the bottom cord (curly
cord) to the Headset port of the
Soundshield with the headset
symbol.
Note: Please refer to diagram
4.2 on page 5. The Headset
symbol is port 4.
5.1 Connecting your Soundshield 4G to a desk-phone with a dedicated Headset Port
If your desk-phone includes a dedicated headset port complete the following:
1.
2.
3.
Your Soundshield and desk-phone are now connected.
4.

7
5.2 Connecting your Soundshield 4G to a desk-phone without a Headset Port
If your desk-phone does not include a dedicated headset port complete the following:
Disconnect the handset cord from your telephone.
Connect the handset cord to the handset port on the Soundshield
with the handset symbol.
Note: Please refer to diagram 4.2 on page 5. The Handset symbol
is port 5.
Connect the Soundshield tail cord, to the now available handset
port on your telephone.
Note: The Soundshield tail cord is already connected to the
Soundshield’s telephone port.
1.
2.
3.
Connect the bottom cord (curly
cord) to the Headset port of the
Soundshield with the headset
symbol.
Note: Please refer to diagram 4.2
on page 5. The Headset symbol
is port 4.
4.

8
Your Soundshield 4G and desk-phone are now connected.
To power your Soundshield, connect the USB Cable to the USB
port on the back of the Soundshield and connect the USB cable
to your PC.
Note: Soundshield indicates successful power connection
by the touchscreen illuminating and presenting the Polaris
Communications logo on start up.
5.
6.

9
6. Touchscreen Display
Soundshield 4G features a 3.5” colour touchscreen that enables you to customise settings to
individual preferences.
This section explains how to use the features of the Soundshield 4G touchscreen.
6.1 Adjusting the touchscreen angle
The Soundshield 4G touchscreen angle can be adjusted for optimum viewing. Simply tilt the
touchscreen back and forth until it sits at your preferred angle.
As you adjust the touchscreen you will notice you have free range of up to 15° of forward tilt and 70°
backward tilt.
Note: Do not press directly onto the screen when adjusting the screen angle.
6.2 Basic gestures required for touchscreen interaction
Touch the screen with your nger to activate icons, scroll down a page, and select User Settings.
Single Tap
Briey touch surface
with ngertip
Drag
Move ngertip over surface
without losing contact
Flick
Quickly brush
surface with ngertip
6.3 Standard Operation
During standard operation, the touchscreen displays the phone as the current target Audio Source.
The touchscreen also provides access to your Soundshield User Settings and Controls.
PC & Tel Audio
Source icon &
switching control
Receive volume
level control
Volume level
Mute control
Settings icon
Headset/Handset
switching control
Receive volume
level indicator

10
6.4 Adjusting your Receive Volume
Adjusting your volume settings can be done in two different ways:
1. Single Tap either side of slider control to adjust volume by One Increment per tap.
2. Dragging or Flicking slider control either side to adjust volume by One Increment per action.
1. Single Tap
2. Dragging or Flicking
Single Tap either side
of slider control to
adjust volume by one
increment per tap.
Starting from the
centre, Drag or Flick
slider control either
side to adjust volume
by one increment per
action.
Level indicator
updates to new
setting.
Level indicator
updates to new
setting.
Control highlights
whilst adjusting
volume.
Control highlights
whilst adjusting
volume.
Note: If your
telephone has a
volume control,
set it to mid-
range.
To mute your
Microphone, Single
Tap the Microphone
icon and the icon will
turn red.
6.5 Microphone Mute
To unmute,
Single Tap the
Microphone
icon and the
icon will return
to white.

11
When the Settings Menu opens, select functions by doing the following:
1. Single Tap the selected menu items to reveal the submenu.
6.6 Setting User Preferences
To make an adjustment to your User Settings, touch the Settings icon in the upper-right corner of the
touchscreen.
Scroll bar moves with
the menu.
The dark section of
the bar represents the
displayed area against
the total menu.
Submenu expands
and selected menu
items move as the
submenu expands.
Single Tap menu item
to select sub-menu
items.
Drag menu screen up/
down to move.
Single Tap to expand Settings menu

12
Settings
Audio Tone
HEADSET
Display Brightness 6
Display Timeout 15 min
BASE
About
Mic level
Mid
Settings
Audio Tone Bass
Treble Boost
Mid Range
Bass Boost
HEADSET
Mic Level 7
6.7 Adjusting your Audio Tone
Your Tone Level affects how you hear clients. Make an adjustment to your Audio Tone level by doing
the following:
1. Touch the Settings icon in the upper-right corner of the touchscreen.
2. When the Settings Menu opens, Single Tap the Audio Tone tab to reveal the Audio Tone settings.
3. Single Tap the desired Audio Tone setting to make your selection.
4. Single Tap Audio Tone menu again to hide the menu.
Single Tap to expand Settings menu
1.
2. 3.
Current setting
text updates
with new
selection
Single Tap
anywhere
along bar to
select
Circle
shows new
selection

13
5 sec
Mic Level 6
Mic Level 6Mic Level 6
6.8 Adjusting your Microphone Level
Your Microphone level controls how loud people hear you. Make an adjustment to your Microphone
Level by doing the following:
1. Touch the Settings icon in the upper-right corner of the touchscreen.
2. When the Settings Menu opens, Single Tap the Mic Level menu to reveal the Mic Level indicator.
3. Drag or Single Tap the level indicator to your selection.
4. Single Tap the Mic Level menu again to hide the menu.
Single Tap to expand Settings menu
1.
2.
3.
Single Tap menu item to expand
and show slider control
Current setting
text updates
as slider bar
is adjusted by
user
Drag slider control or Single Tap either
side of control to adjust the mic level
Slider control
highlighted during use
OR
Arrow changes from to
when menu is expanded

14
Display Timeout 5 sec
Display Timeout 15 min
Display Brightness 6
Display Timeout 15 min
Display Brightness 6
6.9 Adjusting your Display Brightness
Make an adjustment to your Display Brightness level by doing the following:
1. Touch the Settings icon in the upper-right corner of the touchscreen.
2. On the Settings Menu, Single Tap the Display Brightness tab to reveal the Brightness settings.
3. Drag or Single Tap the level indicator to your selection.
4. Single Tap the Display Brightness menu again to hide the menu.
Single Tap to expand Settings menu
1.
2.
3.
Single Tap menu item to expand
and show slider control
Current setting
text updates
as slider bar
is adjusted by
user
Drag slider control or Single Tap either
side of control to adjust the level
Slider control
highlighted during use
OR
Arrow changes from to
when menu is expanded

15
Display Timeout 30 mins
About
Display Brightness 6
Display Timeout 30 mins
About
Display Brightness 15 min
6.10 Adjusting your Display Timeout
Make an adjustment to your Display Timeout level by doing the following:
1. Touch the Settings icon in the upper-right corner of the touchscreen.
2. On the Settings Menu, Single Tap the Display Timeout tab to reveal the Timeout settings.
3. Drag or Single Tap the level indicator to your selection.
4. Single Tap the Display Timeout menu again to hide the menu.
Single Tap to expand Settings menu
1.
2.
3.
Single Tap menu item to expand
and show slider control
Current setting
text updates
as slider bar
is adjusted by
user
Drag slider control or Single Tap either
side of control to adjust the level
Slider control
highlighted during use
OR
Arrow changes from to
when menu is expanded

16
7. Call Modes
7.1 Switching between your Headset or Handset
To switch between your Headset or Handset Single Tap the Handset/Headset icon.
Your current
selection icon will be
highlighted while the
new selection icon
slides out.
Once you have made
your selection, both
icons will slide back,
with your newly
selected icon visible.
Single Tap the
Headset or Handset
icon to make your
selection
Single Tap
the Handset/
Headset icon.
Volume
and Mute
Controls are
inactive when in
Handset mode
7.2 Switching between your Desk-phone and PC
Soundshield 4G enables you to switch between your Desk-phone and PC. To switch between your
Desk-phone or PC, Single Tap the Desk-phone/PC icon. The source icon will highlight and expand to
the right. Both source options are now visible.
1. Select the phone icon for desk-phone source, or the computer icon for PC source.
2. If nothing has been selected, the icons slide back to current setting.
Single Tap the
Phone / PC
source icon.

17
7.3 How to make a call from your desk-phone
To place a call through your desk-phone:
1. Set the desk-phone as the Audio Source for your Soundshield by selecting the headset icon on
the Soundshield touchscreen.
2. Press the desk-phone headset button to answer the call or lift the handset from your desk-phone
and set it aside.
3. Dial the number using your desk-phone’s buttons.
Single Tap on
source icon
7.4 How to make a call from your softphone
To place a call through your softphone:
1. If necessary, set the Softphone as the Audio Source for your Soundshield by selecting the PC
icon on the Soundshield touchscreen.
2. Dial the number or choose a contact using your softphone program.
Single Tap on
source icon

18
8. Ergonomic Guidelines for
touchscreen usage
Screen distance from user
The Soundshield 4G should rst be placed at arm’s length from the user, and the touchscreen
adjusted back and forth to suit individual preference. Vertical adjustments should not result in a
change in viewing distance.
Screen tilt
The screen should be tilted so the user’s line of sight is perpendicular to the screen. This angle
creates the most consistent viewing distance when scanning from the top of the screen to the bottom.
In some instances, when the screen is tilted backward, the location of the Soundshield may need to
be adjusted to avoid screen glare by surrounding light sources.
Screen angle
This guideline places the centre of the screen at an ideal 15° to 20° viewing angle for most desktop
displays. If the display has multiple users, the screen height should be located to ensure easy
adjustability to accommodate each user’s height and preference.

19
9. Frequently Asked Questions
1. Nothing happens when I try to use my desk-phone.
• Make sure the Soundshield is correctly powered (check that the touchscreen is on).
• Make sure the audio link to the desk-phone is active (e.g. by touching the Source icon &
Switcher icon on the touchscreen). See Page 18.
• Make sure that the telephone has an active connection to the phone network
(i.e. its handset is off the hook or its headset button is pressed).
2. Whydoesn’tmycomputerdetectSoundshield?
• Try connecting the base to another USB port on the PC.
• It is recommended to have a direct connection to the PC - i.e. not using a
USB hub.
3. Ican’thearsoundorlistentomusicfrommyPCinmyheadset.
• Make sure that Soundshield is in PC mode. See Page 18.
• Make sure that Soundshield is selected as the current audio device both in the Windows sound
control panel and in the application you are using.
4. Ihearmyselftalk(echo)whenusingmydesk-phone.WhatcanIdo?
• Check that your headset microphone is not too close to your mouth
• Check your microphone level via the Settings icon. See Page 13.
• If your desk-phone has a volume control, set the transmission volume on your desk-phone to a
lower level.
5. Callers cannot hear me when I try to make or receive a call through the headset.
• Check that the Mute function is not activated. If the Mute icon is displayed on the touchscreen
then press the Mute Switch once to de-activate the Mute function.
• Check the headset microphone is correctly positioned.
• Check the microphone level setting; this level may need to be increased.

20
10. Warranty and Safety Information
Soundshield 4GTM comes with guarantees that cannot be excluded under Australian Consumer Law. You
are entitled to a replacement or refund for a major failure and compensation for any other reasonably
foreseeable loss or damage. You are also entitled to have the goods repaired or replaced if the goods fail to
be of acceptable quality and the failure does not amount to major failure.
Five year warranty coverage commences from the date of purchase. Warranty does not cover abuse,
accidental damage (i.e. liquid spillage, natural disasters, etc.), and normal wear and tear or replacement
consumables. To claim your warranty please contact our Firstpoint Customer Service & Sales team on
You will be required to send the goods at your expense to:
Polaris Communications Pty Ltd
Service Centre
393 Flemington Road, North Melbourne Vic 3051
Repaired or replacement goods will be dispatched back to you free of charge.
The benets provided under this warranty are in addition to other rights and remedies under Australian law
in relation to the goods and services to which the warranty relates.
Important Headset Safety Information
Please read carefully before using your new headset:
> If your telephone has a volume control, turn the volume down before connecting your headset.
> Whilst wearing your headset, adjust the volume to your preferred volume level. Make sure that the ear
cushion is resting gently on the exterior of your ear.
> Position the microphone approximately two nger widths away from your lips to ensure your voice is not
transmitted too loudly.
Caution: Telephone Headsets may hold small magnetic objects in the area of the earpiece.
Operational Information: Clean the product by wiping with a dry or slightly damp cloth as required. Avoid
exposing the product to rain or other liquids. Do not immerse the product in water.
Keep out of the reach of children: The packaging, including plastic bags and wrapping parts, are not toys
for children. Please be aware that small parts may cause choking if swallowed.
Product disposal: Please dispose of the product according to local standards and regulations.
www.polaris.com.au/weee
Certicationandsafetyapprovals: Assurance that the Soundshield 4G meets the relevant safety
standards. Soundshield 4G meets the test requirements of the Australian Industry Standard AS/NZS 60950
and the Australian TT4 mode - Acoustic Limiting measurements for Telephones and Headsets and I-ETS
300 245-5 – Wideband mode compatible.
It also meets the electrical safety standards AS/NZS CISPR 22, AS/NZS CISPR 24, EN55022 and
EN55024.
CE: This product is CE marked according to the provisions of the R & TTE Directive (99/5/EC).
Hereby, Polaris Communications Pty. Ltd. declares that this product is in compliance with the essential
requirements and other relevant provisions of Directive 1999/5/EC. For further information please consult
www.polaris.com.au
For more information, please contact our Firstpoint Customer Service &
Sales team on 1800 626 505 or visit our website at www.polaris.com.au
Soundshield 4G is a registered trademark of Polaris Communications Pty Ltd
Polaris Communications Pty Ltd owns, reserves and retains all copyright in the SonaronTM
software and icons in our Soundshield product, which is also the subject of Patent Application
No. 2011904477. You are prohibited from copying, distributing, adapting, reverse engineering or
otherwise dealing with the product, or any part of it, in a way that would infringe our exclusive
rights. We reserve our rights to take any legal action necessary to protect our rights and to seek
compensation to the maximum extent.
20
Table of contents
Popular Telephone Accessories manuals by other brands

Leviton
Leviton LE-47609EMP Specifications

yellow jacket
yellow jacket Stun Gun product manual

Plantronics
Plantronics ML15 manual

Jabra
Jabra LINK 14201-20 - DATASHEET FOR TOSHIBA PHONES datasheet

SSS Siedle
SSS Siedle MFM/TI 611-0 Product information

Grandstream Networks
Grandstream Networks HT801 user guide