MANOR BROOK MB 00730 User manual
USEANDCAREGUIDE
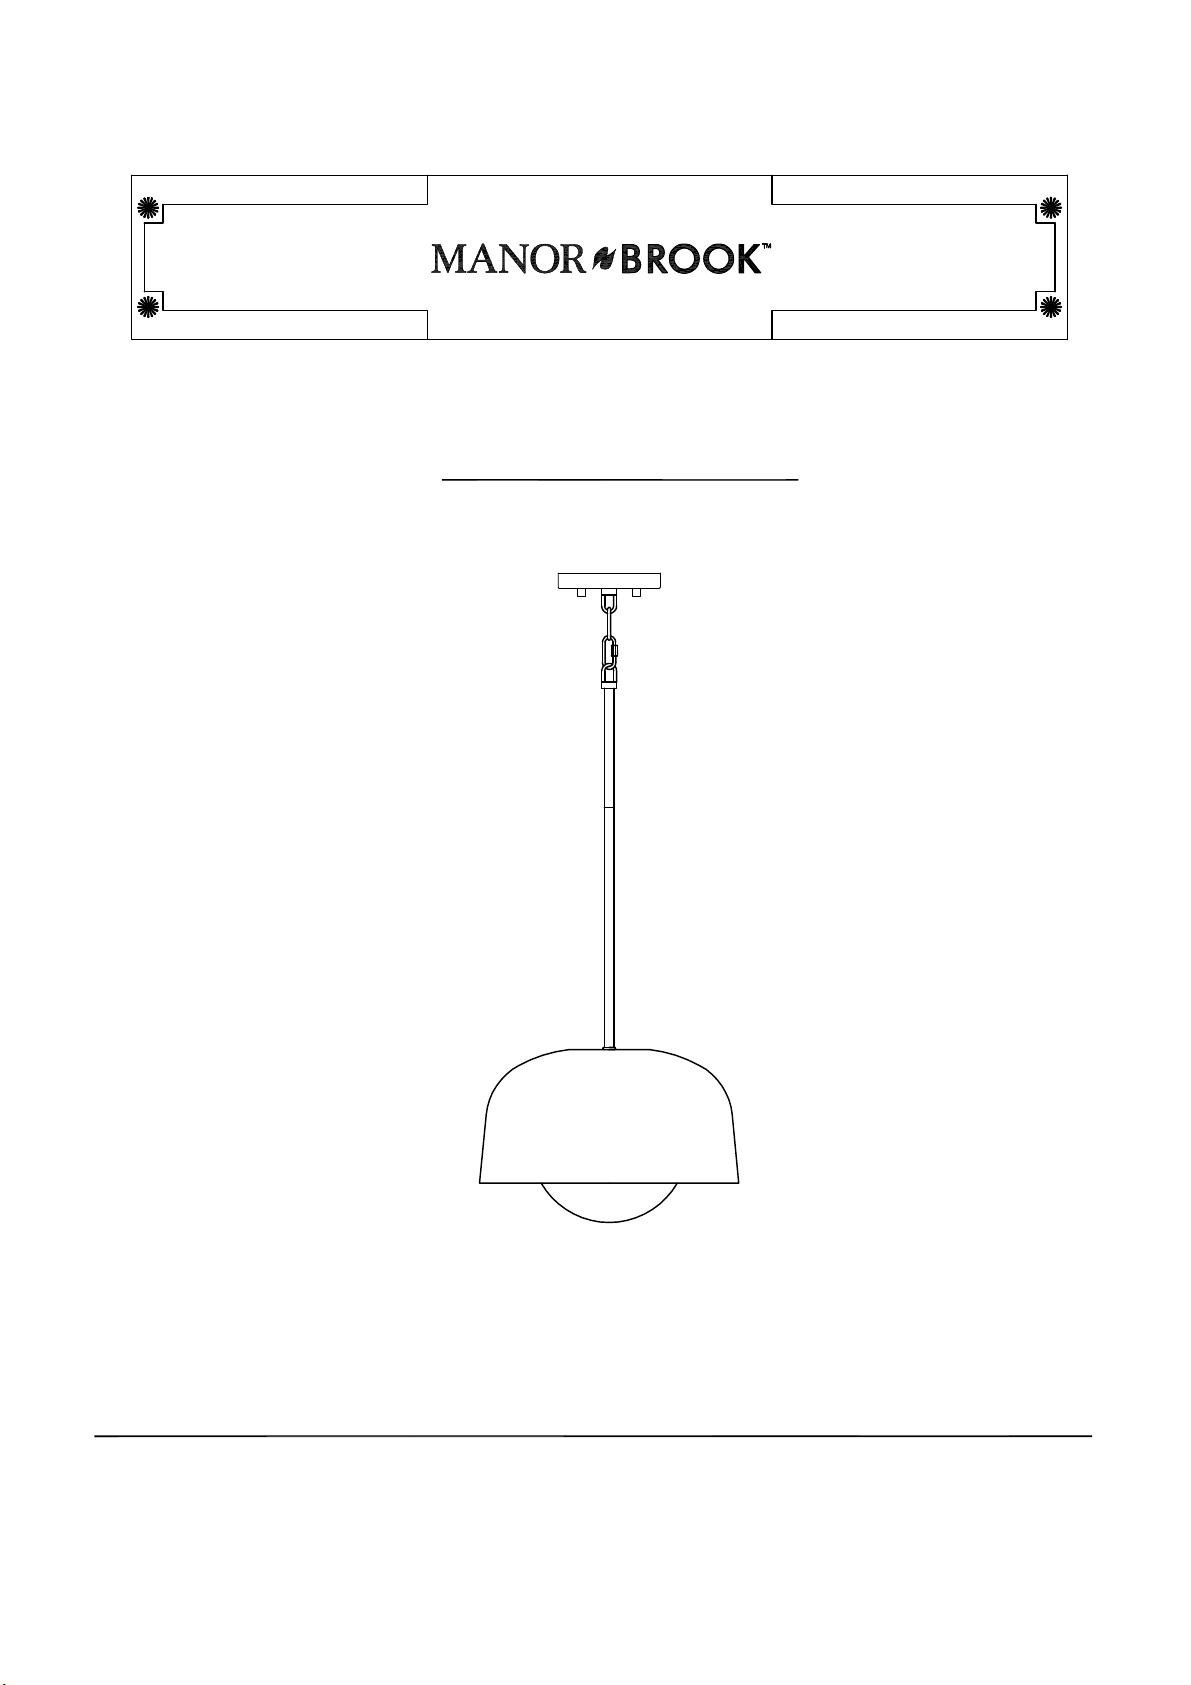
MILLIE1LIGHTMINIPENDANT
Questions, problems, missing parts?Beforereturning tothestore,
call ManorBrook CustomerService
8a.m.-6 p.m., EST, Monday-Friday
904-642-4340
THANKYOU
Weappreciatethetrust and confidence you have placed inManorBrookthroughthepurchase of this light fixture.Westrive tocontinuallycreate
qualityproducts designed toenhance your home.
Thank you for choosing us!
Model#MB 00730
#MB00730-DISP
TableofContents
SafetyInformation .................................................... 2Assembly..................................................................... 5
Warranty................................................................... 2Installation ............................................................5,6,7
Pre-Installation.......................................................... 3Care and Cleaning ........................................................ 7
PlanningInstallation............................................ 3Troubleshooting ........................................................... 7
ToolsRequired.....................................................3
HardwareIncluded...............................................3
PackageContents.................................................4
SafetyInformation
Consultaqualifiedelectricianwithany
electricalquestionsyoumayhave.
Warranty
1-YEARLIMITEDWARRANTY
WHATISCOVERED
Themanufacturerwarrantsthislightingfixturetobefreefromdefectsinthematerialsandworkmanshipforaperiod
ofone(1)yearfromdateofpurchase.Thiswarrantyappliesonlytotheoriginalconsumerpurchaserandonlyto
productsusedinnormaluse.Ifthisproductis foundtobedefective,themanufacturer'sonlyobligation,andyour
exclusiveremedy,is therepairorreplacementoftheproductatthemanufacturer'sdiscretion,providedthatthe
producthas notbeendamagedthroughmisuse,abuse,accident,modifications,alterations,neglectormishandling.
Thiswarrantyshallnotapplytoanyproductthatis foundtohavebeenimproperlyinstalled,assembled,orusedin
anywaynotinaccordancewiththeinstructionssuppliedwiththeproduct.Thiswarrantyshallnotapplytoafailure
oftheproductas aresultofanaccident,misuse,abuse,negligence,alteration,faultyinstallation,oranyotherfailure
notrelatingtofaultymaterialorworkmanship.
WHATISNOTCOVERED
Thiswarrantyshallnotapplytothefinishonanyportionoftheproductduetoweathering,as this is considered
normalwear.Themanufacturerdoesnotwarrantandspecificallydisclaimsanywarranty,whetherexpressedor
implied,otherthanthewarrantycontainedherein.Themanufacturerspecificallydisclaimsanyliabilityandshallnot
beliableforanyconsequentialorincidentallossordamage,includingbutnotlimitedto, anylabororexpensecosts
involvedinthereplacementorrepairoftheproduct.
ContacttheCustomerService Team at904-642-4340.
IMPORTANT:Inspectthewireinsulationforanycuts,
abrasions,or exposedcopperthatmayhaveoccurred
duringshipping.Ifthere isadefectinthewire, donot
continuetheassemblyprocess. Please call ourCustomer
ServiceTeamat 904-642-4340.
2

Pre-Installation
PLANNINGINSTALLATION
Readallinstructionsbeforeassembly.
Toavoiddamagingthisproduct,assembleitonasoft,non-abrasivesurface such ascarpet or
cardboard.Inspecteachpartfordefectsthatmayhaveoccurred during shipping.
Keepyour receiptandtheseinstructionsforproofofpurchase.
TOOLSREQUIRED
3
Part
AA
BB
CC
DD
Description
Mounting plate
Wirenut
Outlet boxscrew
Mounting screw
Quantity
3
1
2
2
Safety
goggles
Wire
strippers Wirecutters
Flathead
screwdriver
Phillips
screwdriver
Ladder Electrical
tape
HARDWAREINCLUDED
NOTE:Hardwarenotshowntoactual size.
AA BB CC
EE GG
Pliers
NOTE:Thislightfixturerequirestheuse of one120V,60Hz,
60-Wattmax,medium-basetypeAbulb(not included).
Donotexceedtherecommendedwattage.
EE
FF
Groundscrew 1
GG
Smallnut 2
Pleasecontact904-642-4340forfurtherassistance.
DD
FF
Finial 2

4
Pre-Installation(continued)
PACKAGECONTENTS
Part
A
Description Quantity
1
B1
Canopy assembly
Quicklink
C1
Loop
D1
6inchesextension tube
E312 inchesextension tube
F1Fixturebody
A
B
C
D
E
F
G
G1
Glassshade

Assembly
1 Assembling the lightfixture
Carefullyunpackthefixtureand lay outall
partsoncleansurface.
Determinehowmany extensiontubesyou
would liketouse.Thenumbersoftubesyou use
dependsonthelengthyoudesireforthe
installedlightfixture.
Feedthefixturewiresupthrough the12"tubes
(E), the6"tube(D).
Attachthedesirednumber oftubes(Dand E)to
thefixturebody(F)by screwing thetubesin a
clockwisedirection.
Screwloop(C)totopoftheextensiontube.
Attachquicklink (B) tothebottomofcanopy
assembly (A)andloop (C) tohang thefixture.
5Pleasecontact904-642-4340forfurtherassistance.
A
B
C
D
E
F
BB
CC
Installation
1Installingthemountingplate
Turnofftheswitch atthewall.
Turnthepoweroffat themainfusebox.
Attachthemountingplate(BB) totheoutletbox
usingtheoutletboxscrews(CC).
CAUTION:Ensurethepowerisoffat the
mainfuseboxpriortobeginninginstallation.
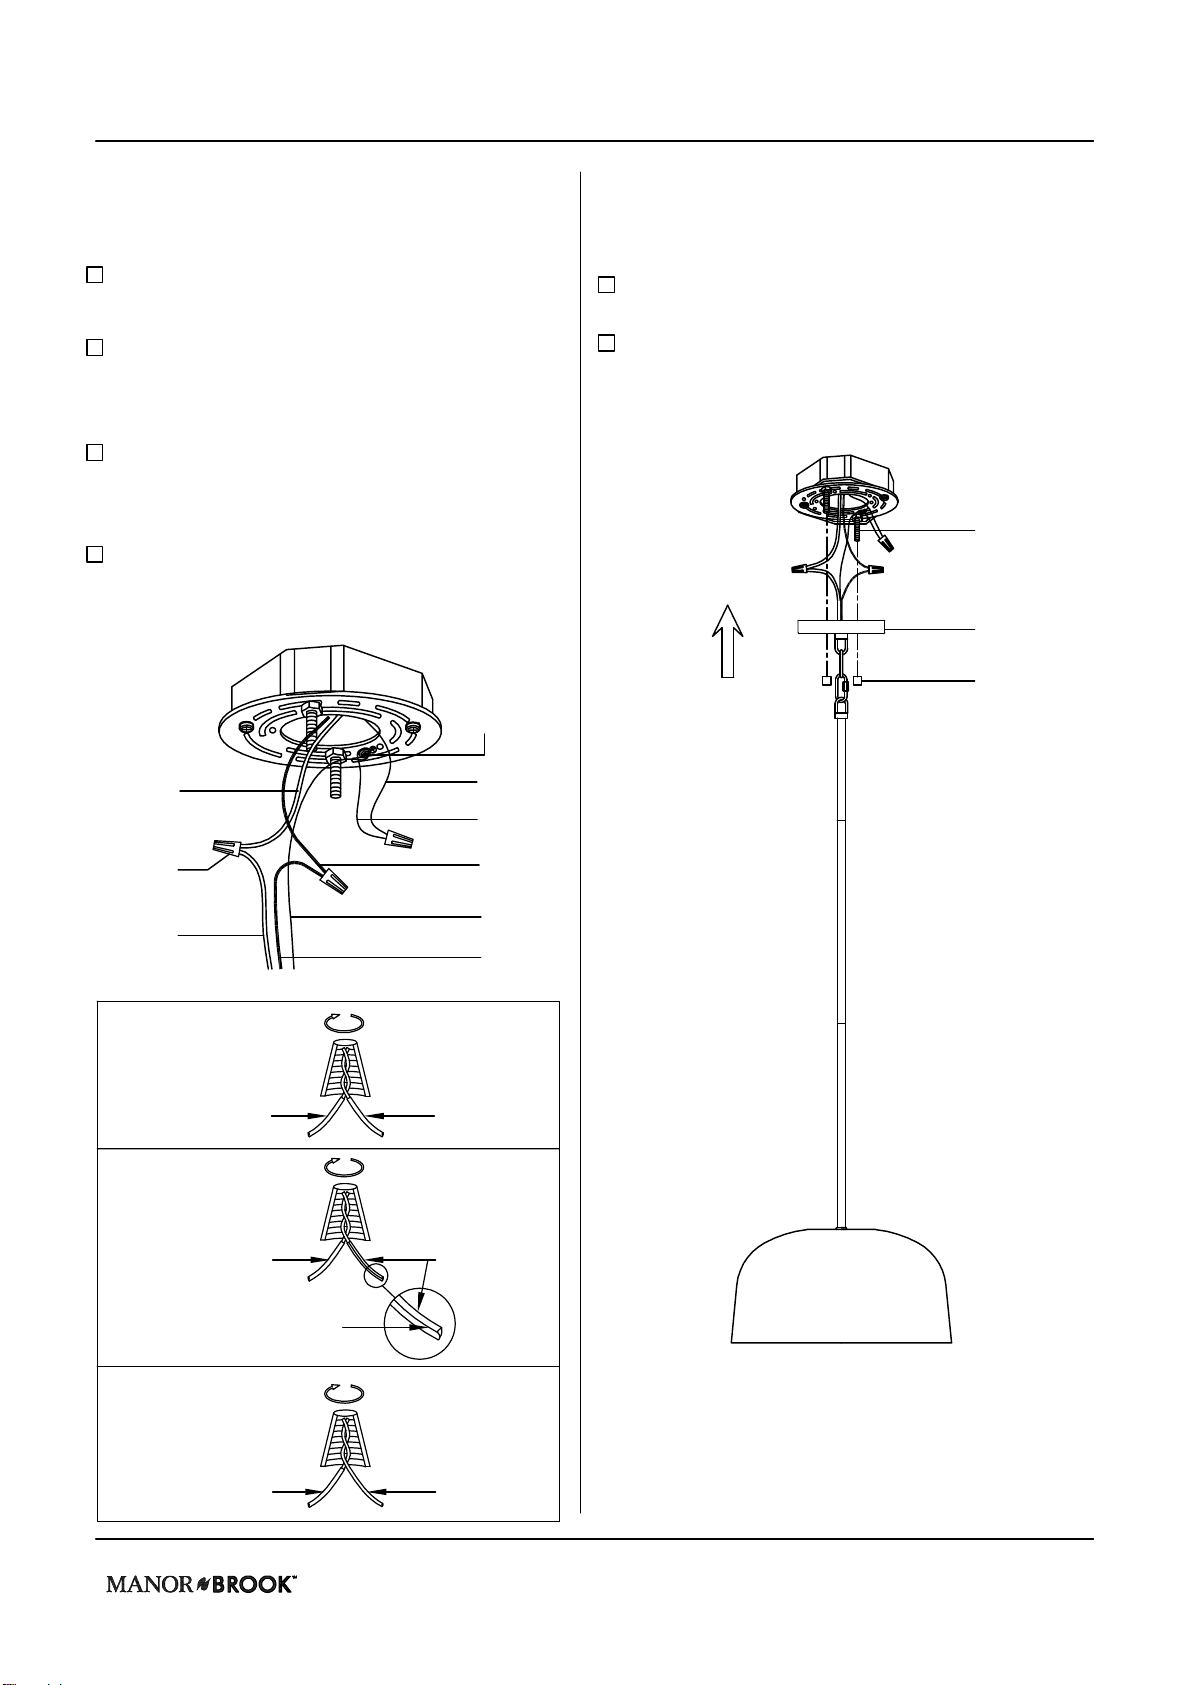
Installation (continued)
2 Connecting the wires
Installthefixturebaregroundwire(1)underthe
groundscrew(EE) onthemountingplate(BB).
Connectthefixturebaregroundwire(1)to the
green(orbare,or green&yellow supplyground
wire(2)intheoutletbox using awirenut(AA).
Connectthewhitefixturewire(3) tothewhite
(or ribbed) supplywire(4) in theoutlet box
using awirenut(AA).
Connecttheblackfixturewire(5) totheblack
(or red,orblue) supply wire(6)in theoutletbox
using awirenut(AA).
6
3 Hangingthelightfixture
Pushallexcess wiresinto theoutletbox.
Raisethecanopy (A) totheceilingand securein
placeby screwing thetwofinials(GG) to the
nipplesofthemounting screws (DD).
DD
A
GG
5
6
4
31
2
AA
EE
1
Housewire
black
(orred,orblue)
(HOT)
Fixturewire
smooth
(HOT)
Housewire
white
(NEUTRAL)
Fixturewire
ribbed
(NEUTRAL)
Housewire
green
(orbarewire,
orgreen&yellow)
(GROUND)
Fixturewire
barewire
(GROUND)
Ribbedline
7
Careand Cleaning
Clean the lightfixture witha soft, drycloth. Donotuse any cleaners withchemicals, solvents, orharshabrasives.
Troubleshooting
PossibleCause
Thebulb isburned out.
Thepowerisoff.
Thereisafaultywireconnection.
Thecircuitbreakerisoff.
Thereisan exposedwire.
Therearetoo many itemson
onecircuit.
Discontinueuseofthelight
fixture.
Contactaqualifiedelectrician or
calltheCustomerServiceTeamat
904-642-4340.
Unplugother itemsonthecircuit.
Ensurethatthecircuitbreaker
issetintheon position.
Checkthewiring.
Ensurethatthepower supply is
turnedon.
Replacethelightbulb.
Solution
Thebulbwillnotlight.
Thefuseblowsora
circuitbreaker tripswhen
thelightisturned on.
Problem
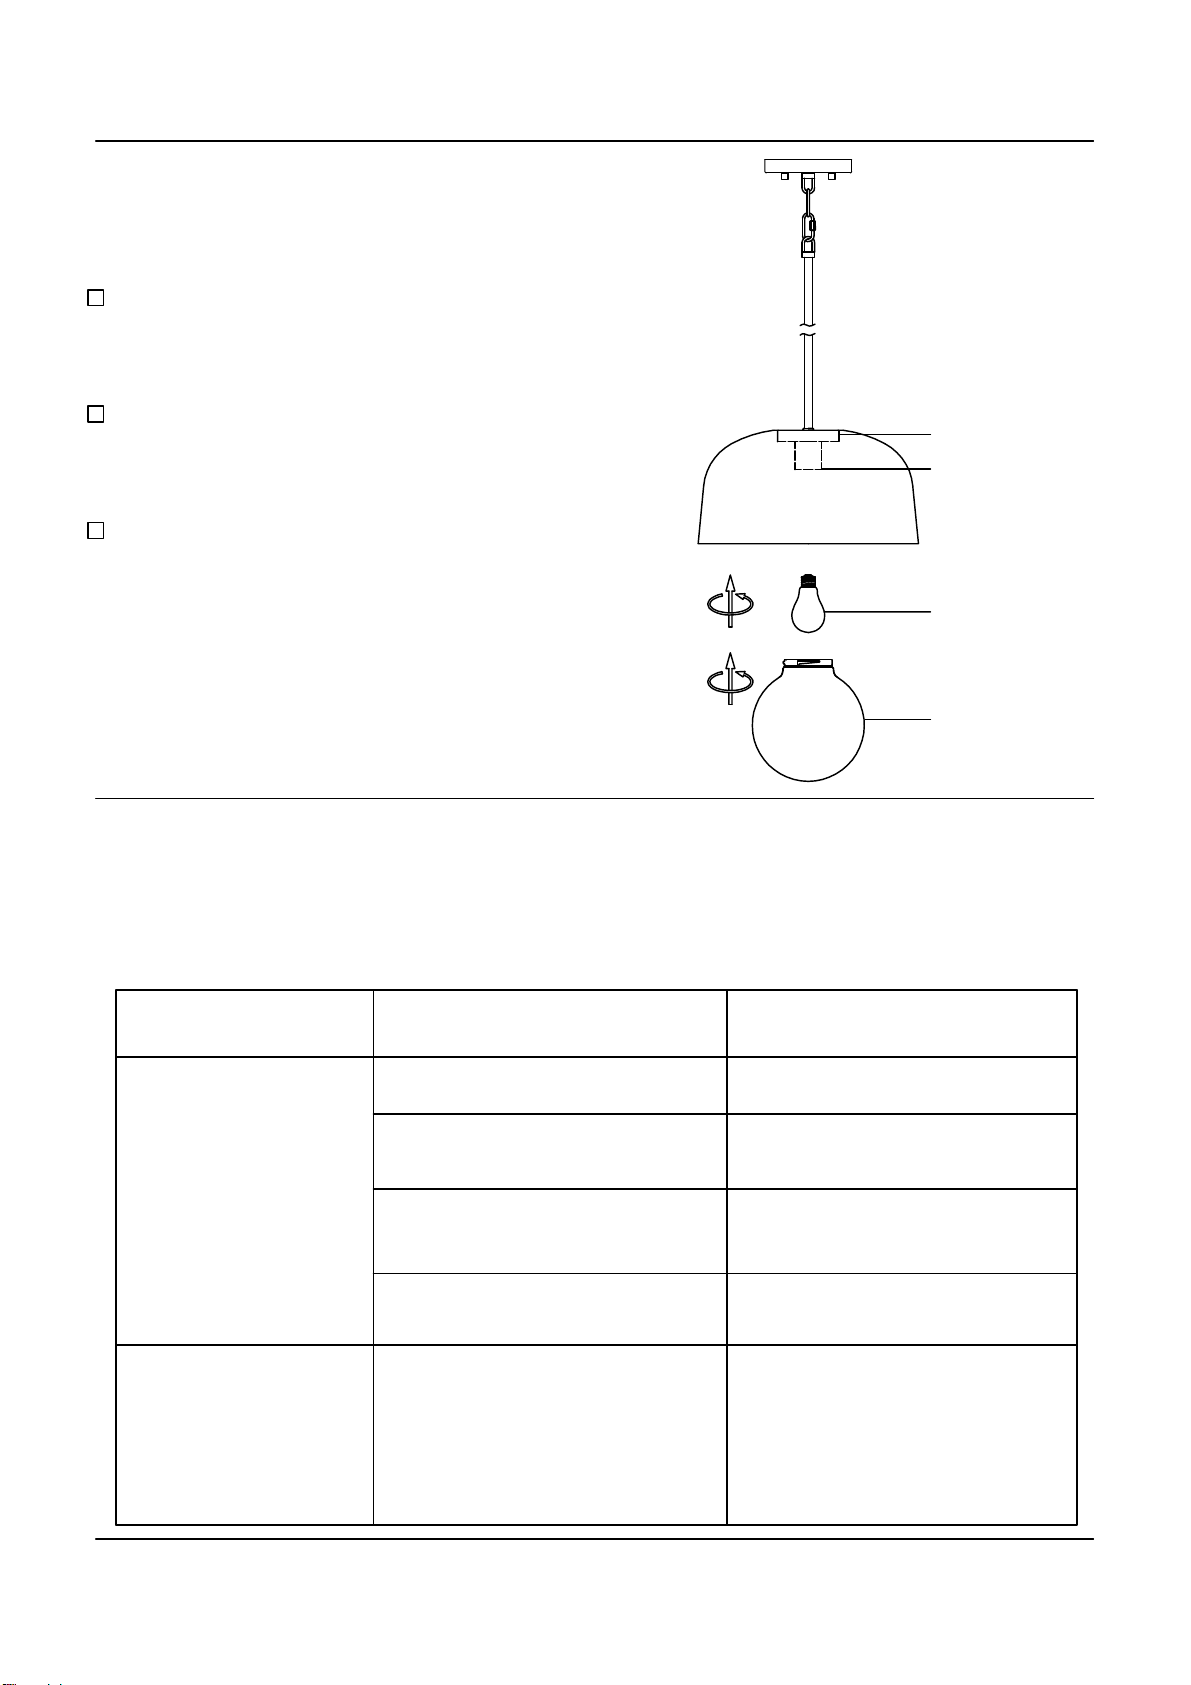
Installation (continued)
4Installing the bulb &assembling glass shade
Prior toinstallingthebulb,inspectsocket forsilica
packet.Ifpacketispresent,thenremoveand throw
away. Do notexposeittochildrenorpets.
Installone120V, 60Hz,60-wattmax.,medium-base,
typeAbulb (notincluded)intothesocketof fixture
body.
Securetheglassshade(G)tobottomofthecup by
twisting it.
Pleasecontact904-642-4340forfurtherassistance.
Bulb
(Notincluded)
G
Socket
Cup

Questions, problems, missing parts?Beforereturning tothestore,
call ManorBrook CustomerService
8a.m.-6 p.m., EST, Monday-Friday
904-642-4340
Retain this manualforfuture use.
This manual suits for next models
1
Table of contents


