manuals.online logo
Brands
  1. Home
  2. •
  3. Brands
  4. •
  5. Polder
  6. •
  7. Bathroom Fixture
  8. •
  9. Polder BTH-110 User manual

Polder BTH-110 User manual

DUO SHOWER CURTAIN ROD & TOWEL RACK
PLEASE READ THROUGH ENTIRE INSTRUCTION BOOKLET BEFORE ATTEMPTING TO INSTALL THIS PRODUCT
BTH-110
Fits a standard 5 ft. bath tub, safely extend to 63 in. (5 ft. 3 in.) & can withstand a weight of up to 16 lbs.
BTH-110
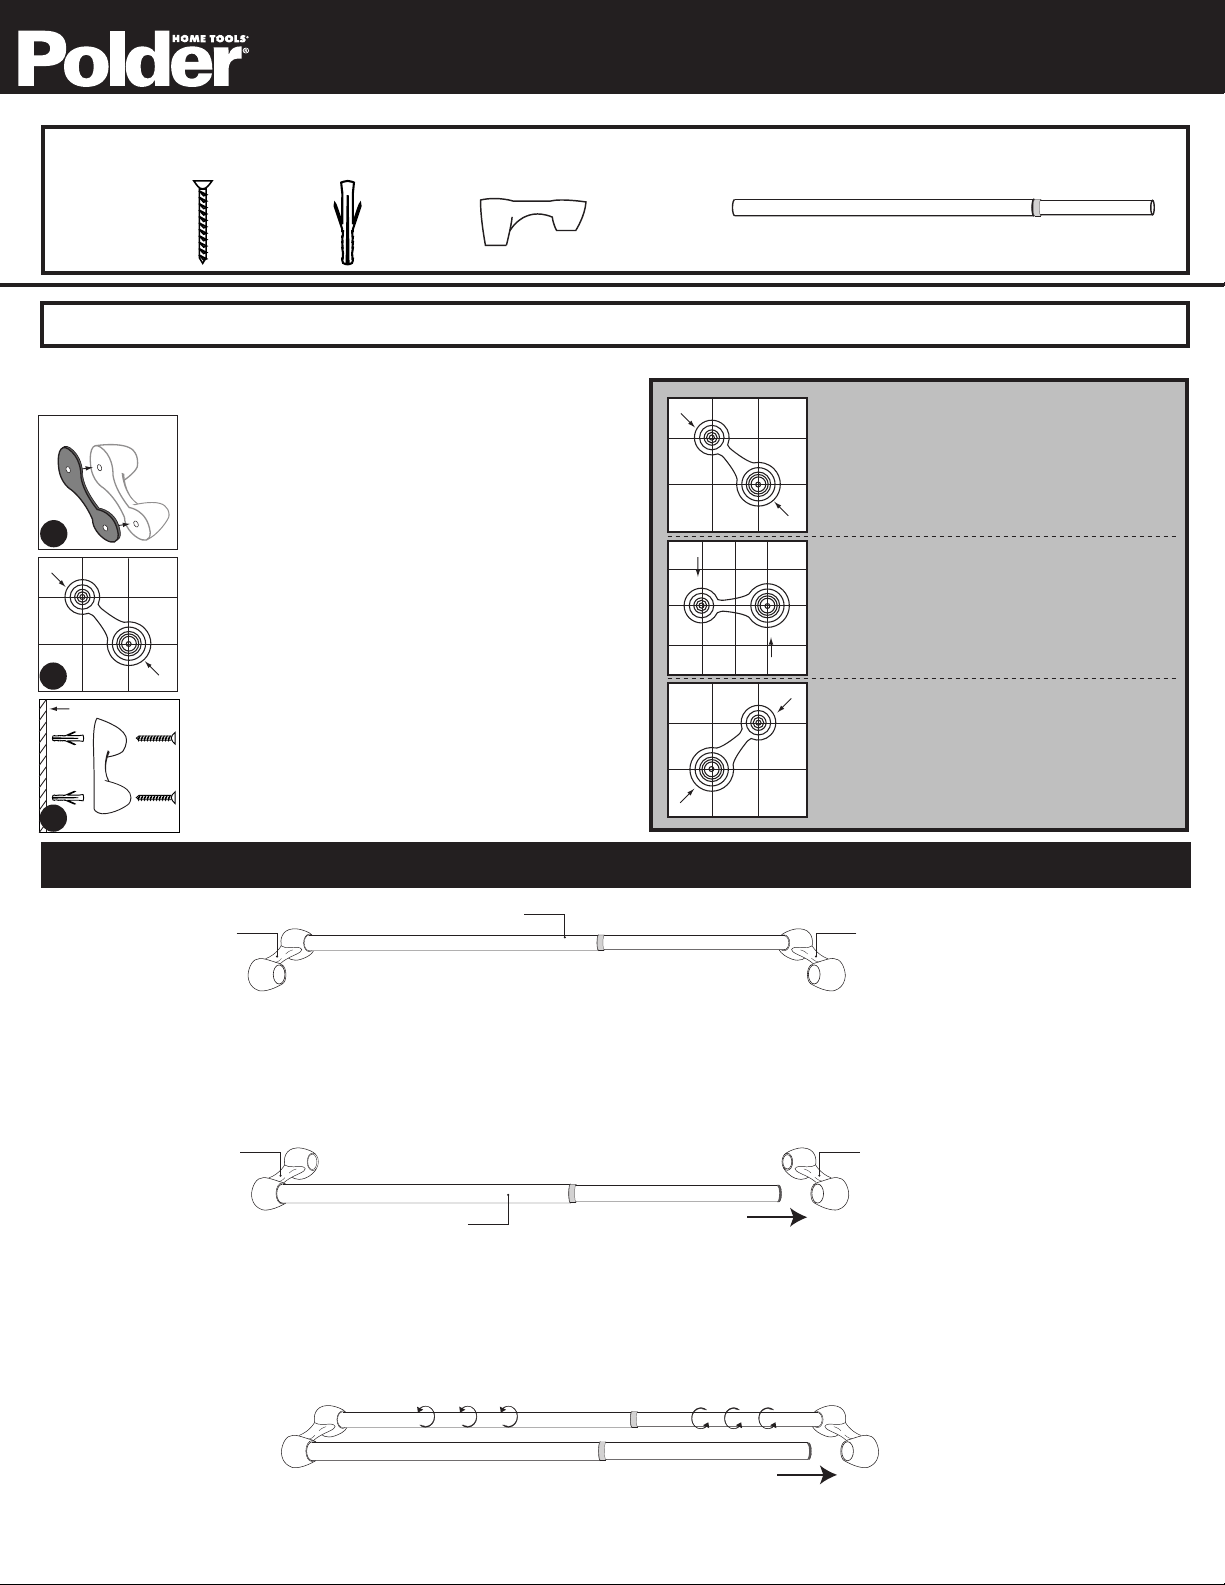
1. Be sure to keep rubber gasket in place when screw mounting the end caps to
the shower wall. see image 1A.
2. Position the end cap (C) at a 45°angle, aligning the two mounting holes with
the tile grout lines. see image 1B.
NOTE: additional placement options are listed to the right
3. With a pen, mark the two hole locations directly on the shower wall through
the end cap (C) hole openings.
4. Move the end cap (C) away from the wall, and drill a hole through the marked
areas using a 1/4" drill bit. Be careful not to bore into the tile
(if positioning allows).
NOTE: extended bar should be horizontal (flat) when in place.
5. Press the plastic grommet (B) into the hole opening, lightly tapping with a
hammer (if needed). see image 1C
6. Place the end cap (C) back over the two grommets (B) and screw in place
using supplied hardware (A).
NOTE: you may need to use an extender in order to reach through the end cap.
PLEASE READ THROUGH ENTIRE INSTRUCTION BOOKLET BEFORE ATTEMPTING TO INSTALL THIS PRODUCT
Dx 2
BTH-110 Polder inc. 8 Slater Street, Port Chester, NY 10573 800-431-2133 • info@polder.com • www.polder.com Made in China. Fabriqué en Chine. Hecho en China.
INCLUDED COMPONENTS
OPTIONAL SCREW MOUNT INSTALLATION
STEP ONE: Mount end caps on shower wall (hardware needed - A, B, C & D - see images above)
TWO-PERSON ASSEMBLY IS SUGGESTED FOR PROPER INSTALLATION OF THIS PRODUCT
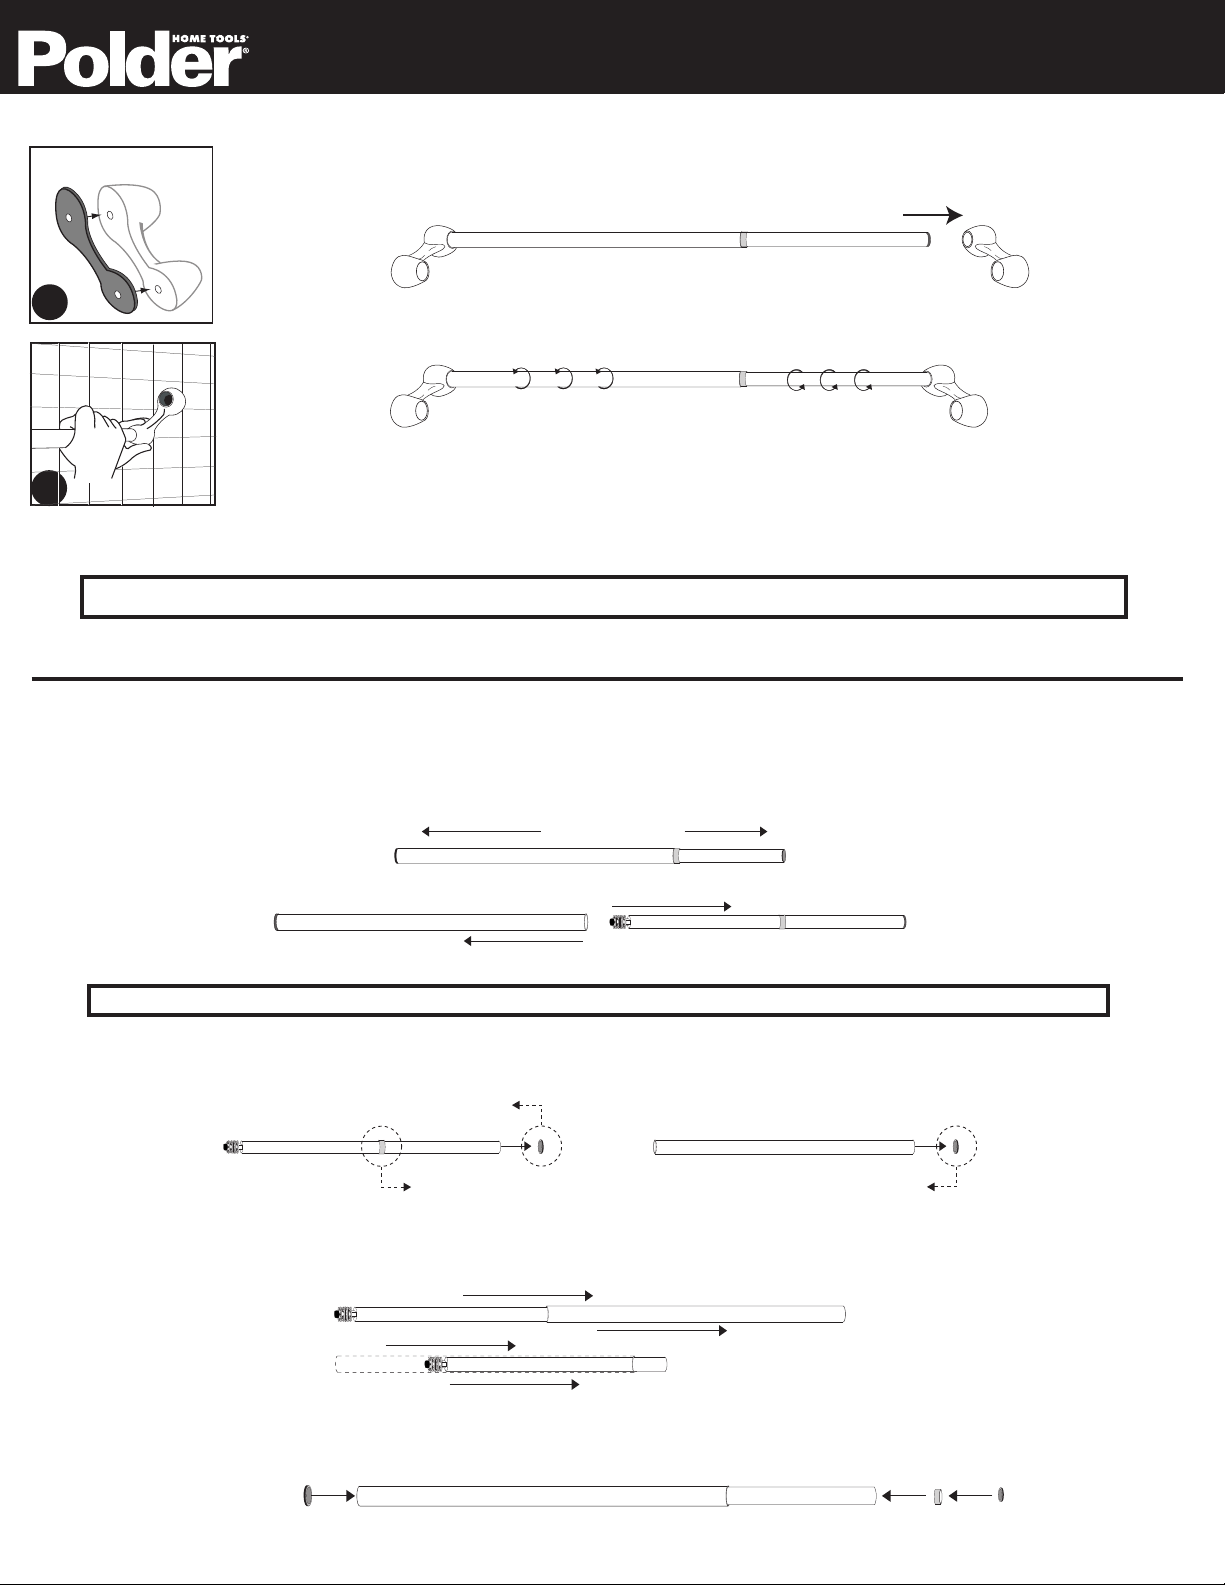
7. While one person holds the unmounted end cap in place, the other person should place one end of the rod (D) into the mounted end cap and extend until it just reaches the opening of the unmounted end cap.
Hold in place. DO NOT TIGHTEN. Using a level, check to see if the rod is level. Move rod away from unmounted end cap and mark the hole location (see image above).
8. Repeat steps 4 & 5 for one portion of unmounted endcap - do not drill both holes at this time!
9. Place the end cap (C) over the grommet (B) and screw LIGHTLY in place using supplied hardware (A). NOTE: The endcap should be LIGHTLY screwed in place in order to adjust the bottom portion.
10. Insert end of second rod (D) into mounted end cap, and extend across to reach the opening of the partially mounted end cap.
11. Adjust the partially mounted end cap until the second rod is straight and level. Mark the hole location. (see image above).
12. Repeat steps 4 through 6. Tighten the end cap in place. (Be sure to tighten both screws)
(INSIDE SHOWER)
(OUTSIDE SHOWER)
1B
IMPORTANT: BE SURE THE END CAPS AND RODS ARE LEVEL BEFORE DRILLING THE MOUNTING HOLES FOR THE SECOND END CAP.
Ax 4 Bx 4 Cx 2
1A
SHOWER WALL
1C
(CURTAIN ROD)
(TOWEL ROD)
(CURTAIN ROD)
(SHOWER LINER)
(CURTAIN ROD)
(TOWEL ROD)
TOWEL ROD OUTSIDE SHOWER
offers an easy and convenient solution for drying towels, bathing suits, etc.
Place smaller portion of the end cap (curtain rod portion) toward the inside of
the shower and position the larger portion of the end cap (towel rod portion)
at a 45°angle. Be sure to line up the mounting holes of the endcaps with the
tile grout.
SHOWER LINER PLACEMENT
offers a separate rod to hang shower liner, extending the life of the curtain
and the liner and protecting it from mold and mildew growth.
Place smaller portion of the end cap (curtain rod portion) toward the inside of
the shower and position the larger portion of the end cap (towel rod portion)
paralell. Be sure to line up the mounting holes of the endcaps with the tile
grout.
TOWEL ROD INSIDE SHOWER
same easy and convenient solution for drying towels, bathing suits, etc. but
keeps these wet items hidden behind the shower curtain!
Place smaller portion of the end cap (curtain rod portion) toward the outside
of the shower and position the larger portion of the end cap (towel rod
portion) at a 45°angle. Be sure to line up the mounting holes of the endcaps
with the tile grout.
MOUNTED ENDCAP UNMOUNTED ENDCAP
FIRST ROD
MOUNTED ENDCAP PARTIALLY MOUNTED ENDCAP
SECOND ROD
STEP TWO: Insert rods in end caps (hardware needed - C and D- see images above)
13. Place one end of the rod (D) into its corresponding end cap (C) opening NOTE: the diameters on the rod endcap openings vary slightly
14. While holding one end in place extend the rod until it slides into the adjacent end cap. Tighten by positioning one hand on each half of the rod and twisting the smaller diameter
rod counter-clockwise. Repeat for both rods. (see image above).
BTH-110
BTH-110 Polder inc. 8 Slater Street, Port Chester, NY 10573 800-431-2133 • info@polder.com • www.polder.com Made in China. Fabriqué en Chine. Hecho en China.
NOTE: In case of over extending the one-way locking storage rod, follow the re-loading instructions below to continue installation.
STORAGE ROD RE-LOADING INSTRUCTIONS
If you have over extended the one-way locking storage rod, please follow these directions to re-load the sections and continue installation.
1. Place one hand on each portion of the rod and, with force, pull the rod sections completely apart. Twisting the smaller diameter rod counter-clockwise to fully separate the rods.
2. Remove the plastic inner cap from both rods, as well as the clear plastic ring on the smaller diameter rod (the rod with the locking mechanism). The cap and ring are designed to be easily removed using a
fingernail. Always pull in a direction away from your body.
3. Reload the small diameter rod into the large diameter rod. The locking mechanism portion of the rod should be facing away from the large rod into which it is being inserted.
The locking mechanism is EXTREMELY SHARP. Handle with care.
4. Push the rear end of the locking mechanism all the way into the larger tube and pull the small diameter rod through a short distance. Replace the plastic ring and then the inner caps and you are ready to
continue installation.
CAUTION: The locking mechanism on the smaller diameter rod is EXTREMELY SHARP and can cause injury. Avoid contact whenever possible, and handle with care.
Plastic inner cap to be removed
Plastic ring to be removed
1. Be sure to keep rubber gasket in place when installing the DUO. see image 1A.
2. Insert first rod into upper portion of the end cap. One person should hold both the rod and endcap securely in place. see image 1B
3. While one person is holding the rod and endcap in place, the other person positions the second end cap in place on the opposite shower wall. Extending the rod to meet
the corresponding opening of this end cap. (see image above).
1A
1B
QUICK-LOCK INSTALLATION (TWO PERSON ASSEMBLY IS MANDATORY FOR THIS TYPE OF INSTALLATION)
4. Using a level, check to be sure the rod is straight and even. Adjust accordingly. Once the rod is level, tighten by positioning one hand on each half of the rod and twisting the
smaller diameter rod counter-clockwise. (see image above).
5. Repeat steps 2-4 for the second rod.

Popular Bathroom Fixture manuals by other brands

Helvex Vertika MR-1001 installation guide

Helvex

Helvex Vertika MR-1001 installation guide

Zenith 5804B Assembly instructions

Zenith

Zenith 5804B Assembly instructions

Megius SOFIST B2F Installation instruction

Megius

Megius SOFIST B2F Installation instruction

Toto TB2F Installation and owner's manual

Toto

Toto TB2F Installation and owner's manual

OVE ZOLA manual

OVE

OVE ZOLA manual

Strend Pro SS18 instruction manual

Strend Pro

Strend Pro SS18 instruction manual

Novellini LUNES F Assembly instructions

Novellini

Novellini LUNES F Assembly instructions

VERNON TUCSON installation guide

VERNON

VERNON TUCSON installation guide

Mirabelle MIRPR8020 quick start guide

Mirabelle

Mirabelle MIRPR8020 quick start guide

Triton Topaz T100si Installation and operating instructions

Triton

Triton Topaz T100si Installation and operating instructions

ABI INTERIORS AZUL installation guide

ABI INTERIORS

ABI INTERIORS AZUL installation guide

BELLOSTA 6521/DOM instructions

BELLOSTA

BELLOSTA 6521/DOM instructions

ACO QuARTz Lightline quick start guide

ACO

ACO QuARTz Lightline quick start guide

Kohler K-712-H2 Homeowner's guide

Kohler

Kohler K-712-H2 Homeowner's guide

Juralco Trident manual

Juralco

Juralco Trident manual

Hans Grohe 35807803 Assembly

Hans Grohe

Hans Grohe 35807803 Assembly

Isenberg Ecomatic 100.6410 installation manual

Isenberg

Isenberg Ecomatic 100.6410 installation manual

INR BASIC Ramona quick start guide

INR

INR BASIC Ramona quick start guide

manuals.online logo
manuals.online logoBrands
  • About & Mission
  • Contact us
  • Privacy Policy
  • Terms and Conditions

Copyright 2025 Manuals.Online. All Rights Reserved.