Polk Mono Signa S4 User manual

.
Signa S4 HOME THEATER SYSTEM
.
Owner’s Manual
1

About manuals .................................................................... 4
About descriptions of this manual .................................. 4
Accessories ......................................................................... 5
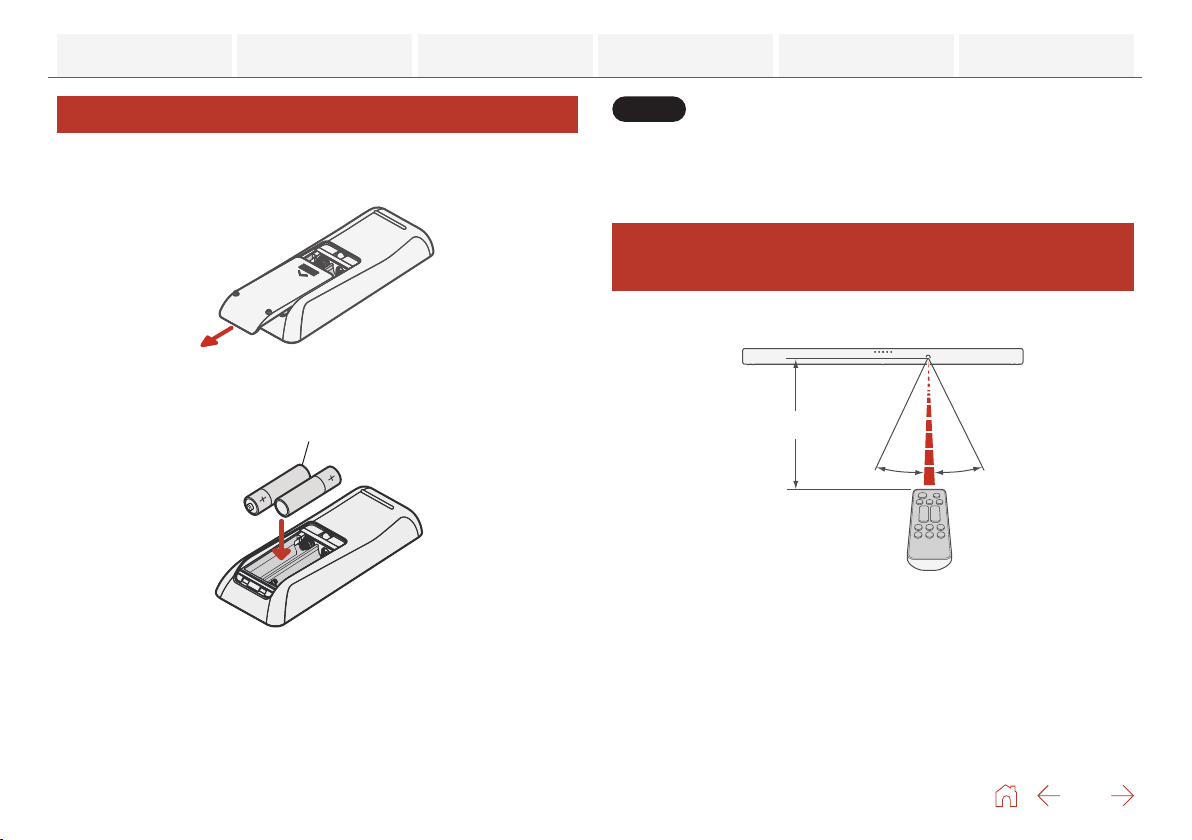
Inserting the batteries ....................................................... 6
Operating range of the remote control unit ................. 6
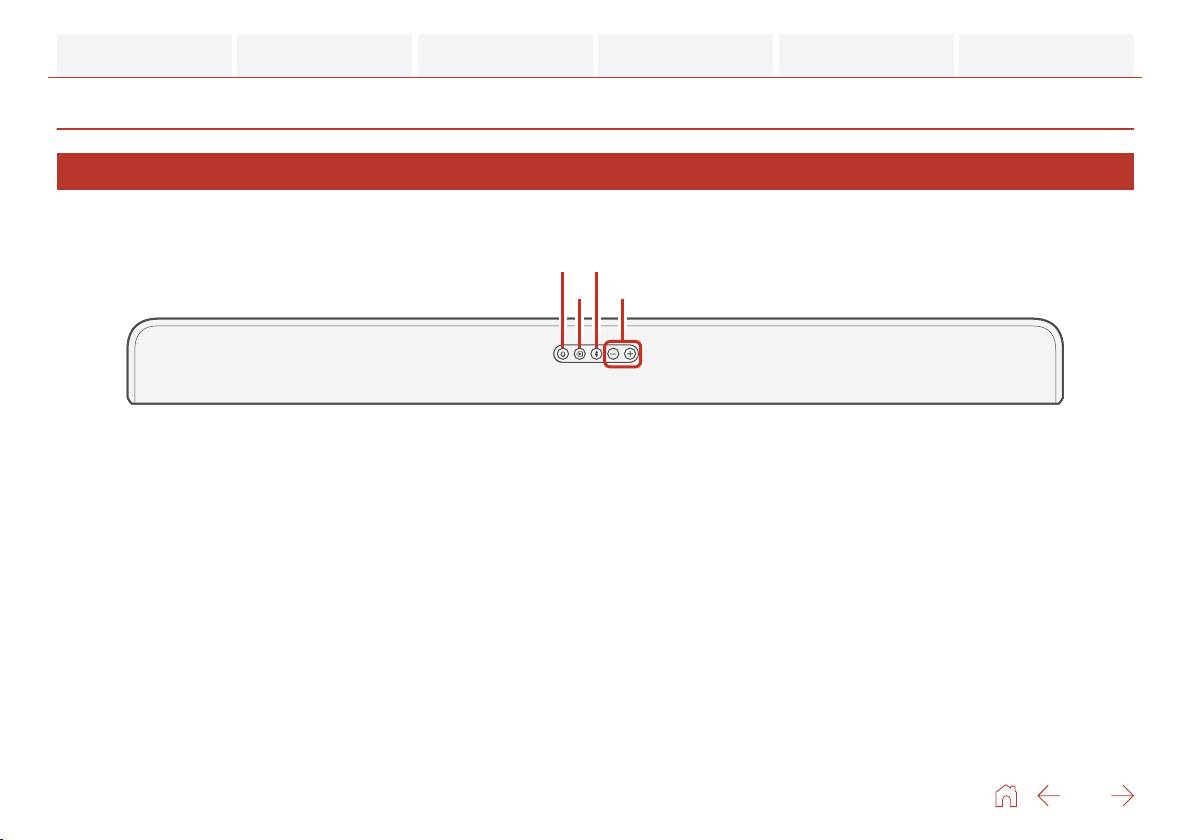
Part names and functions ................................................. 7
Sound bar ............................................................................. 7
Subwoofer ........................................................................... 11
Remote control unit .......................................................... 12
Connections ............................................................... 14
Positioning .......................................................................... 14
Positioning the sound bar in front of a TV ................... 14
Hanging the sound bar on a wall .................................. 15
Positioning the subwoofer .............................................. 17
Connecting a TV ............................................................... 18
TV equipped with an HDMI connector and compatible
with the eARC (Enhanced Audio Return Channel) or
ARC (Audio Return Channel) .......................................... 19
TV equipped with an HDMI connector and
incompatible with the eARC or ARC / TV equipped with
an optical digital connector .......................................... 20
TV equipped with an HDMI connector and
incompatible with the eARC or ARC / TV equipped with
an analog connector ....................................................... 21
Connecting the power cords ......................................... 22
Playback ..................................................................... 23
Playing TV, movies and music ........................................ 23
Adjusting the volume ....................................................... 24
Adjusting the subwoofer volume .................................. 24
Turning off the sound temporarily ................................ 24
Playing music on a Bluetooth device ........................... 25
Pairing a Bluetooth device for the first time ............... 25
Pairing with other Bluetooth devices ........................... 26
Playing music with a paired Bluetooth device ........... 26
Settings ....................................................................... 27
Settings .............................................................................. 27
Selecting a sound mode ................................................. 27
Automatically setting to standby (Auto standby
function) ............................................................................ 28
Reducing the standby power consumption (Deep
standby function) ............................................................ 28
Switching the standby linking via HDMI control
function on or off ............................................................. 29
Automatically turning on the power according to the
playback of the playback device (Auto on control
function) ............................................................................ 30
Operating this unit using the remote control of a TV
............................................................................................... 31
Contents Connections Playback Settings Tips Appendix
2

Tips .............................................................................. 33
Troubleshooting ............................................................... 33
Power does not turn on / Power is turned off ............ 34
Operations cannot be performed through the remote
control unit ........................................................................ 35
Trouble teaching this unit remote control commands
.............................................................................................. 35
No sound comes out ........................................................ 36
Bluetooth playback does not work ............................... 37
The HDMI control function does not work .................. 38
Audio can be heard coming from the TV’s speakers
.............................................................................................. 38
Resetting factory settings ............................................. 39
Appendix .................................................................... 40
About HDMI ....................................................................... 40
Trademark information .................................................... 41
Specifications ................................................................... 42
Sound bar ........................................................................... 42
Subwoofer ......................................................................... 45
Contents Connections Playback Settings Tips Appendix
3

Thank you for purchasing this Polk product.
To ensure proper operation, please read this owner’s manual carefully before using the product.
After reading this manual, be sure to keep it for future reference.
About manuals
The following manuals are included on this unit.
0Safety Instructions (supplied)/Cautions on Using Batteries (supplied):Describes careful considerations that you should note in
order to use this unit correctly and safety. Please read carefully before using this unit.
0Quick Start Guide (supplied):Describes the basics about how to use this unit. Please read when you use this unit for the first time.
0Owner’s Manual (this manual):Describes details about how to use this unit. Also, describes troubleshooting.
About descriptions of this manual
0Signa S4 (sound bar and subwoofer) is described as this unit in this manual.
0In this manual, when you can operate either the sound bar or remote control, the operations for remote control are mainly
described.
0The symbols used in this manual have the following meanings.
.
Information such as the precautions on the use and the function restrictions.
.
Information such as supplementary notes that are useful for you to know.
0Contents of this unit may be updated without notice.
Contents Connections Playback Settings Tips Appendix
4

Inserting the batteries
1Slide the rear cover off the remote control unit in the
arrow direction.
.
2Insert two batteries correctly into the battery
compartment as indicated.
.
Batteries
3Put the rear cover back on.
NOTE
0Remove the batteries from the remote control unit if it will not be in use
for long periods.
0If the battery fluid should leak, carefully wipe the fluid off the inside of
the battery compartment and insert new battery.
Operating range of the remote
control unit
Point the remote control unit at the remote sensor when
operating it.
.
30°
30°
Approx. 7 m
Contents Connections Playback Settings Tips Appendix
6

Part names and functions
Sound bar
oTop panel
.
eq
rw
APower operation button (c)
Turns the sound bar power on/off (standby). (v p. 23)
Links to sound bar power and turns the subwoofer power
on/off (standby).
BInput source button (d)
This selects the input source. (v p. 23)
Switches the input source each time the button is pressed.
CBluetooth button (g)
0Switches the input source to “Bluetooth”. (v p. 25)
0Used to pair with Bluetooth devices. (v p. 25)
DVolume buttons (+, –)
These adjusts the volume level. (v p. 24)
Contents Connections Playback Settings Tips Appendix
7

oStatus LED
.
TV (HDMI eARC/ARC)
TV (OPTICAL)
AUX
Input
source
Off (Standby)
On
Power
Bluetooth
Dolby Atmos
Audio format
[Ex.] Input source:
TV (HDMI eARC/ARC)
Dolby
(other than Atmos)
Unsupported
audio format
PCM
(or No Signal)
Movie mode
Sound mode
[Ex.] Input source:
TV (HDMI eARC/ARC)
Music mode
Night mode
Blink
once
Blink
twice
Blink
three times
Voice adjust 1 Blink
once
Voice adjust 2 Blink
twice
Voice adjust 3 Blink
three times
Contents Connections Playback Settings Tips Appendix
9

oRear panel
.
qq
r
e
t
y
w
AWall hook hole
Used to mount the sound bar on a wall. (v p. 15)
BAUX audio input connector
Use a commercially available 3.5 mm stereo audio cable to
connect an audio device. (v p. 21)
COptical input connector (TV (OPTICAL))
Use the included optical cable to connect a TV with an optical
terminal. (v p. 20)
DHDMI connector (TV (HDMI) eARC/ARC)
Use the included HDMI cable to connect an eARC or ARC
function-compatible TV. (v p. 19)
EUSB port
Service terminal. This port does not support playback of music
from USB flash drives.
FAC inlet
Used to connect the power cord. (v p. 22)
Contents Connections Playback Settings Tips Appendix
10

Subwoofer
oRear panel
AStatus LED
Displays subwoofer status.
LED indication Status
.
When subwoofer power is standby
.
When the sound bar and subwoofer are
wirelessly connected
0The sound bar and subwoofer are wirelessly connected as the
factory default. If no audio is output from the subwoofer, wirelessly
connect the sound bar and subwoofer again. (v p. 36)
BCONNECT button
Used to wirelessly connect the sound bar and subwoofer.
(v p. 36)
CAC inlet
Used to connect the power cord. (v p. 22)
e
q
w
Contents Connections Playback Settings Tips Appendix
11

Remote control unit
t
q
w
r
e
u
y
APower button (c)
Turns the sound bar power on/off (standby). (v p. 23)
Links to sound bar power and turns the subwoofer power
on/off (standby).
BInput source buttons (TV, AUX, g)
This selects the input source. (v p. 23)
CVolume buttons (VOL +, –)
These adjusts the volume level. (v p. 24)
DNight mode button (3)
Compresses the dynamic range (difference between loud and
soft sounds) to make audio easier to hear at low volumes.
(v p. 27)
EMovie mode button (4)
Enjoy movie theater-like surround sound. (v p. 27)
FRemote control signal transmitter
This transmits signals from the remote control unit. (v p. 6)
GMute button ( )
This mutes the output audio. Press again to unmute.
(v p. 24)
Contents Connections Playback Settings Tips Appendix
12

o
Q0
i
HButton to adjust subwoofer (BASS +, -)
Adjusts the volume level for the subwoofer. (v p. 24)
IMusic mode button (2)
Enjoy the full presence of a wide, encompassing acoustic
field. (v p. 27)
JVoice adjust buttons
(VOICE ADJUST 1, 2, 3)
Adjust the volume of dialog in movies, vocals in music, etc. so
these can be heard more easily. (v p. 27)
Can be set to 3 levels. Set this to the desired value.
Contents Connections Playback Settings Tips Appendix
13

Positioning
Positioning the sound bar in front of a TV
Position the sound bar in front of your TV, etc., on a flat surface.
.
NOTE
0When positioning the sound bar in front of your TV, make sure the sound bar does not obstruct the TV’s remote control light sensor, etc.
Contents Connections Playback Settings Tips Appendix
14

Hanging the sound bar on a wall
The sound bar can be mounted on a wall using the two keyholes
provided on the back of the bar for this purpose. When hanging
bar on a wall, position it in a flat, vertical position.
To ensure safety, it is best to employ a contractor to mount the
sound bar on the wall.
NOTE
0In order to use the unit safely, do not place items on or hang items from
the unit.
0Do not attempt to install the sound bar onto a wall made of material
that may crumble easily, such as mortar or decorative plywood. Doing
so may result in the screw pulling out and the sound bar falling, causing
injury or damage to the sound bar.
0Be sure to fix connection cables to the wall to ensure that the cables
cannot be pulled or tripped over, which may cause the unit to fall.
Check that the unit is mounted safely after the mounting work is
complete.
0Also, periodically check that the unit is mounted solidly and that there
is no possibility that the unit could fall.
0Polk cannot accept any responsibility for damage, injury or accidents
caused by problems with the mounting location or mounting method.
.
(B)
(A)
(A) Depth of the
mounted TV
(B) Required space between the bottom of
the TV and the top of the sound bar
Less than 64 mm More than 50 mm
64 – 102 mm More than 102 mm
More than 102
mm More than 191 mm
Contents Connections Playback Settings Tips Appendix
15

0When hanging the sound bar on a wall, use the included wall mount template.
How to use the wall mount template
ATape the template to the location you would like to mount the sound bar.
Leave enough space between the TV and the sound bar so that the sound from the Atmos speakers on the top of the bar, which projects towards
the ceiling, is not blocked by the TV. Refer to the table on the previous page for spacing recommendations. (v p. 15)
BScrew in the wall mount screws by following the template.
Screw in one self-tapping screw (commercially available, 5 mm to 6 mm diameter) into a wall that has sufficient strength to support the weight of
the sound bar, or into reinforcing material on the wall.
.
10.5 mm
More than 20 mm
CRemove the template from the wall.
DMount the included wall mount spacers on the back of the sound bar.
The wall mount spacers create a space for cords to pass through between the sound bar and the wall.
EHang the sound bar on the screws.
Contents Connections Playback Settings Tips Appendix
16

Connecting a TV
How to connect a TV depends on the connectors and functions equipped on the TV.
0Enable the TV’s HDMI control function when using an HDMI cable to connect this unit to your TV. (See the TV owner’s manual for details.)
0Turn off the TV’s speaker or minimize the volume when using this unit.
0HDMI cable connection is recommended, but connection can be performed without an HDMI cable.
NOTE
0Make sure all devices are off when connecting.
0Do not plug device power cords into an outlet until all devices have been connected.
Contents Connections Playback Settings Tips Appendix
18

TV equipped with an HDMI connector and compatible with the eARC (Enhanced
Audio Return Channel) or ARC (Audio Return Channel)
Use the included HDMI cable to connect this unit to an eARC or ARC function-compatible TV.
.
HDMI INPUT
(eARC/ARC)
TV
HDMI cable (included)
Soundbar
(Rear panel)
0The TV also needs to be compatible with the eARC or ARC function.
Contents Connections Playback Settings Tips Appendix
19

TV equipped with an HDMI connector and incompatible with the eARC or ARC / TV
equipped with an optical digital connector
Use the included HDMI and optical cables to connect this unit to your TV.
.
OPTICAL
OUTPUT
HDMI
INPUT
TV Soundbar
(Rear panel)
Optical cable (included)
HDMI cable (included)
0Line up the optical cable with the shape of the terminal to insert.
Contents Connections Playback Settings Tips Appendix
20
Other manuals for Signa S4
4
Table of contents
Other Polk Mono Home Theater System manuals