Polygroup SUMMER WAVES CP2000-C User manual

Should you encounter any problems, contact the Customer Service at (888) 919-0070 from 8 AM to 5 PM Mon. thru Fri.
EST. Extended operating days and hours during peak season requirements.
21
OWNER’S MANUAL
MODEL CP FILTER PUMP
FOR ABOVE GROUND SWIMMING POOLS
To order parts, accessories, or answers to frequently asked questions
about your product please visit WWW.POLYGROUPSTORE.COM
Customer Service: (888) 919-0070
To watch how to setup your product please visit:
WWW.POLYGROUP.COM/VIDEO
DO NOT RETURN PRODUCT TO STORE
DISTRIBUTED BY: POLYGROUP LIMITED (MCO)
Avenida Xian Xing Hai, Centro Golden Dragon, 11 Andar M, Macau
CP2000-C
Table of Content
Should you encounter a problem with your Polygroup Product, please do not return the product to the place or
purchase. All Warranty claims must be made directly to Polygroup. Prior to contacting Customer Service, please first
review the Troubleshooting Guide in the Installation Manual, or review the FAQ at www.polygroup.com. Please review
setup instruction videos on www.polygroup.com/video. If you are still unable to correct the problem, please contact
Polygroup customer service at (888) 919-0070. Have the product type and your purchase receipt ready. Our Customer
Service Representative will assist you in resolving the problem. You may be asked to return all or part of the product for
inspection and/or repair. Do not return any product to Polygroup without a Return Authorization number.
1. READ ALL INSTRUCTIONS CAREFULLY and get a thorough understanding of what is required to assemble your Type
CP Power Filter.
2. Before you begin to assemble the pool, identify, count, and check all parts needed for assembly.
3. It is recommended that you have some PETROLEUM JELLY on hand for lubricating the gaskets.
1. Installer shall follow written instructions provided for operation of the circulation systems.
2. All electrical components shall be installed in accordance with Article 680 of the National Electrical Code (NEC)“Swim-
ming Pools, Fountains and Similar Installations”or its latest approved edition.
3. The Filter Cartridge (21) 3-3/4” will hold as many as 2 of the 1”diameter chlorine tablets and the 8”will hold as many as
6 of the 1”diameter chlorine tablets. Check your chlorine levels to determine the proper number of chlorine tablets to
add.The filter cartridge will automatically dispense chlorine into the pool as the pump runs.
You must have the type of Filter Cartridge (21) with a central core mesh divider (See page 3) to use the chlorine
dispenser. DO NOT use this to dispense powdered chlorine, shock treatment or any other type of chemicals as
damage to the pump, filter cartridge, and pool will occur.
4. The CP Type pump/filter systems are manufactured by Polygroup and ETL control number 4006317 - double insulated
and grounded - 120 V.A.C. - 60 Hz. (ALL Units must have a minimum of 105 V.A.C. to start and run properly.)
PRELIMINARY STEPS
FILTER PUMP IMPORTANT NOTES:
Press
"RESET"
Button
To Start
Pump
Operation
How to use the GFCI plug:
*Do not connect
to a timer device
Do not bury cord. Locate cord to minimize abuse from lawn mowers, hedge trimmers, and other equipment.
The unit is provided with a ground-fault circuit-interrupter (GFCI). To test the GFCI, push the test button.The GFCI should
interrupt power. Push the reset button. Power should be restored. If the GFCI fails to operate in this manner, the GFCI is
defective.If the GFCI interrupts power to the pump without the test button being pushed, a ground current is flowing,
indicating the possibility of an electric shock. Do not use this pump. Disconnect the pump and have the problem
corrected by a qualified service representative before using.
SAVE THESE INSTRUCTIONS
IMPORTANT SAFETY INSTRUCTIONS
When installing and using this electrical equipment, basic safety precautions should always be
followed, including the following:
READ AND FOLLOW ALL INSTRUCTIONS
WARNING - To reduce the risk of injury, do not permit children to use this product
unless they are closely supervised at all times.
WARNING - Risk of Electric Shock. Connect only to a grounding type receptacle.This
product is provided with a ground-fault circuit-interrupter. If replacement of the plug or
cord is needed, use only identical replacement parts.
WARNING - To reduce the risk of electric shock, replace damaged cord immediately.
WARNING - To reduce the risk of electric shock, do not use extension cord to connect
unit to electric supply; provide a properly located outlet.
CAUTION - To reduce the risk of electric shock the pool must be installed no closer
than 6 feet (1.8 m) from any electrical outlet. Do not place portable appliances closer
than 5 feet (1.5 m) from the pool.
CAUTION - This pump is for use with storable pools only. Do not use with
permanently-installed pools. A storable pool is constructed so that it is capable of being
readily disassembled for storage and reassembled to its original integrity. A
permanently-installed pool is constructed in or on the ground or in a building such that
it cannot be readily disassembled for storage.
Section Description Page
General information & Important
Safety Instructions
1 Filter Pump Power Information
2 Part List
3 Filter Pump Installation
4 Filter Pump Operation
5 Pump Motor Protection
6 Filter Cartridge Cleaning Instructions
7 Pool Maintenance
2
3
3
4
5
6
6
7
7
8
9
9
9
10
8 Pool Water Care
9 Trouble Shooting Guide
10 Filter Pump Disassembly abd Storage
11 Warranty Statement
12 Replacement Part Ordering Info
13 Asme Compliant Suction Fitting Info Rmation

Should you encounter any problems, contact the Customer Service at (888) 919-0070 from 8 AM to 5 PM Mon. thru Fri.
EST. Extended operating days and hours during peak season requirements.
Should you encounter any problems, contact the Customer Service at (888) 919-0070 from 8 AM to 5 PM Mon. thru Fri.
EST. Extended operating days and hours during peak season requirements.
43
1 FILTER PUMP POWER INFORMATION
2 PART LIST
3 FILTER PUMP INSTALLATION
FILTER PUMP MODEL WATTAGE AMPERAGE
CP2000-C Filter System Pump 340 watts 2.8 amps
Item
1 Fitting Gasket 1
1
1
1
1
1
1
1
1
1
1
1
1
4
2
1
1
1
1
1
1
1
4
Suction Fitting
Suction Fitting Washer (SF Washer)
Fitting Lock Nut
Suction Fitting Cap (SF CAP)
Return Fitting
Return Fitting Diverter (RF Diverter)
RF Locking Ring
RF elbow 90˚
RF nut
RF Gasket
RF Thrust Washer
Hose
Hose Clamp
Filter Pump Assembly
Vent Screw
Vent Screw O-Ring
Seal Top
Canister Gasket
Type D Filter Cartridge
2
3
4
5
6
7
8
9
10
11
12
13
14
15
16
17
18
19
21
O-Ring (on hose connections)
20
GFCI Power Cord Set
22
Return Fitting plug (RF Plug)
23
Part Name Qty
Set up the pool by following all instructions comes
with the pool. Do not fill water until the Filter Pump
is properly installed. Locate the outlet and inlet
openings on the pool wall.
1Install the Suction Fitting on the outlet opening of
the pool.
2
Install the Return Fitting on the inlet opening of the
pool.
3
Remove the Filter Pump(15), Hoses (13) and Hose
Clamps (14) from the package.
4
Attach one hose to the Suction Fitting and the Filter
Pump inlet.
5
Attach the hose to the pool return fitting and the
pump outlet.
6
5
20
2
1
3
4
7
8
6
11
9
20
10
12
14
13
16
17
18
21
19
15
20
15
22
13
14
7
86
9
11 12 10
43
12
23
Inlet
Outlet
RETURN
FITTING
SUCTION
FITTING
POOL
RETURN
FITTING
POOL
SUCTION
FITTING
20
13
14
13
14

Should you encounter any problems, contact the Customer Service at (888) 919-0070 from 8 AM to 5 PM Mon. thru Fri.
EST. Extended operating days and hours during peak season requirements.
Should you encounter any problems, contact the Customer Service at (888) 919-0070 from 8 AM to 5 PM Mon. thru Fri.
EST. Extended operating days and hours during peak season requirements.
65
4 FILTER PUMP OPERATION
5 PUMP MOTOR PROTECTION
1. Plug the GFCI power cord to a properly grounded receptacle at least 15 feet (4.5m) away from the pool.
2. IMPORTANT: To start the filter pump, press the RESET button on the GFCI plug (22).
3. Check the return fitting on the inside of the pool for correct flow, it should feel like a solid stream
of water returning to the pool. You can use the return flow as a gauge to determine when the filter
needs cleaning or replacement. If you feel a reduction in flow, clean or replace filter.
4.Test water and adjust as needed, read Section 6 - “POOL WATER CARE”.
VERY IMPORTANT – FILTER PUMP ALONE WILL NOT PREVENT ALGAE FROM GROWING IN
POOL WATER; THIS CAN ONLY BE DONE BY MAINTAINING PROPER CHLORINE AND pH LEVELS
AT ALL TIMES!
5.The filter cartridge may need to be cleaned and/or replaced several times at start up until the correct
chlorine and pH levels are attained. We recommend that you keep at least one spare filter cartridge
on hand at all times. Filter cartridges may be purchased at the store you purchased your pool from, or
ordered from Polygroup.
6.To turn off the filter pump, unplug the GFCI power cord (22).
IMPORTANT! Your filter pump is protected by a thermal switch. The switch senses the temperature of the filter
pump. If it gets too hot, the switch will stop the pump from running until it cools off. It will automatically turn back on
when the filter pump has cooled down.This is a safety device to prevent pump damage and prolong service life. If your
pump is automatically turning off, it is because of high pool water temperature and/or low water flow through the pump.
If this happens you need to check the water flow and correct it if needed, as this filter pump uses the water flow for
cooling. You may also want to run the pump at night when the temperature is lower.
6 FILTER CARTRIDGE CLEANING AND REPLACEMENT
Tighten all Hose Clamps (14) to prevent water
leakage.
7
Air is now trapped inside the Filter Pump system,
which will prevent the water from flowing smoothly.
To VENT the system (release the trapped air), open
the Vent Screw (16) at the top of the pump by
turning it counter-clockwise. The water pressure
will force out all the trapped air inside the Filter
Pump system. Tighten the Vent Screw (16) when
you see water flowing out from the Seal Top(18).
9
Hand loosen the RF Locking Ring (8). Adjust the Return
Fitting Diverter (7) to maximize the calculate of the
pool water. Hand tighten the RF Locking Ring (8).
10
Do not plug in the filter pump at this point. Begin to
fill water until the water level reaches the fill line.
8
Unplug the Power Filter Pump. Release the RF Locking
Ring (8). Remove the RF Diverter (7) from the Return
Fitting (6) and then plug the Return Fitting (6) with the
RF Plug (23). Hand tighten the SF Cap (5) onto the
Suction Fitting (7).
1
Use both hands to twist off the Seal Top (18) by
turning counter-clockwise. Remove the Filter
Cartridge (21).
3
To depressurize the filter pump system, vent the
filter pump by twisting the Vent Screw (16)
counter-clockwise.
2
22
5
323
6
18
360°
Loose Tight
PRESS
Loose Tight
18
16
Loose Tight
18
16
21
Loose Tight
7
8
7
8
14

Should you encounter any problems, contact the Customer Service at (888) 919-0070 from 8 AM to 5 PM Mon. thru Fri.
EST. Extended operating days and hours during peak season requirements.
Should you encounter any problems, contact the Customer Service at (888) 919-0070 from 8 AM to 5 PM Mon. thru Fri.
EST. Extended operating days and hours during peak season requirements.
87
7 POOL MAINTENANCE
8 POOL WATER CARE
1. Check and adjust pH and chlorine levels daily using required chemicals. See below Section 6 “POOL WATER CARE”.
2. Check filter pump output daily. If flow is reduced, see Symptom 2 in Section 7 “TROUBLE SHOOTING GUIDE”.
3. Check filter pump, hoses, fitting for leaks. If a leak is found, see Symptom 4 in Section 7 “TROUBLE SHOOTING GUIDE”.
4. Check seams in pool periodically. Minor repairs may be made with the repair patch kit (supplied with pool). Additional
patches are available from Polygroup or your local pool supply store.
1. The following items are required and readily available from your local pool supply store:
• TEST KIT - Used to check chlorine and pH levels.
• 1” CHLORINE TABLETS - Used to disinfect pool water and help control the growth of algae.
• pH CONTROL CHEMICALS - Used to adjust pH levels Up (Soda Ash) or Down (Acid).
• ALGAECIDES - Used to eliminate algae.
• SUPERCHLORINATOR - Used to destroy combined chlorine, ammonia, nitrogen, and
organic compounds.
• LEAF NET with handle - Used to remove leaves, trash, insects, etc. from pool.
• CHLORINE DISPENSER (Supplied with Polygroup’s patented Filter Cartridge
U.S. Pat. 7,005,062) - Used to dispense 1”chlorine tablets ONLY.
2. Use test kit daily to check pH and chlorine levels. Adjust accordingly using the required chemicals.
NOTE: Excessive levels of chlorine or low pH levels will damage pool liner.
3. The pool can be cleaned using a garden hose powered vacuum from Polygroup or a pool supply store.
4. Using a foot bath near the pool to wash off your feet prior to entering the pool will assist in keeping the pool clean.
5.Well water often presents special problems with water chemistry. If you must use well water, take a sample to your
local pool chemical supplier for analysis before adding ANY chemicals.
6. Refer to the POOL’s USER MANUEL for the capacity of your pool. You will need this information to determine the
amount of chemicals you will need to correct the pool water. NOTE: It is recommended to use a 5 gallon bucket of
water to mix and dissolve your chemicals and then applying directly to the pool water. Follow manufacturers label
directions on all chemicals.*Most pool supply stores will test your pool water for free and advise you of what chemicals
you need, and the correct amount to use for your pool. You will need to tell them the pool capacity in gallons.
7. IMPORTANT - We cannot over-stress the importance of proper and adequate daily chemical treatment. Chlorine and
pH levels must be properly maintained at all times. PUMP AND FILTER ALONE WILL NOT PREVENT ALGAE FROM GROW-
ING IN POOL WATER; THIS CAN ONLY BE DONE BY MAINTAINING PROPER CHLORINE AND pH LEVELS AT ALL TIMES.
• Maintain pH level between 7.3 and 7.8.
• Maintain chlorine level between 1.0 and 1.6 ppm (parts per million).
• Superchlorinate your pool at least every other week.
NOTE:
*Hot weather/heavy use may require pH and chlorine levels to be maintained on the upper side of the scale and super-
chlorination of the pool every week.
*Using a pool cover and/or solar cover will assist in maintaining your pH and chlorine levels by reducing the amount of
evaporation from your pool.
CAUTION - Concentrated chlorine levels and low pH levels will damage pool. You must follow the instructions for
the pool chemicals you use, as to quantity and recommended usage.
NEVER drop lumps or pellets of chemicals in pool; this may present a hazard to swimmers and/or damage your liner.
9 TOUBLE SHOOTING GUIDE
WARNING UNPLUG THE POWER CORD BEFORE TROULE SHOOTING THE FILTER PUMP.
1
2
3
4
SYMPTOM PROBLEM POSSIBLE SOLUTION
Motor fails to start
or kicks on and off
A) Unit not plugged in or
GFCI not activated A) Unit must be plugged into a grounded power outlet.
Press the reset button on the GFCI to start the pump.
B) Reset the GFCI plug and/or circuit breaker. If problem
persists, have the circuit checked by a qualified
electrician.
B) GFCI Plug and/or circuit
breaker tripped
C) Low voltage C) Check the line voltage, it must be in the range of
105 to 125V.
No or slow water
flow through the
return fitting.
Filter pump is not
cleaning the pool
properly(Cloudy
water, green…..etc.)
Water leakage
A) Low pool water level A) Fill the pool to the fill line. The suction fitting must
be at least 4”under water.
A) Chlorine level
B) pH level
C) Dirty filter cartridge
D) Damaged filter cartridge
E) Slow water flow
F) Other chemicals required
G) Pool water very dirty
A) Maintain chlorine level between 1.0 to 1.6 ppm.
B) Maintain pH level between 7.3 to 7.8.
C) Clean or replace the filter cartridge.
A) Tighten the hose clamps. Check the o-rings on the
suction/return fittings. Check hoses for damage.
Replace if needed.
B) Check if O-ring (17) for damage. Replace if needed.
C) Check O-ring (19) for damage. Replace if needed.
D) Check filter for damage and holes. Replace new filter
immediately.
E) Check for obstructions(s) at the suction fitting and
return fitting.
F) Have the pool water sample tested by a pool supply
store. Obtain opinions on additional water treatment
chemicals.
G) Run pump more often, but never when the pump is in
use. Clean/replace filter cartridge more frequently.
B) Check for obstructions(s) at the suction fitting and
return fitting.
B) Inlet/Outlet clogged
C) Dirty filter cartridge
A) Suction/return hose
B) Vent screw in Seal Top
C) Seal Top
C) Clean or replace the filter cartridge. A spare cartridge
makes service more convenient.
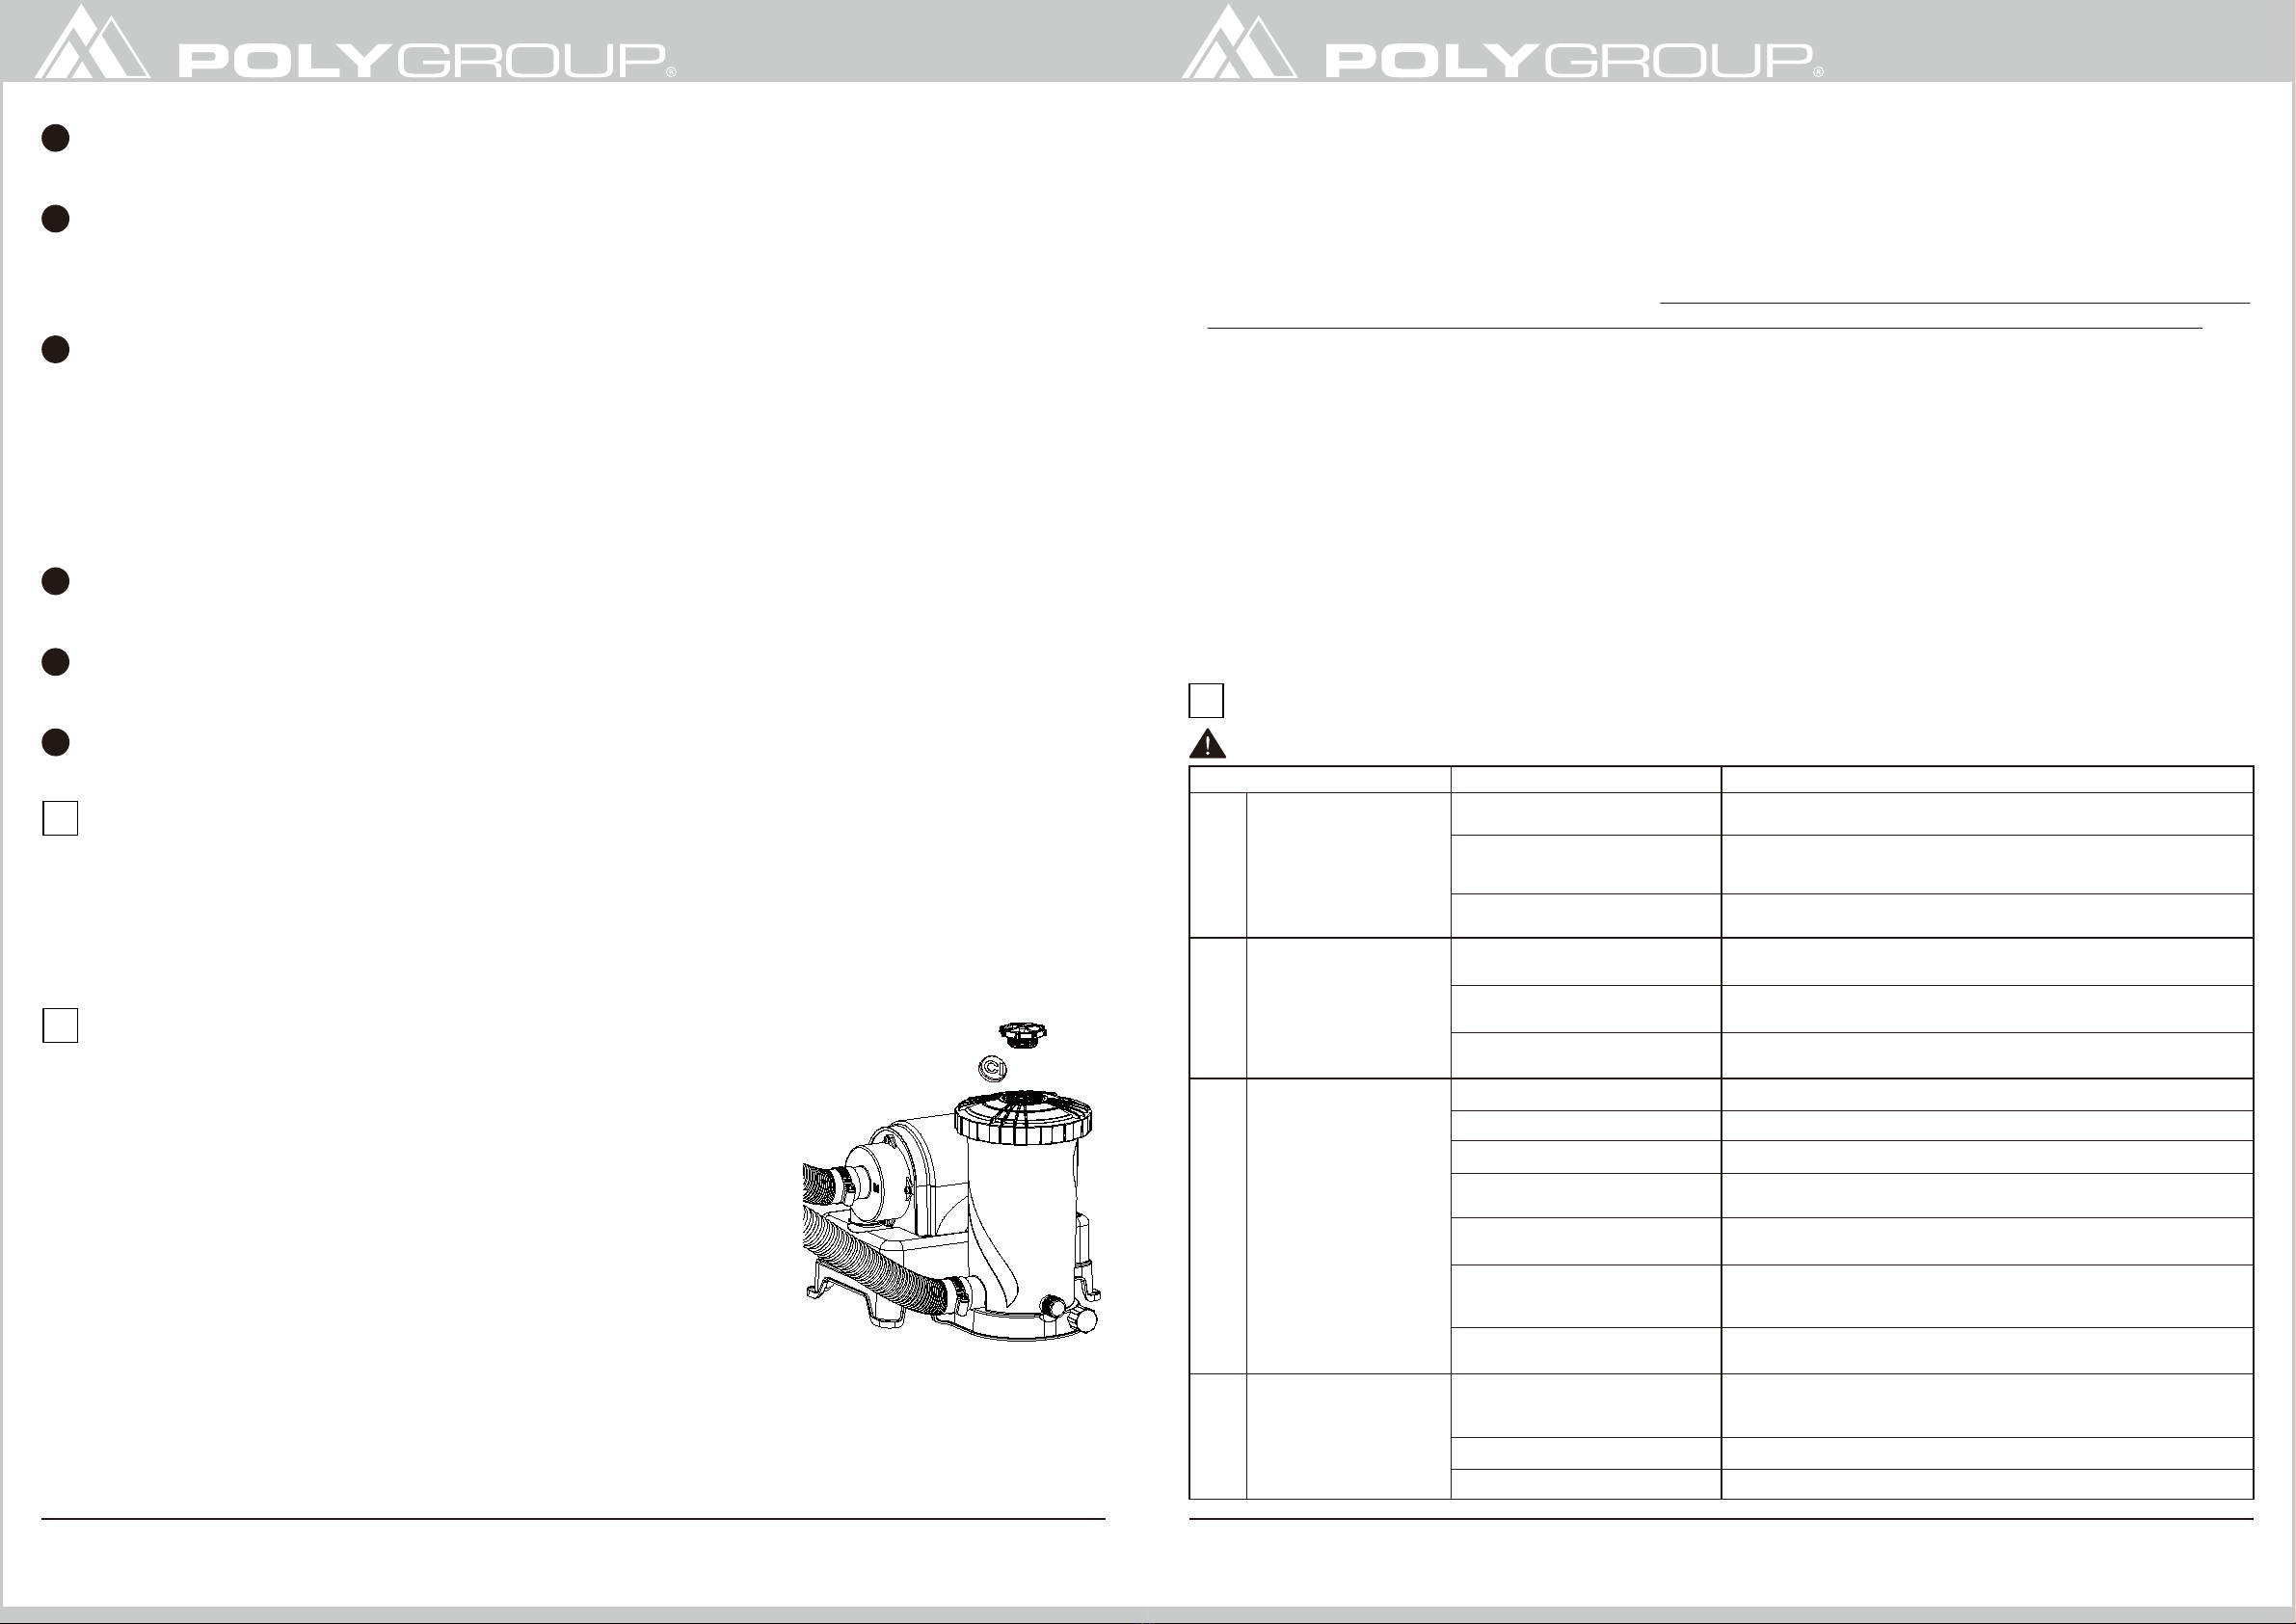
After you are finished cleaning the filter cartridge, liberally lubricate the GASKET (19) with petroleum jelly and
re-assemble in reverse order. Before restarting the filter pump, be sure to remove the RF PLUG (23) and SF CAP (5) and
install back the return fitting diverter (7) and hand tighten the RF locking ring (8).
The filter cartridge can be cleansed of coarse dirt and debris by pressure washing inside and out with a garden hose,
making sure to wash between all pleats. Fine particles of dirt are more easily removed from the filter pleats when the
cartridge is dry. Therefore, after hosing the cartridge, allow the filter to dry and carefully brush, but do not scrub the
pleated surface areas. Cleaning and scrubbing a filter too vigorously will also wear out the cartridge much faster than
if it is simply hosed off correctly.
Suntan oils, body oils, and algae can form a coating on the filter pleats which may not be thoroughly removed by
hosing. Such films of oils and/or algae will rapidly clog up the filters’ pores, greatly reducing filtration. Therefore, it is
imperative to remove such materials from the filter element as soon as possible. To remove oils, we recommend
soaking the cartridge in a solution of 1 pound of tri-sodium phosphate (or any other strong detergent) to 5 gallons of
water for up to 12 hours. Tri-sodium phosphate is available in many supermarkets, hardware stores, or janitorial
supply stores. After the oils have been removed, rinse the filter cartridge to remove any dirt. If algae is a problem, add
1/2 pint of pool chlorine or 1 pint of liquid household bleach to the cleaning solution, 1 hour before removing the
filter cartridge from the solution. Thoroughly rinse the filter cartridge before replacing it in the filter case. Check the
pool chemistry to determine the cause of algae growth.
Excessive calcium and/or mineral deposits may build up on a filter cartridge and should be handled differently.
Contact your local pool supply store to ask about additional filter cartridge cleaners or treatment for calcium or
mineral deposits. Check pool chemistry for high pH or alkalinity; this may cause a calcium or mineral build-up.
A spare“stand-by” Filter Cartridge (21) is an excellent investment. It provides a convenient way to continue filtration
of your pool while cleaning or replacing a dirty Filter Cartridge(21). Also, a well-maintained, clean cartridge assures
you that your filter will always be ready to operate at peak efficiency.
Filter cartridges may be purchased at the store you purchased your pool from, or ordered from Polygroup. Always
replace with genuine POLYGROUPTM’s SUMMER ESCAPETM filter cartridges.
4
5
6
7
8
9

Should you encounter any problems, contact the Customer Service at (888) 919-0070 from 8 AM to 5 PM Mon. thru Fri.
EST. Extended operating days and hours during peak season requirements.
Should you encounter any problems, contact the Customer Service at (888) 919-0070 from 8 AM to 5 PM Mon. thru Fri.
EST. Extended operating days and hours during peak season requirements.
109
Fitting Gasket P58PF1520K01
P58284283W05
P58PF1510P01
P58PF1430W05
P58PF2820P01
P58PF1680W05
P58PF1720W05
P58PF1710W05
P58PF1700W05
P58PF1690W05
P58PF1730K01
1
1
1
1
1
1
1
1
1
1
Suction Fitting
Suction Fitting Washer
(SF Washer)
Fitting Lock Nut
Suction Fitting Cap
(SF CAP)
Return Fitting
Return Fitting Diverter
(RF Diverter)
RF Locking Ring
RF Elbow 90˚
RF Nut
1
2
3
4
5
6
7
8
9
10
1
RF Gasket
11
Item Part Name Qty
Part #
CP2000-C
1
4
1
2
1
1
1
1
1
1
4
Hose P58150059W01
P58PF2960W05
P5842504500A
P58PP1768W05
P58182201W05
P58182501K01
P58PP2098W05
P58147800K01
P58037000K01
P581041080PR
P58GF90000K1
P58PF0620K01
Hose Clamp
Filter Pump Assembly
Vent Screw
Vent Screw O-Ring
Seal Top
Canister Gasket
Type D Filter Cartridge
O-Ring
(on hose connections)
GFCI Power Cord Set
13
14
RF Thrust Washer
12
15
16
17
18
19
20
21
22
1
Return Fitting plug (RF Plug)
23
Item Part Name Qty
Part #
CP2000-C
10 POOL PUMP DISASSEMBLY & STORAGE
(1) Unplug the Power Filter Pump. Release the RF Locking Ring (8). Remove the RF Diverter (7) from the Return Fitting (6)
and then plug the Return Fitting (8) with the RF Plug (23). Now, hand tighten the SF Cap (5) onto the Suction Fitting (2).
(2) Slowly unscrew the Vent Screw (16) from the Seal Top (18) allowing the filter pump to depressurize.
(3) Remove the Seal Top (18) by turning counter-clockwise.
(4) Remove the Filter Cartridge (21) and remove any chlorine tablets left inside the core section of the filter.
(5) Loosen all four Hose Clamps (14), remove the Hoses (13) and allow water to drain out.
(6) Clean and dry all filter pump parts including filter cartridges.
(7) Liberally lubricate the O-rings (17) at the Seal Top (18) and Gasket (19) on the canister with petroleum jelly, and then
reassemble it along with the Seal Top (18),Vent Screw (16) onto the canister. Store all filter parts carefully.
12 REPLACEMENT PART ORDERING INFO
11 LIMITED WARRANTY
Polygroup Limited (Macao Commercial Offshore), (hereinafter “Polygroup”) warrants to the original purchaser only, the
CP type Electric Filter Pump against defects in material and workmanship for 180 days from the date of purchase.
Original Purchaser must retain proof of such purchase in the form of an original store sales receipt and must produce
such upon request by Polygroup or its designated agents. Warranty claims cannot be processed without a valid proof
of purchase.
This Limited Warranty applies only to the original purchaser of the product and is limited solely to the repair or
replacement of the product, to be decided in Polygroup’s sole discretion. Consequential damages, including claims for
loss of water, pool chemicals, damage, or labor are not covered under this Limited Warranty.
This Warranty will be declared invalid should the Purchaser modify or repair the product themselves or by unauthor-
ized persons; use non-Polygroup parts or accessories with the product; use the product in contravention of the
manufacturer’s Instructions; use improper voltage; abuse the product in any way; or through accident or negligence.
Normal wear-and-tear is not covered under this Warranty, nor are acts of God outside the control of Polygroup.
IN NO EVENT SHALL POLYGROUP,THEIR AUTHORIZED AGENTS, RELATED ENTITIES, OR EMPLOYEES BE LIABLE TO THE
BUYER OR ANY OTHER PARTY FOR DIRECT OR CONSEQUENTIAL DAMAGES. Some states or countries, or others jurisdic-
tions do not allow the exclusion or limitation of incidental or consequential damages, so the above limitation or
exclusion may not apply to you.
IMPORTANT SAFETY INSTRUCTIONS
13 ASME COMPLIANT SUCTION FITTING INFORMATION
PSF-100A AND PSF-100B SUCTION OUTLET
FOR ABOVE GROUND POOL
(1) READ AND FOLLOW ALL INSTRUCTIONS
CAUTION! DO NOT EXCEED THE MAXIMUM ALLOWABLE FLOW RATE:
(1) PSF-100A and PSF-100B Suction Outlets are certified by IAPMO in accordance with the ASME/ANSI A112.19.8b-2009
Suction Fitting for use in Swimming Pools,Wading Pools, Spas, and Hot Tubs.
(2) This is a submerged suction outlet for use with above ground swimming pool.
(3) For single drain only. Use only ONE outlet for each pump.
(4) Do not locate this suction outlet on sitting areas or on the backrest for such seating area.
(5) Install this outlet at location recommended by the pool manufacturer.
(6) The maximum allowable flow rate of this suction outlet is 45 gallon per minute (2,700 gallonper hour).
(7) Connection Hose:
• Model PSF-100-A is to be connected with 1 1/4” (31.8mm) diameter hose.
• Model PSF-100-B is to be connected with 1 1/2” (38.1mm) diameter hose.
(8) The suction outlet is to be mounted at the suction outlet opening as specified by the manufacturer of the above
ground pool.The diameter of this opening should be within the range of 1.77”to 1.85”(45.0mm to 47.0mm). Refer to
the following diagram for detail assembly instructions:
(9) The suction outlet PSF-100A or PSF-100B is to be replace every 5 years.
(10) No tool is required for installation.
(11) Service and Winterizing Instructions
• 45 Gallon per minute (2,700 Gallon per hour).
• Carefully observe and inspect the suction outlet for damage and tampering before each use of the pool.
• Missing, broken or cracked suction outlet must be replaced before using the pool.
• Loose suction fitting should be reattached or replaced before using the pool.
• Remove and store Suction Outlet assembly if temperatures are expected to fall below 32° F.
READ,THEN KEEP THESE INSTRUCTIONS FOR FUTURE REFERENCE
Swimming Pool
Water Hose
Hose Clamp
Lock Nut,To Be Tightened By Hand
Rubber Gasket
Water Cap,To Be Installed Only During
Pump Maintenance Or Filter Change
Suction Fitting, PSF-100A Or PSF-100B
Flat Washer
Other manuals for SUMMER WAVES CP2000-C
1
This manual suits for next models
1
Table of contents
Other Polygroup Water Pump manuals

Polygroup
Polygroup SUMMER WAVES RP800 User manual

Polygroup
Polygroup SUMMER WAVES SKIMMERPLUS SFS350 User manual

Polygroup
Polygroup SUMMER WAVES ST1100 User manual

Polygroup
Polygroup RX330 User manual

Polygroup
Polygroup SFX600 User manual

Polygroup
Polygroup SUMMER WAVES RX600 User manual

Polygroup
Polygroup SUMMER WAVES SKIMMERPLUS SFX600-GS User manual

Polygroup
Polygroup SUMMER WAVES SKIMMERPLUS F400C User manual

Polygroup
Polygroup SFX1000 User manual

Polygroup
Polygroup SUMMER WAVES AP-05 User manual