Pooli Gamma 4 OS030981K User manual

Article No: OS030981K
PRODUCT MANUAL

Contents
1. Prepare for Installation....................................................................................................................................1
1.1. Selection a Location............................................................................................................... 1
1.2. Delivery.................................................................................................................................. 1
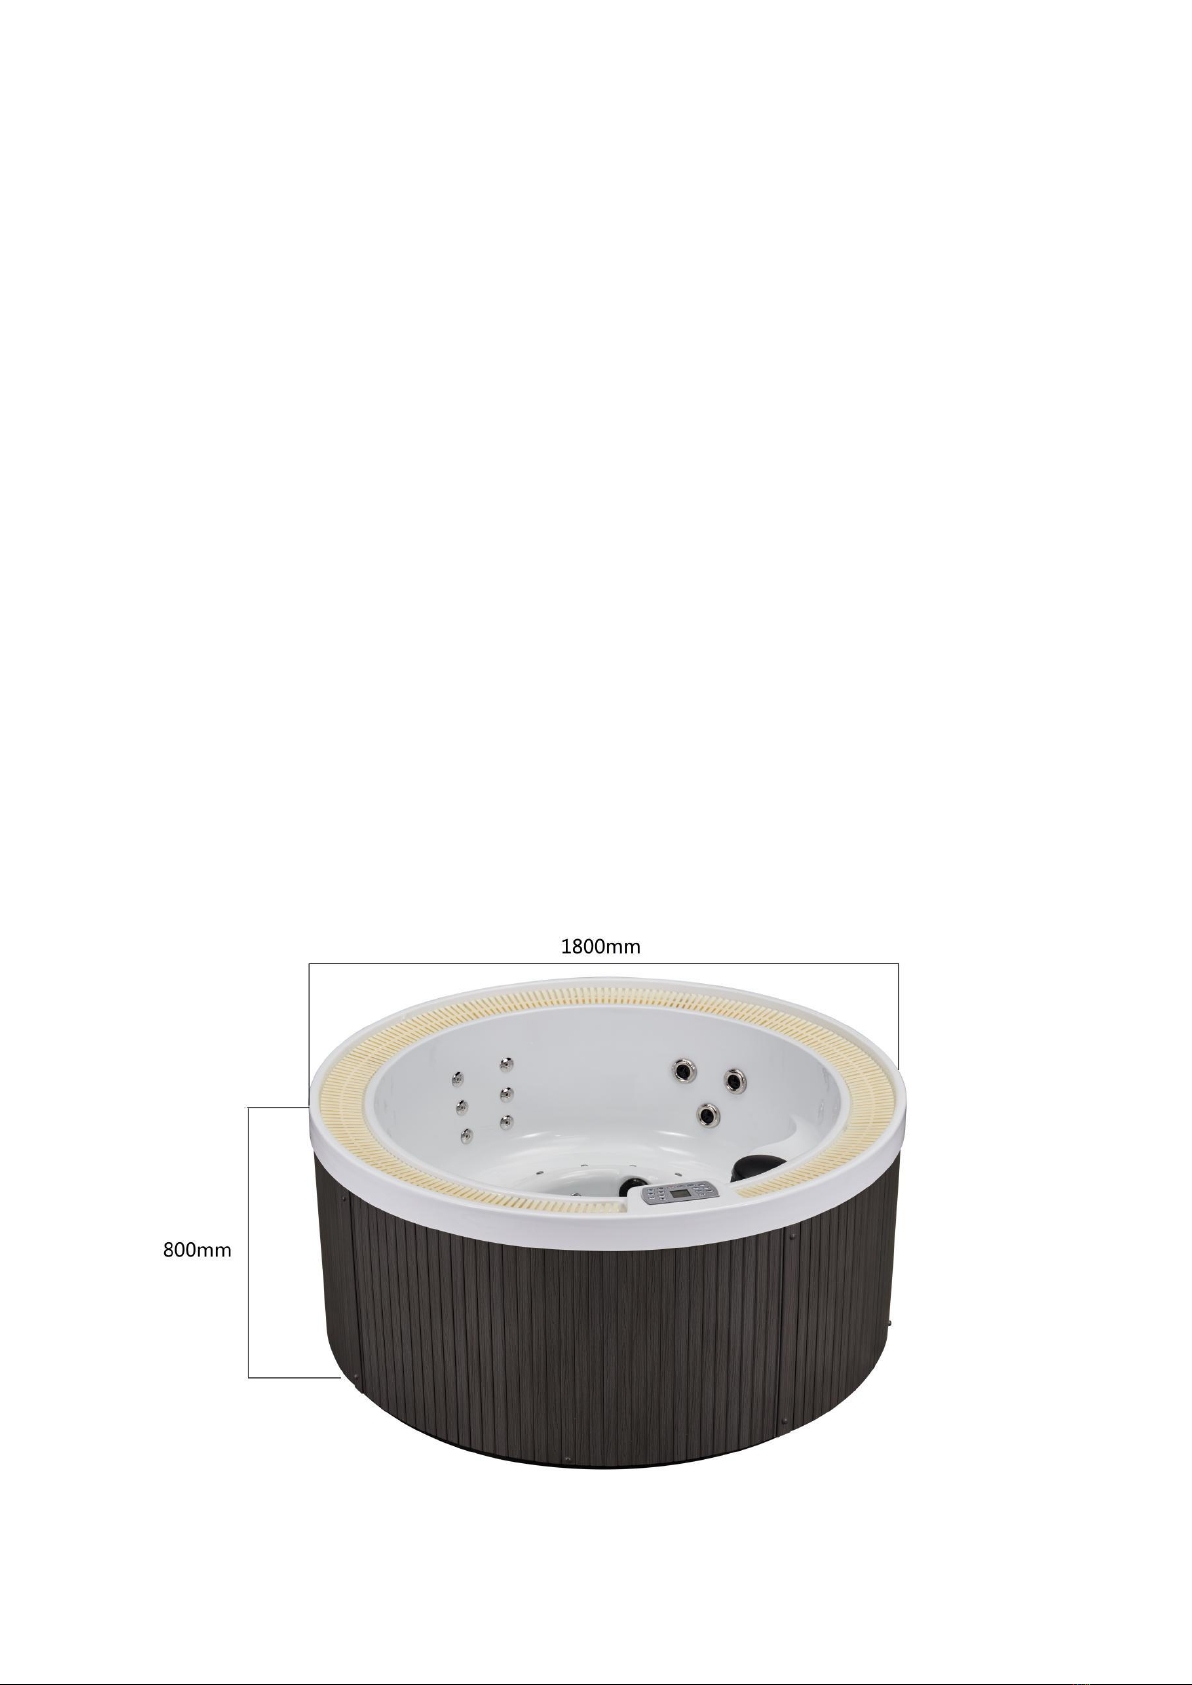
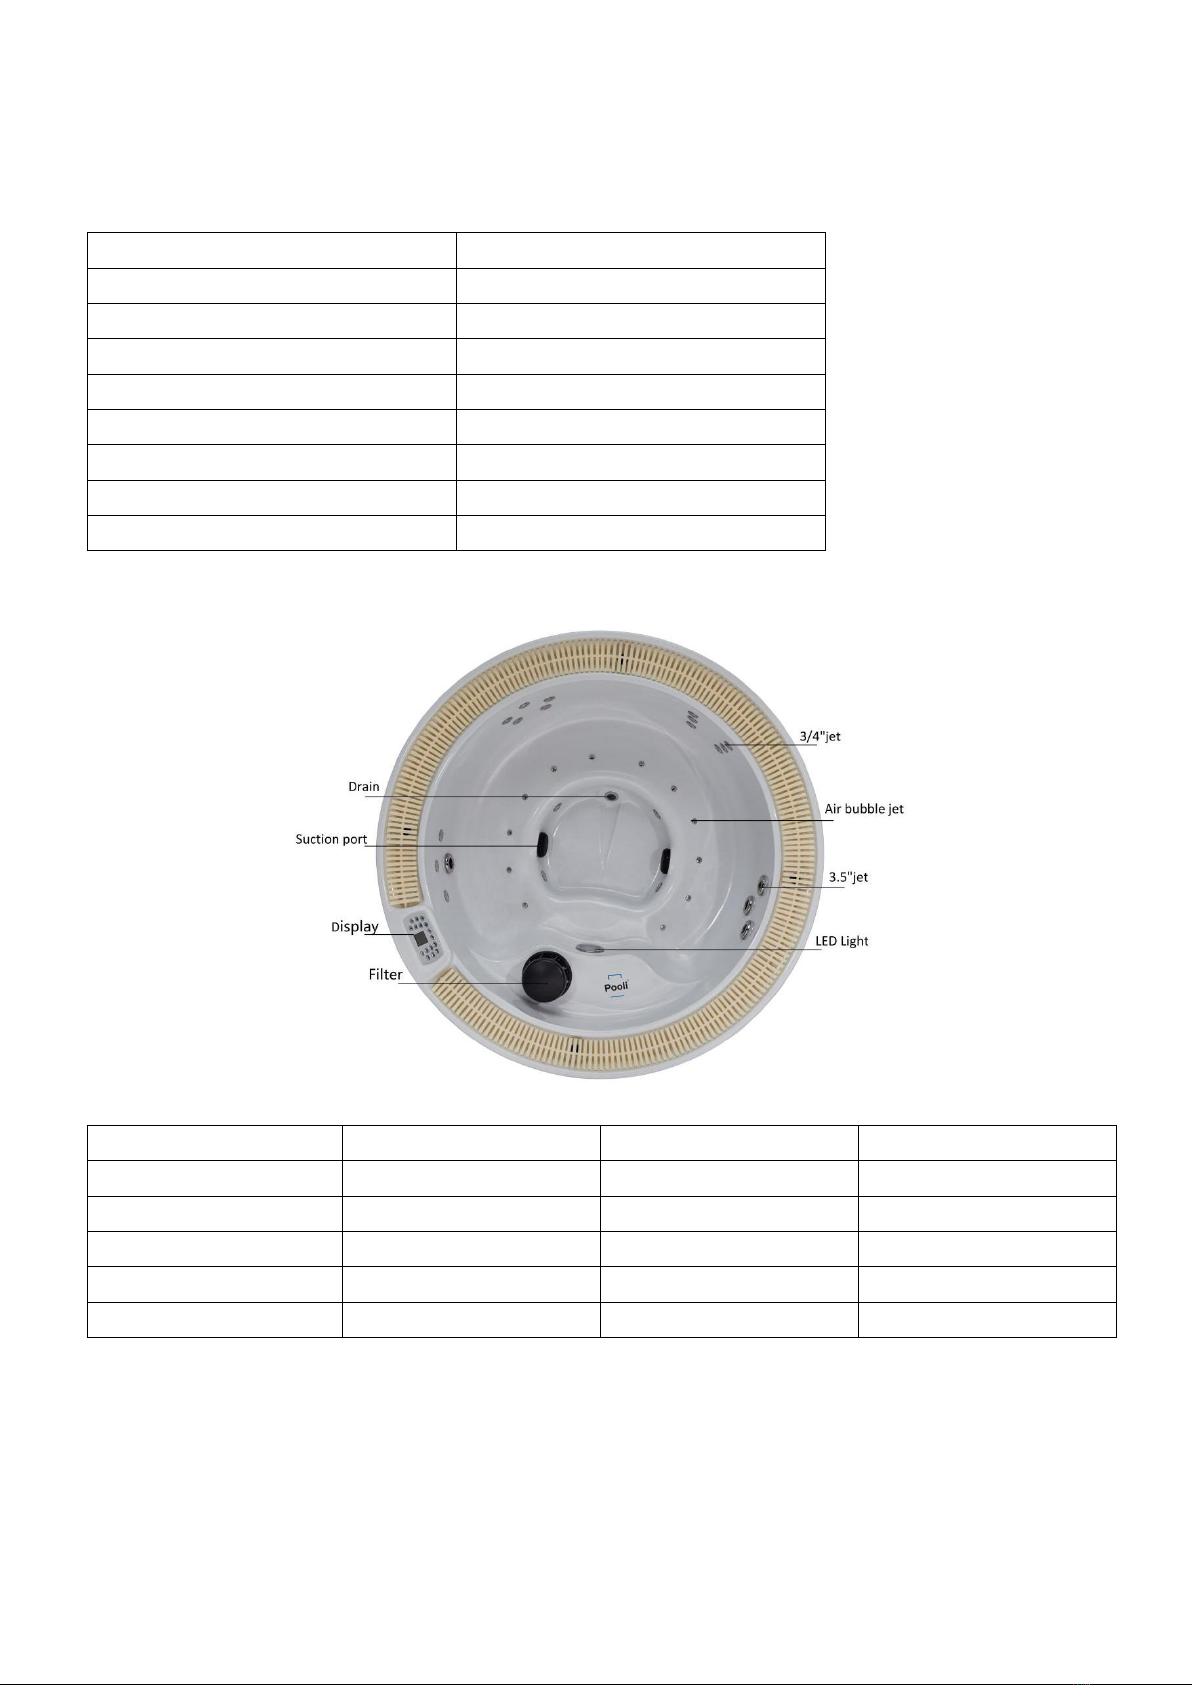
2. Technical Parameter and Specification........................................................................................................... 2
2.1. Structure of the SPA............................................................................................................... 2
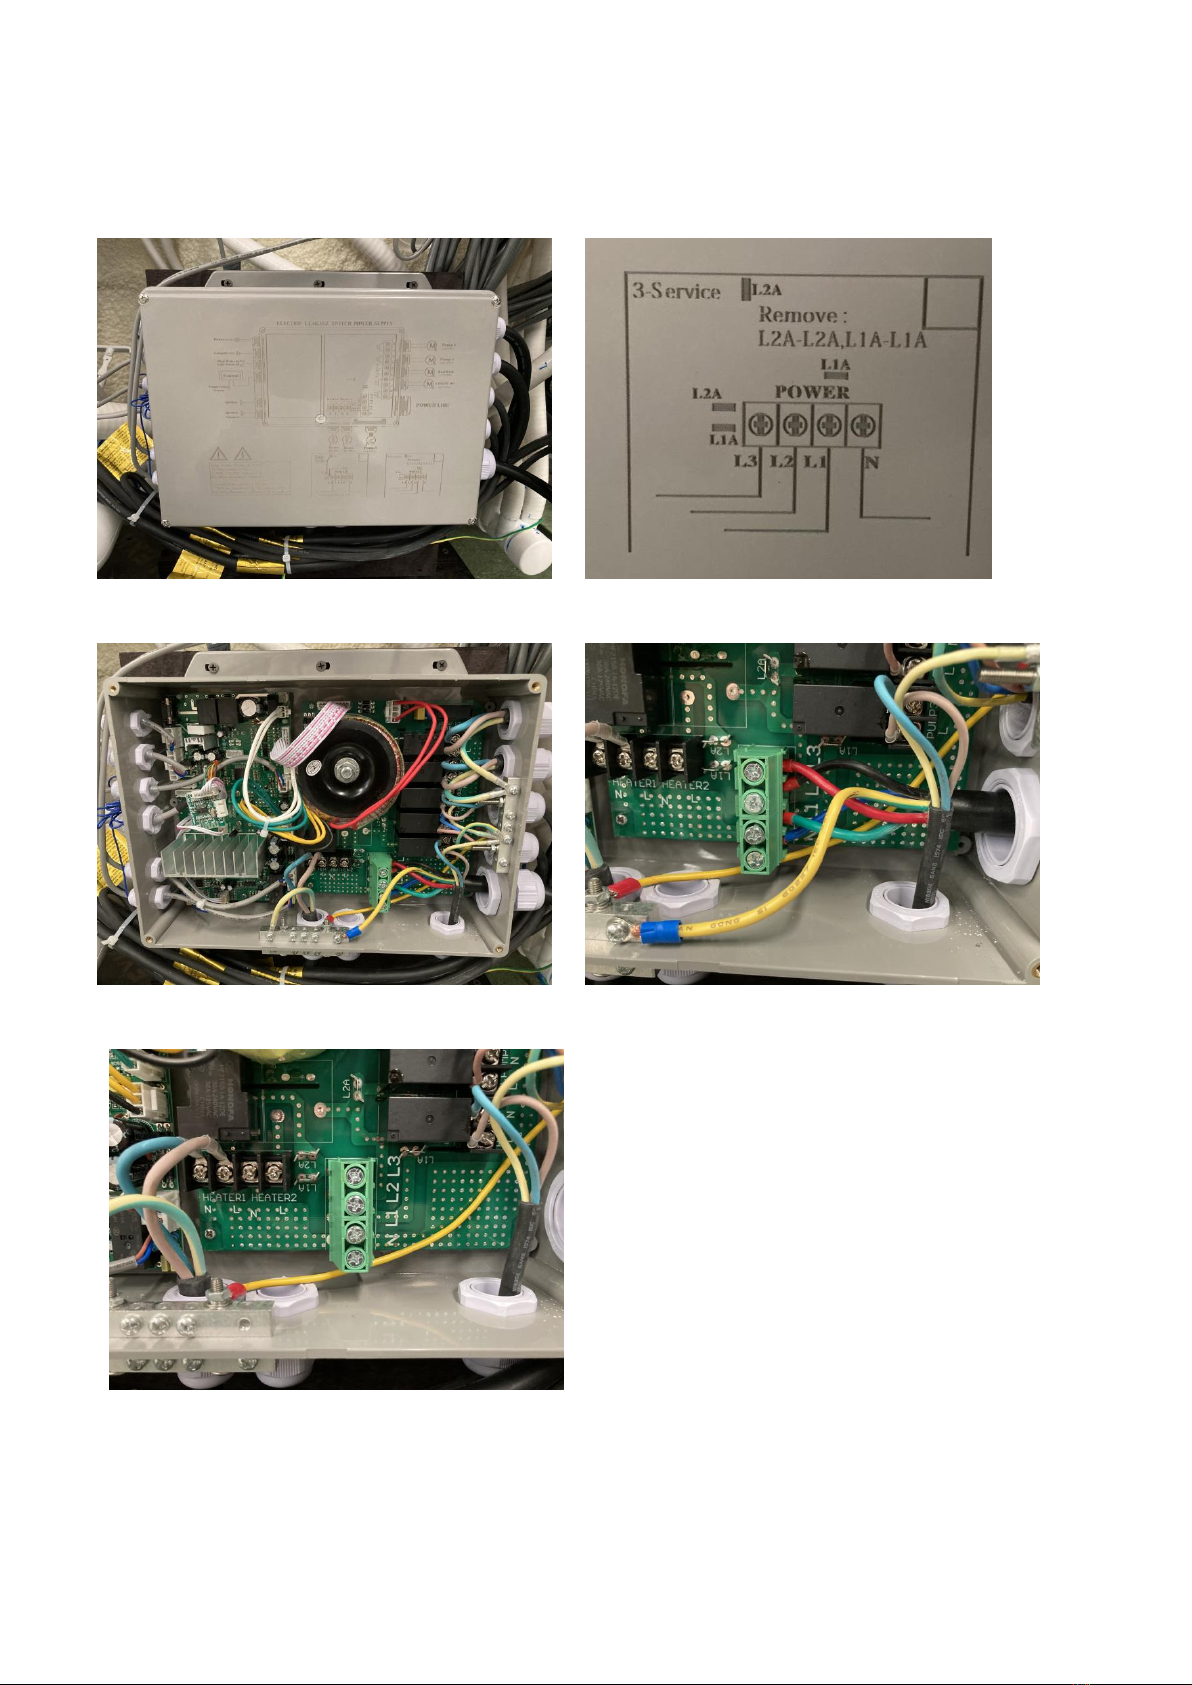
3. Wiring Instruction............................................................................................................................................3
3.1.Find the Electrical Box and the Inlet.......................................................................................3
3.2.Connect to your power supply................................................................................................3
4. Fill the SPA with water.....................................................................................................................................5
4.1. Preparation.............................................................................................................................5
4.2 Fill your SPA within the standard level................................................................................... 5
4.3 Additional Instruction: How to open/remove/change the filter?..........................................5
5. Turn on your SPA(System Instruction).............................................................................................................6
5.1. Power connect:...................................................................................................................... 6
5.2. The Automatic Lock................................................................................................................7
5.3. Time setting............................................................................................................................7
5.4. The setting of circulation cleaning.........................................................................................7
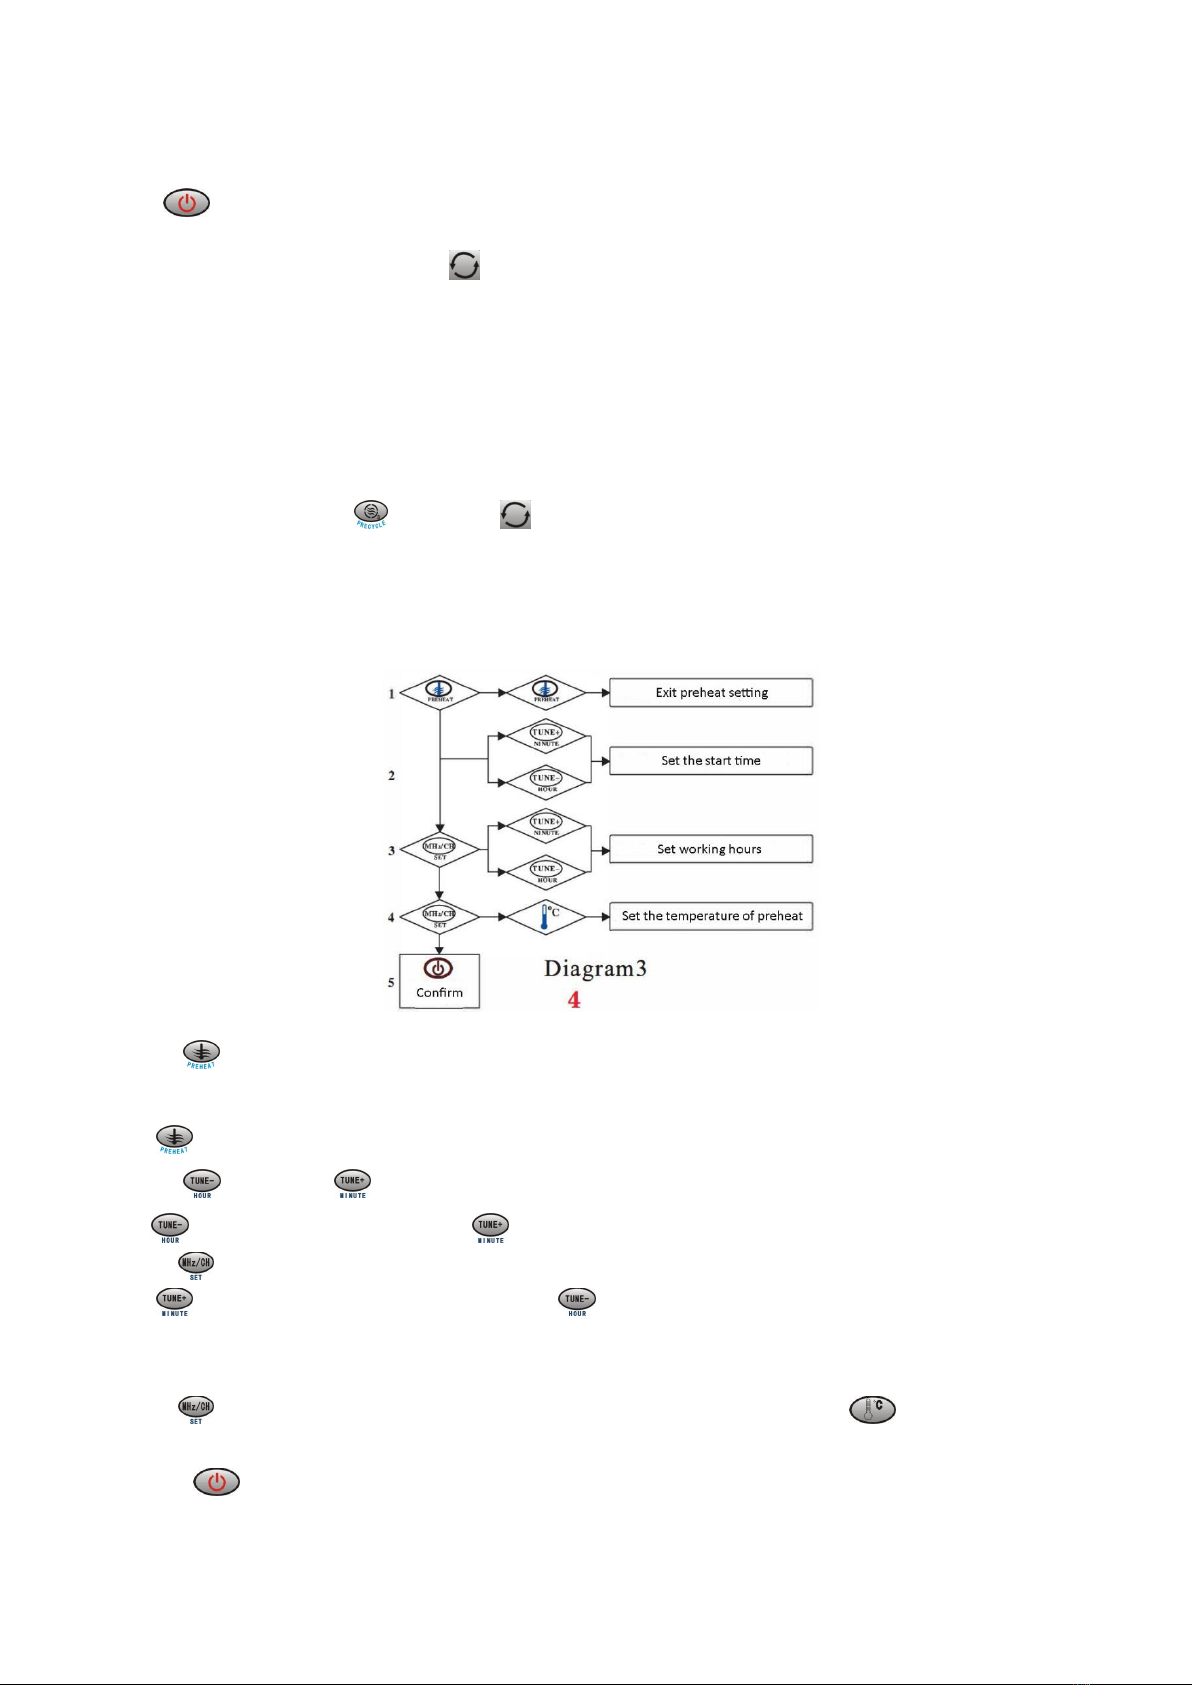
5.5 The operation of pre-heating..................................................................................................8
5.6. Switch between power-on and standby status..................................................................... 9
5.7. Temperature setting............................................................................................................9
5.8. Radio/Bluetooth.....................................................................................................................9
5.9. The Operation Of Pumps: Setting of Water Pump.............................................................. 10
5.10. The operation to long time circulation..............................................................................10
5.11. Bottom light....................................................................................................................... 10
5.12. Heating operation.............................................................................................................. 10
5.13. Blower................................................................................................................................ 11
5.14. Fahrenheit and Celsius conversion.................................................................................... 11
5.15. Water shortage protection................................................................................................ 11
5.16. Unfrozen protection...........................................................................................................11
5.17. Current control...................................................................................................................11
6. Maintenance................................................................................................................................................. 12
6.1. How to drain the water from your SPA?.............................................................................. 12
6.2. Water quality........................................................................................................................12
7. Precautions of using the SPA outdoors......................................................................................................... 13
7.1 Environment of Using........................................................................................................ 13
7.2 Instructions and Requirements in Winter......................................................................... 13
7.3 The Low Temperature Protection Function.......................................................................13
8. Troubleshooting Guide..................................................................................................................................14

1
1. Prepare for Installation
1.1. Selection a Location
The SPA can be installed indoors and outdoors. When choosing a location, please take the following factors into
consideration:
*The weight of the SPA, including water and the user(s)
*Drainage facilities: The drainage facility should be able to handle the maximum water capacity of the SPA.
*Surface Condition
Please place the spa on a structurally sound and level surface that is large enough for the entire spa, for example, a
concrete pad, concrete pavers or bricks or a reinforced deck. The adequacy of the structural support for a spa placed
on a terrace, balcony, roof terrace or other elevated structure must be determined by a licensed structural engineer,
architect or contractor depending on local and state requirements.
Do not place the SPA in a sink to avoid water accumulation and damage.
The spa warranty will be voided if an improper installation is performed. Structural damage due to an inadequate or
improper foundation is not covered under warranty.
1.2. Delivery
The SPA is erected sideways, packaged in carton and plywood and securely attached to a pallet. Use a trolley, forklift
or similar tool to transport your SPA to the desired location.

2
2. Technical Parameter and Specification
Voltage
380V 50Hz
Electrical connection
3-phase, 16A
Hydraulic Pressure
0.1~0.2Mpa
Power of water pump
1500W*1pc
Filter pump
250W*1pc
Power of heater
3000W *1pc
Power of air pump
300W*1pc
Colorful light
12V,100mA
Total Power
5050W
2.1. Structure of the SPA
Size
1800*1800*800mm
Number of Seats
4-6
Shell
Aristech Acrylic (White)
PS Skirt
Grey
Filter
1pc
3.5"jet
4pcs
LED Light
1pc
3/4"jet
18pcs
Ozone
1pc
Air bubble jet
12pcs
Suction port
2pcs
Maximum water capacity
600L

3
3. Wiring Instruction
The SPA has been assembled before delivery, you only need to connect it to the power supply to use it.
There are two ways of connecting the wires for the system: 220V one-phase and 380V three-phase. For a better
user experience, Pooli has chosen the 380V three-phase. There are 5 wires that need to be connected: 3 fire wires, 1
neutral wire and 1 ground wire.
3.1.Find the Electrical Box and the Inlet
The electric box is located inside the removable skirt board. You will find the following stickers on the board.
To open the skirt board, you need a pliers and a screwdriver.
1) Remove the gray screw around the skirt board (use pliers if it’s tight) , remove the screw with a screwdriver.
2) Hold the bottom of the skirt board with both hands and pull it out. (Note: The weight of the skirt is about 5KG)
3.2.Connect to your power supply
All SPA are 380V 50Hz 3*16A, and have a 5*2.5mm2 power cord.
The electric box is composed of 5 wires, which are live wire (L)*3pcs, neutral wire (N)*1pc and ground wire (G)*1pc.
All you need to do just is to connect the live wire (L), neutral wire (N) and ground wire (G) corresponding to your
home.

4
If the cable length is not enough, the user can directly connect the electric box of the SPA from the power source.
1) Open the skirt and find the electric box. There is a diagram on the surface of the electric box to show the
connection of single-phase and three-phase. (Standard configuration is three-phase)
2) Open the electrical box and find the power connector. The user needs to remove the original cable .
3) The user needs to connect the cable from the home to the connector correspondingly. All you need to do just is
to connect the live wire (L), neutral wire (N) and ground wire (G) corresponding to the connector.
Important! A leakage protection switch with a current not less than 20A and a leakage current not more than 30MA
should be installed in current front-end.

2. Fill the SPA with water
2.1. Preparation
(1)Ensure that the spa is powered off.
(2)Double check the drain valve is closed in case of water leaking from the SPA. The drain valve is
located at the corner of the SPA cabinet. See 6.1 (page 12) for details.
(3)Take out the filter core to enable filling of the spa through the filter itself (See 4.3 How to
open/remove/change the filter?).
4.2 Fill your SPA within the standard level
*Please refer to the water level marker on your tub (as picture below) and make sure the water
is filled up within the standard range.
*Start all the pumps to test the system. See section 5. for the system instruction.
*Put the filter core back to the filter box. Please remove the protective film before use.
4.3 Additional Instruction: How to open/remove/change the filter?
1) Remove the cover by rotating it slightly
2) Rotate the inside cover 90 degrees to remove the inside cover.
3) Untighten the filter core by rotating it counterclockwise.
4) Remove the filter core from the box.
OR
Put the new filter core into the box and tighten it by rotating.
5) Put the cover back in place.
5

6
5. Turn on your SPA(System Instruction)
5.1. Power connect:
The display shows current time and water temperature when the power is on.
When the display shows "---", the system is in standby status,and pre-heating and circulation cleaning are off right
now.
standby status

7
5.2. The Automatic Lock
If there is no any manual operation in 1 minutes or press " " in standby status, the control display would be
locked.
Press " ", and the display will be unlocked. The "lock" on the screen will disappear.
5.3. Time setting
1) Press " "or '' "to enter time setting status in the standby status and on the condition that the pre-heating
setting and circulation cleaning setting are off. The display shows "SYSC".
2) Press" " to control hour (0-23)
3) Press" "to control minute (0-59)
4) The system automatically saves the time after waiting 6 seconds.
5.4. The setting of circulation cleaning
All settings of circulation cleaning need to be set on the condition of the standby status (the display shows "---")
1) Press " " to enter circulation cleaning setting status, then display shows "FLON", and the mark of "FLON" would
flicker. Circulation cleaning is turned on, and the start time of circulation cleaning can be set up now.
Press " " again to exit the setting and turn off the circulation cleaning at the same time.
2) Press " "(hour) and " "(minute) to set the start time of the circulation cleaning
Press" " to control hour (0-23) Press" "to control minute (0-59)
3) Press" " to enter working hours setting status of circulation cleaning (diagram2). Then display shows "FLDU",
and the mark of "FLDU" would flicker.
Press " " each time to increase 5 minutes, press " " each time to increase 1 hour. The longest working time is
19 hours and 55 minutes. Minimum working time is 5 minutes.

8
For example, if the user needs to clean for 200 minutes, user needs to set 3 hours and 20 minutes (3:20).
4) Press " " to confirm and the system will automatically exit the setting status. After the setting is successful, in
the standby mode, the display will show “ ”.
*****NOTICE*****
*All settings of circulation cleaning should be done in standby status.
*The circulating pump and ozone would not work during the process of setting.
*If pre-heating and circulation are working at the same time, the display will show the countdown time of pre-heating.
Exit circulation clean mode:
In the standby status, press “ ”twice and “ ”disappears from the display.
5.5 The operation of pre-heating
All settings of the pre-heating need to be set on the standby status (the display shows "---")
1) Press " " to enter setting status, and display shows "HTON" and "time" would flicker. The start time of
pre-heating can be set up now( diagram3).
Press " "again to turn off the pre-heating and exit pre-heating setting.
2) Press " "(hour) and " "(minute) to set the start time of the pre-heating.
Press" " to control hour (0-23) Press" "to control minute (0-59)
3) Press" " to enter working setting status of pre-heating ( at least 10 minutes) and the display shows "HTDU".
Press " " each time to increase 10 minutes, press " " each time to increase 1 hour. (the longest working time:
19 hours and 55 minutes)
For example, if the user needs to heat for 250 minutes, he needs to set 4 hours and 10 minutes (4:10).
4) Press" "to enter temperature setting status, and the display shows "HT-T". Press “ ”to adjust the
temperature (15-42°C).
5) Press " " to confirm and the system automatically exits the setting state and enters the pre-heating standby
state.

9
*****NOTICE*****
*All settings of pre-heating should be done in standby status.
*The circulating pump and heater would not work during the process of setting.
*Please pay attention to "ON" or "OFF" on the display, "ON" means that the heater is working right now. "OFF" means
that the heater has not worked.
*If the water temperature is higher than the setting temperature,the heater and circulating pump would not turn on.
Exit pre-heating mode:
In the standby status, press “ ”twice and “ ”disappears from the display.
5.6. Switch between power-on and standby status
At standby status, press" " to enter power-on status and the display show ”WELCOME”. At the power-on status,
press" " to enter standby status.
5.7. Temperature setting
Press “ ”or keep pressing” ” to adjust the temperature from15C°to 42C° when the heater is working at the
power-on status.
This temperature setting does not affect the pre-heating setting temperature.
5.8. Radio/Bluetooth
" " is the on/off button of the radio and Bluetooth, which can only be operated at the power-on status.
Press " " for the first time to turn on the radio;
press " " for the second time to turn off the radio and turn on Bluetooth at the same time
press " " for the third time to turn off the radio and turn off Bluetooth at the same time.
Radio
1) Press" " to turn ON/OFF radio at power-on status.
2) Current frequency will be shown on the display.
3) Current frequency can be changed by pressing“ ” and “ ”
4) Volume can be changed by pressing “ ” and “ ”
Hold the " " button, the system will store all the stations actually searched, and the "MHZ" on the display flashes
during the auto-receiving process. When the search is over, the "MHZ" stops flashing.
Press " " to play the next memory channel.
5) User can press the " " (the display will show "SAVE")to save the channel.
Bluetooth

10
Only applies to the models equipped with Bluetooth.
Bluetooth name: BT-AUDIO Bluetooth coverage: 10 meters
When user want to increase/decrease the volume, user need to adjust the volume of the phone instead of the spa
display.
5.9. The Operation Of Pumps: Setting of Water Pump
The water pumps only work when the system is at power-on status.
*The button of Water Pump 1( ) is for controlling the Water Pump 1.
*The button of Water Pump 2/3( ) is for controlling the water pump 2/3, if the Spa is equipped with
two water pumps; if the SPA is equipped with only one Water Pump, those buttons would not be functional.
*The button of filter pump( ) is for controlling the filter pump.
5.10. The operation to long time circulation
The long time circulation only work when the system is at power-on status.
Press the " " to turn on/off the long time circulation. Ozone will run for 15 minutes every 120 minutes.
*Ozone will not work when the water pump or blower is turned on.
*Ozone will not work when the circulating pump is turned off.
5.11. Bottom light
The bottom light only work when the system is at power-on status.
Press" " to turn the bottom light ON/OFF.
Press “ ”twice in succession to change the color
The light will automatically turn off after 2 hours.
5.12. Heating operation
The heating operation only work when the system is at power-on status.
1) When the Pre-heating has been set and the time is up, or to press the “ ” 2 times can start the heater.
press the “ ” first time to start the circulation pump and press the “ ” again to start the heater.
3) For example: if the temperature is set at 35°C, the heater will be off automatically when the water
temperature reaches 36°C or above.
4) When the water temperature is lower than 34°C, the heater would be on again.
4) When the temperature sensor is not installed well, the auto-thermostatic system would not be functional.

11
5.13. Blower
Press” ” to turn the blower ON/OFF. It would stop working automatically after 20 minutes. (if the SPA is not
equipped with blower, this button would not be functional at the power-on status.)
5.14. Fahrenheit and Celsius conversion
Press the " " to switch between Fahrenheit and Celsius at standby status
5.15. Water shortage protection
All the water pumps and heater except the blower will not work, and “Water shortage” would be showed on the
display when there is not enough water in the spa.
5.16. Unfrozen protection
The display will show ""COOL"", and it will show "FREEZING" when system is turned on. When the water
temperature is lower than 5°C, the heater and circulating pump will automatically start. When the water
temperature reaches 10°C, the heater will stop working.
*This function must ensure normal power supply.
5.17. Current control
This system has the current control for safety reasons, therefore, the current limit is set by default for all systems.
(The display shows ” ”) Please pay attention to status below:
*The heating system and the circulating pump cannot be turned on, while the water pump 1, 2,3 is running.
*The heating system and the circulating pump would be automatically closed, while the water pump 1, 2 or the
blower is turned on.
*If user need to turn on the heating system, user need to turn off the water pump 1, 2,3 and the blower first.

12
6. Maintenance
6.1. How to drain the water from your SPA?
Please ensure the power is off before draining your SPA.
(1) Locate the drain valve at the corner of your spa cabinet (marked as "drainage").
(2) Pull the drain valve halfway out. When the pipe is pulled to its outermost position, the drain valve will be locked
and cannot drain.
(3) Remove the cap by turning it counterclockwise. The cap can be tight for the first time, you may need to use pliers.
(4) The drain valve can be connected to a hose if you want to discharge water to other places.
(5) Once the SPA is emptied, use a wet/dry vacuum cleaner to suck out the remaining water from the jet and the seat.
Remember if the SPA has a bubble system, please turn on the power and turn on the air pump to drain the excess
water. After about 10 seconds, user can turn off the power.
(6) Finally, install the cover clockwise and return it to its position.
6.2. Water quality
The water in the SPA can be contaminated in many ways. Due to warm water and abundant food supplies, such as
sweat, dander, skin cream and hair, bacteria can multiply explosively. Users can use some chemical additives to ensure
good water quality. In addition, users need to check the pH of the water regularly. If the scale shows that the pH is 7, it
is within the optimal range. Problems caused by water quality problems are not covered by the warranty.
•If the water is hard, use calcium stabilizers.
•Use disinfectants such as chlorine/bromine. You can balance the values by reviewing pH and alkalinity.
Weekly
•Add water appropriately.
•Check and adjust pH and alkalinity.
•Test the chlorine/bromine in the water.
•Add a scale stabilizer when the water is hard.
•Clean the filter paper core with water.
Every 3-4 months
•Clean the SPA. The swimming pool should be cleaned every quarter. Drain the water and clean the acrylic surface
with a cleaner.
If the filter paper core is found to be damaged, please replace it in time.

13
7. Precautions of using the SPA outdoors
7.1 Environment of Using
1) Inlet water temperature: The inlet water temperature must be between 0℃and 40℃and ensure the water does
not freeze in the product. The water would freeze and cannot flow if the temperature is lower than 0℃. If higher than
40℃, error codes would appear in the control system panel (because it is beyond the system’s temperature detection
range)and it will stop working.
2) All POOLI Spas are equipped with PU foam insulation around the tub, extra thermal insulation on the skirt/side
wall and an insulated base plate of ABS at the bottom; plus the additional Spa cover for purchase, the lowest ambient
temperature to use them outdoors would be around -20℃in winter. But this standard is limited to the following steps
are strictly followed by end users.
7.2 Instructions and Requirements in Winter
Based on the above situations, to operate the spa correctly in winter, the user needs to follow steps and requirements
below:
(1)The season of installing the product: best at the end of spring or early fall, it is recommended that be installed
and electrified before the temperature gets to under 0℃.
(2)If user wants to use the product in Winter, please ensure there are enough water inside in the Spa and keep the
power on, to avoid the water from freezing.
(3)If the user doesn’t want to use it in Winter, the water in the spa should be drained away completely, then check
and make sure there is no water left in the water pumps and the pipes; please twist off the inlet connector that is in
the front of the water pump, keeping ventilation as long as possible to make the water evaporate( you can leave the
cover off at the same time).
(4)If user needs to use and inlet the water into the spa in winter (or subzero temperature), please ensure that the
water does not freeze before the spa is filled with water, and power it on as soon as possible to make sure normal
using.
7.3 The Low Temperature Protection Function
For all Pooli models, the Low Temperature Protection Function is set in the operating system. As long as there is
enough water and the power is on, when the temperature drops to a certain point, it would trigger the low
temperature protection function of the system which will turn on the heater until the water is heated up to 10℃.
(1) Heat Preserving mode (or we call it standard mode: heating function keeps running. The heater will start
running when the temperature is 2℃lower than the setting temperature and it will stop working when it reaches to
the setting temperature).
(2) Preset heating Mode (heating within a specified time, but it might not reach the preset temperature). The other
option could be that don’t set up the heating mode (in this case the heater doesn’t start up, but when the
temperature drops to low temperature protection conditions, the protection function would turn on automatically, in
order to keep the water from freezing.)

14
8. Troubleshooting Guide
Q: No power or the electricity leakage protection device is triggered.
*Check if the electricity line is well connected.
*Check the power supply, circuit and ground wire for leakage
Q: Bluetooth or radio does not work.
*Check if the speakers is broken.
*Check if the speaker cable is normal.
*Check if the display is working properly.
Q: Water leaks from the pipes.
* Replace the sealing ring if water leaks due to aging or damage of the sealing ring
*Tighten the pipe joints if the pipe joints are loose.
Q:The temperature of the water cannot rise.
*Put the cover on for quicker heating.
*Check the heating time is set correctly and the heating temperature.
(It takes 40 minutes for 1000L of water to rise by 1 degree under ideal conditions)
*If the weather temperature is too low, it may not be able to heat up, please pay attention to prevent the water from
freezing.
Q: Jets are not working.
*Check whether the system is turned on normally.
*Check whether the water pump is working normally.
*Check whether the jets are blocked.
*Check whether the pipeline is blocked by objects.
●Address: Maria Bangata 17, 118 63 Stockholm, GardenStore Nordic AB.
Do not dispose this product as unsorted municipal waste. Collection of such waste separately for special treatment is
necessary.
Table of contents
Other Pooli Hot Tub manuals