Pop POPworldradio User manual


1
Table of Contents
Table of Contents.............................................................................................................. 1
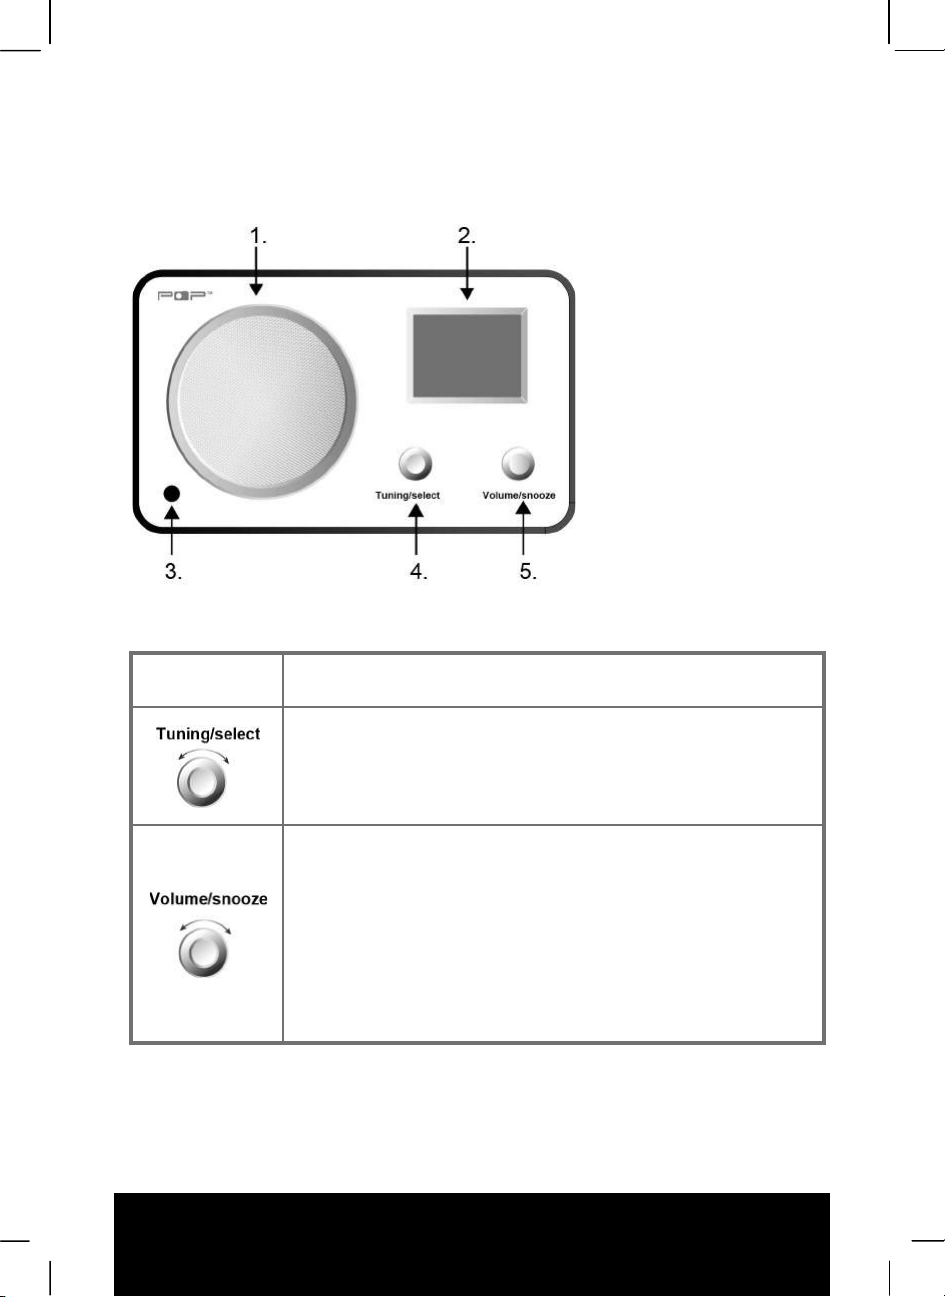
Front view ............................................................................................................................... 4
Rear view................................................................................................................................ 5
Remote Control Description............................................................................................. 5
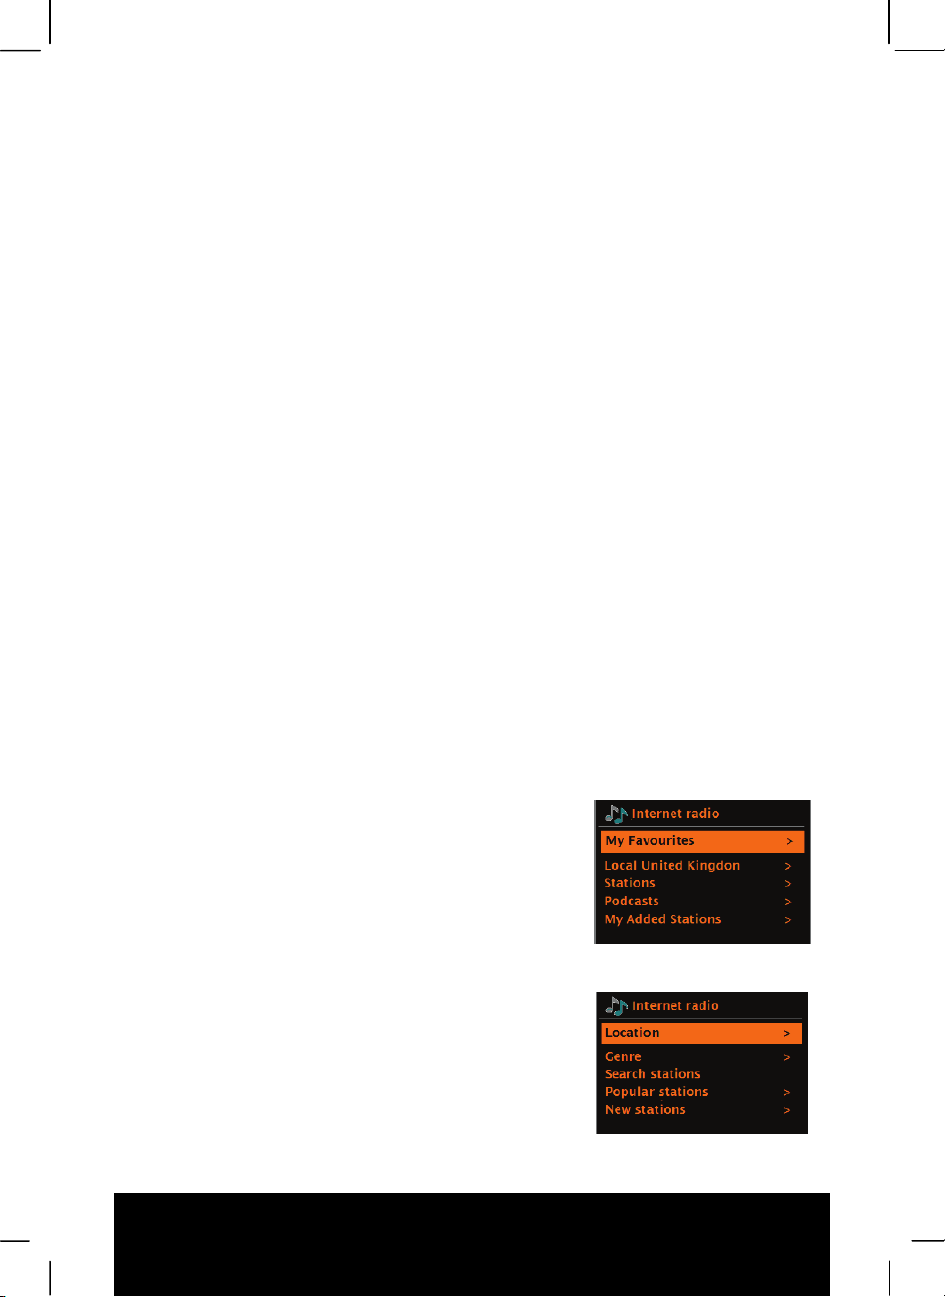
Internet Radio.................................................................................................................... 8
Last Listened .......................................................................................................................... 9
Favourites ............................................................................................................................... 9
Browse.................................................................................................................................... 9
Search .................................................................................................................................. 10
My Added Stations ................................................................................................................ 11
Now playing information........................................................................................................ 11
Internet Radio portal registration ........................................................................................... 12
Spotify Connect .............................................................................................................. 13
Connect spotify app to POP World Radio.............................................................................. 13
Music Player mode (network)......................................................................................... 14
Shared media (from UPnP media server).............................................................................. 14
My playlist ............................................................................................................................. 15
Repeat/shuffle....................................................................................................................... 15
Now playing information........................................................................................................ 16
Setting up a music server...................................................................................................... 16
Sharing media with Windows Media Player........................................................................... 16
Using the “Play To” feature in Windows 7 to stream media.................................................... 17
Use “Play To” in Windows Media Player ................................................................................ 17
Use “Play To” elsewhere in Windows 7.................................................................................. 18
Now playing information........................................................................................................ 18
DAB/DAB+ mode............................................................................................................. 19
Power on .............................................................................................................................. 19
Shift to another DAB/DAB+ station........................................................................................ 19
View station information ........................................................................................................ 19
Display signal strength .......................................................................................................... 20
Full Scan (Automatic station search) ..................................................................................... 20
Manual Tune (Manual station search) ................................................................................... 20
The way to prune (delete a station) ....................................................................................... 20
DRC (dynamic range control) value....................................................................................... 20

2
FM mode .......................................................................................................................... 21
Tune in FM mode.................................................................................................................. 21
Scan settings ........................................................................................................................ 21
Audio settings ....................................................................................................................... 21
Station presets ...................................................................................................................... 21
Preset recall.......................................................................................................................... 21
Bluetooth mode............................................................................................................... 22
Bluetooth connection settings ............................................................................................... 22
AUX IN mode ................................................................................................................... 23
System settings .............................................................................................................. 23
Method to enter system settings............................................................................................ 23
System menu: Settings ......................................................................................................... 23
Equaliser............................................................................................................................... 24
Network ................................................................................................................................ 24
Set the time and date............................................................................................................ 27
Inactive Standby ................................................................................................................... 28
Set language......................................................................................................................... 28
Factory reset......................................................................................................................... 28
Software update.................................................................................................................... 28
Setup Wizard ........................................................................................................................ 29
INFO ..................................................................................................................................... 29
Backlight ............................................................................................................................... 29
Sleep .................................................................................................................................... 29
Alarms .................................................................................................................................. 30
Snooze ................................................................................................................................. 30
Specifications.................................................................................................................. 31
Guarantee ........................................................................................................................ 31

3
Package content
Main unit
Remote
control
Power
adapter
Instruction
manual

4
Front view
1.
Speaker
2.
Display
3.
IR receiver
4.
Scroll
Knob–Tuning/function
selection
5.
Scroll k nob -
volume/snooze
Control key
Mode
a. In the subsequent sections of this manual, we will refer to this scroll
knob as “Select” knob.
b. Turn the knob to view options, and press the knob to confirm.
a. In the subsequent sections of this manual, we will refer to this scroll
knob as “Volume” knob.
b. Turn the knob to adjust the volume, and press the knob to mute the
device.
c. When the alarm is activated, ,when alarm is sounding, short press this
button to snooze for a set time. Long Press this button to Set alarm
Off.
d. Long press the knob to turn on or turn off the device.

5
Rear view
1.
Antenna
2.
Headphone
3.
Line out
4.
Auxiliary input
5.
DC power supply (DC
12V/1.5A)
Remote Control Description
1. POWER
2.
MUTE
3.
MODE
4.
TUNE▲
5.
MENU
6.
VOL-
7.
SELECT
8.
VOL+
9.
TUNE▼
10.
SLEEP
11.
ALARM
12.
INFO
13. Preset 1
14.
Preset 2
15.
Preset 3
16.
Preset 4
17.
Preset 5
18.
Preset 6

6
Remote Control Description
Control key
Mode
Press this button to power on/off; when the alarm goes off, press this button
to turn off the alarm
In any mode, press this button to turn off the speaker, and press the button
again to turn on the speaker.
Press this button to Cycle through the modes
Internet Radio, Spotify , My Music , DAB, FM, Bluetooth, AUX in
Scroll up through a menu or station list.
DAB/DAB+ and FM mode: When a radio station is broadcasting, press this
button to fine tune the radio; long press the button to automatically search the
next station.
In the system menu or other o
ptions, press this button to jump to the previous
option.
Menu settings: In any mode, press this button to enter the system menu or
other options; press the button again to jump back to the settings mode.
In any mode, press this button decrease the volume.
When you are in the system menu or other options settings, press this button to
jump back to the previous option; press the button continuously to jump back to
the settings mode.
In any mode, press this button to confirm the option, and jump back to the
previous option.
Bluetooth mode: In Bluetooth mode, press this button to control the playback
or pause of the playlist.
In any mode, press the button to increase the volume.
When you are in the system menu or other options settings, press this b
utton
to enter the option; press this button again to jump back to the previous
option.
Scroll down through a menu or station list.
DAB/DAB+ and FM mode: When a radio station is broadcasting, press this
button to fine tune the radio; long press the but
ton to automatically search the
previous station.
When you are in the system menu or other options, press this button to jump to
the next option.
Press this button to set the sleep time (sleep off -15 minutes - 30 minutes -
45
minutes – 60 minutes).

7
Press this button , Enters alarm wizard, turns off alarm (when alarm is
sounding)
When a radio station or Track is playing
, press this button to navigate through
the queue information of the station or track that is currently broadcasting.
IN Radio mode: When a radio station is broadcasting, long press this button
to store the station to preset 1, Short press Recall Preset 1 Station
IN Radio mode:Radio
mode: When a radio station is broadcasting, long press
this button to store the station to preset 2, Short press Recall Preset 2 Station
IN Radio mode:: When a radio station is broadcasting, long press this button
to store the station to preset 3, Short press Recall Preset 3 Station
IN Radio mode: When a radio station is broadcasting, long press this button
to store the station to preset 4, Short press Recall Preset 4 Station
IN Radio mode: When a radio station is broadcasting, long press this button
to store the station to preset 5, Short press Recall Preset 5 Station
IN Radio mode: When a radio station is broadcasting, long press this button
to store the station to preset 6, Short press Recall Preset 6 Station

8
Internet Radio mode
1. POP World Radio can play thousands of radio stations and podcasts from around the world
though a broadband Internet connection.
2. When you select Internet radio mode, POP World Radio contacts the Frontier Silicon
Internet radio portal to get a list of stations, organised into different categories like Country,
Most popular and Genre. Once you select a station, POP World Radio connects directly to
that station.
3. The portal also enables multiple lists of favourite stations that you can personalise, for
example Andy’s stations, Jo’s favourites, Talkshows. To use the favourites feature, register
your radio with the portal website as described in Page13 Internet radio portal registration. If
you have several Frontier Silicon radios, you can register them all on the same account so
that each radio has access to your favourites lists. It is possible to add favourites either
directly through POP World Radio or through any computer with a web browser.
4. To enter Internet Radio mode, either press Mode until the display shows Internet Radio or
select Menu > Main menu > Internet Radio.
Note: The station list menu is provided from the Internet radio portal, so it is only accessible
when POP World Radio is connected to the Internet. Station lists and submenus may
change from time to time.
5. Here are several ways of selecting stations.
Directly from the radio:
●Last listened
●Presets

9
6. From the portal through the Menu > Station list > menu:
●Location – find a radio station based on its location in the world.
●Genre – Search for stations broadcasting the type of music you like.
●Search Stations – Search for a station name.
●Popular Stations – lists the most popular, listened to stations on the internet.
●New stations – lists the lastest stations broadcastin。
7. Last listened
When Internet radio mode restarts, the last-listened station is selected. To select another
recently used station, select Menu > Last listened then one of the stations listed. Most
recent stations appear at the top of the list
8. Favourites
Favourites are stored on the Internet radio portal. Before you set up an account on the portal
from its Web interface (www.wifiradio-frontier.com), the favourites are associated solely with
the radio on which you set them. After you set up a portal account, all the favourites from
your different radios are merged into a combined favourites list. This combined list is
available to all the radios on your account.
To store a playing station as a favourite, press and hold Select until the display shows
‘Favourite added’. The station appears in the default favourites list Stations.
To select a favourite, select Menu > Station list > My favourites > [Favourites list] > [Station].
9. Browse
●To browse Internet broadcasts, select Menu > Station
list >.
Browse through the menus to find appropriate
broadcasts.
For example: Select Stations:
●And the Stations menu is displayed, select Genre:

10
●To see the Genre menu, Select Blues:
●And the Blues menu allows you to select a station from
a complete list or from specific countries.
●Choose a radio station from the list to tune to that station.
●Note: BBC radio ‘Listen Again’ programmes are
accessible through the Podcast menu, for example
Menu > Podcasts > Location > Europe > United
Kingdom > All shows > BBC Radio 4 > You and Yours >
20/10/2013- October 20.
10. Search
●You can also search through Internet broadcasts for stations or podcasts with particular
keywords in their title.
●To search, select Menu > Station list > then either Search Stations >
●Enter a keyword by selecting characters then OK. The search entry screens are similar in
operation to the Wi-Fi passphrase entry screen.

11
●Select a broadcast from the list.
●For podcasts, you may be able to select a particular episode.
11. My Added Stations
Even though the Internet radio portal contains thousands of stations, you may want to listen
to stations not listed. You can add your own stations via the portal. These added stations
are accessible from POP World Radio by selecting Menu > Station list > My added stations
> [Station].
12. Now playing information
While the stream is playing, the screen shows its name and description. If artist and track
information is available, this is also shown. To view further information, press Info .
Each time you press Info , another set of information is displayed, cycling through the
following details:
●Artist and track name (default; where available)
●Station description
●Station genre and location
●Signal reliability
●Codec and sampling rate
●Playback buffer
●Today’s Date

12
13. Internet Radio portal registration
The Frontier Silicon Internet radio portal website allows you to organise your favourites lists
and also listen to Internet radio on a computer.
●To register your POP World Radio with the portal, switch to Internet radio mode as
described in Page 9, and then obtain your radio’s unique portal access code by selecting
Menu > Station list > Help > Get access code >.- Write down the access code.
●Note: The displayed access code is only valid for a few minutes. If you fail to register your
radio within the time window you will need to repeat the above step to get a new access
code and try again. Do not confuse the portal access code with the Radio ID (from Menu >
System settings > Info.)
Visit the portal website at www.wifiradio-frontier.com.
●If this is your first visit to the portal, register for a new account, entering the following
information access code,
your e-mail address,
passphrase,
radio model (POP World Radio ).
●If you already have an account and wish to add an additional radio, log in to your
account and select My preferences > Add another Wi-Fi radio.
Once your radio is registered with the portal, you can immediately use the Internet radio
favourites and added stations features

13
Spotify Connect
POP World Radio is compatible with Spotify Connect
allowing a POP World Radio unit to act as wireless
speakers controlled by the Spotify App available for iOS,
Android smart devices and a desktop client for PCs.
●Note: A Spotify Premium account is required to use
Spotify Connect.
●Note: Ensure POP World Radio has the Keep Network Connected option turned On, see
Page 33 Keep network connected. This will enable Spotify streaming to the POP World
Radio unit when in sleep or a non-network mode (DAB/FM, Aux-In).
●When Spotify Connect mode is selected, on a POP
World Radio, before a connection with a Spotify App is
established, the message ‘Waiting for Users is
displayed.
Connect Spotify app to POP World Radio
1.1 Add your speakers to your wifi network
(see product user instructions for details).
1.2 Fire up the Spotify app on your phone, tablet
or PC using the same wifi network as above.
1.3 Play a song on Spotify and hit ‘DEVICES AVAILABLE’
1.4 Choose your speakers and your music will start
playing out loud.
Happy listening.

14
Music Player mode (network)
●Music player mode plays audio files such as MP3s, AACs,
WMAs or FLACs from a computer on the local network.
To enter Music player mode, either press Mode until the display
shows Music player, or select Menu > Main menu > Music player
Once in music player mode, press Menu , then select Shared
media.
●
Note: POP World Radio does not support USB playback as
shown in the picture.
You can use and to move
through tracks. Press and
hold to rewind or fast forward and press quickly to select
previous or next track.
1. Shared media (from UPnP media server)
●Select Menu > Shared media >
●If you have set up shared media (see page 19 Setting up a music server for details), you
should see an entry consisting of <computer name>: <Shared media name>, for example
JB-Laptop: Audio. If you have more than one computer sharing media, the alternatives
are listed. Select the shared media you want to play.
●From this point on, the menus are generated from the
shared media server (typically Windows Media Player). The
first menu shows a list of media types, for example Music,
Video, Pictures and Playlists. POP World Radio can only
play music and playlists.
●There is also a search function, which finds tracks in a similar way to Internet radio
search, as described on page 12.
●In the Music menu there are numerous options for selecting tracks. Select one of the
options to find the usic you want to listen to.

15
●Once you have found a track you want to play, press Select . A short press plays the track
immediately and a long press adds the track to ‘My playlist’. You can also add entire
albums to ‘My playlist’.
●Playlists you have created on your shared media server can be accessed and played via
the Playlists option in the Shared media menu
1.1 Wake-on-LAN
●When shared media is selected a list of available music servers is displayed.
●If a question mark appears before the server name, this indicates that the server
has been seen before and supports Wake-on-LAN functionality, but cannot
currently be found on the network.
●If a server with a question mark is selected by the user, the device will try to wake
the server up and connect to it. In some instances this may not be possible as the
server may not be connected to the network any more or may be switched off.
1.2 Prune servers
From time to time it may be necessary to remove servers displaying question marks in
front of the server name from the server list. For example, if the device is moved to a
new network or if a Wake-on-LAN server is removed from your current network.
To perform this function go to Menu > Prune servers > Yes
2. My playlist
POP World Radio holds a queue of up to 500 tracks in the
playlist. Playlist tracks can be mixed from multiple UPnP
servers. To manage the playlist, select Menu > My playlist.
●To view the playlist, scroll though it by turning Select .
UPnP tracks show their track name.
●To play the playlist from a certain track, quick press Select .
●To erase a track from the playlist, long press Select . then confirm YES.
If you select a track/album/folder for instant playback (without using the playlist), the
playlist is preserved. The playlist is also preserved during standby.
3. Repeat/shuffle
You can repeat tracks or play them in random order by selecting Menu > Repeat play or
Menu > Shuffle play.

16
4. Now playing information
4.1 While a track is playing, the screen shows its track and artist (UPnP). There is also a
progress bar with figures for elapsed and total track time. At the bottom of the
screen, an icon indicates UPnP. To view further information, press Info .
4.2 Each time you press Info , another set of information is displayed, cycling through:
●UPnP: playback progress bar (default), album, codec/sampling rate, playback buffer
bar, today’s date
5. Setting up a music server
●In orderfor POP World Radio to play music files from a computer,the computer must be
set up to share files or media.
●UPnP media sharing allows devices like POP World Radio C to play music from a shared
media library, navigating through tag menus such as Artist, Album or Genre. If you are
running a suitable server system such as a PC with Windows Media Player 10 or later
(WMP), and your music library is well-tagged, then it is recommended to use media
sharing. Only the UPnP server needs to be set up.
●Note: iTunes does not currently work as a UPnP media server, but there are add-ons
available to work with an iTunes library.
6. Sharing media with Windows Media Player
The most common UPnP server is Windows Media Player (10 or later). Alternatively, other
UPnP platforms and servers may be used. To set up WMP for media sharing, perform the
following steps:
6.1 Ensure that the PC is connected to the network.
6.2 Ensure that the radio is powered on and connected to the same network.
6.3 In WMP, add to the media library the audio files and folders you want to share with
POP World Radio (Library > Add to Library…).
6.4 In WMP, enable media sharing (Library > Media
sharing…).
●Make sure that the radio has access to the shared
media by selecting it and clicking Allow. You can
also set a name for the shared media in
Settings… Click OK to close the dialogue boxes.
●The PC is now ready to stream the music to the radio. The WMP UPnP service runs
in the background; there is no need to start WMP explicitly.

17
7. Using the “Play To” feature in Windows 7 to stream media
●One of the new Windows 7 features includes a feature called “Play To” and this lets
your PC running Windows 7 control POP World Radio to push media and use as a
universal remote control for your media collection.
●POP World Radio supports the industry standard DLNA (Digital Living Network Alliance)
1.5 digital media renderer. This allows you to "Play To" other devices around your home
and combine media streaming with controlling a connected media receiver while
streaming content to it from another Windows 7 PC on a home network
8. Use “Play To” in Windows Media Player
8.1 Windows Media Player can be used to manage your media, find items that you want
to play, and open Play To. To select items that you want to play, follow these steps:
8.2 Click the Start button, click All Programs, and then click Windows Media Player.
8.3 If the Player is currently open and you’re in Now Playing mode, click the Switch to
Library button in the upper-right corner of the Player.
8.4 If the list pane is closed or if the Burn or Sync tabs are exposed, click the Play tab.
8.5 Find the items that you want to play in the Player Library, and then drag those items
from the details pane into the list pane.
8.6 Click the Play to button at the top of the list pane, click the device on your network
that will receive the media.
8.7 In the P la y To dialog box, use the playback controls to play,
pause, or stop the media stream, and to change to the next
or previous item in the list.

18
9. Use “Play To” elsewhere in Windows 7
Outside of Windows Media Player, you can stream media to POP World Radio with “Play To”
by right-clicking music files. To select music files and stream them to POP World Radio,
follow these steps:
9.1 Click the files you want to stream to POP World Radio.
9.2 Right-click the selected files, point to “Play to”, and then click the device on the
network that will receive the media.
9.3 In the Play To dialog box, use the playback controls to play, pause, or stop the media
stream, and to change to the next or previous item in the list.
10. Now playing information
10.1 While a track is playing, the screen shows its track name (UPnP). There is also a
progress bar with figures for elapsed and total track time. At the bottom of the screen,
an icon indicates UPnP. To view further information, press Info .
10.2 Each time you press Info , another set of information is
displayed, cycling through the following:
●Artist, album, codec/sampling rate, playback buffer

19
DAB+ mode
Power on
1.
Elongate the antenna on the back of radio, and then press the
“POWER” button on the remote control or Press and hold
“Volume/snooze” scroll knob to turn on the radio power.
2.
For first time use, the radio will automatically conduct a complete
frequency scan and store detected stations into memory.
3.
If no DAB radio station is found, the device will automatically enter
the system menu.
4.
Once frequency scanning is completed, the DAB/DAB+ stations
will be displayed in alphanumeric order, and the radio will access
the first station in the list.
NOTE:
If no DAB / DAB + signals in your location can be found, the
display will show "No Station Found"; try moving the
location of the radio. If there is no DAB station, please ignore
this function.
Shift to another DAB/DAB+ station
During the program playback, press "TUNE ▲ / ▼" on the remote control, or rotate
“tuning/select” Knob, “Station list” appears on the display, where, you can cycle through
the available stations. Press “select” on the remote control or press “tuning/select” snob to
confirm the station. The radio will then connect to the selected radio station.
●NOTE: if<station name: Service not available> appears on the
display, for example,it means no DAB+ radio signal at your
location. Please try to update the station list.
●NOTE: To execute this order, you are highly recommended to place your radio in a stronger
signal position!
View station information
While listening to DAB+ or FM, internet Radio ,My Music, by repeatedly pressing the
“info”, you can view the information of the station on the display.
Table of contents
Other Pop Radio manuals