Porkka Inventus User manual

Rev. 201603
Installation and Operation Manual
Montage- und Bedienungsanleitung
Asennus- ja käyttöohjeet
Installations- och bruksanvisning
Installasjons- og bruksanvisning
Instructions d’emploi et montage
Inventus
Commercial refrigerators and freezers
Hotel Restaurant
& Catering


ENGLISH
Purpose of use 3
Reception 3
Installation 3
Introduction 4
Temperature control keys 5
Use of temperature control 5
Control of the minimum and maximum temperatures recorded 6
Function display lights 6
Alarms 7
Frame heating 7
Routine cleaning 8
Operation failures 9
Disposal of the equipment 10
Guarantee 10
Contents
2

ENGLISH
Purpose of use
Inventus C commercial refrigerators are for the storage of pre-chilled products, not for chilling
down warm products, likewise, Inventus F commercial freezers are for the storage of already
frozen products and not for freezing non-frozen products.
Reception Examine the product carefully as soon as you receive it. If you notice that it has suffered from
damages during transportation, you must indicate this in the delivery document and report to
the carrier and the retailer.
Note!
The manufacturer’s guarantee does not cover damages caused by transportation!
Installation The ambient temperature must not exceed +43°C or fall under +16°C. Avoid placing the
cabinet close to any equipment that radiates heat.
Note!
The cabinet must not be used outdoors nor exposed to rain.
Note!
According to the electric safety regulations no liquid materials must be kept above the
cabinet.
Note!
Air circulation above the cabinet must be free.
Note!
Make sure there is enough room for the air circulation around the cabinet.
3

ENGLISH
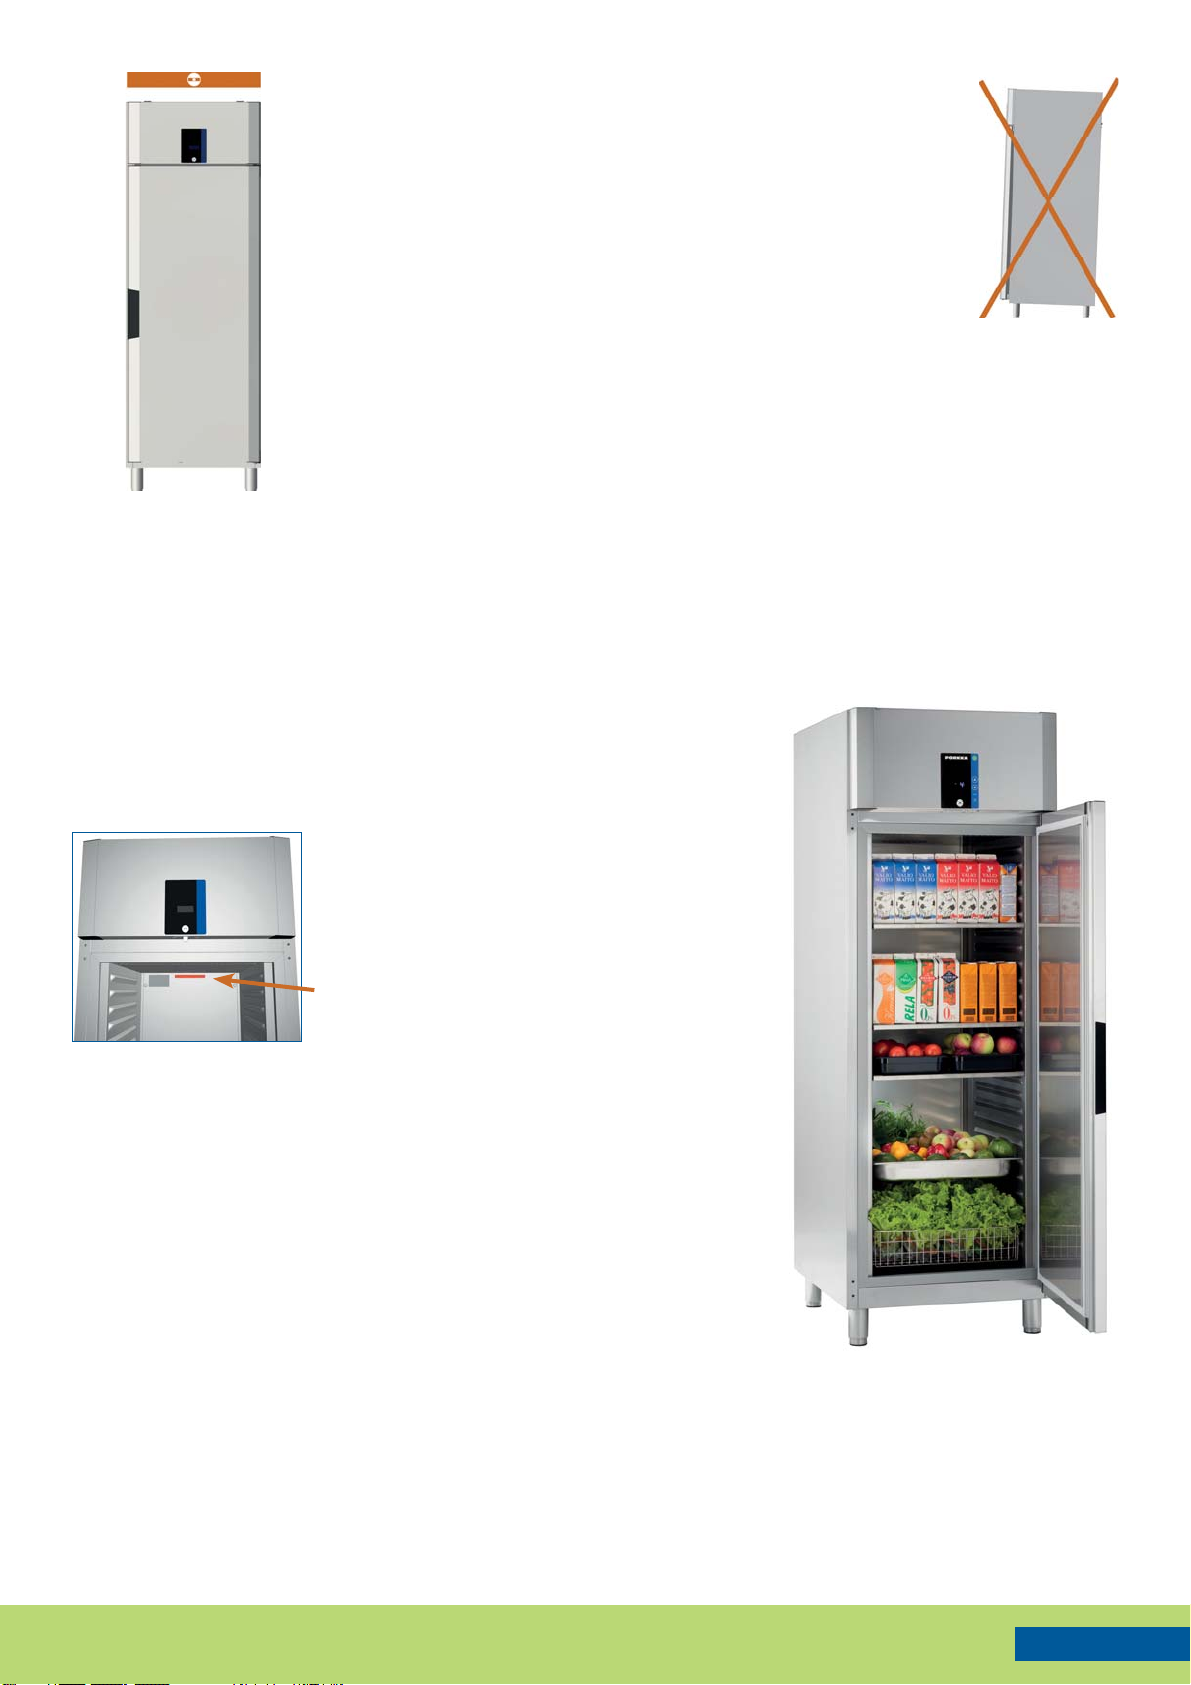
Adjust the cabinet with legs to ensure it is horizontal in all directions, by
using the adjustable feet, check with spirit level if necessary, alway ensure
that all feet are in contact with the ground.
Note!
The cabinet must not tilt backwards.
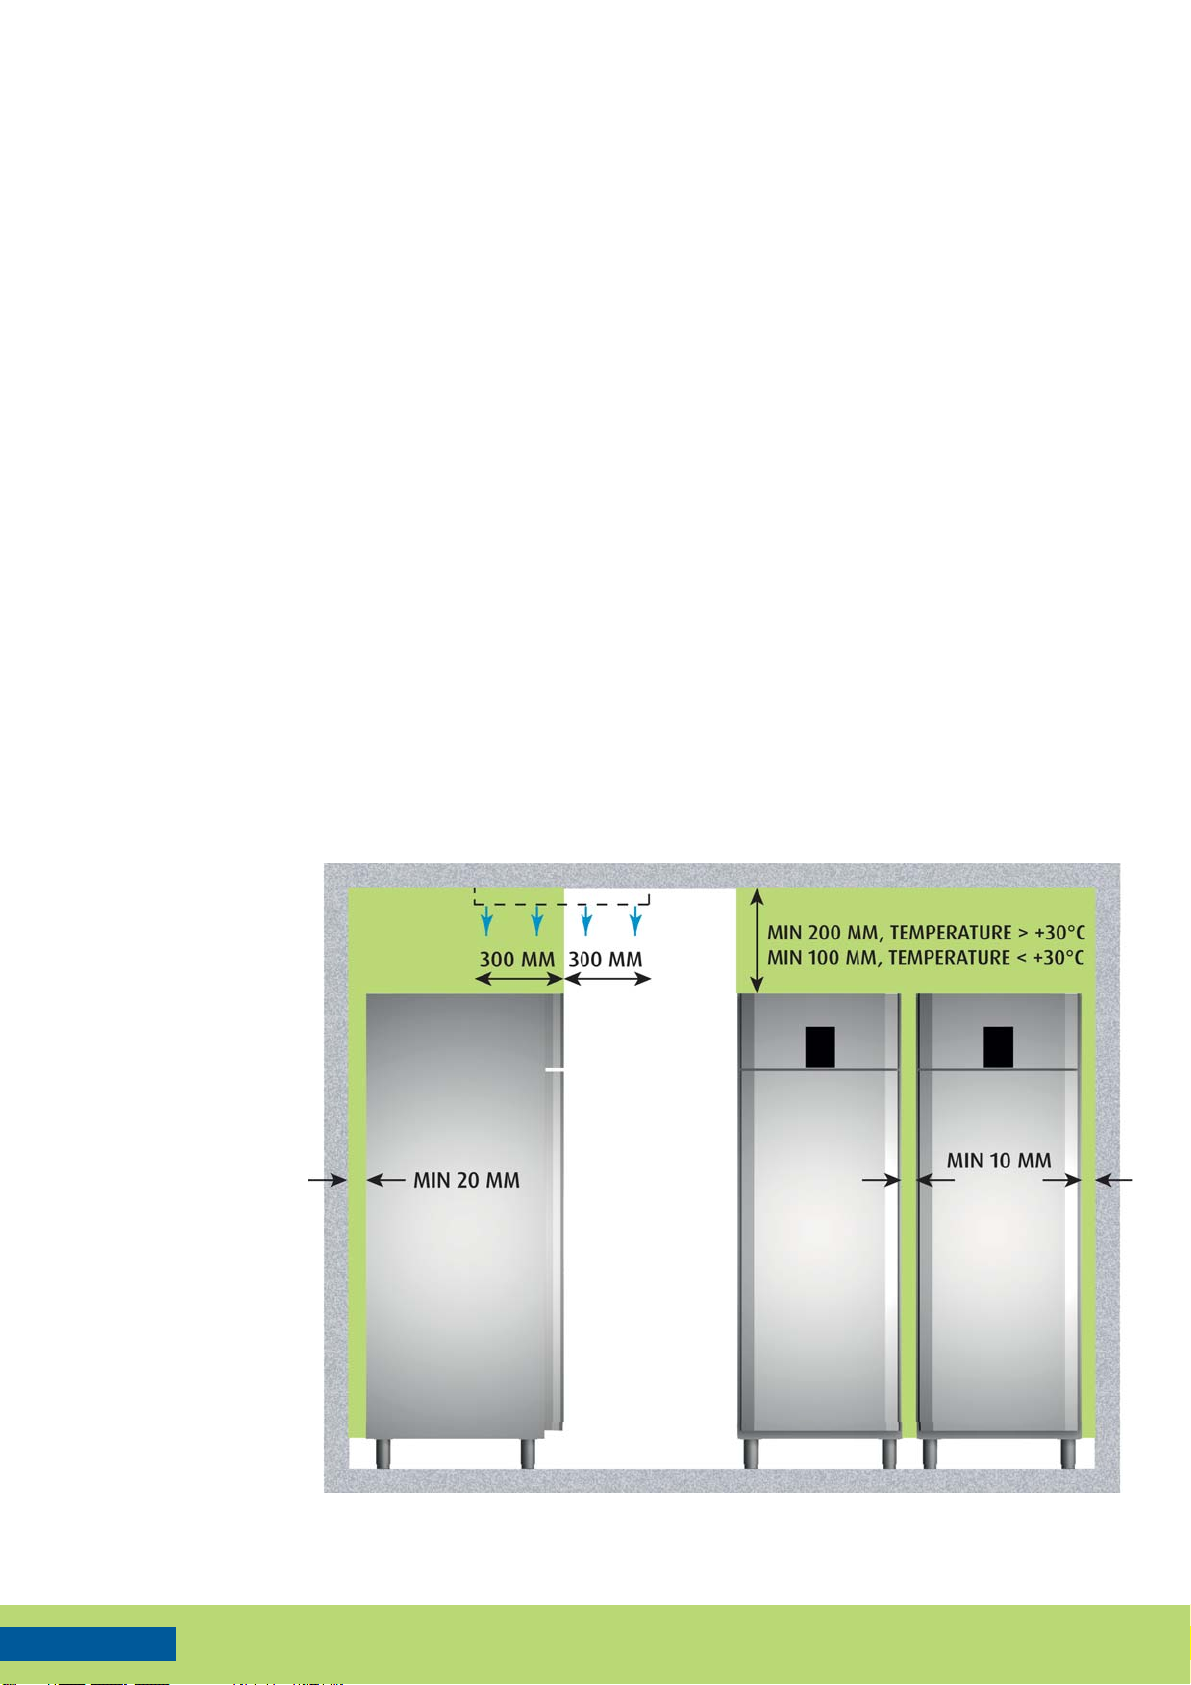
Place the cabinet with castors on hard and level floor. Ensure that all the
castors touch the floor. Uneven floor may cause the frame to distort and
differences of height between the cabinets. Lock castors with brakes when
the cabinet has been put in place.
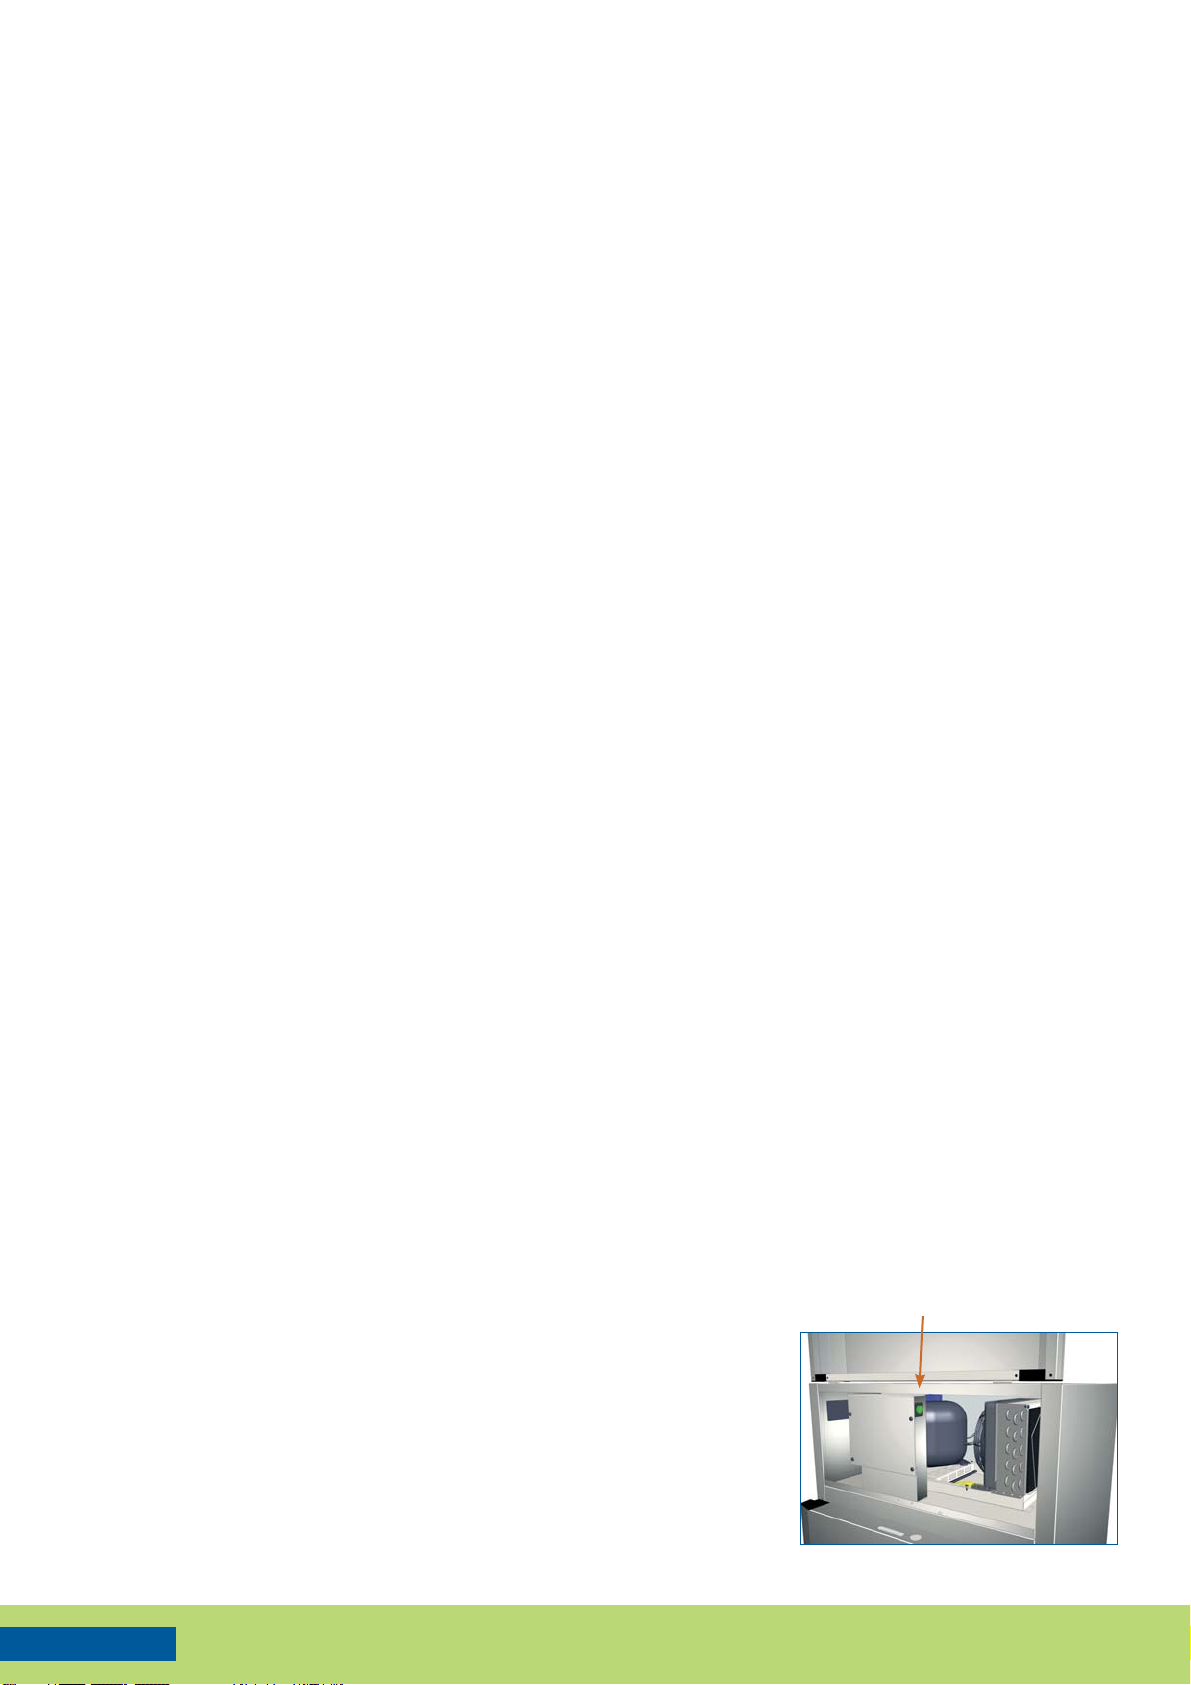
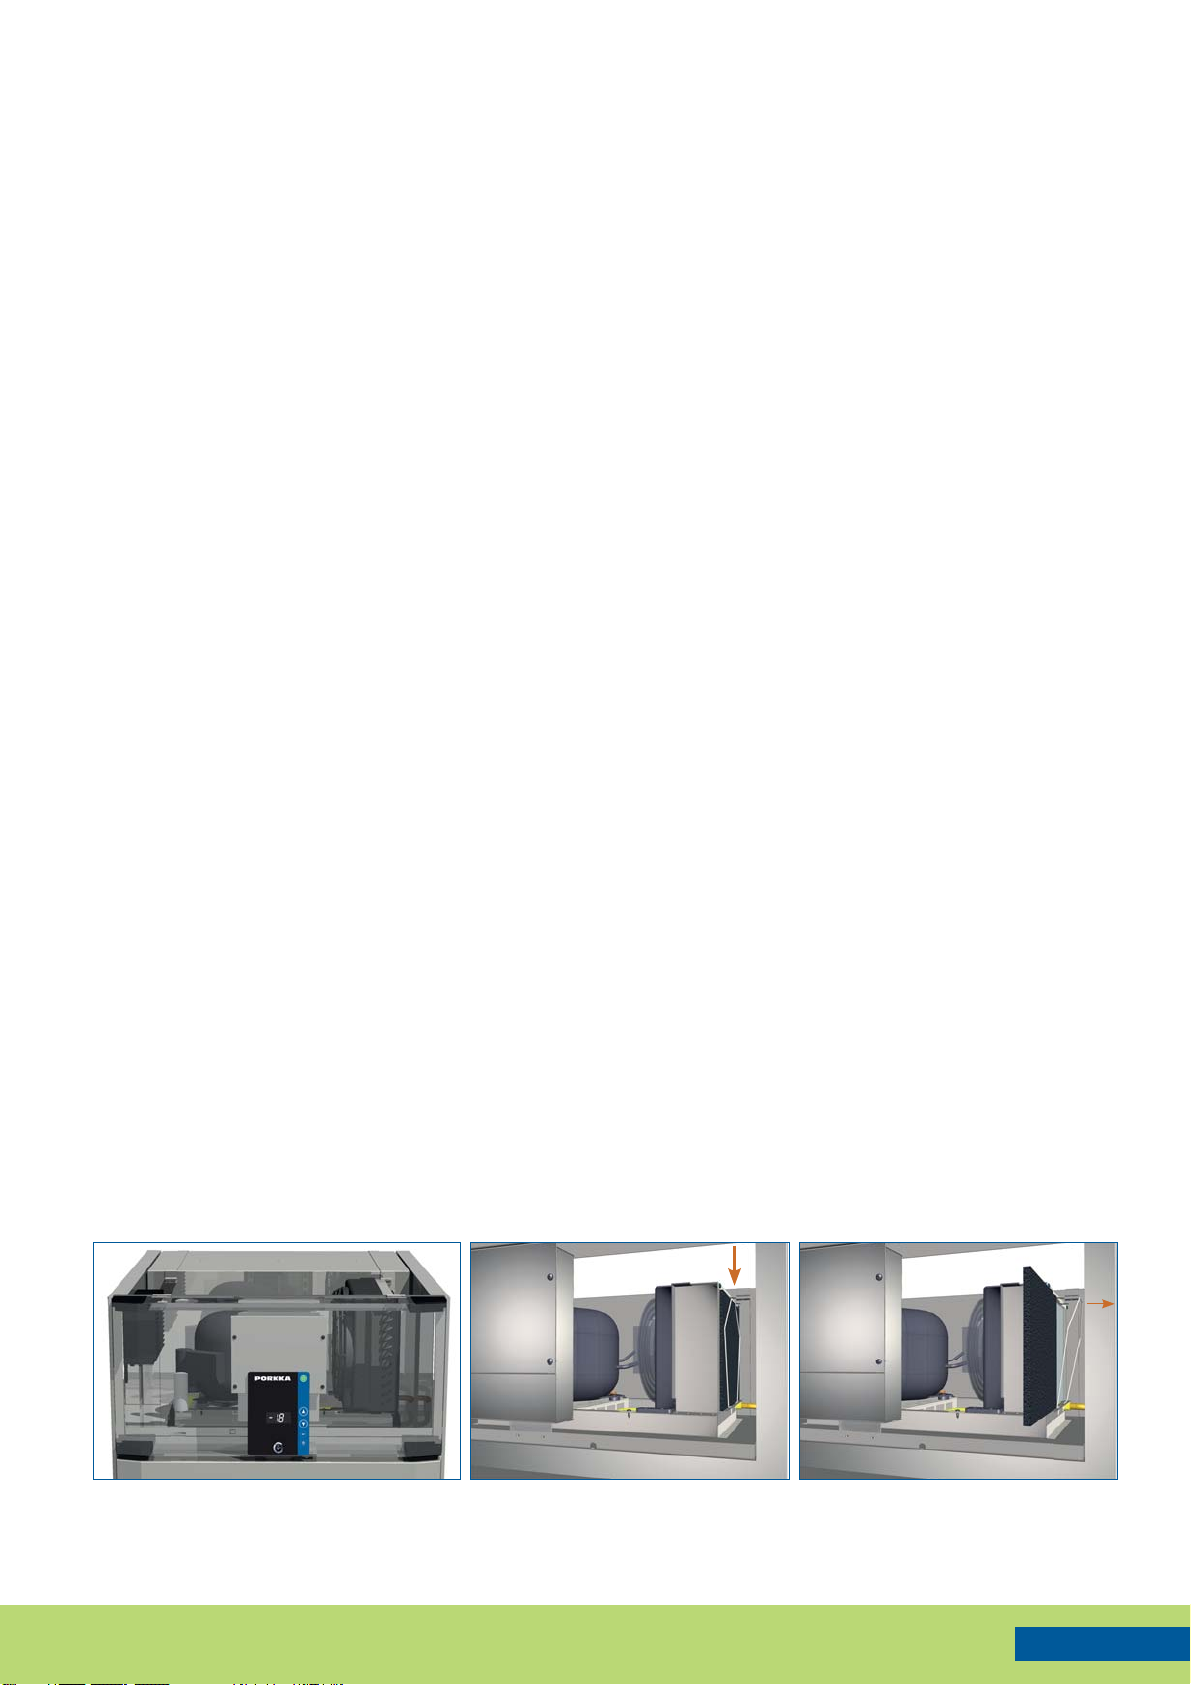
Connect the connection cord of the cabinet to an earthed 230 V / 50 Hz wall socket with its
own 10 A safety fuse. Check the voltage and frequency of the cabinet from the rating plate.
The rating plate is in the left front upper corner of the machinery room of the cabinet.
Note!
The damaged power supply cord must only be changed by a professional electrician,
authorised by the manufacturer.
Introduction Before using it, clean the cabinet carefully with mild cleaning agent, e.g. liquid dishwasher
detergent. Rinse and wipe dry. Leave the door open for airing for a moment.
Put the shelves in place.
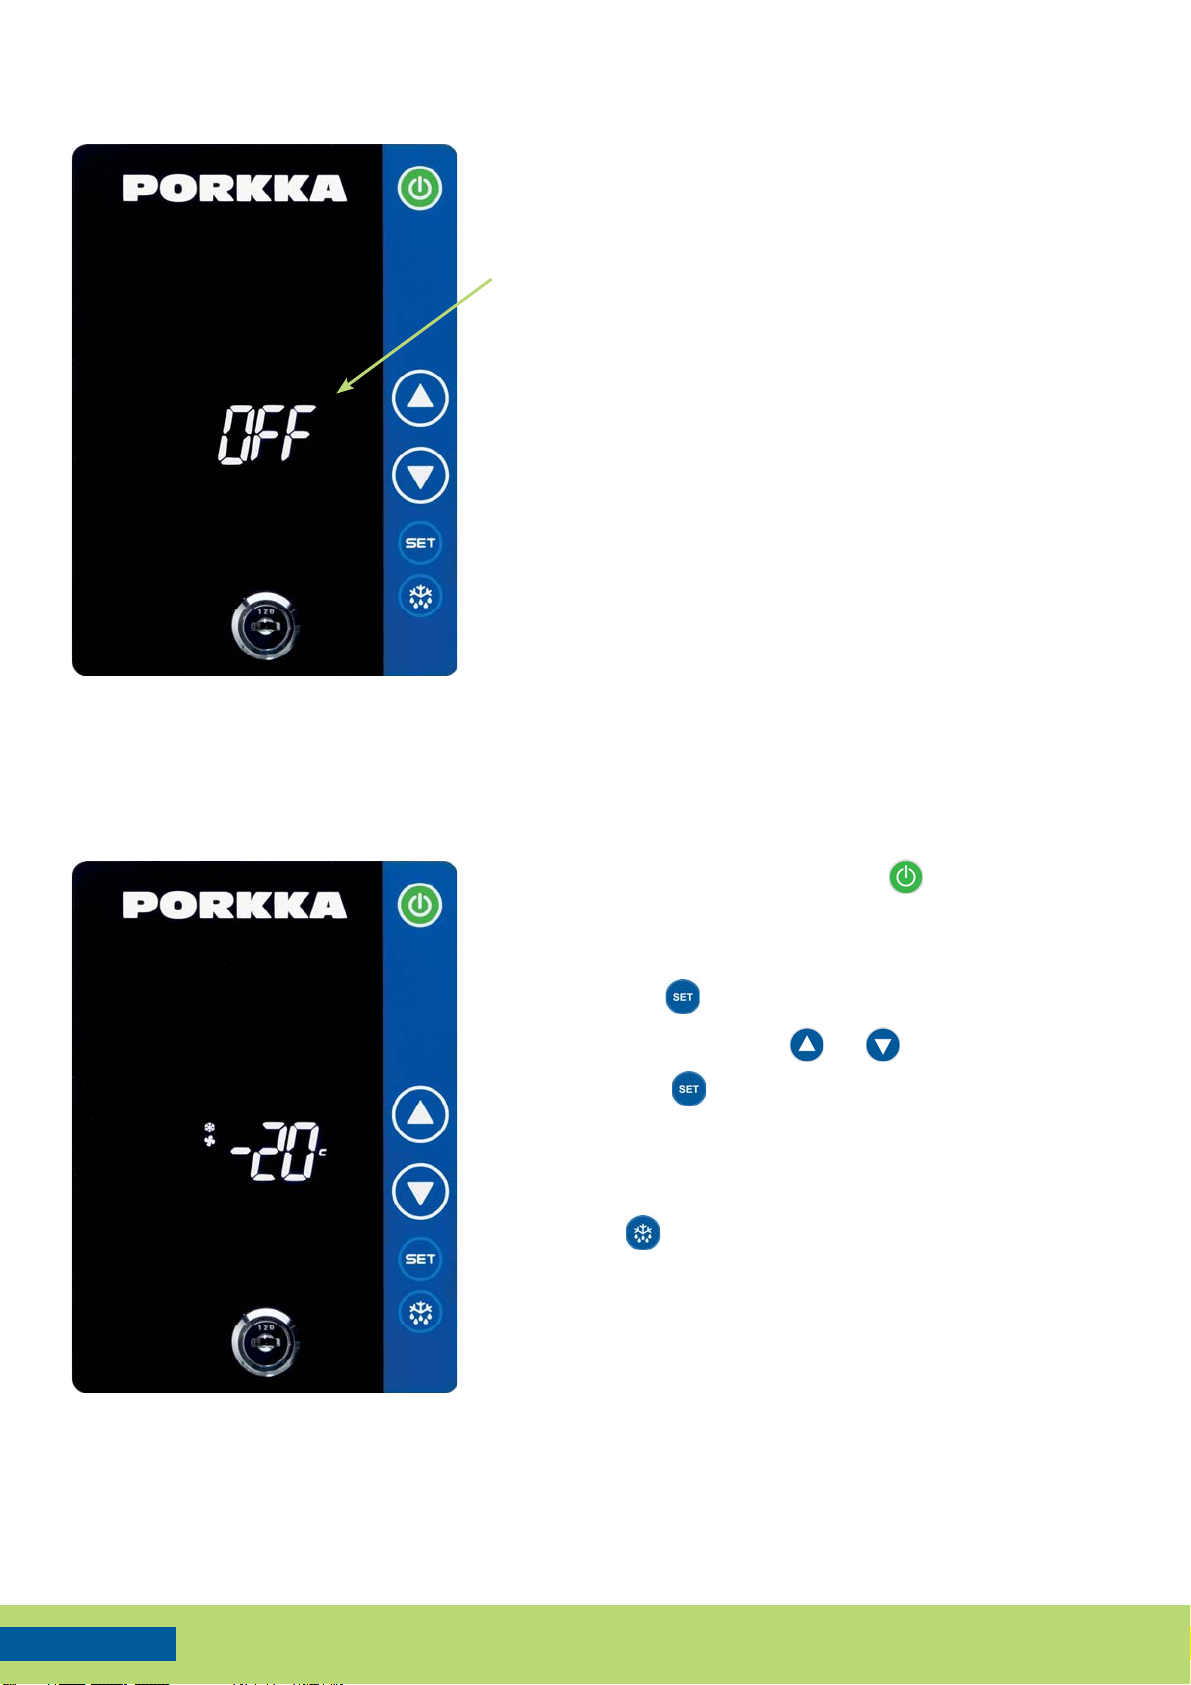
Before loading with goods, ensure the cabinet has
reached the required holding temperature (See
chapter ”Use of temperature control”).
Note!
To avoid evaporator corrosion, it is important to
keep food with high acid content / vinegar etc.
in air tight containers.
Note!
When loading the cabinet with goods, please do
not exceed the load limit (red mark inside the
cabinet on the back wall).
Note!
Do not place goods on cabinet floor but on the
bottom shelve to avoid blocking the air circulation.
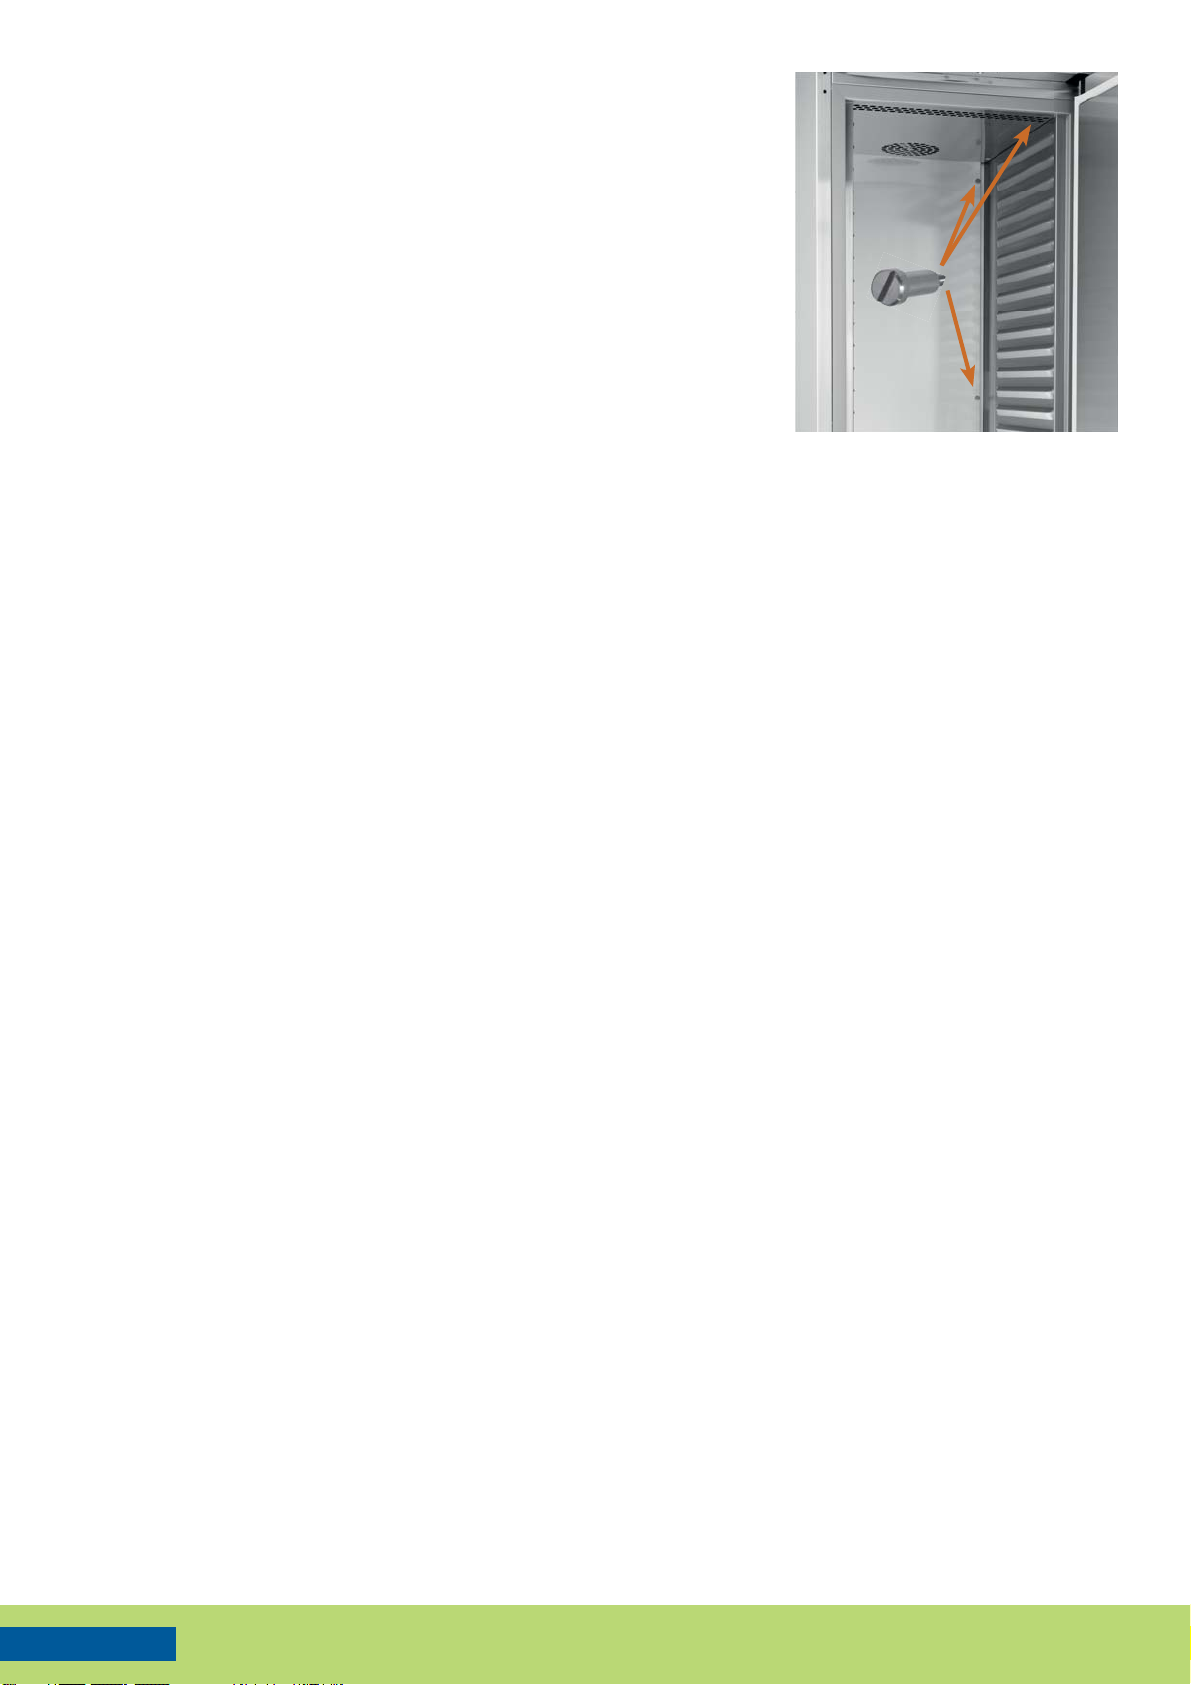
Note!
Please ensure correct air circulation inside the
cabinet at all times. When placing goods on to
the shelves ensure the do not overhang the
front of the shelves, as this will also interrupt air
circulation.
For slippery products, like frozen goods in plastic
bags, we recommend to use wire baskets (optional
accessory).
The cabinets are equipped with anti-tilting, sliding shelves. The maximum load is 70 kg/shelf.
4

ENGLISH
• ON/OFF button
• Temperature control key
• Function start and stop key SET
• Manual defrost starting key
• Door lock
• Temperature display and function display lights
Temperature control keys
1. Switch the power on by pressing the button .
2. Temperature control:
• Press once button , then the display will show the set temperature
• Adjust temperature with buttons and
• Press again button or wait for 15 seconds and the display will revert
to the normal state
3. Additional defrost:
• Press button for more than 3 seconds to start additional defrost
Use of temperature control
5

ENGLISH
1. Press button once. ”Lo” will appear on the display for a moment
followed by the minimum temperature logged.
2. Press button once. ”Hi” will appear on the display for a moment
followed by the maximum temperature logged.
The equipment will revert to the normal state in 5 seconds.
Function display lights
Light on Compressor is running
Light flashing Time delay to protect compressor after start-up
Light on The evaporator fan is on
Light on Defrost is on
Light flashing Time delay after defrost
AUX Light on The condenser fan is on
Light on Alarm; see chapter ”Alarms”
Control of the minimum and maximum temperatures recorded
6

ENGLISH
Alarms HA High temperature alarm
The temperature inside the cabinet has exceeded the set alarm temperature. The alarm
can be instigated by sudden icing of the evaporator. Initiate additional manual defrost.
See instructions on the previous page. Ensure the cabinet has not been loaded with warm
products. Check that a door has not been left open. Check that any product is not blocking air
circulation within the cabinet. The cabinet is meant to keep ready chilled products cold.
LA Low temperature alarm
The temperature inside the cabinet has fallen below the set value. Ensure that the products
put into the cabinet are not too cold.
The temperature alarm will reset automatically after the interior of the cabinet returns to the
set temperature range. If this does not happen, move the products to another cabinet and
contact your service provider.
dA Door open alarm
Close the door carefully and the alarm will reset automatically.
HA2 Condenser alarm
The condenser/filter needs to be cleaned. Switch cabinet off and remove the plug from the
wall socket. Clean the condenser /filter (see chapter ”Cleaning”).
Check also that air circulation to the condenser is not blocked or that the ambient temperature
is not too high. If the alarm still does not stop, remove products to another cabinet and
contact your service provider.
P1 Thermostat probe failure *
P2 Evaporator probe failure *
P3 Condenser probe failure *
*The cabinet operates on its standby system and will hold normal temperature. Reset the
alarm signal and immediately contact your service provider.
EE Data failure
To reset an ‘EE’ Alarm on the display and resume normal function of the equipment press any
button for 3 seconds. After this ‘rSt’ message will be displayed again for 3 seconds and the
equipment should return to normal function.
Frame heating (Inventus F)
Freezer cabinets are supplied with a doorframe heater,
this is ’on’ when the cabinets is shipped from our
factory. The vast majority of time this heater is not
required and it can be switched ’off’ to reduce energy
consumption. When there is extremely high humidity
you may notice condensation on the doorframe in this
case switch the heater ‘on’ using the switch behind the
top cover.
Note!
Our energy consumption tests are made with the doorframe heater ’off’.
7
The switch

ENGLISH
Cleaning Clean spillages immediately.
Ensure effective operation of the equipment and the quality of the products being stored, by
defrosting and cleaning the equipment regularly, we recommend at least once per month.
Remove all products and store them in a back-up store.
Switch off the cabinet from the main electrical supply by removing cable and plug from the
wall socket.
Remove the shelves.
Wash the stainless steel surfaces of the cabinet with a mild detergent mixed with water, e.g.
dishwasher detergent or other suitable food safe cleaning product. Use a cloth or paper towel
to prevent scratching the steel surface.
Wipe with down with a cloth and allow the cabinet to dry.
Note!
Do not use detergents or disinfectants containing chlorine i.e. bleach, solvents, scouring
products, or a knife or other sharp tools when cleaning.
Note!
Do not use running water to wash the cabinet.
Note!
Refer to the product description of the disinfectant to see which materials it is suitable for.
Do not let it splash on sensitive parts, such as thermostat regulator or door hinges. Dry the
equipment after the disinfection and let it ventilate.
To clean the condenser and or condenser filter:
Switch off the cabinet from the main electrical supply by removing cable and plug from wall
socket. The condenser is situated on the right hand side of the machine compartment of the
cabinet when facing the front, (1). Remove the knurled - head screw on the lower part of
the top front panel, then pivot the panel upwards on it’s hinges until it is secure, leaving the
machine compartment open. Take care that the panel will not fall back and cause injury.
Push the filter holding bracket (2) down from the top until it becomes free, then swing to
the right, when you can then remove the filter and or use a dry brush or vacuum cleaner to
remove dust from condenser fins.
Was the filter with e.g. liquid detergent, rinse the filter and let it dry, and then put replace.
Switch that cabinet on only when the front cover has been replaced in position and screw is
back in place.
8
2.
1. 3.

ENGLISH
The air circulation ducts inside the cabinet can be
removed without tools so that it is easy to clean
all surfaces. Rear and roof ducts have been fitted
with knurled-head screws with a coin slot for easy
loosening.
Clean the cabinet door gasket using a mild water
soluble detergent and check the condition of the
gasket. A silicone spray makes the gaskets flexible
and dirt-rejecting.
Cleaning in dishwasher is not recommendable
for the loose parts of the equipment.
Put back all removed parts and switch on the
equipment.
Ensure that the temperature has become to the normal level before using the equipment
again.
Operation failures
In case of alarm:
• see chapter ”Alarms”
If the cabinet fails to cool check that:
• the power supply is OK and the cabinet is switched ‘on’ there are indications on the
control panel if there is a power supply to the cabinet.
• the defrost LED is not lit
• the cabinet has not been overloaded or filled with warm products
• the air circulation for the condenser or inside the cabinet is not blocked
• the ambient temperature around the cabinet is not too high
• the condenser filter is not blocked
If the machinery makes a strange sound:
• check that the feet of the cabinet have been properly adjusted
• make sure that the cabinet does not rock when pushed from one or another of the front
corners
• check that loose items such as bottles in the cabinet are not knocking against each other
If the malfunction cannot be corrected by checking the above points prevent the goods from
spoiling by moving them to another cooling or freezing unit. Switch the faulty cabinet off,
remove the power supply from the wall socket and contact your dealer or service company.
9

ENGLISH
Disposal of the equipment
Once the equipment becomes redundant it must not be disposed of with normal waste
because the equipment is governed by the WEEE directive. It has to be disposed of following
the WEEE act which became effective on August 13th 2005.
Guarantee Check the guarantee period at your merchandiser.
The guarantee does not cover faults caused by:
• transportation
• overloading or user’s negligence
• negligence due to not reading manuals, proper care and maintenance
• changes in current (max ± 10% allowed) caused for example by lightning etc.
• modifications or repairs performed by an unauthorized service agent
• use of parts not supplied and approved by the manufacturer
The guarantee does not cover:
• incidental scratches/marks or other minor faults caused when unpacking or during
installation that does not effect operation or performance of the equipment
Note!
The manufacturer or his selling agent is not at any time, or under any circumstances liable for
food loss howsoever it occurs. the owner/user should ensure the contents are insured at all
times.
All goods are supplied under our terms and conditions of sale a copy of which may be
obtained upon request.
10


DEUTSCH
INHALT
Verwendungszweck 3
Entgegennahme 3
Installation 3
Einführung 4
Tasten zur Temperatureinstellung 5
Bedienung der Temperatursteuerung 5
Einstellung der Höchst- und Tiefsttemperatur 6
Funktionen der Anzeigen im Display 6
Alarme 7
Rahmenheizung 7
Routinemässige Reinigung 8
Fehlfunktionen 9
Entsorgung des Geräts 10
Garantie 10
2

DEUTSCH 3
Verwendungszweck
Kühlschränke vom Typ Inventus C dienen zur Lagerung bereits gekühlter Produkte und nicht
dem Abkühlen. Gefrierschränke vom Typ Inventus F dienen zur Lagerung bereits gefrorener
Produkte und nicht dem Einfrieren.
Entgegennahme Prüfen Sie das Produkt bei der Entgegennahme sorgfältig. Wenn Sie Transportschäden
feststellen, muss dies im Lieferschein angegeben und dem Spediteur sowie Händler gemeldet
werden.
Hinweis!
Der Hersteller übernimmt keine Haftung für Transportschäden!
Installation Die Umgebungstemperatur darf nicht mehr als +43°C und weniger als +16°C betragen.
Vermeiden Sie die Aufstellung des Geräts in der Nähe von Wärmequellen.
Hinweis!
Das Gerät darf nicht in Aussenbereichen genutzt werden oder mit Regen in Kontakt
kommen.
Hinweis!
Gemäss den Vorschriften zur elektrischen Sicherheit, dürfen keine Flüssigkeiten auf das
Gerät gestellt werden.
Hinweis!
Die Luft über dem Gerät muss frei zirkulieren können.
Hinweis!
Stellen Sie sicher, dass eine ausreichende Luftzirkulation um das Gerät herum vorhanden
ist.

DEUTSCH
Justieren Sie die horizontale Ausrichtung des Geräts mithilfe der
verstellbaren Füsse und einer Wasserwaage. Stellen Sie sicher, dass alle
Füsse den Boden berühren.
Hinweis!
Das Gerät darf nicht nach hinten geneigt sein.
Stellen Sie das Gerät mit Rollen auf einen harten und ebenen Boden.
Stellen Sie sicher, dass die Rollen den Boden berühren. Ein unebener Boden
kann dazu führen, dass sich der Rahmen verzieht und Höhenunterschiede
zwischen den Geräten auftreten. Aktivieren Sie die Rollensperre, sobald sich
das Gerät an seinem definitiven Standort befindet.
Verbinden Sie das Netzkabel des Geräts mit einer geerdeten 230 V / 50 Hz Wandsteckdose
mit einer separaten 10 A Sicherung. Überprüfen Sie die Spannung und Frequenz des Geräts
anahnd der . Die Datentafel befindet sich an der linken, oberen Ecke an der Vorderseite des
Maschinenfachs.
Hinweis!
Ein beschädigtes Netzkabel darf nur durch einen vom Hersteller autorisierten Elektriker
ausgewechselt werden.
Einleitung Reinigen Sie das Gerät vor seiner ersten Nutzung mit einem milden Reinigungsmittel wie z. B.
Geschirrspülmittel. Nach dem Reinigen trocken wischen. Lassen Sie die Tür für einen Moment
geöffnet, um den Schrank zu lüften.
Setzen Sie die Gitterroste ein.
Stellen Sie sicher, dass das Gerät die erforderliche
Temperatur erreicht hat bevor Sie es mit Produkten
beschicken. (Siehe Kapitel „Benutzung der
Temperatursteuerung“)
Hinweis!
Um eine Korrosion des Verdampfers zu
vermeiden, sollten Lebensmittel mit hohem
Säureanteil, wie z.B. Essig etc. in Luftdichten
Behältern aufbewahrt werden.
Hinweis!
Überschreiten Sie beim Beschicken des Geräts
nicht die max. Beladungsgrenze (rote Markierung
an der Rückwand des Geräts).
Hinweis!
Stellen Sie keine Produkte auf den Boden des
Geräts sondern benutzen Sie den untersten
Rost, um eine Blockierung der Luftzirkulation zu
vermeiden.
Hinweis!
Bitte stellen Sie jederzeit eine ausreichende
Luftzirkulation im Gerät sicher. Stellen Sie
Produkte so auf die Roste, dass die Vorderkante
nicht überschritten wird.
Für leicht rutschende Produkte wie gefrorene Waren in Plastikbeuteln empfehlen wir die
Verwendung von Drahtkörben (optionales Zubehör).
Die Schränke sind mit kippsicheren, einschiebbaren Gitterrosten ausgerüstet. Die Höchstlast
beträgt 70 kg/Rost.
4

DEUTSCH
1. Einschalten durch Drücken der Taste .
2. Temperatursteuerung:
• Einmal die Taste , um die eingestellte Temperatur anzuzeigen.
• Die gewünschte Temperatur mit den Tasten und .
• Erneut Taste drücken oder 15 Sekunden lang warten, bis die
Anzeige wieder in den normalen Zustand zurückgeht.
3. Manuelle Abtauung:
• Taste für mehr als 3 Sekunden drücken, um eine zusätzliche
Abtauung zu einzuleiten.
• EIN/AUS-Taste
• Taste zur Temperatureinstellung
• ”SET”-Taste zum Starten und Stoppen von Funktionen
• Taste für Einleitung einer manuellen Abtauung.
• Türschloss
• Temperatur- und Funktionsanzeige
Tasten zur Temperatureinstellung
Bedienung der Temperatursteuerung
5

DEUTSCH
1. Taste einmal drücken. Auf der Anzeige erscheint einen Moment
lang ”Lo“ und anschliessend die registrierte Tiefsttemperatur
2. Taste einmal drücken. Auf der Anzeige erscheint einen Moment
lang ”Hi“ und anschliessend die registrierte Höchsttemperatur.
Nach 5 Sekunden schaltet das Gerät wieder in den Normalzustand
zurück.
Einstellung der Höchst- und Tiefsttemperatur
Funktionen der Anzeigen im Display
Licht an Kompressor in Betrieb
Licht blinkt Zeitverzögerung zum Schutz des Kompressors nach dem
Einschalten
Licht an Verdampferlüfter in Betrieb
Licht an Abtauungvorgang in Betrieb
Licht blinkt Zeitverzögerung nach dem Abtauvorgang
AUX Licht an Kondensatorventilator in Betrieb
Licht an Alarm; siehe Kapitel ”Alarme”
6

DEUTSCH
Alarme HA Innentemperatur zu hoch
Die Temperatur im Gerät hat die eingestellte Alarmtemperatur überschritten. Der Alarm kann
durch plötzliche Vereisung des Verdampfers ausgelöst werden. Führen Sie eine manuelle
Abtauung durch. Siehe Anleitung auf der vorherigen Seite. Stellen Sie sicher, dass keine
warmen Produkte in das Gerät gestellt wurden. Prüfen Sie, dass die Tür geschlossen ist.
Prüfen Sie, dass keine Produkte die Luftzirkulation blockiert. Das Gerät dient dazu, bereits
abgekühlte Produkte zu lagern.
LA Innentemperatur zu niedrig
Die Temperatur im Gerät ist unter den eingestellten Wert gefallen. Stellen Sie sicher, dass die
in das Gerät gestellten Produkte nicht zu kalt sind.
Die Temperaturalarme werden automatisch zurückgesetzt, sobald die Temperatur im Inneren
des Geräts wieder im eingestellten Bereich ist. Ist dies nicht der Fall, bringen Sie die Produkte
in ein anderes Gerät und kontaktieren Sie Ihren Anbieter.
dA Türöffnungsalarm
Schliessen Sie die Tür. Der Alarm stoppt automatisch.
HA2 Alarm Kondensatortemperatur zu hoch
Der Kondensator/Filter muss gereinigt werden. Schalten Sie das Gerät aus und ziehen Sie den
Stecker aus der Steckdose. Reinigen Sie den Kondensator/Filter (siehe Kapitel „Reinigung“).
Prüfen Sie ausserdem, dass die Luftzufuhr zum Kondensator nicht blockiert und die
Umgebungstemperatur nicht zu hoch ist. Falls der Alarm nicht stoppt, bringen Sie die Produkte
in ein anderes Gerät und kontaktieren Sie Ihren Kundendienst.
P1 Fehlfunktion des Temperaturfühlers *
P2 Fehlfunktion des Verdampferfühlers *
P3 Fehlfunktion des Kondensatorfühlers *
*Das Gerät läuft mit Standby-Modus und hält die Normaltemperatur. Quittieren Sie das
Alarmsignal und kontaktieren Sie sofort Ihren Kundendienst.
EE Datenfehler
Im Falle eines ”EE“-Alarms quittieren Sie den Alarm und führen Sie einen Neustart des Geräts
durch, indem Sie eine beliebige Taste 3 Sekunden lang drücken, bis der Code ”rSt“ im Display
angezeigt wird.
Rahmenheizung (Inventus F)
Tiefkühlschränke sind mit einer Türrahmenheizung
ausgestattet, welche bei der Auslieferung
standardmäßig eingeschaltet ist. In den allermeisten
Fällen ist diese nicht notwendig und kann
ausgeschaltet werden um Energie zu sparen. Bei
Umgebungstemperaturen mit einer extrem hohen
Luftfeuchtigkeit werden kann unter Umständen
Kondenswasser am Türrahmen festgestellt werden.
7
Schalter

DEUTSCH
In diesem Falle kann die Heizung eingeschaltet werden. Der Schalter für die
Türrahmenheizung befindet sich hinter der oberen Frontblende des Schrankes.
Anmerkung:
Der Energieverbrauchstest der Tiefkühlschränke wurde mit ausgeschalteter Türrahmenheizung
ausgeführt.
Reinigung Reinigen Sie ausgelaufene Substanzen sofort.
Sie können eine optimale Funktionsweise des Geräts und die Qualität der gelagerten Produkte
sicherstellen, indem Sie das Gerät mindestens einmal pro Monat reinigen.
Entnehmen Sie alle Produkte und lagern diese in einem anderen Kühl- oder Tiefkühlgerät.
Schalten Sie das Gerät am Hauptschalter aus und ziehen Sie den Stecker aus der Steckdose.
Entnehmen Sie die Roste.
Reinigen Sie die Edelstahloberflächen des Geräts mit einem milden Reinigungsmittel und
Wasser wie z. B. Geschirrspülmittel oder einem anderen geeigneten Reinigungsmittel.
Verwenden Sie ein Tuch oder Papiertuch, um Kratzer auf den Edelstahloberflächen zu
vermeiden.
Abschliessend mit einem feuchten Lappen auswischen, abtrocknen und komplett austrocknen
lassen.
Hinweis!
Verwenden Sie keine chlorhaltigen Reinigungs- oder Desinfektionsmittel, Lösungs- oder
Scheuermitteln, Messer oder andere scharfkantigen Utensilien.
Hinweis!
Verwenden Sie zum Reinigen kein fliessendes Wasser.
Hinweis!
Entnehmen Sie der Produktbeschreibung des Desinfektionsmittels, für welche Materialien
es geeignet sind. Vermeiden Sie Spritzer auf sensible Teile wie die Steuereinheit oder
die Scharniere. Trocknen Sie das Gerät nach der Desinfektion und lassen Sie es gut
durchlüften.
Reinigen Sie den Kondensator und/oder Kondensatorfilter. Der Kondensator befindet sich auf
der rechten Seite des Maschinenfachs (1). Entfernen Sie die Rändelschraube an der unteren
Seite der Frontabdeckung und öffnen Sie die diese (ausgestattet mit Scharnieren an der
Oberkante) durch Heben vollständig.
Drücken Sie die Halterung des Filters (2) von oben nach unten, um sie zu lösen. Drehen Sie
die Halterung nach rechts und entfernen Sie den Filter (3). Säubern Sie den Filter, z. B. mit
Spülmittel oder einem anderen geeigneten Reinigungsmittel. Spülen Sie den Filter ab, lassen
Sie ihn trocknen und setzen Sie ihn wieder ein.
8
2.
1. 3.

DEUTSCH
Die Abdeckungen im Gerät können ohne Werkzeuge
entnommen werden, so dass eine Reinigung aller
Oberflächen problemlos möglich ist. Die Abdeckungen
an der Ober- und Rückseite sind mit Rändelschrauben
befestigt, die über einen Schlitz verfügen, um sie mit
einer Münze lösen zu können.
Reinigen Sie die Dichtung der Tür mit einem milden,
wasserlöslichen Reinigungsmittel und überprüfen Sie
den Zustand der Dichtung. Ein Silikon-Spray hält die
Dichtung geschmeidig und schmutzabweisend.
Die Reinigung von losen Teilen des Gerätes in einer
Spülmaschine wird nicht empfohlen.
Setzen Sie alle entnommenen Teile wieder ein und
schalten Sie das Gerät ein.
Stellen Sie sicher, dass die Temperatur die Set-Temperatur erreicht hat, bevor Sie das Gerät
mit Produkten beschicken.
Fehlfunktionen
Im Alarmfall:
• Siehe Kapitel ”Alarme“
Falls das Gerät nicht kühlt, prüfen Sie, dass:
• Spannung am Gerät vorhanden ist, ob etwas angezeigt wird und dass das Gerät
eingeschaltet ist
• die LED für Abtauung nicht leuchtet
• das Gerät nicht übermässig oder mit warmen Produkten beschickt wurde
• die Luftzirkulation des Kondensator oder im Inneren des Geräts nicht blockiert ist
• die Umgebungstemperatur nicht zu hoch ist
• der Kondensatorfilter nicht blockiert ist
Falls das Gerät ungewöhnliche Geräusche verursacht:
• Prüfen Sie, dass die Füsse des Geräts korrekt justiert wurden.
• Stellen Sie sicher, dass das Gerät nicht wackelt, wenn Druck auf eine der vorderen Ecken
ausgeübt wird.
• Prüfen Sie, ob lose Elemente wie Flaschen im Gerät gegeneinander stoßen.
´
9
Table of contents
Languages:
Other Porkka Refrigerator manuals