Haier HSQ04WNA User manual

®
TM
HSQWNA-1
Issued: Jan-00
IMPORTANT
Do Not Return This Product To The Store
If you have a problem with this product, please contact the "Haier Customer
Satisfaction Center" at 1-877-337-3639.
DATED PROOF OF PURCHASE REQUIRED FOR WARRANTY SERVICE
IMPORTANT
Ne retournez pas ce produit au magasin
Si vous avez un problème avec ce produit, veuillez contacter le "Haier Customer
Satisfaction Center" au 1-877-337-3639
LA PREUVE D'ACHAT DATÉE EST EXIGÉE POUR LE SERVICE DE GARANTIE
IMPORTANTE
No regrese éste producto a la tienda
Si usted tiene problemas con éste producto, por favor contacte al "Centro de Servicio
al Cliente de Haier al 1–877-337-3639.
SE REQUIERE UNA PRUEBA DE COMPRA FECHADA PARA EL SERVICIO DE GARANTIA
Model No. • Modèle no. •No. de Modelo
HSQWNA
120V, 60 Hz
Made in China
Fabriqué en Chine
Hecho en China
Haier America Trading, L.L.C.
New York, NY 10018
Printed in China
Imprimé en Chine
Impreso en China

®
TM
Compact Refrigerator/Freezer
Réfrigérateur/Congélateur Compact
Refrigerador/Congelador Compacto
English • Anglais • Inglés . . . . . . . . . . . . . . .1
French • Français • Francés . . . . . . . . . . . . . .9
Spanish • Espagnol • Español . . . . . . . . . . .17
Model No.•Modèle no.•No. de Modelo
HSQ04WNA
User Manual • Manuel de l’utilisateur • Manual del usuario
page • page • página

IMPORTANT SAFEGUARDS
Read all of the instructions before using this appliance.
When using this appliance, always exercise basic safety
precautions, including the following:
1) Use this appliance only for its intended purpose as described in this use
and care guide.
2) This refrigerator must be properly installed in accordance with the
installation instructions before it is used. See grounding instructions in the
installation section.
3) This refrigerator should not be recessed or built-in an enclosed cabinet. It
is designed for freestanding installation only.
4) Never unplug your refrigerator by pulling on the power cord. Always
grasp the plug firmly and pull straight out from the outlet.
5) Repair or replace immediately, all electric service cords that have become
frayed or otherwise damaged. Do not use a cord that shows cracks or
abrasion damage along its length, the plug or the connector end.
6) If your old refrigerator is not being used, we recommend that you remove
the doors. This will reduce the possibility of danger to children.
7) After your refrigerator is in operation, do not touch the cold surfaces in
the freezer compartment, particularly when hands are damp or wet. Skin
may adhere to these extremely cold surfaces.
8) Do not refreeze foods, which have been thawed completely. The United
States Department of Agriculture in Home and Garden Bulletin No. 69
reads: "…You may safely refreeze frozen foods that have thawed if they
still contain ice crystals or if they are still cold-below 40˚F"
"…Thawed ground meats, poultry, or fish that have any off-odor or off-
color should not be refrozen and should not be eaten. Thawed ice cream
should be discarded. If the odor or color of any food is poor or question-
able, discard it. The food may be dangerous to eat."
"…Even partial thawing and re-freezing reduce the eating quality of
foods, particularly fruits, vegetables, and prepared foods. The eating qual-
ity of red meats is affected less than that of many other foods. Use
refrozen foods as soon as possible, to save as much of they’re eating
quality as you can."
9) Do not use any electrical device or any sharp instrument in defrosting your
refrigerator.
1
English

2
Thank you for using our Haier
product. This easy-to-use manual will
guide you in getting the best use of
your refrigerator.
Remember to record the model and
serial number. They are on a label in
back of the refrigerator.
Model number
Serial number
Date of purchase
Staple your receipt to your manual. You will need it to obtain
warranty service.
English
10) Unplug your refrigerator before cleaning or before making any repairs.
Note: If for any reason this product requires service, we strongly
recommend that a certified technician perform service.
11) Do not operate your refrigerator in the presence of explosive fumes.
For Future Reference Please
SAVE THESE INSTRUCTIONS
DANGER
Risk of child entrapment. Before you throw away your old
refrigerator or freezer, take off the doors. Leave the shelves
in place so that children may not easily climb inside.
As per UL 250 11.2.6

English
Table Of Contents
PAGE
Important Safeguards ..........................................................................1
Features..............................................................................................3
Energy-Saving Tips..............................................................................4
Refrigerator Installation........................................................................4
Electrical Connections ..........................................................................4
Door Reversal......................................................................................5
Operating Your Refrigerator ................................................................7
Care and Cleaning..............................................................................7
Vacation and Moving ..........................................................................8
Defrosting ..........................................................................................8
Troubleshooting ..................................................................................9
Warranty..........................................................................................10
Features
3
A. Separate Freezer Compartment
B. Dispense-A-CanTM Storage
C. Removable Shelves
D. Adjustable Temperature Control
E. Glass Crisper Cover
F. See-Through Crisper
G. Tall Bottle Storage
A
B
C
D
E
F
G

•Do not place your refrigerator next
to a heating vent, a range, or in
direct sunlight.
•Do not open door more often than
necessary.
•Keep the door closed as much as
possible, especially, in hot and
humid weather.
•Cover foods to reduce moisture
build up inside the refrigerator.
• Store only foods that require
refrigeration.
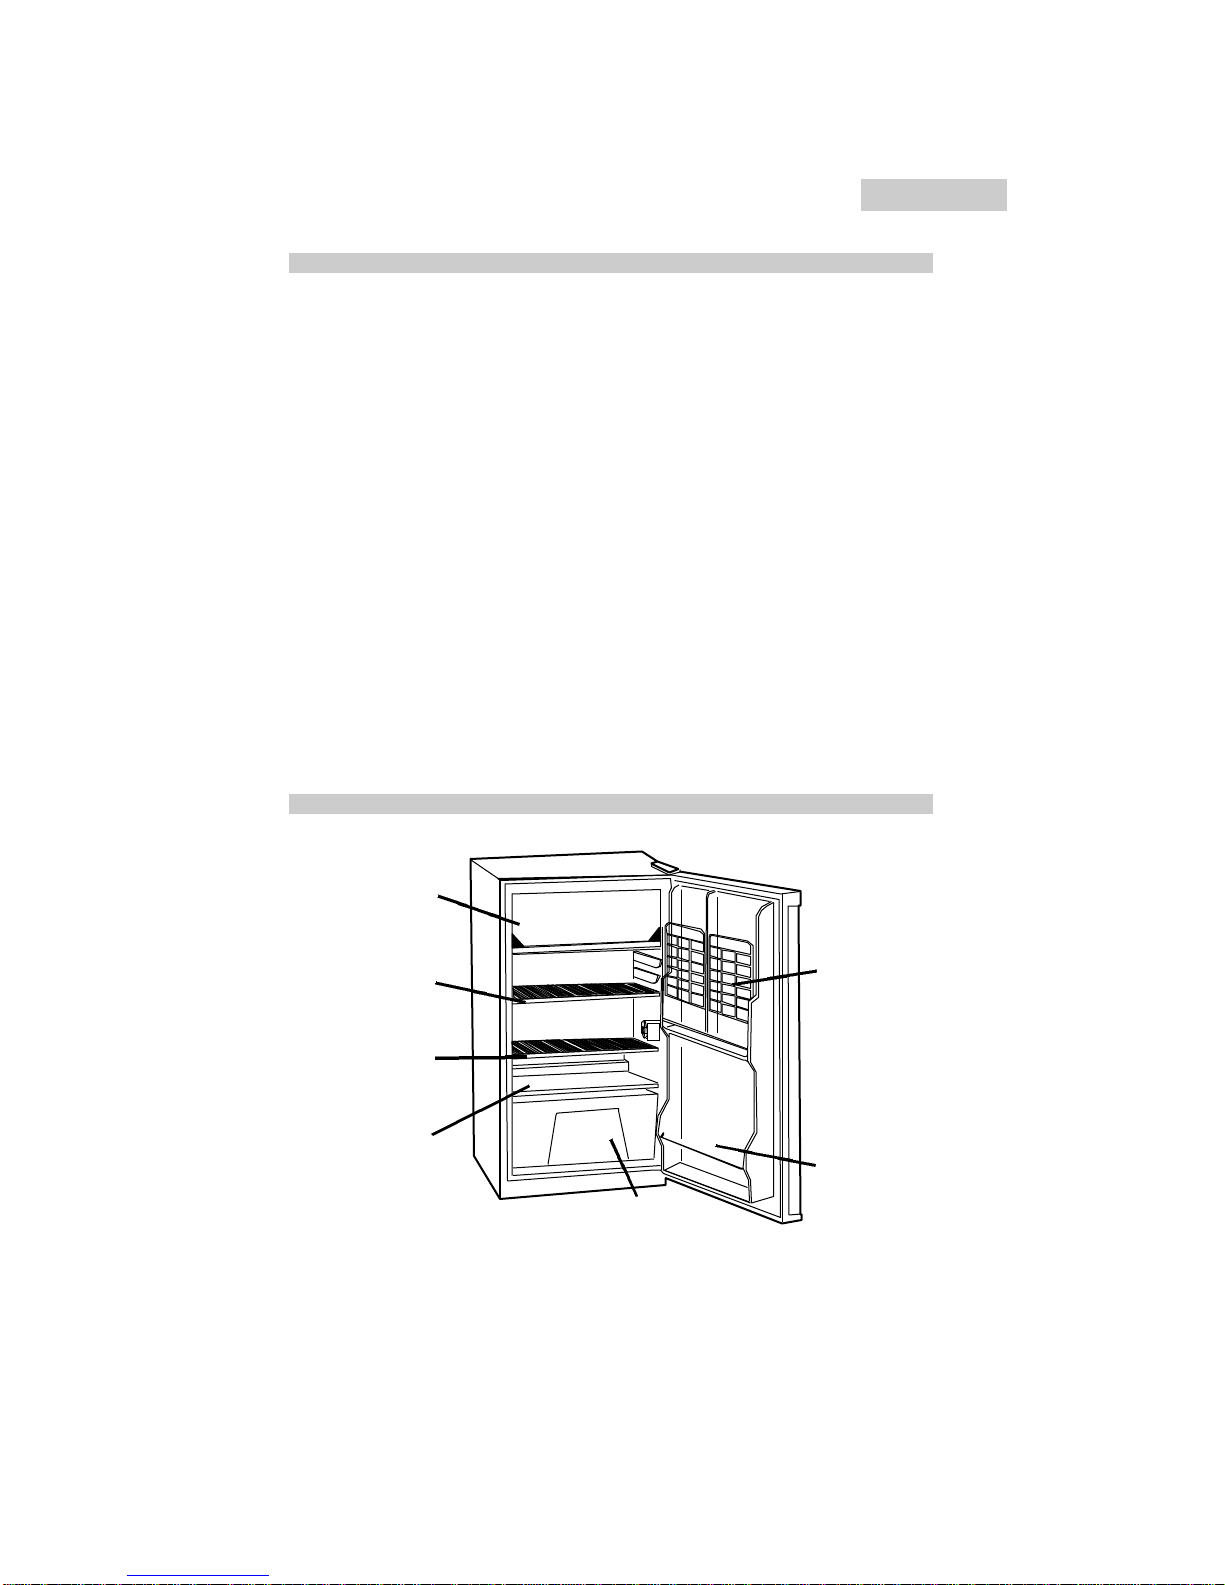
•For proper air circulation, do not
overfill your refrigerator shelves.
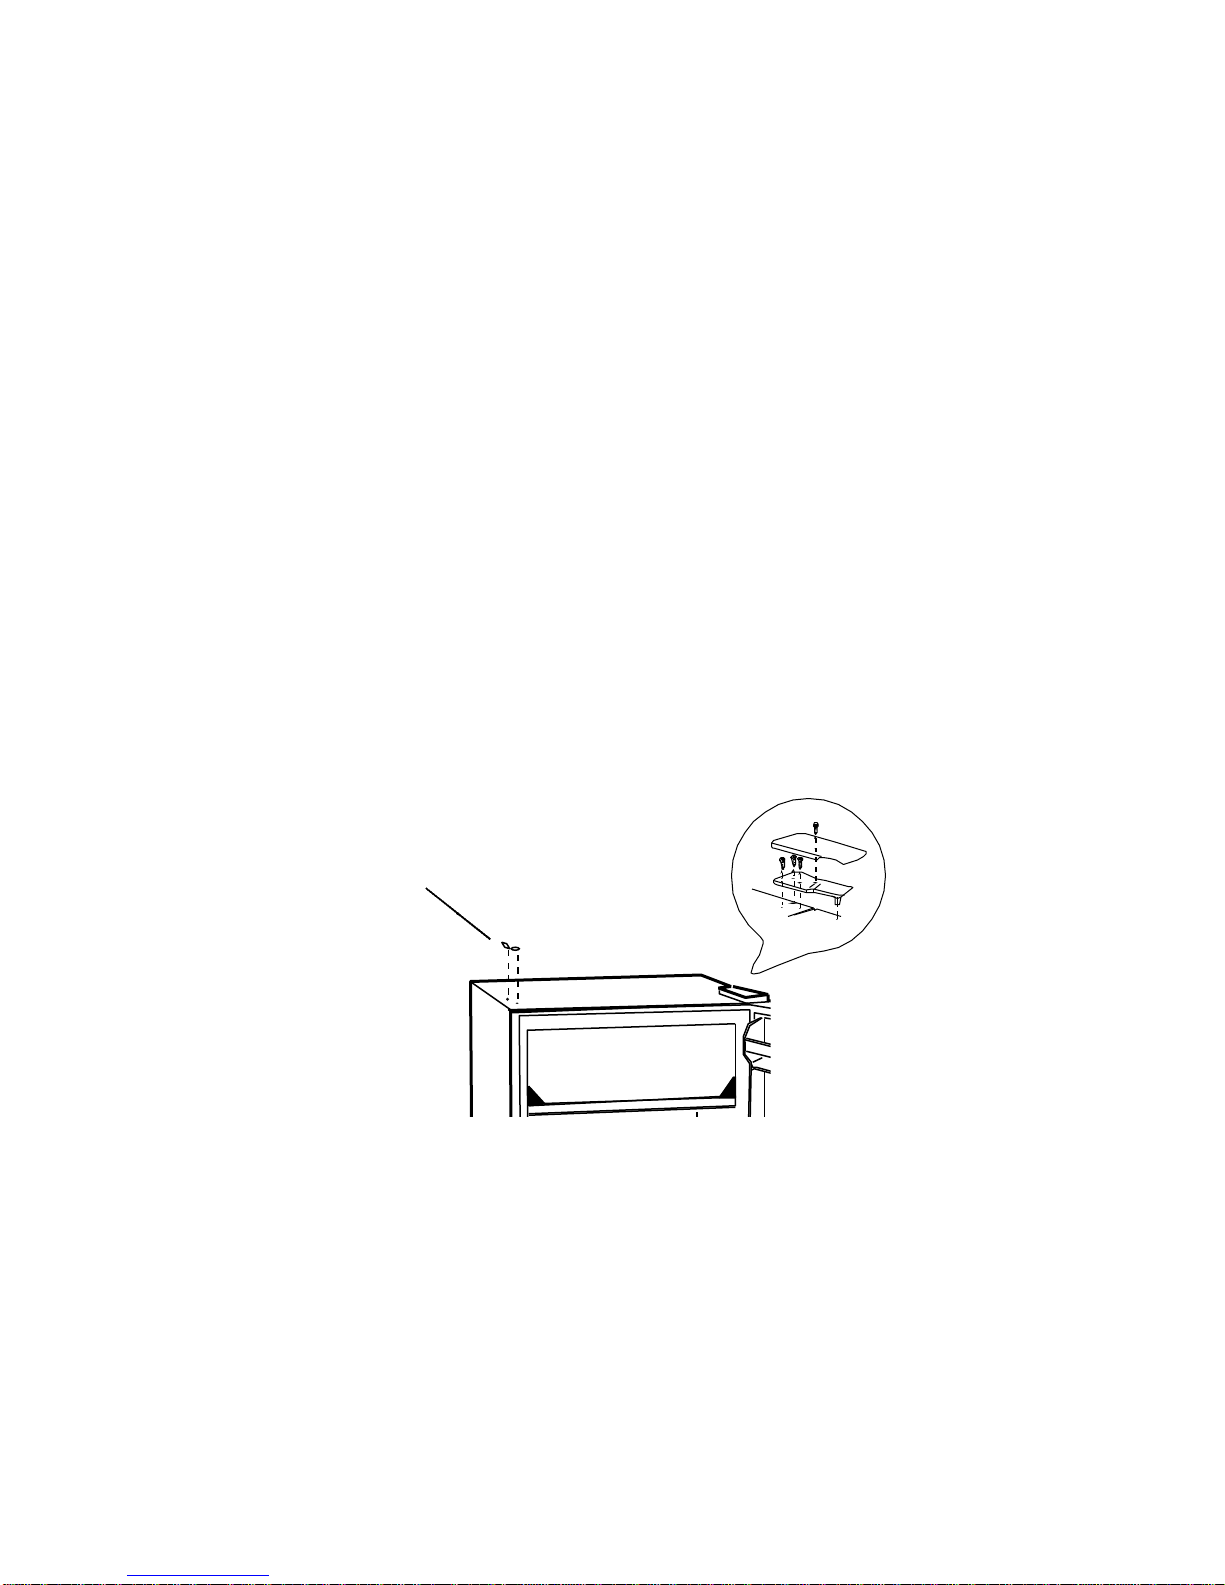
The refrigerator is designed for free-
standing installation only. It should
not be built-in. Allow a minimum of
1 inch on each side and above the
top of the refrigerator to ease instal-
lation and proper air circulation. Be
sure to install your refrigerator on a
floor that is strong enough to support
the unit when fully loaded.
If the refrigerator is not leveled,
adjust the front leveling legs by turn-
ing clockwise to raise the refrigerator
and counterclockwise to lower it.
Do not install your refrigerator where
the temperature will fall below 60˚F,
as it will not run frequently enough
to maintain proper temperature.
Important-for personal
safety, this appliance must be
properly grounded.
In the event of an electrical short
circuit, grounding reduces the risk of
electric shock by providing an
escape wire for the electric current.
This appliance is equipped with a
cord having a grounding wire with a
grounding plug. The plug must be
plugged into an outlet that is proper-
ly installed and grounded. Consult a
qualified electrician or service center
if the grounding instructions are not
completely understood. If doubt
exists as to whether the appliance is
properly grounded, have a qualified
electrician check the circuit to make
sure the outlet is properly grounded.
Do not, under any circum-
stances, cut or remove the
third (ground) prong from the
power cord.
Use of Extension Cords
Avoid the use of an extension cords
due to potential safety hazards
under certain conditions. If it is
necessary to use an extension cord,
use only a 3-wire extension cord that
has a 3–blade grounding plug and a
3-slot outlet that will accept the plug.
The marked rating of the extension
cord must be equal to or greater
than the electrical rating of the
appliance.
4
Energy Saving Tips
English
Refrigerator
Installation
Electrical
Connections
English

Reversing the Door Hinge
1. Remove the top hinge cover screw and then remove
the top hinge cover. (see fig. # 1)
2. Using a Phillips Head Screwdriver, loosen and remove the
screws holding the top hinge in place. (see fig. # 1)
3. Remove the top hinge and carefully lift off the door.
4. Remove the screw hole plug from the opposite side and
insert the plug in the screw hole openings of the just
removed screws. (see fig. # 2)
5. Remove the door pin from the bracket of the lower
hinge by turning counter clockwise. Move the pin to the
opposite hole and tighten. (see fig. # 3)
6. Loosen the screws holding the lower hinge bracket
and remove the hinge.(see fig. # 3)
7. Align the holes in the lower hinge bracket to the
corresponding holes in the opposite side of the cabinet.
Insert and tighten the screws.(see fig. # 3)
8. Align the bottom hole on the left side of the door with the
pin of the lower hinge and slide into place.
fig. # 2
screw hole plugs
5

9. Align the pin of the top hinge with top hole on the left
side of the door and push into place. Replace the screws in the
upper hinge bracket but do not tighten all the way. (see fig. # 2)
10. Make sure the door closes easily but forms a tight seal.
Adjust the door as needed. Once you are satisfied with the door
alignment, completely tighten the upper door hinge screws.
11. Replace the hinge cover, insert the screw and
tighten completely. (see fig. # 2)
12. If the door does not close properly, refer to the
section titled “Door Alignment”.
fig. # 3
door pin
lower hinge bracket
screw hole plug
6

Temperature Control Dial
The temperature control dial has set-
tings from
• "1" to 7 plus "OFF".
• "1" is the warmest
• "7" is the coldest
Initially, set the temperature
control dial to "4".
After using the refrigerator for 24
hours, adjust the temperature control
dial to the setting that best suits your
needs. Turning the temperature con-
trol dial ‘OFF’ stops the cooling
cycle; however, it will not shut off
power to the refrigerator.
Important: If you unplug or turn
off the refrigerator, allow 4 minutes
before restarting it or re-plugging it
in.
FREEZER COMPARTMENT &
USE OF THE ICE CUBE TRAYS
This compartment is designed for
making ice cubes and for short-term
food storage (a few days at most).
This compartment is not cold enough
to freeze foods safely for extended
periods of time.
•If ice cube tray freezes to the floor,
pour a little warm water around it
to loosen it. Do not use boiling
water, which can damage plastic
parts, or sharp metal objects such
as a knife or screwdriver, which
can damage the cooling system
tubing.
Wash tray in lukewarm water only.
Do not wash in the dishwasher.
DISPENSE-A-CAN
The refrigerator has a convenient
"Dispense-A-CanTM" storage
compartment. Simply stack cans
vertically, loading from the top and
drawing them from the bottom.
SHELVING
The refrigerator has shelves that can
be adjusted to different levels that
will suit your food storage needs. The
door shelves provide storage for
small and large items.
7
Operating Your Refrigerator
English
Care And Cleaning
Cleaning the Outside
Clean the outside of the refrigerator
with a damp cloth and dry thorough-
ly. To clean the door gasket, use only
mild soapy water. Never use harsh
cleansers or a scouring pad to clean
any part of the refrigerator.
For efficient operation dirt and dust
should be removed from the back
and bottom of your refrigerator
every three months. Turn the
temperature control to the "OFF"
position and unplug the refrigerator.
Carefully slide the refrigerator away
from the wall so as not to damage
the floor below. Wipe dust from the
back of refrigerator with a clean dry
cloth use a vacuum cleaner with a
brush attachment to clean the
compressor area.

English
Cleaning the inside
Clean the inside of the refrigerator at
least twice a year. Turn the tempera-
ture control dial to "OFF" unplug the
refrigerator and remove food and
shelves. Wash inside with warm
water and baking soda solution. (2
tablespoons of baking soda to one
quart of water), then rinse and dry
thoroughly. Do not use cleaners such
as harsh detergents, scouring pow-
der or sprays containing bleach,
ammonia, or other chemicals that
may cause odors inside the refriger-
ator or damage to the refrigerator.
Wash the ice cube tray, drawers and
shelves in mild detergent solution,
rinse thoroughly and dry with a soft
cloth. To help prevent odors, leave
an open box of baking soda in the
refrigerator. Change the box every
three months.
Do not wash any plastic parts
from your refrigerator in the
dishwasher.
8
English
When not in use:
If your refrigerator will not be used
for a period of time turn the unit off
and unplug it. Clean the refrigerator
(see care and Cleaning
instructions).
Moving the refrigerator
When transporting the refrigerator it
must be kept in the upright position.
If the refrigerator is inadvertently tilt-
ed beyond 45 degrees, place it in
the upright position and wait 24
hours before plugging in.
Vacation And Moving
Defrost whenever frost on the wall of
the freezer compartment becomes
1/8" thick. Never us a sharp or
metallic instrument to remove frost as
it may damage the cooling coils. (A
punctured cooling coil will cause
serious damage to the product and
will void the warranty). We recom-
mend using a plastic scraper. To
defrost, remove foods and ice cube
tray from the freezer compartment.
Put the drip tray in place and set the
temperature control dial to the ‘OFF"
position.
Defrosting usually takes a few hours.
To defrost faster, keep the door open
and place a bowl of warm water in
the refrigerator. After defrosting,
empty water from the drip tray and
wash the drip tray in warm water.
Defrosting

English
9
English
Refrigerator does not
operate.
•The unit may not be plugged in.
•Circuit breaker may have tripped
or fuse may be blown.
Refrigerator seems to run
longer or more often than
necessary.
•The door may have been left open
•Frequent door openings lets the
cold air escape.
•Air is not circulating freely, remove
the refrigerator from the wall and
clean.
Refrigerator vibrates.
•Check to be sure that the
refrigerator is leveled, if not adjust
the leveling legs.
Refrigerator compartment
has an odor.
•Foods with strong odors should be
tightly covered.
•Check for spoiled food.
•Interior may need cleaning
•Keep an open box of baking soda
in the refrigerator. (Replace every
three months).
Foods are not cold
enough.
•The temperature setting is not high
enough.
•The door has been left open.
•Frequent door openings will let the
cold air escape.
•Circulation of air inside the refrig-
erator is blocked because the
shelves are too full.
The walls on the inside of
the refrigerator are damp.
•The door has been left open.
•Frequent door openings let
moisture in.
•The room is warm and there is
high humidity.
•Warm foods have been placed in
the refrigerator.
•Foods are stored in the refrigerator
uncovered.
Troubleshooting

Limited Warranty
What is covered and for how
long?
This warranty covers all defects in work-
manship or materials for a period of:
12 months labor (carry-in only)
12 months parts
5 years sealed system
The warranty commences on the date
the item was purchased and the original
purchase receipt must be presented to
the authorized service center before
warranty repairs are rendered.
EXCEPTIONS: Commercial or
Rental Use warranty
90 days labor (carry-in only)
90 days parts
No other warranty applies
What is covered.
1. The mechanical and electrical parts,
which serve as a functional, purpose
of this appliance for a period of 12
months. This includes all parts except
finish, and trim.
2. The components of the sealed system
e.g. hermetic compressor, condenser
and evaporator from manufacturing
defects for a period of 5 years from
the date of purchase. Any damages
to such components caused by
mechanical abuse or improper
handling or shipping will not be cov-
ered.
What will be done?
1. We will repair or replace, at our dis-
cretion any mechanical or electrical
part which proves to be defective in
normal usage during the warranty
period so specified.
2. There will be no charge to the pur-
chaser for parts and labor on any
covered items during the initial 12
month’s period. Beyond this period
only parts are covered in the remain-
ing warranty. Labor is not provided
and must be paid by the customer.
3. Contact your nearest authorized
service center. For the name of the
nearest service center please call
1-877-337-3639
THIS WARRANTY COVERS
APPLIANCES WITHIN THE
CONTINENTAL UNITED STATES
AND CANADA. IT DOES NOT
COVER THE FOLLOWING
Damages from improper installation
Damages in shipping
Defects other than manufacturing
Damage from misuse, abuse, accident,
alteration, lack of proper care and
maintenance or incorrect current or
voltage.
Damage from other than household use
Damage from service by other than an
authorized dealer or service center.
Decorative trims or replaceable light-
bulb's
Transportation and shipping
Labor (after the initial 12 months)
THIS LIMITED WARRANTY IS GIVEN IN
LIEU OF ALL OTHER WARRANTIES,
EXPRESSED OR, INCLUDING THE
WARRANTIES OF MERCHANTABILITY
AND FITNESS FOR A PARTICULAR
PURPOSE
The remedy provided in this warranty is
exclusive and is granted in lieu of all
other remedies.
This warranty does not cover incidental
or consequential damages, so the above
limitations may not apply to you. Some
States do not allow limitations on how
long an implied warranty lasts, so the
above limitations may not apply to you.
This warranty gives you specific legal
rights, and you may have other rights,
which vary, from state to state.
Haier America Trading L.L.C.
New York, NY, NY10018.
English
10

MESURES PREVENTIVES
IMPORTANTES
Lire toutes les instructions avant d’utiliser l’appareil. Lors de
l’utilisation de cet appareil, prendre toutes les précautions de
sécurité élémentaires, y compris celles qui suivent :
1) N’utiliser cet appareil que pour l’usage prévu, tel que décrit dans ce guide
d’utilisation et d’entretien.
2) Ce réfrigérateur doit être correctement installé, conformément aux instructions
d’installation avant d’être utilisé. Voir les instructions de mise à la terre dans
la section Installation.
3) Ce réfrigérateur ne doit être ni encastré, ni enclos dans un placard. Il est
uniquement conçu pour être installé tel qu’il se présente.
4) Ne jamais tirer sur le cordon d’alimentation pour débrancher le réfrigérateur.
Toujours saisir fermement la fiche et la tirer tout droit hors de la prise.
5) Réparer ou remplacer immédiatement tout cordon électrique effiloché ou
autrement endommagé. Ne pas utiliser un cordon fissuré, abrasé ou dont la
prise ou le connecteur est endommagé.
6) Si un ancien réfrigérateur n’est pas utilisé, nous recommandons d’en retirer
les portes afin de réduire le danger qu’il peut représenter pour les enfants.
7) Une fois le réfrigérateur en fonctionnement, ne pas toucher les surfaces
froides du congélateur, particulièrement avec des mains mouillées ou
humides. La peau peut adhérer à ces surfaces extrêmement froides.
8) Ne pas recongeler les aliments qui ont été complètement décongelés. Le
bulletin maisons et jardins du ministère de l’agriculture des États-Unis no. 69
stipule : « ..Les aliments congelés peuvent être recongelés en toute sécurité
s’ils contiennent toujours des cristaux de glace ou si leur température est
toujours inférieure à 4,5 ˚C (40 ˚F) ».
« …Les viandes hachées, la volaille et le poison présentant une odeur ou une
couleur suspecte ne doivent être ni recongelés, ni mangés. La crème glacée
dégelée doit être jetée. Tout aliment présentant une odeur ou couleur
douteuse doit être jeté cas son ingestion pourrait être dangereuse.»
« …La décongélation ou la recongélation, même partielle réduit la qualité
gustative des aliments, en particulier des fruits, légumes et plats préparés. La
qualité gustative des viandes rouge est beaucoup moins affectée que celle de
nombreux autres aliments. Utiliser les aliments recongelés dès que possible,
afin de conserver un maximum de leur qualité gustative. »
9) Ne pas utiliser d’appareils électriques ou d’objets acérés pour dégivrer le
réfrigérateur.
11
Français

10) Débrancher le réfrigérateur avant de le nettoyer ou d’effectuer toute
réparation. Remarque:si, pour une raison quelconque, ce produit
devait être dépanné, nous recommandons vivement de confier le travail
à un technicien certifié.
11) Ne pas utiliser le réfrigérateur en présence d’émanations explosives.
Pour future référence
CONSERVER CES INSTRUCTIONS
DANGER
Les enfants pourraient se retrouver coincés dans votre
réfrigérateur ou congélateur usagé avant que vous ne
puissiez vous en débarrasser. Retirer les portes. Laisser les
étagères en place de manière à ce que les enfants ne
puissent pas grimper facilement à l’intérieur".
Conseils de l‚UL 250 11.2.6
Merci d’avoir choisi notre produit
Haier. Ce manuel simple d’emploi est
un guide qui permettra à l’utilisateur
de tirer le meilleur parti de son
réfrigérateur.
Ne pas oublier de noter les numéros
de modèle et de série qui se trouvent
sur une plaquette, à l’arrière du
réfrigérateur.
Numéro de modèle
Numéro de série
Date d’achat
Agrafer le reçu au manuel. Il est exigé pour obtenir tout service en
garantie. 12
Français Français

Table des Matières
PAGE
Mises en garde Importantes ..............................................................11
Caractéristiques ................................................................................13
Conseils pour économiser l’énergie ....................................................14
Installation du Réfrigérateur................................................................14
Branchements électriques ..................................................................14
Placer la Charnière de Porte sur le Côté Opposé du Réfrigérateur ..........15
Utilisation du Réfrigérateur ................................................................17
Entretien et Nettoyage........................................................................17
Vacances et Déménagement ..............................................................18
Dégivrage ........................................................................................18
Dépannage ......................................................................................19
Garantie ..........................................................................................20
Caractéristiques
A
B
C
D
E
F
G
13
Français
D. Commande de Réglage de Température
E. Couvercle de bac à Légumes en Verre
F. Bac à Légumes Transparent
G. Rangement pour Grandes Bouteilles
A. Compartiment Congélateur Séparé
B. Distributeur Dispense-A-Can
C. Étagères Amovibles

•Ne pas placer le réfrigérateur près
d’une bouche de chauffage, d’une
cuisinière ou à un endroit directe-
ment exposé à la lumière du soleil.
•Ne pas ouvrir la porte plus souvent
qu’il n’est nécessaire.
•Garder la porte fermée le plus
possible, particulièrement par
temps chaud et humide.
•Couvrir les aliments pour réduire
l’accumulation d’humidité à
l’intérieur du réfrigérateur.
•Ne conserver que les aliments qui
doivent être réfrigérés.
•Pour assurer une bonne circulation
d’air, ne pas surcharger les
étagères du réfrigérateur.
Le réfrigérateur est uniquement
conçu pour être installé tel qu’il se
présente. Il ne doit pas être encastré.
Prévoir un dégagement d’au moins
2,5 cm se chaque côté et au-dessus
du réfrigérateur pour faciliter l’instal-
lation et assurer une circulation d’air
adéquate. Veiller à installer le
réfrigérateur sur un sol assez solide
pour le supporter lorsqu’il est rempli.
Si le réfrigérateur n’est pas de
niveau, ajuster les pieds réglables du
devant de l’appareil en les tournant
vers la droite pour relever le devant
de l’appareil et vers la gauche pour
l’abaisser.
Ne pas installer le réfrigérateur à un
endroit où la température peut
descendre au-dessous de 15,5˚C
(60˚F), car le moteur ne tournerait
pas assez souvent pour maintenir
une température correcte.
.
Conseils Pour
économiser
l’énergie
Installation du
Réfrigérateur
Branchements
électriques
14
Français Français
Important - Pour des raisons
de sécurité personnelle, cet
appareil doit être correctement
mis à la terre.
En cas de court-circuit, la mise à la
terre réduit les risques de choc
électrique en procurant un fil
d’échappement du courant. Cet
appareil est équipé d’un cordon doté
d’un fil de terre et d’une fiche avec
broche de terre. Cette fiche doit être
branchée sur une prise secteur
correctement installée et mise à la
terre. Si les instructions de mise à la
terre ne semblent pas claires,
consulter un électricien qualifié. En
cas de doute au sujet de la mise à la
terre de l’appareil, demander à un
électricien qualifié de vérifier le circuit
pour s’assurer que la prise est
correctement mise à la terre.
La troisième broche (terre) de
la fiche du cordon d’alimenta-
tion ne doit en aucun cas être
coupée ou retirée.
Cordons Prolongateurs
Les cordons prolongateurs pouvant
nuire à la sécurité dans certaines
circonstances, leur usage est
déconseillé. S’il est absolument
nécessaire d’utiliser un cordon
prolongateur, celui-ci doit comporter
3 fils et être équipé d’une fiche à 3
broches et d’une prise à 3 conducteurs
correspondant à la fiche de l’appareil.

Placer la Charnière de Porte
sur le Côté Opposé du Réfrigérateur
1. Retirez la vis du cache de protection de la charnière
supérieure puis retirez le cache. (voir fig. # 1)
2. À l'aide d'un tournevis cruciforme, desserrez puis retirez les vis
retenant la charnière supérieure. (voir fig. # 1)
3. Retirez la charnière supérieure et soulevez doucement la porte.
4. Retirez le bouchon du trou de vis du côté opposé et introduisez le
bouchon dans les ouvertures des vis venant d'être retirées.
(voir fig. # 2)
5. Retirez la broche du support de la charnière inférieure de la porte en
tournant dans le sens contraire à celui des aiguilles d'une montre.
Placez la broche dans le trou de l'autre côté et serrez. (voir fig. # 3)
6. Desserrez les vis retenant le support de la charnière inférieure et
retirez la charnière. (voir fig. # 3)
7. Alignez les trous du support de la charnière inférieure sur les trous
correspondant de l'autre côté.
Introduisez les vis et serrez-les. (voir fig. # 3)
8. Alignez le trou inférieur du côté gauche de la porte sur la
broche de la charnière inférieure et glissez-la en place.
fig. # 2
Bouchon pour trou de vis
15
Français

9. Alignez la broche de la charnière supérieure avec le trou supérieur
du côté gauche de la porte et poussez-la afin de l'installer.
Replacez les vis du support supérieur de la charnière mais sans
serrez complètement. (voir fig. # 2)
10. Vérifiez que la porte ferme facilement et ferme le réfrigérateur de
façon hermétique. Repositionnez la porte si nécessaire. Une fois
satisfait de l'alignement de la porte, serrez complètement les
vis de la charnière supérieure.
11. Replacez le cache de protection de la charnière,
introduisez la vis et serrez complètement. (voir fig. # 2)
12. Si la porte ne se ferme pas correctement, reportez-vous à
la section "Alignement de la porte".
fig. # 3
Broche de porte
Support de charnière inférieure
Bouchon pour trou de vis
16
Français Français

Commande rotative de
température
Les réglages de température sont les
suivants :
• « 1 » à « 7 » et « OFF »(arrêt)
• « 1 » est le réglage le moins froid
• « 7 » est le réglage le plus froid
Initialement, régler la
commande de température
sur « 4 ».
Après 24 heures d’utilisation, régler
la température en fonction du
besoin. Lorsque la commande de
température est en position « OFF »,
le cycle de refroidissement s’arrête,
toutefois, le réfrigérateur n’est pas
mis hors tension.
Important: si le réfrigérateur est
débranché ou éteint, attendre 4
minutes avant de le remettre en
marche ou de le rebrancher.
COMPARTIMENT
CONGÉLATEUR ET USAGE DES
BACS À GLAÇONS
Ce compartiment est conçu pour fab-
riquer des glaçons et conserver les
aliments à court terme (quelques
jours au maximum). Il n’est pas
assez froid pour conserver des ali-
ments congelés pendant de longues
périodes.
•Si le bac à glaçon gèle sur le fond
du compartiment, verser un peu
d’eau tiède sur son pourtour pour
le décoller. Ne pas utiliser d’eau
bouillante qui pourrait endom-
mager les pièces en plastique, ni
d’objet acéré tel qu’un couteau ou
un tournevis, qui pourrait
endommager la tuyauterie de
réfrigération.
Laver le bac à glaçons dans de l’eau
tiède seulement. Ne pas mettre au
lave-vaisselle.
DISTRIBUTEUR «DISPENSE-A-
CANTM»
Le réfrigérateur est équipé d’un com-
partiment distributeur «Dispense-A-
Can‘TM» pratique. Il suffit d’empiler les
boîtes à la verticale, en les
chargeant par le haut afin de
pouvoir les sortir par le bas.
ÉTAGÈRES
Le réfrigérateur a des étagères qui
peuvent être ajustées à différents
niveaux pour s’adapter à vos
besoins de rangement pour chaque
aliment. Les étagères de la porte
offrent un rangement pour des
articles petits et grands.
Utilisation du Réfrigérateur
Nettoyage de l’extérieur
Nettoyer l’extérieur du réfrigérateur
avec un chiffon humide et le sécher
soigneusement. Ne jamais utiliser de
produits abrasifs ou de tampons à
récurer pour nettoyer quelque partie
que ce soit du réfrigérateur.
Pour assurer un fonctionnement effi-
cace, le dessous et l’arrière du
réfrigérateur doivent être nettoyés
tous les trois mois. Mettre la com-
mande de température en position «
OFF » (arrêt) et débrancher le
réfrigérateur. Éloigner le réfrigérateur
du mur avec précaution, afin de ne
pas rayer le sol. Nettoyer l’arrière du
réfrigérateur avec un chiffon propre
et sec ou un aspirateur muni d’une
brosse pour nettoyer la zone du
compresseur.
17
Français
Entretien et Nettoyage

Nettoyage de l’intérieur
Nettoyer l’intérieur du réfrigérateur
au moins deux fois par an. Mettre la
commande de température en posi-
tion « OFF » (arrêt), débrancher le
réfrigérateur et retirer les aliments
des étagères. Laver l’intérieur avec
une solution d’eau tiède et de bicar-
bonate de soude (2 cuillerées à
soupe de bicarbonate pour 1 litre
d’eau), puis rincer et sécher
soigneusement. Ne pas utiliser de
produits de nettoyage tels que des
détergents puissants, poudres à
récurer ou aérosols contenant de la
Javel, de l’ammoniac ou d’autres
produits chimiques susceptible de
causer des odeurs ou d’endommager
le réfrigérateur.
Laver le bac à glaçons, les tiroirs et
les étagères dans une solution de
détergent doux, les rincer soigneuse-
ment et les sécher avec un chiffon
doux. Pour aider à empêcher les
odeurs, placer une boîte de
bicarbonate de soude dans le
réfrigérateur. Changer la boîte tous
les trois mois.
Ne mettre aucune pièce du
réfrigérateur au lave-
vaisselle.
Lorsque le réfrigérateur n’est
pas en usage:
Si le réfrigérateur ne doit pas être
utilisé pendant une période pro-
longée, l’éteindre et le débrancher,
puis le nettoyer (voir les
instructions d’entretien et
nettoyage).
Transport du réfrigérateur
Lors du transport, le réfrigérateur
doit être maintenu à la verticale. S’il
était accidentellement basculé à plus
de 45 degrés, le mettre à la verticale
et attendre 24 heures avant de le
brancher.
Vacances et Déménagement
Le dégivrage est nécessaire lorsque
l’épaisseur de la couche de glace sur
les parois du compartiment congéla-
teur atteint 3 mm. Ne jamais utiliser
un instrument acéré ou métallique
pour dégivrer, car il pourrait endom-
mager les serpentins de refroidisse-
ment. (La perforation d’un serpentin
de refroidissement endommagerait
gravement le produit et entraînerait
l’annulation de la garantie.) Nous
recommandons l’usage d’une raclette
en plastique. Pour dégivrer, retirer
les aliments et le bac à glaçons du
compartiment congélateur. Mettre le
bac d’égouttement en place et mettre
la commande de température en
position « OFF » (arrêt).
Le dégivrage prend généralement
quelques heures. Pour accélérer le
processus, laisser la porte ouverte et
placer une casserole d’eau chaude
dans le réfrigérateur. Une fois le
dégivrage terminé, vider le bac
d’égouttement et le laver dans de
l’eau tiède.
Dégivrage
18
Français Français
Other manuals for HSQ04WNA
1
Table of contents
Languages:
Other Haier Refrigerator manuals

Haier
Haier HRF580YHS User manual

Haier
Haier HRF-662RSS User manual

Haier
Haier HR-180T1 User manual

Haier
Haier HNRQB05 User manual

Haier
Haier SBFS21EDAW User manual

Haier
Haier HRF-296W User manual

Haier
Haier HSP06WNA User manual

Haier
Haier HR-136AA User manual

Haier
Haier HSSR-N14F User manual

Haier
Haier DD410RS User manual

Haier
Haier HT18TS45SW Assembly instructions

Haier
Haier DKS 120 User manual

Haier
Haier HBP08GNA User manual

Haier
Haier SC-230 User manual

Haier
Haier HVZ040ABH5S - Dual-Zone Wine Cooler User manual

Haier
Haier HRF-220 User manual

Haier
Haier HRB10N2 User manual

Haier
Haier HB21FWRSS User manual

Haier
Haier HRZ-98AA User manual

Haier
Haier HNSEW025 User manual