REV. 032017
3
Installation and operation manual
Contents
Purpose of use, delivery and installation ...................................3
Introduction .............................................................................4
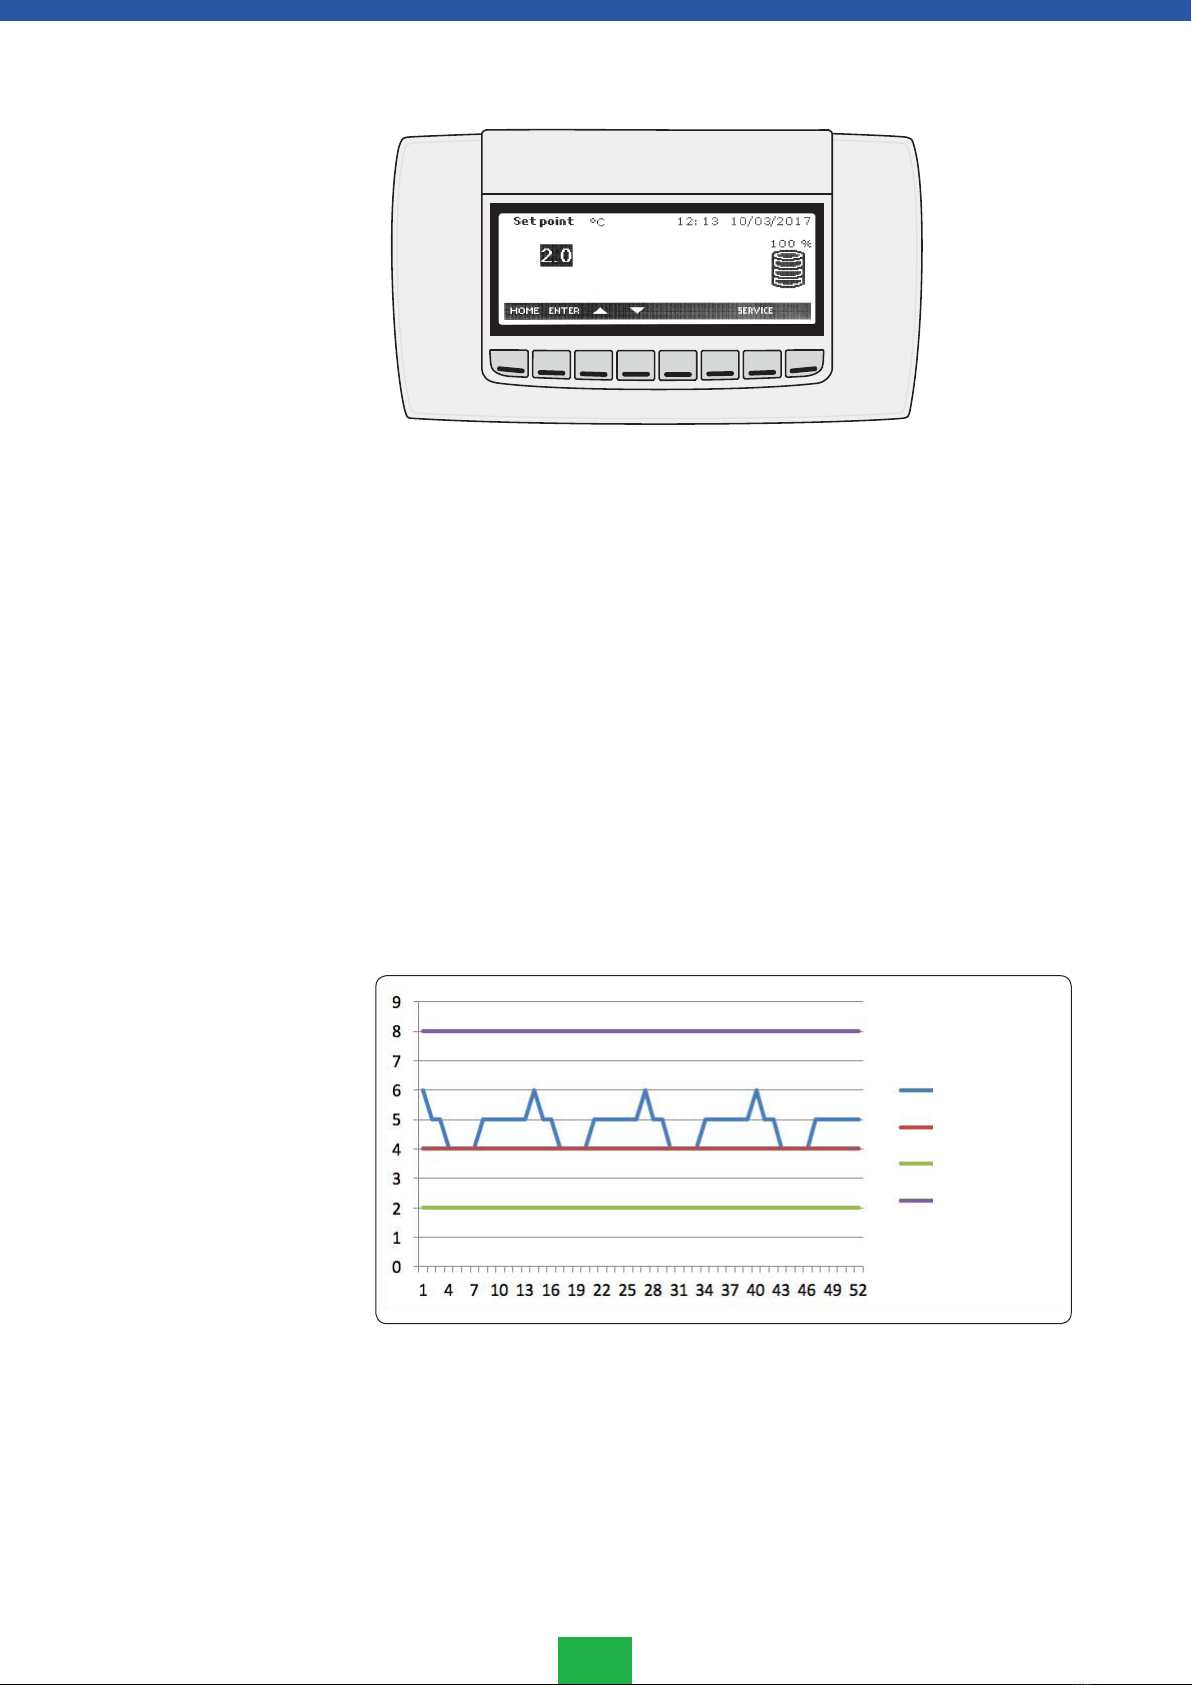
S1. Home screen ......................................................................5
S1.1 USB .................................................................................5
S2. Setting up .........................................................................6
S2.1 Start-up............................................................................6
S2.2 How to set language ........................................................6
S2.3 Time and date ..................................................................7
S2.4 Battery control..................................................................8
S3. Daily use ............................................................................9
S3.1 Temperature settings .......................................................9
S3.2 Temperature set value ......................................................10
S3.3 Temperature set value control ...........................................10
S3.4 Temperature alarm limits ..................................................10
S3.5 Temperature alarm limits, set-up .......................................11
S3.6 Temperature data recording intervals set-up......................13
Service menu ...........................................................................14
Alarms ....................................................................................14
Alarm history menu .................................................................15
Alarm signals ...........................................................................15
Device functions in the event of a power failure
(backup battery must be connected) .........................................16
Temperature data menu ...........................................................17
Export menu (USB)...................................................................18
Reset data and alarm menu......................................................19
Defrost information menu.........................................................20
Information menu ....................................................................20
Cleaning ..................................................................................21
Operation failures.....................................................................23
Disposal of the equipment........................................................23
Warranty..................................................................................24
The ProMed and Future medical and laboratory cold cabinets, freezers and combination
cabinets are specifically designed for storage of temperature sensitive pharmaceuticals and
samples.
On receipt of your product from the carrier, examine it carefully.Any signs of damage must
be indicated clearly on the delivery document and reported to both the carrier and the
retailer. Photographs of any damage to the packaging and product should be emailed to
the retailer.
NOTE!
The manufacturer warranty does not cover transportation damages, therefore claims for
damage in transit cannot be made unless they have been validated as detailed above
Examine the product carefully as soon as you receive it. If you notice that it has suffered
from damages during transportation, you must indicate this in the delivery document and
report to the carrier and the retailer.
It is very important to read these installation and operating instructions carefully before
you start using the equipment for the first time. Please keep these instructions in a safe
place for future reference or use by another operator.
By following these instruction, you can improve the product performance and reduce un-
necessary repair costs. Please note that it is important to have your equipment regularly
maintained by a qualified engineer!
The ambient temperature must not exceed +32°C or fall under +10°C. Air circulation is
required above the equipment. Avoid placing the cabinet close to a heat source..
NOTE! The equipment is for indoor use only.
NOTE! In order to comply with electrical safety regulations do not store liquids above the
equipment
The rear and sides of the cabinet can located against a wall, but when placing refrigerated
cabinets next to each other or against an exterior wall, ensure there is a minimum 10mm
ventilation gap between the cabinets.
Adjust the feet to ensure the cabinet is horizontal in all directions, checking with a spirit
level if necessary. Always ensure that all feet are in contact with the ground.
During cold weather deliveries, transporting the cabinet from the carrier into a warm envi-
ronment may cause a temporary build-up of condensation. In these circumstances DO NOT
connect to a power supply until the unit is dry and at room temperature.
When safe to do so connect the power cable from the cabinet to an earthed 230 V / 50 Hz
wall socket with its own 10 A safety fuse. Check the voltage and frequency of the cabinet
from the rating plate. The power socket must be positioned so that it is possible to discon-
nect the socket without having to move the unit.
NOTE! A damaged power supply cord must only be changed by a professional electrician,
authorized by the manufacturer
Purpose of use
Delivery
Installation
WARNING: Keep clear of obstruc-
tion all ventilation openings in
the appliance enclosure or in the
structure for building-in.
WARNING: Do not use mechanical
devices or other means to accelerate
the defrosting process.
WARNING: Do not damage the
refrigerant circuit.
ENGLISH