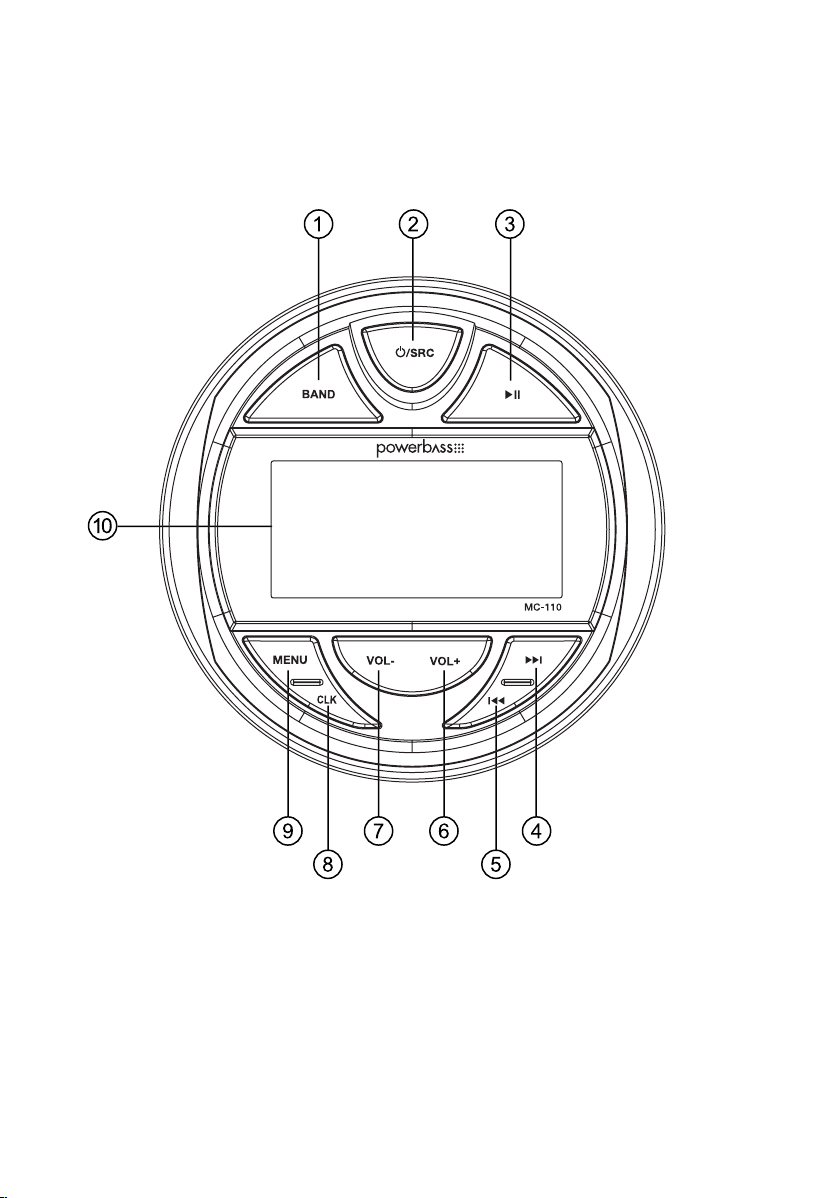
Power bass MC-110 User guide

Marine Grade Digital Media Center
with LCD Display
Application Guide
Please read through this manual to familiarize yourself with your new speakers. Should your
PowerBass Xtreme Marine Media Center ever require service, you will need to have the original dated receipt.
MC-110

Thank you and Congratulations
Congratulations on your purchase of PowerBass Xtreme Marine Media Center. You now own a product of
uncompromising design and engineering from a factory that truly believes in the relentless pursuit of perfection.
Incorporating the highest quality parts and state-of-the-art materials.
At PowerBass USA, Inc. we are confident you will have many years of outstanding enjoyment from this great
investment. For maximum performance we recommend that you have your new PowerBass Xtreme product
installed by an Authorized PowerBass Xtreme Dealer.
To learn more about PowerBass, please visit us on the World Wide Web at
http://www.powerbassusa.com
∆Warning ∆
Continuous exposure to sound pressure levels in excess of 100 dB can cause permanent hearing loss. PowerBass Speakers are capable
of producing sound pressure levels well over 170 dB. Please observe all local sound ordinances while listening to your PowerBass system.
PowerBass USA, Inc. accepts no liability for hearing loss, bodily injury, or property damage due to the result of use or misuse of this product.

KEY FUNCTION
.
1. BAND AM/FM/Weather Button
2. POWER / SOURCE Button
3. PLAY/PAUSE Button
4. SEEK / TRACK UP Button
5. SEEK / TRACK DOWN Button
6. VOLUME+ Button
7. VOLUME- Button
8. CLOCK Button
9. MENU Button
10. LCD Display

BASIC OPERATION
TURN ON/OFF THE UNIT
Press button to turn on the unit. When the unit is on, press and hold it for 2 seconds to turn off the unit.
SOUND AND SETTING ADJUSTMENT
Shortly press MENU button to enter the audio menu as below:
BASS -> TRE -> BAL -> FAD -> EQ (CLASS/ROCK/POP/OFF) -> LOUD (ON/OFF) -> AEQ( ON/OFF) -> RESET
After the AEQ is set to ON, Press MENU button again, you can boost or cut below frequency:
31Hz / 62Hz / 125Hz / 250Hz / 500Hz / 1KHz / 2KHz / 4KHz / 8KHz / 16KHz
Hold the MENU button to enter the system menu as below:
SWVOL(20) -> LPF(80) -> AMP(ON/OFF) -> BEEP(ON/OFF) -> P_VOL(19) -> CLOCK(12/24) ->
CT(INDEP/SYNC) -> AREA(USA/EUR) -> DX/LOC -> STEREO/MONO
In each item press VOL+/- button to set them.
AMP on/off:
AMP off: Muting the speakers output.
AMP on: Speakers have sound output.
NOTE: every cycle from AMP off to on, the volume value will return to 19.
CLOCK (24/12)
Setting the time to 24 hour or 12 hour format.
P-VOL (Preset VOL)
Setting the power on volume. If the volume on shutdown is lower than the P-VOL value, the volume will be
maintained at shutdown volume. If the volume on shutdown is greater than the P-VOL value, the volume will be
restored to the P-VOL value.
CT (Clock Time)
CT INDEP: The clock works independently.
CT SYNC: The clock will be synchronized to the received RDS station’s time.
NOTE: When the time is set manually. The CT will go back to INDEP mode automatically. AREA (USA/EUR): Choose
America or Europe region frequency.
4

BASIC OPERATION (cont.)
INFORMATION PRIORITY OR CLOCK PRIORITY
Shortly press CLK button to change the clock priority or information priority.
CLOCK SETTING
Press and hold CLK button for 2 seconds. The “HH” will flash. Press VOL+/- button to change the hour.
After that press MENU/CLK button the “MM” will flash. Press VOL+/- button to change the minute. Then
press MENU/CLK button to confirm.
NOTE: When the time is set, the CT item will go back to INDEP mode automatically.
RESET THE UNIT
In Standby status (B+ on, ACC on, power off.) press and hold button for 5 seconds to reset the unit to
factory settings. (Note: After reset all memory will be lost.)
RADIO OPERATION
Receive a Radio Station
Press button to select radio source. Then press BAND button to select desired band. Shortly press
, button to receive the desired radio station.
Press and hold VOL+/- button for manual tuning by frequency.
Auto Store
Press and hold BAND button for 2 seconds to auto store stations to band 1~3.
Manually Store Station & Recall Preset Station
Receive a desired station. Press and hold the button. It shows “SAVE P1”. Press VOL+/- button to select
P1~P6 then press MENU button to save.
Listening The Presets Station
Shortly press the , button to select presets and listening
5

6
BASIC OPERATION (cont.)
USB OPERATION
When a USB drive is inserted into the MC-110, the unit will play the MP3/WMA file automatically. If a USB drive is
already inserted in the MC-110 Keep pressing button shortly until the USB mode display appears.
Select File
Press , button to skip to next/previous file. Hold , button to fast forward or fast reverse.
Play/Pause
Press button to play or pause the song.
Search Song Operation
Press and hold BAND button for 2 seconds to show NUM ****, Press VOL+/- to enter numbers then press
MENU button to play.
Repeat/Random Operation
Press and hold button for 2 seconds to select below item:
RPT ALL -> RDM ON -> RPT ONE -> RPT FOLD
IPHONE Playing
Connect an IPHONE to the USB port of the MC-110 via a USB cable. The operation is same as the USB operation.
AUX IN Operation
Connect the source to the AUX IN connector behind the unit. Then press button to switch to AUX IN
source.
BLUETOOTH OPERATION
Pairing
On mobile phone, select the Bluetooth item search for the Bluetooth device. “MC-110” it should appear in the list,
select “MC-110” and then input password “0000” if it needs a password. When successfully paired, the BT icon
will be displayed on LCD.
Bluetooth Audio
Press button to switch to BT MUSIC mode. Press button to play or pause the song. Press
, button to select next/previous song.
Disconnect the Bluetooth
When the mobile phone is paired with the MC-110. In BT MUSIC mode, press and hold the button for 2
seconds to disconnect/re-connect the Bluetooth.

7
INSTALLATION
1. The MC-110 can only be connected to a 12V DC cathode grounding electrical system.
2. Do not connect the terminals of the battery until the MC-110 installation is complete.
3. Please make sure to connect the yellow wire directly to the positive terminal at the battery(+).
4. When changing the fuse, please make sure to disconnect the battery terminals.
PIN
No.
Wire Color Wire Spec Description
1 Green 20# AWG LEFT REAR SPEAKER (+)
2 Green/Black 20# AWG LEFT REAR SPEAKER (-)
3 Yellow 20# AWG BATTERY (+)
4 White 20# AWG LEFT FRONT SPEAKER (+)
5 White/Black 20# AWG LEFT FRONT SPEAKER (-)
6 Red 16# AWG UL ACC (+12V)
7 Gray 20# AWG RIGHT FRONT SPEAKER (+)
8 Gray/Black 20# AWG RIGHT FRONT SPEAKER (-)
9 Blue 20# AWG POWER AMP REMOTE ON
10 Violet 20# AWG RIGHT REAR SPEAKER (+)
11 Violet/Black 20# AWG RIGHT REAR SPEAKER (-)
12 Black 16# AWG UL GROUND

MOUNTING
Once a suitable location has been determined, Cut out the mounting hole and secure the MC-100 using the
supplied metal mounting bracket. If the bracket needs to be shortened, remove the appropriate number of
breakaway segments using a pair of pliers.
1. This player should be installed by professional technician.
2. Please read the instruction and operation of equipment carefully before installing.
3. Make sure to connect other wires before power connection.
4. To avoid short circuit. Please make sure all the exposed wire are insulating.
5. Please fix all the wires after installation.
6. Please make connection to the player accordingly to this instruction manual. Wrong connection may
cause damage.
7. This player only fit for 12V DC device and please make sure your car belongs to this kind of cathode
grounding electrical system.
8. Please connect the wires rightly. Wrong connection will cause malfunction or damage the electrical system.
8

9
SPECIFICATIONS
Power Supply Requirements:
DC 12 Volts, Negative Ground
Chassis Dimensions:
115 (W) x 115 (D) x 75 (H)
Tone Controls
Bass (at 100 Hz): ±10 dB
Treble (at 10 kHz): ±10 dB
Output Power:
4 x 20 watts RMS
4 x 40 watts MAX
Current Drain:
10 Ampere (max.)
RADIO FM
Frequency Coverage: 87.5 to 107.9 MHz
IF: 10.7 MHz
Sensitivity: 4μV (S/N=30dB)
Stereo Separation: >25dB
RADIO AM
Frequency Coverage: 530 to 1710 kHz
IF: 450 KHz
Sensitivity: 36dBuV (S/N=20dB)

TROUBLESHOOTING
Before going through the checklist, check wiring connection. If any of the problems persist after checklist has
been made, consult your nearest service dealer.
10
Symptom Cause Solution
No power The car ignition switch is not on.
The fuse blown.
If the power supply is connected
to the car accessory circuits, but
the engine is not moving, switch
the ignition key to “ACC”.
Replace the fuse.
No sound Volume is in minimum
Wiring is not properly connected.
Adjust volume to a desired level.
Check wiring connection.
The operation keys do not work The built-in microcomputer is not
operating properly due to noise.
Press the reset button.
The radio does not work. The
radio station automatic selection
does not work
The antenna cable is not
connected.
The signals are too weak.
Insert the antenna cable firmly.
Select a station manually.
This manual is the exclusive property of PowerBass USA, Inc. Any reproduction of this manual, or use other than its intentions is strictly prohib-
ited without the express consent of PowerBass USA, Inc. Copyright 2023 PowerBass USA, Inc.

POWERBASS ELECTRONICS
LIMITED WARRANTY POLICY
PowerBass USA, Inc. offers limited warranty on PowerBass products under normal use on the following terms:
PowerBass Xtreme Electronics are to be free of defects in material and workmanship for a period
of one (1) year.
This warranty applies only to PowerBass products sold to consumers by Authorized PowerBass Dealers in the United
States of America. Products purchased by consumers from a PowerBass dealer in another country are covered only
by that country’s Distributor and not by PowerBass USA.
This warranty covers only the original purchaser of PowerBass product. In order to receive service, the purchaser must
provide PowerBass with the receipt stating the consumer name, dealer, product and date of purchase.
Products found to be defective during the warranty period will be repaired or replaced (with a product deemed to be
equivalent) at PowerBass’s discretion and will not be liable for incidental or consequential damages. PowerBass will
not warranty this product under the following situations:
• Amplifiers received with apparent rust or corrosion
• Any evidence of liquid damage or exposure to excessive heat
• Attempted repairs or alterations of any nature
• Product that has not been installed according to this owners manual
Any implied warranties including warranties of fitness for use and merchantability are limited in duration to the period
of the express warranty set forth above. Some states do not allow limitations on the length of an implied warranty, so
this limitation may not apply. No person is authorized to assume for PowerBass any other liability in connection with
the sale of this product.
Please call (909) 923-3868 for PowerBass Customer Service. You must obtain an RA# (Return Authorization Num-
ber) to return any product to PowerBass. The RA number must be prominently marked on the outside of the shipping
carton or the delivery will be refused. Please pack your return carefully; we are not responsible for items damaged
in shipping. Return the defective product along with a copy of the original dated retail sales receipt, plus $12.00 for
handling and diagnostic evaluation to:
PowerBass USA, Inc.,
Attn: Returns (RA#__________)
2133 S. Green Privado, Ontario, CA 91761
Residents of HI, AK and US territories will be charged for return shipping. All inquires regarding service and warranty
should be sent to the above address.
Removed or altered serial numbers will void this warranty

PowerBass Xtreme (PBX) – A division of PowerBass USA, Inc.
2133 S. Green Privado – Ontario, CA 91761
Tel. (909) 923-3868 – Fax (909) 923-8048
www.powerbassusa.com
Table of contents
Other Power bass DVD Player manuals