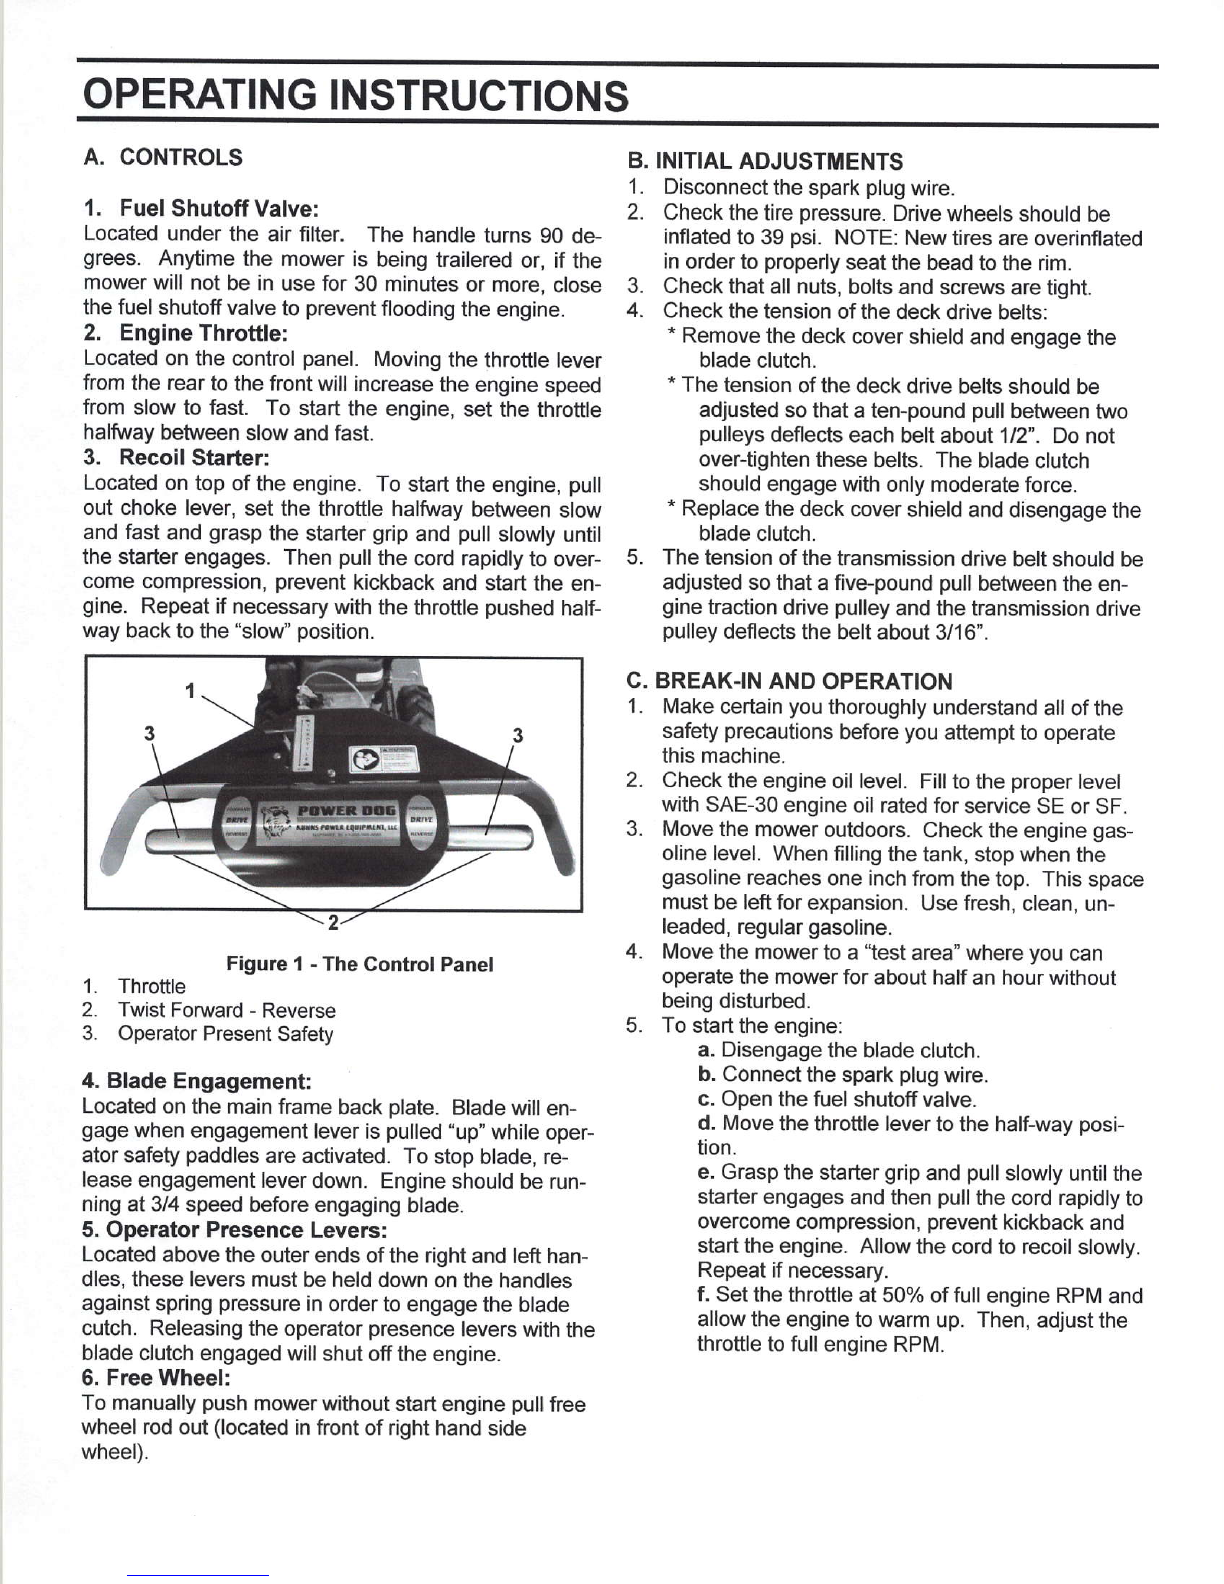
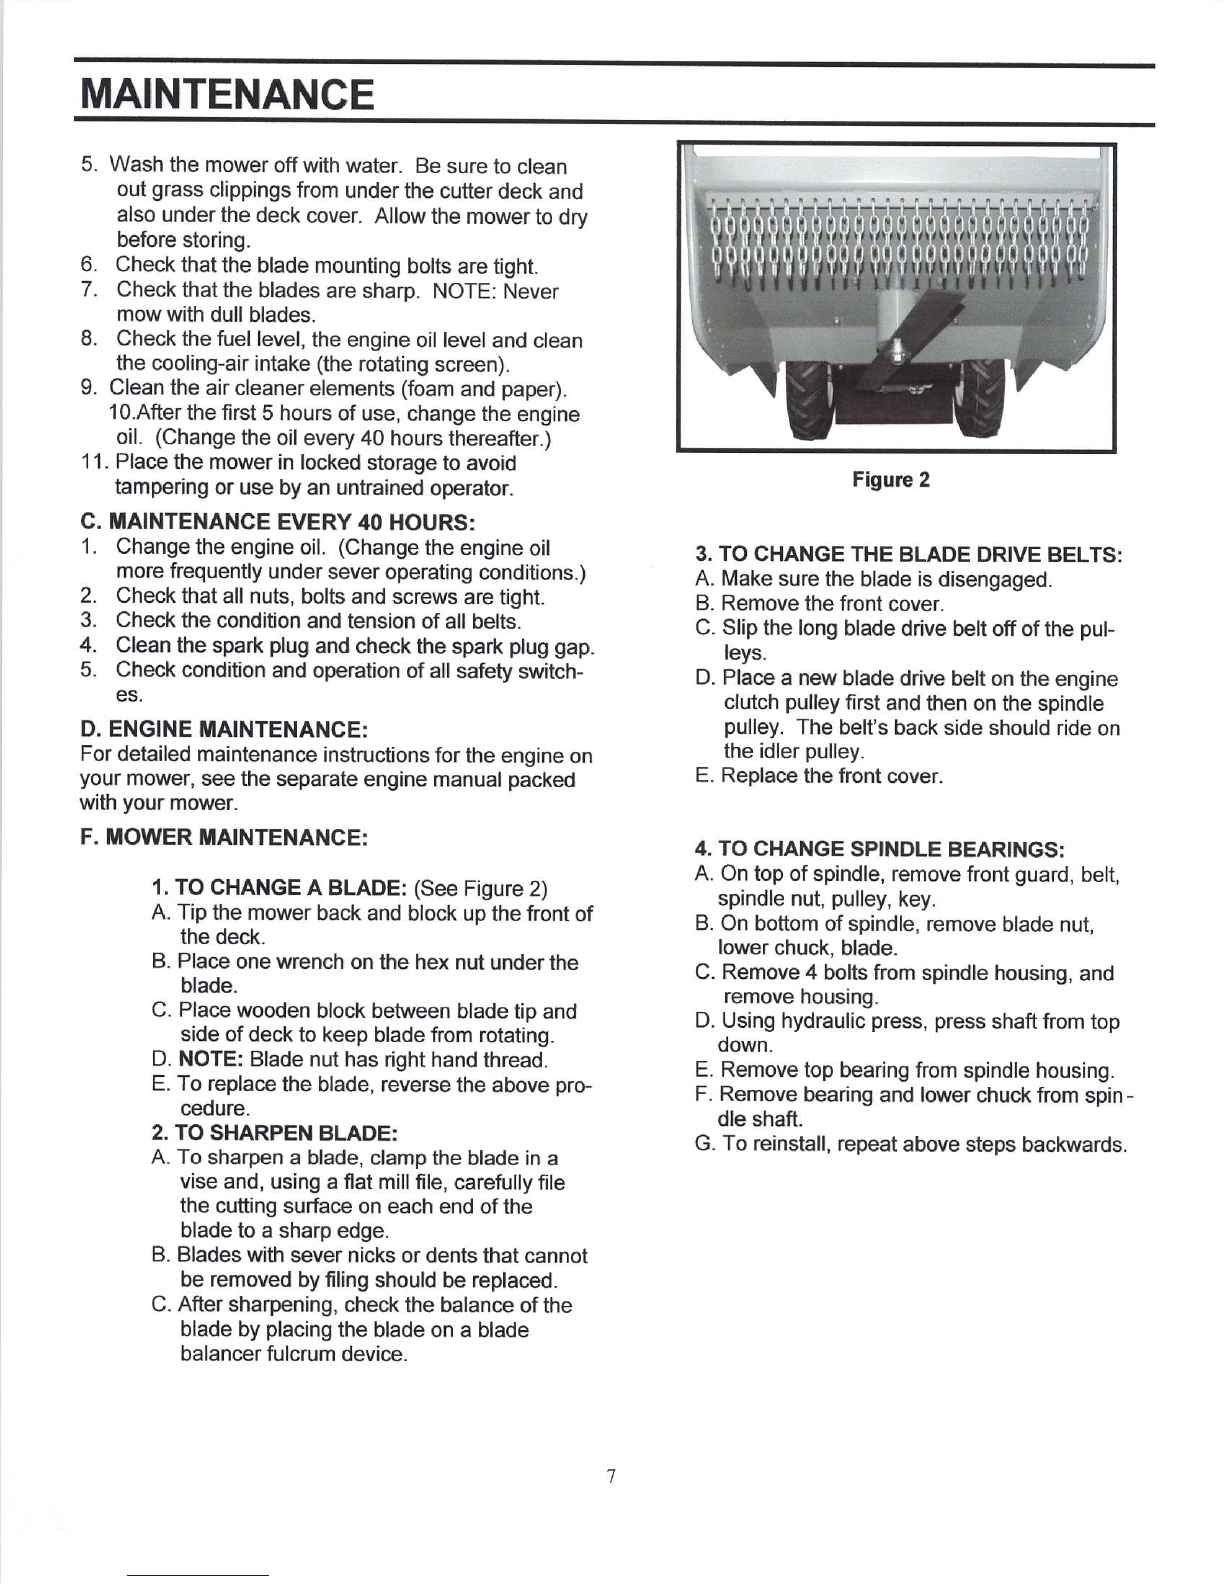
POWER DOG AMBUSH User manual

Pnwer llary*
Owner's
Manual
Agricultural
/Commercial
/ Industrial
lUllil$
P0Wffi
t0UlPilltlll.
uc
10101
Shively
Road,
(C.R.
46)
- Nappanee,
tN40550
Fat- F- a ararrt / -n ar ' t a\t\ r^ Fn F at'a 6F
W

INDEX
FORWARD.
SAFETYPRECAUTIONS
A.
General.
B.
Related
toFuel..
C.When
Mowing.
.
SAFETY
DECALS
SPEC|F|CAT|ONS..........
OPERATINGINSTRUCTIONS
A.
Controls.
1.Fuel
Shutoff
Valve....
2.EngineThroftle...
...
3.Recoil
Starter..
4.Blade
Clutch
5.OperatorPresence
Levers
6.Free
Wheel
B.InitialAdjustments.
...
C.Break-ln
andOperation
2 MAINTENANCE..... 6-8
3 A.GeneralMaintenance
._..... . ... . 6
3 B.DailyMaintenance
After
Mowing. . . . 6-7
3 C.Maintenance
Every40
Hours....... 7
3 D.Engine
Maintenance.
.. ... .. ... . .. 7
4 E.Mower
Maintenance
.... .. 7
4 1.To
Change
aBlade.. 7
5-6 2.ToSharpen
aBlade. 7
5 3.ToChangetheBlade
DriveBelt
. . . . 7
5 4,To
ChangeSpindle
Bearings...... 7
5 TROUBLESHOOTING
GUIDE.. 8
5 SUGGESTEDREPLACEMENTPARTS-mower I
5 MAINTENANCERECORD ...,..... 9
5 WARRANTY 10
5
5-6"
FOREWORD
The
Power
DogCommercial,
Walk-Behind,
Brush
Mowers
havebeen
developed
foruse
by
professional,
agricultural,
commercial
and
industrial
trainedindividuals.
Themachines
incorporate
many
safetyfeatures
that
shouldbestudied
byalloperatorsand
maintenance
personnel
before
use. Thelistofsafety
precautions
should
receive
particular
attention.
This
manual
presents
the
operating
and
maintenance
instructions
necessary
tokeep
youPowerDog
mower
atpeak
efficien-
cy. lfproperly
operatedandmaintained,your
Power
Dog
mowerwill
give
dependableand
houble-
free
service.
Although
hazard
control
and
accident
prevention
partially
aredependent
uponthe
design
andconfiguration
oftheequipment,
these
factors
arealso
dependent
uponthe
awareness,
con-
cern,
prudence,
and
proper
trainingof
the
personnel
involved
in
theoperation,
transport,mainte-
nance
andstorage
of
theequipment.
cAUTloN:
ThePower
Dogcommercial,
walk-Behind,
BrushMower
should
onlybe
op-
erated
andmaintained
bythoroughly
trainedindividuals.
The
machines
couldcause
serious
injury
to anyonewho misuses
themor doesnot understand
theiroperation.
All operators
and maintenance
personnel
are urgedto read
this entiremanualfor
theirsafety.
wARNING:
Theengine
exhaust
from this productcontains
chemicals
knownto the
Stateof California
to causecancer,
birthdefectsor otherreproductive
harm,

SAFETY
PRECAUTIONS
A.
1.
2.
4.
5.
6.
7.
8.
GENERAL
Read
thisOperator's
Manual
before
starting
themower.
Study
thecontrols
andlearn
the
proper
sequence
ofopera-
tion.
Donot
allow
anyonetooperate
ormaintain
thismachine
who
hasnotread
the
manual.Never
permit
children
to
operate
this machine.
Alwayshave
your
feet
andhands
clear
ofthecutter
deckwhen
starting
theengine.
Donot
remove
anyshields,
guards,
decalsorsafety
devices-lfashieid,
guard,
decal
orsafetydevice
isdamaged
or
doesnotfunction,
repair
orreplaceitbefore
operatlng
themower.
Always
wear
safety
glasses,
long
pants
and
safetyshoes
when
operating
ormaintaining
thismower.
Donotwear
loose-fitting
clothing.
Neverrun
theengine
indoorswithout
adequateventilation.
Exhaust
fumes
aredeadly.
To
avoid
serious
burns,donot
touchthe
engineormufflerwhile
theengine
isrunning
oruntilithas
cooledafterit
has
been
shutoff.
Whenlooking
for
oilleaks,never
run
your
hand
overhydraulic
hoses,Iines
orfitting.(High-pressure
oilcan
easily
penetrate
the
skin.)Never
tighten
oradjusthydraulic
hoses
orfittings
whilethe
systemiJunder
pressure.
B. RELATED
TO FUEL:
l. Gasolineis highlyflammable.Respectit.
2. Donotsmoke
orpermit
others
tosmokewhile
handling
gasotine.
3. Always
useapproved
containers
for
gasoline.
4. Always
shut
offtheengine
and
permit
it
tocool
beforeremoving
thecapofthefuel
tank.
5. lfthefuel
container
spoutwillnot
fitinside
thefuel
tankopening,
useafunnel.
6. Whenfilling
thefuel
tank,stopwhen
the
gasoline
reaches
oneinch
from
thetop. This
spacemust
beleftforexoan-
sion.Do
notovertill.
7. Wipe
upanyspilled
gasoline.
C.WHEN
MOWING:
1. Keep
adults,
children
and
pets
awayfrom
the
areatobemowed.
2. Mowonly
indaylight.
3. Alwayscheck
thearea
tobemowed
andremove
debris
andotherobjects
prior
tomowing.
4. Watch
forholes,rocks,
posts,
andother
hiddenhazards.
5. Reduce
speedwhen
makingsharp
turns.
6. Always
have
proper
footing
onslopes
andhillsides
andnever
operatewhen
conditions
areslippery.
Bevery
careful
inwet
weeds.
Always
keepbothhands
onthehandles.
Alwayswalk,
neverrun.
Never
engagethe
bladeclutchwhen
the
engineisrunning
unless
you
arein
areathat
you
intend
tomow.
Be
carefulwhen
crossing
gravel
paths
orroadways.
Always
disengage
thebladeclutch
andwait
untiltheblades
stoprotating.
Never
leavethemower
unaftended
without
disengaging
the
bladeclutch,
shuttingoffthe
engine,taking
thekeyfrom
theignitionswitch
and
closingthefuel
shutoffvalve.
Always
park
themower
andstart
theengine
onalevel
surfacewith
thebladeclutch
disengaged.
lf
youhitasolid
objectwhile
mowing,
disengage
theblade
clutchandstop
theengine.
Diiconnectthe
spark
plug
wireandinspect
fordamage.
Repair
anydamage
andmake
surethe
bladesarein
good
condition
andtheblade
boltsaretight
beforerestarting
theengine.
Donot
mowexcessively
steep
slopes.Mow
across
theslope,not
upanddown
theslooe.
Neverraise
themower
deckwhile
theblades
are
rotatino.
Never
walkor
standonthe
dischargeside
ofamower
wlththeengine
running.
Disengage
thebladeclutch
ifanoth-
erperson
approaches
while
you
areoperating
amower.
16.Always
disconnect
the
spark
plug
wiretoprevent
the
enginefrom
accidentally
startingbefore
performing
any
mainte-
nanceon
thismower.
17.Keep
themower
andespeciallythe
engine/pump
areaclean
andfree
ofgrease,
grass
andleavestoreduce
the
chance
offire
andtopermitproper
cooling.
18.Theoperator
presence
controlleverslocated
ateach
handle
aredesignedfor
your
safety.Do
nottrytodefeat
their
operation.
lftheblade
clutchisengaged,
releasing
bothhandles
willshut
offtheengine.
7.
8.
10.
I t-
13.
14.
15.

Keep
safetydecals
clean.Replace
any
safetydecal
thatisdamaged,
destroyed,
missing,
painted
over
orcannolonger
beread. Replacement
safetydecals
are
available
through
your
dealer.
R-d .nd undfrlrnd
opa6lo/! n[nual bdorg
udnethl!ntchln.
Dond opaEta yrlttout
gurda lnd .hlCd! In
pl!oo.
Located
on
Conkol
Panel
Located
onControl
Panel,
Front
cover,Rear
cover HIGH
Located
on
Control
Panel
a
T
H
R
o
T
T
L
E
*
SPECIFICATIONS
KEEPHAI{DS
andFEETAWAY
AHgusq
Enqine: Honda390V
lransmission: HvdroTransaxledETC
Blade Drive: V-belt
Enoaoement: ManualClutch
tselfadi.)
CuttinqWidth: 26"
Blade: Dual
sided
Deck! l0 quaoe
steel
fireSize: 4.80/4.00-8
Ground
Speed: Variable,
max.4m.p,h.
Forward/Reverce: Instant
OperatorPresent
Safety:Yes
Engine
Start Recoil
Lenqth: 70"
Width: 29'
Heiqht: 41"
Weisht: 300#
Warranty: 6mo.commercial

OPERATING
INSTRUCTIONS
A. CONTROLS
1. Fuel
ShutoffValve:
Located
undertheairfilter. Thehandleturns
g0de-
grees.Anytime
themowerisbeingtrailered
or,ifthe
mower
willnot
beinusefor
30minutesormore,close
thefuelshutoff
valve
toprevent
flooding
theengine.
2, Engine
Throftle:
Located
onthe
control
panel.
Moving
thethrottle
lever
from
therear
tothefrontwillincrease
the
enginespeed
fromslow
tofast. Tostart
theengine,
setthethrottle
halfway
between
slowandfast.
3. Recoil
Starter:
Locatedontop
oftheengine.Tostarttheengine,
pull
outchoke
lever,set
thethrottlehalfi^/ay
between
slow
andfast
and
grasp
thestarter
grip
and
pull
slowly
until
the
starterengages.Then
pull
the
cordrapidly
toover-
comecompression,
prevent
kickback
andstartthe
en-
gine.Repeatifnecessarywith
thethrottle
pushed
half-
way
backtothe
"slow'position.
Figure
I -TheControl
Panel
1. Throttle
2. TwistForward
- Reverse
3. Operator
PresentSafety
4. Blade
Engagement:
Locatedonthemainframeback
plate. Blade
willen-
gage
when
engagement
leveris
pulled"up"
while
oper-
atorsafety
paddles
areactivated-
Tostopblade,re-
lease
engagementlever
down.Engineshould
berun-
ningat3/4speedbeforeengaging
blade.
5. Operator Presence Levers:
Located
above
theouterendsoftheright
andlefthan-
dles,theseleversmust
behelddown
onthehandles
against
spring
pressure
inordertoengagetheblade
cutch. Releasing
theoperator
presence
levers
with
the
blade
clutchengagedwillshutofftheengine.
6. FreeWheel:
Tomanually
push
mower
withoutstartengine
pull
free
wheelrod
out(located
infront
of righthand
side
wheel).
B.INITIAL
ADJUSTMENTS
1. Disconnect
thespark
plug
wire.
2. Checkthe
tire
pressure.
Drive
wheelsshould
be
inflated
to39
psi.NOTE:
Newtiresare
overinflated
in
ordertoproperly
seatthebead
totherim.
Check
thatallnuts,
boltsandscrews
aretight.
Checkthe
tensionofthe
deckdrivebelts:
*Remove
thedeck
covershield
andengagethe
bladeclutch.
*Thetension
ofthedeck
drivebeltsshould
be
adjusted
sothat
aten-pound
pull
between
two
pulleys
deflects
eachbeltabout1/2".
Donot
over-tighten
thesebelts.The
blade
clutch
shouldengage
withonlymoderateforce.
*Replace
thedeck
covershieldand
disengagethe
bladeclutch.
5. The
tensionofthe
transmission
drivebeltshouldbe
adjustedsothat
afive-pound
pull
betweentheen-
gine
traction
drive
pulley
andthetransmission
drive
pulley
deflects
thebeltabout
3/16".
C.BREAK-IN
AND
OPERATION
1. Make
certain
you
thoroughly
understandall
ofthe
safety
precautions
before
you
attempt
tooperate
thismachine.
2. Check
theengine
oil
level.
Fillto
the
proper
level
with
SAE-30engine
oilratedforservice
SEor
SF.
3. Movethemower
outdoors.
Checktheengine
gas-
oline
level.Whenfilling
thetank,
stopwhenthe
gasoline
reaches
oneinchfrom
thetop.Thisspace
must
beleftfor
expansion.
Use
fresh,
clean,un-
leaded,regular
gasoline.
4. Move
themower
toa"test
area"where
you
can
operatethemowerfor
abouthalf
an
hour
without
beingdisturbed.
5. Tostartthe
engine:
a.Disengage
the
bladeclutch.
b.
Connectthespark
plug
wire.
c.ODenthefuel
shutoffvalve.
d.Move
thethroftlelever
tothehalf-way
posi-
tion.
e.Grasp
thestarter
grip
and
pull
slowlyuntil
the
starter
engagesand
then
pull
thecordrapidly
to
overcomecompression,
prevent
kickback
and
start
theengine.Allow
thecordtorecoil
slowly.
Repeat
ifnecessary.
f.Setthe
throttleat50%
offullengineRPM
and
allowtheenginetowarm
up.Then,adjust
the
throttletofull
engineRPM.
4.

OPERATING
INSTRUCTIONS
8.
C.BREAK.IN
AND
OPERATION
con'd
6. Aftertheengine
haswarmed
up,
shutofftheigni-
tion
andcheck
theoperation
ofthe
safetyswitches.
Disengage
the
bladeclutch
Restart
theengine.
Pull
theblade
clutchlever
upuntilitengages
and
the
cutterblades
startrotating.
9. Slowly
twistthehandle
barfonlrrard
and
themower
willmove
aheadinastraight
line.
10.Tostopthemowedsfonllrard
motion,
twistthehan-
dlebarbackward.
11.Forreverse,
slowly
twistthehandle
barbackward
and
themower
willmoveback. Tostop,
twistthe
handle
barfoMard untilthemower
stoDs.
12.To
stopandshut
offthemower,
disengage
the
blade
clutch,turnoff
theignition
tostoptheengine,
closethefuel
shutoffvalve
anddisconnect
the
spark
plug
wire.
13.
Check
thatallnuts,
boltsand
screwsarestill
tight.
14.
Check
andadjustifnecessary,
thetensionofthe
deckdrive
beltsandthe
pump
drivebelt
asde-
scribed
initems4and5of
the
initial
adjustment
section.
15.
Afterthefirst
fullday
of
mowing,
allnuts,
boltsand
screwsshould
berechecked
for
proper
tightness
andthebelts
shouldberechecked
for
proper
ten-
sion.
MAINTENANCE
MAINTENANCE
SCHEDULE
FILLINDATES
ASYOU
COMPLETE
REGULAR
SERVICE /f#/f/f/sr
SERVICEDATES
CheckEngine
OilLevel XX
ChangeEngine
Oil X,,
lnspectSparkAnester/Muffl
er X
Inspect
AirScreen X X
CleanorReplace
AirCleaner
Cartridoe )C
Clean
EngineCylinderFins x
Replace
SparkPlug X
I -Changemore
oftenwhenop€.ating
underaheavyloadorinhighambi€nt
temp€ratures.
2- Servlce
morcoftenwhenopedting in dirty or dGty condition.
WARNING:
Disconnect
thespark
plug
wire to prevent
the enginefrom acci-
dentally starting before perfonning
any
maintenance
onthismower.
GENERALMAINTENANCE:
lfthemower
mustbetipped
onitssideformainte-
nance,firstdrain
thefuelftomthefuel
tankandthe
oil
from
theengine's
crankcase.
Becarefulnotto
spilllubricanton
thedrivebelts.
Donottamperwith
theengine's
governor
settings.
They
areadjustedtoprovide
the
proper
maximum
enginespeed.
lfthemoweris
tobeinstorageformore
than30
days,drain
thefueltank,run
theenginetodrainthe
carburetordry,change
theoil,removethe
spark
plug
and
pour
ateaspoonfulofoilinto
thecylinder.
Pullthe
startercordslowly
tocranktheengine
and
distributetheoil
then
replace
thespark
plug
and
loosen
bladedrivebelt
(remove
from
idler
pulley).
DAILY
MAINTENANCEAFTER
IIOWING:
Park
themower
outsidethestoragefacility
withthe
engineshut
off.
Closethefuelshutoffvalve.
Permitthemower
tocool.
Disconnect
thespark
plug
wire.
4.
A.
1. B.
1.
2.
J.
4.

MAINTENANCE
5.Wash
themower
offwithwater.
Besure
toclean
out
grass
clippings
fromunder
thecutter
deckand
alsounderthe
deckcover.Allow
themower
todry
before
storing.
Checkthat
theblademounting
bolts
aretight.
Checkthattheblades
are
sharo.NOTE:Never
mow
withdull
blades.
Check
thefuellevel,
theengine
oil
level
andclean
the
cooling-airintake
(the
rotating
screen).
9. Clean
theaircleaner
elements
(foam
and
paper).
1o.After
thefirst
5hoursof
use,changethe
engine
oil. (Change
theoil
every40hoursthereafter.)
11.Place
themowerinlocked
storagetoavoid
tampering
oruse
byanuntrained
operator.
c.
1.
2.
4.
5.
MAINTENANCE
EVERY40
HOURS;
Change
theengineoil.
(Change
theengine
oil
morefrequently
undersever
operatingconditions.)
Check
thatallnuts,
boltsandscrewsare
tight.
Check
thecondition
andtensionof
allbelts.
Cleanthe
spark
plug
and
checkthespark
plug
gap.
Check
conditionandoperation
ofallsafety
switch-
es.
D.ENGINEMAINTENANGE:
Fordetailedmaintenance
instructions
fortheengineon
your
mower,
seetheseparate
enginemanual
packed
with
your
mower.
F.MOWERMAINTENANCE:
L TOCHANGEA BLADE:(See
Figure
2)
A.Tipthemower
backandblockupthefront
of
thedeck.
B.Place
onewrench
onthehexnutunderthe
blade.
C.Place
woodenblockbetween
blade
tioand
sideofdeck
to keepbladefromrotating.
D.NOTE:
Bladenuthasright
handthread.
E.Toreplace
theblade,reversetheabove
pro-
cedure.
2.TOSHARPENBLADE:
A.TosharDena blade.clamD
thebladeina
vise
and,usingaflatmillfile,
carefullyfile
thecutting
surfaceoneachendofthe
blade
toa sharpedge.
B.Bladeswith
severnicksordents
thatcannot
beremoved
byfiling
shouldbereplaced.
C.After
sharpening,checkthebalance
ofthe
blade
by
placing
the
bladeonablade
balancerfulcrumdevice.
3.TO
CHANGETHE
BLADEDRIVEBELTS:
A.Make
surethe
bladeisdisengaged.
B.Remove
thefrontcover.
C.Slipthelong
bladedrive
beltoffofthe
pul-
leys.
D.Place
anew
bladedrive
beltontheengine
clutch
pulley
firstand
thenonthespindle
pulley.
Thebelt's
backsideshouldride
on
theidler
pulley.
E.Replace
thefront
cover.
4.
TOCHANGE
SPINDLEBEARINGS:
A.Ontopof
spindle,removefront
guard,
belt,
spindlenut,
pulley,
key.
B.On
bottomofspindle,remove
bladenut,
lower
chuck,blade.
C.
Remove
4boltsfromspindlehousing,
and
remove
housing.
D.Usinghydraulic
press,
press
shaft
from
top
oown.
E.Remove
topbearingfrom
spindlehousing.
F.Remove
bearingandlower
chuckfromspin
-
dleshaft.
G.
To
reinstall,repeat
abovestepsbackwards.
7.
L
Figure2

TROUBLESHOOTING
POINTS
PROBLEM CAUSE CORRECTION
Willnotstart Outoffuel.
Engine
not
"CHOKED"
properly.
Engineflooded.
Dirty air cleaner.
Water in tuel.
Clogged fuel tank.
Loose spark plug wire.
8. Badspark
plug
orimproper
gap.
9. Carburetorout of adjusknent.
10. Engineoilto low.
11. Clutch
engaged.
t.
2.
3.
4.
5.
7.
'1. Fillfueltank.
2. See
"TO
STARTENGINE"
inOperation
section.
3. Wait
severalminutes
beforeattempting
tostart.
4. Cleanorreplace
aircleaner
cartridge.
5. Emptyfueltankand
carburetor,andrefill
tank
withfresh
gasoline.
6. Remove
fueltank
andclean.
7. Make
sure
spark
plug
wireissealed
properly
on
plu9.
8. Replace
spark
plug
oradjGt gap.
9, Makenecessary
adjustments.
10. Addengineoil.
1l- Makesure
clutehistullydisengaged.
Hard
to start Throttle
controlnotsetpropedy.
Dirty
aircleaner.
Bad
spark
plug
or improper
gap.
Stale
or dirtyfuel.
Locse
sparkplug
wire.
Carburetorout of adjustrnent.
1.
2.
3.
4.
5.
o.
1. Placethrotde
controlin "FAST"
position.
2. Clean
orreplace
aircleaner
cartridge.
3. Replace
spark
plug
oradjust
gap.
4. Emptyfuel
tankandrefill
tankwithfresh,
clean
gasoline.
5. llake surc spark plug wit€ is seatedproperly on
plug.
6. Makenecessarv
adiustments.
Lossof power l. Dirtyaircleaner.
2. Low
oil level/dirty
oil.
3. Faulty
spark
plug.
4. Oilinfuel.
5. Staleordirtyfuel.
6. Water
infuel.
7. Clogged
fueltank.
8. Spark
plug
wir€loose.
9. Dirty
engineairscreen.
10. Dirty/clogged
muffler.
'l1. CarburEtor
outofadiustment.
12. Poor
compression.
'13.
Transmission
beltloose.
1. Clean
or replace
aircleaner
cartridge.
2. Check
oil level/change
oil.
3. Cleanandregap
orchangespark
plug.
4. Emptyand
cleanfueltankandrefill,andclean
carburetor.
5- Emptyfuel tank and refill fuel tank with fr€sh
gasoline.
6. Empty
fueltank
andcarburetor,andrefill
tank
withfresh
gasoline.
7. Remove
fueltank
andclean.
8. Connect
andtightenspark
plug
wire.
9. Clean
engine
airscreen.
10. Clean/r€placemuffler.
11. Make
necessary
adjustrnents.
12, Contact
anauthorized
servicecenterdepartment,
13. Loosen
engine
plate
boltandslideengine
back
totightenbelt retighten
engine
plate
bolts.
Engineoverheats 1. Lowoillevel/dirty
oil.
2. Dirty
engineairscreen
3. Dirty
engine.
4. Partially
plugged
muftler.
5. lmpropercarburetoradiustsnent.
'1. Checkoillevel/change
oil.
2. Clean
engineairscreen.
3. Clean
cylinderfins,airscreen,andmuffler
area.
4. Removeand
cleanmuffler.
5. Adiustcarburetor
to richerDosition.
Enginerunsbutmowet
won'tmove Freewheelis engaged.
Clogged oil filter.
Belt off of pulley.
Control rod disconnected.
Park brake is engaged.
1.
2.
3.
4-
5.
l. Disengagefreewheel.
2. Replace
oilfilter.
3. Replace
belt-
4. Reconnect
control rod-
5. Disenqaqe
Darkbrake.
Enginerunsbutlabors
whenmowing l. Mowingtoofast.
2. Throttlecontrolnotproperly
adjusted.
3. Carburetor
outofadjustment.
l- Slow
yourdrivespeed.
2. Check
throttle
controlsetting.
3. Makenecessarvadiustrnenls.
Bladewill not rotate Engagement
disconnected.
Beltoffof oulley.
1.
2. 1. Connectallconnections.
2. Reolacebelt.
Blade
tumsto thedght 1. Bladedrive
belt
istwisted 1.
Plsgejg
Beltfrays
or rollsover
in
pulley
'1. Blade drive belt is twisted wrong way. t.
1. Pulley
groove
is nickedorbelt
wasbro-
kenintootightlyandbrokethecords. 1. Replacebell

MAINTENANCE
SUGGESTED
MOWER
REPLACEMENT
PARTS
PART
# DESCRIPTION
KP6020 blade,
26"weed
lefthand
KP6017 nut.
blade3/4"|efthand
KP601B belt,deck
KP6019 belt,transmission
KP5211 lowerchuck,
blade
KP5206 bearing,
spindle
(top)
KP5207 bearing,
spindle
(bottom)
KP6021 pulley,
8"
KP5225 key,3/16"
KP5228 pulley,
idler
KP5260 key,
1/8"
KP5261 washer,
star3/4"
KP2039 switches,
safety
KP2100 grip
7/8"
KP21O2 bridge
pin
#3
KP2143 ballioint318
- 24'
iIIAINTENANCE
RECORD

!
SI
E
t!
.r
tr
E
q:
€
n
7
z
@
4
m
=
m
z
fi|fi
aaefl;
A$aa;l4
tl6 s=&tiP
afr'9ar
16
lK fiqFE5
: fq6
E
s|e
gq3E€
I F$sl=
rl=
q;eilig
ae*4E
=lEaigrF3
sqE
l;
lf;EidF; E sl* 14
ld
q
;$iq,$
g$*
11
Esl:ti€
e5g'-
lF;la'ix
+46:
|i
EA5ge
s
iA!
F dsA:
g;qa
lEa:ea
qsgs
lq
ae;$
3
$g
le :?g#
E_
q_d
to Fi-Efi
g q+
9
€ 8.X
:oot
;
q3
fo{
EA}lD
.i, [|
6 oE'
4'1.
€€ ii
q.3
.;
o)!,
dg
o^
ax
o-
ao
:.q
!{{
aio
p.qa z
,5F99
(,,
Y=i
_ 6Y0)
a'ii *
!;EE
!t I cl-
E;F
g.
':=,gd
aa67
E.3
R
9s;
{
a=
g-a
g
-d6d
:-.,€
=.F=
l?ord
'
rai
;a?f,a
i
iis*'E.;;
ad
Eii$[i3;i
sE$+ii[$1
nEr$iagil
FU3€R€43:
EEigF5HEE
Egg:n3E
EH,gEgE
t9i
.5E=$flA
6:o x
5
f o 9 i,t j'
-61r 6
s
$1Bfi
fidEi-_
o Y F j" ='
+r =(o
:f g6
Qf. -- at
f.Q < f
qU P,E
Qa <6-
=P X9
.::
F 6=.
.; d9
l3 il+
^uo =,,
59
HS
;e de
4;- 5,e
d d.
=r!
,i:sAEiEgEfiiHiE;EEI€iE
e$FH$iqiisl
eiigqi;sEili
ggpaB:$iiE
iggi!q4
geH
:Egs[;?F#a
E:3F
ilE{
M93
gigEggiHEF
gFiF
+$E
gE
iF4t =a i-i;
:!c=6 6q =
--l
d
t.
l
3
d
o
3
o)
=
9.
o
o)
ot
l0

Pnwar IIrg'"
Parts
Breakdown
PD926SRB
. PD926SRW
PD926HRB
- PD926HRW
Agricultural
/ Commercial
/ lndustrial
.b- I
?i l(Ullll$
P0l{ffi
t0UlPilltllT.
uc
10101Shively
Road,
(C.R.46)
-Nappanee,
lN
46550
ph.574-862-4592
/ 1-866-505-8085

PART#
KP2045
KP2054
KP2055
KP2056
KP2057
KP2060
KP2070
KP2078
KP2085
KP2100
KP214
KP2162
KP2170
KP5202
KP5216
KP5217
KP5219
KP5220
KP5221
KP5222
KP5230
KP5231
KP5232
KP5235
KP5240
KP5274
DESCRIPTION
cap,tank
decal,round
logo
decal,
info
decal,
power
dog
decal,fonrard
- reverse
paddle,
safety
boft.1/4x'|12"fl
bolt.
3/8x 1"fl
sefftaper,#12x314"
grip,
7/8"
nut,3/8fl
boft,1/4x314"
fl
label,manual-warning
deck,revolving
guard,
deckbelt
control
panel
runner.
deck
handle
shield,
debrisdeck
frame,
control
panel
tank,reservoir
wireharness
switch,engagement
decal.926
engine
guard,pump
belt

5230 2045
5240
'' 2078-2144
5216
5274
2054
: I'T-
irl
2170
5232
2100
5222
3
21002060

PART
#
KP20/.2
KP2046
KP2047
KP2048
KP2051
KP2052
KP2078
KP2084
KP2089
KP2091
KP2139
KP2143
KP2145
KP2't68
KP5201
KP5204
KP5213
KP5220
KP5229
KP5230
KP5231
KP5238
KP5240
KP5243
KP5247
KP5265
KP5279
DESCRIPTION
valve
stem
rim,
8
x3.75
tire,480x8
4ply
hub
cotter
pins
nut,
1/2"lug
bolt.3/8x 1"fl
selftaper,
#6x314"
nut,5/16fl
bolt,5/16x314"
ll
nut,
3/8
- 24 fl
balljoint,318
-24
nut,3/8
- 24jam
nut,wheel
bracket,
pump
mount
bracket.
bottomhandle
controlrod
handle
shield,recoil
tank.reservoir
wireharness
pump,
hydro
engine
hose.
3/8x 19"
fitting,
6801-6-6
bracket,angle
recoil
neutral
control
bracket

5201
2078
5213
5231
5229
2048
)na7

PART#
KP2068
KP2070
KP2072
KP2076
KP2078
KP2080
KP2093
KP2144
KP2161
KP2't63
KP2164
KP2165
KP5202
KP5203
KP5205
KP5208
KP5209
KP5211
KP5212
KP5214
KP5215
KP5219
KP5221
KP5224
KP5225
KP5226
KP5227
KP5228
KP5230
KP5233
KP5234
KP5237
KP5261
KP5277
DESCRIPTION
nut.114
-201|.
bolt.114x 112"
fl
bolt,1/4
x3l4"fl
nut,3/8
- 16
nylock
bolt,3/8x 1"fl
bolt,3/8x1-114"tl
nut,
1/2
- 13fl
nut,3/8
- 16fl
decal,danger
bolt,
112x2-112"
fl
washer,
3/8flat
bolt,3/8x2-314"hhcs
deck,revolving
mount,
trianglespindle
spindle
nut,
3/4
left
hand
nut,
5/8lefthand
lower
chuck.
blade
blade,26"weedleft
hand
collar,head
bearing,deck
runner.
deck
shield,
debrisdeck
pulley,
8'
key,3/16"
bracket.
frontU
arm,idler
pulley,
idler
tank,
reservoir
spring,idler
eyebolt114
-20x 1"
belt,
deck
washer,
star3/4"
weight,
radius

5219
2163
5277
5225
- 5209 2068
- 2072 2080
- 2164 2164-2165-2
. '-!-J
rl
5221

PART#
KP2047
KP2054
KP2078
KP2144
KP5200
KP5212
KP5216
KP5235
KP5243
KP5281
KP5282
KP5283
KP5290
KP5291
KP5292
KP5293
DESCRIPTION
tire,480x8Tply
decal,roundlogo
bolt,3/8x 1"fl
nut,3/8fl
mainframe
blade.
26"weed left
hand
guard,
deck
belt
decal,926
hose,
3/8x 19"
deck.enclosed
angle,deckmount
(right)
angle,deckmount
(left)
cotter
pin
3152x1"
rod,1/4"chain
flap,debris
chain

5216
5235
5293
5243

PART#
KP0001
KP2005
KP2026
KP2040
KP2060
KP2072
KP2084
KP2100
KP2101
KP2102
KP2119
KP2138
KP0142
KP2144
KP2174
KP5213
KP5220
KP5222
KP5223
KP5231
KP5241
KP5242
KP5243
KP5244
KP5247
KP5248
KP5250
KP5253
KP5262
DESCRIPTION
wheelmotor
tag,alum.
handlebar
switches.
white
paddle,
safety
bolt,114
x314"ll
sefftaper,
ffix314"
grip,
7/8"
block,swivel3/8
- '16
bridge
pin
#3
fifting,6400S-10
bearing,handle
bar
returnto neutral
nut,3/8
- 16fl
screw,4 x 1/4
controlrod
handle
frame,
control
panel
drive
collar
wireharness
hose,3/8x23-314"
hose,114x27"
hose.3/8x 19"
hose,3/8
x13-112"
fitting,6801-6-6
fitting,
6801-4-4
fitting,2703-6-6-6
batterybox
foam
pad
l0
Other manuals for AMBUSH
1
Table of contents