PR electronics 2231 User manual

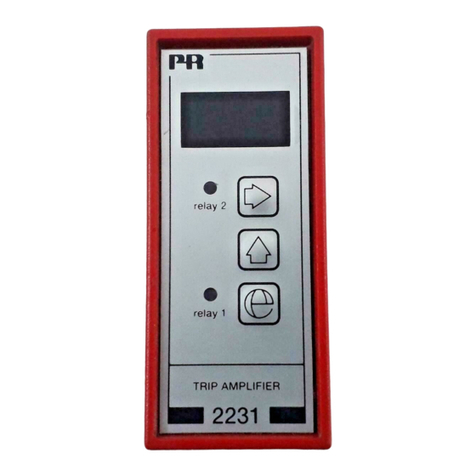
2231
Trip amplifier
No. 2231V104-UK
Serial no.
980170304-191057000

1543
PR electronics A/S tilbyder et bredt program af analoge og digitale
signalbehandlingsmoduler til industriel automation. Programmet
består af Isolatorer, Displays, Ex-barrierer, Temperaturtransmittere,
Universaltransmittere mfl. Vi har modulerne, du kan stole på i selv
barske miljøer med elektrisk støj, vibrationer og temperaturudsving,
og alle produkter opfylder de strengeste internationale standarder.
Vores motto »Signals the Best« er indbegrebet af denne filosofi – og
din garanti for kvalitet.
PR electronics A/S oers a wide range of analog and digital signal
conditioning devices for industrial automation. The product range
includes Isolators, Displays, Ex Interfaces, Temperature Transmitters,
and Multifunctional Devices. You can trust our products in the
most extreme environments with electrical noise, vibrations and
temperature fluctuations, and all products comply with the most
exacting international standards. »Signals the Best« is the epitome
of our philosophy – and your guarantee for quality.
PR electronics A/S ore une large gamme de produits pour le
traitement des signaux analogiques et numériques dans tous
les domaines industriels. La gamme de produits s’étend des
transmetteurs de température aux acheurs, des isolateurs aux
interfaces SI, jusqu’aux modules universels. Vous pouvez compter
sur nos produits même dans les conditions d’utilisation sévères,
p.ex. bruit électrique, vibrations et fluctuations de température.
Tous nos produits sont conformes aux normes internationales les
plus strictes. Notre devise »SIGNALS the BEST« c’est notre ligne
de conduite - et pour vous l’assurance de la meilleure qualité.
PR electronics A/S verfügt über ein breites Produktprogramm
an analogen und digitalen Signalverarbeitungsgeräte für die in-
dustrielle Automatisierung. Dieses Programm umfasst Displays,
Temperaturtransmitter, Ex- und galvanische Signaltrenner, und
Universalgeräte. Sie können unsere Geräte auch unter extremen
Einsatzbedingungen wie elektrisches Rauschen, Erschütterungen
und Temperaturschwingungen vertrauen, und alle Produkte von
PR electronics werden in Übereinstimmung mit den strengsten
internationalen Normen produziert. »Signals the Best« ist Ihre
Garantie für Qualität!
DK
UK
FR
DE

2231V104-UK 1
TRIP AMPLIFIER
Type 2231
CONTENTS
Warning....................................................................................................... 2
Symbol identification............................................................................ 3
Safety instructions................................................................................. 3
Applications............................................................................................... 6
Technical characteristics...................................................................... 6
Input............................................................................................................. 6
Functions ................................................................................................... 7
Programming ............................................................................................ 7
Display......................................................................................................... 7
Electrical specifications........................................................................ 8
Order: 2231............................................................................................... 10
Block diagram........................................................................................... 10
Hardware programming........................................................................ 11
Routing diagram...................................................................................... 12
Programming / operation the function keys ............................... 14
Description of functions (selection of application)................... 18

2 2231V104-UK
WARNING
This device is designed for connection to hazardous electric
voltages. Ignoring this warning can result in severe personal injury
or mechanical damage.
To avoid the risk of electric shock and fire, the safety instructions
of this manual must be observed and the guidelines followed. The
electrical specifications must not be exceeded, and the device
must only be applied as described in the following.
Prior to the commissioning of the device, this manual must be
examined carefully.
Only qualified personnel (technicians) should install this device.
If the equipment is used in a manner not specified by the
manufacturer, the protection provided by the equipment may be
impaired.
WARNING
Until the device is fixed, do not connect hazardous voltages to the
device. The following operations should only be carried out on a
disconnected device and under ESD safe conditions:
Dismantlement of the device for setting of DIP switches
and jumpers.
General mounting, connection and disconnection of wires.
Troubleshooting the device.
Repair of the device and replacement of circuit breakers must
be done by PR electronics A/S only.
WARNING
To keep the safety distances, devices with two built-in relays must
not be connected to both hazardous and non-hazardous voltages
on the same device’s relay contacts.
SYSTEM 2200 must be mounted in socket type S3B Releco (order
no 7023).
If the device is used with a current transformer, this must be
internally protected against disconnection or mounted with an
alternative external measuring shunt.
HAZARDOUS
VOLTAGE
INSTAL-
LATION
GENERAL

2231V104-UK 3
SYMBOL IDENTIFICATION
Triangle with an exclamation mark: Warning / demand. Potentially lethal
situations.
The CE mark proves the compliance of the device with the requirements
of the directives.
The double insulation symbol shows that the device is protected by
double or reinforced insulation.
SAFETY INSTRUCTIONS
DEFINITIONS
Hazardous voltages have been defined as the ranges: 75 to 1500 Volt DC, and 50
to 1000 Volt AC.
Technicians are qualified persons educated or trained to mount, operate, and also
troubleshoot technically correct and in accordance with safety regulations.
Operators, being familiar with the contents of this manual, adjust and operate the
knobs or potentiometers during normal operation.
RECEIPT AND UNPACKING
Unpack the device without damaging it. The packing should always follow the
device until this has been permanently mounted. Check at the receipt of the device
whether the type corresponds to the one ordered.
ENVIRONMENT
Avoid direct sunlight, dust, high temperatures, mechanical vibrations and shock, as
well as rain and heavy moisture. If necessary, heating in excess of the stated limits
for ambient temperatures should be avoided by way of ventilation.
All devices fall under Installation Category II, Pollution Degree 1, and Insulation
Class II.
MOUNTING
Only technicians who are familiar with the technical terms, warnings, and
instructions in the manual and who are able to follow these should connect the
device.
Should there be any doubt as to the correct handling of the device, please
contact your local distributor or, alternatively,
PR electronics A/S
www.prelectronics.com

4 2231V104-UK
Mounting and connection of the device should comply with national legislation for
mounting of electric materials, i.a. wire cross section, protective fuse, and location.
Descriptions of Input / Output and supply connections are shown in the block
diagram and side label.
The following apply to fixed hazardous voltages-connected devices:
The max. size of the protective fuse is 10 A and, together with a power switch, it
should be easily accessible and close to the device.
The power switch should be marked with a label telling it will switch off the volt-
age to the device.
CALIBRATION AND ADJUSTMENT
During calibration and adjustment, the measuring and connection of external
voltages must be carried out according to the specifications of this manual.
The technician must use tools and instruments that are safe to use.
NORMAL OPERATION
Operators are only allowed to adjust and operate devices that are safely fixed in
panels, etc., thus avoiding the danger of personal injury and damage. This means
there is no electrical shock hazard, and the device is easily accessible.
CLEANING
When disconnected, the device may be cleaned with a cloth moistened with
distilled water.
LIABILITY
To the extent the instructions in this manual are not strictly observed, the custom-
er cannot advance a demand against PR electronics A/S that would otherwise exist
according to the concluded sales agreement.

2231V104-UK 5
HOW TO DISMANTLE SYSTEM 2200
Picture 1:
The back panel of the device is detached
from the housing by way of a screw-
driver.
Picture 2:
After this, the back panel can be pulled
out together with the PCB, but please
notice the position of the PCB as there
is a number of different positions
in the house. Do not pull the wires
unnecessarily, instead pull the PCB.
Switches and jumpers can now be
moved. When assembling the back
plate and housing, please make sure
no wires are stuck.

6 2231V104-UK
TRIP AMPLIFIER 2231
• AC/DC trip amplifier
• 2 adjustable alarm limits
• Galvanically isolated 3.75 kVAC
• Front programmable
• 3-digit LED display
• 24 VDC or universal supply
Applications
Alarm detector in connection with measurement of AC/DC current or voltage
signals. The unit is used where accurate setpoint setting and different alarm
functions are required.
The unit can be used as a single or dual trip amplifier.
Alarm detector can be installed in PELV and SELV circuits.
Technical characteristics
General
The unit is microprocessor-based, which allows a very accurate setting of process
parameters. Each unit is supplied with basic calibration data, which eliminate the
tolerances in the component data. This means that the input can be programmed
to the requested signal range without re-adjustment.
Measurement ranges less than the min. measurement range of 0.5 V down to 10
mV may be entered, though this will affect the resolution and the response time.
Please note that the electric specifications of the device are only kept as long
as the stated min. measurement ranges and max. zero offsets are not exceeded.
Input
Standard DC current signals in the range 0...20 mA.
The current signal is detected by a 50 Ωshunt, which is manually connected
through an internal jumper.
DC voltage signals in the range 0...250 VDC.
By measurement of AC current signals up to 1 A from a current transformer or
current clamp a 1 Ω/ 2 W input shunt is used.
True RMS measurement of AC voltage signals in the range 0...250 VRMS, with a
crest factor < 5.

2231V104-UK 7
Functions
The front-operated push buttons are used for programming of the different
standard functions.
Single or dual trip amplifier can be selected. Dual trip amplifier with relay 2 as
pre-setpoint, single or dual trip amplifier with hysteresis in each relay, which is
set as setlow or sethigh and dual trip amplifier with hold on relay 2 until relay 1
is activated.
Make or break function can be selected by an internal jumper.
Programming
The front keys are used for selection of function and for setting all other
parameters like setpoint, reset, active relay for increasing or decreasing signal,
delay, and input signal.
The arrow keys are used as hotkeys if a quick change of setpoint is required.
If the setpoint is changed, the resetpoint follows, so the selected hysteresis is
conserved. A password can prevent access for changing parameters.
Display
During normal operation the 3-digit display shows the input signal in %. All
programmed parameters can be shown by using the front-operated push buttons
(see the routing diagram).

8 2231V104-UK
Electrical specifications
Specifications range............................................... -20°C to +60°C
Common specifications:
Supply voltage, DC.................................................. 19.2...28.8 VDC
Supply voltage, AC and DC................................... 21.6...253 VAC, 50...60 Hz or
19.2...300 VDC
Internal consumption, 2231D............................. 1.5 W
Internal consumption, 2231P............................. 2 W
Isolation voltage, test / operation.................... 3.75 kVAC / 250 VAC
Signal dynamics, input........................................... 16 bit
Response time, program. DC / AC...................... 0.25 / 0.75...60 s
Calibration temperature ........................................ 20...28°C
Temperature coefficient:
DC signals.............................................................. < ±0.01% of span /°C
AC signals.............................................................. < ±0.02% of span /°C
Linearity error:
DC signals ............................................................. < ±0.1% of span
AC sine-wave signals........................................ < ±0.35% of span
50...1000 Hz
Additional linearity error, AC signals
Crest factor 1 - 3................................................ ±0.7% of span
Crest factor 5....................................................... ±2.5% of span
Effect of supply voltage change....................... < ±0.002% of span /%V
EMC immunity influence....................................... < ±0.5%
Humidity...................................................................... < 95% RH (non-cond.)
Dimensions (HxWxD).............................................. 84.5 x 35.5 x 80.5 mm (excl. pins)
Protection degree.................................................... IP50
Weight 2231 D / 2231 P...................................... 125 g / 175 g
Vibration...................................................................... IEC 60068-2-6 : 2007
2...13.2 Hz.............................................................. ±1 mm
13.2...100 Hz........................................................ ±0.7 g
Electrical specifications - INPUT:
DC current input:
Measurement range................................................ 0...20 mA
Min. measurement range (span)........................ 10 mA
Max. offset ................................................................. 50% of selected max. value
Input resistance........................................................ 50 Ω
Updating time ........................................................... 100 ms

2231V104-UK 9
AC current input:
Measurement range................................................ 0...1 ARMS
Min. measurement range (span)........................ 0.5 ARMS
Max. offset ................................................................. 50% of selected max. value
Input resistance........................................................ 1 Ω/ 2 W
Updating time ........................................................... 100 ms
Voltage input:
DC voltage input:
Measurement range................................................ 0...250 VDC
Min. measurement range (span)........................ 0.5 VDC
Max. offset ................................................................. 50% of selected max. value
Input resistance........................................................ Nom. 5 MΩ
Updating time ........................................................... 100 ms
AC voltage input:
Measurement range................................................ 0...250 VRMS
Min. measurement range (span)........................ 0.5 VRMS
Max. offset ................................................................. 50% of selected max. value
Input resistance........................................................ Nom. 5 MΩ
Updating time ........................................................... 100 ms
Electrical specifications - OUTPUT :
Relay outputs:
Setpoint setting ....................................................... 0...99.9% of span
Hysteresis................................................................... 0...99.9% of span
Updating time ........................................................... 100 ms
Delay............................................................................. 0.0...99.9 s
Max. voltage .............................................................. 250 VRMS
Max. current............................................................... 2 A / AC
Max. AC power .......................................................... 500 VA
Max. load at 24 VDC............................................... 1 A
Marine approval:
Det Norske Veritas, Ships & Offshore............. Standard for Certification No. 2.4
Observed authority requirements: Standard:
EMC 2004/108/EC .................................................. EN 61326-1
LVD 2006/95/EC...................................................... EN 61010-1
PELV/SELV .................................................................. IEC 364-4-41 and EN 60742
EAC TR-CU 020/2011............................................ EN 61326-1
Of span = Of the presently selected range

10 2231V104-UK
Order: 2231
BLOCK DIAGRAM
CPU
EEPROM
+
-
V
+
-
V +
V +
V +
PGA
7
5
6
4
2
1
2231
9
10
~
A / D
JP 2
JP 3
N.O.
N.O.
VJP
4
50
JP
1
I
I
V
Input ( + ), (P)
Input (gnd.), (N)
Supply (+), (P)
Supply (gnd), (N)
Rel. 1 common
Rel. 1 N.O. / N.C.
Rel. 2 N.O. / N.C.
Rel. 2 common
Or
Tru e
RMS
AC shunt
1 Ohm / 2 W
N.C.
N.C.
24…230 VAC,
24...250 VDC
24
VDC
Rel. 1
Rel. 2
Type Supply
2231 24 VDC
24...230 VAC &
24...250 VDC
: D
: P

2231V104-UK 11
HARDWARE PROGRAMMING
Input:
Output:
Input JP1 JP4
0...20 mADC
0...1 ARMS
0...250 VDC
0...250 VRMS
I
I
V
V
V
I
V
V
Relay JP position
Relay 1
Relay 1
Relay 2
Relay 2
normally open
normally closed
normally open
normally closed
JP 2 N.O.
JP 2 N.C.
JP 3 N.O.
JP 3 N.C.

12 2231V104-UK
Routing diagram
0.0
4.0 4.1 4.2 4.3
3.0 3.1 3.2 3.3 3.4 3.5
1.0 1.3 1.4 1.5
2.0 2.1 2.2 2.3 2.4 2.5
1.1 1.2
2.1 2.2
1.1 1.2
4.14.0
If no buttons are pressed for a period of 2 minutes,
display returns to stage 0.0
Fast Setting
4.2 EFS/dFS - enable / disable fast setting
Upcount setpoint
Store and exit fast setting
Routing diagram
Press or 2 s for automatic counting.
Downcount setpoint
Relay 1
Increasing
Decreasing
0...99.9 s 0…99.9%
Setpoint Delay Hysteresis
0...99.9% 0...99.9%
Function 004
setpoint window
Hysteresis
Function 004, setpoint window
001 = Single setpoint
002 = Double setpoint
003 = Pre-setpoint
004 = Setpoint window
- stage 1.5 and 2.5 active
- menutext 1.1, 1.2, 2.1 and 2.2 are different
005 = Hold
Function
Select
application
Program
access
Enable fast setpoint
changing
Analogue
input type
U = Voltage
I = Current
Indication of
JP 1 and JP 4
0.0...20.0 mA
0.0...1.0 A RMS
0.0...250 VDC/VRMS
Analogue
100% input
0.2/0.7…60.0 s
Input
signal
AC or DC
DC/AC
Response time
Password code
Increasing
Decreasing
Hysteresis
0...99.9% 0…99.9%
Relay 2
0...99.9 s 0...99.9%
Function 004, setpoint window
Delay Hysteresis
0.0...20.0 mA
0.0...1.0 A RMS
0.0...250 VDC/VRMS
Setpoint
Analogue
0% input
040 = enable change in all stages
- - - = disable change
0…999
Memory
Programming
Press and hold , then press
to store changes
Change of parameter
Next digit or point
Go to entry menu / Leave
menu without changes

2231V104-UK 13
0.0
4.0 4.1 4.2 4.3
3.0 3.1 3.2 3.3 3.4 3.5
1.0 1.3 1.4 1.5
2.0 2.1 2.2 2.3 2.4 2.5
1.1 1.2
2.1 2.2
1.1 1.2
4.14.0
If no buttons are pressed for a period of 2 minutes,
display returns to stage 0.0
Fast Setting
4.2 EFS/dFS - enable / disable fast setting
Upcount setpoint
Store and exit fast setting
Routing diagram
Press or 2 s for automatic counting.
Downcount setpoint
Relay 1
Increasing
Decreasing
0...99.9 s 0…99.9%
Setpoint Delay Hysteresis
0...99.9% 0...99.9%
Function 004
setpoint window
Hysteresis
Function 004, setpoint window
001 = Single setpoint
002 = Double setpoint
003 = Pre-setpoint
004 = Setpoint window
- stage 1.5 and 2.5 active
- menutext 1.1, 1.2, 2.1 and 2.2 are different
005 = Hold
Function
Select
application
Program
access
Enable fast setpoint
changing
Analogue
input type
U = Voltage
I = Current
Indication of
JP 1 and JP 4
0.0...20.0 mA
0.0...1.0 A RMS
0.0...250 VDC/VRMS
Analogue
100% input
0.2/0.7…60.0 s
Input
signal
AC or DC
DC/AC
Response time
Password code
Increasing
Decreasing
Hysteresis
0...99.9% 0…99.9%
Relay 2
0...99.9 s 0...99.9%
Function 004, setpoint window
Delay Hysteresis
0.0...20.0 mA
0.0...1.0 A RMS
0.0...250 VDC/VRMS
Setpoint
Analogue
0% input
040 = enable change in all stages
- - - = disable change
0…999
Memory
Programming
Press and hold , then press
to store changes
Change of parameter
Next digit or point
Go to entry menu / Leave
menu without changes

14 2231V104-UK
PROGRAMMING / OPERATION
THE FUNCTION KEYS
DOCUMENTATION FOR ROUTING DIAGRAM
General
The programming is menu-controlled. The main menus are numbered in level 0
(x.0), and the submenus are numbered in level 1 (x.1 to x.5). Each submenu has
an accompanying entry menu. The menus are structured in such a way that the
menus most frequently used are closer to the default menu 0.0. Please note that
programming is only possible when submenu 4.3 PAS has the value 040.
Main, sub-, and entry menus are selected
by the 3 function keys 2, 3, and 1 as
outlined in the routing diagram.
Activating 2in the submenus will
display the present parameter value in
the entry menu.
In entry menus, the digit that can be
changed will flash. Active digit position
is shifted by the 3key and changed
by the 1key. When the decimal point
flashes, the position can be changed by
the 3key.
In entry menus with fixed parameters,
you switch between the parameters by
the 1key.
Store by first activating the 3key and
the 1key simultaneously.
Activate 2to return to previous menu
without changing the parameters.
0.0 DEFAULT - THE INPUT SIGNAL IS DISPLAYED IN %
At power ON, or if no keys have been activated for a period of 2 minutes, the
display returns to default.
4.14.0
Memory
Programming
Press and hold , then press
to store changes.
Change of parameter
Next digit or point
Go to entry menu / Leave
menu without changes

2231V104-UK 15
When menu 4.2 has been selected, EFS - Enable Fast SETTING, fast setpoint
change is possible by activating the Fast Setting function. In this menu,
the function keys have a special feature as 1increases the setpoint and 3
decreases the setpoint from the value it had when activated. Activating for
more than 2 s automatically activates the increment / decrement function.
The setpoint value is displayed in % of the input signal. 2stores the displayed
setpoint value.
Begin by selecting the function for the device in menu 4.1
1.0 rE1 - SETTING OF PARAMETERS FOR RELAY 1
1.1 SEt / SPL - Setting of relay 1 setpoint
Possible selections are 0...99.9%.
The setpoint is set in % of the input signal. When the selected function
in menu 4.1 = {004 = Setpoint window}, the low window value SPL is set
in this menu. When the selected function in menu 4.1 = {005 = Hold}, the
value resetting the hold function of relay 2 is set.
1.2 HYS / SPH - Setting of relay 1 hysteresis
Possible selections are 0...99.9%.
The hysteresis is set in % of the input signal. The hysteresis is the
difference between the setpoint and reset values. When the selected
function in menu 4.1 = {004 = Setpoint window}, the upper window value
SPH is set in this menu.
0.0
Fast Setting
4.2 EFS/dFS - enable / disable fast setting
Upcount setpoint
Store and exit fast setting
Press or 2 s for automatic counting.
Downcount setpoint

16 2231V104-UK
1.3 InC / dEC - Setting of active relay 1 for increasing / decreasing
input signal
Possible selections are InC or dEC.
If InC is selected, relay 1 will be activated when the input value is higher
than the setpoint and deactivated again, when the input value is lower
than the setpoint minus the hysteresis. If dEC is selected, relay 1 will
be activated when the input value is lower than the setpoint and be
deactivated again when the input value is higher than the setpoint plus
the hysteresis.
When the selected function in menu 4.1 = {004 = Setpoint window},
InC will result in the activation of the relay, and dEC will result in the
deactivation of the relay inside the window.
1.4 dEL - Setting of relay 1 time delay
Possible selections are 0...99.9 s.
The time delay is the period in which the input value must be present
before the relay switches state.
1.5 HyS - Setting of hysteresis for setpoint window
Possible selections are 0...99.9%.
When the selected function in menu 4.1 = {004 = Setpoint window},
menu 1.5 is active. The hysteresis is set in % of the input signal and is
placed outside the window.
A hysteresis less than 1% is typically an acceptable value.
2.0 rE2 - SETTING OF PARAMETERS FOR RELAY 2
When the selected function in menu 4.1 = {001 = Single setpoint}, all sub-
menus (2.1 to 2.5) have no function.
2.1 SEt / SPL - Setting of relay 2 setpoint
Possible selections are 0...99.9%.
The setpoint is set in % of the input signal.
When the selected function in menu 4.1 = {003 = Pre-setpoint}, the
percentage pre-setpoint value in relation to the relay 2 setpoint is set.
Menus 2.3 to 2.5 have no function.When the selected function in menu 4.1
= {004 = Setpoint window}, the low window value SPL is set in this menu.
When the selected function in menu 4.1 = {005 = Hold}, the value that
activates the hold function on relay 2 is set.

2231V104-UK 17
2.2 HYS / SPH - Setting of relay 2 hysteresis
Possible selections are 0...99.9%.
The hysteresis is set in % of the input signal. The hysteresis is the
difference between the setpoint and reset values.When the selected
function in menu 4.1 = {004 = Setpoint window}, the upper window value
SPH is set in this menu. When the selected function in menu 4.1 = {005
= Hold}, menu 2.2 has no function.
2.3 InC / dEC - Setting of active relay 2 for increasing / decreasing
input signal
Possible selections are InC or dEC.
If InC is selected, relay 2 will be activated when the input value is higher
than the setpoint and deactivated again when the input value is lower
than the setpoint minus the hysteresis. If dEC is selected, relay 2 will be
activated when the input value is lower than the setpoint and deactivated
when the input value is higher than the setpoint plus the hysteresis.
When the selected function in menu 4.1 = {004 = Setpoint window},
InC will result in the activation of the relay, and dEC will result in the
deactivation of the relay inside the window. When the selected function
in menu 4.1 = {003 = Pre-setpoint or 004 = Hold}, menu 2.3 has no
function.
2.4 dEL - Setting of relay 2 time delay
Possible selections are 0...99.9 s.
The time delay is the period in which the input value must be present
before the relay switches state.
2.5 HyS - Setting of hysteresis for setpoint window
Possible selections are 0...99.9%.
When the selected function in menu 4.1 = {004 = Setpoint window},
menu 2.5 is active. The hysteresis is set in % of the input signal and is
placed outside the window.
A hysteresis less than 1% is typically an acceptable value.

18 2231V104-UK
3.0 Aln - SETTING OF SIGNAL INPUT
3.1 U / I - Display of input type
There are two alternative displays when setting JP1 on the PCB, U and I.
The input type is detected by JP1. When JP1 is installed in “I”, “I” will
be displayed, and the input signal range is set in current. When JP1 is
installed in “V”, “U” will be displayed, and the input signal range is set
in voltage. Please note that both JP1 and JP4 must be installed in “I” in
connection with the AC current input.
3.2 AIL - Setting of 0% input signal
Valid selections are DC current 0.0...20.0 mA, AC current 0.0...1.0
ARMS, or DC/AC voltage 0.0...250 VDC/VRMS.
See the hardware programming for correct jumper setting.
3.3 AIH - Setting of 100% input signal
Valid selections are DC current 0.0...20.0 mA, AC current 0.0...1.0
ARMS, or DC/AC voltage 0.0...250 VDC/VRMS.
See the hardware programming for correct jumper setting.
3.4 rEP - Setting of response time
Valid selections are 0.2...60.0 s.
The response time averages the input values acc. to an exponential
function. If the set response time is less than the min. response time for
the input type, then the min. response time is used.
3.5 dC - Setting of DC or AC signal input
Possible selections are DC or AC.
4.0 APP - SELECTION OF APPLICATION
4.1 FUn - Selection of function
Possible selections are:
Description of functions (selection of application)
Other manuals for 2231
1
This manual suits for next models
2
Table of contents
Other PR electronics Amplifier manuals

