Preethi INDI COOK User manual

Instruction
Manual

EveryproductthatbearsthePREETHIbrandnamehastopassaseriesofstringentquality
tests.Preethi,istheflagshipbrandofMayaAppliancesPvtLtd,reliesonitscore valuesof
consumer trust, ethics in business practices and quality in its products and services. Our
mission remains single-minded: to improve the family’s quality of life through the
superiorqualityandefficiencyofitshomeappliances.

Congratulations
on purchasing a winner
Dear Customer,
Thank you for choosing Preethi’s new Induction Cooktop. This inspired new design is another unique
product from MayaAppliances (P) Ltd., a market leader in kitchen appliances since 1978.
Preethi Induction Cooktop’s stunning contemporary design and user friendly features is the outcome of
diligent research and extensive consumer feedback. The result is a product that makes your everyday cooking fast
and flexible.
All Preethi products are designed to meet international standards in safety and quality. We encourage you
to read and store this reference guide carefully to ensure many years of trouble free and easy cooking!
Warm regards,
T. T. Varadarajan
Managing Director

2
How Induction Cooking works
An Induction Coil beneath the Ceramic Plate produces a magnetic field that causes the electrons
in the Vessel to vibrate and produce heat. The Vessel heats up the contents in it, while the
cooking surface itself does not heat up.
Benefits of
No risk of fire or electrical mishaps Auto Switch Off feature
Cool - No flame Just wipe to clean Portable-Use anywhere
Directly heats the Vessel Twice as efficient as Gas Stoves Thermostat Control
3
Antimagnetic Plate: The Ceramic Plate heats only the Vessel, while keeping the
cooking surface cool.
Soft Touch: The easy-to-use Buttons also prevent entry of water and other foreign particles.
Auto Detection : The Cooktop beeps for 60 secs if there is no Vessel or
non-magnetic Vessels or Vessels with base diameter less than 12 cms are used.
Temperature Control: If the temperature of the Vessel is excessive, the Cooktop will stop
heating until the temperature drops.
Auto Cooling : A Fan cools the Cooktop even after the “OFF” Button is pressed
(provided it is still plugged in), enabling the Cooktop to cool down very quickly.
Auto Switch Off: The Cooktop will automatically switch off if it is left ‘ON’
without attention for a long time.
accidentally
Complete Safety with
1
2
3
4
5
6

4
Know Your
CAUTION : HOT DO NOT TOUCH
100
130 160 180
200
220
240 °C
120 500 800 1000 1300
2100W
Keep warm
100
1800
1600
Timer
Preset
Temp ON/OFF
3
1. Power Cord
2. Air Vent
4.Control Panel
5. Control Knob
3. Ceramic Plate
Timer
Preset
Slow Cook Stir Fry Fry Deep Fry
Volts/Units
Braise
Boil
Soup
Hot Pot
Keep warm
100
130 160 180 200 220 240 °C
120 500 800 1000 1300 1600 1800 2100W
CAUTION : HOT DO NOT TOUCH
100
ON/OFF
Timer
Elegance
Trendy
Dial
1
2
4
4
3
1
2
6.Cooking Zone
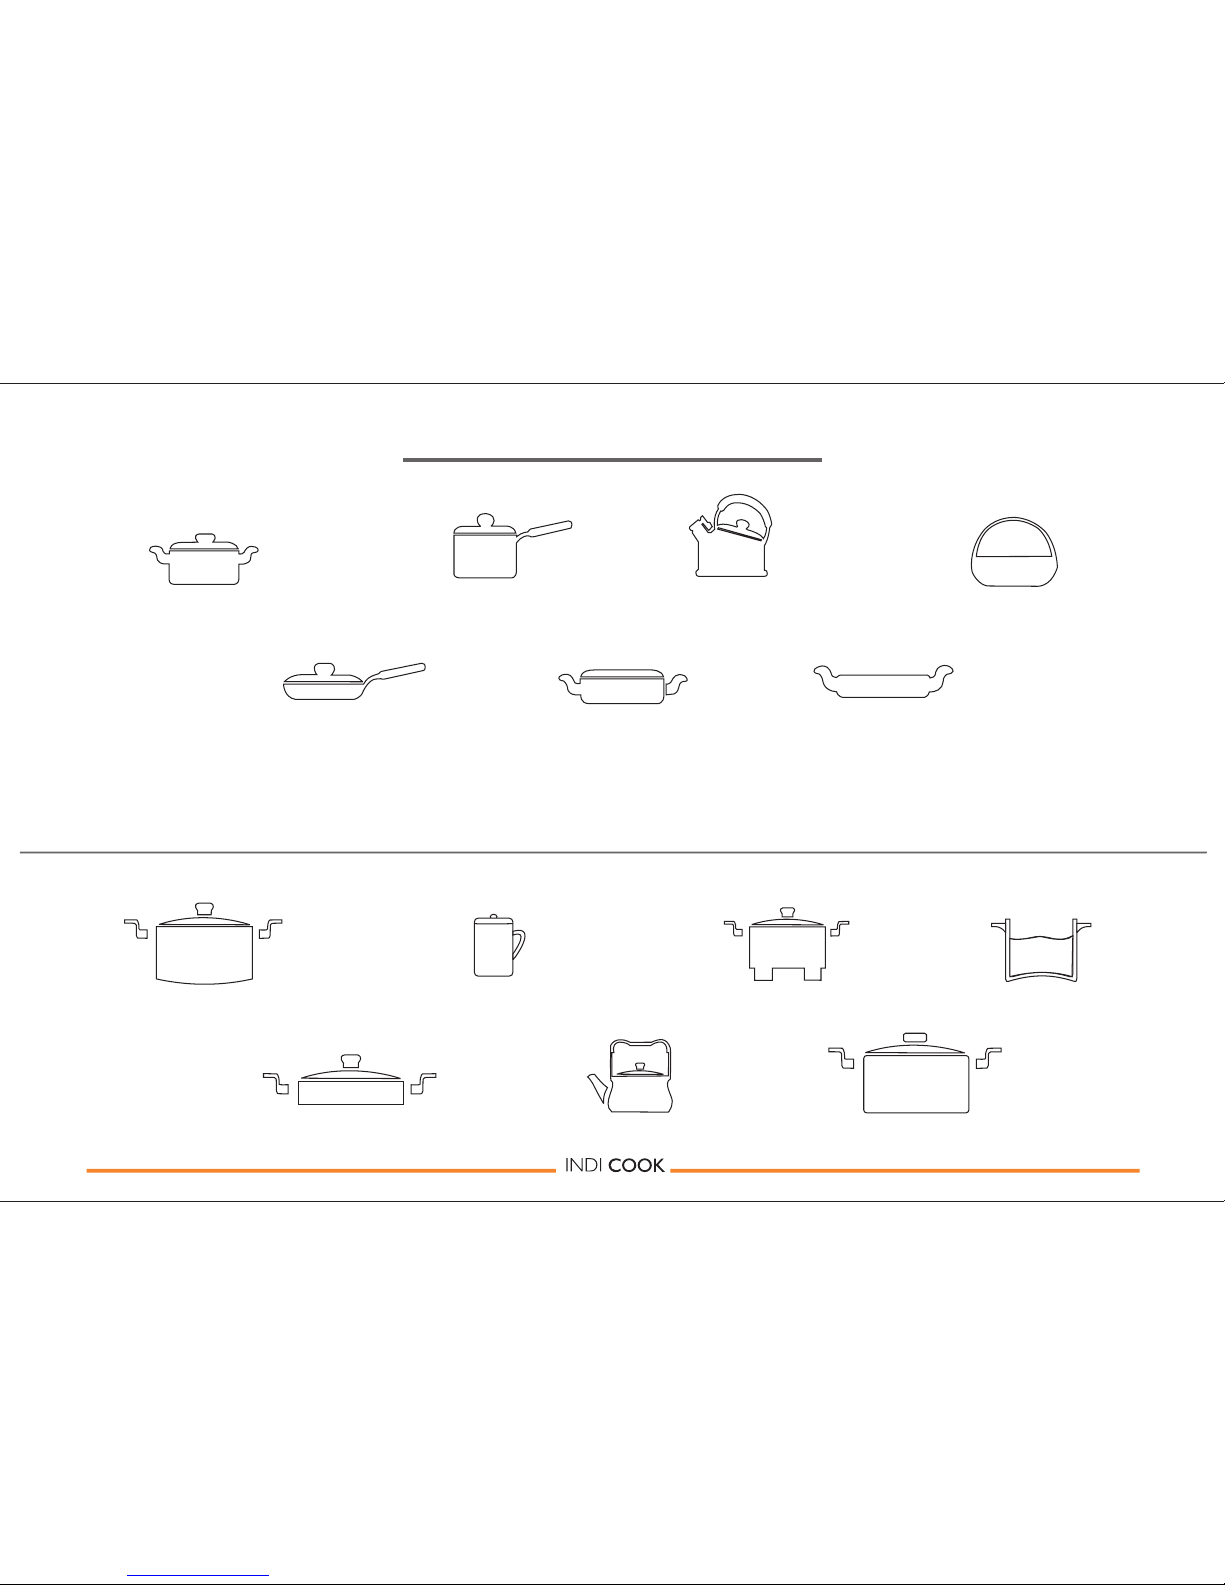
Stainless Steel Pots
Do not use
Use Only
Iron Frying Pans
?Iron and Stainless Steel Vessels with magnetic base.
?Flat base Vessels with diameter between 12 cms and 26 cms.
?The Cooktop will switch ON only if the Cookware is suitable.
Enamelled Steel
Utensils and Kettles
Enamelled Stainless
Steel Kettles
Convex bottom Pots Base Diameter
less than 11cm Pots with stands Concave base Pots
Heat-resistant Glass Pots Aluminum/Copper Pots Ceramic Pots
Iron Kettles
Iron Pans Iron Plates
Cookware
5

6
Quick Start
1. Insert the Plug firmly into socket and switch “ON”.
The Cooktop powers up with a beep and the LED display blinks once.
2. Place the Vessel at the center of the Ceramic Plate.
3. Press the “ON/OFF” Button once, the Cooktop starts with a beep and heats the Vessel.
In the Elegance and Dial models , the Cooktop switches to “Hot Pot” Mode.(Default)
In Trendy, the Cooktop heats to Level “7”.(Default)
4. In the Elegance and Trendy models, the temperature and cooking duration can be
controlled using the Buttons.
In the Dial model use the Control Knob to control temperature.
Before you switch on
?Place the Cooktop in a well ventilated area on a non-metal flat platform.
?Removing all metal, plastic and canned items near the Cooktop is recommended.
?Clean the top surface of the Ceramic Plate with a damp cloth to remove dust and spills if any.
?Make sure the ingredients are ready for cooking.
?Ensure that the power supply is 230V/50 Hz.

7
ON/OFF
Timer
Operating Instructions
?The “Timer” Button controls the cooking duration.
?Press the “Timer” Button to display the time in minutes.
?To set the time from 1 to 180 minutes, press to increase and to decrease.
Cooking Time
1. Press the “ON/OFF” Button once. The Cooktop starts with a beep and heats the Vessel
to Level “7”.
2. If there is no Vessel / non suitable Vessel, then the Cooktop will beep for 1 minute and switch “OFF”.
3. To adjust the Heat Levels from 1to 9, press to increase and to decrease.(Refer Page 13)
4. After cooking, press the “OFF” Button and remove the Vessel.
This will activate the Fan to cool the Cooktop.
Model No: IC 101

Control Panel
Control Panel
Operating Instructions
8
Model: IC 102
Model: IC 103
Model: IC 103
Model: IC 102
1. Press the “ON/OFF” Button once, the Cooktop starts with a beep and heats up the Vessel in
the “Hot Pot” cooking mode.
2. If there is no Vessel / non suitable Vessel, then the Cooktop will beep for 1 minute and switch OFF.
3. After cooking, Press the “OFF” Button and remove the Vessel.
This will activate the Fan to cool the Cooktop.
?Several “Cooking Modes” are available in the Elegance and Dial models.(Refer Page No.12 for details)
?Select the Mode which suits your requirement.
?The associated preset, timer and temperature settings can be varied using the Buttons in the
Elegance model.
In the Dial model use the Control Knob to control preset, timer and temperature.
?
Cooking “Modes”
Operating Instructions
9
10
?Press the “Timer” Button to display the cooking duration for the selected mode.
. In the Elegance & Trendy models press the Buttons to increase/decrease the duration
from 1 to 180 mins.
?In the Dial model, use the Control Knob to increase/decrease time.
The ‘Timer’ Button controls the cooking duration for the selected “Cooking Mode”.
Cooking Time
Cooking Temperature
?In the Elegance model, press the “Temp” Button and use the Buttons to increase and
decrease temperature.
?In the Dial model, use the Control Knob to increase and decrease temperature.
?The temperature can be varied from ”Keep Warm” to 240 C in increments determined by the
selected Cooking Mode.

11
?Press the “Preset” Button to display the start time for the selected Cooking Mode.
?Press the Buttons to increase/decrease the duration in mins/hrs.
In the Dial model, use the Control Knob to increase/decrease time.
The “Preset” Button in Elegance & Dial models is used to set a predetermined start time
(10 mins to 24 hrs) for the selected “Cooking Mode”.
“Preset” Mode
Press the “Volts/Units” Button, once to display power consumption in Units and twice for
Volts.
Power Consumption (Dial model only)
For instance, if you want to heat milk for your coffee after 8 hours, just select “Milk” Mode
and set the preset to 08:00 hrs. The Cooktop will automatically switch “ON” after 08:00 hrs,
in the “Milk” Mode.

Cooking “Modes”
12
This is the most common mode used for all kinds of cooking. In this mode the Cooktop
will provide high heat for 2 mins to allow food to heat up quickly. The Cooktop then
switches to a lower heat setting and maintains temperature between 160 C & 220 C.
In these modes the Cooktop will start functioning on high heat for about 2 mins and
then switch to medium heat. Once the food is Cooked it automatically goes to “Keep
Warm” mode.
This is applicable to high temperature cooking. The heating temperature can only be
reduced since the Default temperature in high.
This mode is suitable for reheating milk and maintaining it at a temperature of around
70 C. To boil milk use the Hot Pot mode.
Use this mode to quickly boil water. Ensure that the volume of water being boiled
is between 30% & 80% of the Vessel.
This is ideal for foods that need to be cooked at low temperature for a long time.
In this mode the Default Temperature of 100 C cannot be changed. The Default
Duration of 3 hrs can be changed. However the minimum time is 30 min.
Hot Pot
Soup/Braise
Stir Fry/Fry/
Deep Fry
Milk
Boil/Water Boil
Slow Cook
Mode Working Procedure

Cooking “Modes” Heat Levels
13
Heat Levels Recommended Use
Bring liquid to a boil/
9
Start food cooking.
7 - 8 Quick brown or sear food.
6 - 7 Hold a rapid boil.
Fry poultry or meat.
5 - 6 Cook gravies, soups,
and sauces.
Maintain a slow boil.
4 - 5 Stew or steam food.
2 - 5 Simmer
1 Keep warm
Hot Pot 2 hours
Soup 2 hours
Braise 1 hour
Stir Fry 1 hour
Fry 3 hours
Milk 20 mins
Deep Fry 1 hour
Boil/Water Boil -
Slow Cook 3 hours
Mode Default Duration*
Note for Dial & Elegance Models:
1. You can change the Default Temperature from"Keep Warm to 240 C and the Default Duration
from 1 to 180 mins as required by pressing Buttons in the Elegance model. In the Dial
model, use the Control Knob.
2. If you do not make any changes in the Default Temperature and Default Duration, the food
may burn.

Maintenance & Cleaning
1.
.
Clean after every use.
Before cleaning, disconnect Plug and wait till the Cooktop cools down completely
2. Clean the Cooktop and the Control Panel with a damp cloth.
3. Do not wash or immerse C
ooktop in water.
4. Use clean Pots/Vessels to avoid discolouration or stains on the Ceramic Plate.
5. To clean the Ceramic Plate, first wipe it with a wet cloth and then with a sponge using mild detergent.
Finally wipe it dry with a soft cloth.
6. Keep the Cooktop clean to avoid trapping insects into the Fan.
This might cause malfunction.
14

15
Caution: Persons with a pacemaker or similar medical device should exercise caution when using or standing near an induction unit while it is in operation. The electromagnetic field
may affect the working of the pacemaker or similar medical device. It is advisable to consult your doctor or the pacemaker manufacturer about your particular situation.
Important Safety Instructions
1.
2.
4.
6.
8.
5.
3.
7.
1.
2.
3.
4.
5.
6.
7.
8.
9.
10.
11.
12.
Ensure that the power supply is 230 V 50 Hz.
Ensure that the Power Cord is plugged firmly into the power
socket.
Place the Cooktop in a well ventilated area and on a flat platform.
Keep the Cooktop away from other heat sources - stove, burner,
ovens etc. and direct sunlight. Avoid exposure to extreme heat and
moisture.
Keep the top surface of the Cooktop clean and free from any
foreign particles and water droplets / other fluids.
Use only Iron and Steel Vessels for cooking.
Pay attention to foods being fried at high/medium temperatures.
Always heat oil slowly, and watch as it boils before deep
frying.
Unplug the Power Cord from the socket after cooking, while
cleaning and when not in use.
Keep the Cooktop away from the reach of children.
Do not place the Cooktop too close to the wall and other large objects.
Do not touch the Ceramic Plate while cooking and even after removing
theVessel, to avoid injuries.
Do not use the Cooktop and other large power electric appliances from the
same power socket simultaneously.
Do not bring any electric, electronic gadgets and canned foods near the
Cooktop.
Do not keep cloth, paper or any flammable materials near Cooktop.
Do not heat an empty Vessel.
Do not move the Cooktop along with the Vessel, while and immediately after
cooking.
Do not handle the Power Cord and Plug with wet hands.
Do not clean the Cooktop immediately with water after cooking, as the
ceramic plate may crack.
Do not use the Cooktop for commercial purposes, as it is designed for
domestic use only.
Do not use the Cooktop if any damage like cut, crack, burn, etc. is found
on Power Cord / Plug / Ceramic Plate.
Do not tamper or attempt to repair the Cooktop on your own. In the event of
any malfunction contact our Customer Care Centre immediately for support.
Do’s Don’t s
9.
10.

Symptom Reason Action
The Power Cord is not
properly plugged.
Plug the Power Cord into the
power socket properly.
Vessel material or size is
not suitable.
Ensure the Vessel is made of
Steel or Iron base and has a
base diameter larger than
12 cm.
Vessel is not placed in the
center of the Ceramic Plate.
Place the Vessel in the centre
circle of the Ceramic Plate.
Vessel temperature is very high. Wait till the Vessel cools down.
Once the set temperature is
reached, the Thermostat will
switch OFF the power.
If required, reset the
temperature and start cooking.
Cooktop stops working
after successive short beeps.
The heating stops abruptly
when cooking.
No beep after power is
switched on.
No display on the
Display Panel.
Troubleshooting
16

Symptom Reason Action
Very high internal temperature
or over Ceramic plate.
Internal failure. Contact Customer Care.
If failure code is E7 or E8.
If failure code is E3 or E6.
Voltage either too high or too low. Wait until the Voltage
becomes normal.
Switch off the Cooktop.
Switch on, after the Cooktop
cools down.
If failure code is E1, E2, E4,
E5, Eb and Ec.
Vessel is not getting heated
up to the required
temperature/setting.
The bottom of the Vessel is not flat. Use flat bottom Vessel only.
If the Cooktop is not heating or the Buttons are non-responsive then
immediately for support.
contact our Customer Care Centre
Troubleshooting
17
Technical Specifications
In pursuance of our policy of continuous product improvement, specifications are subject to change without notice.
Voltage: 230V AC 50 Hz
1 Year Warranty
Trendy IC - 101 Elegance IC - 102
Model :Dial IC - 103
Rated Power (Watts) :2000 2100 2100
Power Adjustment ( )Watts :120 - 2000 120 - 2100 120 - 2100
Gross Weight (Kgs) :2.3 2.5 2.6
Min. side space ( )Cms :12 12 12
Product Size ( )Cms :34 x 27.5 x 6 36 x 30 x 5.6 39 x 29 x 5.6
Carton Size ( )Cms :40 x 33 x 11 42 x 35 x 11 45 x 34 x 11
Power Cord length ( )Cms :140 140
140
Heating area (Cms) :28 x 27 27 x 27
28 x 25
18
Table of contents
Other Preethi Cooktop manuals


