Premium Ambienti PBS762 User manual

1
2
Environmental note
This appliance is marked according to the European directive
2012/19/EU on Waste electrical and Electronic Equipment(WEEE).
By ensuring this product is disposed of correctly, you will help
prevent potential negative consequences for the environment
and human health, which could otherwise be caused by
inappropriate waste handling of this product.
The symbol on the product, or on the documents
accompanying the product, indicates that this appliance may
not be treated as household waste. Instead it shall be handed
over to the applicable collection point for the recycling of
electrical and electronic equipment.
Disposal must be carried out in accordance with local
environmental regulations for waste disposal.
For more detailed information about treatment, recovery and
recycling of this product, please contact your local city office,
your household waste disposal service or the shop where you
purchased the product.
oThe packaging materials that uses are environmentally
friendly and can be recycled.
oPlease discard all packaging material with due regard for
the environment.

3
Important safety information
General Information
oIMPORTANT: The adjacent furniture and all materials used
in the installation must be able to withstand a minimum
temperature of 85°C above the ambient temperature of the
room it is located in, whilst in use.
oCertain types of vinyl or laminate kitchen furniture are
particularly prone to heat damage or discolouration at
temperatures below the guidelines given above.
oAny damage caused by the appliance being installed in
contravention of this temperature limit, will be the liability
of the owner.
oYou should not use this appliance to store items on or as a
work surface.
oRepairs may only be carried out by service engineers or
their authorised service agent.
Child Safety
ostrongly recommend that babies and young children are
prevented from being near to the appliance and not
allowed to touch the appliance at any time. During and
after use, all surfaces will be hot.
During use
oAny film or stickers that are present on the hob surface
when it is delivered should be removed before use.
oCare should be used when utilising the appliance,
otherwise there is a risk of burns being caused.
oYou should not allow the electrical connection cables to
come into contact with the hob surface when it is hot or
any hot cookware.

4
oIf fat and oil overheats, then it can ignite extremely quickly.
For this reason, when cooking with fat and oil the
appliance should not be left unattended.
oMake sure that all of the cooking zones are switched off
after use.
Cleaning
oCleaning of the hob should be carried out on a regular
basis.
oIMPORTANT: Before attempting to clean the appliance, it
should be disconnected from the mains and cool.
oGreat care should be taken whilst using this appliance and
when following the cleaning procedure.
oYou should not use a steam jet or any other high pressure
cleaning equipment to clean the appliance.
Installation
This appliance must be correctly installed by a
GASSAFE registered installer, strictly in
accordance with the manufacturer’s
instructions and the relevant standards of local.
Please see the specific section of this booklet
that refers to installation.
odeclines any responsibility for injury or damage, to person
or property, as a result of improper use or installation of
this appliance.
oIf the appliance is being used in a Leisure Accommodation
Vehicle, the requirements of the local regulations MUST be
followed.

5
oDO NOT recommend that this appliance is installed on any
type of marine vessel.
Declaration of conformity
This appliance complies with the following European Directives:
-2014/35/EU General regulations / Low tension
-2009/142/CE Concerning gas appliances
-1935/2004/CE 90/128/EEC This appliance is suitable to come
in contact with food
-2014/30/EU Electromagnetic compatibility
6
Specifications
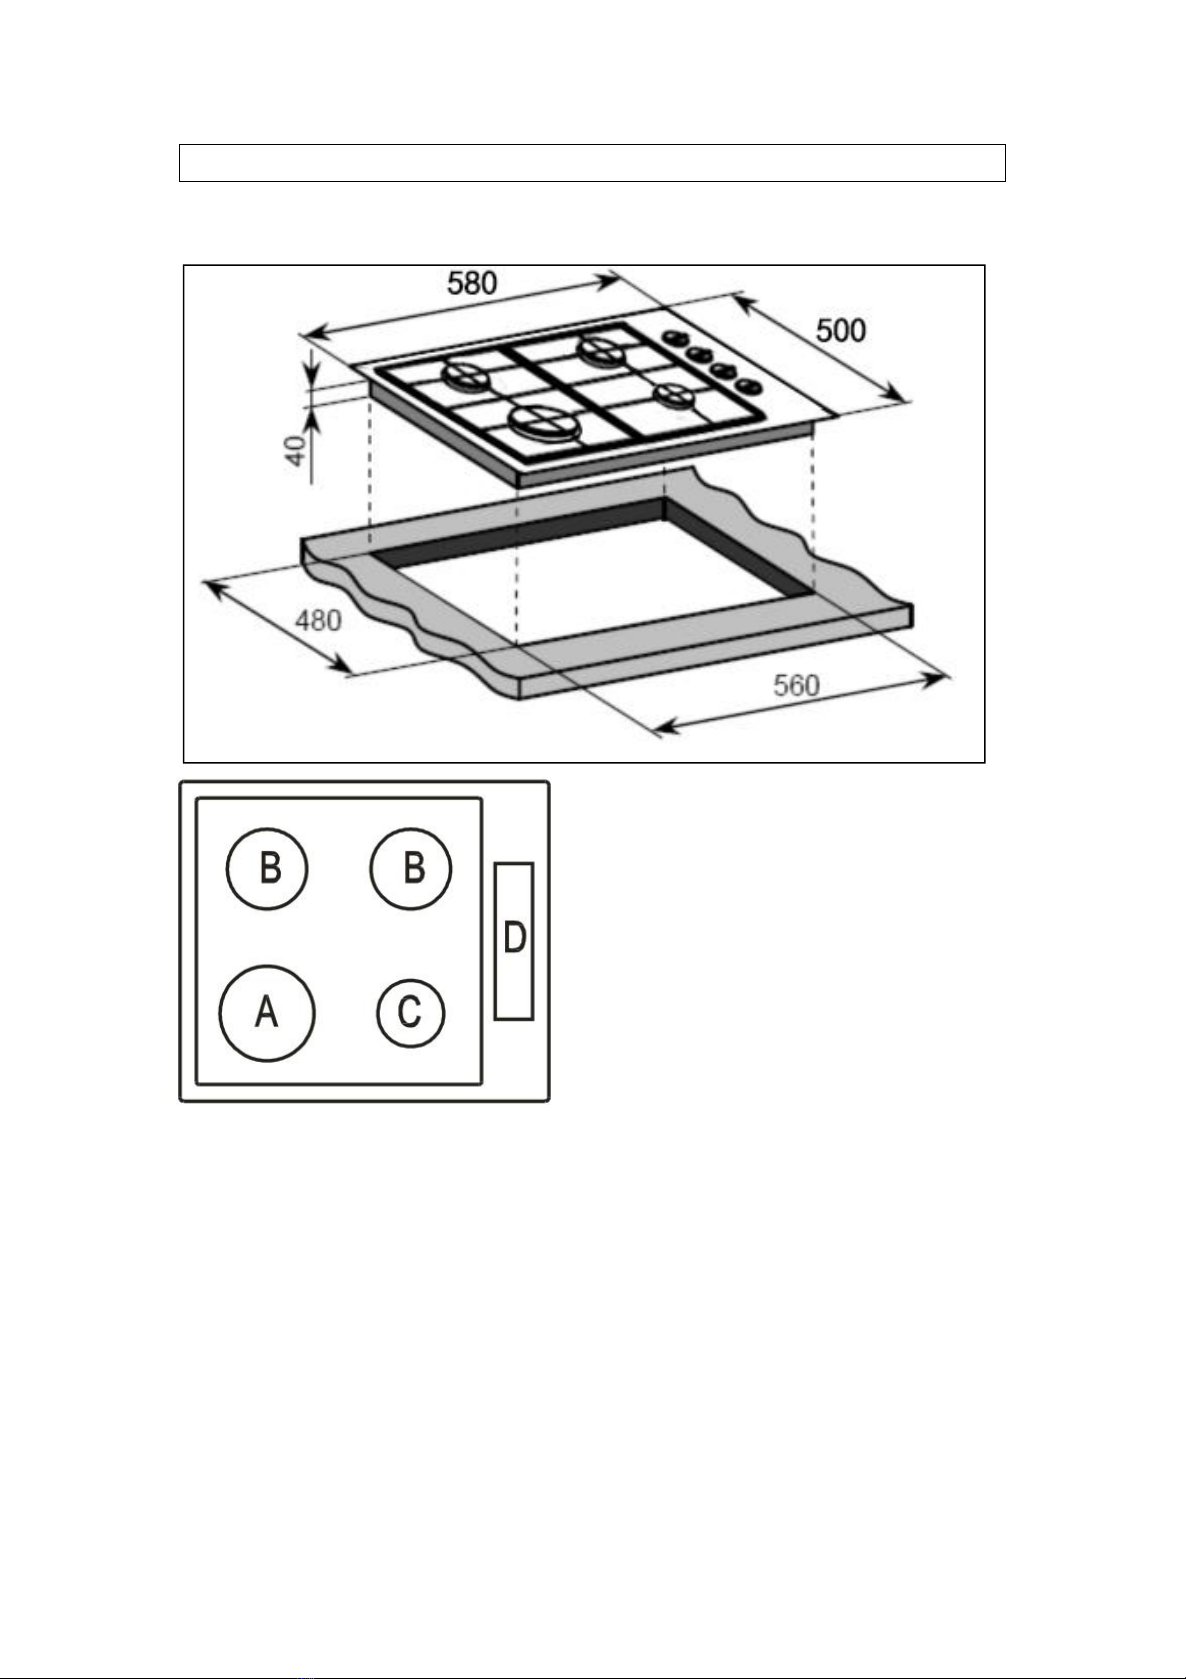
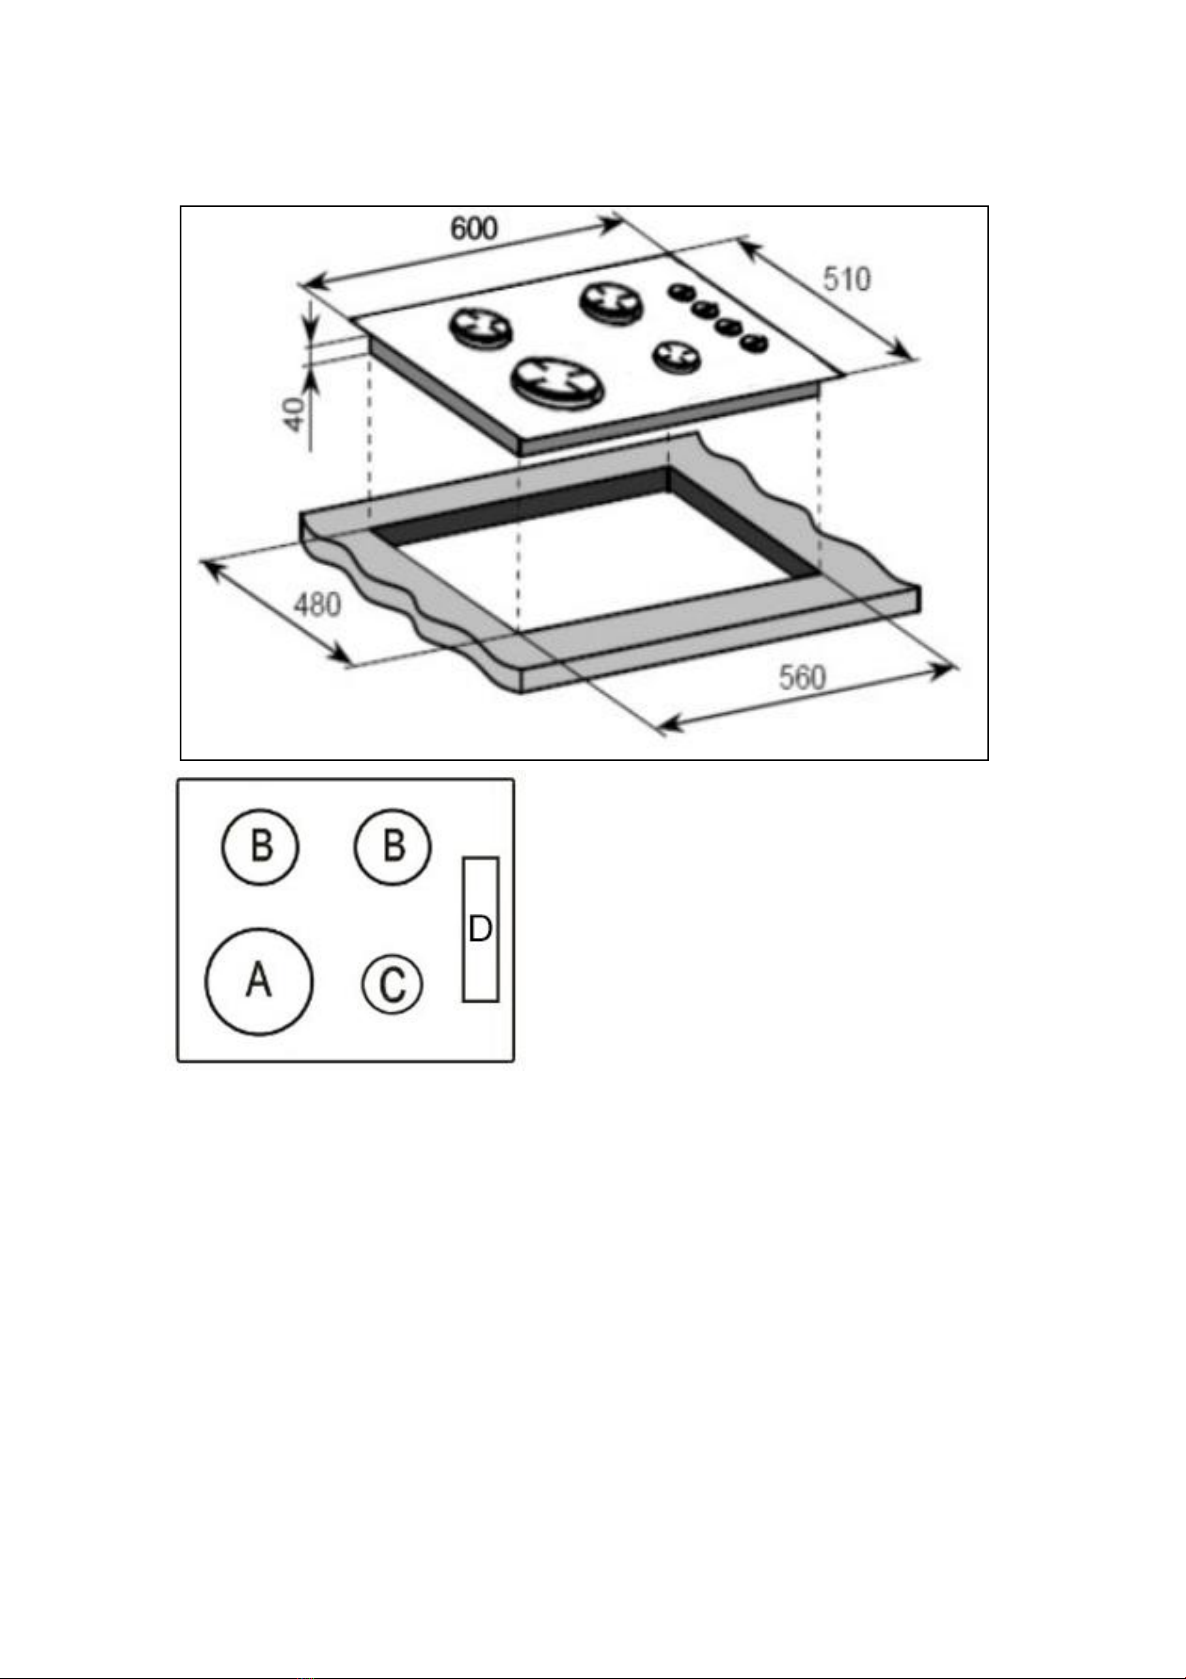
PBS762
Product specifications:
A = 1 x 3.5 KW Wok burner
B = 2 x 1.75 KW semi-rapid burners
C = 1 x 1.0 KW auxiliary burner
D = Control panel
oRight control operation
oAutomatic ignition
oHeavy duty cast iron pan stands
7
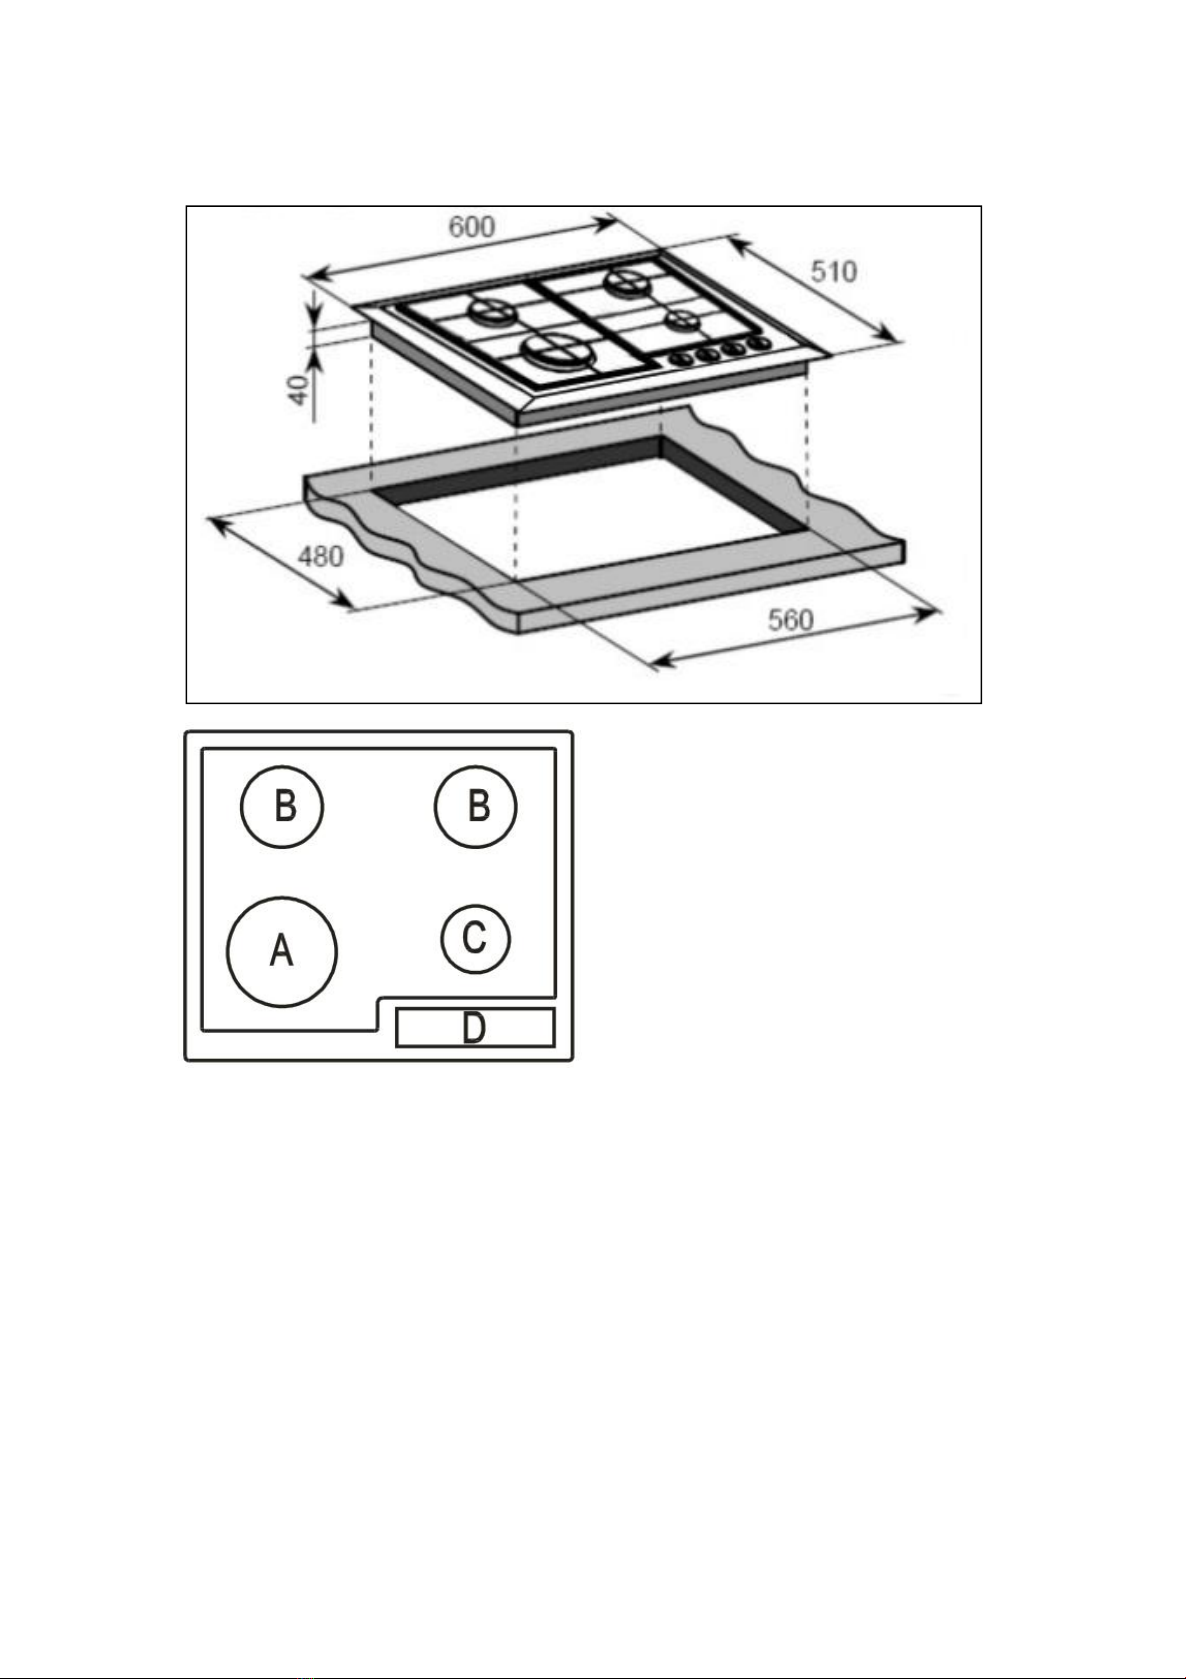
PBS763
Product specifications:
A = 1 x 3.50 kW WOK burner
B = 2 x 1.75 KW semi-rapid burners
C = 1 x 1.00 kW auxiliary burner
D = Control panel
oFront control operation
oAutomatic ignition
oHeavy duty cast iron pan stands
8
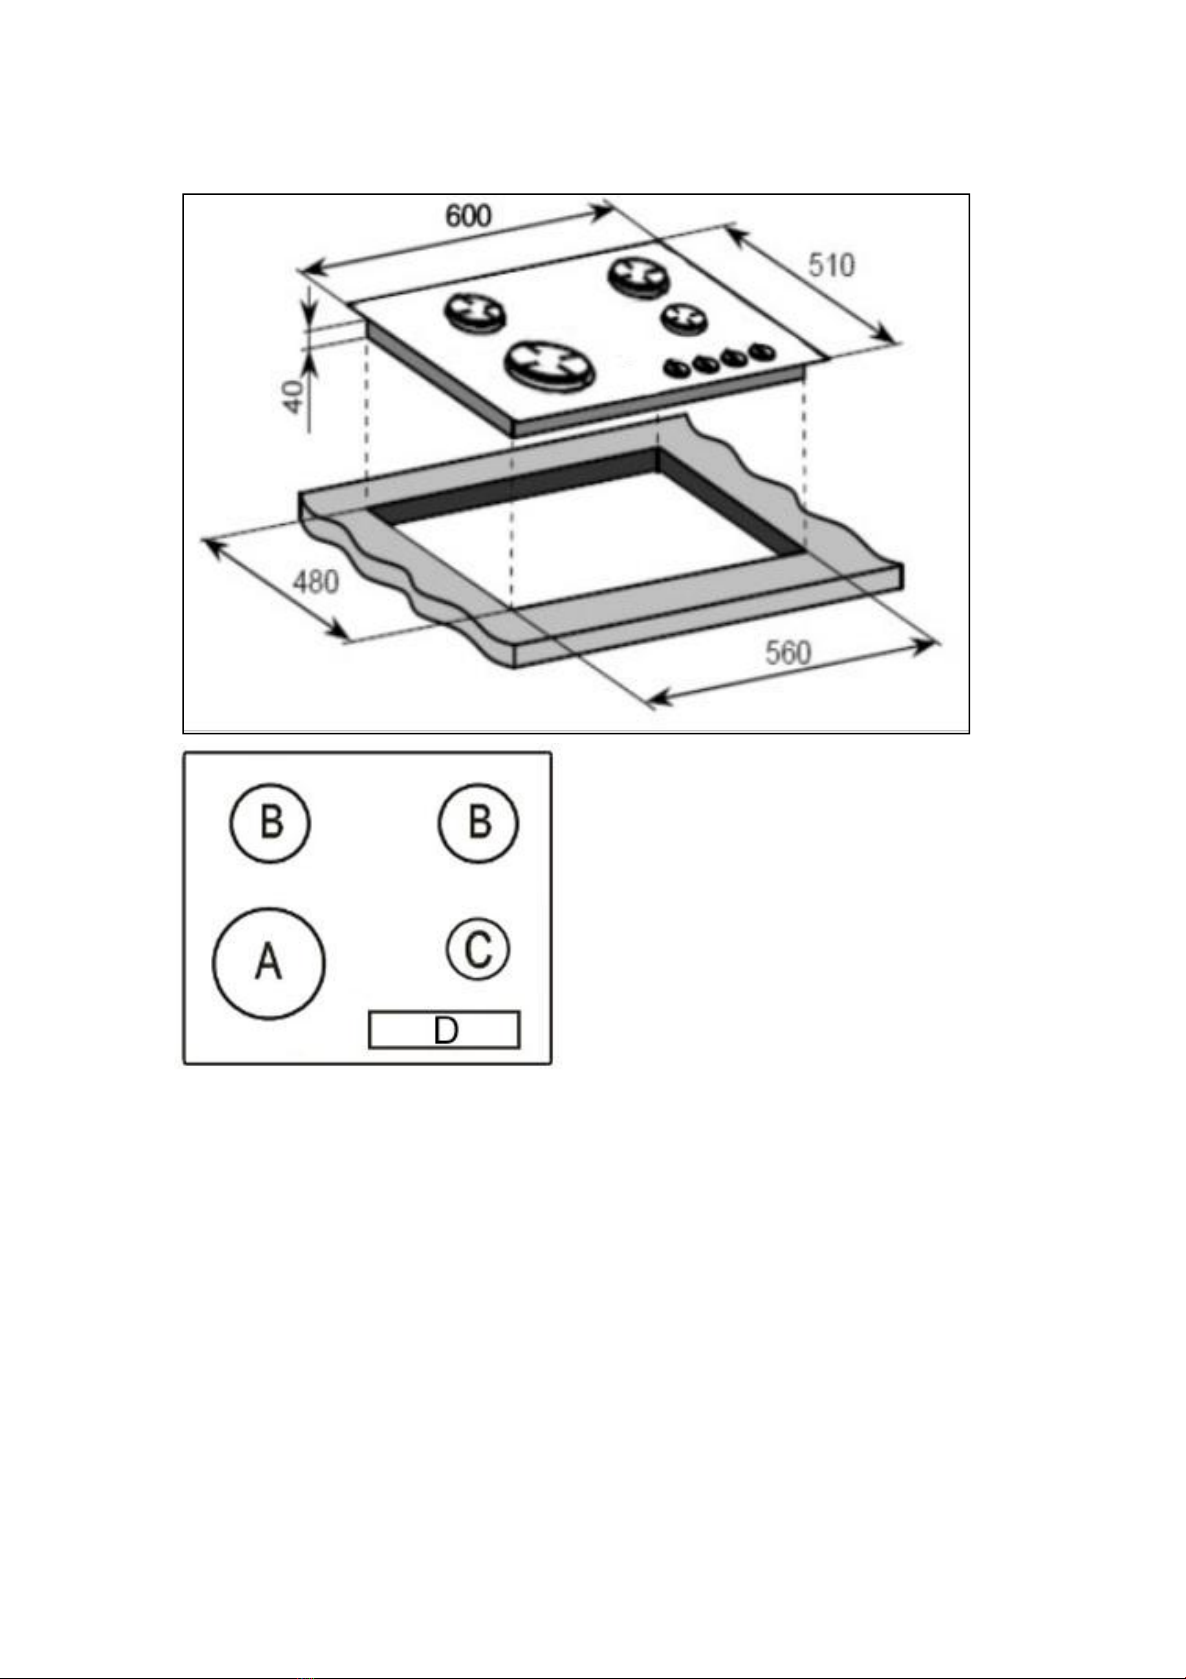
PBS764
Product specifications:
A = 1 x 3.50 kW WOK burner
B = 2 x 1.75 KW semi-rapid burners
C = 1 x 1.00 kW auxiliary burner
D = Control panel
oFront control operation
oAutomatic ignition
oHeavy duty cast iron pan stands
9
PBS765
Product specifications:
A = 1 x 3.50 kW WOK burner
B = 2 x 1.75 KW semi-rapid burners
C = 1 x 1.00 kW auxiliary burner
D = Control panel
oFront control operation
oAutomatic ignition
oHeavy duty cast iron pan stands

10
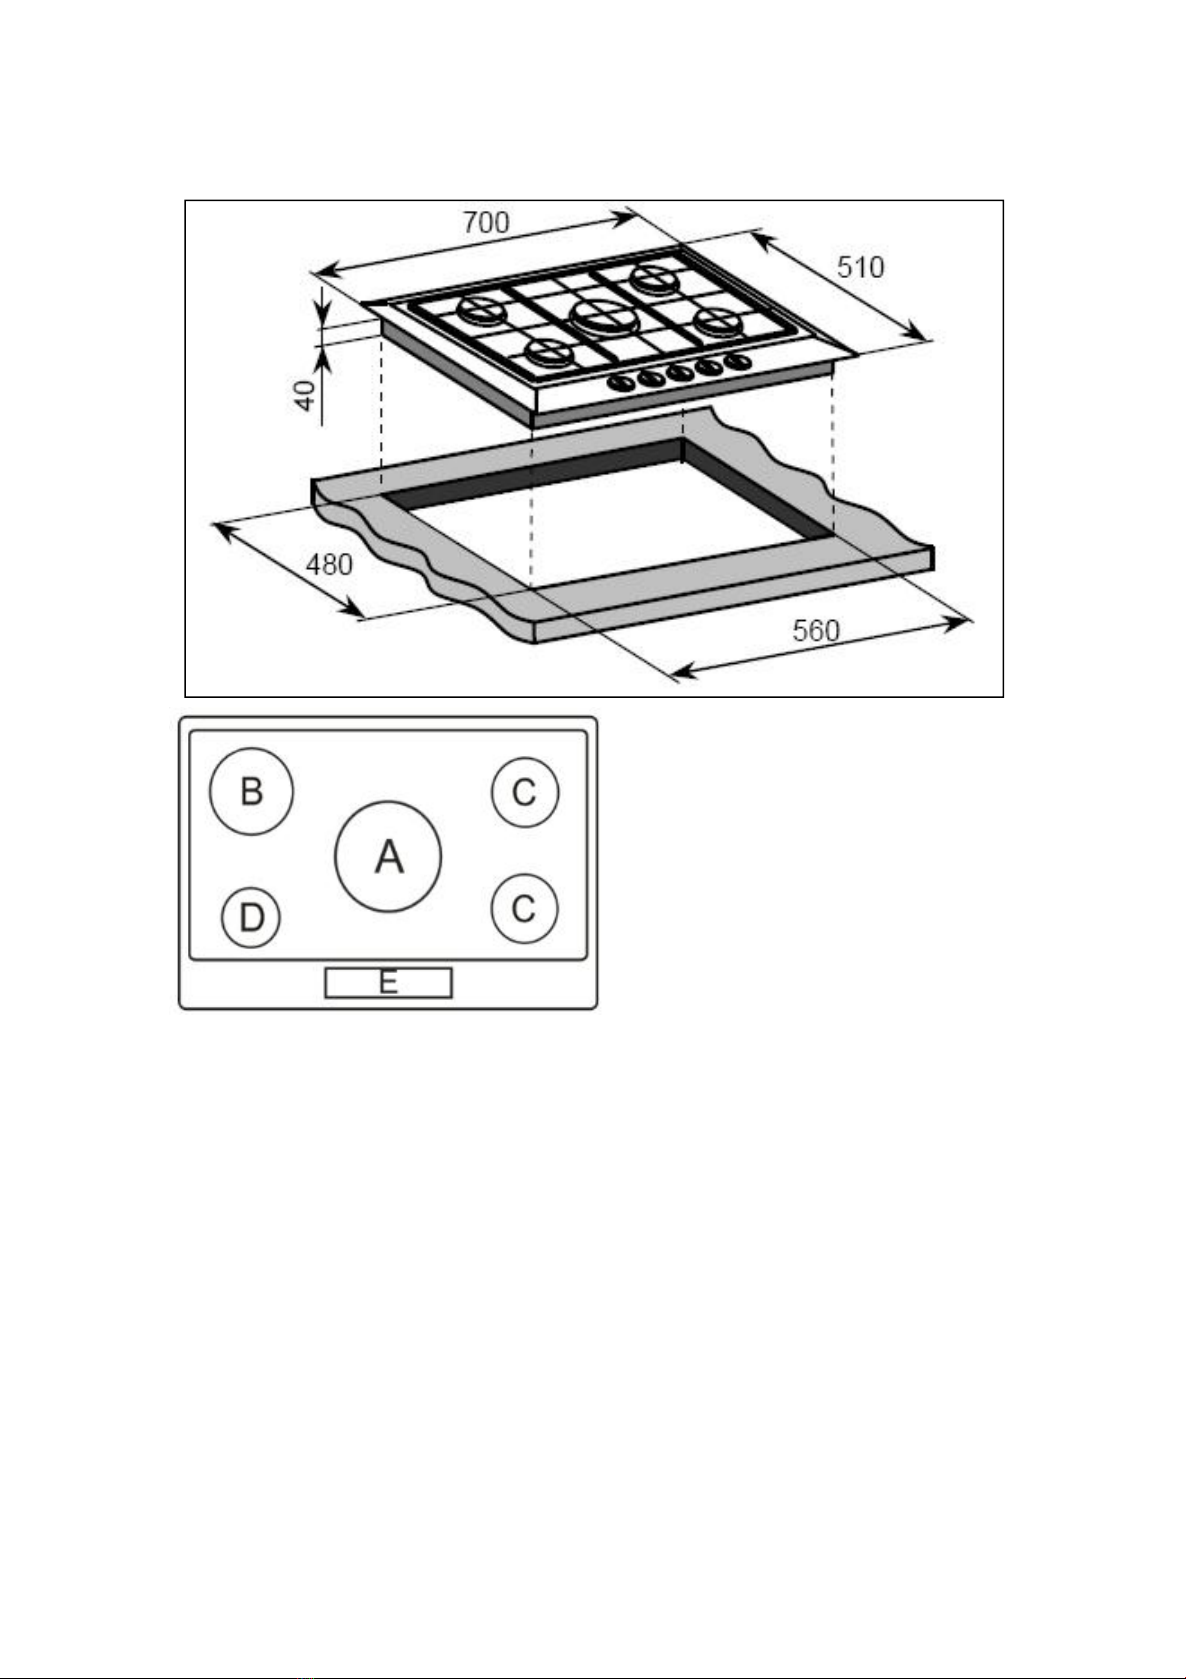
PBS810GH
Product specifications:
A = 1 x 3.50 kW Wok burner
B = 1 x 3.00 KW rapid burner
C = 2 x 1.75 KW semi-rapid burners
D = 1 x 1.00 kW auxiliary burner
E = Control panel
oFront control operation
oAutomatic ignition
oHeavy duty cast iron pan stands
11
PBS812SH
Product specifications:
A = 1 x 3.50 kW Wok burner
B = 1 x 3.00 KW rapid burner
C = 2 x 1.75 KW semi-rapid burners
D = 1 x 1.00 kW auxiliary burner
E = Control panel
oFront control operation
oAutomatic ignition
oHeavy duty cast iron pan stands

12
Electrical details
Rated Voltage: 115 Vac 60 Hz
Supply Connection: 3A (double pole switched fused outlet
with 3mm contact gap)
Max Rated Inputs: 0.0008 kW
Mains Supply Lead: 3 core x 0.75mm² (Type RR-F <HAR>
marked)
Gas details
Type: Alternative LPG G30 (28~30 mbar)
Using the gas hob
Before first use
IMPORTANT: You should clean the hob surface (see
“Cleaning and maintenance” section).
Switching the hob on
The following symbols will appear on the control panel, next to
each control knob:
= gas off
Large flame: maximum setting
Small flame: minimum setting
oThe minimum setting is at the end of the anti-clockwise
rotation of the control knob.
oAll operation positions must be selected between the
maximum and minimum position.
13
oNever select a knob position between the maximum and
off position.
oThe symbol on the control panel, next to the control knob
will indicate which gas burner it operates.
oIn case of power failure, the burners can be lit by carefully
using a match.
Energy saving tips
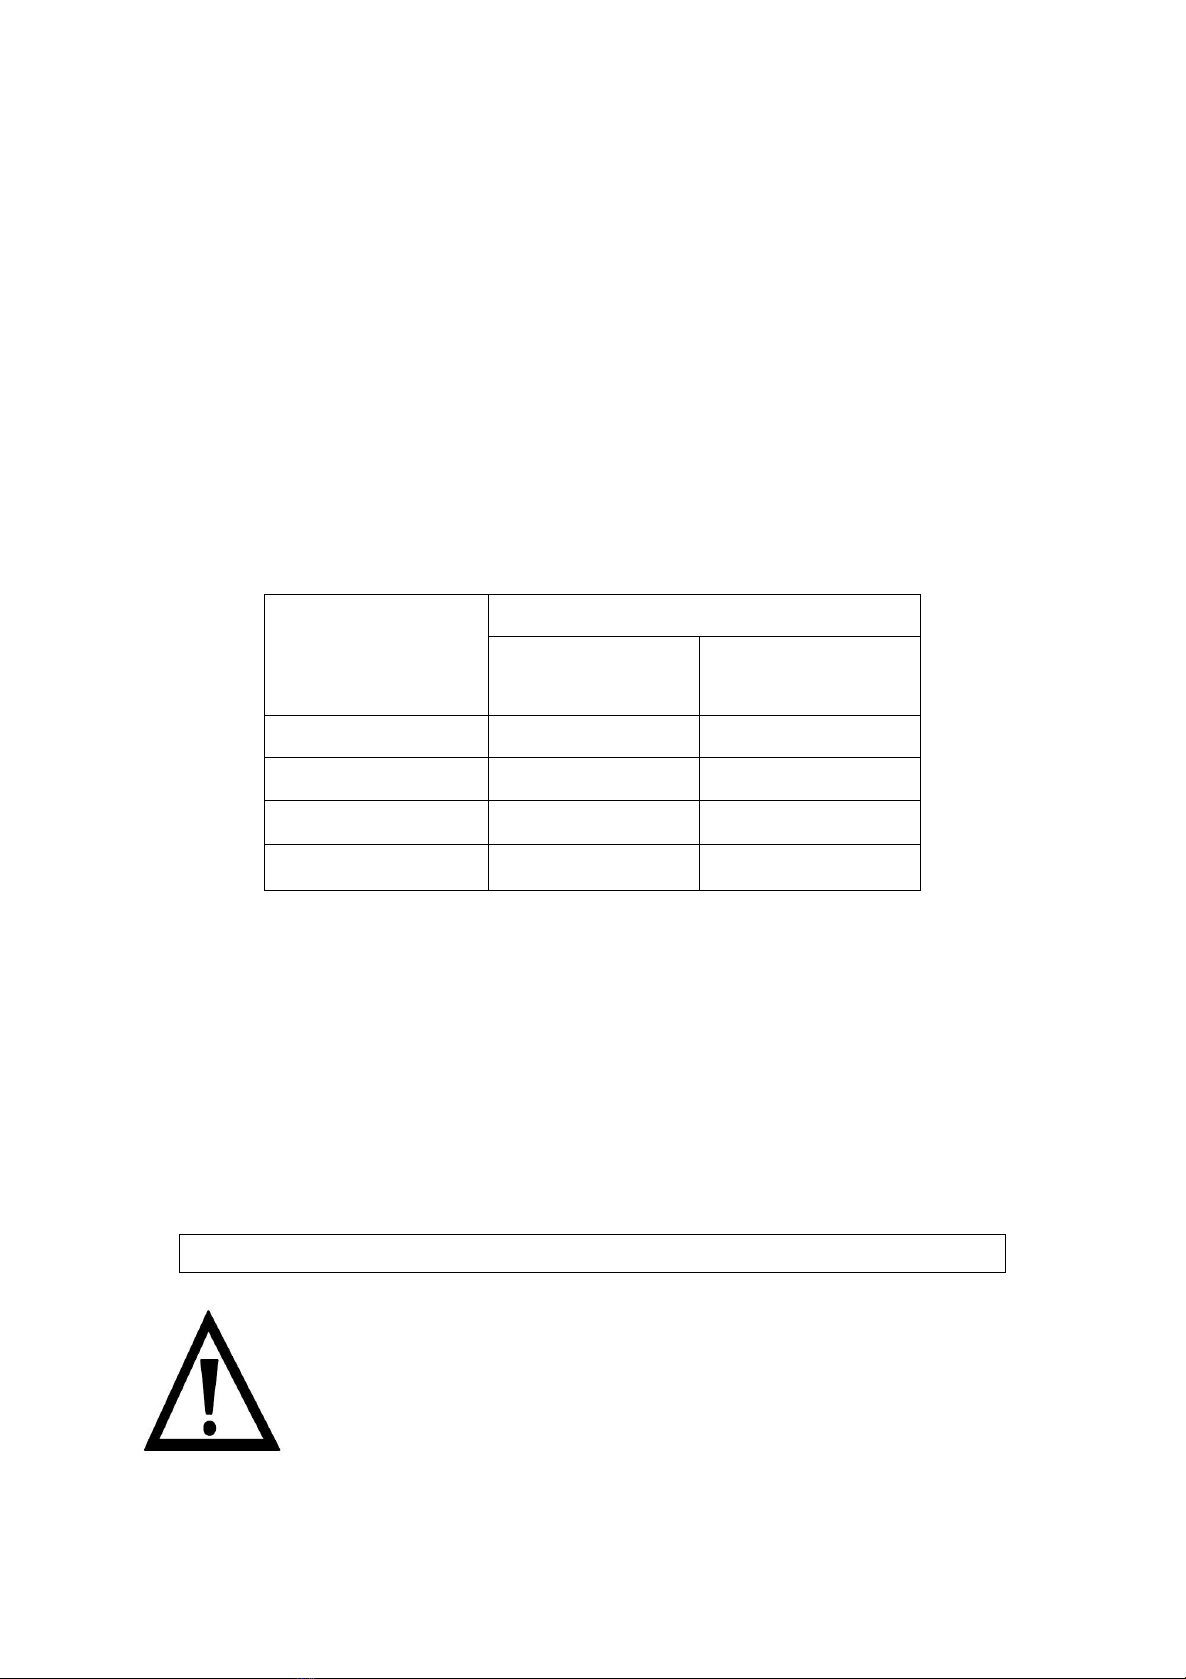
BURNERS
PANS
Minimum
diametre
Maximum
diametre
Wok
220 mm
260 mm
Rapid
180 mm
220 mm
Semi-rapid
120 mm
200 mm
Auxiliary
80 mm
160 mm
oThe diametre of the bottom of the pan should correspond
to that of the burner.
oThe burner flame must never extend beyond the diametre
of the pan.
Cleaning
Cleaning operations must only be carried out when the
hob is cool.
The appliance should be disconnected from your mains
supply before commencing any cleaning process.

14
Cleaning the hob top
Any residues that are left on the hob top surface from
cleaning agents will damage it. You should remove any
residues with warm soapy water.
Abrasive cleaners or sharp objects will damage the hob
surface; you should clean it using warm soapy water.
Although it is easier to clean some deposits whilst the
hob surface is still warm. Make sure that the hob surface,
pan supports and hob burners have all cooled sufficiently
before you attempt to touch them.
After each use
oRemove the pan stands and wipe the appliance over with a
soft, damp cloth that has been put into warm soapy water.
The cloth should be wrung out after being taken out of the
soapy water.
oDry the appliance by rubbing the surface with a soft, clean
cloth.
Installation
The installation must be carried out by a GASSAFE
registered installer, in accordance with the current
version of the following.
oGas Safety Regulations (Installation & Use)
oBuilding Regulations (issued by the Department of
Environment)
oBuilding Standards (Issued by the Scottish Development
Department)

15
oIEE Wiring Regulations
oElectricity at Work Regulations BS 6172
oInstallation of Domestic Gas Cooking Appliances (if
necessary, BS 5482 Installation of Domestic LPG Appliances)
oBS 5440 Installation of Flues and Ventilation for Gas
Appliances
Positioning
The adjacent furniture must be able to withstand a
minimum temperature rise of 85°C above the
ambient temperature of the room it is located in,
during periods of use.
oThis appliance can be located in a kitchen, a kitchen diner
or a bed sitting room. IMPORTANT: The appliance must not
be installed in a bathroom or shower room.

16
oThis appliance is classified as Class 3 and therefore is to be
built into a kitchen unit (depending on size) or 600mm
worktop, providing the following minimum distances are
allowed:
oThe edges of the hob must be a minimum distance of 55
mm from a side or rear wall.
o700 mm between the highest point of the hob surface
(including the burners) and the underside of any horizontal
surface directly above it.
o400 mm between the hob surface, providing that the
underside of the horizontal surface is in line with the outer
edge of the hob. If the underside of the horizontal surface
is lower than 400 mm, then it must be at least 50 mm
away from the outer edges of the hob.
o50 mm clearance around the appliance and between the
hob surface and any combustible materials.
All models
oIMPORTANT: You must have a gap of at least 25 mm
between the underneath of the appliance and any surface
that is below it.

17
oCarefully turn the hob upside down and place it on a
cushioned mat.
oApply the sealing strip (A) provided around the edge of the
appliance.
oThe protective covering must be removed from both sides.
oDo not leave a gap in the sealing agent or overlap the
thickness.
oIMPORTANT: Do not use a silicon sealant to seal the
appliance against the aperture. This will make it difficult to
remove the hob from the aperture in future if it needs to
be serviced.
(A) Sealing strip
(B) Clamp
(C) Screw
oPlace the clamp (B)
over the holes that
match the size of the
screws. There are one
set of screw holes in
each corner of the hob. Slightly tighten a screw (C) through
the clamp (B) so that the clamp is attached to the hob, but
so that you can still adjust the position of it.
oCarefully turn the hob back over and then gently lower it
into the aperture hole that you have cut out.
oOn the underneath of the hob, adjust the clamps into a
position that is suitable for your worktop. Then fully
tighten the screws (C) to secure the hob into position.
18
Gas connection
This appliance must be installed by a competent
person in accordance with the current versions of
the Local Regulations and Safety Standards .
Important information
oThis hob is supplied to run on LPG only and cannot be used
on any other type of gas without modification.
oThe hob must be installed by a qualified person, in
accordance with the current edition of the Gas Safety
(Installation and Use) (Amendment) Regulations and the
relevant building/I.E.E. Regulations.
oFailure to install the appliance correctly could invalidate
guarantee and lead to prosecution under the regulations
quoted above.
oGas pressure may be checked on a semi-rapid hob burner.
Remove the appropriate injector and attach a test nipple.
Light the other burners and observe that the gas pressure
complies with the gas standards in force.
oIMPORTANT: On completion carry out a gas soundness test.
Gas Safety (Installation and Use) Regulations
oIt is the law that all gas appliances are installed by
competent persons in accordance with the current edition
of the Gas Safety Installation and Use Regulations.
oIt is in your interest and that of safety to ensure
compliance with the law.
oThe cooker must be installed in accordance with the local
regulations. Failure to install the hob correctly could

19
invalidate the warranty, liability claims and lead to
prosecution.
oGas pressure may be checked on a semi-rapid hob burner.
Remove the appropriate injector and attach a test nipple.
Light the other burners and observe that the gas pressure
complies with the gas standards in force.
oIMPORTANT: On completion carry out a gas soundness test.
General injectors
GENERAL INJECTORS TABLE
Kind of gas
Nozzle
mm/100
Burners
Power (in watts)
Max.
Min.
L.P.G.
Butane
Propane
94
87
65
51
Wok
Rapid
Semi-rapid
Auxiliary
3500
3000
1750
1000
1300
700
400
350
oReassemble all the burners carefully; in particular you
should make sure that the flame spreader is correctly
placed on the burner.
oIMPORTANT: The minimum flow adjustment process must
be completed before the appliance is next used.
Gas tap maintenance
These maintenance operations MUST ONLY be carried
out by a GASSAFE registered engineer.
IMPORTANT: Before carrying out any maintenance operations,
disconnect the appliance from the gas and electricity supplies.
If a gas tap becomes stiff to operate, then you should proceed
as follows:

20
oRemove the control knobs, pan supports, burners, hob
fixing screws and clamps.
oRemove the hob from the worktop and remove any
underside protective covers.
oDisconnect the fixings holding the tap to the fascia panel
and separate the assembly. Then clean the cone and
seating, with a cloth dampened with solvent.
oLightly smear the cone with high temperature grease,
reassemble into position and rotate a few times.
oRemove the cone again and remove any excess grease,
making sure that the gas ducts are not obstructed with
grease.
oCarefully reassemble the components and perform a gas
soundness test.
oIf it becomes necessary to replace a gas tap, then you
should proceed as follows:
oRemove the control knobs, pan supports, burners, hob
fixing screws and clamps.
oRemove the hob from the worktop and remove any
underside protective covers.
oDisconnect the fixings holding the tap to the fascia panel
and separate the assembly.
oDisconnect the gas pipe from the gas tap, and then
disassemble them from the gas rail by removing the fixing
screws.
oWhen fitting a new tap, ensure that a new gasket is used.
oReconnect the gas tap, perform a gas soundness test and
then reassemble the hob.
This manual suits for next models
5
Table of contents
Languages:
Popular Cooktop manuals by other brands


Bosch
Bosch NIT8065UC - Strips 800 30" Induction Cooktop use and care manual

Kenmore
Kenmore 43420 Use Use, care, safety manual

Electrolux
Electrolux E36GC65ESS - 30"""" Drop-in Gas Cooktop installation instructions

Philco
Philco PHD 32 BP user manual

Frigidaire
Frigidaire FGC36S9H Factory parts catalog

Bosch
Bosch NGT Series installation manual

Fisher & Paykel
Fisher & Paykel ELBA CI604ELTB installation instructions

Brandt
Brandt BPV6421B user guide

KitchenAid
KitchenAid KGCP467JSS07 parts list

Omega
Omega OCI64B Installation, operation and maintenance instructions

Suburban
Suburban SRNA3 SERIES Installation, operation and service manual

GE
GE Profile PHP900SMSS Dimensions and installation information