PREMIUM HOME SOLUTION CP003-16-7-GS007 User manual

CP003-16-7-GS007

2
Read the instruction before use. This appliance must be installed in accordance
with such regulations as are enforced.
DANGER:
DANGER:
FIRE OR EXPL OSION HAZARD
CARBON MONOXIDE HAZARD
If you smell gas:
● Shut off gas to the appliance.
● Extinguish any open ame.
● If odor continues, leave the area immediately
● After leaving the area, call your gas supplier or re department.
Failure to follow these instructions could result in re or explosion, which could cause property damage,
personal injury, or death.
WARNING:
Do not store or use gasoline, or other ammable vapors and liquids, in the vicinity of this or any other appliance.
An LP-cylinder not connected for use shall not be stored in the vicinity of this or any other appliance.
This appliance can produce carbon monoxide which has no odor.
Using it in an enclosed space can kill you.
Never use this appliance in an enclosed space such as a camper, tent, car or home.
WARNING:
Installation and service must be performed by a qualied installer,service agency, or the gas supplier.
INSTALL .ER: leave this manual with the appliance.
CONSUMER: Retain this manual for future reference.
A WARNING: For Outdoor Use Only!
WARNING:
Improper installation, adjustment,alteration, service or maintenance can cause property damage, personal injury
or loss of life.
Read this installation, operating, and maintenance instructions thoroughly before installing or servicing this
equipment.
Safety Information-Gas Fire Pit Table
Pre-assembly-Gas Fire Pit Table
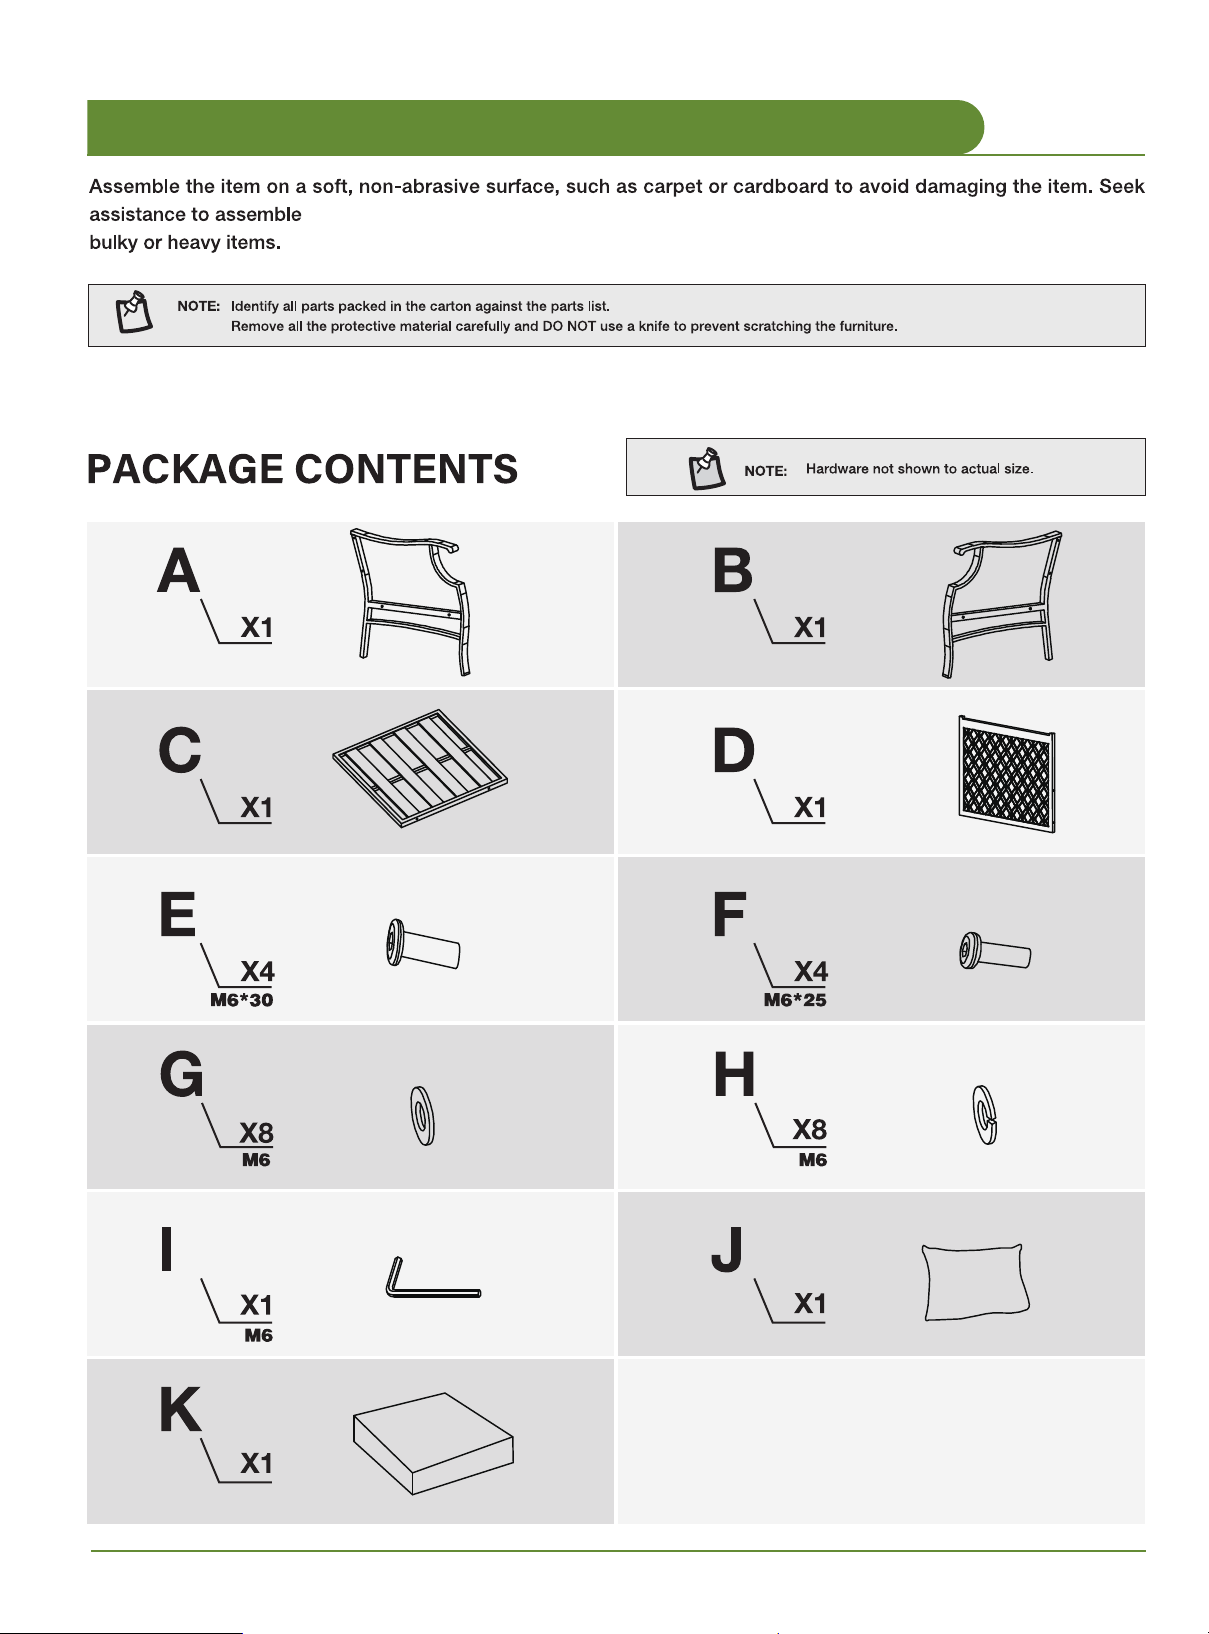
Package Contents-Gas Fire Pit Table
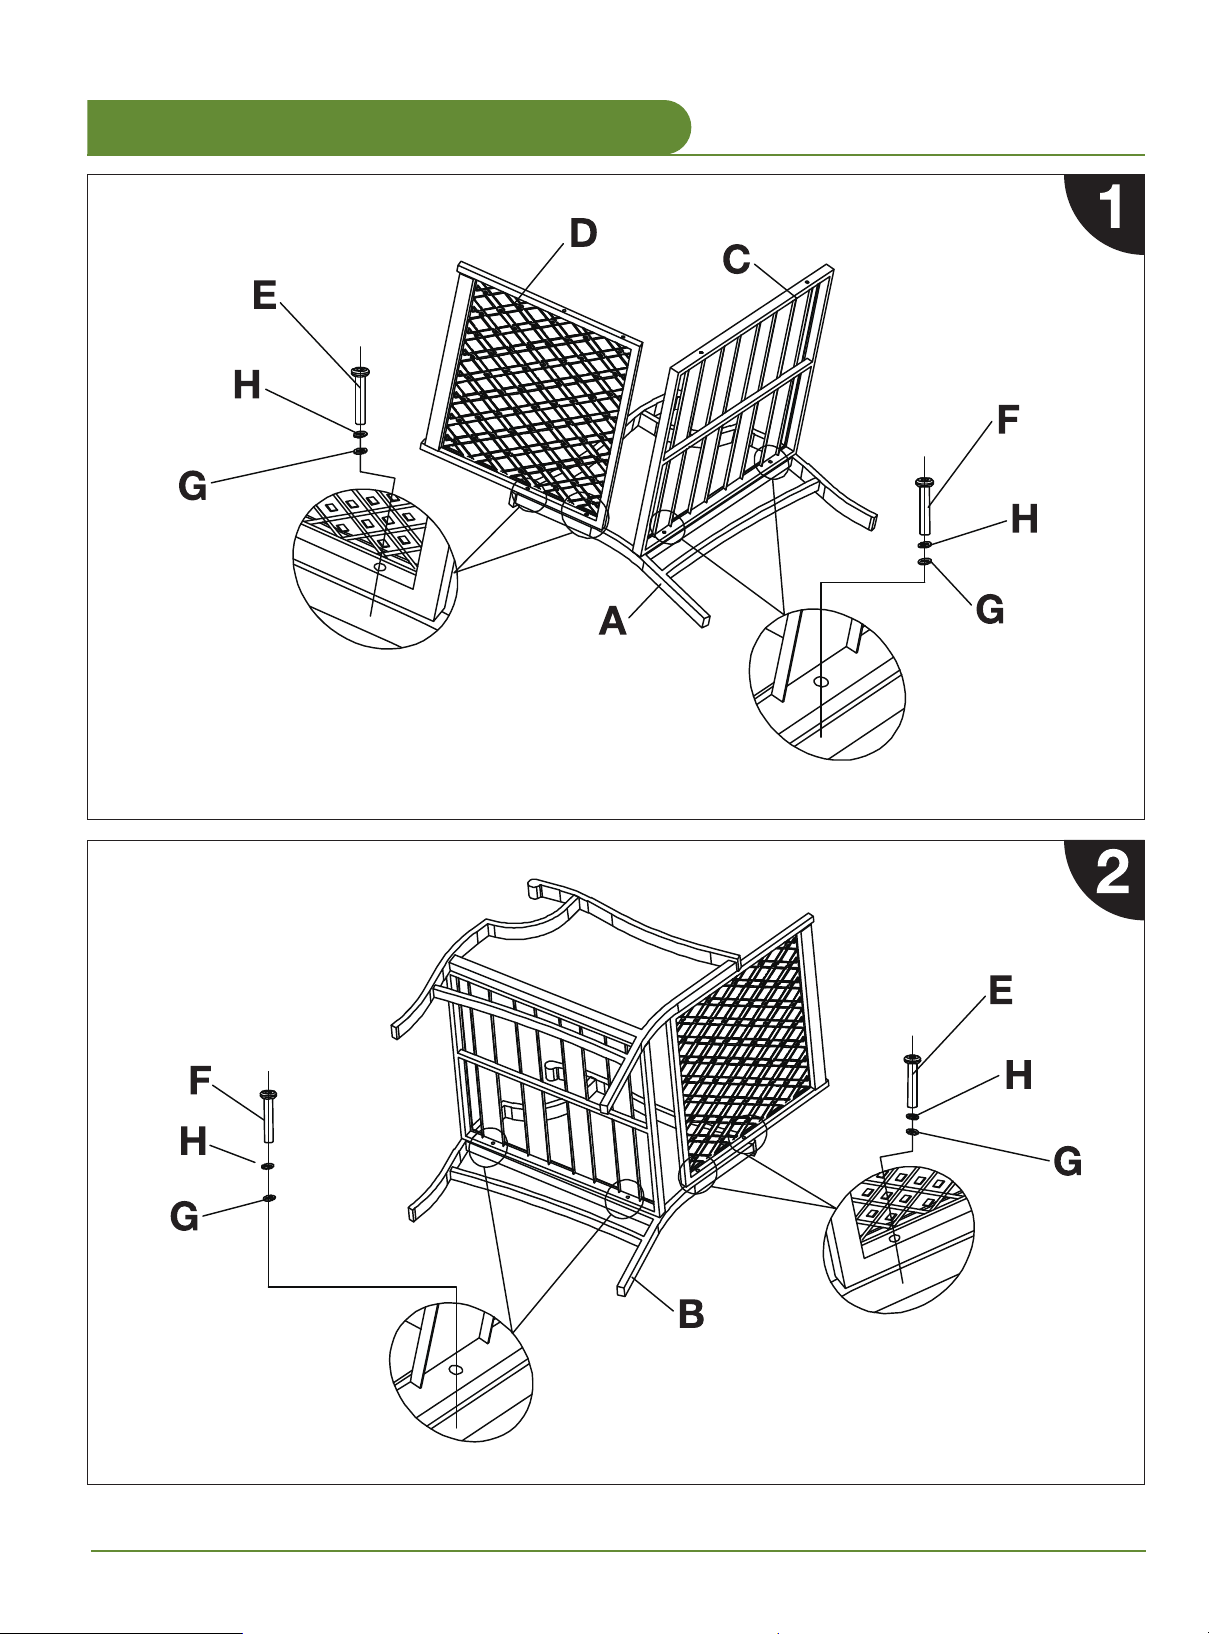
Assembly-Gas Fire Pit Table
2-4
Table of Contents 2
5
6-7
8-10
11-13Operating-Gas Fire Pit Table
14
Maintenance-Gas Fire Pit Table
14
Care and Cleaning-Gas Fire Pit Table
Troubleshooting-Gas Fire Pit Table 15
Safety Information-Single Fixed Sofas 16
Pre-assembly(continued)-Single Fixed Sofas 17
Assembly-Single Fixed Sofas 18-19
Assembly-3 Seater Sofa 22-23
Pre-assembly (continued)-3 Seater Sofa 20-21
Cleaning and Maintenance 27
Pre-assembly (continued)-Ottomans 24
Assembly-Ottomans 25-26
3
WARNING:
FOR YOUR SAFETY:
If the information in this manual is not followed exactly. a re or explosion may result causing property damage,
personal injury or loss of life.
WHAT TO DO IF YOU SMELL GAS:
Do not try lighting any appliance.
Do not touch any electrical switch;
Do not use any phone in your building.
Immediately call your gas supplier from a neighbor s phone.
Fllow the gas supplier's instructions.If you cannot reach your gas supplier.Call the re department.
Installation and service must be performed by a qualied installer, service agency or gas supplier. Save these
instructions for future reference. If you are assembling this unit for someone else, give this manual to him or her to
read and save for future reference.
WARNING:
FUELS USED IN LIQUIFIED PROPANE GAS APPLIANCES, AND THE PRODUCTS OF
COMBUSTION OF SUCH FUELS, CAN EXPOSE YOU TO CHEMICALS INCLUDING BENZENE, WHICH IS
KNOWN TO THE STATE OF CALIFORNIA TO CAUSE CANCER AND CAUSE BIRTH DEFECTS OR OTHER
REPRODUCTIVE HARM. For more information go to: www P65Warnings ca.gov.
WARNING:
You must provide propane gas and propane cylinder. Use a standard 20 lb. propane cylinder only.
Use this heater only with a propane vapor withdrawal supply system. See Chapter 5 of the Standard for Storage
and Handling of Liqueed Petroleum Gas, ANS/NFPA 58. Your local library or re department should have this
book.
The pressure regulator and hose assembly supplied with the appliance must be used.
The installation must conform with local codes, or in absence of local codes, with National Fuel Gas Code,
ANSI Z223.1.
A dented, rusted, or damaged propane cylinder may be hazardous and should be checked by your cylinder
supplier.Never use a propane cylinder with a damaged valve connection.
The LP-gas supply cylinder must be constructed and marked in accordance with the U.S. Department of
Transportation(D.O.T) Specications for LP-Gas Cylinders, or the standard for Cylinders, Spheres and Tubes for
Transportation of Dangerous Good and Commission, CAN/CSA-B339, as applicable.
The LP-gas supply cylinder must be provided with a cylinder connection device compatible with the connection f
or the appliance.
The cylinder used must include a collar to protect the cylinder valve.
The LP-gas supply cylinder must be provided with a listed overll protection device (OPD).
Do not store a spare LP gas cylinder under or near this appliance.
Never l the cylinder beyond 80 percent full.
For appliances designed to use a CGA No.791IQCC connection.
Place the dust cap on the cylinder valve outlet whenever the cylinder is not in use.
Note: Gas supply pressure: 25 PSI to 250 PSI.
Standard 20 lbs. tank

4
WARNING:
Solid fuels shall not be burned in this appliance.
The installation must conform with local codes or, in the absence of local codes, ANSIZ223.1/NFPA54, NFPA58
NaturalGas and Propane Installation Code, CSA B149.1, or Propane Storage and Handling Code, B149.2.
This appliace must be isolated from the gas supply piping system by closing its individual manual shutoff valve
during any pressure testing of the gas supply piping system at test pressures equal to or less than 1/2 psi
(3.5 kPa).
Max. gas supply 6791.3 in wC (1725 kPa). Manifold pressure 11 in wc (2.74 kPa).
Prior to use, check for damaged parts such as hoses, regulators, pilots, or burners.
Inspect the fuel supply connection for signs of leakage (including the hose for the LP models) before each use of
theappliance.
AIlI leak tests should be done with a soapy solution. NEVER USE AN OPEN FL AME TO CHECK FOR LEAKS.
Keep the appliance area clear and free from combustible materials, gasoline, and other ammable vapors and
liquids.
DO NOT OBSTRUCT the combustion process or air ventilation ow.
Keep the ventilation opening(s) of the cylinder enclosure free and clear from debris.
The appliance should be used in a well-ventilated space and not in a building, garage or any other enclosed area.
An appliance may be installed within a shelter if the shelter meets one of the following conditions:
The shelter has walls on all sides, but with no overhead cover.
The shelter is within a partial enclosure which includes side walls. These side walls may be parallel, as in a
breezeway,or at right angles to each other.
Children and adults should be alerted 1to the hazards of high suface temperatures and should stay away from the
app iance 10 ayoid burns or cloth ng ignition. This apliance comes with a heat shield which is an important safety
component preventing contact with the re bow when adjusting the propane valve,
Young chidren should be carefully supervised when they, are in the area of the heater.
Clothing of other ammable material's should be not be hung from the heater, or placed on or near the heater.
Any guard or other protectve device removed for servicing the heater,. must be replaced prior to operating the
heater.
Installation and repair should be done by a qualfed service person The heater should be inspected before us0 and
at least Bnnually by B quB ied service Derson.
More frequent cleaning may boe required 5 necessany. t is imperative that the control compartment. burners, and
circulating alr nass8geways of the heater be kept clean.

PL ANNING ASSEMBLY
Carefully remove all pieces from the carton and make sure that you have all parts (refer to the hardware and
package contents list).
If you are missing parts, please contact 1-877-606-2818for further assistance.
YOUR OWNER'S MANUAL
Keep and store this Owner's Manual for future reference. It contains important instructions and procedures for
safety and maintenance.
NOTE: Please read and understand the entire manual before you assemble, operate, or install the fire pit.
Phillips
screwdriver M6 Wrench
Part Quantity
M6x12 mm Bolt
HARDWARE INCLUDED
29
M6x20 mm Het HeadBolt 1
M6x10 Nut 2
AAA Battery 1
TOOLS REQUIRED(NOT INCLUDED)
Description
AA
BB
CC
DD
5
6

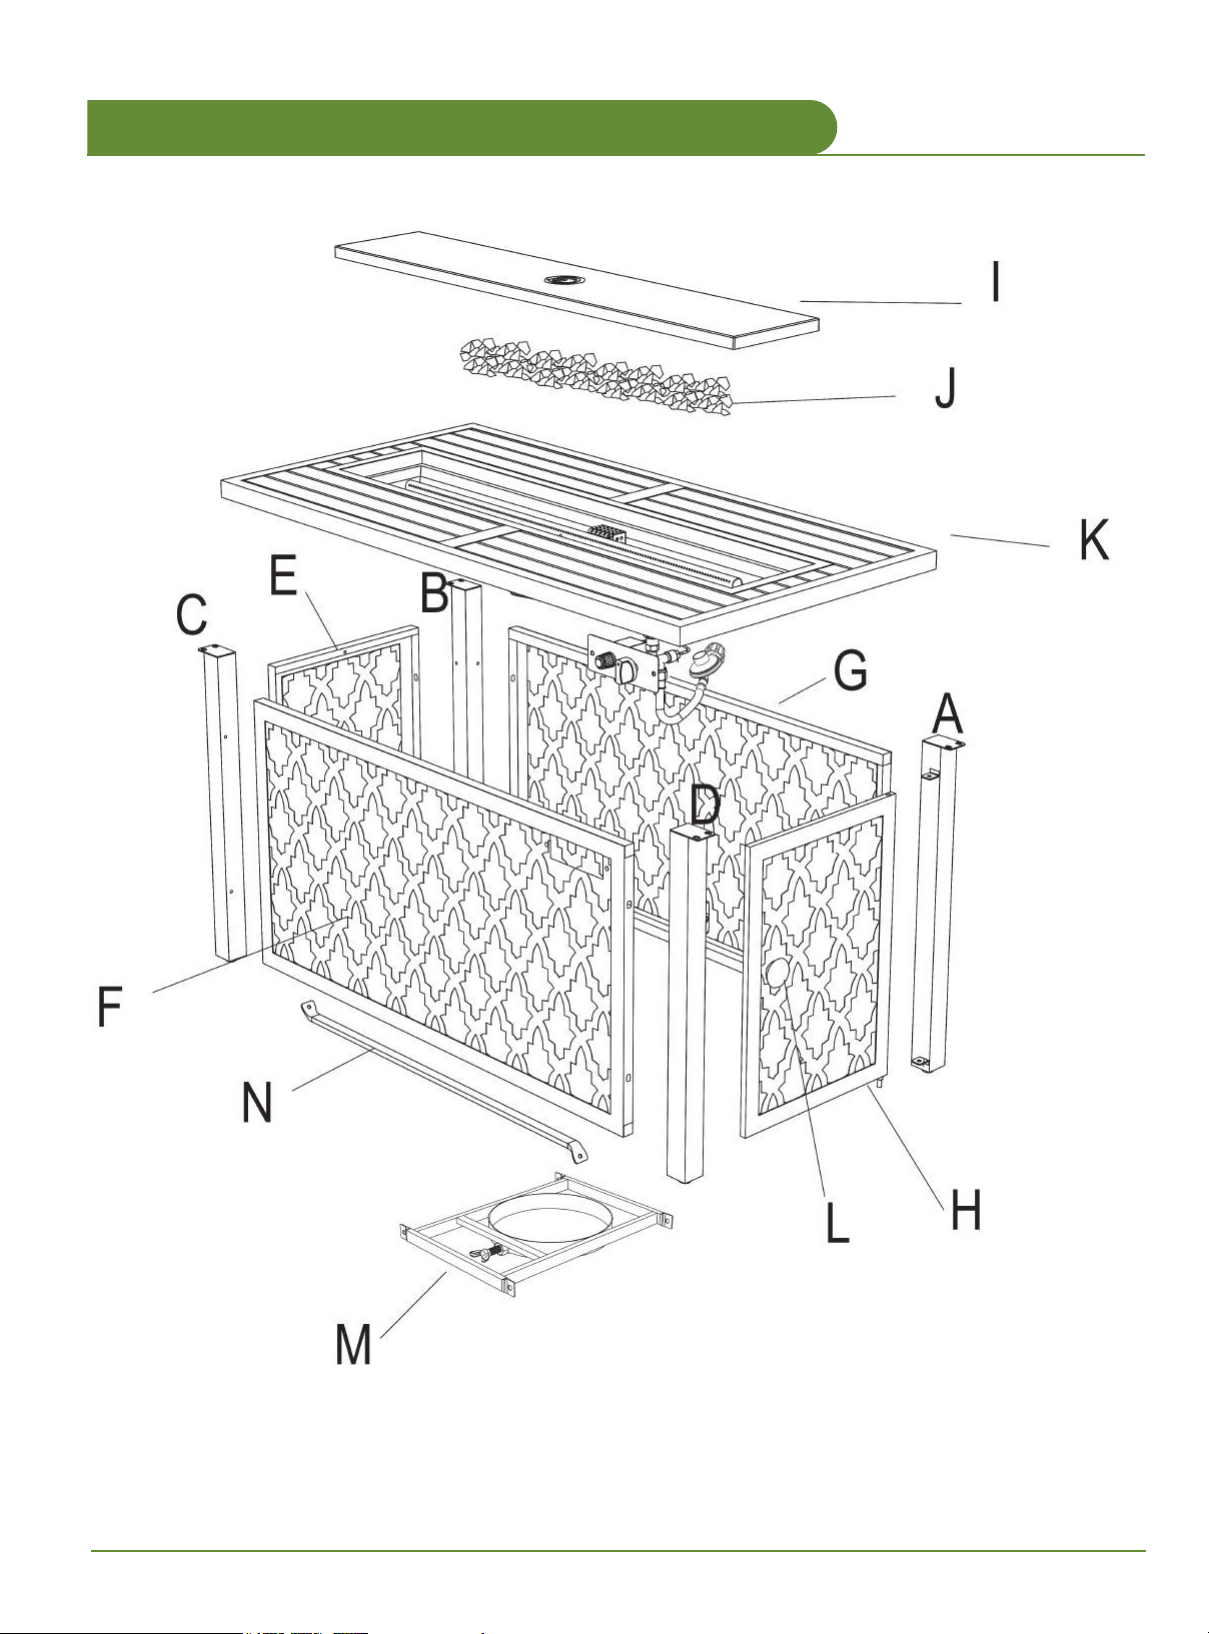
PART QUANTITYDESCRIPTION
LegA
Leg B
LegC
Leg D
Back Panel
Side Panel With Window
Side Panel
Door
Lid
Fire Glass
Table Top With Burner
Door Knob
Tank Support
Cross Bar
A
B
C
D
E
F
G
H
I
J
K
L
M
N
1
1
1
1
1
1
1
1
1
1
1
1
1
1
7
8
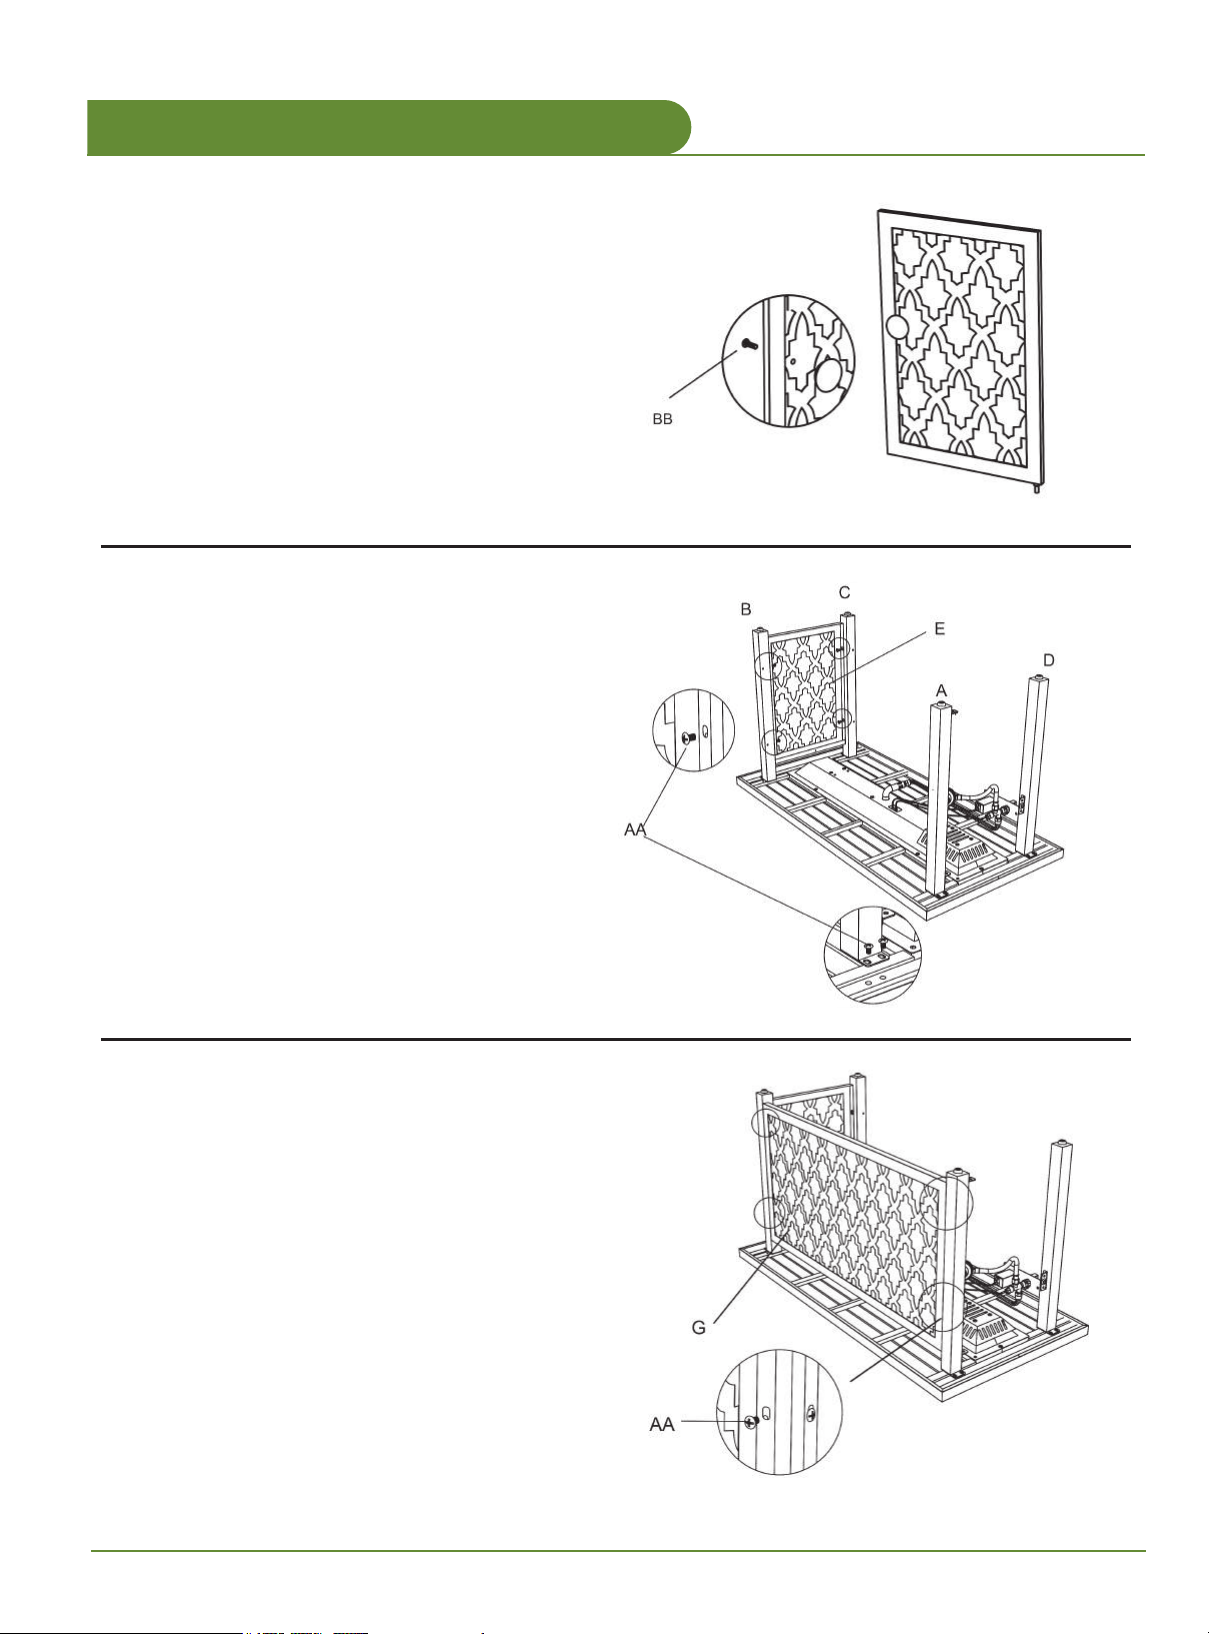
Attach Door Knob (L) to Door Panel () using one (1)M6 X 12mm
Bolt(AA).
Step 1:
Attach the leg (ABCD)to the table top by
using eight M6*12 Bolts.
Attach Back panel (E) to Leg (B)and (C)with
four M6*12 Bolts (AA).
Phillips head screwdriver (not included). Please
do not tighten any screws to the end at this step.
Step 2:
Attach side panel (G) to leg (A) and (B) by using
four M6* 12mm Bolts (AA).
Please use Phillips head screwdriver (not
included). Please do not tighten any screws to the
end at this step.
Step 3:
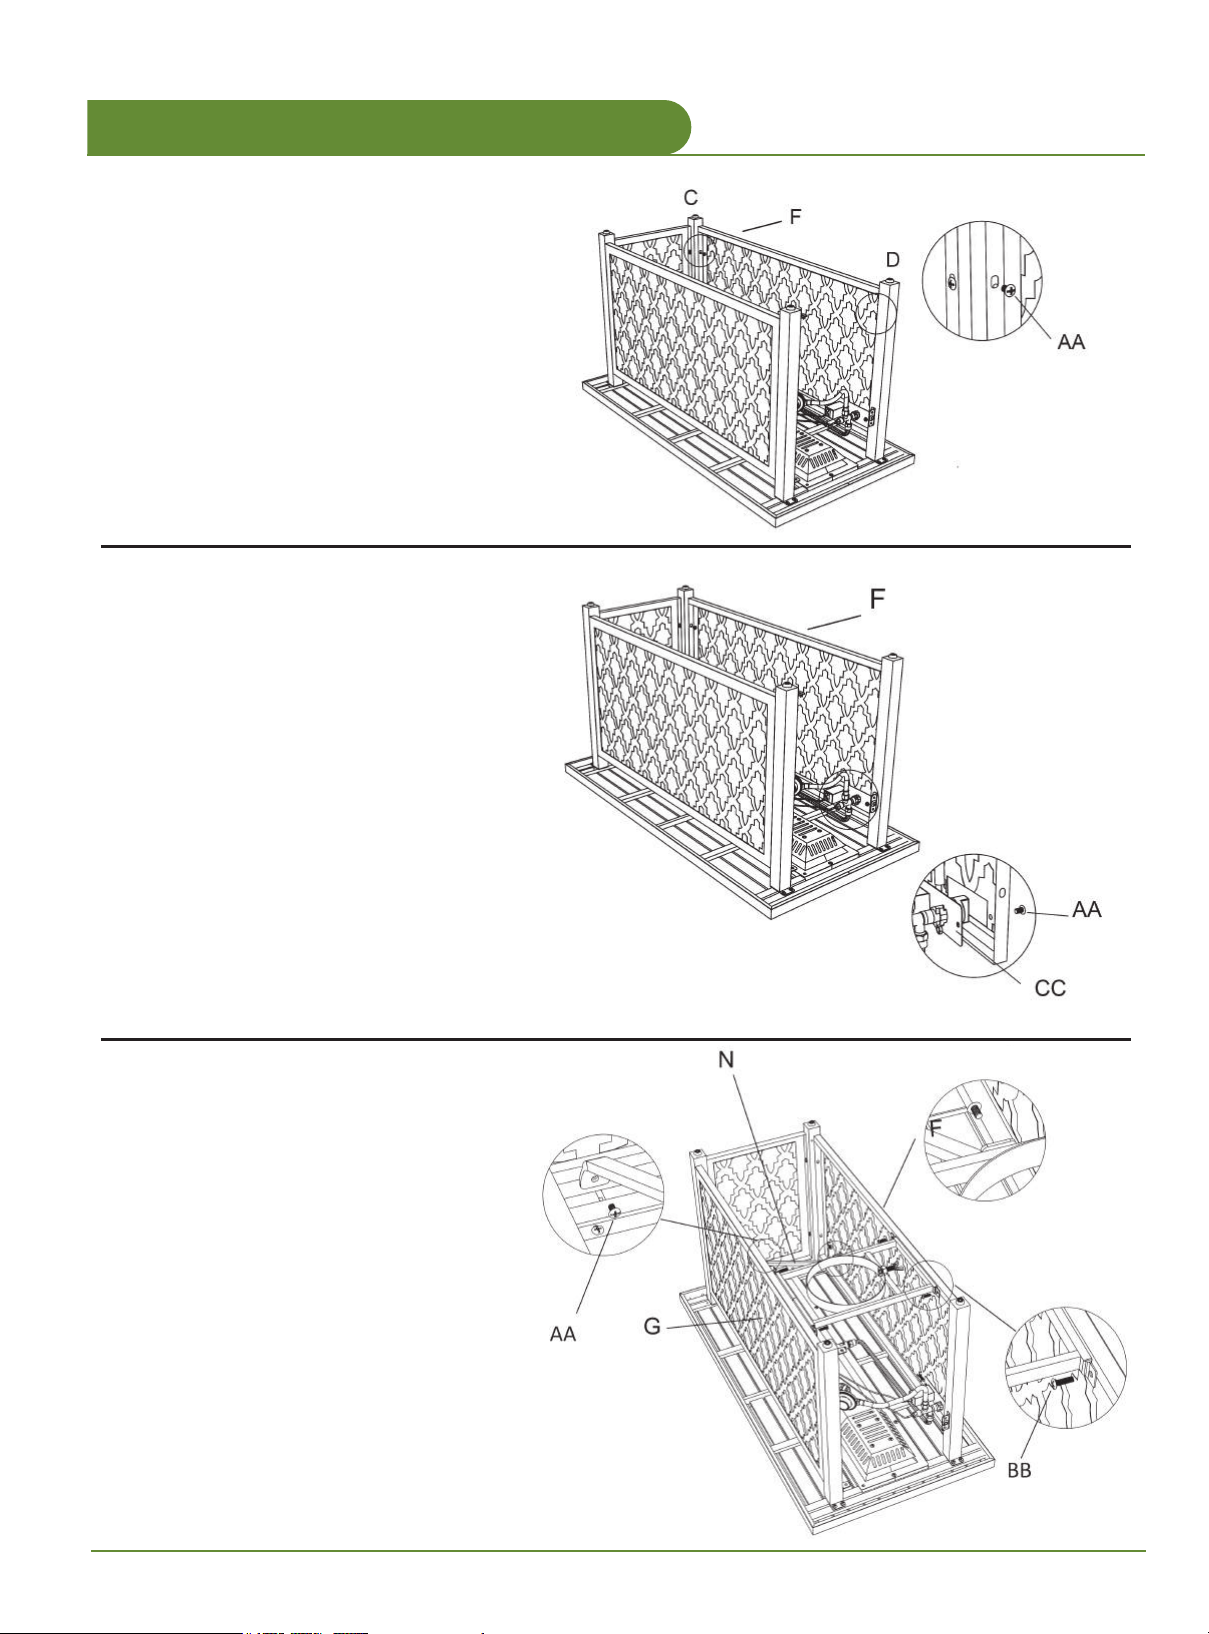
9
Attached the Side Panel With Window (F) to
Leg(C) and (D) by using four M6*12mm bolt.
Do not tighten the bolts at this step.
Step 4:
Pull out the control panel and attach it to side
panel with window (F) with two M6* 12mm bolts(AA)
and M6 Nut(CC).Please use Phillips head
screwdriver(not included).
Please do not tighten any screws
to the end at this step.
Step 5:
Position as shown. Attach propane tank
support(M)
to Side panel (G) and Side
Panel With Window (F) by using four M6* 12mm
bolts (BB).
L ocate the cross bar(N)to back panel and tank
support by using M6x12mm bolt.
Please use Phillips head screwdriver
(not included).
Please tighten all the screws for step 2-6.
Step 6:

10
Insert the door(H) to
the leg(A),and attach it with
one(1) M6x20mm Hex Head Bolts(DD).
Step 7:
Place the propane tank (not included) onto the
propane tank support (M). Secure the tank by
tighting the screw of the propane tank support(M).
Connect the hose and regulator to the propane
tank.
NOTE: USE A STANDARD 20L .B PROPANE
TANK ONLY.
Step 8:
Open the igniter cover and place the AAA
battery into it. Then tighten the igniter cover completely.
Place the re glass into re bowl,Ensure re glass do not
cover the ignition portion of the burner,
Finish and enjoy your re pit table.
Step 9:
11
WARNING: Never use this appliance for other than the intended use. DO NOT use this
appliance to prepare food.
WARNING:
Initial Lighting: When lit for the first time, the appliance emits a slight odor. This is a normal
temporary condition caused by the“burn-in”of internal paints and lubricants used in the manufacturing
process and does not occur again. Simply run the main burner on high for approximately one-half
hour.
Children and adults should be alerted to the hazards of high surface temperatures and should stay away from the
appliance to avoid burns or clothing ignition. The appliance comes with a heat shield which is an important safety
component preventing contact with the fire bowl when adjusting the propane valve.
Children should be carefully supervised when they are in the area of the appliance.
Clothing or other flammable materials should not be hung from the appliance, or placed on or near the appliance. The
area above the fire pit may be extremely hot. Direct contact with these surfaces should be avoided in order to prevent
burns or clothing ignition.
Any guard or protective device removed for servicing the appliance must be replaced prior to operating the appliance.
Installation and repair should be done by a qualified service person.
The appliance should be inspected before each use and at least annually by a qualified service person. More frequent
cleaning may be required necessary. It is imperative that the control compartment, burners and circulating air
passageways of the appliance be kept clean.
WARNING:
Never use the appliance while it is raining. Always turn the appliance off when raining.
Never use the appliance if the burner is damaged. Inspect the burner before each use. Ensure that no debris such as
leaves; grass or other objects have entered or are on the appliance. If the burner is damaged it must be replaced prior
to using this appliance with a replacement burner specified by your dealer.
Inspect the hose assembly before each use. If there is evidence of excessive abrasion or wear, or if the hose is
damaged it must be replaced prior to using the appliance with a replacement hose assembly specified by your dealer.
WARNING: Any modification to the appliance may compromise the safety of this appliance.
Special concern is as follows:
Do not bypass the thermocouple safety.
Do not operate the appliance if any parts have been under water. Immediately call a qualified service technician to
inspect the appliance and replace any part of the control system, and any gas control, which has been under water.

12
WARNING: A leak test must be performed annually or if a part of the gas system is replaced.
LEAK TESTING OPERATION
WARNING: Never use an open flame to check for gas leaks. Be certain no sparks or open flames are in the
area while you check for leaks. Sparks or open flames will result in a fire or explosion, damage to property,
serious bodily injury, or death.
LEAK TESTING:
1, Make 2-3 oz. of leak detection solution by mixing one part liquid dishwashing soap with three parts water.
3, Apply several drops of solution where hose attaches to regulator.
4, Apply several drops of solution where regulator connects to cylinder.
5, Turn cylinder valve ON.
2, Make sure all fire pit and light valves are OFF
If bubbles appear at any connection, there is a leak.
1, Turn cylinder valve OFF.
2, If leak is at hose/regulator connection: tighten connection and perform another leak test. If bubbles continue appearing,
pls contact 855-600-9294 for assistance.
3, If leak is at regulator/cylinder valve connection: disconnect, reconnect, and perform another leak test. If you continue
to see bubbles after several attempts, cylinder valve is defective, and contact 855-600-9294 for assistance.
If NO bubbles appear at any connection, the connections are secure.
NOTE: Whenever gas connections are loosened or removed, you must perform a complete leak test .
Hose/Regulator
Connection Regulator/Cylinder
Connection

CAUTION: Keep the outdoor gas appliance area clear and free from combustible materials, gasoline
and other flammable vapors and liquids.
LIGHTING
Lighting:
1. Make sure the control knob is in the“OFF" position (Figure A).
2. Fully open LP cylinder valve.
Note: For initial start or after any cylinder change, hold Control Knob IN for 2 minutes to purge air from gas lines
before proceeding.
3. Push in gas control knob, turn counterclockwise to“LOW" (Figure B), and press the RED lgnitor button to light the fire
table. If needed, keep the control knob depressed and continue pressing the RED lgnitor button until the fire table lights
(you should hear a clicking sound).
4. After the fire table lights, release control knob. To increase the flame, turn the control knob counterclockwise to
“HIGH”(Figure C). To decrease the flame, turn the control knob clockwise to“I OW".
Note: If burner fails to remain lit, all valves should be closed and a waiting period of at least 5 minutes should pass before
attempting to light.
CAUTION: Do NOT obstruct the flow of combustion and ventilation air.
CAUTION: Check and clean burner/venturi tubes for insects and insect nests. A clogged tube can lead
to a fire.
WARNING: If the burner does not light within 10 seconds, turn the valve off and wait 5 minutes for gas
to dissipate before repeating the procedure
Shut Down
1. To extinguish burner depress control knob and continue to turn it clockwise to “OFF”
2. Turn cylinder valve clockwise to “OFF” and disconnect regulator when fire pit is not in use.
WARNING: Surface of the fire pit can remain extremely hot for a period after use. Allow 45 minutes to
cool to dissipate before repeating the procedure.
13

Storage between uses:
□Turn the control knob to “OFF” position.
□Disconnect LP source.
□Store heater upright in an area sheltered from direct contact with inclement weather (such as rain, sleet, hail, snow, dust
and debris).
□If desired, cover heater to protect exterior surfaces and to help prevent build up in air passages.
Storage during periods of extended inactivity or when transporting:
□Turn the control knob to “OFF” position.
□Disconnect LP source and move to a secure, well ventilated location outdoors. DO NOT store in a location that will
exceed 125℉.
□Store heater upright in an area sheltered from direct contact with inclement weather (such as rain, sleet, hail, snow, dust
and debris).
□If desired, cover heater to protect exterior surfaces and to help prevent build up in air passages.
NOTE: Wait until heater is cool before covering.
NOTE: Wait until heater is cool before covering.
To enjoy years of outstanding performance from your heater, make sure you perform the following
maintenance activities on a regular basis:
□Keep exterior surface clean.
□Use warm soapy water for cleaning. Never use flammable or corrosive cleaning agents.
□While washing your unit, be sure to keep the area around the burner dry at all times. If the gas control is exposed to
water, do NOT try to use it. It must be replaced.
□Keep the appliance area free and clean from combustible materials, gasoline or other flammable vapors and liquids.
□At least once a year, the unit should be inspected for the presence of spiders, spider webs or other insects.
□Air flow must be unobstructed. Keep controls, burner, and circulating air passageways clean. Signs of possible
blockage include:
Gas odor with extreme yellow tipping of flame.
Heater does NOT reach the desired temperature.
Heat glow is excessively uneven.
Heat makes popping noises.
□Spider and insects can nest in burner or orifices. This dangerous condition can damage heater and render it unsafe for
use. Clean burner holes by using a heavy-duty pipe cleaner. Compressed air may help clear away smaller particles.
□Carbon deposits may create a fire hazard. Clean reflector, thermocouple, and emitter screen with a dry cloth if any
carbon deposits develop.
□The burner is made from stainless steel, but extreme heat and a corrosive environment can cause surface corrosion to
occur. This can be removed with a brass wire brush. Inspect the burner at least annually for cracks, insect nests,
excessive corrosion or any other damage. If the burner is damaged, it must be replaced with a burner specified by the
manufacturer before the appliance is put into operation.
□
Whenever conduct hose/regulator inspection, pull out the door using handle on the door panel to gain access.
14

PROBLEM PROBLEM CAUSE SOLUTION
The flame and heat are
low when the valve is
turned to high.
The propane lighting
procedure was not followed
correctly.
Ensure lighting procedure is followed carefully. The valve
must be in the off position when the tank valve is turned on.
Turn the tank on slowly to allow pressure to equalize. See
Lighting Instructions in the Operating section.
Burners burn with yellow
flame, accompanied by
the smell of gas.
There is possibly a spider web
or other debris.
Thoroughly clean the burner venturi. See the Maintenance
section.
The burner will not light
with the igniter, but will
light with a match.
The battery is either dead or
installed incorrectly.
There is a loose electrode wire
or switch terminal wires.
Check the installation or replace with a new battery.
Check that the electrode wire is firmly pushed onto the
terminal on the back of the igniter. Check that the lead wires
from the module to the ignition switch (if equipped) are firmly
pushed onto their respective terminals.
The burner will not stay lit
when control knob is
released.
The knob is not being held in
long enough.
It is too windy outside.
Lava rock or debris are in the
ignition area of the burner
preventing the thermocouple
from being fully engulfed in
flame.
Either the thermocouple or
thermocouple connection is
dirty.
Either the thermocouple or
valve is faulty.
The thermocouple must have time to heat up. Hold the knob
in for 30 seconds after the burner lights, then release.
The unit will shut down if winds are greater than 10 mph
(16 km/h). Either locate the fire pit to a different area or use
when it is less windy.
Ensure there is no lava rock or other debris in the ignition
area, and that the small hole below the thermocouple is
unobstructed.
Clean the thermocouple and clean the connection between
the valve and thermocouple. Ensure the connection is
properly tightened.
Replace thermocouple and/or valve.
The regulator is humming. This is a normal occurrence
on hot days.
This is not a defect. It is caused by internal vibrations in the
regulator and does not affect the performance or safety of
the gas heater.
Humming regulator will not be replaced.
The valve is set to high
but there is low heat
output. There is also a
rumbling noise and a
fluttering blue flame at the
burner surface.
There is not enough gas.
The supply hose is pinched.
The burner orifice is either
dirty or clogged.
There are spider webs or other
matter in venturi tube.
The propane regulator is in a
“low flow” state.
Check the gas level in the propane cylinder.
Reposition the supply hose as necessary.
Clean the burner orifice.
Clean out the venturi tube.
Ensure the lighting procedure is followed carefully. All
valves must be in the off position when the tank valve is
turned on. Turn tank on slowly to allow pressure to
equalize. See the Lighting Instructions in the Operating
section.
15
DANGER : Do not allow children to play with plastic wraps
or small parts to prevent potential chocking hazard.
CAUTION: Read all the instructions before assembly.
Failure to do so may result in faulty assembly and potential injury!
This warranty does not cover commercial use, hardware, acts of nature, re, freezing and abusive.
In addition, purchased parts are not covered under this warranty.
We reserve the right to make substitutions with similar merchandise, if the model in question is no longer in production.
For a copy of our full limited warranty, please contact our customer service team.
LIMITED WARRANTY
WHAT IS COVERED
WHAT IS NOT COVERED
We warrant the frame to be free of Manufacturing defects to the original purchaser for one year.
• Do not completely tighten screws until all screws are started.Tighten each bolt rmly and properly.
• Some parts may contain sharp edges. Wear protective gloves as necessary.
• Children under the age of 16 should not be engaged in the assembly, removal or disassembly of the product.
Children under the age of 10 should be supervised by a competent adult while using this furniture.
• Please keep children out of the assembly are ssembly.
• This set is heavy, and may require two adults for safe assembly.
• Never use this product as a support. Do not shake, lean, or climb on the product at any time.
This warranty is a limited warranty, and applies to the original purchase is required. This is a residential warranty and
does not apply to commercial use. This collection carries a (1) year limited warranty and is valid from original date of
purchase to the original owner
(proof of purchase required).
16
17
18

19

20
Table of contents
Popular Outdoor Furnishing manuals by other brands


domi
domi LGMF1559 Assembly manual

Zest 4 Leisure
Zest 4 Leisure Emily Seat Assembly instructions

Sunjoy
Sunjoy L-GZ212PCO-B1 instruction manual

Forever Redwood
Forever Redwood RUSTIC REDWOOD BENCH Assembly instructions

BENITO
BENITO Urban Tulipa PA635 Anchoring instructions

Fortress Building Products
Fortress Building Products EVOLUTION STEEL PERGOLA installation instructions


